An electrode boiler is a direct-acting heating equipment. The coolant in it warms up due to the fact that electric current passes through it. The reason why heating occurs is the movement of ions in water - it is chaotic, the ions oscillate at a frequency of about 50 times per second. What most affects the efficiency of such a boiler is the technical features of the coolant used.
So, heat is released due to the fact that the ions move and is transferred to the coolant. Thanks to this, this type of equipment saves up to 40% energy when compared with other devices of a similar purpose. So, today we will talk about how to make an electrode boiler with your own hands, and also consider the principle of its operation and the main advantages.
In this system, electric current is carried by water, which, accordingly, must be properly prepared. There should be some salt in the water. Salt dissolves in it and brings it to the desired state. The amount of salt that needs to be added is clearly stated in the technical data sheet for the boiler.
- 1 How does an electrode boiler work?
- 2 Video instructions
- 3 Pros and cons of such a boiler
- 4 Materials needed
- 5 Electrode boiler manufacturing technology
- 6 Installation and operating features of the device
- 7 Selection of radiators
- 8 How the boiler will work
Operating principle of an electrode boiler
The conductor of the system is water, which must be properly prepared. The liquid must have a saline solution. The salt particles are dissolved in water and then added to the system. In order not to make a mistake in the proportions, it is necessary to study the boiler passport.
The effects of current pass through water. Under these conditions, you should not connect the boiler through an RCD. Otherwise, this will lead to a decrease in the safety of the system. The current passing through the water forms electrolysis, which in turn contributes to the appearance of electrolysis gas. Such gas is a significant problem for the operation of the system. Therefore, it is necessary to take care of deflating the air after each session.
How to make an electrode boiler?
This type of electric boiler in the heat exchanger design has two electrodes to which electricity is supplied, which creates a potential difference. The salts contained in the coolant make it an electrical conductor. Electricity passes through the electrolyte with high resistance, causing it to heat up. Nominal power is achieved in just a couple of minutes.
The role of the coolant (electrolyte) in electrode boilers can be performed by a vault prepared in a special way, or by a liquid based on ethylene glycol.
It is enough to simply assemble this type of heater yourself. To do this you need to have on hand:
- iron pipe, with a diameter of 57 mm and thick walls;
- sheet of iron, more than 2 mm thick;
- internal electrode with a diameter of 25 mm;
- paronite or rubber gaskets and connecting terminals.
Electrode heating boilers: pros and cons
Negative points include:
- the need to use gigantic electrical power for connection;
- high electricity costs;
- virtual lack of security;
- sudden surges in electrical supply.
But at the same time, all these disadvantages can be safely avoided.
Then electrode heating boilers will have positive aspects. The positive characteristics include the following:
- innovative ways to control the system (for example, via the Internet);
- autonomous heating;
- small dimensions of system equipment;
- low cost of equipment;
- use of hot water supply;
- ease of installation work;
- safe characteristics against fire;
- no need to equip a separate room;
- high environmental parameters;
- low noise level during operation.
How does an electrode boiler work?
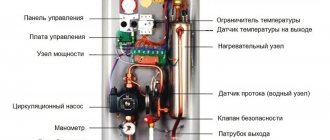
First of all, familiarize yourself with the unit diagram shown in the image. Electrode boilers have a simple design. They consist of an all-metal pipe, the surface of which is covered with an insulating layer of polyamide. Terminals and pipes are welded into the housing. One side of the pipe is tightly sealed. On the other side, a block of electrodes is inserted. It must be isolated from the unit body using polyamide nuts.
Factory boilers have a length of up to 60 cm and a diameter of about 32 cm. Their power can range from 2-50 kW. Thus, the electrode boiler can be safely used for efficient and economical heating of rooms with an area of 80 to 1600 m².
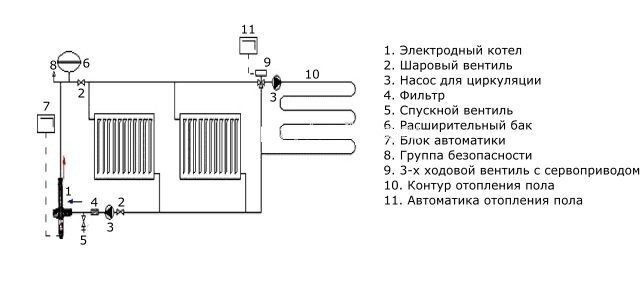
Image 2. Diagram of the device and operating principle of the boiler.
Boilers are single-phase (used for heating private houses and have a power of 2-6 kW) and three-phase (designed for heating various types of industrial structures, the power of the unit can be 9-50 kW). The coolant inside the electrode boiler is usually heated to a temperature of 75 °C. If the temperature drops below this value, the amount of energy consumed by the boiler also decreases, and vice versa.
Modern models of electrode heating boilers are equipped with automatic control systems. They provide reliable protection of equipment from surges in mains voltage. The boilers also have starting units. More expensive units can be equipped with a remote control system. The required coolant temperature is set using the controller.
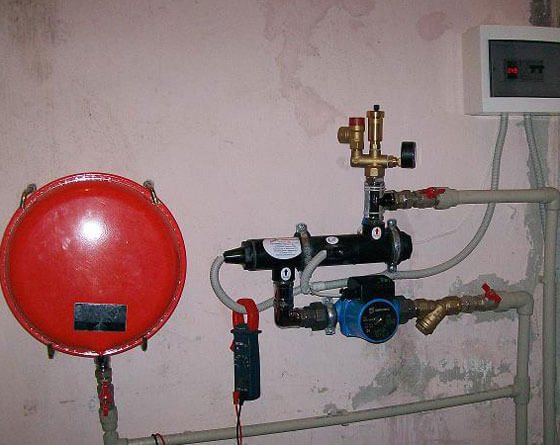
Depending on the characteristics of the coolant distribution, electrode boilers can be open or closed.
A feature of an open system is, first of all, that the movement of the coolant in it is ensured by natural circulation during the heating process. The coolant enters the heating batteries, gives up its heat and is sent back to the electrode boiler. Closed systems have a circulation pump and an expansion tank.
Connection
After familiarizing yourself with the heating schemes, you can begin to independently create an electrode boiler.
An induction boiler is used both for heating water and for household needs (for more details: “We make induction heating boilers with our own hands, taking into account the experience of specialists”). Its thermal energy can heat entire rooms. As a result, we can say that electric electrode heating boilers have a high level of functionality and practicality.
Connection diagrams can be divided into several categories:
- single phase connection;
- joint connection with household heating appliances;
- three phase connection;
- using control and regulatory blocks.
Step-by-step instructions for self-assembly of an electrode boiler
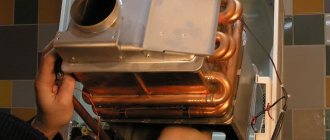
Now that you know how an electrode boiler works and on what principle it works, you can try to assemble such a heating unit with your own hands. This is not a very difficult job, but you need to be careful when doing it to ensure that the finished product is effective and safe.
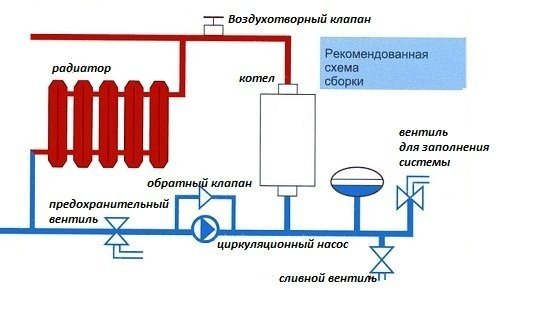
Image 3. Connection diagram for a homemade electrode boiler.
To assemble an electrode boiler yourself, you will need the following:
- welding machine;
- insulators for electrodes;
- group of electrodes;
- steel pipe of suitable sizes;
- terminal insulators;
- coupling;
- ground and neutral wire terminals;
- metal tee.
Before you begin to independently assemble an electrode heating boiler, be sure to familiarize yourself with the diagram of its structure and operating principle, shown in Image 2.
Remember a few particularly important nuances. First of all, such a boiler must be grounded. The neutral wire from the electrical outlet can only be supplied to the outer pipe. Take into account the fact that the phase can only be supplied to the electrode.
The technology for self-assembly of an electrode boiler is quite simple and straightforward. First of all, you need to find a pipe with a diameter of 5-10 cm and a length of about 25 cm. On one side of the pipe you need to insert an electrode block or electrode. In this case, you will need a tee. The coolant will enter and exit through it. On the other side of the workpiece it is necessary to install a coupling to connect the heating pipe.

Scheme of modifications of the electrode boiler.
Place an insulator between the electrode and the tee. In addition to its main function, it will provide additional tightness of the electrode boiler. The insulator can be made of heat-resistant high-quality plastic. When assembling a homemade electrode boiler, you need to achieve maximum tightness. At the same time, the possibility of threaded connection with the electrode and tee must be ensured. So it is best to order the production of an insulator from a qualified craftsman who can manufacture the part, meeting all the required dimensions.
Take a bolt and weld it onto the body of the electrode boiler. Attach the ground and neutral terminals to this bolt. You can further secure yourself by installing another bolt. The finished boiler can be hidden using some kind of decorative coating. In addition to purely aesthetic functions, it will provide additional protection against electric shocks. Don't ignore this point, because... It is very important to limit access to the heating boiler for personal safety reasons.
Stages
When creating a boiler, you must follow a certain sequence of operations:
- Elaboration of options for the heating system scheme - it is necessary to decide which operating principle will be used. You can choose a single-circuit heating scheme. Another option for a homemade electric boiler is to choose a double-circuit model. In the second case, heating and hot water are supplied simultaneously.
- Arrangement of a grounding system.
- Heating the liquid and starting its circulation throughout the entire circuit.
- Use of moisture-resistant radiators.
DIY electrode boiler, detailed video:
Electrode boiler manufacturing technology
Now that we have briefly familiarized ourselves with the operating principle of the device, its advantages and disadvantages, we can talk about how to make it yourself. But before you get started, it’s worth familiarizing yourself with a few important points for us.
Note! An electrode boiler must be grounded. Moreover, the neutral wire, which will be supplied to the outer pipe, must be supplied from the socket, and the phase must be supplied only to the electrode.
First stage. The procedure for manufacturing an ion boiler is extremely simple and straightforward. We take a steel pipe approximately 25 centimeters long and with a diameter of no more than 10 centimeters, and insert one or more electrodes into it from one end, using a tee prepared in advance. Actually, it is through this tee that the coolant will subsequently be supplied to the equipment, and also exit back out of it. The second end of the pipe is equipped with a coupling, which is needed to connect heating pipes.
Second phase. Next, we take the insulator and install it between the electrodes and the tee. In addition to its direct responsibility, this insulator will also ensure the tightness of the device. It is best to use heat-resistant plastic as an insulator. Due to the fact that we need in this place not only tightness, but also the ability to connect the electrode and tee via thread, it is advisable to entrust the manufacture of the insulator to craftsmen who, better than anyone, will be able to adhere to all the structural dimensions of the product.
Third stage. We continue to make an electrode boiler with our own hands. It is necessary to weld a massive metal bolt to the body of the device, which will serve us to fasten the grounding, as well as the zero terminal. For greater reliability, you can weld a couple of bolts at once, it won’t hurt. If you wish, you can hide the entire resulting structure with some decorative material, which, by the way, will provide additional protection against electric shock during operation. The fact is that your main priority during manufacturing should be compliance with safety standards, which consist of limiting access to the boiler as much as possible.
Operation of an electrode boiler
- After pouring the liquid into the “glass”, you need to wait for the water to boil. The resulting steam will gradually rise along the pipe chute and begin to release thermal energy. After this, the steam particles will turn into water and flow down the inclined pipe. As a result, the water will fall back into the “glass”. Upon completion of the first cycle, the second, third, etc. will begin. Heating is distinguished by its efficiency. If you need to create a large heating volume, then small-sized boilers will do the job perfectly.
- When heating large areas, it is recommended to equip several electrode boilers. In this case, no special permission is required to install boilers.
The best Russian electrode heating boilers
The big advantage of domestic equipment is that it is perfectly adapted to real-life operating conditions - with voltage fluctuations, unstable current, etc. At the same time, in terms of price, maintenance costs, unpretentiousness and reliability, it will give a head start to most competitors.
"Galan" Vulcan 36
was one of the first to begin developing such a family of heating devices, using developments in the military space industry and patented engineering solutions. For a quarter of a century, even the first line of devices has not failed and continues to function.
"Galan" Vulcan 36
Model power 36 kW, suitable only for three-phase network. The maximum current for three phases is 27.3 A. The control is mechanical; the boiler is installed only on the floor.
This model “Vulcan” 36 has many advantages, let’s highlight the main ones:
- ease of maintenance and operation.
- safety and reliability - if an electric short circuit occurs, the current supply wires overheat, the set temperature is exceeded, or a coolant leak occurs, the boiler turns off.
- the coolant volume is 600 liters, the volume of the heated room is 1700 cubic meters.
- affordable cost - the average price is 11,000 rubles.
Operating instructions "Galan" Vulcan 36
"Galan" Geyser 15
A safe and productive single-circuit electrode boiler, which is often preferred by owners of country property. Equipment power 15 kW, suitable only for three-phase network. The maximum current for three phases is 22.7 A. The control is mechanical; the boiler is installed only on the floor. As an additional option, it is possible to connect external control.
"Galan" Geyser 15
It is bought due to the following advantages:
- Simplicity and ease of use - even a beginner can understand the device.
- light weight of the structure and compact dimensions - only 5.3 kg.
- large heating area - up to 180 sq.m.
- electronic automatic control - the presence of a control unit that allows you to create an interval for heating the coolant.
- ability to connect to a room temperature indicator.
- The average price of the device will be 7800-8000 rubles.
Operating instructions "Galan" Geyser 15
RusNIT 208M
, Ryazan. Can be used as the main or backup heat source in a house or domestic premises with an area of up to 80 sq.m. Power 8000 W.
RusNIT 208M
Specifications:
- three-stage power adjustment - 30%, 60% or 100%;
- the heat exchanger and heating element are made of stainless steel;
- antifreeze or distilled water can be used as a coolant in the system;
- the presence of a thermal switch that prevents heating of the coolant above 90°C;
- can be connected to a circulation pump;
- Manufacturer's warranty – 2 years.
Among the disadvantages, we note the manual selection of power, difficulties during connection, requiring certain skills.
The cost of the unit is from 15,000 rubles.
Operating instructions RusNIT 208M