Checking the horizontalness of the foundation with a hydraulic level
First, we need to determine how level the horizontal surface of the foundation is relative to the ground level?
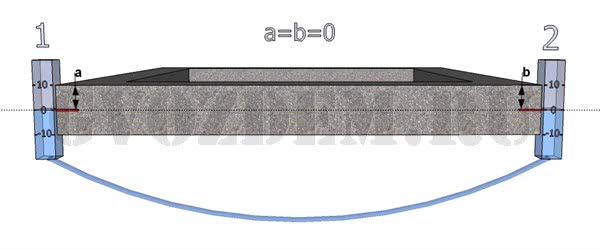
For this purpose, we will use a hydraulic level and check first the corners, and then the entire perimeter of the foundation. (When filling the hydraulic level with water, make sure that there are no bubbles in the tube, otherwise the measurements may not be accurate).
In the figure we see that both corners are at the same level. As the masters say, “located at zero.” But this method of measurement cannot be used if our foundation has discrepancies relative to the level. So let's move on to a more practical method.
Let's lower the 1st flask of the hydraulic level relative to the foundation so that o is 5 cm below the upper surface of the foundation (with the condition that the maximum difference across the foundation at the maximum point is slightly less than 5 cm). Opposite the o on the flask we place a mark on the foundation. We will not touch this flask now. First, let's check all the outer corners of the foundation, in our case there are 4 of them. To do this, we will move the 2nd flask to all 3 corners, and put a mark on the foundation opposite the o, which is on the 2nd flask. Then we repeat the steps with the 2nd flask, transferring it to other measured points on the foundation.
When we have placed all the marks, we begin to measure the distances between the mark on the foundation and the upper edge of the foundation. In the figure we measured the distance on two segments: a and b. Let's assume the distance a=5cm and b=5cm (a=b). Consequently, the foundation at these points is set to “0”.
Second option a=5cm, b=3cm. Therefore, there is a difference relative to zero of 2 cm. Such a foundation needs to be leveled, and we take the highest point on the foundation as zero. You can align in several ways:
- leveling screed on cement-sand mortar using formwork,
- brickwork, changing the thickness of the horizontal seam.
If the difference is large, then it is better to level it using mortar; if it is small, then using masonry. Just remember that the permissible horizontal seam thickness according to SNiP should be 12 mm with a tolerance of +3, -2 mm (according to SNiP 3.03.01-87). When reinforcing, the maximum thickness of the seam should not exceed 16mm. And just for reference: the permitted permissible deviation from the horizontal per 10m of masonry is up to 15mm, which is then eliminated by the next row.
Practical advice
If you still doubt whether it is possible to glue tiles to a brick wall without plaster, or do not know how such work is performed correctly, listen to the recommendations of experienced specialists.
First you need to choose the right adhesive that is suitable for laying tiles on brick stone. To this end, carefully study the accompanying instructions placed by manufacturers on the packaging material.
Following the same information, prepare the adhesive composition. The recommended number of servings is at the rate of 0.7 – 1.0 per square meter.
For convenience in working with an unplastered surface, some craftsmen use sheets of plasterboard mounted on profile strips. In order to increase stability and form a monolithic structure, the joining areas created by sheet material are sealed with putty. After this, the surface is primed twice, and you can begin laying the tile material.
The tiles are laid out on a plasterboard surface in the same way as on any other surface that has undergone preliminary preparation in the form of applying a plaster layer:
- glue is applied to the surface and distributed over an area equivalent to one square area;
- each tile is pressed against the wall with force, while it is allowed to tap its surface with a rubber hammer;
- To ensure that the rows are drawn evenly, special plastic crosses are used;
- the time required for the glue to dry completely is maintained;
- the seam areas are rubbed down and covered with a special moisture-repellent varnish.
When performing such work, you should not rush, so as not to worsen the final result. After laying the tiles in four to five rows, it is necessary to take an hour break so that the glue has time to set and the tension that has arisen in the base is relieved.
If you are not sure that you can handle such work, entrust it to an experienced specialist.
How to build a brick wall in the interior of a private house
So, we’ve sorted out the general issues, let’s move on to practice. And on the agenda is the construction of a beautiful brick wall. There are two fundamentally different ways to solve the problem.
The first, most logical and correct, is to think through all the interior nuances at the stage of drawing up project documentation and, already in the process of masonry and finishing work, leave the section of the wall you need without plaster in clean brick.
As a result, you will not need to do any dismantling work, spend money on various plastic panels or plaster and, in general, you risk saving a lot on finishing, because the planes intended for natural texture will not need to be subjected to additional processing.
It’s much worse if your house is purchased and the previous owner had no idea about your “brick and mortar” plans. In this case, you will inhale a fair amount of dust. We guarantee this to you.
First, you will have to arm yourself with a hammer, chisel and hammer drill and carefully, so as not to ruin the masonry, clean it of putty and plaster mortar. When you have removed the bulk of the debris, proceed to finer cleaning, for which you will need a metal brush, an unnecessary chisel and a coarse duster. As a result of the work, the wall should be cleaned to the artistic state you need.
At the next stage, water procedures. It’s good if you don’t have the fifth floor, but your own dacha, which is not afraid of a flood. In this case, arm yourself with a Karcher and thoroughly go over the masonry with some water, otherwise you will have to wash the bricks for a long time and tediously with a brush in a soapy solution.
Well, then there’s a rather long drying process. Before you open the brick with primer or varnish, you need to make sure it is completely dry.
We wrote in more detail about how to tidy up an old brick wall here.
A wall “manufactured” in this way, however, is not the biggest sorrow on the path to the desired beauty. More often it happens that the primary masonry will not suit you in terms of quality, or it may be absent altogether.
Well, it’s true that brick is used less and less to create walls, giving way to more advanced, but less beautiful materials. In this case, you will need imitation brick for interior decoration. Fortunately, there are plenty of them on the market.
The cheapest option (within reason) would be to use gypsum tiles for brick. It can be glued both from top to bottom and from bottom to top, using ordinary liquid nails as glue.
The main thing here is to sometimes look at the level and maintain some accuracy. The imitation is very easy to stain, but difficult to clean. Therefore, do not forget to varnish a wall made of such artificial “stone”, otherwise it will not serve you for long.
Flexible decor made from polymers will cost much more. Lightweight, durable, wear-resistant material is perfect for creating a brick wall, but it will cost you 800-1200 rubles per square meter, and this does not include installation adhesive and grout. You can see exactly how to work with such material in the following video:
Let’s just say that even though the brick is flexible, you shouldn’t refuse to buy corner elements, especially if you are doing the cladding for yourself.
Well, the last option is either for the very poor or for the very hardworking. It is not necessary to buy a plaster imitation; you can paint it on the wall yourself using a spatula and plaster mortar. On the Internet you can actually find dozens of techniques and video examples on how exactly this decor is made. We will focus only on the simplest option.
To implement it, you just need to tighten the wall along the beacons with gypsum plaster for machine application. And while the latter is not too “frozen”, mark the plane vertically every 75 mm, and then, as a rule, clear out the masonry joints in the wet plaster.
This needs to be done quite quickly, since behind the horizontal seams you will need to have time to draw the vertical ones. They are made in increments of 25 centimeters, that is, along the length of an ordinary brick. After priming and painting, you will get quite a brick texture. Of course, it will be far from the real one, but you won’t go broke.
Vasily Molka
Traditional finishing methods
The lining of your chimney can be made of a completely different material. But keep in mind that in addition to the cladding material itself, you will also need to manufacture a special casing, sheathing or duct for the chimney, in particular this applies to ceramic and metal structures. For example, for tin, light tiles of different fractions and dimensions are often used, depending on the structures themselves.
We suggest you read: Installing master flash on slate
As for brick buildings, here, of course, preference is given to facing bricks, marble and tiles. Although in fact, the range of facing elements is huge. The most traditional for the entire existence of such structures was considered classical plaster, which can be performed for all types of channels, with some reservations regarding the purchased solution.
Cladding the stove and chimney with ceramic tiles
Lining a chimney inside a house can be done in one of the following ways:
- Plaster, both classic and variations of Venetian or marble.
- Wild stone.
- Clinker bricks.
- Facing slate.
As you can see, the choice is quite extensive; then we’ll talk about each offer separately.