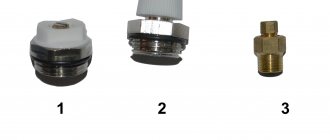
Fastening for cast iron radiators
Warmth in a house or apartment is one of the elements of comfort and coziness.
Therefore, you should take the installation of the heating system seriously, in accordance with the thermal engineering calculations, the selection of heating devices and their reliable fastening. Today, building design has begun to play a significant role and batteries; fastener parts differ significantly in design from their predecessors. If you have chosen cast iron as the radiator material, then let's look at which mount for cast iron heating radiators to choose.
During the next repair, the question of replacing or flushing heating radiators often arises, and during new construction they need to be installed. In old houses, radiator fastenings were made mainly from fittings with a diameter of 12-16 mm, which were driven into the wall and bent like a hook to hang the radiator.
Modern brackets are a product where its design has been developed in detail, which allows it to be securely and safely fixed to the surface.
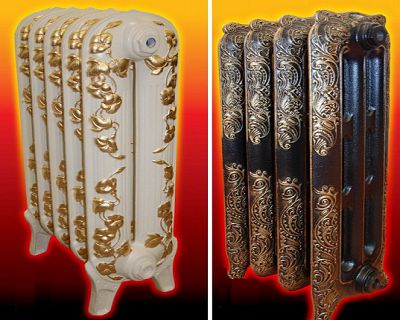
New radiator design Old radiator design
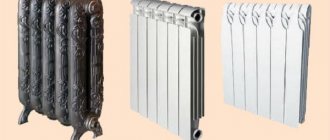
Today the market offers an abundance of different radiators according to material,
characteristics and design. These can be aluminum, steel, cast iron, bimetallic and other radiators.
In the old days, most of us had cast iron radiators installed. Today, their design has also undergone changes and cast iron fans have plenty to choose from.
Therefore, in this article I want to choose from the variety of types of heating devices - a cast iron radiator - a faithful friend and comrade, proven by time and its excellent characteristics. Its service life is up to 50 years.
It's no secret that the quality of the coolant is not ideal due to old pipes and heating system equipment. But this does not harm cast iron heating radiators, since cast iron has high abrasive wear.
In addition, cast iron is not subject to corrosion and has a lower price level compared to modern counterparts made from other materials and imported analogues.
The big minus, despite all the pluses, is its weight. Now we have smoothly reached the question - fastening for cast iron heating radiators.
Radiator repair
It will be difficult to repair cast iron batteries yourself. Not even all plumbers undertake this task. Therefore, when you are worried about the question of how to disassemble a cast-iron heating radiator in order to repair it, don’t even think about it.
The radiator consists of sections that are connected to each other by nipples. The last one is a connecting double bend made of cast iron. To seal the joint, cuffs made of dense material (paranit or heat-resistant rubber) are installed. To remove one section, you need to unscrew the top and bottom covers, then use a special key with an external head to unscrew the nipples connecting the first and second sections. Since the coolant in the heating system is hot water, the nipple often simply sticks to the sections.
If you overdo it, you can break either the nipple or the section. Therefore, disassembling the radiator is carried out after warming it up with an open fire. This could be a gas burner or a special oven. It is the junction of the two sections that is the most vulnerable point in the design of a cast-iron heating radiator. In essence, repairing the device consists of disassembling it, replacing the cuffs, cleaning the internal channels from scale and deposits, and then reassembling it.
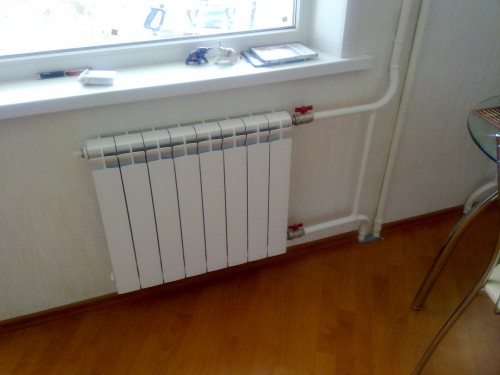
Fastening cast iron radiators
Mounting methods: wall mounting elements
Wall mounting is the main type of radiator mounting. As a rule, they are installed under the window opening so that the warm air rising upward prevents the windows from fogging up and, as it were, creates a “thermal curtain”.
Sometimes incorrect placement of radiators causes fogging of plastic windows, which I wrote about in the article at the link - here.
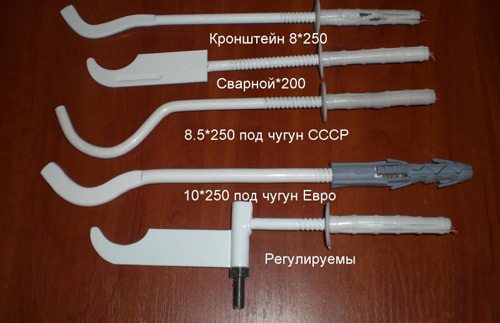
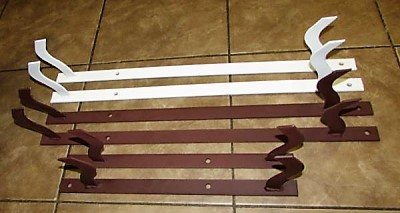
brackets on the strip
In addition, the weight of the cast iron radiator should be taken into account. If the wall material is made of brick, blocks and other durable materials, then you can safely attach it to the base.
Types of fastening for cast iron radiators:
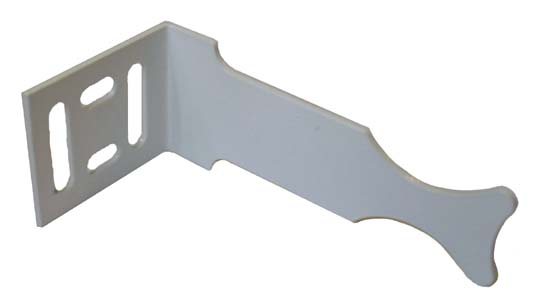
— Cast iron brackets are produced by casting;
— Steel brackets on the strip;
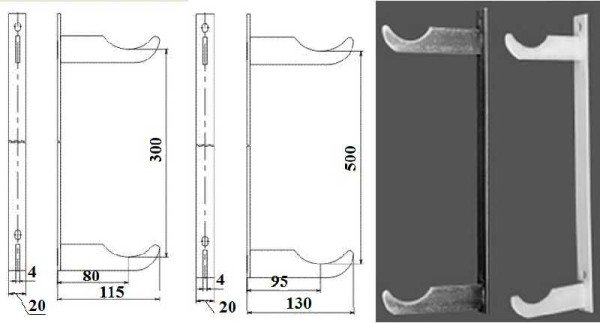
— Reinforced steel pin brackets (300 mm long);
Floor fastening element
— Adjustable steel fasteners, making it possible to adjust the position of radiators during installation.
Floor mounting is provided if the weight of the radiator is significant and the wall is made of wood, plasterboard or other non-load-bearing material.
Then a mounting support is installed on the floor, and it bears the main weight of the radiator.
The wall mount only fixes the radiator in a vertical plane.
There are a number of general rules when installing radiators:
- Installation of the heating system must begin with the installation of heating devices.
- The surface where the radiators will be located must first be plastered, and the floor mark must be marked on the wall.
- All heating devices must be mounted at the same level in the room. If the wall structure is fragile, then fastenings cannot be embedded into it, then the radiators are secured with a stand to the floor, and to the wall with a plank.
- Heating appliances must be mounted vertically and level. Its height from the floor mark must be at least 60mm. From the top of the heater to the window sill - at least 50mm. The gap from the wall plane to the heater should be 25mm.
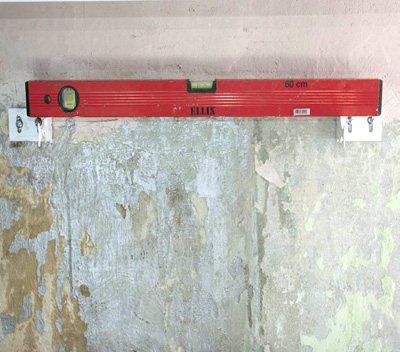
- The mount for cast iron heating radiators is installed on a solid surface base under the necks of the devices at the top and bottom. The brackets must be perpendicular to the surface of the walls. The number of fasteners is provided at least three per heating device, if it has more than two sections.
- We seal the fastenings into the walls to a depth of 110 mm or more (we do not take into account the plaster layer) with cement mortar M - 100.
I would like to give advice - do not take on the work of the heating system yourself without skills. Invite specialists, as there are certain tolerances and several types of wiring.
Based on the base material of the walls and the cubic capacity of the rooms, you will select the appropriate mounting option for heating radiators.
I suggest watching the video.
Questions and answers
There are a lot of questions from consumers regarding the design of a water heating system that uses cast iron radiators. There are some questions that confuse even professionals. Eg:
- Is it justified to replace cast iron heating radiators with bimetallic or aluminum ones? This question should not be asked at all. Each model has its own advantages and disadvantages, there are certain requirements for operating conditions, the quality of the coolant, etc. There are so many nuances that everyone must decide for themselves which radiator to install.
- Is it possible to use cast iron batteries as an electric heating device? The question is really strange. But in search of an answer to the question, you come across the experience of home craftsmen who make very interesting things from all sorts of rubbish. The same goes for the radiator. It can be filled with technical oil, and instead of the bottom cover, a heating element for a cast iron battery can be screwed in. It turns out to be a good oil cooler. But is it worth doing, because the market is filled with all sorts of electrical appliances that work more efficiently and save energy. They are equipped with control devices, safety units and other necessary devices. And they are not very expensive today.
- How many sections can be used in a battery? Unlimited amount. But let's think sensibly. Why do you need a battery with a large number of sections in a small room? This is, firstly, excessive heat consumption, which everyone is trying to save, and secondly, cluttering of space. That is why the power of the device is calculated, where the number of sections is taken into account.
Video on the topic:
Installation of elements
In order for the result of the work to be as good as possible, several important recommendations should be followed, and it is important to carry out high-quality preparation; it is from this stage that we will begin describing the process.
Preparatory activities
First of all, you need to prepare everything you need:
- Naturally, you can’t do without radiators; the choice of fasteners completely depends on this.
- Brackets can have very different configurations depending on what type of equipment they are intended for. In addition, the length may also differ - for more durable bases you can choose shorter products, for less reliable ones - longer ones.
Choosing the right bracket for mounting the radiator to the wall is very important
- Dowels for brackets - we will highlight this element separately, since standard options are often included in the kit, but the work requires an extended modification or products for a certain type of material, for example, fastening heating radiators to a wall made of aerated concrete.
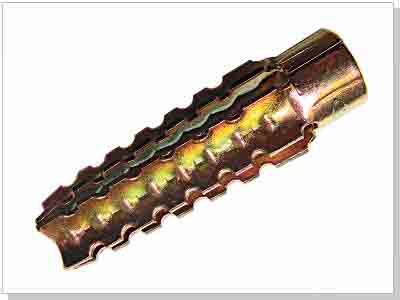
Special dowels are used for aerated concrete
- In order to take all the necessary measurements, you will need a tape measure , and to control the position of the structure you need to have a building level on hand. Marking is best done using a construction pencil, but in extreme cases you can get by with the usual option.
- Holes are drilled using a hammer drill with a drill of the appropriate diameter and length. If you do not have this tool, then you can rent it; buying a hammer drill for the sake of installing radiators is at least impractical.
Also, as part of your preparation, you need to take into account several important building codes:
- The distance to the floor must be at least 100 mm.
- There should also be at least 100 mm to the window sill.
- The battery should be mounted with a distance of 50 mm from the wall.
The structure must be located with certain indentations
If painting is required, then before fixing the heating radiator to the wall, it must be coated with special paint for radiators and heating pipes, which is resistant to high temperatures and does not turn yellow under their influence.
Before work, you need to complete the finishing of the walls; if you want to achieve maximum efficiency, you can attach heat-reflecting material behind the batteries.
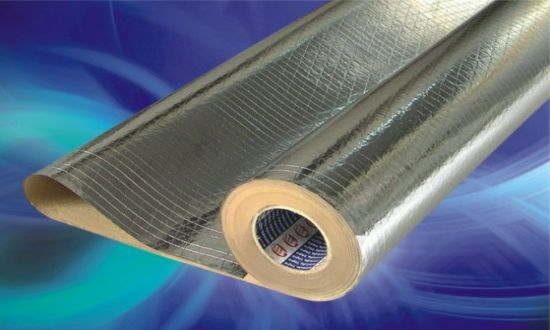
Reflective material is sold by the meter, you can buy as much as you need
Main stage
The work is carried out in the following order:
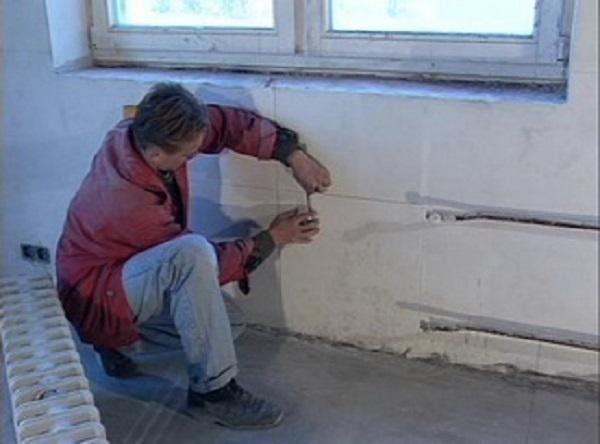
- Attaching the radiator to the wall begins with carefully marking the location of the brackets; remember the standards described above and carry out the work in accordance with them. It is important that they are positioned evenly, so when working it is best to use a level, with its help you will prevent distortions.
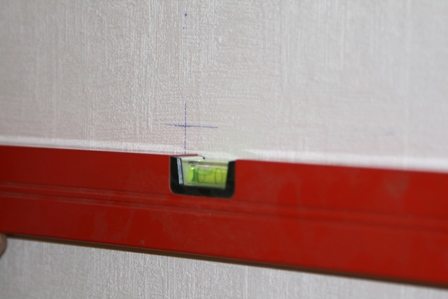
Correct marking is very important, since distortions will cause air pockets in the radiators.
Important! For radiators with up to 6 fins, three brackets should be used - two at the top and one at the bottom; if the structure consists of a large number of elements or its weight is significant, then one fastening element is added at the top and bottom.
- Next, you need to drill; for brick, concrete and other hard bases, a hammer drill is used; for foam concrete, you can also use an electric drill, since this material is not so hard. When carrying out work, control the position of the tool; it must be positioned exactly both vertically and horizontally, otherwise the brackets will become crooked.
- Dowels are first driven into the resulting holes; do this carefully so as not to break or deform them. The elements must enter with some resistance; a hole that is too large or too small is not allowed.
- Then the fastening of the heating radiators to the wall is screwed in; the easiest way to tighten the bracket is with an adjustable wrench; this should be done carefully so as not to tear off the paint from the surface, since corrosion will first occur in such places. (See also the article Propylene pipes for heating: features.)
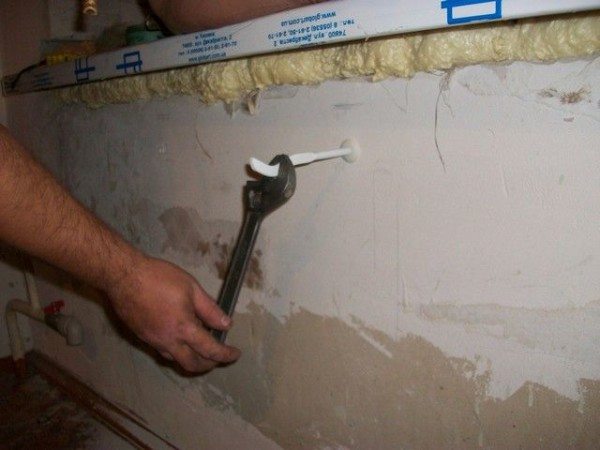
The photo shows that the hole was drilled crookedly and the bracket is tilted, don’t make the same mistake
- After finishing the work, be sure to check the strength of fixation of the load-bearing elements; there should be no play, each bracket should stand very securely and firmly.
- Lastly, the radiators are hung, their position is checked using a level. If everything is fine, you can collect communications.
Sometimes situations arise when the walls are not very reliable and the radiators are heavy. In such cases, floor mountings are used; many antique cast iron radiators initially have legs, which simplifies the mounting process. On sale you can find special supports that can withstand a lot of weight and are securely fixed to the floor; with their help you can do without the use of wall brackets.
If you do not know how to mount a bimetallic radiator to a wall due to its low strength, then a floor mount can be an excellent way out of the situation; the instructions for installing it are simple, so there will be no problems with installation
Anyone can attach a radiator on their own; the most important thing is to have a minimum set of tools, clearly mark and drill holes evenly. The video in this article will talk about some important aspects of the workflow and help you understand the issue even more thoroughly.
General information
Not only their aesthetics, but also the degree of heat transfer depends on the quality of installation of batteries. Therefore, the installation must be carried out taking into account the requirements of SNiP:
Of course, the batteries must be fastened firmly and securely, since the durability of the device and the heat pipe depends on this.
Marking for battery installation
Preparation
Before attaching the heating radiator to the wall, it is necessary to perform some preparatory work:
- First of all, you need to prepare a heating system design. The diagram must indicate not only the location of the devices, but also the heat pipes, as well as all other elements of the system.
- Then you need to apply markings to the areas where the devices will be located.
- Next, the devices themselves are prepared - they need to be removed from the packaging, the plugs and the Mayevsky tap must be screwed in.
This completes the preparatory work.
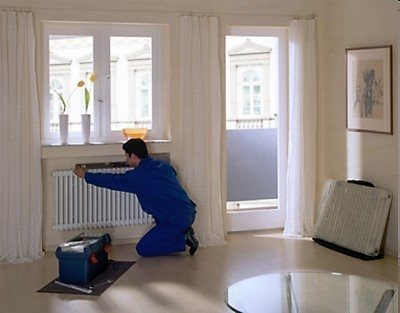
Installation of cast iron batteries
First of all, let's look at how to attach cast iron radiators to the wall, since they remain one of the most common to this day.
So, this process is performed in the following sequence:
- Fastening cast iron heating radiators to the wall is complicated by their heavy weight. Therefore, it is necessary to use special reinforced fasteners for them.
Installation work begins with marking the fasteners. In this case, their position must be checked with a level.
Then you need to drill holes for the fasteners; for this you can use a hammer drill.
- Then you should hammer dowels into the holes and screw into them the brackets on which the device is suspended.
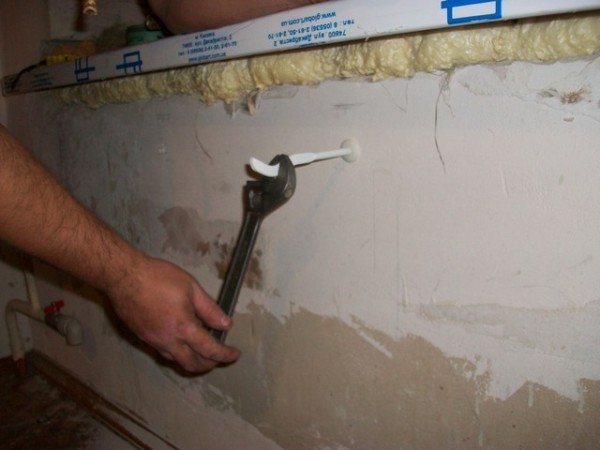
- After installing the battery, you should check its position with a building level . If there is a deviation, the position should be corrected. To do this, you can place a rubber gasket on the bracket.
In the photo - checking the position of the brackets
- After this, you just need to connect the device to the heat pipe. Below we will take a closer look at how this is done.
Note! For devices up to one square meter in size, one bracket is sufficient. If the size is larger, then one bracket is added to each square meter.
This completes the installation process. If you need to attach heating radiators to a wall made of aerated concrete, you should use special mounting strips rather than hooks.
Moreover, for their fastening you should use special dowels for aerated concrete. At least three such strips should be installed per square meter.
Floor Mounted Racks
Another option for installing cast iron batteries is to install them on the floor using special legs. As a rule, the legs are fixed with screws or dowels to the floor and at the same time hold the battery using special adjustable brackets or chains. It should be noted that this installation method looks original and attractive, especially in classic interiors.
Note! Often installation work is carried out by companies that sell heating devices. However, in this case their price increases significantly. Therefore, it is more advisable to do the work yourself.
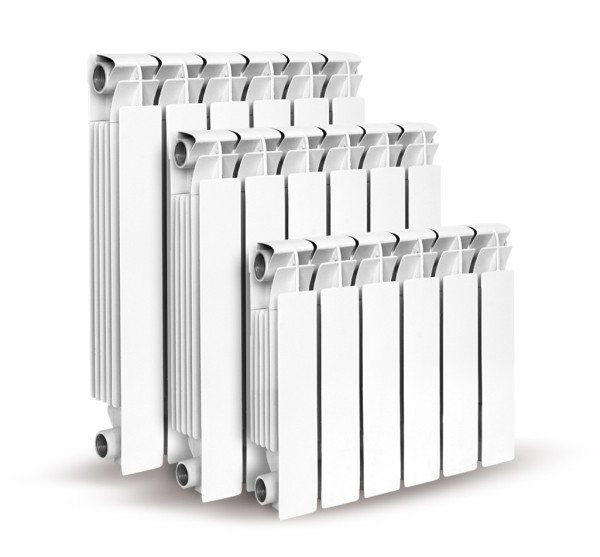
Installation of bimetallic and aluminum batteries
Now let's look at how aluminum radiators are attached to the wall, as well as bimetallic batteries. This process is not much different from fastening cast iron appliances, however, special brackets are used for these purposes.
The process is carried out in this order:
- Before attaching the bimetallic radiator to the wall, you should attach the brackets and mark the locations of the dowels.
- Next, holes are made for the dowel-nails, after which the dowels themselves are driven in.
- Then the brackets are attached and dowel-nails are driven into the dowels. Each bracket for attaching the radiator to the wall must be firmly fixed. As in the previous case, the position of the brackets must be checked with a building level.
Bracket for bimetallic heating devices
- Then the bimetallic radiators are directly attached to the wall, which are suspended on the installed brackets.
Note! The polyethylene film in which the products are supplied should not be removed until installation work is completed.
Here, in fact, is all the information on how to attach the radiator to the wall. It must be said that bimetallic and aluminum panels can also be installed on the floor using special racks.
The latter come in several types, some of them are attached to the floor, and some are fixed to the wall, but the main load still falls on the floor. This method of fastening is an excellent solution if the walls are made, for example, of plasterboard.
Advice! Before mounting the device on the wall, it is advisable to fix penofol (foamed polyethylene covered on one side with foil). The material should be positioned with foil facing the room. This will increase heat transfer, as heat will be reflected.
Types, design and application of fasteners
Wall mounting
Here, manufacturers do not spoil us with variety: wall mounting brackets come in only two varieties.
- Angular (plate, cantilever). Behind these names lies only an L- or T-shaped steel plate with holes for screws. After marking the attachment points, the bracket is attached to the wall using a standard mount or (which is much more reasonable) anchor bolts; the heating device is hung by the collector on a plate with a recess perpendicular to the wall.
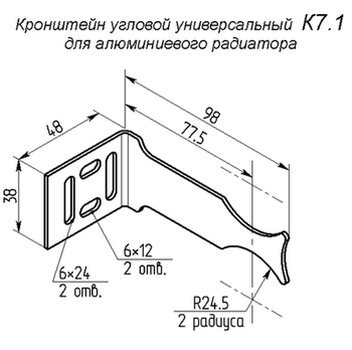
The product is suitable for lightweight aluminum batteries.
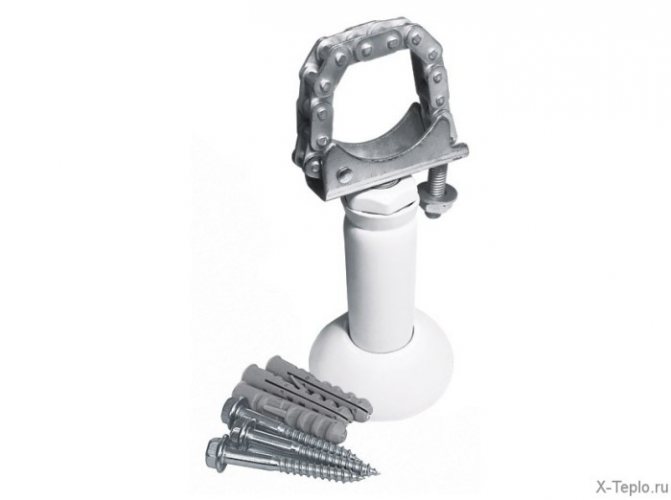
- Pin brackets are a curved rod with a pipe thread that is screwed into a plastic dowel. The dowel, in turn, is driven into a hole pre-drilled in the wall. This type of fastening is noticeably more reliable than the previous one and is designed for greater load.
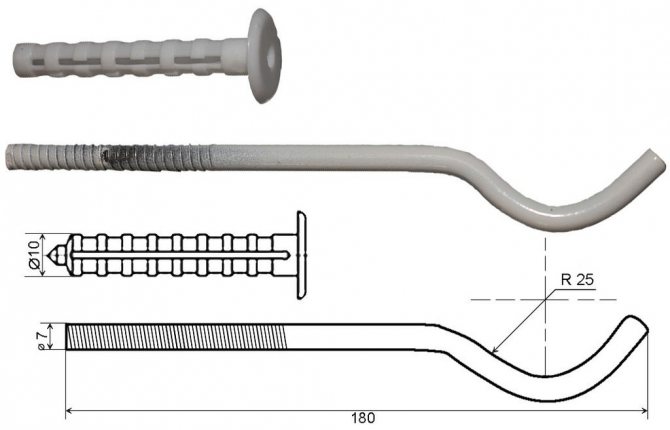
This type of fastener has a greater load-bearing capacity.
Please note: it is better to hang massive cast iron heating devices on pin brackets.
crazy hands
If for some reason you do not have the opportunity to purchase a mounting kit for wall mounting of a radiator, the situation can be saved by ordinary smooth fittings with a diameter of 10 - 12 millimeters.
- The radiator is placed on any supports (bars, bricks, etc.) in the working position.
- Mounting points are marked on the wall. Their total number is selected at the rate of one per three sections of the heating device; In this case, both the upper and lower collectors need fastening.
- The wall is drilled under reinforcement with a diameter 0.5 mm less than the own diameter of the rods.
- The reinforcement is cut into pieces of approximately 25 cm; on one side (hammered into the wall) the chamfer is removed.
- The rod sections are hammered into the wall, after which the heating device is hung on them.
- The edges of the rods are bent upward using any pipe as a lever and cut in place.
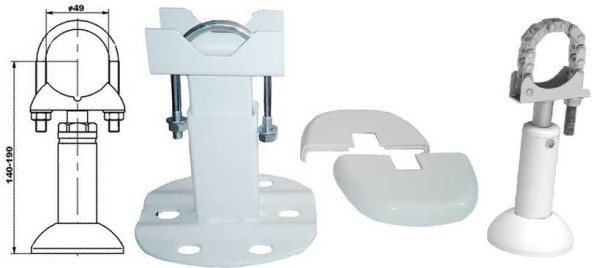
Floor mounting
Here are the most common types of floor brackets.
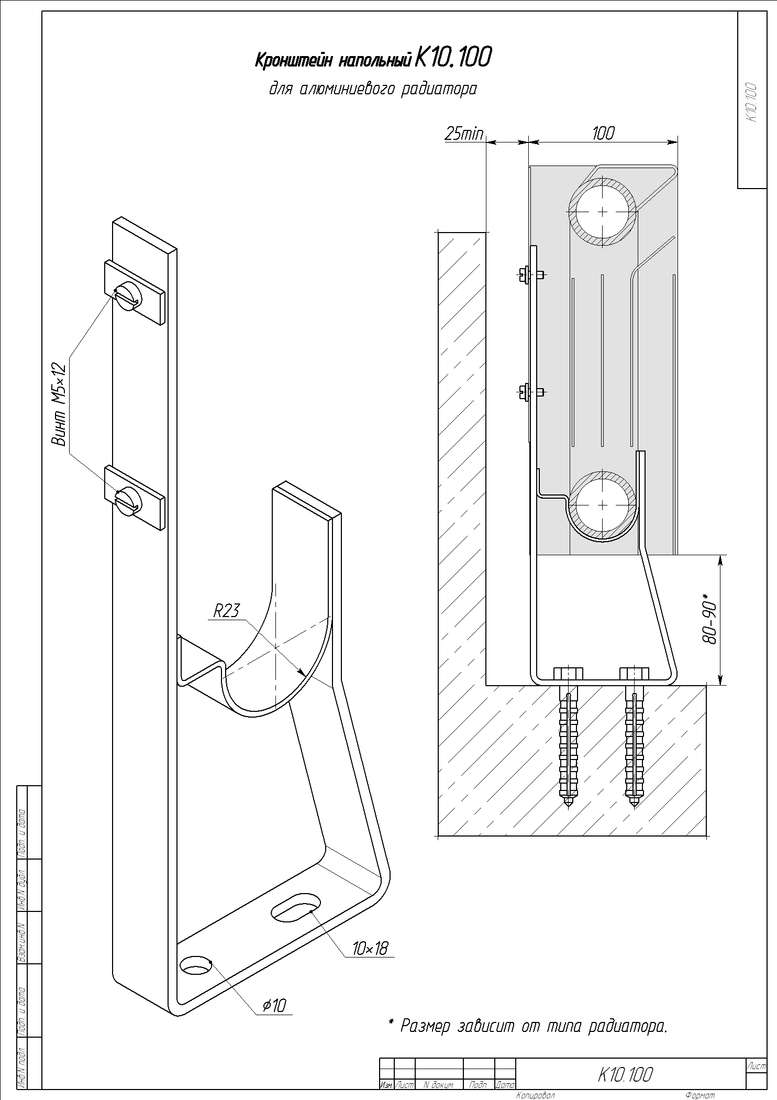
Bracket K10.100.
This floor mount for aluminum radiators is designed for fixed depth sections (100 millimeters). The heater is installed on a support with the lower manifold; the rear fins of the sections are fixed with a pair of screw clamps.
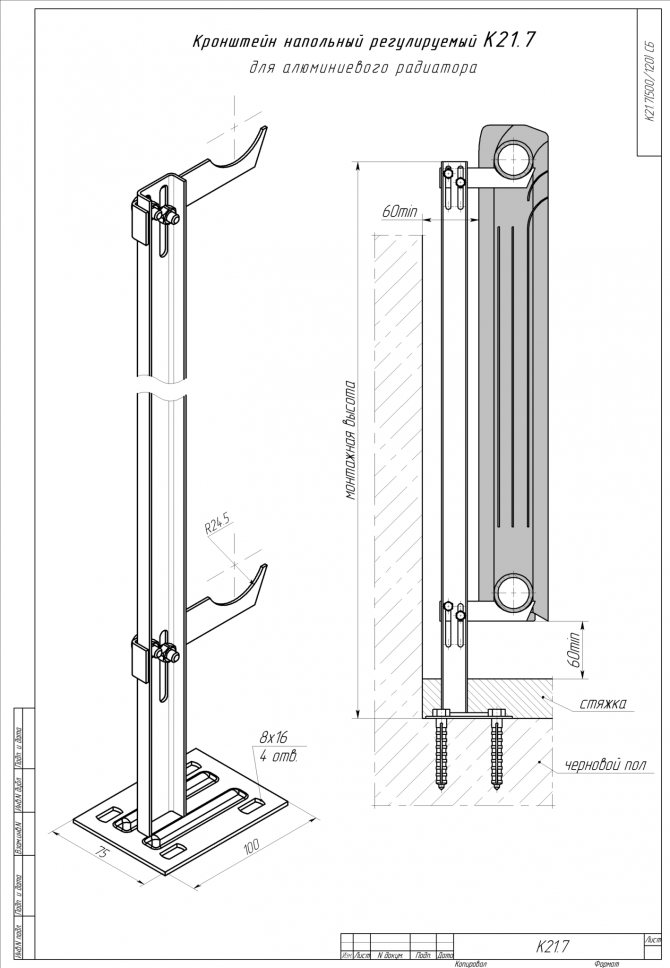
Bracket K 21.7.
Unlike the previous one, this product:
- It is adjustable in height, which allows you to install the heating device both at a minimum distance from the floor and with a gap below it.
- Universal: you can install an aluminum or bimetallic radiator of any size on it.
The retail price of the stand varies from 300 to 450 rubles.
Installing the heater on a rack is extremely simple:
- The upper holder is set at the desired height;
- The radiator is hung on it;
- The lower holder rises to the level of the lower manifold and is clamped with a screw.
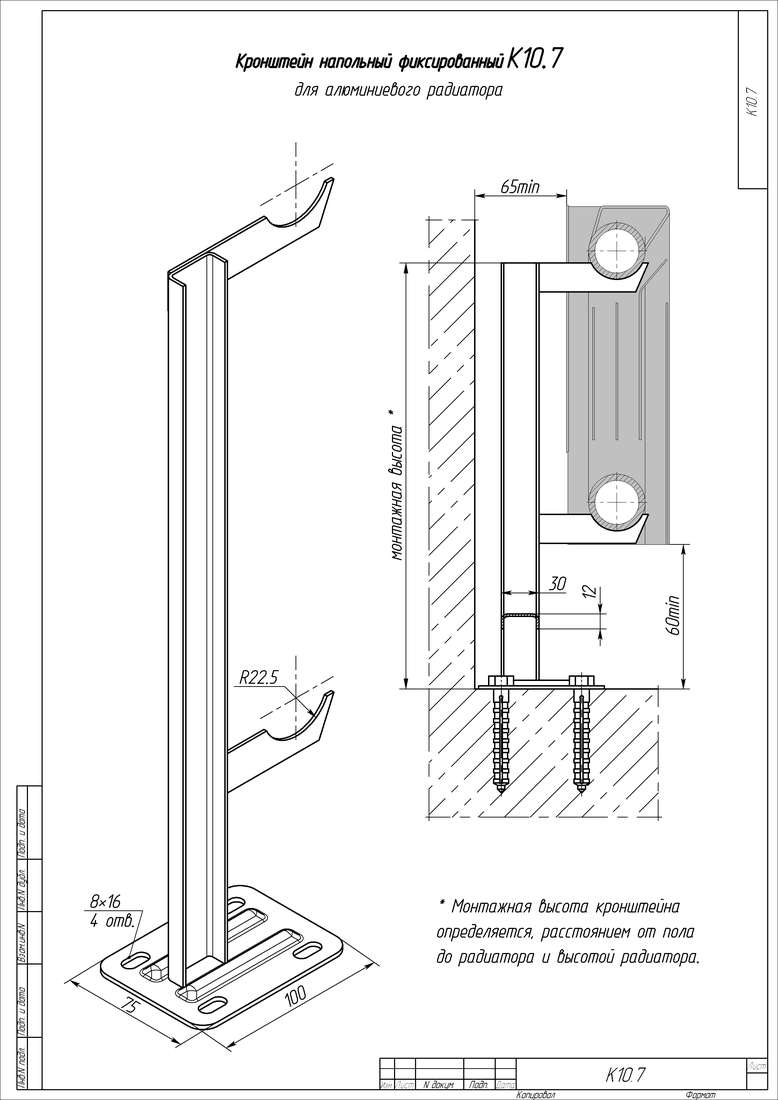
Bracket K10.7.
Another device for fixing a heating device of fixed dimensions. In this case, it is designed for a center-to-center distance between collectors of 500 mm with a section depth of 100 mm. The absence of moving parts makes it reliable and cheap (retail cost is only 200 rubles).
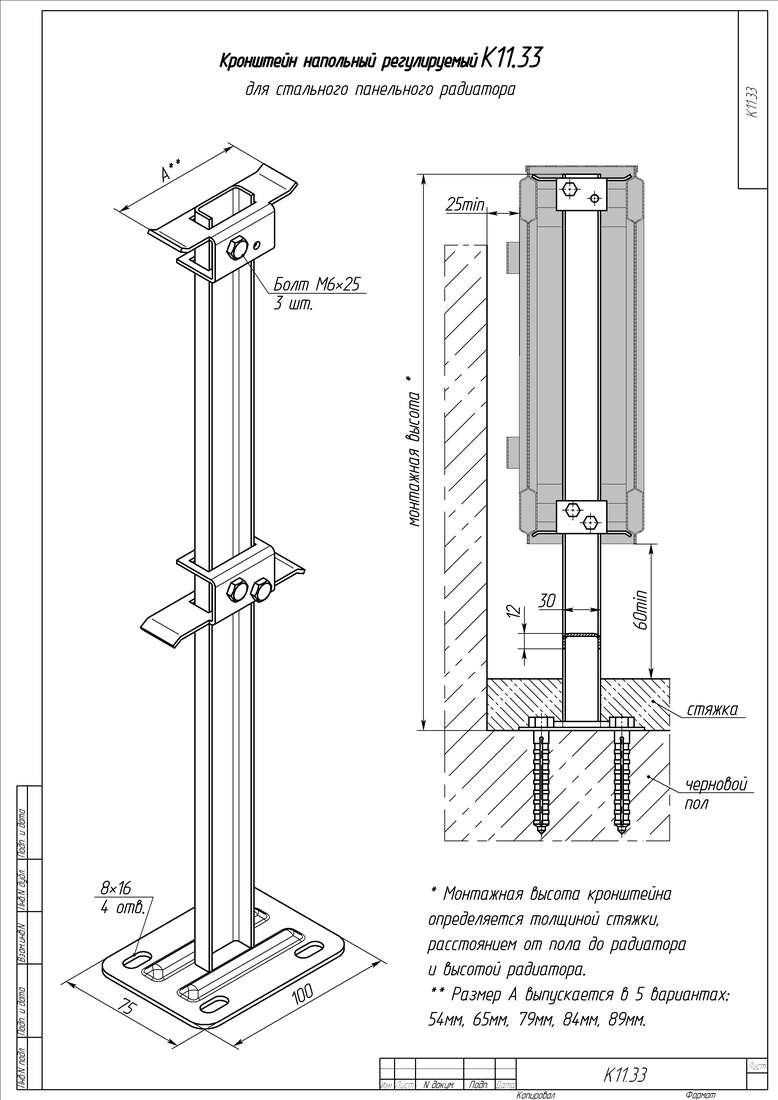
Bracket K 11.33.
Here is an adjustable stand for panel radiators; The diagram makes it clear how to fix them with stops. The maximum mounting height is 640 millimeters (along the upper edge of the radiator); The retail price of the product is 350 rubles.

Bracket K 10.10.
Economy version of the mount for a panel steel radiator. There is no height adjustment; The simplest method of fastening the panel is used - standard eyes are put on the hooks of the racks. The cost predictably turns out to be very affordable: in batches of 100 pieces, K 10.10 can be purchased for 150 rubles.
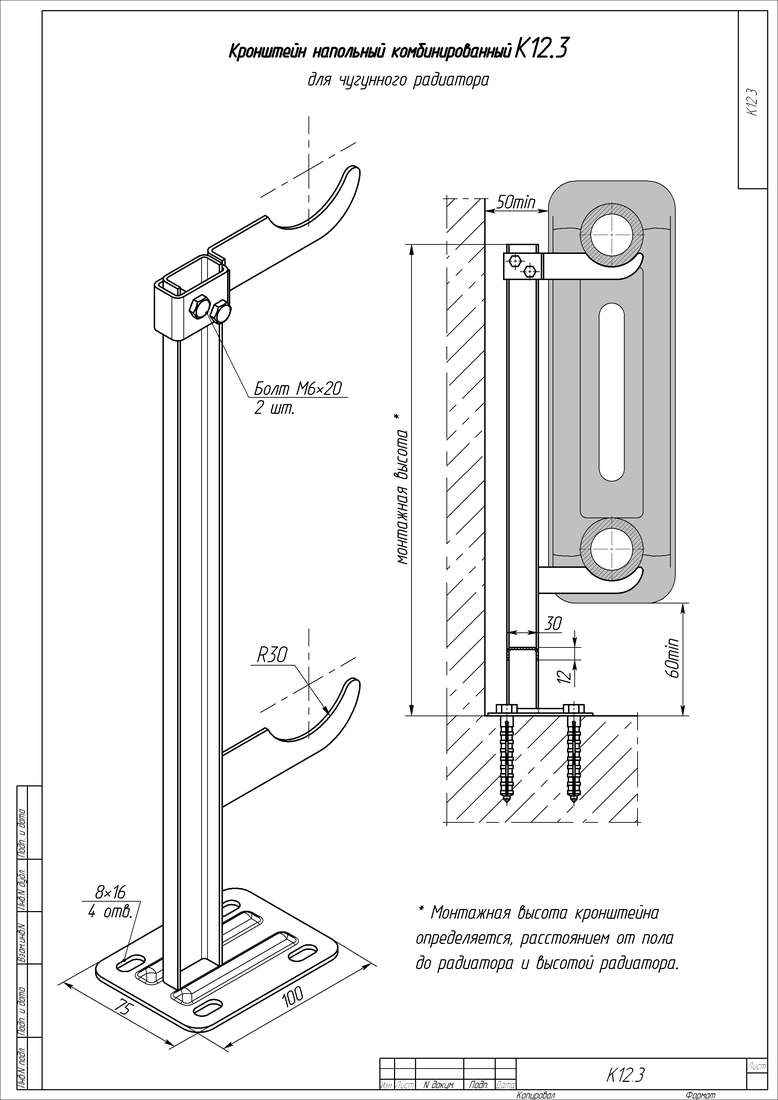
Bracket K 12.3.
Unlike previous products designed for relatively lightweight aluminum and bimetallic heating devices, K12.3 is a floor mount for cast iron radiators.
Please note: cast iron appliances are not only heavy in themselves. They also have an impressive internal volume (up to 4 liters per section), which significantly increases the load on the mount after filling the battery with coolant.
The lower rack holder is rigidly fixed; This is where the main load falls. The top one is movable, which allows you to install a device with a height of both 500 and 350 mm.
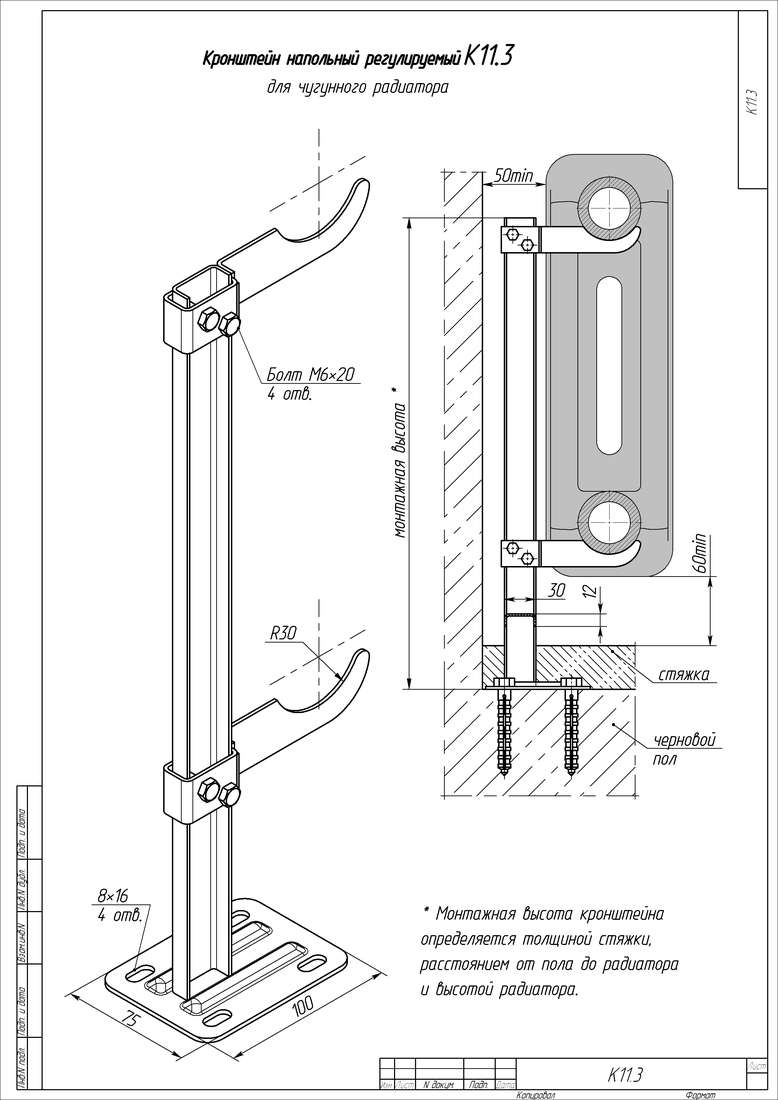
Bracket K 11.3.
The difference from K 12.3 is only in the ability to adjust the height of the lower collector above the floor. Otherwise the products are completely identical.
Recommendations
We take the liberty of giving the reader some recommendations for floor installation of radiators.
- The racks must be secured as rigidly as possible - with anchors or, when installed on a wooden floor, with thick (at least 8 mm) self-tapping screws with hexagonal heads.
- On a wooden base, it is better to additionally secure the battery to the wall. Even to a light internal partition: this will significantly reduce the likelihood of the racks falling and breaking the tightness of the liner.
- As already mentioned, when installing the device in the middle of the room, it is better to lay the connections to it hidden, in the floor. The instructions are due to the fact that, for example, metal-plastic pipes are quite capable of deforming under the weight of an overweight person.
The photo clearly shows the eyeliners going into the floor.
Connection features
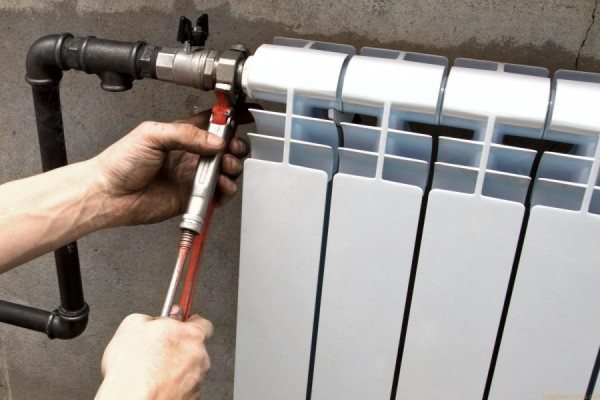
After installing the devices, you need to connect them to the heat pipeline.
Brief instructions for performing this procedure look like this:
- Adapters for certain types of pipeline are screwed into the inlet and outlet. In some cases, a thermal control valve is connected directly to the inlet.
At this stage, it is important to ensure the tightness of the threaded connections. For sealing, you can use flax with heat-resistant sealant or fum tape.
- Next, the adapter or thermal valve is connected to the pipeline, usually with a threaded connection.
- It is advisable to make a jumper (bypass) between the incoming and outgoing demand.
- After connecting the batteries yourself, you should fill them with coolant and turn on the system. The taps must be opened smoothly to avoid water hammer and clogging of the internal section.
- In the process of filling the instrument system, it is necessary to release air through the Mayevsky taps.
- Then you need to turn on the heating. When testing the system, it is advisable to turn on the heating to the maximum temperature and at the same time carefully inspect all connections. If drops of coolant are detected, it is necessary to turn off the system, drain the water and seal the connection.
Functions and types of mounts for radiators
Fastening systems are designed for rigid fixation of radiators, thereby preventing damage to heating lines.
Reliable fastening maintains the functionality of heating circuits and fittings throughout the entire period of operation .
Batteries that are mounted in a vertical position will have maximum efficiency and will create a dense thermal curtain that separates the room from cold air flows from the window.
Cast iron appliances have a large mass and exert a load of 10-20 kilograms per fastener and point on the wall , so it is important to select products taking into account the intended method of installing radiators. Combined fastening systems will be an excellent option for private houses and apartment buildings.
Cast iron brackets
Solid cast iron fasteners are strong, durable and able to support very heavy weights . Brackets made of this material are in demand when installing cast iron equipment and heavy building heating systems.
Important! In addition to the fact that cast iron pins must be of high quality, they must be installed correctly on the wall to ensure reliable operation of the heating circuits.
Steel fasteners on strip and with pin reinforcement
Fasteners on a steel strip are quite easy to install and provide reliable support for radiators throughout the entire period of operation.
The strip can be attached to concrete and wooden walls . To install batteries consisting of less than 10 sections steel fastening strips will be sufficient
Steel fasteners with pin reinforcement are mounted into the wall using special dowels , which provide increased wear resistance and resistance to shape changes and sagging. Durable steel parts are perfect for mounting both lightweight batteries and cast iron radiators.
Adjustable steel mounts
These mounting systems are very easy to use and allow you to change the position of the radiator without removing it.
Important! When purchasing steel adjustable fasteners, you should consider the thickness of the metal and the expected load on them.
How to fix cast iron radiators
Depending on the individual characteristics of the room, you should select an option for installing products that will ensure uniform distribution of the load and prevent destruction of the wall of the home.
Installing wall mounting systems is the most popular method used when installing heating in a home.
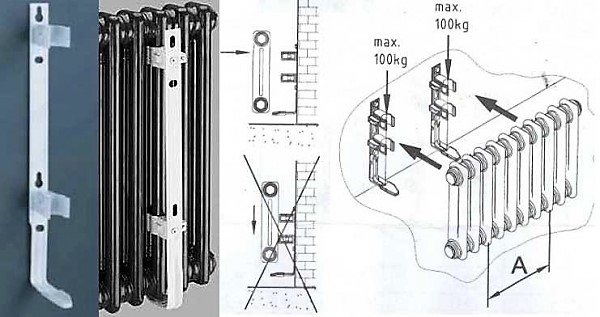
Photo 1. Quick wall mounting of radiators using a special strip with clamps. Maximum load 100 kg.
The fasteners are designed to withstand increased loads from equipment and can provide durable service even under adverse operating conditions. Most systems are used for installation on brick, concrete and wooden walls . Wall mounting of cast iron radiators is not suitable for equipping houses made of plasterboard and lightweight foam blocks .
Floor installation
In cases where the walls are not intended for the installation of cast iron batteries, floor fasteners are an excellent solution. The fasteners transfer the entire mass of the radiators to the floor and relieve the load from the walls. Despite the fact that floor fasteners are quite reliable and stable , sometimes it is necessary to install additional wall clamps to hold the batteries in a certain position.
General recommendations
Recommendations for installation of heating devices:
- Cast iron batteries should be placed at a distance of 3-5 cm from the wall, 6-12 cm from the floor and 5-10 cm from the windowsill . This position will provide the best heat transfer.
- The center of the radiator should coincide with the middle of the window opening to create warm flows that prevent cold air from entering the home.
- Before installing the fasteners, you should mark the points where they will be mounted.
- to securely fix the fasteners . Dowels, plugs and cement mortar can be used for this .
- After the fasteners are installed, the batteries are mounted according to the intended diagram .
- Radiators must be correctly assembled and nipples must be tightened . plugs on all free collectors .
- Manual or automatic air vents are mounted on the batteries , helping to increase the efficiency of the system.
- Shut-off valves , which are installed on the inlet and outlet openings, will make the process of heating the house most comfortable. Ball valves allow you to remove the radiator without stopping the entire heating system.
- When connecting the circuit, it is important to choose the correct fitting size that matches the diameter of the heating pipe .
- The last stage of installation is pressure testing of the equipment.
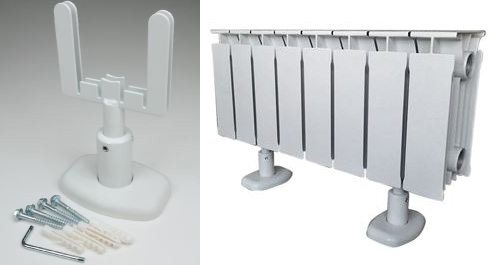
Floor fasteners
They are used much less frequently than wall-mounted ones. There are several main reasons for using floor brackets for radiators:
- The strength of the wall into which the installation takes place. First of all, this applies to cast iron models, which cannot be securely fastened to an internal plasterboard wall;
- Lack of required space, especially under large windows, which are so fashionable in modern design developments;
- Design intent. There are many design styles that require the installation of radiators on legs or special pedestals on the floor.
Installation
The structure of the floor bracket is a two-pronged fork on a round stand. The stand is fixed to the floor with screws and adjusted in height so that the battery is strictly horizontal. However, in country houses and old houses where the floors are wooden, it is worth securing the floor mounts with wall mounts in order to reduce the load on the load-bearing wooden structures.
If the radiator is made of aluminum alloy and has a small mass, it can also be installed on thinner legs or other openwork stands.
The mounting devices used to install batteries are quite simple. Their installation does not require special qualifications and is accessible to almost everyone. You just need to make the right choice of radiator bracket.