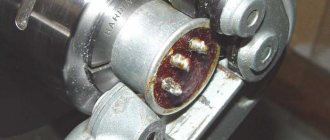
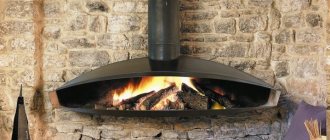
Kryza device
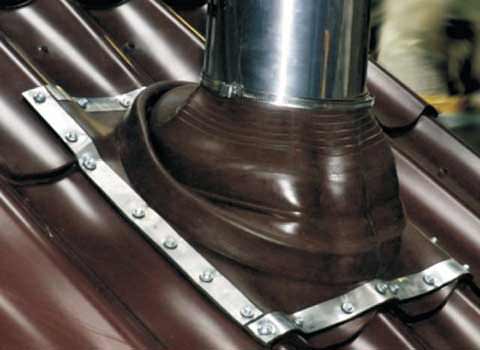
Master Flash is a pyramid of rings of different diameters, attached to an elastic base in the shape of a square or rectangle. Each of the rings corresponds to a specific pipe diameter, so this design is universal. The rings can be attached to the base at an angle of 90º, or at an angle of 30 or 45º. Depending on this, the penetration is used for fastening on a flat surface or on an inclined one.
Advice! If there is no corner master flush on sale that matches the angle of inclination of your roof slope, then take a straight one, but of a larger size.
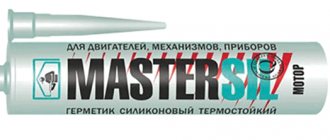
The chimney cover can be made of silicone or rubber. Silicone is a more elastic material and more resistant to high temperatures. But its disadvantage is its lack of resistance to UV radiation, which leads to its shorter service life. If solid fuel is used for combustion, the temperature of the waste products discharged through the pipe will be higher. In this case, the installation of a silicone master flash is required.
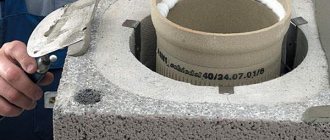
Assembling a ceramic chimney
A prefabricated structure consists of several elements:
- Inner layer. The base is made of ceramic. It is thanks to it that no harmful substances or residues accumulate inside.
- Intermediate layer. Its main purpose is heat insulation. Naturally, it is made from various non-flammable materials (mineral wool).
- External covering. Typically made from expanded clay blocks or a stainless steel casing.
Assembly order
So, in order to understand how to properly install a chimney pipe, you need to keep in mind that a ceramic chimney has several key features.
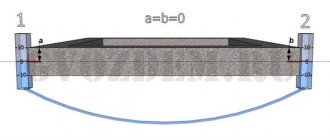
First, you need to build a foundation. A flat surface without the slightest shifts or roughness is required.
Secondly, we connect the tee using a special module. It has a pipe, and all joints are covered with a solution when connecting.
The part protruding above the roof can be covered with bricks or blocks to create a pleasant appearance and protect the thermal insulation from external influences.
Nuances
Remember that you are dealing with a modular system. And all fastenings should be as tight as possible, without any gaps.
Ceramics are a fragile structure; care should be taken; a strong mechanical shock can crack the product.
If the elements have chips or cracks, replace them immediately; they are no longer suitable for use.
Working with glue
A special acid-resistant glue is used. It is purchased in powder form and diluted with water in a ratio of approximately seven to one. Cooking time is only ten minutes.
Remember that before applying the surface must be thoroughly wetted with a sponge. And it is better to use glue with a reserve so as not to accidentally miss the gap
- High cost of the products themselves.
Ceramic is 2-3 times more expensive than the stainless steel version. In the case of brick, choosing red brick (namely, it can meet the high temperature loads of sauna stoves), you must be prepared to pay a decent amount not only for the material itself, but also for the work of the craftsman.
- DIY assembly difficulty:
– Assembling ceramic chimneys requires the presence of the following tools: angle grinder (grinder), diamond disc, corundum disc, rubber mallet, tape measure, level, trowel, square, bucket (mixer, drill, marker, mounting gun).
– It is necessary to properly dilute the solution for ceramic pipes and separately for concrete or expanded clay blocks.
– It takes time to dry the product, especially with brickwork.
– The service life of the product and the safety of its use directly depend on the quality of the joints of ceramic pipes (or bricks). The joints must be leveled with a damp sponge; excess mortar is removed to make the seams smooth. It should be noted that the greatest risk of depressurization and fire hazard occurs at the joints.
- A chimney made of brick and ceramics must be laid at the design stage of the bathhouse/house. In ready-made buildings, it is sometimes very difficult or completely impossible to implement such systems.
- The high weight of the structures implies the presence of a foundation, which is not possible in the case of a finished structure.
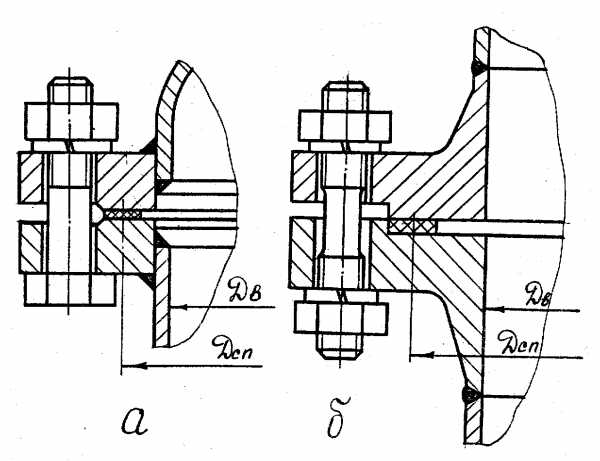
Tags: chimney, pipe, installation, flange
« Previous entry
Advantages and disadvantages
Modern craftsmen prefer installing a master flush for the chimney for the following reasons:
- elasticity, which ensures a tight fit between the pipe and roofing materials;
- a form that allows it to be installed on roofs of a wide variety of shapes and slopes and made of different materials;
- durability and strength, which ensures resistance to mechanical stress, including corrosion;
- tightness achieved due to the tight coverage of the pipe by the upper ring;
- thermal resistance to changes in low and high temperatures;
- wide scope of application - it is possible to install master flash on corrugated sheets, metal tiles, ondulin and other coatings;
- the ability to install master flash in any weather;
- ease of installation of a chimney penetration with your own hands.
- affordable price.
The only downside we can mention is that it is somewhat labor-intensive to install master flash on a roof ridge.
Necessary materials
Before installing the master flush on the roof, check its contents. You will need:
— Master flush for a pipe of the appropriate diameter. When choosing, also focus on the temperature of the exhaust gases, since the choice of material from which the roof is made depends on it.
Advice! When choosing a penetration, keep in mind that a flash master with a reinforced base has a longer service life, but provides insufficient adhesion when installed on metal tiles, corrugated sheets or other embossed roofing materials.
— A plate used to protect the wing from sunlight. It can be purchased at building materials stores or made with your own hands. It looks like an ordinary plate without a bottom.
— Screwdriver, self-tapping screws, metal scissors and heat-resistant silicone sealant
Product advantages
- The elasticity of the material ensures a continuous connection of the seal to the pipe, even when the dimensions of the pipes change during heating and cooling;
- Thanks to the design features of the seal, vibration and displacement of the pipes are dampened, and the external pressure of the layer of snow collecting on the surface is reduced.
- The chimney flasher protects the roof from destruction. Even when heated, deformation and expansion of the volume of the product are minimal;
- A large assortment of seals with different sizes allows you to select and efficiently install a unit from 0.3 to 66 cm;
- Used on roofs with any covering (slate, shingles, clay tiles, sand-cement tiles, metal tiles, corrugated sheets, bitumen tiles, metal sheets, etc.)
- The materials from which the flash seal is made provide high-quality sealing;
- To install the device, no special skills are required; you can remove and strengthen the chimney on the roof yourself, quickly enough and without the involvement of specialists.
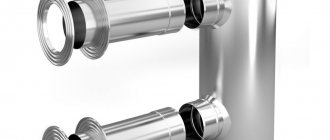
Sealing sandwich pipes.
A cone-shaped device consisting of rings of different diameters, each of which is larger than the previous one, connected by silicone bridges. As a standard, the rings are located vertically at an angle of 90°, however, special models are produced for pitched roofs, with an inclination of 10-30° or 20-55°.
Attention! If you are unable to find a seal for a pitched roof, you can use a straight model. But it is worth considering that the diameter of the seal flange will have to cover the ellipse of the roof gap; the higher the slope, the larger the diameter of the ellipse along the major axis. Therefore, when buying a seal, the choice should also be in favor of a larger size.
Master Flash Roof Passage.
Master flush selection
To choose the right penetration, it is not enough just to know the dimensions of the chimney. Master flash on sloping roofs made of polyprofile, roofing steel without relief, flat tiles, with an angle from 10 to 45º, a roof with a base in the form of a circle or square is selected. For the same roofing materials and a slope of 45-60º, a device with a reinforced flange is selected. In case of a slope of more than 60º, you need to select a seal with an enlarged flange. On flat roofs, perpendicular cuffs will be required. For tiled and slate roofs, penetrations with enlarged flanges are selected. Also, depending on the slope of the roof, choose a corner or straight roof. For some types of chimneys it is impossible to use a standard type of penetration. This may be due, for example, to the fact that the pipe has a square cross-section (wall size up to 15 cm). In this case, a special hood with a clasp is used. Such devices are also used to repair existing insulation. For larger square pipes, a rubber or silicone strip with an aluminum base is used. If it is impossible to use a flash master for compaction, it is recommended to use a special elastic roll material reinforced with aluminum.
In order to decide on the material from which the master flash is made, start from the temperature to which the chimney heats up. In the case of a gas hood, the heating of which does not reach very high temperatures, you can choose a rubber device. A silicone sealant is suitable for a stove chimney.
The Flash Wizard is installed as follows.
First, cut off the upper part so that the diameter of the resulting part is approximately one fifth less than the chimney pipe. This will ensure a tight fit. The resulting structure is placed on the pipe with the base down and moved along the pipe until it fits against the roof. When installing master flush on corrugated sheets and metal tiles, it is better to use a rubber penetration.
The next step will be to secure the resulting structure with sealant. At the very end, you should screw it to the roof using self-tapping screws.
There are several tricks when installing master flash.
- To make it easier to thread the pipes through the roof, cover them with soapy water. This will make pulling easier.
- If you were unable to immediately successfully cut a hole in the master flash, you can try to use it, sealing it tightly with a clamp.
- When buying a sealant for master flush, make sure that it is resistant to moisture.
- There should not be too many self-tapping screws, since in any case the sealant will someday begin to let moisture through, and then it will seep through the holes. Try not to screw self-tapping screws into recesses in the roofing material, as this is where precipitation flows.
- When installing the master flush on a chimney ridge, place its top under the flashing.
There are some features that you need to know before installing master flush on metal tiles. And other roofing materials that are installed with one sheet overlapping another. When performing installation in this case, you need to bring the upper part of the canopy under the nearest adjacent sheet. By performing this maneuver, you will achieve free flow of liquid regardless of the tightness of the penetration connection. This way you can increase the service life of the connection.
Note! Not every chimney is suitable for installing a roof, since in some of them the temperatures of the gases passing through the pipe exceed those permissible for a master flash. You will not have to face this problem in the case of a steel sandwich pipe and chimney connected to a gas-fired condensing boiler, since it does not heat up more than 100º.
If you use a chimney without insulation, as well as boilers running on solid fuel, temperatures can reach 600 º, which can lead to failure of the roof. How to install the master in this case? You need to select a pipe whose size exceeds the diameter of the chimney by about 10-12 cm. Its length should be up to 50 cm, or you can use regular galvanized metal. In the place where the chimney passes through the roof, it must be covered with basalt, and a selected sleeve must be placed on top. The master flash is installed, the dimensions correspond to the sleeve used. The open section of the insulation at the top is covered with a hopper, which is made of galvanized steel. You can attach it using a clamp.
The canopy with fastener is installed according to the following scheme. The top of the cone is also cut to a size 20% smaller than that of the pipe. Then the clasp is removed from the lock. The cuff is wrapped around the pipe, its sides are connected. Then the fastener returns to its place, the teeth tighten. The sealant is then applied to the appropriate area of the roof. Then the fastener and all places that need to be insulated are treated with it.
Having completed the installation, install the plate, thus giving the structure a finished look.
Thus, installing a master flush with your own hands is completely easy to do even for a novice, inexperienced builder. After all, all the tools needed for it can be easily found in many construction stores or even made with your own hands. This will not require special time or material costs from the master. At the same time, the installation of such a device will reliably protect the roof from precipitation, which otherwise could lead to unpleasant consequences.
Terms of Use
The elastic Master Flash system is suitable for waterproofing work in areas where the chimney exits through the roof.
Experts advise using such a sealing system for the following heating systems:
- Sandwich chimneys. Such chimneys are pipes made of galvanized metal with a thermal insulation layer of basalt material. Thus, the rubber seal allows you to maintain the optimal temperature inside in such a chimney and does not let heat out of the house;
- Chimneys made of stainless material. Such smoke exhaust systems can heat up to high temperatures, so it is effective to use a silicone sealant for them. Silicone does not deform at high temperatures. Rubber models can only be used with a condenser-type gas boiler.
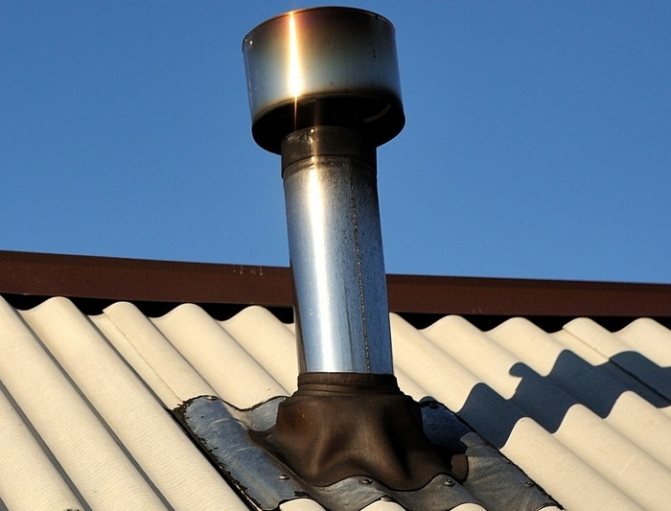
When sealing uninsulated pipes with the Master Flash system, it is considered advisable to use a special sleeve. To do this, a 500 mm strip is cut from the tube. The chimney outlet is tightly wrapped with fire-resistant material and a sleeve is put on it, which is fixed with a steel clamp.
Elastic rubber penetration Master Flash is the best option for waterproofing the gap where the chimney passes through the roof. However, it is not suitable for all cases. Professional roofers and manufacturers recommend using this device for DIY installation on the following types of smoke exhaust ducts:
- Sandwich chimneys. Between the two galvanized steel contours of these pipes there is a thermal insulating layer of basalt fiber. The insulation retains heat in the inner pipe, so the outer surface of the chimney remains cool. Rubber models are used to waterproof sandwich pipes.
- Stainless steel chimneys. Stainless steel chimneys that remove combustion products from solid fuel stoves are heated to high temperatures. Therefore, heat-resistant silicone penetrations are used to seal the target between the roof and the pipe. The use of conventional rubber models is possible if the chimney is connected to a condensing-type gas boiler.
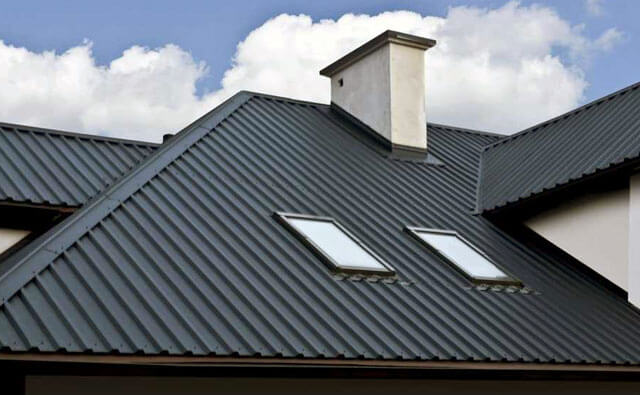
Master flush for a chimney: advantages, equipment, installation features
The passage of chimney channels is not without reason called one of the most difficult sections during installation. It is very difficult to make a truly airtight transition and protect your home from fire. Previously, they used various tricks, such as asbestos, galvanized sheets, bitumen and the like. As a rule, the result could last only a few months, and rarely a full season. All due to the characteristic climatic features. Therefore, today, more and more respect and reliability are given to the sealant called master flush for the chimney.
With the help of such a simple device, a person unfamiliar with construction can carry out penetrations in the roofing even with his own hands.
Installation
It is imperative to adhere to the requirements of SPiP 41-01-2003 “Heating, ventilation and air conditioning”:
- The cross-sectional area of the smoke duct must be no less than the cross-sectional area of the boiler pipe. Smoke channels should be installed vertically, without ledges.
- An inlet vacuum of at least 5 Pa must be ensured. The recommended duct height is at least 5 m from the boiler air intake.
- It is mandatory to use polyurethane foam when crossing a roof or wall.
- Lack of horizontal channels for cleaning in the attic.
- Connections of parts cannot be installed in interfloor and attic floors.
- The smoke duct should not come into contact with any communications.
- Heating of nearby building elements should not exceed 50 degrees.
How to mount:
- It is not recommended to use a sandwich pipe as the first element installed directly on the outlet pipe of the heat-generating apparatus. The first item should be the adapter.
- Installation proceeds from the bottom up, each subsequent element is included in the previous one.
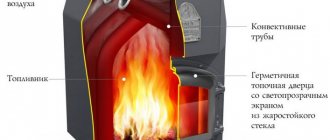
This type is a structure that consists of two pipes of different diameters - external and internal. The space between them is filled with non-flammable heat-insulating material with an operating temperature of up to 600°C - mineral wool made from high-quality basalt fiber.
Using a standard set of elements, you can create a smoke exhaust duct of almost any level of complexity. Each element is connected to the other using a bell-shaped design; they can be used for external and internal installation. The Ferrum company produces elements in the diameter range from 80 to 300 mm.
Design and installation require guidance on the rules for choosing the diameter and height of the chimney pipe, and taking into account the intensity and frequency of operation of the heat-generating apparatus. Sandwich chimneys provide increased fire safety, but they do not guarantee it completely. Therefore, passage through the ceilings requires the mandatory use of additional fire safety elements, namely polyurethane foam produced by Ferrum.
The elements are installed from the bottom up from the heat generating apparatus. If there is a mismatch in diameters, the joint is sealed with heat-resistant sealant. During installation, the inner pipe fits inside the previous one, and the outer pipe fits over the previous one. For better sealing of pipes, be sure to use a sealant with an operating temperature of at least 1000°C.
The joints of pipes and other elements (bends, tees, etc.) are fastened with clamps. They must be outside the ceilings. Wall brackets are installed for every two meters of the chimney, and the tee must have a supporting element. The fastening of parts to building structures must also be carried out using consoles and support platforms at least five meters apart. The fastening of connecting pipes must exclude the possibility of deflection.
We invite you to familiarize yourself with: Installing an electricity meter, rules and subtleties of electrical installation
Installation must be carried out on brackets through the wall or straight through the roof.
When deciding on the installation method, the following points must be taken into account:
- dimensions of the building - if small, then it is logical to make an external structure;
- the premises are old or being built from scratch.
Necessary elements included in the chimney kit.
The boiler adapter is the starting pipe component of the future chimney. It is necessary for condensate assembly, as it reorients the turn during installation.
The gate blocks the flow of flue gases if necessary, representing a valve with holes to prevent combustion.
The start sandwich is an intermediate element in the transition from single-wall to double-wall construction.
A ceiling-passage assembly (CPU) with mineralite is a mandatory element when maintaining fire safety at the point of passage through roof and ceiling slabs. PPU contains fireproof insulation material, an air layer and an area for placing an additional layer of thermal insulation.
The groove on the roof insulates the chimney from rain and snow. The increased rigidity of Ferrum structures will protect during snow melting, preventing leaks.
Clamps are used to fix the chimney relative to the installation plane. Steel fasteners are needed to position the system so that it does not rest on the stove or fireplace.
The standard set of modular stainless steel chimney system consists of:
- Adapter.
- Single wall pipe.
- Rotary gate.
- Start sandwich.
- Sandwich pipes (3-4 pcs.).
- Clamps of different lengths.
- Heading. Protects the insulation in the sandwich from precipitation.
- Tee sandwich. Serves to change the direction of movement of flue gases.
What is a master flush?
Thanks to such a device, the chimney roof gains elasticity; the master flush is designed to design transitions to the roof. Master flash is produced in the most common configurations and formats; in addition, different sizes and shapes are possible. Today, manufacturers are ready to offer rubber seals for roofs made of tiles, corrugated sheets, slate, and the like. Such systems have come, so to speak, to replace the classic “aprons”; they are often made of special rubber labeled EPDM or silicone. The cuff allows for a hermetically sealed connection to the pipe, excluding the penetration of even dust.
The design also has a flange, a device that serves as a base and is also made of rubber. Along the perimeter, for reliable fastening, the base has an aluminum or galvanized tape, which allows not only to create the necessary relief identical to the roof, but also to install the “apron” tightly and, most importantly, hermetically.
Advantages and disadvantages
The chimney roof seal has the following characteristics:
- It is elastic, which allows you to create shapes identical to the overlap and make a hermetically sealed joint.
- Withstands flash and temperature changes over a fairly wide range.
- Inert, that is, they have a high degree of resistance to oxidation.
- Extremely low porosity of the surface and structure, resulting in amazing tightness.
- Fire resistance.
- It is possible, even after exposure to temperature, to take the same shape and configuration.
- Wear resistance within 30 years.
- No special tools are required for installation.
- There are no contraindications due to weather conditions during installation.
Flash master for a chimney - step-by-step instructions
When building a house, one of the last steps is to install a chimney for the stove. Everything seems to be going well, but then it turns out that on the roof, where the pipe goes outside, there is a small space between the edges of the roof cutout and the pipe itself, through which water can get inside. This space needs to be sealed somehow.
Previously, bitumen lubricants, cement mortars, etc. were used for this purpose, but all this over time negatively affected the pipe and the place where it rises to the surface. Later, a new device was invented, which was superior to its predecessors in many respects. It was the master flash (another name is kryza) for the chimney.
What it is
This device is a base in the shape of a square or circle, in the center of which rings rise, one after another. Moreover, each overlying ring is smaller in diameter than the previous one. In general, the material resembles a cone.
The base can be made of silicone or special rubber. Silicone can withstand high temperatures, approximately 350 degrees. But the melting of ordinary rubber begins at a temperature of 180 degrees. Therefore, in terms of heat resistance, silicone prevails over rubber. But, if you look at the ability to withstand ultraviolet exposure to sunlight, then rubber has an advantage. It does not collapse or deform under the influence of ultraviolet rays, unlike silicone.
But in the case of silicone, this problem can be solved, since there are special devices that will protect master flash from the harmful effects of ultraviolet radiation. The base of the master flush may also include aluminum. This metal gives it strength and promotes uniform pressure distribution.
What is Master Flash?
Master Flash is a kind of sealing cuff with high elasticity. They are used to seal the intersection of pipes and roofs. Different materials are used for manufacturing.
It should be noted that this device is not used as a seal for chimneys without insulation.
The main advantages of Master Flush:
- Tight fit to the pipe walls due to its elasticity.
- Withstands temperature changes.
- Corrosion is not a problem.
- High sealing due to low porosity.
- Returns to its shape after expansion from high temperature.
- High fire resistance.
- Long warranty.
- Installation without special tools.
- Can be installed in any weather conditions.
The main advantage is the reduction in material consumption in this process. No additional waterproofing required.
Roof seals have become a replacement for pipe aprons. They are similar in design to their predecessors, but have some differences:
- Made of rubber, often silicone, in the form of a tapering cone with a flexible cuff. It ensures a tight connection of the pipe to the roof. In addition, it protects against moisture and dust. The top of the cone follows the shape of the pipe. Connects to the seal at the bottom.
- Flange - base. Made from various materials. Rubberized or silicone base for installation on a roof with massive ribs, has aluminum strips. It allows the flange to take the shape of the profile.
We suggest you read: How to install a pump on a pool
The insulation cuffs for a flat roof are located at a slight angle. An element in the form of a cone with corrugations, which forms the contours of oval holes with gradation in diameter. That is, you can change the angle by tilting at certain intervals. Sometimes it happens that the axis is perpendicular to the base, then the sealant is used for a flat roof.
How to install?
Flexible seals were able to outperform their outdated counterparts in many respects. They are able to withstand different temperature ranges, practically do not need to be repaired, and have a long service life. They are unpretentious in installation. You do not need to have any special skills to install. The upper part of the seal is cut off so that a narrow hole is formed.
The method of fixing the flange depends on the roof material:
- Silicone glue or bitumen mastic is used for a flat surface with a roll coating.
- If there is a slope, then the entrance is provided with self-tapping screws.
After installation, the lower part of the flange and the cut of the cone are lubricated with silicone sealant to ensure greater reliability. Sometimes a clamp is used for the top edge. Despite the strength of the fixation, the master flash will be movable. For example, if thermal expansion occurs, the master flash will not lose its tightness. Also, the cuff will behave if shrinkage occurs at home.
What is it needed for
The place on the roof where the chimney goes outside must meet the following requirements:
- The space between the edges of the hole and the pipe must be sealed tightly. Otherwise, water will start flowing there.
- Corrosion resistance
- Resistance to low and high temperatures.
- Flexibility.
It is attached with its base to the surface of the roof, and with its rings it envelops some part of the pipe, as a result of which the space between the edges of the hole and the wall of the pipe is hermetically sealed.
Advantages and disadvantages
Master Flush has a number of advantages:
- Ease of installation. Indeed, you don’t need to have professional knowledge here; you can install this device yourself.
- Affordable price.
- Durability and resistance to high temperatures. Master Flash is made of elastic materials, which gives it strength. In addition, it was said that silicone samples can withstand temperatures up to 300 degrees.
- Tightness. The cone of the roof tightly wraps around the chimney, closing the hole hermetically.
- Flexibility. Thanks to this quality, the canopy can be mounted on any type of roof (pitched, straight, etc.), regardless of the type of roofing material (tiles, metal tiles, corrugated sheets, slate, etc.).
How to install a master flush for a chimney with your own hands. Step-by-step instruction
So, before you begin installation, you need to purchase the following things:
- Self-tapping screws (5-6 pieces).
- Devices for tightening screws.
- Sealant.
- Master flush.
- Scissors.
If all these materials and tools are available, you can get to work. To do this, you can follow the following algorithm of actions:
- The upper part of the master flush cone should be cut so that the diameter of the lumen is 20% smaller than the diameter of the chimney pipe. This is done so that the roof fits tightly around the chimney.
- You need to take a master flush and thread it onto the upper end of the pipe.
- Now you need to carefully and carefully move it along the pipe down to the surface of the roof.
- Then, using sealant, attach the underside of the master flush base to the roof surface.
- After this, as additional reinforcement, you can use self-tapping screws to secure the base to the surface.
That's all! The gap between the edges of the hole and the pipe wall is hermetically sealed.
How to install a chimney correctly - choose the type of outlet
There are two options for the passage of the chimney:
- Through the wall. The advantages of this solution are improved fire safety, minimization of smoke, the ability to simply increase draft depending on the height of the pipe, as well as installation in a finished building. But there are also disadvantages: more complex and expensive installation.
- Through the roof. The advantages of this solution are high structural stability and the absence of overcooling of flue gases. But at the same time, the probability of “missing” the occurrence of a fire is higher, since smoke occurs in the ceilings that are located in the attic and on the roof, and they are simply not visible until the fire appears.
It should not be forgotten that fulfilling all these requirements is a guarantee of the safety of your health and property. Therefore, it is worth approaching this problem as seriously as possible. And first thoroughly study how to install a chimney correctly and only then start working.
Peculiarities
During installation, some nuances and problem cases may arise, which will be discussed below:
- Master flush can be installed both on a pitched roof and on a flat one. If the roof is flat, then you can use a roof in which the axis of the cone is located perpendicular to the plane of the base. And if the roof is pitched, then it is recommended to use those options in which the axis of the cone is located at a certain angle of inclination to the plane of the base.
- If the roof has an intermittent structure, that is, it has many overlaps, then the upper part of the master flush base must be laid under the nearest sheet, and the lower part must be reinforced with self-tapping screws . This will ensure that water, flowing from top to bottom, will not touch the seams of the foundation fastenings to the roof surface.
- If the roof is laid from corrugated sheets or slate, then it has rows along which water flows down. In this case, it is not recommended to tighten the screws for fastening the master flush in the rows of the roof along which water flows.
- As already mentioned, Master Flash, which is based on silicone, is susceptible to the harmful effects of ultraviolet rays. But this problem can be avoided. To do this, a special shape is made from galvanized steel, in the form of a “bowl without a bottom.” It is then placed over the master flash to protect against ultraviolet rays. In this case, it is necessary to select the diameter so that it does not dangle from the wind.
- When installing a master flash on a roof ridge, the upper part should be installed under the ridge masonry.
- It is not recommended to screw too many screws onto the base.
- Sometimes the pipe heats up to 600-650 degrees, in which case the master flush will simply begin to melt. To avoid this, you need to wrap this section of the pipe with bitumen, then put a metal sleeve made of galvanized steel on top of it. Master flash is selected according to the size of the sleeve. In this case, you can also use the so-called “sandwich pipes”. To do this, the chimney must be multi-layered, as a result of which the outer layers heat up less.
What is the best way to seal a pipe on a roof made of corrugated sheets, what material and method to choose
— Master flush for a pipe of the appropriate diameter.
When choosing, also focus on the temperature of the exhaust gases, since the choice of material from which the roof is made depends on it. — A plate used to protect the wing from sunlight. It can be purchased at building materials stores or made with your own hands. It looks like an ordinary plate without a bottom.
— Screwdriver, self-tapping screws, metal scissors and heat-resistant silicone sealant
To choose the right penetration, it is not enough just to know the dimensions of the chimney. Master flash on sloping roofs made of polyprofile, roofing steel without relief, flat tiles, with an angle from 10 to 45º, a roof with a base in the form of a circle or square is selected. For the same roofing materials and a slope of 45-60º, a device with a reinforced flange is selected.
In case of a slope of more than 60º, you need to select a seal with an enlarged flange. On flat roofs, perpendicular cuffs will be required. For tiled and slate roofs, penetrations with enlarged flanges are selected. Also, depending on the slope of the roof, choose a corner or straight roof. For some types of chimneys it is impossible to use a standard type of penetration.
This may be due, for example, to the fact that the pipe has a square cross-section (wall size up to 15 cm). In this case, a special hood with a clasp is used. Such devices are also used to repair existing insulation. For larger square pipes, a rubber or silicone strip with an aluminum base is used.
In order to decide on the material from which the master flash is made, start from the temperature to which the chimney heats up. In the case of a gas hood, the heating of which does not reach very high temperatures, you can choose a rubber device. A silicone sealant is suitable for a stove chimney.
So, before you begin installation, you need to purchase the following things:
- Self-tapping screws (5-6 pieces).
- Devices for tightening screws.
- Sealant.
- Master flush.
- Scissors.
If all these materials and tools are available, you can get to work. To do this, you can follow the following algorithm of actions:
- The upper part of the master flush cone should be cut so that the diameter of the lumen is 20% smaller than the diameter of the chimney pipe. This is done so that the roof fits tightly around the chimney.
- You need to take a master flush and thread it onto the upper end of the pipe.
- Now you need to carefully and carefully move it along the pipe down to the surface of the roof.
- Then, using sealant, attach the underside of the master flush base to the roof surface.
- After this, as additional reinforcement, you can use self-tapping screws to secure the base to the surface.
That's all! The gap between the edges of the hole and the pipe wall is hermetically sealed.
During installation, some nuances and problem cases may arise, which will be discussed below:
- Master flush can be installed both on a pitched roof and on a flat one. If the roof is flat, then you can use a roof in which the axis of the cone is located perpendicular to the plane of the base. And if the roof is pitched, then it is recommended to use those options in which the axis of the cone is located at a certain angle of inclination to the plane of the base.
- If the roof has an intermittent structure, that is, it has many overlaps, then the upper part of the master flush base must be laid under the nearest sheet, and the lower part must be reinforced with self-tapping screws. This will ensure that water, flowing from top to bottom, will not touch the seams of the foundation fastenings to the roof surface.
- If the roof is laid from corrugated sheets or slate, then it has rows along which water flows down. In this case, it is not recommended to tighten the screws for fastening the master flush in the rows of the roof along which water flows.
- As already mentioned, Master Flash, which is based on silicone, is susceptible to the harmful effects of ultraviolet rays. But this problem can be avoided. To do this, a special shape is made from galvanized steel, in the form of a “bowl without a bottom.” It is then placed over the master flash to protect against ultraviolet rays. In this case, it is necessary to select the diameter so that it does not dangle from the wind.
- When installing a master flash on a roof ridge, the upper part should be installed under the ridge masonry.
- It is not recommended to screw too many screws onto the base.
- Sometimes the pipe heats up to 600-650 degrees, in which case the master flush will simply begin to melt. To avoid this, you need to wrap this section of the pipe with bitumen, then put a metal sleeve made of galvanized steel on top of it. Master flash is selected according to the size of the sleeve. In this case, you can also use the so-called “sandwich pipes”. To do this, the chimney must be multi-layered, as a result of which the outer layers heat up less.
This will be the first row of sheathing for attaching the chimney lining.
The lathing for the cladding was made from the same bars. The bars are carefully screwed to expanded clay concrete structures using ordinary self-tapping screws.
The chimney lining is made of metal profiles in the color of the roof. Here, two cut out side walls are sunbathing on the grass.
The cladding is attached to the wooden sheathing with roofing screws with hexagonal heads, also painted in the color of the roof.
The corners between the metal profiles are closed with special metal corner slats. In place of the ventilation openings, metal grilles-blinds are installed to prevent precipitation and insects from getting inside. Here you can also see that the chimney lining does not reach the roof a little. The gap is again left in case of any movement of the log house - during shrinkage this gap will increase, but during caulking the log house may rise a little.
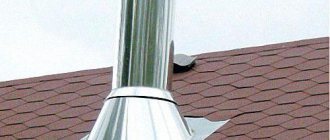
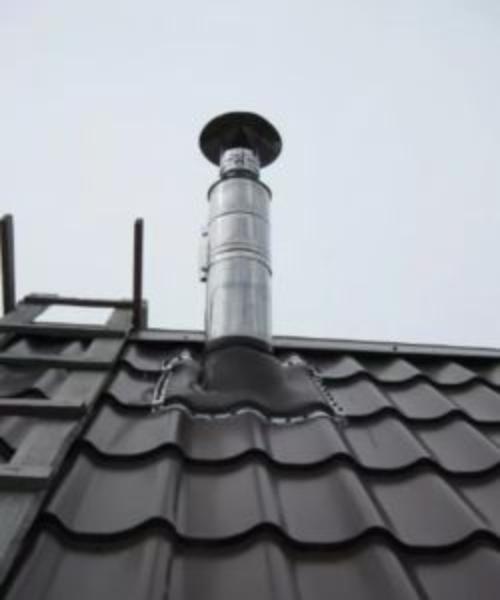
And now, our chimney is completely ready. From a distance it looks very good.
A special cone from the kit is additionally installed at the mouth of the chimney above the cover plate. We do not provide any protection from rain. As the craftsmen who installed the chimney explained to us, all these “umbrellas” only interfere with the ceramic chimney. If soot accumulated on the walls of the chimney ignites, the “umbrella” will prevent the flame from escaping outside and the fire may enter the room.
We suggest you familiarize yourself with how isospan is applied to the roof
No protection from rain is needed either. If precipitation gets inside the chimney, it will simply go into the drainage. Water cannot get into our fireplace, because... The outlet from the chimney to the fireplace is made at an angle of 90 degrees.
At the point where the chimney exits onto the roof, a gap forms between them, which, if not eliminated, will lead to moisture getting under the roof. The size of such a gap can be 3-5 cm. Traditionally, bitumen, cement or various sealants were used to eliminate it. However, such protection is short-lived and not reliable enough. To eliminate all these shortcomings, a master flush for the chimney is used. Another name for this device is rat or otter.
When building stoves for houses and baths, a hole was left in the roof for laying a chimney. Years ago, only experienced roofers could properly fill these holes. To seal roof breaks, roofing felt, asbestos, and tin were used, and the joints were filled with bitumen or cement. At the present stage of construction, it is customary to use Master Flash. It is also called otter or kryza.
Roof seals are replacing pipe flashings that have been used for several decades. In design, these two products are little different, but modern devices consist of two main parts:
- Flexible cuff. It looks like a truncated rubber or silicone cone with markings. The cuff provides a tight seal between the pipe and the roof, preventing moisture and dust from penetrating inside. After installation, the upper part of the cone tightly closes the sandwich chimney. The lower part of the system is connected to the flange.
- Flange. It looks like a round or square skirt. The raw materials for its production are rubber, silicone, lead, aluminum or galvanized sheet. When installed on a roof with large embossed corrugations, the silicone or rubber base is equipped with aluminum strips around the perimeter. This allows the flange to fit as tightly as possible to the surface.
On pitched roofs, the seal cuffs are placed at an angle to the base. Corrugations increase the accuracy of pipe cutting. This allows you to change the angle of inclination of the seal according to the manufacturer’s parameters.
Before starting installation work, you should prepare all the necessary materials. To fasten the structure you will need about six self-tapping screws, a screwdriver or screwdriver, sealant, and special scissors. After preliminary preparation, you can begin installation.
If you carry out the work yourself, you should study the installation instructions and follow all instructions. The algorithm of actions is simple and does not present much difficulty:
- The upper part of the device cone is cut so that the diameter of the lumen is 20% less than the cross-section of the chimney pipe. In this case, the roof will fit tightly to the chimney.
- Excess rubber or silicone is cut off as evenly as possible with special scissors.
- At the next stage of work, the Master Flash is put on the upper end of the pipe.
- Then it is slowly advanced, directing it down to the roofing surface. To improve sliding, it is recommended to moisten the pipe.
- The lower base is attached to the roof surface with sealant.
- For reliability, the structure is secured with self-tapping screws.
- An elastic sealant is applied along the perimeter of the edge of the upper cut.
- to facilitate tensioning, it is better to cover the surface of the pipe and the ring of the product with a soap solution;
- If the hole is cut unsuccessfully, then do not rush to throw away the master flush. It may be possible to seal it tightly with a clamp;
- use only waterproof sealant;
- Don't screw in too many screws. The sealant will sooner or later begin to lose its insulating properties and water will begin to flow through many holes. Do not screw self-tapping screws into the recesses of the coating through which water flows;
- When installing the roof on a chimney ridge, be sure to place its upper part under the ridge flashing, as shown below:
Estimated cost
The cost of a master flush depends on what material it is made of. If the base is silicone, then such materials are more expensive than those based on rubber.
Prices for silicone wings range from 1,500 rubles to 3,500 rubles per piece. The price depends on the diameter and the size of the material.
Prices for rubber roofs range on average from 255 rubles to 600 rubles per month.
That's all! As you can see, master flush is an inexpensive material. It should be remembered that if everything is done in accordance with the rules, the gap will be closed hermetically, which will further prevent water from entering under the roof.
Also, when working at height, one should not forget about safety rules.
Installation of a chimney in ceilings for a house and bathhouse
Diameter
As a rule, manufacturers of heat-generating devices prescribe the recommended chimney diameter in their instructions. This parameter directly depends on the traction force. And it is already determined by height, the dependence is directly proportional. The main requirement: the diameter cannot be narrower than the diameter of the furnace pipe; this is prohibited.
Height
Calculation of the height of the chimney relative to the ridge is based on the requirements of SNiP 41-01-2003 and SP (building rules) 7.13130.2009, as well as on the recommendations of the heating device manufacturer.
If the roof has a flat structure, then the height above the roof is at least 50 cm. On pitched roofs, if the chimney is located at a distance from the ridge of up to 1.5 m, its height must be at least 50 cm relative to the last or enclosing parapet. If it is located within 1.5–3 meters, the height cannot be lower than the ridge or parapet.
Material
Today, consumers have many options when choosing a smoke exhaust system:
- classic version of pipes made of brick;
- ceramic analogues;
- modular chimneys made of stainless steel, which have become popular relatively recently, but have already established themselves as a simple and at the same time reliable device.
The main criteria are prescribed in fire safety standards. As mentioned above, the correct installation of the chimney (chimney) pipe is influenced by the diameter, height and type of assembly. A prerequisite is maintaining the distance from the walls and ceilings, the presence of a ceiling passage unit, and proper insulation of all joints.
The most fire-hazardous places in a bathhouse/house are passages through ceilings and walls. Below we will look at the passage options in more detail.