Repair and decoration
08/01/2018 Anastasia Prozheva
When arranging a bathroom, a hand-made tile shower is not uncommon. Such designs provide for stationary placement. To construct it, it is necessary to provide a concrete pallet.
When arranging and decorating it, it is important to consider the following:
- Water. Constant contact with water requires the use of waterproof materials. Therefore, tiles are the best option for decorating the surface and protecting concrete from destruction. It is advisable to choose waterproof glue and appropriate grout. A prerequisite is the installation of waterproofing. If you don't do this, you risk flooding your neighbors below.
- Safety. Tile flooring tends to become slippery when wet. Therefore, choose non-slip tiles. The second option is the use of silicone mats, special spraying and similar devices.
- Convenience. The sides of a stationary pallet must be of a suitable height. Invest in wall grab bars for added convenience. And most importantly, the booth should be spacious so that it is convenient to wash in it.
To make optimal use of the available space in a cramped bathroom, a tiled shower stall must meet several requirements:
- location;
- type of construction;
- pallet shape;
- dimensions of the sides;
- access to communications.
The first and last factors are closely related. It is advisable to locate the cabin in a place where there is an outlet for water pipes and sewerage. This way you can save on materials and maintain the aesthetic appearance of the room.
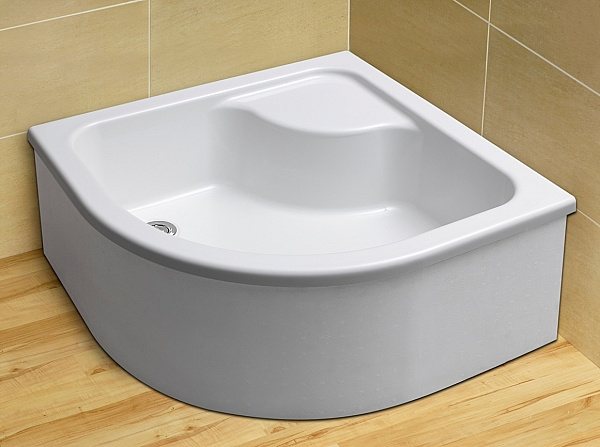
There are two types of shower trays: low for a standing shower and with high sides for a semi-sitting shower. Usually the first option is chosen, since the second requires the installation of an auxiliary metal frame.
Pallet types
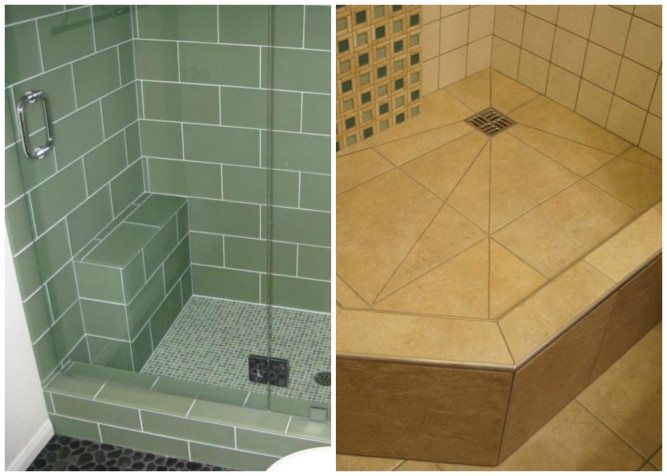
The optimal model is a built-in shower. Making it from tiles is a winning idea, but it’s better to place it in the corner of the room. So the walls will play the role of limiters on both sides, which will reduce construction costs.
Related article: DIY tire crafts. Options for making a craft from a tire
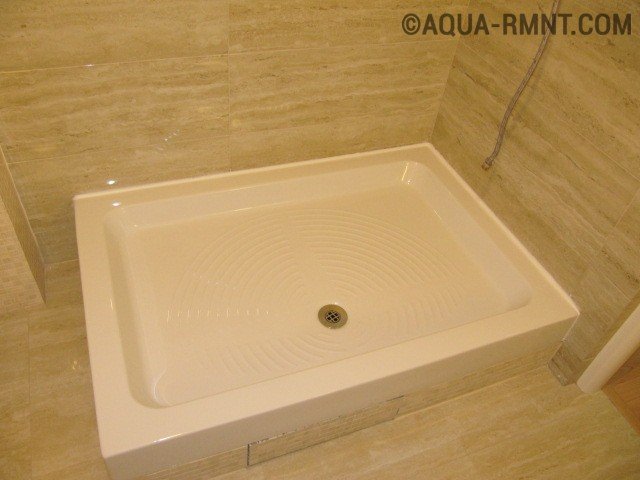
Rectangular steel shower tray installation technology
As mentioned above, one of the advantages of steel shower trays is its simple installation, which will be discussed further. To make the information easier to understand, we will present it in detail and point by point.

Basically, that's all. After the mounting foam or sealant has hardened, all that remains is to tidy up the parapet itself (if there is one, of course). Typically, the supporting brick is covered with tiles that match the walls of the room. When the finishing is completed, all that remains is to take care of the curtain, and the simple one will be ready.
As you can see, a steel shower tray is not a difficult device to install - everything is simply simple and understandable. And the lack of appearance that is usually attributed to it rather depends on the inept hands of the craftsman who lays out the pedestal and tiles it.
There are several types of shower bases. However, acrylic trays predominate in use. This device is characterized by its positive properties and also has durable qualities.
When arranging conditions for swimming, it is worth paying attention to the structure on which we will stand while taking water treatments. This should be the safest and most comfortable surface possible.
It is better to buy a unit with a tray made of acrylic. However, you shouldn't lose sight of other options. They will be useful for comparison. On sale are:
Cabin placement
To make a shower tray, correctly determine the contours of the structure. This takes into account the location of other objects in the room, for example, a washbasin, toilet (with a combined bathroom option) or a washing machine. Nothing should block the entrance to the booth.
For external fencing, erect a border. They do it in different ways. A popular method is casting concrete using formwork. In this way, a strong, durable and monolithic restriction is created, and of any shape: both straight and curly. You can use bricks or other block building materials bonded with cement mortar.
Related article: Photo wallpaper with cars on the wall
To prevent the spread of moisture, take care of waterproofing the floor and adjacent walls in advance. For this purpose, film flooring and bitumen coating are used. It is imperative to finish the surface of any type of structure with cement mixture. This will strengthen it, hide defects and provide protection from moisture.
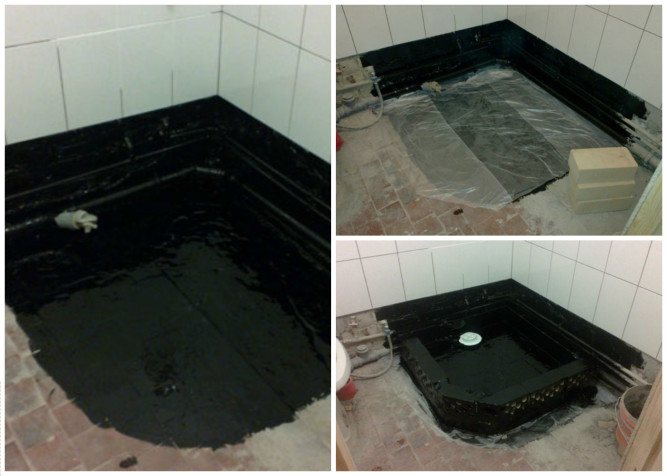
Waterproofing using film flooring and bitumen coating
Make sure you have a protective screen:
- curtain on a rod or thread;
- plastic partition;
- glass (triplex is best).
Such materials catch splashes of water, do not deteriorate when interacting with detergents, are not afraid of microclimate fluctuations, including temperature, and their appearance is quite aesthetic. Moreover, they are easy to care for.
Option 2 - installation of ceramic option
Sanitaryware has an attractive appearance; in addition, ceramic trays for shower cabins last a long time and do not cause problems with their care.
Pallets made of sanitary ware and sanitary porcelain are resistant to dirt and scratches, but can break if hit by a heavy object
A rigid tray made of ceramics and synthetic resins differs from acrylic in that it does not have free space under the structure, that is, it is simply installed on the floor of the bathroom (or bathhouse). This excludes work to strengthen it. But there is a slight difficulty with the access device to the drain pipe. This problem is solved as follows:
- The pan is positioned so that the drain hole is as close as possible to the connected drain pipe. The marker indicates the boundaries of the perimeter and the location of the drain.
- Using a jigsaw, cut out the part of the floor where the siphon will be located.
- Outside the structure, not far from the first cutout, a second section of the floor is cut out. This is necessary for laying a pipe and siphon under the floor and free access to communications. An inspection panel is made from a cut-out piece of flooring, equipping the edges of the cutout with slats.
- PVA composition, slightly diluted with water, is applied to the place where the pallet will stand. When it dries, another thin layer is added on top.
- Mount the siphon to the drain, then place the tray on the prepared solution, trying to maintain a strictly horizontal position.
- After the solution has dried (about a day), the siphon is connected to the pipe through the inspection panel.
The junctions of the pallet with the walls and floor are covered with an even strip of silicone sealant.
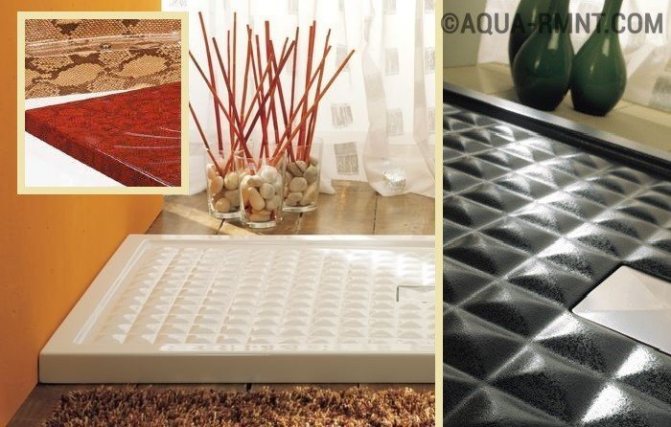
Ceramic pallets are varied in color and design style
Peculiarities
For a tiled shower tray, there are several requirements that relate to the materials used in the work. Let's look at them separately:
- Tile . It is best to choose non-slip ceramics for the floor. There are even tiles with a special relief.
- Glue . Use waterproof mixtures. They contain a polymer filler. Suitable solution for swimming pools.
- Grout . Buy special formulations. Suitable fugue with the addition of latex, epoxy mastic or liquid glass. As a last resort, tile adhesive is used.
- Primer . Increases adhesion and creates a protective film against moisture.
- Antiseptic. Treat surfaces before and after the main installation process.
- Sealant . To prevent leaks, treat joints with communications with silicone or acrylic.
Related article: Preparing the floor for tiles: instructions, materials and tools
If done correctly, you will end up with a durable shower with a unique design.
We recommend watching the video:
The best posts
- How to make a plasterboard ceiling in the kitchen with your own hands
- Painting drywall - step-by-step instructions
- How to join drywall in corners and the process of building a decorative niche
- Sealing drywall joints - recommendations from professionals
- Epoxy resin, application
- How to seal a doorway with plasterboard - installation diagram
- DIY plasterboard ceiling installation - video tutorials and installation instructions
- How and how to glue a foam plastic ceiling plinth
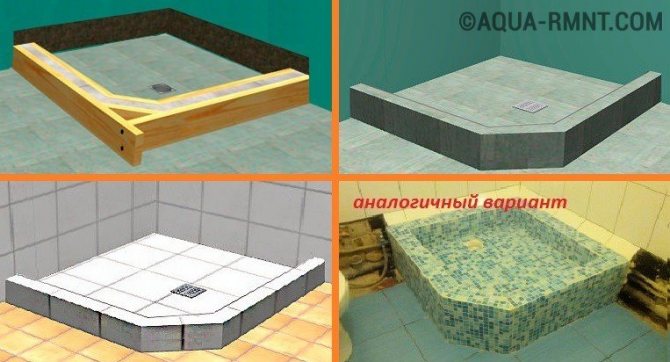
Option 3 - making your own pallet
An inexpensive shower tray for your home or bathhouse is suitable for those who want to save money or people who prefer original designs. Self-installation of a shower tray gives you the opportunity to choose any design shape, color and cladding material.
The base is prepared from concrete screed (or plastered bricks) lined with ceramic tiles. As the walls of the shower stall, special translucent panels are used, which can be bought ready-made, or ordinary shower curtains.
You need to start by laying the drain pipe and installing the drain neck. It is better to take plastic products: they are easy to install and last a long time.
Installation of enclosing sides. They are necessary to prevent water from spreading throughout the room.
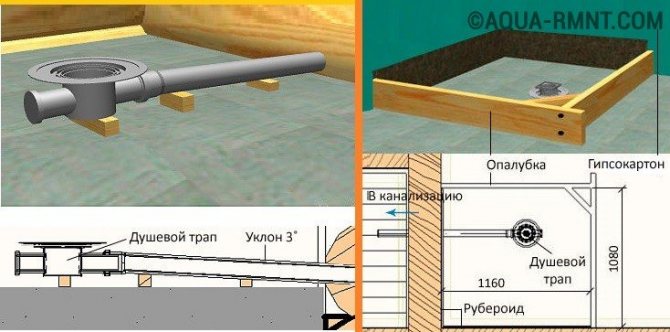
The sides can be either concrete poured with formwork, or brickwork, plastered several times. In any case, the resulting structure will need to be faced with ceramic tiles
- Concrete screed inside the pallet.
Are you planning to purchase an expensive shower cabin for your dacha? Take your time - there may always be a cheaper option! The low cost of a product does not mean its poor quality; more can be said - almost always it is just a simplified and minimized design. In this article, together with the website, we will study a steel shower tray, which will help you build a primitive, but quite nice shower stall.
Rectangular shower tray
Important Tips
Before you start installing the shower tray, you must first carefully read the instructions and make sure that the specified components are available. When the model has a base located slightly above the floor level, it is necessary to build an additional step to make it easy to climb.
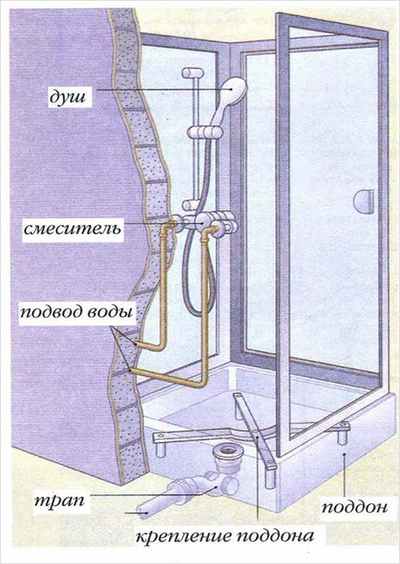
Installation diagram of a shower tray with a wall-mounted mixer.
When performing installation, a lot of attention needs to be paid to the correct alignment of the base level relative to the sewer drain pipe. If this condition is violated, a breakdown of the wastewater regime will occur. In addition, a poorly aligned base will disrupt the overall balance of the structure, leading to rapid failure.
Of course, you can pick up a ready-made accessory in the store and install it in accordance with the instructions. However, you can make this element yourself and give it the shape and dimensions that you consider the most optimal. For such work, it is necessary to first lay a waterproofing layer under the shower unit.
First, the location of the structure in which it is installed in an unsecured form is determined. The installation height should be 20 cm above the floor. When all calculations have been made and all parameters correspond to the system, the pan is attached to the floor and connected to the main sewer.
To prevent damage to the drain when the structure is being built, it must be covered with a steel pipe of the appropriate size. The pipe must be secured to the floor. The entire area of the pallet is completely covered with bricks; the resulting area will act as a base. Then the screed is poured, which is located below the drain point, approximately 7 cm. This is necessary for further pouring the mixture in order to level it and lay out the future pallet with ceramic tiles.
When installing the pan, you must remember that it must have a slight slope directed towards the drain. It is advisable to make such a slope with bricks immediately when laying out the base; it can also be done during finishing using concrete mortar.
What criteria are used to determine the cost of a pallet?
The price of an acrylic shower tray is influenced by several factors.
- Quality
. The material must be free from defects, that is, free from manufacturing defects and mechanical damage due to its transportation. For example, a cast iron shower tray remains durable, but takes a very long time to heat up. - Manufacturer
. As a rule, the more famous the manufacturer's brand, the more expensive the device is. - Model
. The cost of cabin bottom options varies depending on the design and attractiveness of the device. The ceramic option will cost more than the acrylic one. - Material
. During the manufacture of bottoms, they resort to the use of additional raw materials. This may include reinforcement, sealants, and various types of sealants. Not to mention the fact that completely different materials are used to achieve the desired result. For example, ceramic shower trays will be heavier in weight, therefore, it will be difficult to handle the installation yourself.
In this case, the consumer is required to pay attention when purchasing. Only the correct choice of bottom will protect against counterfeiting
Modern homes have fairly large bathrooms, but many have a bathroom that only takes up a few square meters. For this reason, people try to install a shower stall in order to free up at least a little space for other things. We will help you cope with this work, consider the options for shower trays and the main points of their installation.