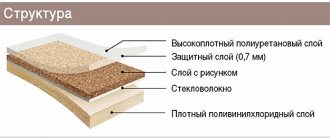
Techniques for controlling household electrical appliances should be understandable to any family member. Not every person understands the effects of electric current, but everyone knows how to turn on the lights or TV. Control of electric floor heating systems is designed to create a comfortable temperature during various periods of activity of the residents of the house, and to guarantee the safety of the structure.

Thermostat for heated floors "Teplolux" TP 520, operating instructions
The device is equipped with:
- thermostat with built-in air sensor;
- remote floor temperature sensor;
- a strip with terminals for outputting ground wires;
- instructions for the Teplolux thermostat.
Installation work on the thermostat and temperature sensor can be done independently if you have the appropriate skills. Otherwise, you need to contact specialists. Do not forget that the power of an electric heated floor can reach 6 kW. Even a small deviation from the rules for installing electrical equipment can lead to irreparable consequences.
Review of Devi thermostats for heated floors
Thermostats that control heated floors operate mainly on one principle: they are triggered to turn the heating cable on and off by a temperature sensor.
The response algorithm for turning on a heated floor for all regulators is as follows: the sensor, sensing a decrease in the temperature on the floor, changes its resistance, and when the floor temperature drops below the set value, the thermostat closes the contacts of the switching relay and begins to supply 220V power to the heating cable of the heated floor, and this heating The cable, accordingly, heats up, and along with it the floor structure heats up.
The floor temperature sensor, under the influence of heating, begins to change its resistance in the opposite direction, and when the temperature value set in the regulator is reached (i.e., when the floor is heated to the temperature you specified in the regulator), it sends a command to turn off the relay. The warm floor begins to cool down.
Thermostat "Teplolux" tp 520, installation instructions
This model of thermostat allows its installation both in a socket niche inside a wall and on top of a wall in a protective box.
The device is connected to the working network through a machine equipped with a residual current device. The wires of the heating sections and the floor temperature sensor are connected to the terminals of the device using screws. The leads from the protective braiding of the heating cables are connected to the grounding bus through an external terminal block.
The thermostat model 520 is democratic and can work with floor sensors from other manufacturers, the main thing is that its resistance corresponds to the parameters of the original one - 6.8 kOhm. An external temperature sensor is connected to the corresponding terminals of the regulator without determining the polarity.
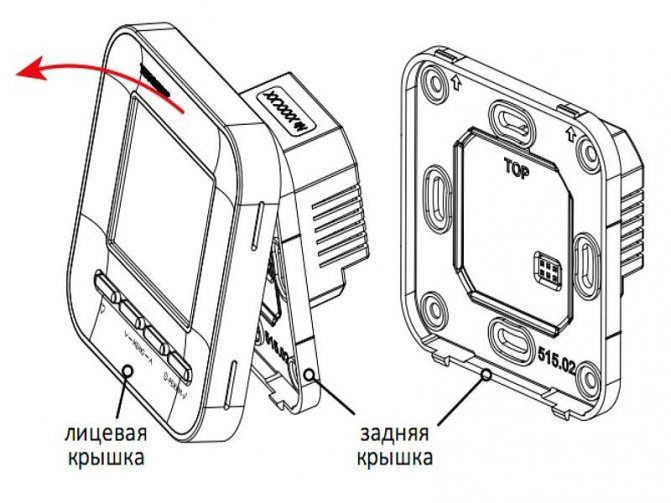
After installation of the heated floor is completed, its performance is checked using the Teplolux thermostat. The operating instructions for the device describe in detail the options for setting certain parameters of the heater. The front panel of the device contains four main buttons and a liquid crystal screen that displays the current state of the heating system.
Electric underfloor heating how to connect
How to connect a heated floor to electricity
Today, the variety of heated floors can confuse anyone. To begin with, there is a need to understand the various types and types of such floors.
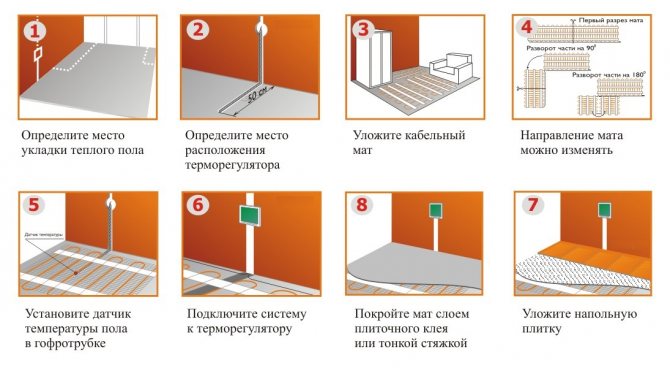
Diagram of the sequence of work when connecting heated floors.
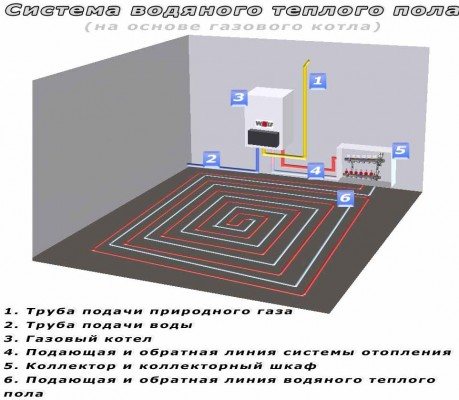
Types and types of heated floors There are the following types of heated floors: water and electric. In water-based floors, hot water (from a boiler or central heating) serves as a heat conductor. And hence, electric floors use electricity instead of water. Electric floors are currently divided into the following types: cable systems or heating sections, heating mats and film or infrared floors. Each type and type of flooring has its own pros and cons. Before purchasing flooring, you should definitely consult with the seller, who will help you choose the best option for a particular room.
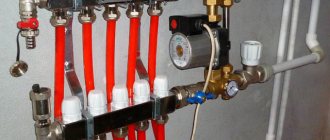
Thermostat connection diagram.
Of course, the main component of a warm floor is the heating element, but its heart is in the thermostat.
The floor is connected to electricity through a thermostat.
They are divided into several types: from mechanical to intelligent devices that control the temperature of the air and the floor itself.
Installation and installation of an electric heated floor Installing an electric floor is quite simple; it will not cause any particular difficulties for a person who can hammer a nail in with his own hands.
Such floors are laid either under the screed or directly on it (this depends on the technical characteristics of the heated floor). Particularly difficult is connecting such a floor to electricity.
How to connect an electric heated floor to the network
Scheme of installation and connection of heated floors.
This floor is connected to the network through a thermostat. Of course, it is better to entrust this to an electrician, but if you have confidence in your own abilities, you can do it yourself. In some models, a schematic representation of the connection of the floor to the thermostat is indicated on the body of the same device. Connecting the temperature controller to the electrical network can be either direct, from the electrical panel, or through a regular outlet.
It should be noted that it is necessary to provide a separate circuit breaker for direct connection through the electrical panel. It will allow you to disconnect or connect the temperature controller, and also serves as protection during power surges in the network. If you plan to connect the regulator to a regular outlet, you should take into account all electrical appliances that will be connected to this outlet.
The most popular temperature controllers are mechanical and electronic thermostats. However, the principle of their connection is similar to more complex models. As a rule, the kit includes a temperature sensor, terminals, mounting box and installation and operating instructions.
Any type of thermostat is suitable for all types of electric heated floors. There is only one condition: the maximum current that the floor consumes must correspond to the maximum current that the thermostat passes through itself. Installing a thermostat will not take much time. You should make a recess in the selected location and connect the wires of the network, temperature sensor and the heated floor itself to it.
The heating element wires are color coded. So, the white (brown or black) wire is a phase, denoted L in the diagrams; blue wire - zero, in diagram N; yellow or green - earth. But the wires coming from the network are not always marked. In order to determine the phase and zero in the network wires, it is enough to use an indicator screwdriver.
When its metal tip touches the phase, the light on the screwdriver lights up. To connect the floor to electricity, you should follow these steps in the following order.
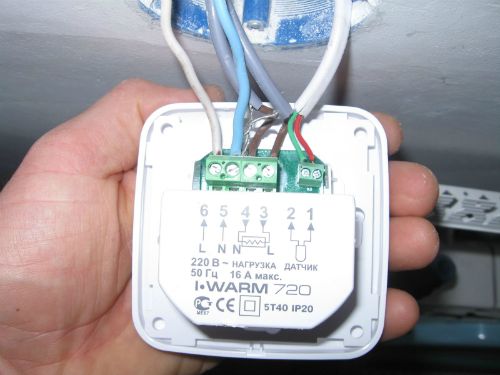
- Connect the mains wires (220 W) to temperature controller contacts 1 and 2. The “socket” markings are usually indicated on the side cover of the thermostat. It is very important to maintain the correct polarity: phase (L) is connected to “socket” 1, and zero (N) should be connected to pin 2.
- Connect the heating element wires to “sockets” 3 and 4, where zero (N) is connected to pin 3, and phase (L) is connected to pin 4.
- Connecting the temperature sensor. Usually it is connected to “sockets” 5 and 6 and polarity is not necessary here.
- Checking the correct connection of the temperature controller. To do this, turn on the device and set the minimum heating temperature, then increase the temperature to the maximum. The correct connection will be indicated by a click of a closed circuit.
- A hammer drill with a pobedite bit (for drilling a hole for a thermostat).
- Strobe (for drilling holes in the wall for wires).
- Thermostat (included with it are a temperature sensor, terminals, mounting box, as well as installation and operating instructions).
- An indicator screwdriver or other device for determining the polarity of network wires.
- Screws for attaching the thermostat to the wall (if they are not included in the kit).
- Finishing materials or cable ducts for masking wires.
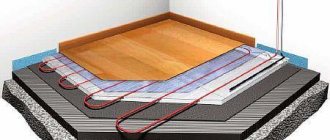
- Level the rough coating and eliminate defects in the form of cracks.
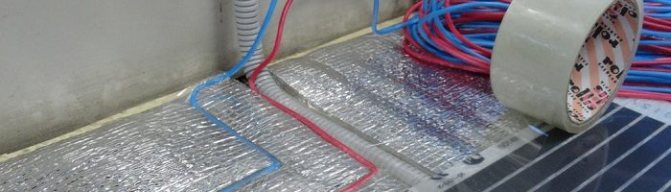
- Lay the thermal insulation with the foil surface facing the ceiling.
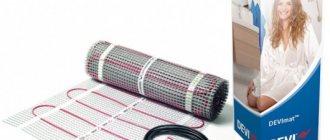
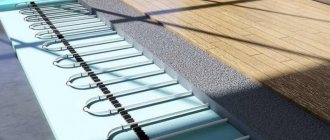
- Lay the underfloor heating system itself - cable, heating mats or infrared film.
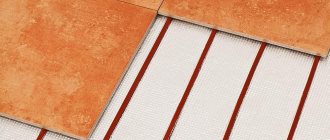
- Secure the cable with a tie, the thermal mats with an adhesive base . and you can immediately apply the finishing coating to the film.
- Mechanical type.
- Software type.
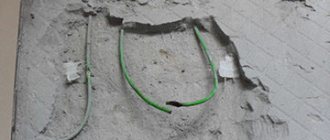
- In the location chosen for the device on the wall, you need to make a hole and draw a recess from it down to the floor.
- Then connect the underfloor heating cables, network wires and the thermostat itself to it.
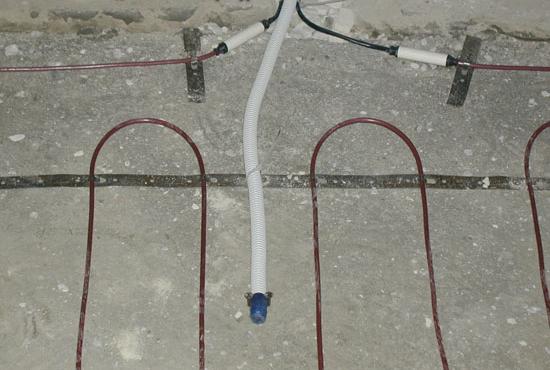
- It is recommended to use a corrugated tube with a plug for laying all wires.
- After the device is installed, grounding, phase and neutral must be connected to it.
- The temperature sensor of the heating system must be “packed” into a corrugated tube and placed in a groove prepared in the wall.
- Connect the wire from the sensor to the thermostat . and fix it itself between the turns of the floor heating element.
- The last stage is checking the entire system using a tester and comparing the indicators with the data . declared by the manufacturer in the instructions.
- The location where the thermostat will be installed is determined.
- The mats are laid according to a pre-drawn diagram. The convenience of this type of heated floor is that the mats can be cut and laid as required by the shape and area of the room.
- The temperature sensor must be placed in a corrugated tube and secured to the floor between the turns of the system, and the cable from it must be connected to the thermostat according to the diagram.
- To make work easier, it is recommended to install a junction box . and mark each wire if the manufacturer did not do so.
- In the box, the wires are connected in accordance with phase to phase . zero to zero using soldering so that there are two of them. These 2 wires are connected to the thermostat.
- Each heat-conducting strip on one side of the film must be insulated, and a power wire must be connected to the other. To connect everything correctly, the sheets are laid parallel to each other.
- The thermostat and its strobe are made in the same way as described in previous systems . and the temperature sensor is placed in a corrugated tube, fixed on the floor and connected to the thermostat.
- Maintaining the set temperature in automatic mode;
- Heating the floor at certain time intervals;
- Energy saving;
- Maintaining a comfortable temperature around the clock.
Depending on the type of thermostat, its connection diagram may be different. To avoid mistakes, you should connect the thermostat according to the diagram indicated on its body. Minor changes are made to the connection process and the type of electric floor.
Connecting cable systems (heating sections and heating mats)
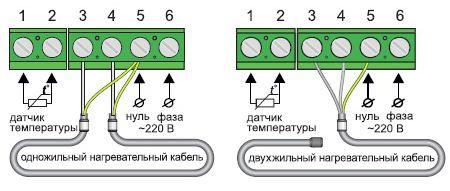
Heating sections and mats can consist of two-core or single-core cables, which dictates its own characteristics in connecting a heated floor.
A two-core cable has three wires: ground (yellow-green), phase (white or brown) and neutral (blue). It is connected to the thermostat according to the basic connection diagram with the difference that the “ground” should be connected to “socket” 2, to which the zero from the power supply is connected.
A single-core cable includes one current-carrying wire (usually white insulation), the second wire is grounding. The current-carrying wires of both ends of the single-core cable are connected to “sockets” 3 and 4, and both ends of the ground wire should be connected to “socket” 2 (zero (N) of the power supply).
Connecting an infrared or film electric heated floor
Infrared floor connection diagram.
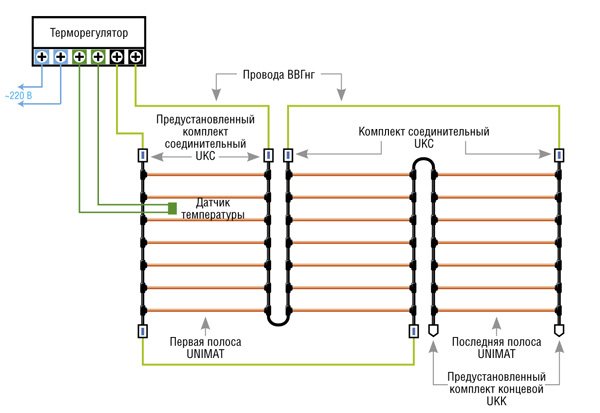
Film underfloor heating systems have several sections or strips of film and two wires come out of each section. The more such sections, the more wires will have to be connected to the thermostat.
To avoid this, it is recommended to use a junction box, which will allow you to connect only two wires to the thermostat and easily check the functionality of the heated floor without dismantling the floor covering.
Experts recommend numbering the wires, which will reduce the time required to check the functionality of the entire installation and its individual elements. In the junction box, the wires coming from the floor should be connected in parallel (phases to phases, and zeros to zeros) by soldering or twisting.
And only two wires come out of the junction box, which are connected to the thermostat according to the main circuit.
So, what tools and materials will you need to connect flooring systems to electricity:
Safety precautions No work should begin without studying safety precautions. When connecting the floor to the electrical network, you need to follow only one rule: be sure to turn off the power to the apartment or house where the installation is being carried out in order to avoid electric shock.
Preparation, installation and connection of electric heated floors
Connecting an electric heated floor practically comes down to connecting it to electricity and a thermostat.
It must be said that these operations are so simple that you can safely perform them yourself, although, as in any other matter, there are some secrets.
For a warm floor to be truly effective, it must first be correctly “assembled” and then connected.
How to connect an electric heated floor correctly?
At the stage when the heated floor has already been laid, it needs to be connected to the thermostat and checked for serviceability.
Installing a thermostat
The location for the thermostat must be chosen before installing the floor. since it is from him that the whole system begins. A thermostat is necessary to monitor the temperature in the room and maintain it at the required level, as well as to connect the entire circuit to the network.
For a thermostat with a built-in air temperature fixer, the optimal distance from the heated floor will be 1.5 m. When choosing a place for it, you need to make sure that the sun’s rays do not fall on it, otherwise its settings will show incorrect data.
The latter independently monitor both the floor and air temperatures, and if it becomes below the set temperature, then at the right time the system turns on and heats up.
Each thermostat has a connection diagram, and in some models it is shown directly on the body:
If the sensor does not come with a heated floor, then you need to choose one so that its maximum current coincides with that consumed by the floor.
Connecting the cable system
As a rule, it is better to entrust such work to professionals, but if you wish, you can connect the electric heated floor yourself:
After the warm cable floor has proven its performance, a screed is placed on it, and after it has completely dried, the underfloor heating can be turned on.
Read on our website about the technology and sequence of laying warm electric floors under:
And also find out in this article how to make an electric heated floor with your own hands.
Attaching thermal mats
The connection diagram for heating mats is quite simple:
The convenience of installing heating mats is that, having calculated in advance the power and usable area of the room, you can purchase a set with the appropriate power and step length.
In this system, the groove for the corrugated tube will have to be made not only in the wall, as in the case of a cable floor, but also in the floor. This is due to the fact that the heating mats are only 15 mm thick. To prevent the tube from sticking out, it is “walled up” in the floor.
Connecting the film floor
Infrared film is an example of how connecting electric heated floors to the network can be a test of patience.
It is designed in such a way that 2 wires come out of each section, and if there are many such sections, then they too, and all of them need to be connected to the thermostat:
You need to be especially careful with film floors, since they can only be connected correctly once. If something was done wrong, you will have to change the entire sheet.
How to connect a heated floor to the electrical network
When installing an electric heated floor, the most labor-intensive part is connecting to the power supply. Installing floors directly with your own hands is not difficult even for beginners, but if the connection of an infrared heated floor, either cable or rod, is done incorrectly, the system will not perform its functions or will fail. You should pay attention to the grounding device, otherwise the system will “beat” with current.
Electric heated floors require the installation of a thermostat. This device is needed to maintain a stable set temperature in the room. The thermostat turns the floors off and on according to the temperature sensor readings.
Installing a thermostat

Connecting a heated floor is possible without using a thermostat. However, in this case, you will have to manually organize the operating mode of the system. Firstly, it is inconvenient; secondly, home owners are deprived of the following benefits:
When choosing a thermostat, you need to take into account the power consumption of the floor heating system. Typically, devices with a power of 3 kV are used. The device can be connected directly to the panel or through an outlet. The device is always accompanied by instructions in what order to connect the power wires, as well as ground, phase and neutral.
The thermostat is located at a distance of 1.2-1.5 m from the floor. Some types of regulators can be installed lower - about 30 cm from the surface; they are usually equipped with ultra-sensitive temperature sensors.
Connection via socket
Install the thermostat. There are 2 installation options: overhead and hidden. Accordingly, for hidden installation it is necessary to make a hole and a groove for the cable in the wall. For overhead installation - only a groove.
Connection via panel
If the thermostat is intended for use in a large room (20 sq. m. or more), then technicians recommend installing the device on a separate power line. In the case of connecting directly through the shield, the operation scheme is similar to that described above (grounding, phase and neutral wires), with the difference that the installation of an RCD (residual current device) is required. The RCD is installed in the panel. After fixing the thermostat, the procedure for connecting the heated floor follows.
Connecting a heated floor without using a thermostat
It is possible to install heated floors without using a thermostat. In this case, usually, the heating wire is connected to a dedicated line and, using an RCD, the floors operate in on/off mode. Simply put, you will have to constantly monitor the system with your own hands. During “manual” operation, energy consumption increases significantly. In addition, the grounding problem will have to be solved.
Connecting a film infrared heated floor to a thermostat with your own hands
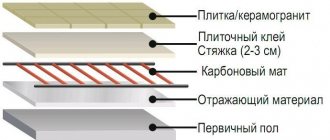
Film IR floor is a heating mat on which strips of carbon polymer are applied. Before installing the system, it is necessary to level the surface and lay thermal insulation.
Connection diagram for electric heated floor:
Advice! It is highly recommended to use a dense foam thermal underlay before installing the infrared floor. It is convenient to make holes and grooves in such material so that wires and connections can be hidden. The heating film mat will turn out “smooth” and the topcoat will lie perfectly.
Connecting a rod heated floor with your own hands
A core floor is a type of infrared heating system. It consists of mats on which parallel rods made of carbon, copper and silver are fixed. Unlike film flooring, a single-core wire connects the rods together like a rope ladder. DIY connection instructions:
Advice! For high-quality adhesion of the finishing screed and the rough surface, it is necessary to make rectangular holes in the heat-reflecting material. For every square meter - 3-4 cutouts.
A ground wire is also connected to the thermostat. Typically, manufacturers include detailed instructions for the device, where everything is clearly described.
Do-it-yourself cable floor connection
Installation of a cable floor should begin with laying thermal insulation. The material can be spread directly onto the screed or hidden in a layer of self-leveling self-leveling floor. There are 2 options for cable heated floors: in the form of a separate wire or a mat with a cable attached to it. Reinforced mesh is used as a roll material.
Floor installation as a separate cable:
The heating mat is connected in the same way, but there is one important nuance. Do not cut the cable! You can only cut the mesh on which it is attached. Therefore, you will have to calculate in advance where the cuts of the mat will be and in which direction to turn its parts. Then everything follows the scheme described above: connecting the cable directly to the thermostat, the phase, neutral, sensor and grounding wires.
- Electric floor and its main features To feel comfortable in the house, you need to make a comfortable floor. It must be warm...
- Which electric heated floor to choose? Which electric heated floor is better to choose? Heating a home using heated floors is becoming incredibly common,…
- Do-it-yourself electric heated floor under laminate A comfortable and energy-efficient home is, to a certain extent, the right combination of modern technologies and materials.…
- How to make an electric heated floor How to make an electric heated floor with your own hands Laying an electric (cable) heated floor is not so difficult,…
Temperature regulator "Teplolux" TP 520, operating instructions
Programming of equipment operating modes is performed using the following buttons:
- the first is the most comfortable and favorite mode for the whole family;
- the second is a menu button to reduce the temperature;
- the third is a menu button to raise the temperature;
- fourth – performs several functions depending on the combination: on/off, selection, confirmation.
The display shows all actions performed by the owner.
Symbols confirming the operations performed and the established modes:
- The specified heating parameters are maintained automatically
- The temperature is maintained between +5 °C and +12 °C, so that the room does not freeze in cases where the owners are absent for a long time
- Favorite mode is turned on for a certain time
- Working in programming mode
4.1. Maintaining a comfortable temperature level, set at two intervals per day
4.2. Economy mode
4.3. Self-learning function allows you to heat the room at the desired moment
4.4. Displays the operation of the floor sensor
4.5. Air sensor enabled
4.6. Heating the room according to specified parameters
4.7. Sets specific temperatures
4.8. Menu work in progress
4.9. Changing parameters is blocked
4.10. Days of the week – the current day is underlined, weekends are marked with the top tick
4.11. Icons to indicate working days and weekends.
All programming steps are performed sequentially. Changing the parameters of any mode is only possible by scrolling through the menu to the desired operation. In case of unforeseen situations, errors will be displayed on the screen, the meaning of which is described in the instructions.
For optimal operation of underfloor heating electrical equipment, the heating system must match it in terms of heat transfer, and the room itself must be well insulated from heat loss.
pol-hot.ru
Where is it used?
First of all, you need to figure out where this heated floor can be used. This type of underfloor heating is especially popular in those regions where gas heating is impossible or problematic. Also, this heating can be in demand as additional heating in private and apartment buildings. Even if there is a main heating system, Teplolux underfloor heating can create comfort in other rooms.
For example, in some rooms it can be quite cool due to poor thermal insulation. To increase the temperature, you can install electric floor heating. Among other things, Teplolux underfloor heating will be effective in cases where in late spring and early autumn the central heating is already turned off, and the room is still cool. This type of heating can help out by creating a comfortable temperature.
Types of water heated floors
Depending on the method of fixing the pipes, such floors are divided into:
- Flooring;
- Into the screed.
In a laying system, laid pipes are not filled with screed, but are covered with sheets of gypsum fiber board or chipboard. In this case, first a polystyrene or wooden flooring with special grooves is laid. Aluminum radiators with grooves are fixed in these grooves, and only then pipes are fixed into these seats.
If you know how to work with wood, you can assemble a wooden system with your own hands. The advantage of such a system is that it:
- Weighs little;
- Easy to repair (simplified design);
- Heats up quickly;
- Has a relatively small thickness.
It will be interesting: Water heated floor from central heating in the apartment! We study installation diagrams and legal nuances.
The disadvantages of floor warm water floors are their weak heat transfer. Among all heated floors, it has the lowest efficiency and their maximum heat transfer is 50-55 W/m2. Its use is only advisable as an additional heat source.
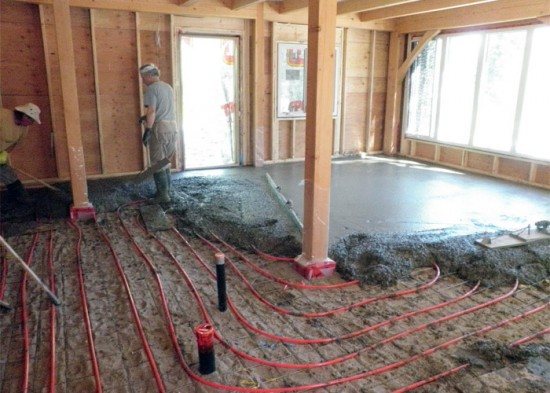
Screed floors are more solid. The laid pipes are filled with screed and then covered with floor covering (you will see all this in the video below). There are four disadvantages to such floors:
- One square meter of such floors can weigh more than a quarter of a ton;
- Such floors are practically irreparable;
- The thickness is at least 10 cm;
- Monstrous inertia of the system.
Their heavy weight and thickness may limit their use in houses with low ceilings and weak ceilings. If a pipe is damaged, it is not possible to find the leak and eliminate the defect. You will need to open the entire screed. And the inertia of the system is caused by the fact that in order to transfer heat from the pipes to the room, it is necessary to first warm up the screed layer. On the one hand, this is a minus; it is quite difficult to regulate the temperature in the room, and it will not be possible to heat the rooms quickly. But on the other hand, this is a plus, such floors will retain heat for a long time.
There is also a common flaw in the design of water heated floors - the difficulty of adjusting the temperature. It is due to the inertia of the system and the peculiarity of heat transfer. The fact is that such floors have a supply and return circuit.
Varieties
The modern market offers a wide range of heated floors. Each system has its own technological differences. The differences boil down to the fact that in different systems the number of wires inside the cable varies, as well as the thickness of the heating element.
So, on the market you can find the following brands of Teplolux underfloor heating:
- Warm floor Teplolux tropix. Warm floor Teplolux tropix is an ideal solution for rooms that have a small area. The heating element of the Teplolux tropix heated floor is about 3 mm. As for installation, installation of the Teplolux tropix heated floor is carried out using a special self-adhesive tape. Compared to other types of systems, Teplolux tropix heated floors have undeniable advantages.
- Teplolux pro. Great for rooms that have a large area. The heating mat itself has a thickness of up to 3.5 mm. The package includes a powerful cable. Thanks to this, the entire area of the room is heated evenly and efficiently. You won't find any cold spots on the floor.
- Mobile heated floor. It is presented in the form of a thin mat. It can be easily placed under any rug. This is what a mobile heated floor is all about. It is lightweight, so it can be easily moved from one room to another.
- Warm floors mini. This type of heating can be placed in a thick screed without any problems. The heating element is only 3 mm.
These are the main types of electric heating systems. With all this, it doesn’t matter whether you buy Teplolux express, mini, mobile, pro or tropics, choose a reliable supplier who guarantees high quality products.
Test run of water floor
After completing the assembly of the system, before pouring the screed, it is checked for functionality. Thanks to this procedure, it is possible to eliminate deficiencies made during installation. The circuits are washed and then filled with coolant that will be in the system.
Before making a screed, liquid should not be drained from the pipes; it should be laid when the pipelines are full so that they are in working condition.
There are three ways to check a heated floor before pouring and identify any shortcomings:
- the system is brought to operating temperatures and left there for several days;
- test under conditions of excess pressure on a cold coolant;
- perform air pressure testing.
The choice of testing method depends on the personal preferences of the property owner, but starting the system at elevated pressure without a concrete screed may result in the pipes flying out of their sockets. This occurs when using mounting tapes or single fasteners. It is advisable to install a thermostat for a water heated floor, which will save resources.
To prevent this, before the test run, beacons for the screed are installed with a specific step and secured with small portions of the solution. Pressure testing can be carried out after the cement holding the guides has set. It turns out to be a kind of frame that holds the pipes, and as a result they remain in the nests.
Guides will not interfere with eliminating deficiencies. If during the installation process the pipes were not bent and the coil was rolled out, then the pipelines are intact and there will be no problems with them. Leaks can only appear at the junction of the pipes with the collector or in the piping of the heating boiler.
The frame should be constructed when self-focusing fastening systems were used. If the pipes are fixed to the mesh, problems do not arise.
System testing using each method is performed in a certain sequence:
- The first option is running at operating temperatures . The system is brought to the desired temperature regime gradually, starting from 20 degrees and raising it to 50 degrees. At this time, observe the contours, joints and connections. If leaks occur, the system is stopped, the liquid is drained, the faults are eliminated, it is refilled and tested again. After bringing the working environment to the required temperature, the heated floor is left for 2 - 3 days. If there is no damage, the screed is poured, having cooled the coolant in advance.
- The second option is checking under high pressure conditions . It's easier to do. The structure is filled with a working medium, a pressure is created that is 1.5 - 2 times higher than the working pressure in the underfloor heating system, and they wait 24 hours. If the drop in this parameter in circuits made from PERT or PEX products does not exceed 1.5 Bar, this means that there are no leaks and the screed can be made. If there are deficiencies, a set of measures described in the first testing method is carried out.
- The third option is dry pressure testing , which is used if it is impossible to use a coolant. In this case, air is pumped into the system by a compressor. But in this situation it is necessary to create a pressure 2–3 times higher than the operating parameters. You need to know how to pressurize a heated floor with air, since this method is not considered reliable, especially when antifreeze is used as a coolant. Therefore, experts advise checking with working fluid, especially since the screed is poured with pipes filled with liquid.
What does the heating system consist of?
Although there are different models of the Teplolux underfloor heating system on the market, their basic configuration is almost the same. Let's look at the package:
- A heating element. This means a special mat or a piece of heating cable. It must have a mounting end. Through them, voltage is supplied to the heating system. There are two cable options: single-core and double-core. This factor affects the power of the entire heating system.
- Mounting tape. It is necessary to make the installation process much easier.
- Thermostat. Thanks to its presence, you can program the Teplolux underfloor heating system to the required mode. Plus, thanks to its presence, you can control energy consumption.
This is the basic package. However, for improved and efficient operation of the entire system, it is necessary to additionally purchase some additional equipment. We are talking about thermal insulation. It is necessary so that heat is retained in the room and does not erode. Moreover, a reflective film can be laid under the heated floor system, which will direct all the thermal energy to the top of the room.