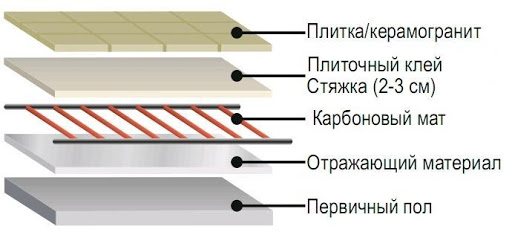
What is a heated carbon mat floor?
Carbon heated floors should be considered as an additional source of heat and as an independent heating system.
Panel heating of this type is available in different modifications, which allows consumers to choose the most optimal type. The system is highly adaptable and cost-effective. An innovative option for heating a home is powered by an infrared energy source. Most often, graphite-silver rods connected in parallel to each other are used for this. For this purpose, wires with an increased degree of protection against overheating are used in production.
The insulating material is a substance based on polyester and polyethylene. The main component of the product is the heating element, which consists of carbon and polymers. The cable used for these purposes is made of copper. Its cross-section is 2.5 mm. It is insulated with a shell up to 3 mm thick.
Everyone who has used carbon heated floors claims that the modern market cannot offer a more profitable option for panel heating. In a house where this type of heating is installed, natural air humidity is always maintained. An intelligent heating system with modern thermostats and temperature sensors helps with this.
All currently existing variations of carbon-based panel heating are complemented by a detailed description of the installation and operating instructions. The buyer only needs to choose the most optimal option, show a little effort in order to surround himself with warmth and comfort for a long time.
Recommendations
Rod heated floors have been a more popular type of heating lately, but their prices are a cut above. But it is often better to overpay a little and have high-quality heating in the house, rather than cheap analogues that will break down in the first 5 years.
Of course, installation may seem very easy, but it is not. There are many nuances here, if not observed, the system will fail much faster, or even not start at all.
Use the services of professionals who know what they are dealing with. This will save a lot of nerves and time, and will also leave part of your fortune with you.
- Related Posts
- What kind of warm floor is better to put under the tiles?
- How to lay cable heated flooring?
- Do you need an anchor bracket for underfloor heating?
- How to connect a heated floor from a stove?
- How to lay a heated floor under PVC?
- How to install a heated floor under a cork?
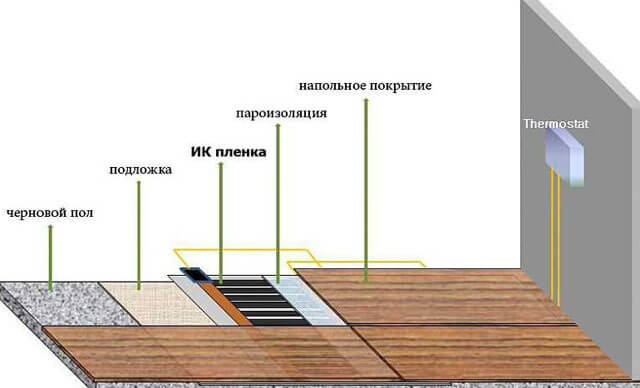
Scope of application of infrared film
First of all, it is worth mentioning that with the help of infrared film, not only floors are insulated, but also other elements of buildings - walls, ceilings, etc. This makes a certain sense, because heat can escape not only through the floor, but also through other surfaces.
In addition to residential premises, infrared floor heating can be used in a variety of areas:
- Greenhouses and greenhouses;
- Outbuildings intended for animals;
- Technical buildings (workshops, garages, etc.);
- Baths and saunas.
In the latter case, installing an infrared heated floor will also be good because such radiation is used to treat various diseases, and its effect in combination with hot air will be extremely useful.
In addition, infrared film can be used as heating in open areas that need to be kept clean - and these are various sports fields, runways and car parks.
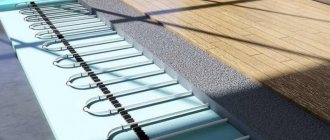
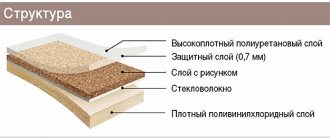
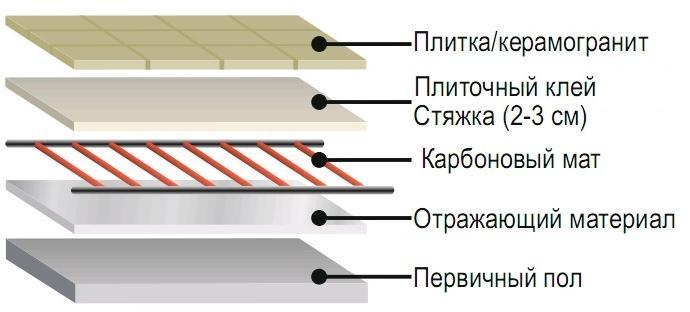
Description of carbon fiber underfloor heating
The basis of a carbon heated floor is a cable with carbon fiber winding.
The basis of the electrical system is a heating cable. When turned on, the electric current heats the wire, it transfers heat to the floor surface, and the latter releases it to the air in the room. This option has 2 disadvantages. The cable resistance practically does not change with increasing temperature, so it is impossible to regulate the degree of heating along the length of the cable. More importantly, heat transfer occurs in 2 stages, which increases electricity consumption.
The first problem is partially solved by laying the cable in loops at regular intervals. This is not entirely convenient, since only modules of a certain size are received. During installation they have to be joined to each other. The standard modification does not solve the second problem.
The design of a carbon heated floor is devoid of these disadvantages:
- The basis of the floor heater is carbon rods. Carbon is an amorphous carbon, it has high electrical resistance - when an electric current passes, it becomes very hot and emits thermal radiation in the range of 5–20 microns. Infrared radiation transfers heat to objects and objects, and not to the air - such a system heats the floor, furniture and people in the room, and the air is heated secondarily. To increase the efficiency of the heater, elements made of graphite and silver are included.
- Carbon rods are assembled into blocks and interconnected by multi-core copper cables in polymer insulation. The area of such a structure is practically unlimited.
- The role of temperature regulators is played by polymer inserts. When the air temperature reaches a threshold value - from +18 to +22 C, the material increases in volume, which leads to an increase in electrical resistance. In this case, the current strength drops and the heating temperature of the rod decreases.
Carbon heaters generate thermal radiation. The air heats up slightly and retains natural humidity.
Specifications
- Operating voltage – 220 – 230 V;
- System power per 1 m² – 220 W;
- Surface heating temperature 45 - 50°C;
- Thickness no more than 0.5 mm.
Heating element device
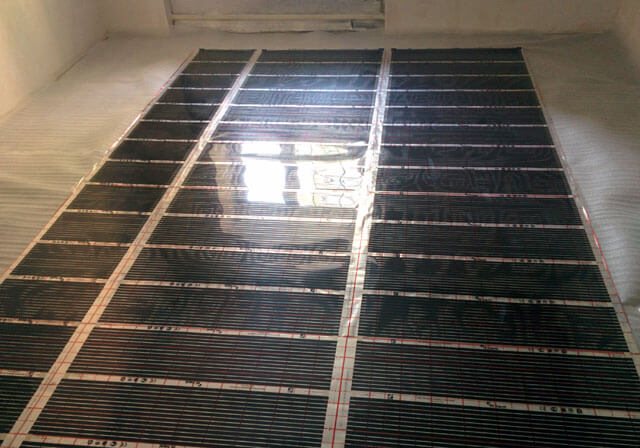
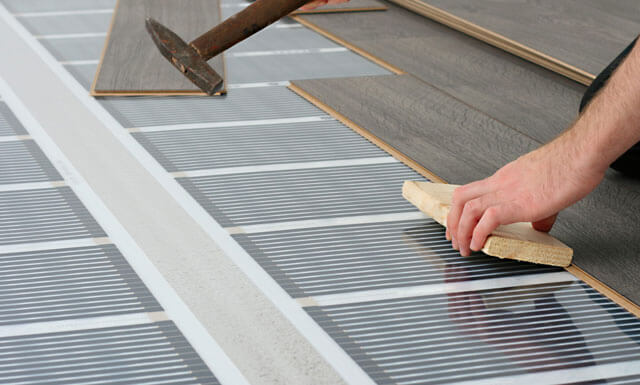
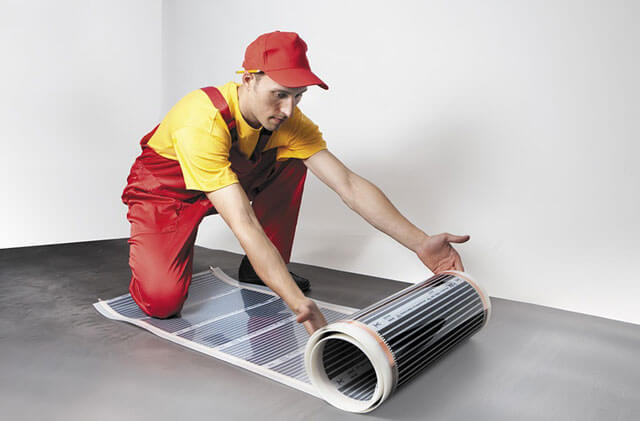
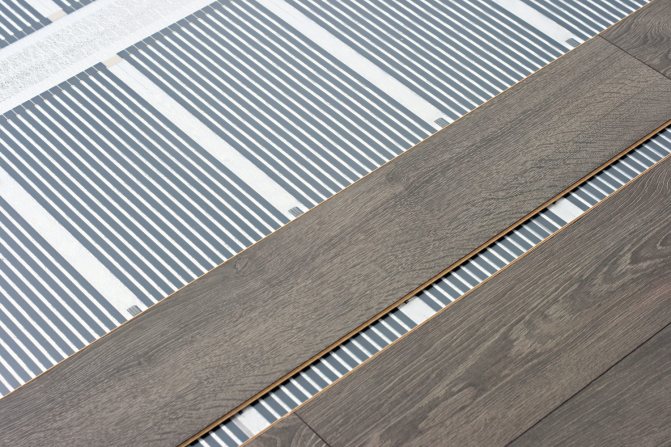
A film heated floor consists of two layers of polymer film, between which strips of carbon material are included. The polymer material provides waterproofness, mechanical strength and safety in case of local overheating. Strips 1.5 cm wide are connected in parallel to copper-silver busbars, which conduct electric current. With this connection scheme, the strips heat up independently of each other, and if a problem occurs in one of the strips, all other strips of the system continue to work. In the event of a failure in one segment, to eliminate the malfunction, you will have to open the floor only in this area, and there is no need to dismantle the floor covering in the entire room. When reconstructing a floor or part of it, infrared film can be dismantled, moved and installed in a new location.
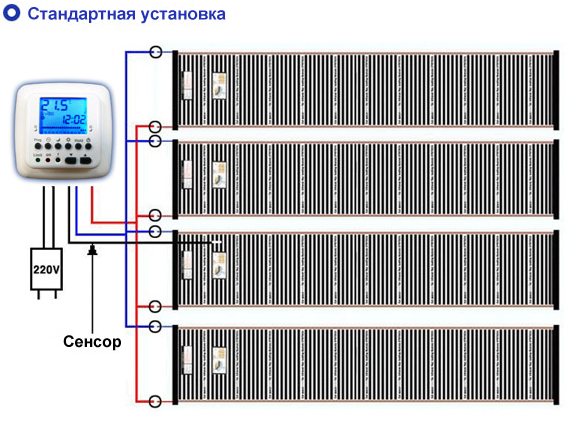
Diagram of an infrared heated floor
Main types of graphite heated floors
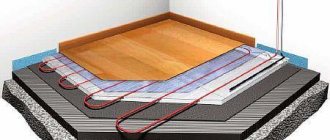
A rod heated floor is mounted in a concrete screed.
There are 2 main types of heaters: film and rod. These also include bimetallic and amorphous floors. However, these 2 options do not include carbon elements. Although their principle of operation is the same: radiation of infrared heat.
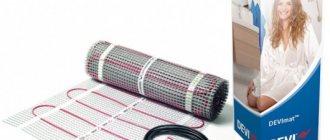
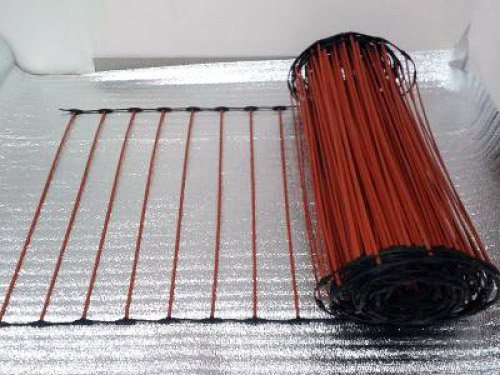
Rod mats
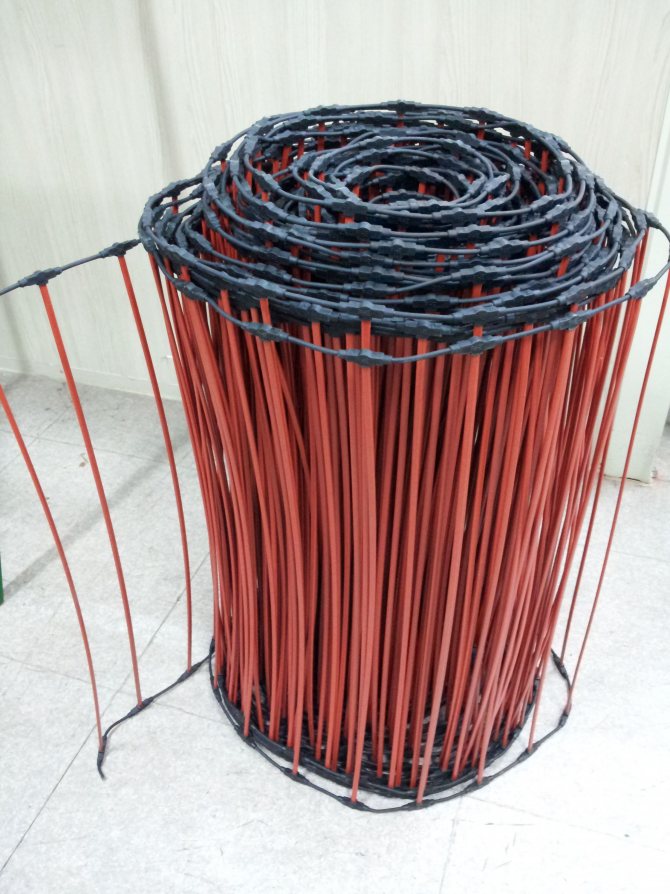
Rod heated floor is a wire mat, 83 cm wide, the number of rods in 1 linear meter is 10. The structure is spread on a prepared base of any area. The sections are joined to each other using connecting kits.
We recommend: DIY waste oil heating: organization options
Rod mats are laid under any, even the most capricious material: tiles, laminate, wooden flooring, parquet. Prerequisite: the heater is placed in a layer of concrete screed or tile adhesive. The subfloor is thermally insulated.
The advantage of the product is the possibility of self-regulation. The carbon fiber rod floor is not afraid of pressure, since its design prevents overheating of the wire. If an area is temporarily covered with furniture, heat transfer from it decreases. At the same time, the rods reduce energy consumption and cool down. In areas where the surface cools faster, the elements heat up more.
The level of electricity consumption is determined by the heating temperature - from 110 to 180 W per linear meter.
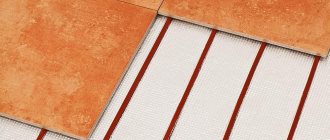
Film mats
Film heated floor coated with carbon material with graphite impurities.
The design of the product is significantly different. The basis of the heating element is still carbon or a mixture of carbon and graphite. The composition is sprayed onto a base made of heat-resistant polypropylene, forming conductive paths. The base is covered on both sides with a two- or three-layer film and sealed. The material can withstand heating up to 120 C and is not afraid of water or moisture. The width of the strip is 50–100 cm. They are connected to each other by copper busbars.
There are several methods of applying carbon:
- Continuous film - carbon fiber is applied to the entire area of the base. The heating speed of the heater is as high as possible, energy consumption is lower. If any areas are damaged, the performance of the system does not change.
- Perforated - stripes and circles are formed in the continuous coating, where there are no heating elements. The modification is designed for installation in screed or under tiles.
- Perforation in the form of a honeycomb is a variation of the previous one.
- Striped - a classic version in which stripes of different widths are formed on the substrate. The power of IR film depends on their size.
Installation of IR film is extremely simple and convenient. It is very thin - 0.23–0.47 mm, it is laid without a screed. The film can be cut into pieces of any size and heat the smallest areas and even staircase steps. If any section fails, the rest of the floor continues to operate as before, and the damaged fragment can be replaced at any minute.
However, the film version has many limitations. It cannot be laid under porcelain stoneware or tiles, since “wet work” and IR film are incompatible. The exception is the perforated modification. But its use is, rather, a forced decision. Flooring made from materials that conduct heat poorly, such as carpet, linoleum on a felt base, is not suitable. In this case, the heat is absorbed by the coating.
Film heated floors can be dismantled, transported to another location and reinstalled in another room.
Advantages and disadvantages
In principle, all the advantages and disadvantages of rod models of heated floors are the same as those of their film “brothers”. It is impossible not to mention several advantages of rod models, the main one of which is ease of installation, directly into a thin screed or tile adhesive. In addition, core “warm floors”:
- Eco-friendly and fireproof.
- Durable. The service life of most models is more than half a century, since the self-regulation system protects the emitters from burnout and problems associated with overheating.
- They have a small mass.
- Can be installed in rooms with complex architecture.
- Thanks to the way the emitters are connected, if one element fails, the rest will function.
- Can be used in rooms with high humidity levels.
Self-regulation, thanks to which energy is saved, and therefore the owner’s money. These heating systems also have disadvantages that potential buyers need to be aware of, namely:
- Wet installation. Although this is usually not a problem, many consider the difficulties associated with installing a heating element in a tile floor covering to be the determining factor in rejecting this type of underfloor heating.
- Placing a heating element in a screed also entails the problem of labor-intensive repairs.
- The requirements for installation in a screed make it impossible to create a “mobile” heated floor based on a rod system.
- Complex electrical connection of a rod-based heated floor, requiring special knowledge and permission to work with household electrical networks.
The main disadvantage of the rod modification of the carbon heating element, according to the majority of our compatriots, is the high cost, even compared to film models of heated floors. And it’s impossible to disagree with this. As for the electromagnetic radiation created by rod models, it does not exceed the natural background.
Why is this heated floor better than others?
Carbon fiber floors can be used to heat indoor and outdoor areas. Their advantages:
Self-regulation
These are “smart” systems that control temperature and, accordingly, energy consumption without installing complex, expensive equipment. The higher the temperature, the more the distance between the particles of the heating elements increases, and the heating is automatically reduced due to increased resistance. Thus, energy consumption is reduced. When the temperature drops, the reverse process occurs.
In areas of the floor with increased load, for example, in places where furniture is installed, the system will heat up significantly less. Rearranging furniture and heavy objects is not a problem; no additional heating protection measures are required.
Reliability and safety
Since the infrared carbon floor cannot overheat due to its thermoregulation features, there is no risk of damage or deformation of the floor covering. The heating system is extremely reliable and does not fail.
Infrared radiation from a heated floor has no negative side effects; it is used in chambers for premature babies for gentle heating of babies and a healing effect. The scope of application of infrared systems is constantly expanding. They are used in spas and infrared saunas.
Economical
The power of the carbon floor is 116 watts per linear meter. When the layer of tile adhesive or screed in which the systems are installed warms up, power consumption decreases. Typically it is 87 watts per linear meter.
To ensure maximum control over energy consumption, thermostats are installed. This allows you to save up to 30% on energy costs. Today, carbon floors are the most economical of all heating systems.
Carbon heating allows significant savings on energy costs. Systems are ultra-reliable and safe
Carbon and carbon underfloor heating - what is the difference?
Carbon is the international name for all composite materials, the basis of which is a carbon nanostructure and various binding components. Thus, what is known to domestic consumers as carbon and carbon are one and the same substance. Those. film carbon floor and film carbon floor are the same system.
Manufacturers offer two types of carbon floor systems:
- film carbon heated floor (solid);
- rod carbon heated floor.
There are two more types of carbon floors on the market:
Bimetallic heated floor
Bimetallic heated floor Heating system based on bimetallic film. A distinctive characteristic of carbon film is a patented two-layer compound (the top layer is an alloy of copper and additives, and the bottom is an alloy of aluminum with additives). Heating plates emit waves in the infrared range. Such a warm floor should only be laid “dry”; it is prohibited to lay it in a screed or in tile adhesive.
Amorphous heated floor (ANT)
Amorphous heated floor (ANT)The Israeli company Advanced Heating Technologies (AHT) Ltd has developed a new technology - a heated floor based on an amorphous metal strip. The main feature is fire safety, because floors do not heat up above 35 °C (for example, cable floors can heat up to 60-70 °C). Made in the form of thin heating mats. The heating element is made of amorphous metal (ultra-thin tape, 30 microns thick). Warm floors on amorphous tape can be installed under all floor coverings (tiles, parquet, laminate, linoleum and carpet).
Do-it-yourself installation of a rod-based heated floor under tiles
All stages of installation in the form of step-by-step instructions
Design and calculation
This process comes down to calculating the amount of materials and planning the direction of placement of the rod heating mat. The rod heated floor is sold as a kit, which includes everything necessary for installation (depending on the completeness, it may be necessary to purchase some additional consumables).
When performing the calculation, two factors are taken into account:
- type of heating. It is planned to equip the main or additional heating of a house or apartment by installing a heated floor;
- heating area. The size of the room should also be taken into account. You can install the system over the entire floor or part of it (if an additional heating system is installed).
These two factors influence the choice of power of the floor heating system. There are two types of carbon heated floors on the market: with a power of up to 160 W/m2. and up to 220 W/sq.m. The higher the calculated room temperature, the more powerful the system needs to be installed.
Note. Infrared rod heated flooring is laid over the entire surface of the floor, including places where furniture and other heavy objects are installed.
You can lay rod mats in any direction, but as testimonials from craftsmen testify, it is better to place them along the longer wall of the room, and orient them towards the heat regulator, and not install it parallel to it. Thus, the number of cuts in the heating fabric is reduced and the length of the wires for connecting to the heat regulator is reduced.
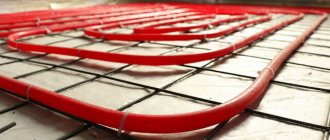
Sequential installation diagram of carbon floor rod mats
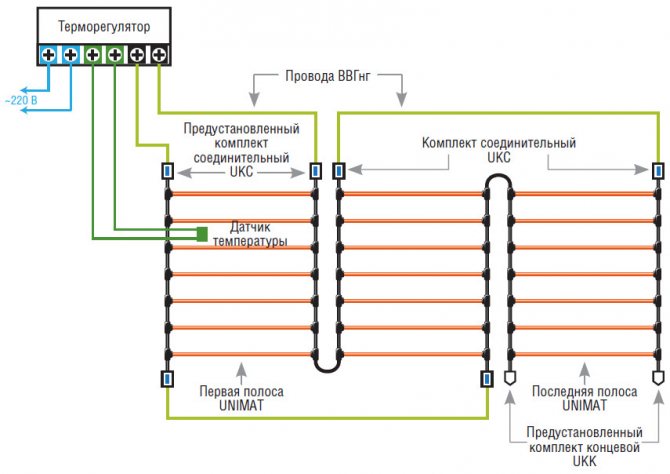
Diagram of serial connection of UNIMAT rod heated floor
Set contents
Most manufacturers provide a complete set of materials for the job. The minimum kit includes: carbon mat, wires, end and connection kits, as well as step-by-step installation instructions.
Additionally purchased: corrugated pipe (preferably with a plug), temperature sensor, thermostat, thermal insulation material (foil can be used), bitumen insulation, tape.
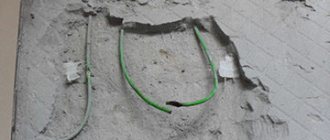
Preparing the base for laying the core floor
Installation of infrared rod-heated floors is carried out only on a flat base, without significant differences in height (no more than 3 mm). To do this, the surface is checked with a level (laser level) and, if necessary, leveled. All significant surface defects are also eliminated.
In addition, here it is advisable to groove the wall to the installation site of the thermostat. It is advisable to install the thermostat close to the power source at a height of 0.9-1 m. And also groove the floor for subsequent installation of corrugations with a temperature sensor.
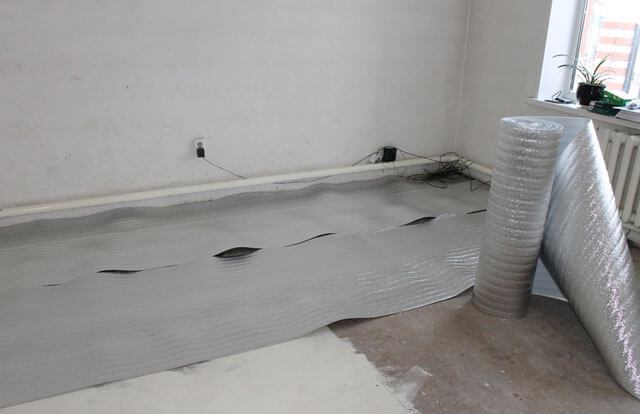
Laying the substrate (thermal insulation layer)
Insulation, in particular foil, will prevent heat loss into the ceiling. The insulation is laid out at a distance of 50 mm from the walls, and in order to prevent its movement, the insulation strips are fastened together with tape. Users recommend additionally fixing the thermal insulation layer to the floor surface.
Note. The foil insulation is oriented with the heat-reflecting layer upward.
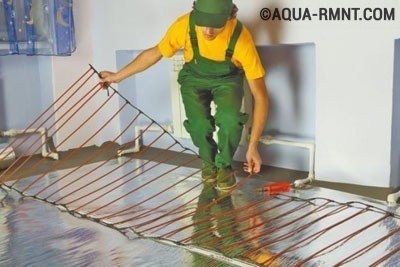
Laying infrared rod-heated floors
The installation process is very simple. Carbon rods, formed into a roll where they are at the optimal distance from each other, are laid on the prepared surface. If necessary, the heating mat is cut, turned 180 degrees and a second strip is laid. It is necessary to ensure that the distance between adjacent strips is within 50-70 mm. And the length of one strip (or strips connected along the length) did not exceed 25 meters.
After installation, the heating mat is fixed with tape to prevent displacement.
Connecting a thermostat for a heated floor
After installing the thermostat, the rod mat wires are connected to it. The connection technology differs depending on the type of thermostat. It is better to entrust this work to a professional electrician or strictly follow the instructions from the kit.
Installing a temperature sensor for a heated floor
The sensor is placed in a corrugation. This technique makes it possible to repair or replace the sensor in the event of a breakdown. The process of installing the sensor is shown in the photo.
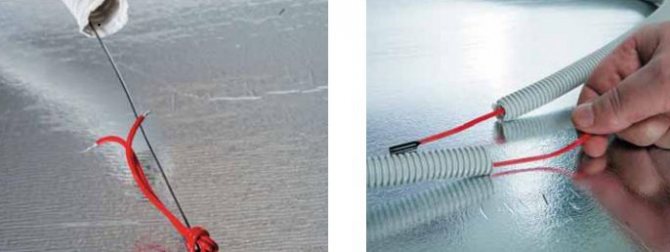
How to insert a temperature sensor into a corrugation
The corrugation with the sensor is placed in a previously prepared place. To do this, the insulation is cut in the place where the groove was installed. It is advisable to install a plug on the open side of the corrugation to prevent screed solution from getting into it. If the thickness of the insulation allows, you can lay corrugation in the insulation. Often the sensor is placed directly between the carbon rods. This simplifies installation, but causes difficulties with repair. The sensor is also connected to the thermostat.
Checking the floor heating rod system
After connecting the system, the thermostat is connected to the power supply and the carbon mat is turned on. A performance check makes it possible to evaluate the correctness of the connection and the reliability of the connections.
Note. Test (first) activation of the system does not exceed 15 minutes.
Pouring screed for carbon heated floors
It is recommended to use dry adhesive mixtures for screeding. The thickness of the screed for a rod heated floor is 20-30 mm. The minimum height suggests that laying rod mats does not greatly affect the height of the room. When laying tiles, the screed is not poured.
How to determine the film size?
Due to its design features, this type of heater is cut in increments of 25 cm. The maximum length of use of one tape should not exceed 7 meters.
Heating film width - 0.5 m. Voltage 220 V. Length
Power
Length
Power
Length
Power
| Film - 0.25 m | 27.5 W | Film - 2.75 m | 302.5 W | Film - 5.0 m | 550 W |
| Film - 0.5 m | 55 W | Film - 3.0 m | 330 W | Film - 5.25 m | 577.5 W |
| Film - 0.75 m | 82.5 W | Film - 3.25 m | 357.5 W | Film - 5.5 m | 605 W |
| Film - 1.0 m | 110 W | Film - 3.5 m | 385 W | Film - 5.75 m | 632.5 W |
| Film - 1.25 m | 137.5 W | Film - 3.75 m | 412.5 W | Film - 6.0 m | 660 W |
| Film - 1.5 m | 165 W | Film - 4.0 m | 440 W | Film - 6.25 m | 687.5 W |
| Film - 1.75 m | 192.5 W | Film - 4.25 m | 467.5 W | Film - 6.5 m | 715 W |
| Film - 2.0 m | 220 W | Film - 4.5 m | 495 W | Film - 6.75 m | 742.5 W |
| Film - 2.25 m | 247.5 W | Film - 4.75 m | 522.5 W | Film - 7.0 m | 770 W |
| Film - 2.5 m | 275 W |
We recommend: Malfunctions of the Junkers gas boiler: error codes and methods for eliminating them
Specifications
The main characteristics that the rod floor is endowed with may vary depending on the manufacturer, but the average indicators can still be derived. They are:
• standard roll width – 83 cm;
• mat thickness is 3-3.5 mm;
• power consumption ranges from 110 to 180 W/rm (depending on heating temperature);
• energy consumption per 1 linear meter - from 20 to 50 W/hour;
• power supply from 220 V mains.
Manufacturers of IR underfloor heating
The construction market currently offers many models of infrared warm coatings from various manufacturers. At the same time, many of them are little known to a wide range of consumers, and therefore the reliability and effectiveness of such products are not guaranteed.
If you want to purchase high-quality products from well-known companies, then the lion's share of the market here is occupied by branded products from South Korean manufacturers, although there are also products produced in other countries, including Russia. Some of the more well-known brands can be briefly seen below.
Caleo is a manufacturer of infrared heated floors from South Korea. The products of this company have earned popularity due to their high quality and efficiency, but there is an important point that must be taken into account when choosing it: due to its very small thickness (0.42 millimeters), infrared film requires great care and precision when installing.
Marpe High Quality - innovative infrared coating from South Korean. It is characterized by high efficiency and economical energy consumption, and has a warranty period of 15 years.
Teplofol-nano – infrared film floors made in Germany and Russia. They are an innovative development: they are only 0.2-0.4 millimeters thick, and the heating element in them is aluminum. The warranty period is 7 years.
RexVa is another South Korean brand whose products are of high quality. The warm floors of this company are reliable and have an affordable price, which makes them popular in Russia and the CIS countries.
Slim Heat - film heated floors produced by a group of Russian companies. The warranty period is 7 years.
Heat Plus is another South Korean manufacturer whose products are very widely represented on the Russian market. Warm floors from this company are characterized by economical energy consumption, reliability and safety. The warranty period is 10 years.
Of course, infrared heated floors, for all their advantages, are far from the only option for efficient and convenient heating in the house. There are many other very practical heating systems: water heated floors, central heating, heating mats, cables, etc. They all have their own advantages and disadvantages, a comprehensive assessment of which determines the choice of the optimal option in each specific situation.
Disadvantages of a rod floor
Rod floors are highly expensive.
The main disadvantage can be considered the rather high price of the coating. The cost is much higher than even infrared film heated floors.
Another drawback is that the connection procedure is quite complicated, especially for people who are not well versed in this.
In addition, the installation takes place in a screed or with tile adhesive, which means that the procedure will be quite long, and in case of repairs you will need to break the screed.
Installation of infrared floor
An important quality of a film heated floor is the fact that it does not require a new foundation. It will be enough to repair, clean and level the old coating. All necessary work can be divided into several stages, which will be discussed further.
Material and tools
Having decided to install a rod floor, you need to buy the selected model, which includes all the components for arranging the structure.
In addition, you need to purchase:
- substrate;
- heat shrink tubes;
- thermostat;
- sleeves;
- wire for connection having double insulation.
For tools, you should stock up on scissors, wire cutters, a knife, a screwdriver, and tape. You will also need a hair dryer to warm up the heat-shrinkable pipes.
Preparing the base
Before laying, it is necessary to properly prepare the concrete base. First, you need to vacuum it - in addition to directly cleaning, this will reveal various damage to the base that needs to be repaired. Particular care must be taken to deal with the cracks at the junction of floors and walls - it is through them that most of the thermal energy usually escapes.
Any cracks and crevices need to be widened and cleaned. To eliminate them, special repair mixtures or regular sealant are most often used. To fill large damage, you can use foam. In any case, after the mixture used has hardened, it is necessary to cut off its remains, after which you can move on.
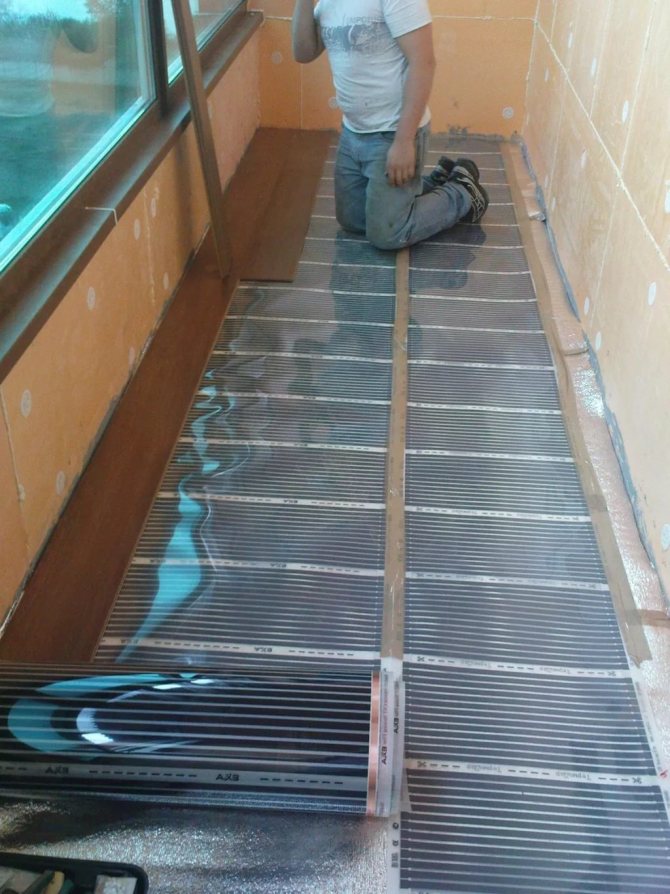
Insulating material is laid and fixed on top of the cleaned base. As a rule, in the case of infrared heated floors, foamed polyethylene is used, the characteristics of which are best suited for such situations. The material is attached to the base, and the sheets themselves are connected to each other with special tape. This insulation will preserve the film, providing a level base.
Installation of heating elements
On the finished base, it is worth marking in advance all the areas on which the film will be placed. In addition, it is worth noting the parts of the floor intended for installing furniture, so as not to install heating in these places.
In accordance with the markings, you need to cut the film into suitable pieces. You need to cut it clearly along the lines, without deviating from them, and with caution - a film cut in the wrong area, at best, simply will not work.
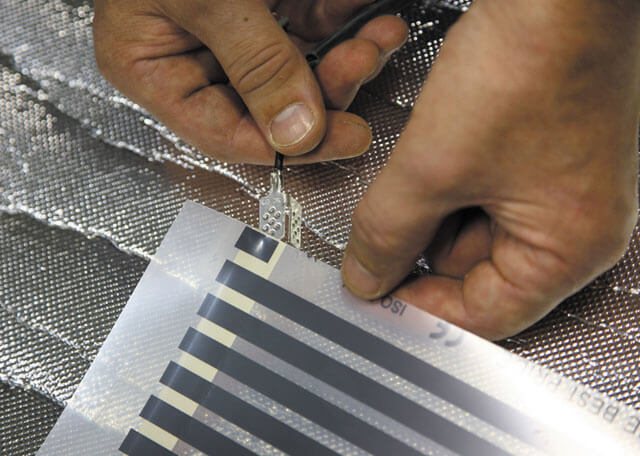
The prepared infrared floor film is laid in the desired areas. Tape or hot melt adhesive is suitable for fixing the material. It is imperative to pay attention to the location of the copper strips - they must be located at the bottom.
Grooves are cut into the insulating layer for laying the cable, terminals and temperature sensor so that these elements do not stick out above the film. It is best to position the temperature sensor taking into account several indicators: firstly, the original wire should be enough, secondly, the distance to the wall should be at least 50 cm, thirdly, the device should be located in the center of one of the heating strips.
After installing the sensor, you need to connect its cable to the thermostat. Now you can attach and crimp the terminals to the contact bars. Next, the wires are connected to the terminals.
Having finished laying all the elements of the system, you need to insulate all connections using special overlays. The insulation will ensure the tightness of the contacts. The same must be done in the places where the film was cut - the exit points of the copper bars must be closed.
We recommend: Why the boiler stopped heating hot water: reasons
All wires are attached to the thermostat. To understand how to do this, it is better to look at the corresponding photo for clarity. After this, the thermostat with the junction box must be mounted on the wall. Next, the design needs to be checked for correct connection, and only after that can it be launched to test its functionality.
Connection
Connecting a device consists of several stages:
- Installing the thermostat at the planned location.
- Electrical diagram connection:
- stripping the cable at the cut points by 1 cm;
- installing the contact (it is included in the kit) on the stripped end of the cable; it should be clamped well with pliers;
- connection to the second contact - is made by passing the wire through a heat-shrinkable tube, and bringing and fixing it to the terminal; the insulation is first removed from the cable;
- heating the heat-shrinkable tube with a hairdryer;
Thus, the entire system is assembled.
- Placement of the temperature sensor - it is better to install it in a corrugated pipe. To do this, a recess is made in the insulation layer into which a corrugation with a sensor inside is placed. A cable is pulled from the device and connected to the thermostat.
The wires coming from the core floor are connected to the thermostat terminals. At this point, the connection of the rod-heated floor is completed, and you should check its operation. The system turns on for several hours; it is possible to leave the floor on for a day.
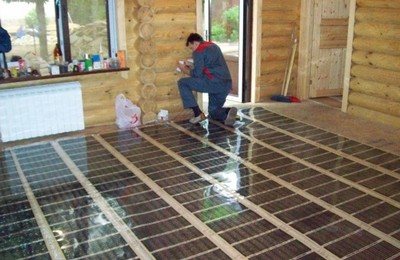
Installation of carbon heated floors
Laying a rod-based heated floor under the tiles is very simple, but if you need to install a thermostat, then you will have to seek help from a specialist.
The beginning of installation work is preparing the floor surface. If there are cracks, depressions, or uneven spots on the base of the room, it must be leveled using a concrete screed, and then proceed with the step-by-step laying of the core floor:
- Determine the location of the thermostat.
- For the sensor, make a groove in the floor under the thermostat.
- Heat-reflecting material is laid on the floor, keeping a distance of 5 cm from the walls, with the foil side up. Then, to prevent its mobility, all elements are fixed to the base of the room with construction tape or glue, while making sure that the carbon rods do not intersect.
- Infrared mats are laid on a heat-insulating layer and fixed with tape. If necessary, the core “carpet” is cut along the marked lines, turned over and laid along the first strip, keeping a distance of 6 cm between them.
- A special sensor with a corrugated pipe is installed in a groove in the floor.
- A thermostat is installed in a pre-prepared place. Next, the wires of the mats are connected to it.
- After all the work has been completed, it is necessary to check the operation of the system.
In this case, pouring the mortar is not required; the tiles are glued directly to the mats. If, however, the rod mats will be used under another floor covering, then they must be filled with a solution no more than 3 cm thick.
Having familiarized yourself with the design of a rod infrared heated floor and its operating principle, you can confidently classify it as one of the best heating systems. But do not forget that the efficiency of heat supply directly depends on correctly performed installation. Therefore, if you doubt your abilities, it is better to invite a specialist to lay warm mats.
What finishing coatings are suitable for infrared floors?
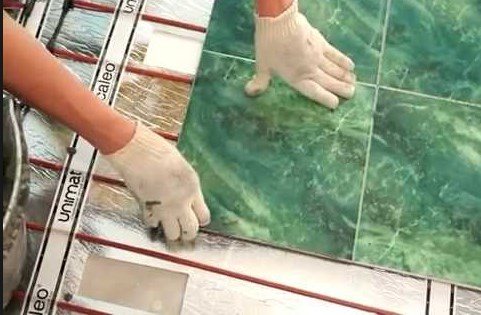
The top finishing layer for an infrared floor can be any covering: tiles, porcelain stoneware, parquet, linoleum, laminate, and so on. In this regard, it is worth noting that when choosing laminate or linoleum, you will no longer have to install a leveling screed. The work is carried out using the dry method. At the same time, most people consider it necessary to use such a system under tiles, which, in principle, for many seems to be a cold material, but has high thermal conductivity and, when paired with underfloor heating, creates an excellent insulating effect, which is highly valued in rooms such as kitchens, bathrooms and corridors, where Additional heat is always needed.
Any flooring can be used for infrared flooring
At the same time, it is necessary to take into account the fact that the top covering, arranged according to the heating system, is divided into hard and soft materials. For certain types of coatings, there is a separate system for installing heated floors with the selection of a specific model and, accordingly, technology option. For example, rod models of self-regulating samples are more suitable for the same tile. But soft materials (for example, you can take laminate or linoleum) require the installation of film IR floors with the obligatory laying of an intermediate layer of plywood sheets or fibreboards.
Floor installation work can be carried out using the dry method.
Advantages and disadvantages
The carbon mat can be laid under tile adhesive so as not to overload the structure
The core floor has good performance in terms of fire safety. Thanks to self-regulation, the surface is not overheated. The mat with rods can withstand heat up to 60 degrees Celsius. Other advantages of these floors:
- reducing energy consumption during the heating season is a side effect of self-regulation;
- possibility of operation with different types of external coverings - tiles, laminate flooring, linoleum;
- environmental friendliness of the parts included in the design, as well as the absence of electromagnetic rays, as a result - safety for the inhabitants of the home;
- non-attachment to the layout of the room, the possibility of installation under heavy cabinets and other pieces of furniture without harm to the mat and rods;
- resistance to moisture, which allows the floor to be used in the bathroom, and to corrosion damage;
- ease of installation for a person with basic construction skills;
- lightness, which eliminates overloading of floors.
However, the design also has disadvantages. This includes a high price and zero mobility: a mat laid under the floor covering cannot be moved somewhere without first removing the latter. In addition, it is prohibited to combine heated floors with foil insulating materials. By reacting with the aluminum contained in the foil, the alkali creates conditions for damage to the core components.
If water gets on the coating, heating temporarily stops. It resumes after the moisture dries.
Sometimes the ability to saturate the air with ions is attributed to the rod floor. This is a publicity stunt that has no physical basis. The rods are insulated from air masses with tiles or other covering. The flooring cannot ionize the air even when heated.
Safety precautions when installing infrared heated floors
During the installation process and when using film heated floors, certain safety rules must be observed:
- Before installing the system, it is necessary to clean the base from any contaminants, after which it is advisable to lay thin insulation on it;
- Film strips must be laid no closer than 10-20 cm from the wall, but no further than 40-50 cm;
- It is forbidden to lay infrared film overlapping - this can lead to dire consequences;
- The thermostat should be mounted from the floor at a distance exceeding 10-20 cm;
- The length of one canvas should not exceed 8 m;
- The longer the length of the blades used, the fewer contacts will be required;
- For safety reasons, individual strips of infrared flooring must be laid with a distance of at least 5 mm;
- The terminals themselves must be mounted so that one part of the contact is located on top of the film, above the conductive layer, and the second is inside the film, for which there is a special cavity in the latter;
- Having mounted the contact, it must be crimped using special tools for crimping contacts or ordinary pliers;
- Before installation, you should study the instructions - for some designs you can only use “your own” clamps, which are included in the kit;
- When cutting the film, the contact buses must be covered with bitumen insulation, which also comes complete with the rest of the structural elements;
- The thermostat can be connected in two ways: firstly, directly to the mains on a permanent basis, secondly, using a separate grounded cord;
- When connecting the thermostat and the film, it is necessary to lay the wires in such a way that they do not intersect each other;
- Under no circumstances should any other heating devices be placed above the film heated floor;
- It is highly undesirable to install the film at low temperatures or high humidity in the room;
- Bends of the film are unacceptable, otherwise its performance will be in great doubt;
- The film cannot be fixed using metal fasteners (nails or self-tapping screws).
Limitations and Disadvantages
- IR film transfers heat to the floor covering. Constant and prolonged heating of laminate, linoleum or parquet leads to color fading. The coating may also deform and become unusable earlier than the manufacturer declared. Justification: This is a problem with all heated floors.
- The furniture gets hot. To avoid fires, it is recommended not to lay film under heavy interior items at all. Exit: there should be a gap of 10-15 cm between the floor and the furniture set: cabinets, sofas and bedside tables are placed on legs.
- IR heaters are initially spread locally on a free surface. Changing the surroundings and heating zones is a difficult process.
- The heating system depends on the electrical network. No electricity - no heat.
- It is dangerous to use in rooms with high humidity (bathrooms).
- If you close the temperature sensors, they transmit distorted data to the thermostat and problems begin in the system.
Infrared heated floors are widely used in apartments in country houses or cottages, in kindergartens and orphanages, shopping centers and industrial premises. They are equipped with outdoor sports grounds and used in agricultural facilities: incubators, nurseries, etc.
As a result, mobility, reliability, ease of installation and noticeable savings have made warm infrared floors one of the most popular even among radical skeptics.
Buying rod-based warm mats in Moscow
Brands of rod-based heated floors can be purchased in stores and online stores in Moscow at affordable prices. Let's consider the most popular and accessible:
The brand of underfloor heating called "Caleo" combines several popular core mats.
- UnimatBoost. Mat power 160 W per sq. meter. The sheet's components are made of graphite, carbon and silver to help save energy. But this is a rather expensive option compared to other heating systems. The average cost starts from 3,000 rubles per square meter of material.
- UnimatRail. Power 130 W per sq. meter. The mat elements also consist of graphite, silver and carbon and prevent loss of electricity. They are also endowed with the ability to self-regulate temperature. The mats cost approximately the same as “UnimatBoost”; the price starts from 2900-3000 rubles per square meter of material.
We recommend: How to assemble a Valtec manifold for heated floors?
These particular brands of mats can be laid under heavy furniture and used with all types of finishing coatings.
It is worth noting that, despite the promised ease of installation of the system, it can be problematic to connect it or even design its location in the room.
If you do not have the necessary skills and abilities, you need to contact the appropriate services, which are scattered throughout the city, online and in the online stores themselves.
Keep in mind that it is better to invest in the long term once than to constantly overpay for repairs when faced with malfunctions in the system.