.
To ensure a quality life for all household members of a private home, special attention should be paid to indoor ventilation. After all, the presence of moisture and dampness in the house will not improve anyone’s health. Ventilation in the basement of a private house deserves special attention.
Ventilation of the basement floor of a private house is an event necessary to ensure a quality life for all household members
The role of ventilation in the basement
Due to its location, the ground floor is practically the foundation of a private house.
This room takes on a certain load and then transfers it to the base.
The combination of these factors leads to the fact that a number of requirements are imposed on this room, including high-quality ventilation in the basement. In the summer, when it is incredibly hot outside, the basement of the cottage is quite cool.
Many home owners make the huge mistake of thinking it's fresh air. In fact, this situation indicates that the ventilation in the basement is not done well enough, and the air there is harmful to the human body.
The harmfulness of this air lies in the fact that it contains large amounts of a gas such as radon. Its presence in the air of a given room is explained by the fact that the gas enters building structures from the ground. And due to the fact that the ground floor is in direct contact with the ground, there is a high probability of its presence in the air.
The mass of the gas is heavier than air masses, therefore it is always concentrated in the lower part of the living space, and the cross ventilation present in the basement (with several windows) is not able to completely remove radon from the room.
Features of organizing air exchange in the basement
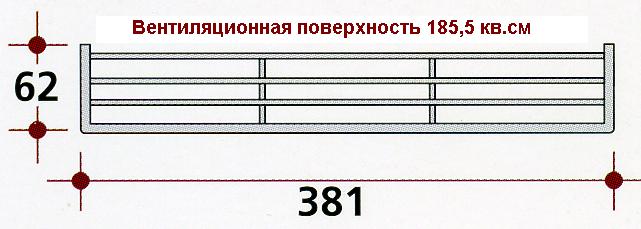
Ventilation grille for medium-sized plinths
Having visited any home, it is easy to understand how effective the air exchange in the room is. A heavy and musty smell, condensation on the surface of the walls, all this indicates problems with ventilation .
If the house design involves the construction of a basement floor, you should immediately plan in its walls the presence of special openings (vents and vents) designed to provide natural ventilation.
Vent for air exchange
Ventilation in the basement of a private house should be planned taking into account a number of factors, including the type of foundation and soil on which it is built, the area of premises in the basement, average annual ambient temperatures, wind direction, soil moisture, etc.
Most often, for complete ventilation of the base, one vent located every 4 meters along the perimeter of the outer wall is sufficient. If the house is located in a low area, ventilation grilles are installed on the base in double quantity.
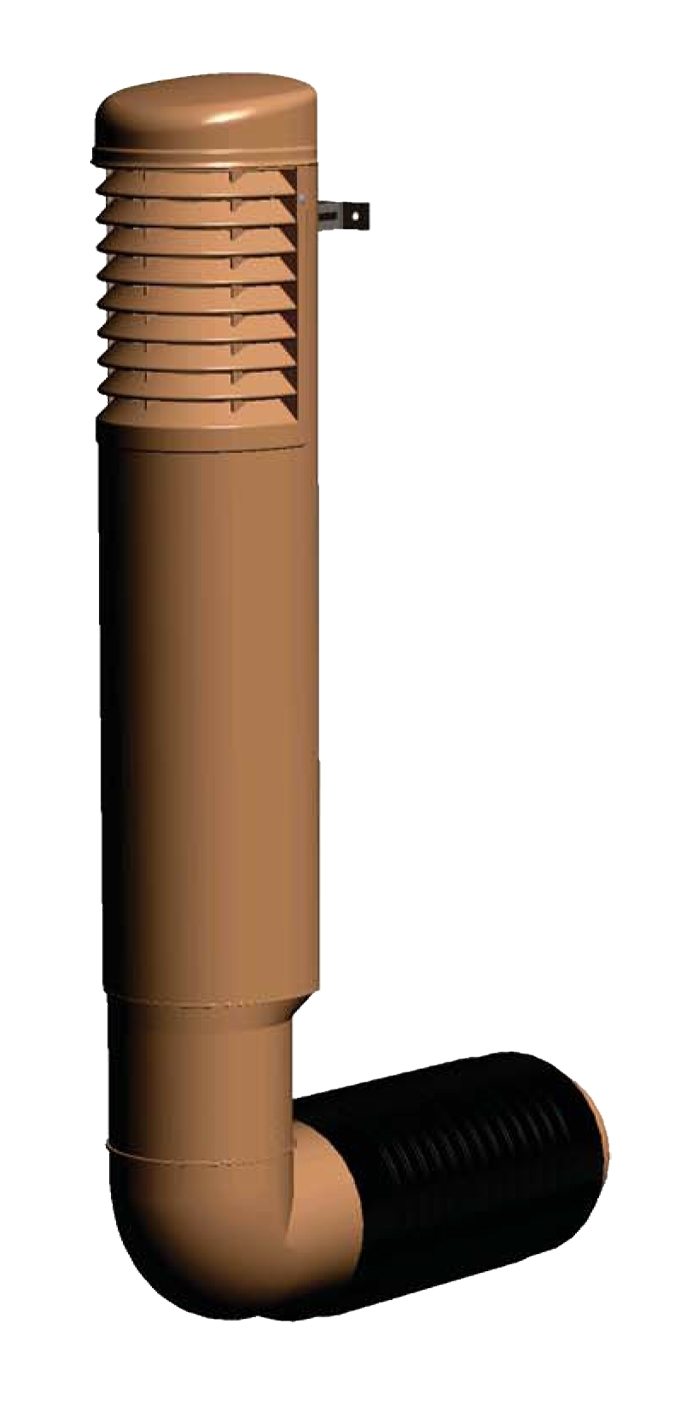
Natural supply and exhaust ventilation

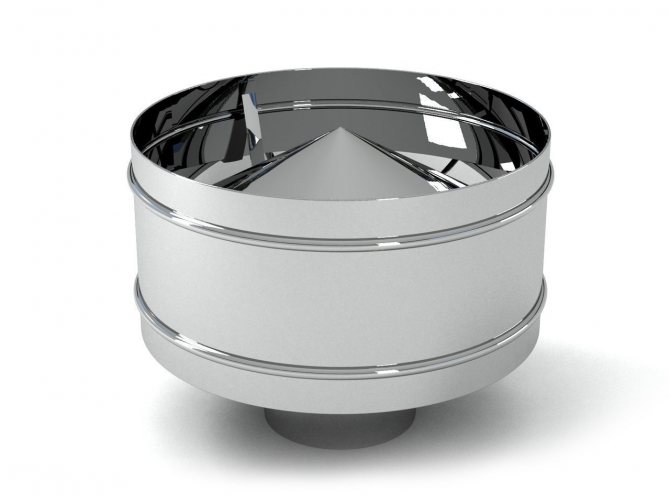
The photo shows a deflector for supplying fresh air
Construction design statistics indicate that vents designed to provide ventilation may not be sufficient. For example, if the basement is used as a warehouse, workshop, gym or billiard room, you will need to use supply and exhaust systems that not only remove polluted air, but also provide fresh air from outside.
This type of ventilation is natural, since its operation is based on the temperature difference between the outside and inside of the basement. If the calculations when designing such systems are carried out correctly, natural ventilation ensures high-quality air exchange in the complete absence of drafts.
A supply and exhaust natural ventilation system can be ordered from specialized companies or can be assembled independently. Essentially, the system consists of two pipes, one of which is supply and the other is exhaust.
To ensure optimal performance of the system, the pipes are distributed on the sides, for example on opposite walls. In addition, to ensure optimal air exchange, the pipes must be located at different heights.
Considering that warm air is concentrated in the upper part of the room, literally under the ceiling, it is advisable to install the exhaust air pipe as high as possible. Conversely, cold air is located below, so it would be better to place the pipe for supplying fresh air from the outside closer to the floor.
In addition to the correct placement of pipes, it is necessary to take into account their sizes and configuration. As a rule, to ensure air exchange in the basement of an individual residential building, plastic pipes with a cross-sectional diameter of 100 mm are sufficient.
Installation of natural ventilation
The instructions for setting up the system are as follows:
- At the top of the wall we mark the diameter of the hole, which on each side should be 10 mm wider than the diameter of the pipe.
Important: When marking, make sure that there are no hidden wiring in the wall. To avoid trouble, drilling should be performed after cutting off the electricity supply to the room. During this time, you can power the power tool from the next room using an extension cord.
- We make through holes along the perimeter of the drawn circle. For this work, we use a hammer drill with a drill longer than the width of the wall (usually 60 cm is enough).
- After the holes are drilled in a circle into the hammer drill, we insert a chisel and begin to gradually cut out the inside of the future hole.
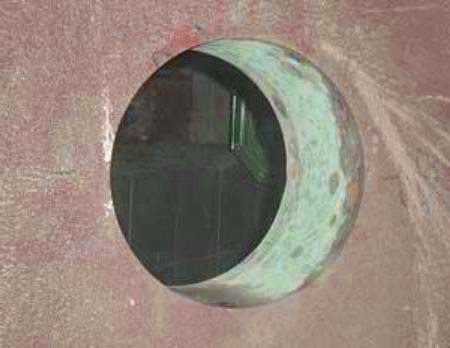
Hole for ventilation pipe
Of course, there is a simpler and less labor-intensive way - ordering diamond cutting of concrete. But the price of this service will negatively affect the cost of the result, so we save and continue to work with our own hands
- After the hole is ready, cut 1 meter of pipe and insert this piece into the hole.
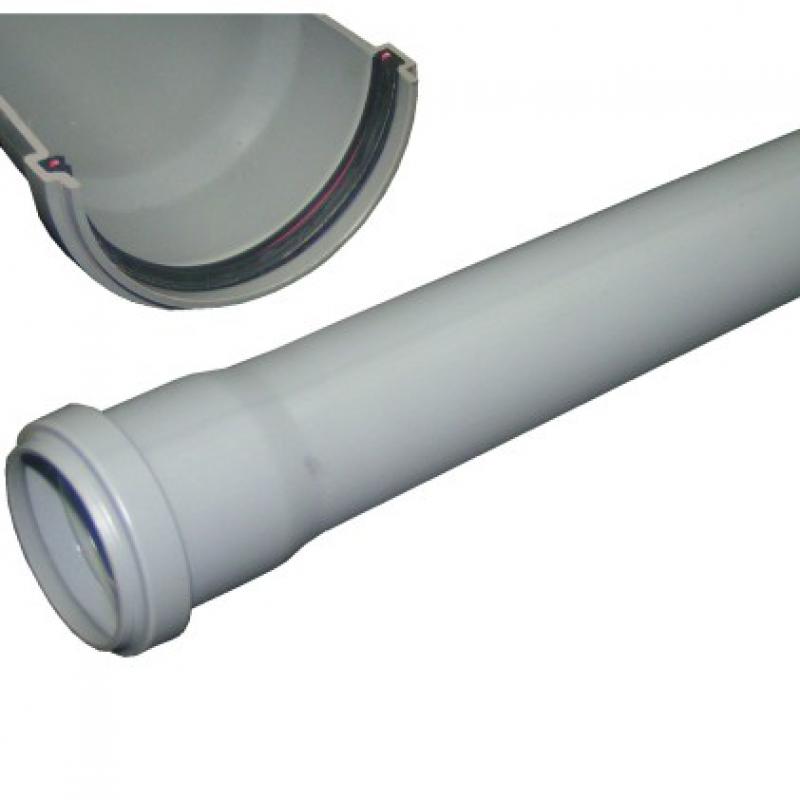
Sewer pipe for ventilation assembly
- We put a tee on the outer end of the pipe so that one outlet looks up and the other down. We close the outlet that is directed downwards with a lid, in which we drill holes so that condensate flows into it.
Important: Ventilation pipes should be positioned with a slight slope outward, so that condensation that will form during the cold season flows outward and not inward.
- In the branch that is directed upwards, we insert a pipe 1.5-2 meters long, which will be enough to create traction.
- We mount a deflector or “umbrella” at the end of the pipe.
- We moisten the gaps between the pipe and the hole in the wall with water and fill it with polyurethane foam, which, after drying, is cut off and plastered.
- We do not raise the pipe for supplying fresh air, but simply take it out from the wall about half a meter and cover it with a grill.
- To effectively regulate air exchange parameters, dampers are mounted on the inside of the pipe.
Forced ventilation
Factory-made forced ventilation system
Sometimes, conventional ventilation grilles do not provide sufficient fresh air, and in this case forced ventilation is used. Such systems are also supply and exhaust systems, but the main difference is that the removal and supply of air is not carried out naturally, but with the use of mechanized blowers.
In addition to the supercharger, the system is equipped with a special supply valve, which shuts off the flow of air from outside when the system is turned off. Forced ventilation systems are supplied ready-made or assembled to order in specialized companies. (See also the article How to insulate the foundation base yourself.)
Tools for creating ventilation in the basement
Basement ventilation is a rather important point, because the existing cross-ventilation is not enough to provide clean air in the room. But quite often, owners of private houses do not have the financial means or desire to entrust the creation of ventilation to professionals; in this case, you can create a ventilation system with your own hands.
In this case, you should start working by preparing the necessary tools, these include:

To create ventilation in the base, you need to prepare a hammer drill and many other tools
- perforator;
- pipes through which air masses will move;
- gate-type dampers, as well as PVC mesh;
- chalk;
- deflectors;
- blinds;
- special elements for air flow control;
- concrete, as well as sand;
- container where the concrete solution will be mixed;
- trowel and spatula.
Using these tools you can create two ventilations:
- exhaust;
- supply and exhaust.
Vents in the foundation of a wooden house ‒ Underfloor ventilation
According to construction technology, the design of vents, and then the installation of vents with your own hands, is carried out during the construction of the base. This approach allows you to correctly determine the optimal number of ventilation holes, as well as equip them with high quality.
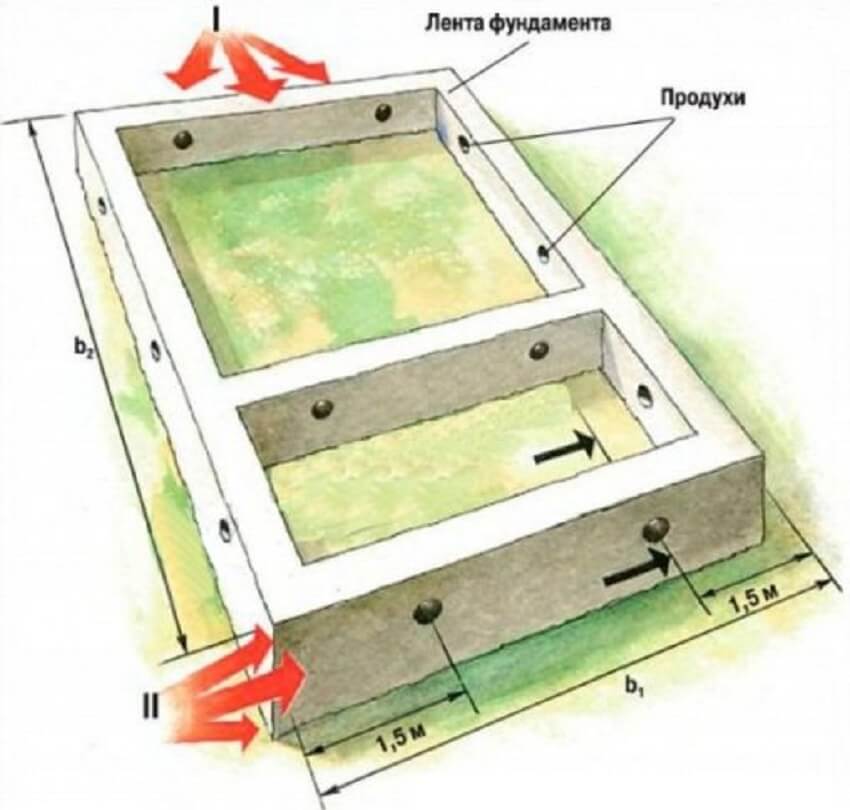
Location of vents in the foundation
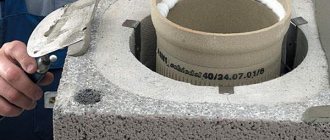
But if, for some reason, vents in the underground were not provided during the construction process, then they are not difficult to make later. To create vents with your own hands, it is recommended to use a diamond drill of the required diameter and size. Such a drill can easily cope with concrete and reinforcement, while maintaining the integrity and strength of the foundations of the building.
Ventilation system options
One of the most common options for getting out of the current situation, when the stage of arranging a proper ventilation system is skipped, is to install vents above the foundation of the ground floor. In the walls of this design, ventilation openings of the optimal diameter and required quantity can be easily equipped.
The second option makes it possible to make ventilation with your own hands by making holes in the field of the upper room. For the arrangement, several rather large openings are made into the ceiling of the basement floor, which are covered from above with a grating. It is advisable to hide such ventilation openings under furniture. This way you can prevent permanent pressure drops.
It is worth noting that the second option is not at all the standard for an impeccable ventilation system. Because there is a high probability of harmful fumes and dampness occurring under the floor of the building. Of course, such harmful fumes will negatively affect the general microclimate in a private, permanent building.
Vents in the foundation of a wooden house ‒ Installation of vents with your own hands
The high-quality installation of vents in the foundation of a wooden house has its own special purpose. As you know, wood is very prone to rotting. Therefore, organizing and installing vents with your own hands requires a meticulous, special approach. Usually, it is recommended to equip vents in a wooden house between the first and second crowns with embedded beams. In addition, ventilation openings are also allowed between the base and the first log.
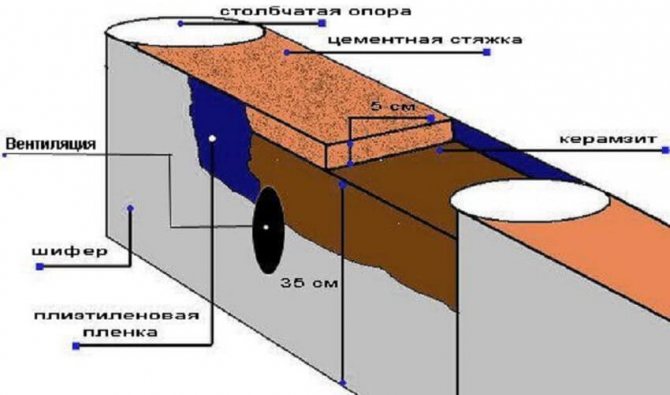
Scheme of foundation ventilation arrangement
- Proper arrangement of ventilation holes should begin at least a meter away from the corner of the house. This way you can completely prevent the formation of air pockets.
- At the beginning of installation work, markings should be made to determine the location and size of the openings.
- Installation process. Installation of air exhaust pipes made of asbestos cement usually occurs during the reinforcement of the foundation. Pipes, the optimal diameter of which is 100-150 mm, are inserted into the reinforcement mesh sequentially around the perimeter of the building. Using a binding wire, securely fix the pipes to the fittings.
- Before pouring concrete into air pipes, it is recommended to close the outlet openings. This way you can completely avoid penetration of cement mortar into them.
- Afterwards, when the concrete has set and gained minimum strength, the formwork can be removed, the pipe holes can be emptied of the contents.
- It is advisable to immediately close vents in the foundation with a metal mesh. In this simple way, you can prevent rodents from freely entering the underground floor of a permanent building.

Tools for equipping vents
In order to make vents in the foundation of a wooden house yourself, you will need the following tools and materials:
- Hammer, medium size;
- heavy hammer or sledgehammer;
- drills for metal and wood;
- chisels, different sizes;
- asbestos-cement pipes;
- sand;
- for ventilation openings - grilles.
Installation of exhaust type ventilation
Exhaust ventilation is one of the easiest to install, so even a person who does not have proper experience in creating ventilation systems can perform it. This type of ventilation for the basement of a private house is most suitable if the basement occupies a small area.
To create this system, you will only need one pipe with a diameter of at least 15 centimeters. Regarding the material, it is desirable that it be made of asbestos concrete (this material is characterized by a long service life and is quite resistant to mechanical damage).
Next, you should pay attention to choosing a place to place the pipe. An excellent solution would be to install it near the basement ceiling, but it is very important that the pipe exits to the roof using a ventilation duct.
After selecting a location, you need to move on to marking. On the wall you should use chalk to draw the diameter of the pipe selected for installing ventilation. Then a hole is created using this marking (a punch is used). To create a hole of the required depth, a hammer drill will require special attachments. After preparing the hole, you should immediately proceed to creating a ventilation duct (use a hammer drill again).
Having completed all the above work, you should proceed to installing the exhaust pipe. Here you will have to try quite hard, since you need to install the pipe evenly. Any holes that appear between the pipe and the wall should be sealed with concrete mortar. For the solution, take sand, cement and water in a ratio of 2:1:1/2.
A deflector should be placed on the extreme part of the pipe facing the street.
After installing the pipe, a deflector should be placed on its extreme part that faces the street.
With its use, the ventilation of the basement floor of the cottage becomes of better quality, since the required draft is created for the flow of the required amount of air masses into the basement. In addition, elements that regulate air flow should be installed; they ensure that the microclimate conditions in the basement are maintained optimally. Such a ventilation system on the ground floor provides home owners with the opportunity to create a gym on its territory or simply do fitness.
Installation of vents in the basement of a residential building
Comments:
Rating: 33
Vents are called technical openings in the foundation (basement) of a house, which are located above the ground. Their main purpose is to ventilate the underground space under the first floor of the house. Their role in the operation of a residential premises is very important, since moisture tends to accumulate in the basement, evaporating from the upper layers of the soil, which can subsequently lead to dampening of building structures or the formation of mold or rot.
A vent is a small window in the basement wall or strip foundation, necessary to ventilate the underground space under the first floor of the house.
This leads to the development of certain diseases in residents, which over time can develop into chronic forms. These ventilation holes are located opposite each other. Thanks to this, a draft effect occurs, which effectively removes excess moisture from the basement.
Ventilation in the basement of a residential building made of wood should be carried out especially carefully, since moisture is the main enemy of wooden structures. In addition to the accumulation of moisture, radon gas, which is radioactive, accumulates in the basement.
In winter, it is impossible to close the vents under any circumstances; this is also fraught with an increase in humidity, because the ground does not freeze, the moisture condenses, and then it freezes on the upper part of the foundation and the lower part of the floor of the first floor. To prevent such problems from arising, it is necessary to arrange vents. There are several cases when it is possible to refuse to install vents. This is a situation when the entire floor in the underground room is laid with vapor-proof material or when a ventilation system is provided around the perimeter of the entire house, and its base is insulated together with the soil surrounding the house.
Features of the location and the required number of vents
Ventilation layout diagram.
Clause 9.10 of SNiP 31-01-2003 establishes certain standards according to which in the basement of basements the total volume of vents should not be higher than 1/400 of the total area of the basement. Provided that the area is susceptible to radiation contamination, the area of the vents is already 1/150 of the total underground area. The minimum vent size per 1 m² should not be less than 0.05. Taking into account space savings when constructing residential premises, the maximum allowable size of vents is 0.85 per 1 m². If you make larger holes, you will have to reinforce them. For example, vent dimensions of 300x300 mm are reinforced along the entire perimeter.
The geometric shape of such holes can be different: you can make either the traditional shapes of a rectangle and square, or a more “exotic” triangle.
For a more aesthetic appearance, it is customary to make rectangular vents.
Although, at the request of the customer, it is possible to execute different forms.
The optimal location of the rectangular vent.
These ventilation holes are located evenly along the entire perimeter of the foundation. It is necessary to do this to eliminate places where air will stagnate, the so-called “non-ventilated bags.” Therefore, it is necessary to place vents no further than 900 mm from the corner of the building (along the internal boundaries), and then evenly along the entire perimeter.
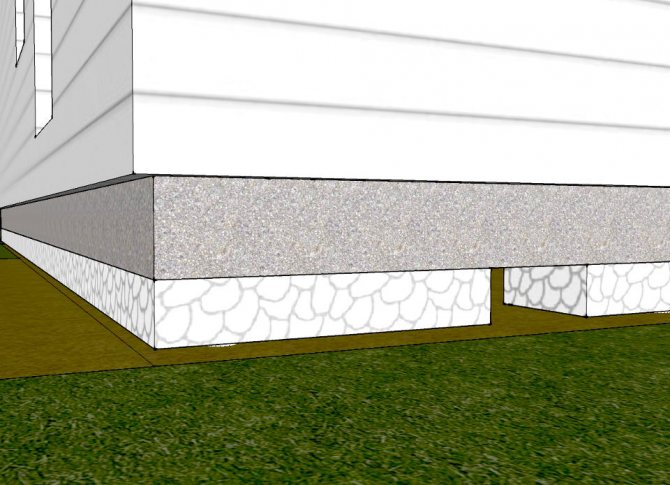
In order to determine the height at which the vents should be located, it is necessary to know to what height the first floor will be raised relative to the surface of the ground. The minimum distance from the ground surface to the lower edge of the vent must be at least 300 mm. If this hole is located lower, then there is a possibility that in the spring melt water and in the fall rain water will enter the basement.
Cement mortar composition table.
In this case, it is better to stick to a higher location of the ventilation holes above the ground.
Tools needed to organize products:
- cement mortar;
- bricks;
- pipes;
- boards;
- hacksaw or chainsaw.
Return to contents
When the construction of a house is carried out without following the rules or by persons who are not knowledgeable in certain issues, a situation may arise when the vents were simply forgotten to be done when arranging the foundation. But construction technology involves laying them together with the construction of the foundation. There are several options for correcting construction mistakes.
Vents must be located at least 15 cm from the ground level.
Punching (or cutting through) vents after completion of construction work can only be done by a team of professional builders who have all the necessary equipment to carry out the procedure. These specialists drill a hole, which will be approximately 150-250 mm in diameter. The cost of the work carried out will depend on what material was used in the construction of the foundation. The width of the wall that needs to be drilled and the required number of holes will also be added to the cost of the work. Provided that the part of the foundation that protrudes above the ground is made of brick, it is possible to carry out the vents yourself. But it should be borne in mind that this process is quite labor-intensive and a minimum set of tools is required: a hammer drill, a sledgehammer, a chisel.
In many European countries, the floors of the first floor are laid directly on the ground, while no work on the arrangement of the subfloor is carried out. This method eliminates some of the problems that may arise during the installation of a floor made according to the “overlapping” principle. Floors that are laid on the ground do not suffer from oversaturation with moisture and condensation does not accumulate on them, which is why mold does not form. At the same time, this installation technology makes it possible to reduce the cost of building materials by lowering the height of the building.
Return to contents
The basement must be ventilated even in winter. This is done in order to avoid the formation of condensation, as well as contamination of the room with radon gas. This requirement is also regulated in the SNiP regulations on construction equipment.
According to this provision, the difference in air temperature in the basement (subfloor) and on the lower part of the flooring cannot differ by more than 2°C. And this technical requirement can only be met if there are ventilation ducts in the foundation. If you are afraid that in winter it will be cold on the floor of the first floor, you should start insulating the floors located in the underground room, under no circumstances closing the vents.
Return to contents
Layout of ventilation ducts.
As in apartment buildings, residential wooden buildings require the installation of ventilation openings (vents). They are often performed in embedded logs or beams. They are cut down between the first crown and the second. If a frame structure is being built, then a ventilation window is placed between the base of the house and the very first log (as a rule, such a house has only a few crowns). Another reason for this arrangement of vents is that the base lags behind the ground by a height of about 400 mm.
In a wooden house, air vents are arranged in the following way. First of all, they mark the future ventilation window, after which, using a regular saw or chainsaw, they make a through cut in the embedded logs. After the work has been done, the hole can be made using ordinary boards, from which a box is made according to the shape and size of the hole. It is done in order to hide the cuts.
If the house is being built from brick, then for the installation of a ventilation hole it is necessary to leave an area equal in height to ½ of a brick, and in length - the size of the brick block itself. You can install ventilation holes directly during laying the foundation. To perform this procedure, you need to take a plastic pipe, the length of which will be equal to the width of the foundation formwork.
Approximate dimensions of vents in the basement of a house.
Accordingly, if you do not have a pipe of a suitable size, you can cut a longer one, or, conversely, install a smaller pipe. Only in this case it will be necessary to make the pipe connections very tightly so that the cement mortar does not penetrate into it. Pipes of suitable size are installed in the foundation formwork, but make sure that they lag behind the outer parts of the foundation by at least 100 mm. Sand is poured into the pipes themselves so that they do not crack during concrete pouring.
And when the formwork is removed from the foundation, the sand is very easily cleaned out. Using this method, the ventilation holes made will look more aesthetically pleasing on the facade and will not spoil the appearance of the building. It is not recommended to use wooden formwork instead of pipes to carry out vents, since the wooden parts, while the foundation is drying (about 1 month), under pressure firmly adhere to the concrete mortar, and it will be very difficult to remove them later without damaging the base of the foundation.
Return to contents
In wooden houses, frequent guests can be mice and other unwanted rodents, neighbor's cats, which, using the ventilation holes, can enter the living space or the cellar and basement of the building. In order to avoid this, you can use barrier screens or grilles that are installed on the vents.
They can also be decorative, which will further decorate the facade of your home. When a wooden house with an underground floor is equipped with vents, this allows for high-quality ventilation of the rooms located under the floor of the first floor. Therefore, it is necessary to think about the presence of such an important “little detail” as ventilation at the stage of developing project documentation.