Siding serves as an excellent decorative material for the exterior decoration of buildings, houses and various structures. Because in addition to its impeccable appearance, it has many positive properties, among which are: frost resistance, moisture resistance and durability. Therefore, if your house has lost its external beauty and you don’t know how to update the facade, siding will be an excellent solution. You will be pleasantly surprised by the fact that you can attach it yourself without outside help! In this article we will talk about how to properly attach siding.
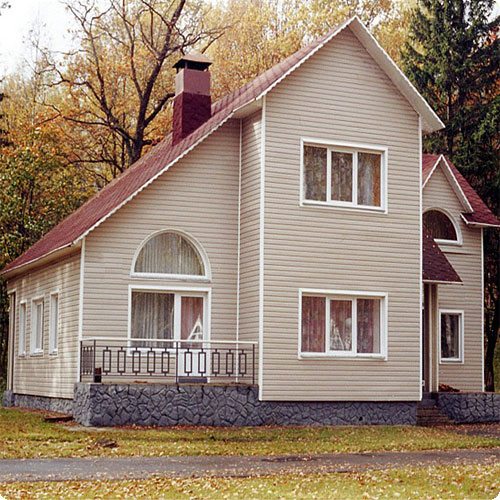
Two-story house, neatly finished with siding
Let's start with the fact that its characteristics, proven both in laboratories and in practice, are ideal for Russian weather conditions. As for maintenance, siding is an unpretentious material that does not require painting the facade, impregnation with special liquids or other processing. It is enough just to wipe it occasionally to remove adhering dirt.
Before starting work
Before installing siding, you need to purchase it in the right size and color. Panels 6 m long are ideal for covering walls (many people choose them, first of all, because they leave behind much less waste). It is also worth noting the fact that price plays an important role when choosing siding. The average cost of one 1 m² is approximately 180-200 rubles.
Attention!!! In order to correctly calculate the area of one siding panel, just multiply the length by the width, and the total will be the area.
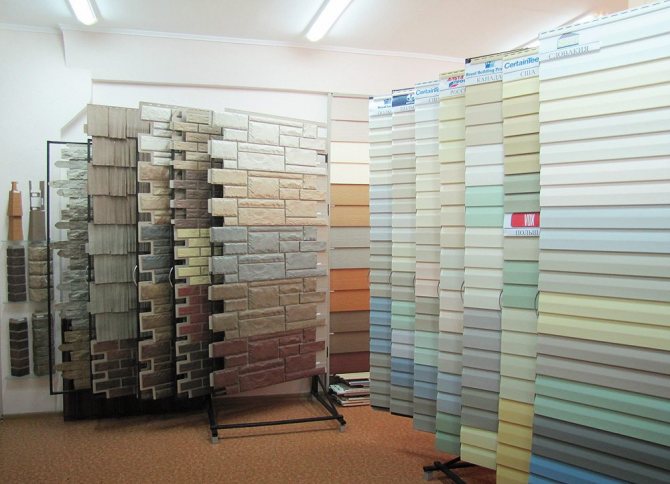
As for colors and textures, there are practically no restrictions. Many manufacturers present both ordinary panels of various colors and textured siding that imitates wood, brickwork, stone cladding, etc.
Types of siding
Note!!! Many people ask the question “what to attach the siding to?” If you are fastening using technology, then you need to install and align the guide rails before installation (we will talk about this below). The second option is to attach the siding on top of the old cladding (in this case, there is no need for guide rails, since the old cladding was installed level).
We calculate the amount of material
After you choose siding for your home, you need to decide on the required amount of material. The easiest way to calculate it is using a drawing. Draw a diagram of the house and measure all the walls separately using the formula S = axb (where a is the horizontal length of the wall, b is the vertical length of the wall). Calculate the surface area of each wall and ultimately add up the total footage of all the walls of the building. This will give you the total wall area of the entire house.
Note!!! The area of the walls must be calculated, minus window and door openings (you probably won’t cover them with siding).
Calculate the area of the pediment
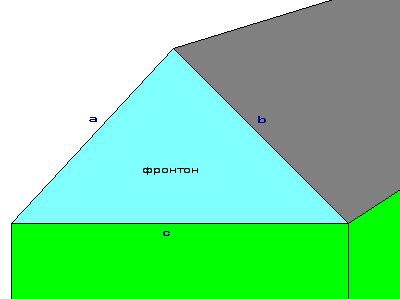
Pediment in the form of an isosceles triangle
To calculate the area of the pediment, you need to apply the following formula: first, imagine the pediment as an isosceles triangle, that is, the equal sides will be “a” and “b”, and the base will be denoted by the letter “c”. Now, we act strictly according to the formula: P=(a+b+c):2 (where “P” is the semi-perimeter). Then, we should apply the formula to calculate the area: S=p(pa)(pb)(pc).If Taking numbers as an example, it will look like this:
- a and b = 8 meters
- c = 6 meters;
- We apply the first formula: P=(8+8+6):2 =11 meters (semi-perimeter).
- We apply the area search formula: S=11(11-8)(11-8)(11-6);
- The result is S=495=22.25 m².
Well, despite a bunch of mathematical equations, we calculated the required area. These manipulations will help you save a lot and prevent waste of material.
Features of vinyl siding
PVC siding has the following features:
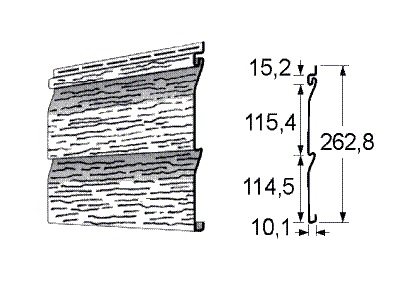
Vinyl siding - dimensions and weight.
- chemical inertness of the material;
- UV resistance;
- it is not subject to corrosion;
- the panels can withstand negative external conditions of use; they are not afraid of moisture or sudden temperature changes;
- caring for the panels is extremely simple;
- service life is 20-25 years;
- temperature conditions of use allow it to withstand fluctuations within -50-+50°C.
Installation of siding is extremely simple, it requires a minimum of time, wet construction processes are not used. The low cost of the material and its good quality make siding very popular. Special ventilated gaps are also provided, so moisture and condensation will be effectively removed, protecting the wall structure and providing a comfortable microclimate in the interior.
Of the minuses, it should be noted:
- Low thermal insulation properties.
- If there is a strong impact, the panels may break, although this happens quite rarely. If you purchase high-quality cladding, the material will last a long time.
We begin installation
So, if you decide to attach the siding yourself, then you should find out what the siding is attached to and what is needed for this? So, let's begin.
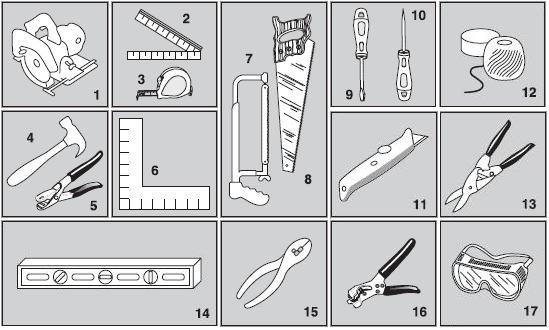
Required Tools
As for the tool, it is familiar to any summer resident and is available even to a person far from construction:
- A circular saw
- Metal ruler
- Roulette
- Hammer
- Pliers
- Metal (or, in extreme cases, wooden) square
- Hacksaw (fine-toothed blade recommended)
- Hacksaw
- Flat head screwdriver
- crosshead screwdriver
- Knife cutter
- Long thin rope and chalk
- Metal scissors
- Level
- Pliers
- Screwdriver
Preparing the surface for work
Preparation is not the most difficult, but the most important stage of the entire work process, so you should approach it with maximum responsibility. To begin with, you should remove all weeds and climbing plants from the wall. If there is a drain, various accessories and decorative decorations, dismantle them. In general, get rid of all things and objects that may interfere with the work process.
Attention!!! If there are rotten elements on the working surface, they should be removed and replaced with new ones, since the process of wood decomposition that has begun is unlikely to be stopped. It is recommended to treat the rest of the wall with an antiseptic.
Please take into account the fact that you will have to remove all the trim - these include protruding window sills, shutters, drains and decorative elements of doors and windows. After dismantling is completed, you can take a long level and easily check the evenness of the walls of the entire house.
Lathing and wall insulation
Before moving on to the main question, “how to attach siding?”, Let’s consider such a concept as sheathing. The sheathing of the building may not be done only if the previous wall sheathing is in less than decent condition. As for old houses, some work needs to be done here, since the walls become deformed and “float” over time. In this case, we stock up on the necessary tools and install the scaffolding (if you are working alone, you cannot do without them).
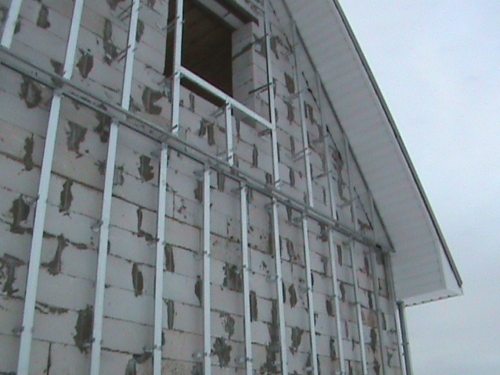
Rack system for siding
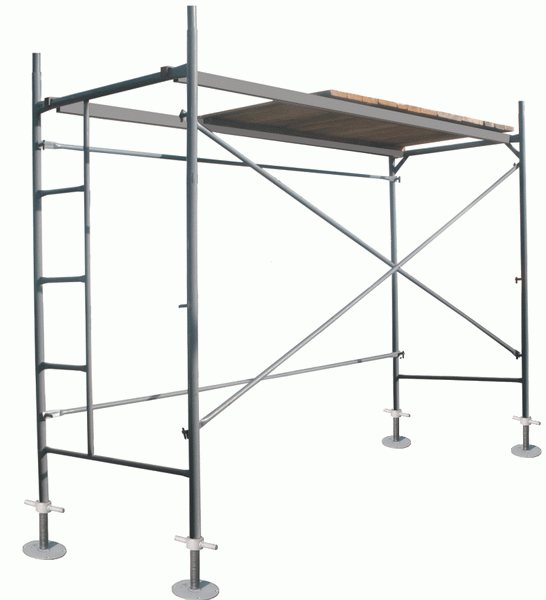
Scaffolding
On floating and concrete walls, sheathing is installed under siding made of slats or boards. The slats are attached to the wall with ordinary nails (usually 100 mm long). Slats (boards) should be nailed at a distance of 30-40 cm from each other. Take into account the fact that they must be nailed around window and door openings, as well as at all corners of the building. By the way, at the same time as sheathing the building, you can cover the walls with insulation. Some choose polystyrene foam, others choose mineral wool and glass wool slabs, and others simply use polyethylene.
We insulate the walls
Now one of the most basic questions is brewing - how to properly fix the siding? Any instruction for siding states that the panels must be fastened with galvanized or aluminum nails. But if you think about it, it is most convenient to fasten the siding with self-tapping screws. Why? Just imagine that you will have to balance on scaffolding or a ladder, while holding the panel with one hand, and holding a nail and a hammer with the other hand, and at the same time you need to manage to hammer it in. Self-tapping screws with magnetic heads are easily held on a screwdriver and are easy to drive into the panel even with one hand!
Starting strip and installation of panels
So, we figured out how to secure the siding, now we proceed directly to the installation work. First, let’s figure out how to secure the starting strip:
- First you should find the lowest point of the old sheathing;
- Then, using a long rope, chalk and a building level, we draw an even horizontal line, 30-40 mm above the lowest point;
- We install the starting bar so that its upper edge is flush with the drawn line, and fasten it with self-tapping screws.
Before you start attaching the panels, you need to install a starter rail around the entire perimeter of the building (or in those places where you plan to install the siding).
A few rules:
- Siding panels must be mounted in such a way as not to interfere with its possible thermal expansion and contraction. That is why it is necessary to leave a “working” gap of 4-6 mm between the end edge of the panel and the slats (other parts and fittings).
- Do not attach siding panels too tightly to the wall. Do not tighten the screws all the way, leaving 1-1.5 mm between the screw head and the plane of the panel. This will help avoid warping of the surface when changing temperature conditions.
- Nails (screws) must be driven into the middle of the oblong mounting hole, and not into the edge. It is customary to hammer nails in increments of 30-40 cm. We hammer in the nails correctly (screw in the screws)
- The installation of the panels must begin from the bottom (this means fastening with a starting strip or with a bottom panel), and then slightly push it up until the “lock” snaps into place.
Useful tips
Installing siding is quite simple, but there are a number of tips that must be followed. The recommendations are simple, but effective. They help to increase the service life of facade cladding and make the wall surface more attractive.
Expert advice:
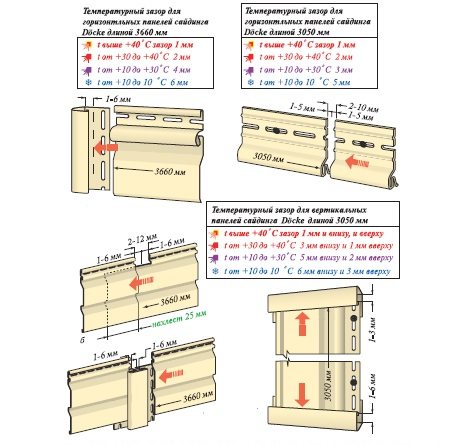
Temperature gaps when installing vinyl siding are necessary to prevent deformation of the material during seasonal temperature changes.
- It is imperative to inspect the surface of the façade walls. If there are traces of damage, rot or other defects, they must first be eliminated. Irregularities are covered with sheathing, but all weak areas of the walls should be eliminated before installation of the siding frame begins.
- The lathing can be vertical or horizontal. The selection depends on the direction in which the panels will be installed. If the siding will be installed in a vertical position, then the sheathing slats should run in a horizontal direction. When laying panels horizontally, the sheathing will be installed in a vertical direction.
- It is necessary to leave temperature gaps of 6-4 mm between individual siding boards, since during seasonal temperature changes the panels can contract and expand. If you do not leave such gaps, the casing will be deformed.
- The boards are not screwed tightly during fastening; it is necessary to leave 2 mm of space between the panel and the nail head. Sheathing technology assumes that the siding sheet will have the ability to move slightly in a vertical or horizontal position.
- It is recommended to lay siding from the center of the wall, moving towards the corners. This will make the appearance of the cladding more beautiful.
- When screwing, nails and screws must be fixed in the center of special technological holes; they cannot be moved tightly to the corners.
- Every 3-4 rows of laying siding, it is necessary to check the smoothness of the move using a level. Otherwise, the sheathing may shift, and this will cause the already laid rows to have to be disassembled and started all over again.
- The soffits are attached last, when the overall cladding is ready.
Siding is one of the most affordable materials for cladding a house. Installation of the cladding is simple, but you need to follow a number of recommendations that will extend the life of the cladding and make the cladding neat and beautiful. Experts have developed a number of rules for using siding panels that do not require special experience, but help make the work quick and simple.