Correct temperature
To achieve maximum comfort levels, we recommend maintaining the following floor surface temperatures:
- Linoleum 26-28 °C
- Ceramic tiles/concrete floor 26-28 °C
- Laminate 23-27 °C
The maximum floor temperature can be limited by a thermostat.
If you do not know the maximum permissible surface temperature for your flooring material, please contact the manufacturer.
Important! Wood is a good thermal insulation material.
Recommendations
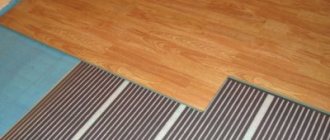
Warm film flooring is an easy-to-install method of heating rooms. The difficulty lies only in your installation skills and the financial component.
If you do not have the necessary skills, try to avoid unnecessary waste of money and nerves by calling a professional. This is guaranteed to leave some of your budget with you.
- Related Posts
- How to lay a water-heated floor?
- What are the characteristics of Knauf heated floors?
- How to repair a heated floor?
- What characterizes Rehau underfloor heating?
- How is an infrared heated floor installed?
- How to connect a warm floor?
What to consider when installing heated floors
- Heating cables are not installed under furniture or stationary objects
- It is necessary to observe the installation interval within the design limits and the minimum bending radius
- Heating cables must not be allowed to cross each other.
- The cable must be in a uniform and homogeneous environment along its entire length
- To avoid overheating, the cable must not be installed inside the thermal insulation layer
- To avoid physical damage, the cable should only be laid on a clean surface.
- The heating cable should not pass through a moving seam, kinks or be installed in areas of possible overheating. Distance to heat sources, such as a fireplace, sauna stove, etc. must be at least 0.5 m
- The possibility of using a heating cable with flooring materials is regulated by their manufacturers
- Resistive heating cable must not be shortened or extended
- A 30 mA residual current device must be used in all zones
- The angle of installation of the corrugated tube under the sensor on the wall should be such that the sensor can be easily removed in the event of its failure. The sensor is installed in the middle between the turns of the cable
- The installation interval may be smaller in areas of maximum heat loss, for example, windows, but not less than 2 bending radii
- Do not turn on the cable until the screed or leveling solution has completely dried. The exact timing is regulated by the manufacturers. For concrete screed this period is about 30 days, for leveling mortar or glue - up to 14 days.
Calculation of heated floors
Home \ Calculation of heated floorsProgram for calculating underfloor heating - DEVI HeatMAP
DEVI HeatMAP is a convenient tool to help you calculate the length of the heating area given the installation of DEVI heating systems. First determine the size of your room and add cold spots (areas without heat). DEVI HeatMAP will automatically calculate the length and location of DEVI heating systems needed to provide ideal heating conditions for your room.

Launch DEVI HeatMAP >>>
Please note: To operate the DEVI HeatMAP program, you need to install Adobe Flash Player 10. If this program is not installed on your computer, you will automatically be given the opportunity to download it. This installation is free. If you would like to learn more about Adobe Flash Player, visit the website at www.labs.adobe.com.
Calculation of heating cable laying pitch
The heating cable laying pitch is the distance between its lines.
For the “Warm Floor” system, as the distance between the cable lines increases, cold zones (“thermal zebra”) may appear on the floor surface!
The larger the laying step, the thicker the layer of concrete above the cable must be to ensure uniform temperature distribution over the entire floor surface.
For the “Warm Floor” system, we do not recommend exceeding the cable laying pitch of more than 12.5 cm with the minimum possible screed thickness of 3 cm for ordinary cement-sand mortar.
For thin screeds, we recommend using DTIP-10 or DTIE-10 cable with a laying pitch of no more than 10 cm.
When calculating the cable laying pitch, you should remember the minimum permissible power values for cable heating systems!
When installing Deviflex heating cables, we recommend using Devifast mounting tape, manufactured in such a way that the distance between cable turns can be selected in 2.5 cm intervals (2.5 cm, 5 cm, 7.5 cm, 10 cm, 12.5 cm, 15 cm, 17.5 cm, etc.).
To calculate the pitch distance for laying the heating cable, you can use two formulas:
1. Overall cable length: h = (S x 100) / L (cm)
where S is the laying area m², L is the length of the heating cable m.
2. According to the total specific power: h = (Ppog x 100) / P beat (cm)
where Ppog is the linear power of the cable W/m, Pud is the calculated specific power W/m².
Example 1
The Deviflex DTIP-18 cable, 535 W, 29 m must be installed in a bathroom with a free area (laying area) of 3 m2.
Laying pitch calculation: (3m² x 100cm/m) / 29m = 10.35cm
However, using the Devifast mounting tape, we can install the heating cable in the bathroom in 10 cm increments, i.e. During installation, a slight adjustment to the cable installation area will be required.
Example 2
In the process of reconstructing a floor with a thin screed, we use a heating cable DTIP-10 (10 W/m at 230 V).
We select the installed power 120 W/m2.
Then the calculation of the laying step will be: (10W/m x 100cm/m) / 120W/m² = 8.3cm
When calculating, the installation pitch is not always a multiple of the fastening pitch on the Devifast mounting tape.
In this case, we recommend laying the heating cable with variable pitch. The table shows the correspondence between the laying pitch and power per 1 m²:

* Variable laying step. For example, 5 - 7.5 = (6.25) means that one cable line is laid after 5 cm, and the next line after 7.5 cm. Then again after 5 cm, etc.
Calculation of Devifast mounting tape
To calculate the length of the Devifast mounting tape, it is necessary to determine the distance between the tape strips. For concrete floors, where the cable is covered with a layer of screed of 3 cm or more, and the cable laying step exceeds 10 cm, the distance between the strips of the Devifast mounting tape should be no more than 50 cm.
For floors with minimal screed, where the cable is covered with a layer of special mastic of 1 - 2 cm, and the cable laying step is 10 cm or less, the maximum distance between the strips of the Devifast mounting tape should be no more than 25 cm.
A larger distance between the strips of tape is also allowed. The main condition is the inadmissibility of displacement of the laid heating cable lines during pouring.
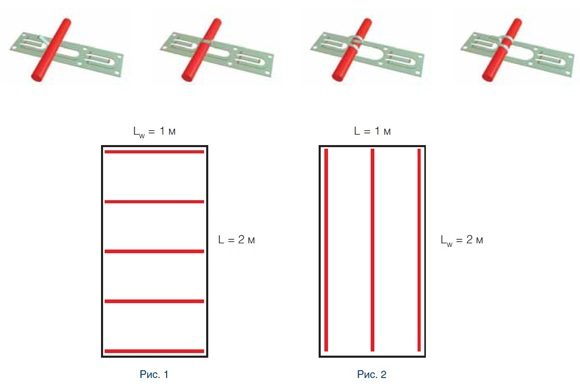
Formula for calculating the length of the mounting tape: Total installation area (m²) x 100(cm/m) / distance between lines (cm) + Lw(m)
where Lw is the length of the wall, parallel to which the mounting tape is laid (m).
Example
Total installation area: 1 m x 2 m = 2 m2. If we install the Devifast mounting tape parallel to a wall 1 m long (Fig. 1), with a distance between the tape lines of 50 cm, the required length is calculated as follows: 2m² x 100cm/m / 50cm + 1m = 5m.
If we install DevifastTM mounting tape parallel to a 2 m long wall (Fig. 2), with a distance between the tape lines of 50 cm, the required length is calculated as follows: 2m² x 100cm/m / 50cm + 2m = 6m.
As you can see from this example, depending on the installation method, the length of the DevifastTM mounting tape changes, while the area of the room and the distance between the tape lines remain the same.
Determining the desired temperature in the rooms
The final floor temperature depends on the purpose for which the room is used. For example:
- +29-30 degrees – halls, hallways;
- +27-29 – offices, living rooms;
- +30-35 – floors near windows, on verandas;
- +32 – bathrooms, toilets;
- +17-19 – gyms.
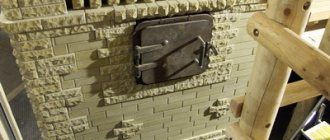
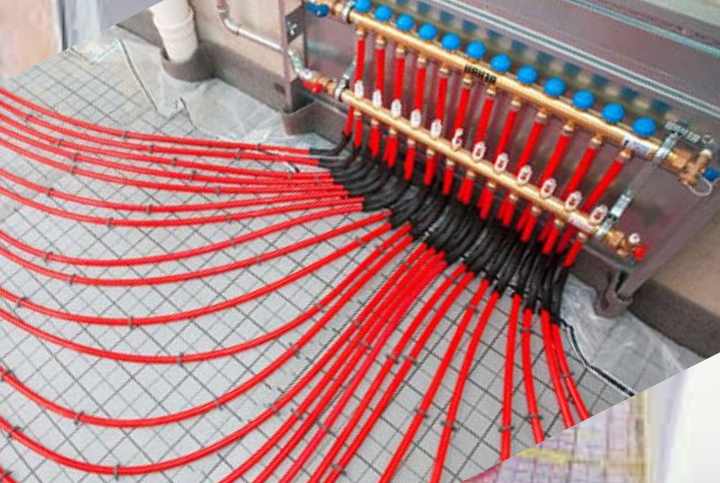
Installation of water heated floor
In this case, the coolant temperature should not be less than +40 degrees or exceed +60. The heating system should be such that the difference between the temperature indicators of the forward and return pipes in the case of water floors does not exceed 15 degrees. Otherwise, the base will be heated completely unevenly.
The balance of thermal/hydraulic loads for a water floor must also be optimal and adjusted. Therefore, the heating circuits must have a certain length in accordance with the diameter. The optimal pipe option is 18 mm, since even with a small amount of water such a pipeline will work correctly and heat the base.
How to calculate a warm electric floor
To install a heated electric floor, you can contact a company where they will give you a full calculation of the power of the heated floor, taking into account the type of room and number of floors.
The calculation can also be done using online calculators, on the websites of companies that install underfloor heating, or using programs, of which there are many on the Internet. To calculate the power of an electric floor yourself, you can use a simple formula:
P=1.3*Pm*Sroom,
1.3 – power reserve factor of the heating element is 30%; for a thermal storage screed, this coefficient is taken equal to 1.4 or 40% power reserve,
Pm – selected electrical power of the heating element in W/m²,
Sroom is the area of the part of the room not filled with furniture in m².
In this formula you need to find the unknown values of Pm and Sroom. There are two options when choosing the size of a room. This is the area of the room for calculating electric underfloor heating with additional heating, which is selected approximately 60% of the total area of the room.
Only the floor area not filled with furniture is considered, because there is no need to heat the floor under the furniture. If you plan to purchase additional furniture, then you need to leave a place for it without heating.
The second option is to calculate the power of underfloor heating for the main heating of rooms, where Sroom is selected equal to 70% of the total area of the room.
Suitable options for heated floor kits
Code RSNameArea, m2Specific power, W
- Attention!!! The heating cable sets presented in the calculation are required in the amount of 3 pieces!
Code RSNamePower, WLength, mMinimum laying step, cmStep of laying, cmSpecific power per m2 Code RSNamePower, WArea, m2Specific power per m2 List of suitable options
(PDF) download
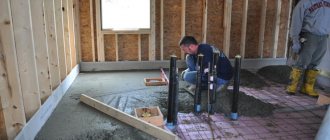
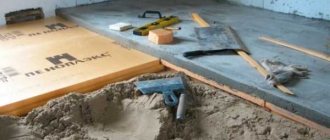
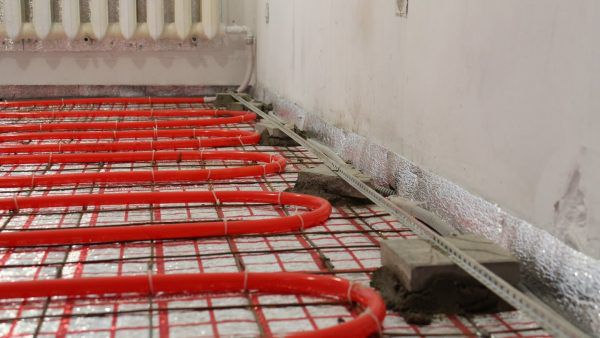
- 1. Base
- 2. Thermal insulation
- 3. Foil
- 4. Basic screed
- 5. Mounting tape
- 6. Heating cable
- 7. Temperature sensor in corrugated tube
- 8. Leveling screed
- 9. Waterproofing (if necessary)
- 10. Tile adhesive
- 11. Sound insulation
- 12. Flooring
- 13. Thermostat
Types of film heated floors with average prices in Moscow
As mentioned earlier, different models of film elements have different characteristics. So, we can conclude that the price range for models of different quality will be quite large. Let's look at the average price range in stores and online stores in Moscow:
- average prices for film flooring of the Caleo Line brand in various stores range from 1,500 to 2,000 rubles per 1 sq. m. meter of material;
- the cost of the film heating system of the “Caleo Gold” brand is in the range between 2000-5000 rubles;
- the cost of building materials of the “Caleo Grid” brand reaches prices from 1800 to 3000 rubles;
- and finally, the most prestigious brand “Caleo Platinum”, combining high quality, low energy consumption and versatility, costs from 4,500 to 8,000 rubles per sq. m. meter of material.
We recommend: How to make a warm floor from a heated towel rail?
Each type of warm infrared floor has the right to be installed, since each type is combined with a specific floor and floor covering. The choice depends on personal goals and the financial component.
Effect of IR heat source on the body
Not many people know about such an advantage as a beneficial effect on the body. The secret is that human heat is emitted in the same range as infrared. This means that an infrared heated floor is perceived by a person as a natural source of heat and therefore more pleasant. For example, if with water heating a person needs 22-25 degrees of heat for comfort in a room, then when using IR heating the same feeling will be already at 18 degrees.
IR radiation ionizes the air, destroys harmful bacteria and viruses, and removes unpleasant odors.
IR rays treat many diseases. Under their influence, nervous tension goes away. In our age of constant stress, this is a great opportunity to strengthen the nervous system without leaving home.
Many people find it difficult to tolerate dry air in their apartments, which is caused by central heating radiators. You have to use humidifiers. IR heated floors do not dry out the air, so it is easy to breathe in such a room.
IR radiation does not heat the air itself, but objects. Therefore, walking on such a floor is a pleasure and a state close to relaxation arises.
Pros and cons of film for underfloor heating
Each heated floors have their own advantages and disadvantages. The film heating system is no exception. Let's start with the pros:
- installation within a few hours. After laying the film, the floor covering is laid, and then the floor is put into operation;
- electricity consumption is significantly lower than a cable heating system;
- the layers of heated floors will take up about 5 mm in total, so there will be no need to carry out additional repair work to raise doorways;
- the system does not dry out the air, and infrared radiation is minimized;
- The floor is installed independently. All you need are simple skills;
- the room warms up evenly and in a short time;
- the system can withstand heavy loads;
This type of heating can be installed under any floor covering.
Let's move on to the disadvantages of the system:
- complexity of installation due to ignorance of basic rules;
- It is necessary to divide the film into parts along special lines. If you miss a little, part of the film will be faulty;
- the subfloor under warm sheets must be leveled. If this is not done, problems will arise in the future;
- considerable prices for sets of this system;
- Do not lay the film under heavy household objects;
Taking the above into account, it will be much easier for you to understand what you are dealing with. Take this into account when choosing the type of heating system.
We recommend: What concrete is suitable for a warm water floor?
Features of different types of infrared floors
The production of infrared floors is constantly being improved. Manufacturers are trying to take into account consumer preferences. According to the type of construction, IR floors are:
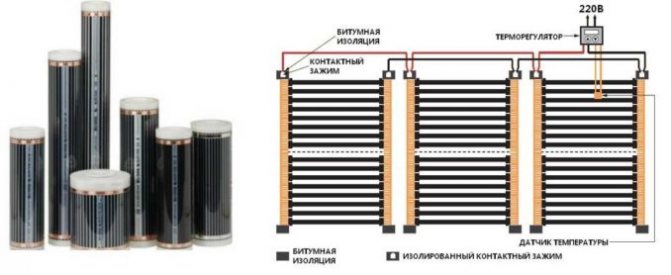
- film;
- rod-shaped.
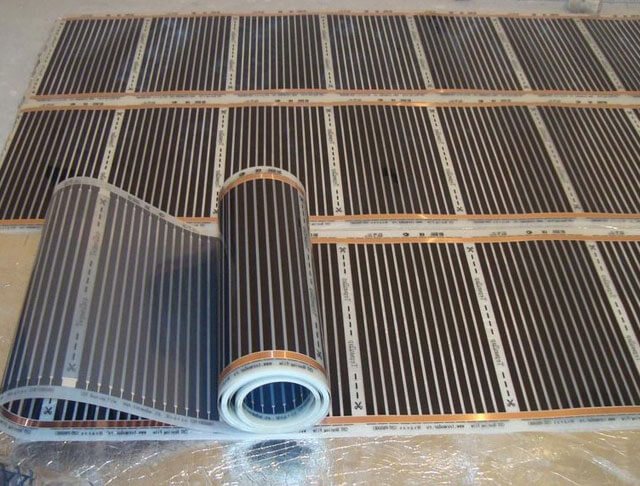
Film, in turn, are divided into solid and striped, according to the type of carbon fiber applied, which is the source of infrared radiation. The film with continuous carbon fiber coating is easy to install and easy to cut. It transfers heat from the entire area, the heating dynamics are higher than when applying carbon in strips.
The carbon strips are arranged in groups, between which cuts can be made. Since the connection to the power source is parallel, if any unit fails, the remaining area of the “stripe IR film” will remain operational.
In this case, a film with a continuous coating is more advanced, since only the places where there is a tear or a cut fail. The service life and price of solid carbon film are higher than that of striped film.
The IR rod floor looks like a rope ladder. Many rods, which are filled with carbon, copper and silver, are connected to each other by wires. The rod mat has the ability to self-regulate. Its installation differs from the film type in that installation requires a “wet” cement screed. However, the service life is even higher than that of solid film, and it is not afraid of heavy mechanical loads.
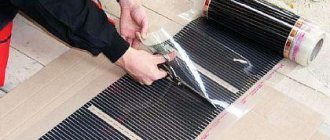
Installation of warm film flooring for various types of floor coverings
Making a film heated floor with your own hands is quite simple if you have the appropriate skills. The skills consist of connecting the electrical parts of the film to each other, as well as connecting the finished structure to the network.
Anyone can handle the rest. Let's look at the main stages of installing an infrared structure, and then move on to laying possible finishing layers. Let's get started:
- the base is cleared of debris and dirt is removed. If irregularities of more than 3 mm are observed, they must be leveled with a screed;
- in accordance with the furniture layout, we determine where to place the film on the base;
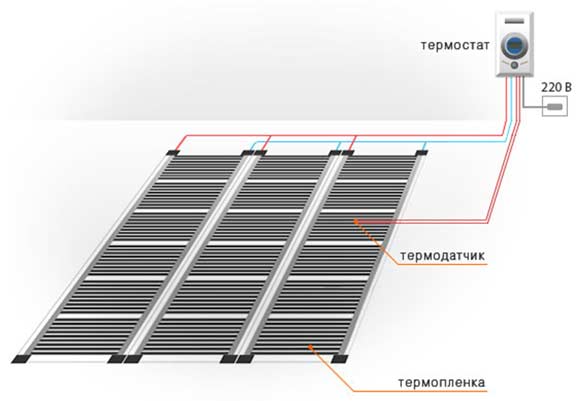
- choosing a location for the temperature controller. We choose a place on the wall in a convenient place, laying a recess from it to the floor in which the connecting wires will be located;
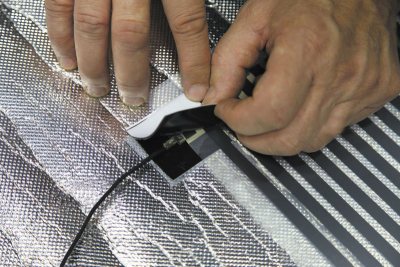
- substrate. We lay thermal insulation over the entire surface of the future heating film system. The strips are laid without overlapping each other, but in parallel, after which the joints are covered with adhesive tape. The backing is attached to a wooden surface with a stapler, and to concrete with double-sided adhesive tape;
- We lay the infrared film with the copper side down on the insulation, retreating 10-15 cm from the walls. According to the diagram, we distribute the material around the room and cut it into strips of the required sizes. We cut the film strictly along the cut lines;
- We fix the film with adhesive tape to avoid shifts;
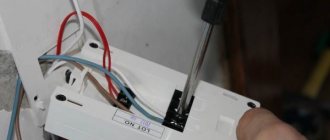
- We seal the cuts in the places of the copper strip with bitumen tape, after which we peel the film a little, placing the clamp with one side inside the film and the other side on top of the copper busbar. Squeeze with pliers;
- We insert the wires, stripped of insulation, into the inside of the terminals, and then squeeze them with pliers. We seal the resulting connection at the top and bottom with bitumen tape;
- The temperature sensor is glued with bitumen tape to the black stripe at the bottom of the film. Part of the substrate at the installation site is cut out to avoid unevenness;
- we run the wire to the thermostat and connect it, after which we fix the regulator on the wall;
- We check if the system is working. To do this, just run your hand over the turned on thermal film;
- After a successful check, we lay a vapor barrier layer over the entire surface.
We recommend: How to install a water heated floor with your own hands?
After the above points, we begin laying possible finishing coatings. Let's look at the examples of linoleum, laminate and tiles.
Film heated floor under linoleum:
- lay a layer of plywood or chipboard over the entire surface, carefully securing it with self-tapping screws or glass nails. It is important not to damage the contacts. To do this, the material is attached only at the edges, where the contact points are visible;
- roll out a roll of linoleum, warm it up for 24 hours, then secure it with mastic and baseboard.
Film heated floor under tiles. Under the layer of floor tiles you need:
- pour the self-leveling floor, spread it over the surface and dry;
- Next, we glue the tiles using tile adhesive, wait for them to dry and put the system into operation;
Film heated floor under laminate:
- a vapor barrier film is laid on the finished film floor system;
- The laminate is installed immediately on top of the film in accordance with the manufacturer’s instructions.
Calculation of the power of infrared heated floors per 1m2
In addition, when starting calculations, it is necessary to take into account the specific operating conditions of the infrared warm floor:
- The type of floor covering, more precisely, the degree of its thermal conductivity and thermal sensitivity.
- What is the IR floor placed on? Below there can be a cement screed or dry, insulating materials.
- The presence of heated floors above and below or a foundation and a cold basement.
- The total area of the room and the area free of furniture.
It is extremely important to consider the permissible temperature thresholds for different floor coverings. Manufacturers should indicate this. For example, when installing an infrared floor under linoleum and laminate, the surface cannot heat up above 28 degrees. Therefore, the power will be limited to 130 W per square. For porcelain stoneware and floor tiles, power up to 250 W is allowed.
Calculation example
Infrared heating elements are mainly installed in areas of the premises that are free from heavy furniture. If you ignore this rule or rearrange beds, refrigerators and cabinets after installing heated floors, the system will overheat under the furniture.
The exception is self-regulating rod mats, which are able to adapt to the desired heating mode and reduce or increase energy consumption. But popular film infrared floors do not have this ability. Therefore, to calculate, the part occupied by furniture is subtracted from the total area.
For example , there is a children's room with 12 square meters. 5 of them are under furniture. Therefore, 12 – 5 = 7, that is, 7 m2 of infrared heating film can be installed in a room.
Pay attention to the details: how to calculate a heated floor by area
Regardless of the planned type of coating, the work uses the formula P = Pm x S, where Pm is the power of the heating material per 1 square meter, and S is the usable area of the room.
Experienced builders focus the attention of beginners on the fact that the use of this formula is justified in relation to electric and water heated floors.
At the next stage, you pick up a calculator and begin the calculations.
The average statistical indicators for various types of premises, taking into account the parameters, are as follows:
- The permissible width and length of the film coating in the living room is from 110 to 130 W per square meter;
- On the balcony, this indicator is at around 180 W/sq.m;
- The recommended dimensions of a heating element for a bathroom range from 120 to 150 W/sq. m;
- Calculation of the length of heating mats for the corridor shows that it is better to stay here in the range from 110 to 120 W/sq. m;
- The range from 110 to 130 W/m2 will help you correctly calculate the parameters for the kitchen.
Technically, the ratio of the usable area in the room and the power of the heating element helps determine this indicator correctly. It is recommended to operate exclusively with exact and not approximate values. After all, an error up or down will not have the best effect on the degree of comfort in the room.
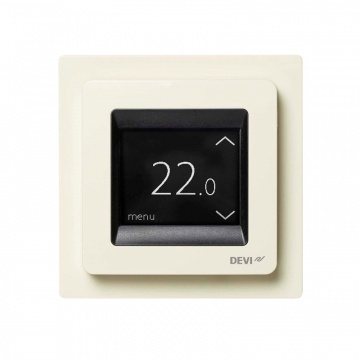
Thermoreg TI 200 thermostat
| Manufacturer: | Thermo |
| Model: | TI 200 |
| View: | electronic thermostat |
| Power: | 3600 W |
| Installation type: | recessed |
to compare old price RUR 3,528 RUR 2,990
Photo Name Price per piece. Quantity Cost
| Thermoreg TI 200 thermostat | 2,990 rub. | <1> | RUB 2,9902,990 |
There are 0 items in the cart worth 0 rub.
Continue shopping
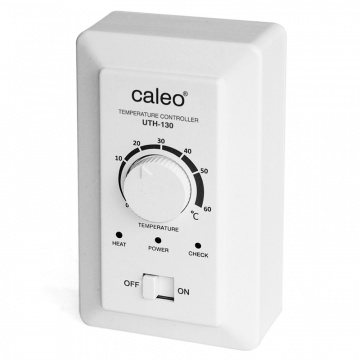
Thermostat Caleo UTH-130
| Manufacturer: | Caleo |
| View: | mechanical thermostat |
| Power: | 4000 W |
| Installation type: | overhead |
to compare RUB 3,173
Photo Name Price per piece. Quantity Cost
| Thermostat Caleo UTH-130 | RUB 3,173 | <1> | RUB 3,1733,173 |
Continue shopping Availability
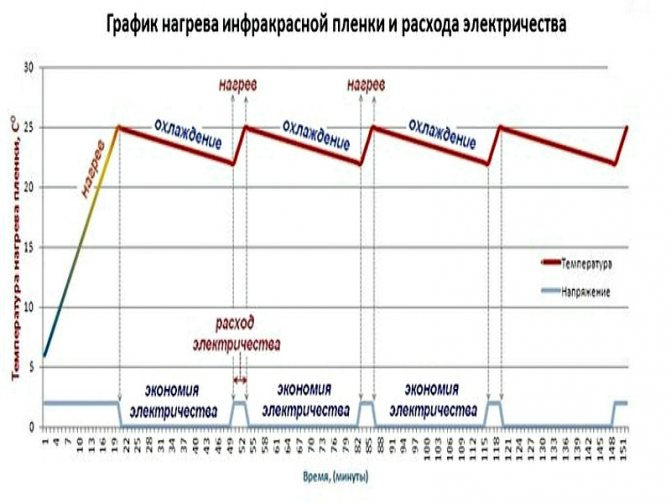
Energy consumption of heated floors
The energy consumption of infrared film heated floors is calculated using simple formulas. Before installation, it is necessary to decide how the film will be used - as the main source of heating or as an auxiliary heat source in addition to radiators, radiators and other devices.
If the film heated floor will act as an addition, you will need a film with a power of 150 W/sq. m. To operate in independent mode, its power should be 200-220 W/sq. m. If the room is cold, and even damp, we increase the power to 300 sq. m. As a basis for our calculations, we will choose two samples - with a power of 150 and 220 W/sq. m. Let's see how much electricity a warm floor consumes per month, in kilowatts.
General information
Important!!! Water system for private houses, electric for apartments. Let's look at both systems and their capacities in more detail.
In some houses, underfloor heating is the only heating system; its power is 200 W, and if there is additional heating, then 100-160 W.
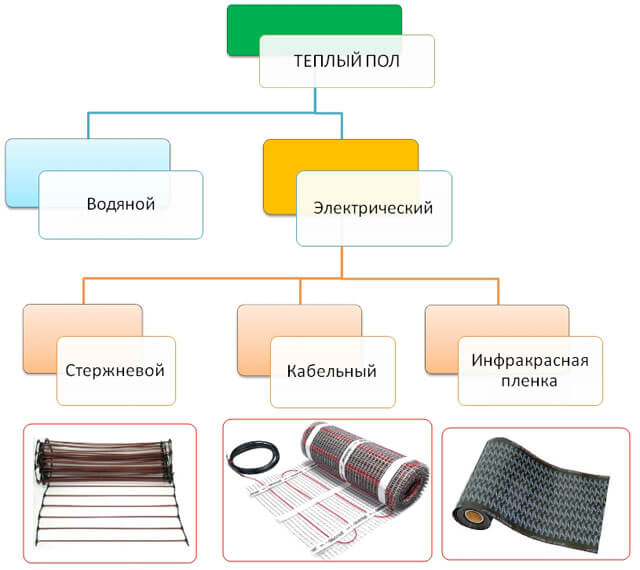
Types of electrical system:
- Electrical cable;
- Thermomat (cable and carbon);
- Infrared film.
The power of a heated floor depends on the heating element
| Heating element | Power W/m2 |
| Electric cable | 120-150 |
| Thermomat | 120-200 |
| Infrared film | 150-400 |
These are average figures, each manufacturer has its own data.
The film is suitable for thin floor coverings such as linoleum and laminate. The electrical cable and thermomat are laid in a screed or under the tile.
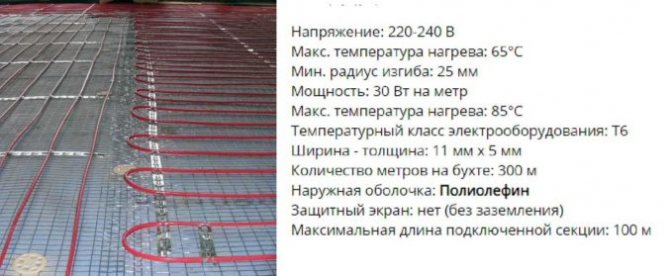
- Electrical cable. The system is inexpensive, it fits under a screed no more than 5 cm thick. It is not recommended to make it thicker, as there will be heat loss. The power of such a cable is small; if it is folded more tightly, it can reach 200 W/m2.
If there is no more heating in the house, in addition to the underfloor heating system, then the room coverage should be at least 70%. Otherwise the system will be ineffective.
Thermomat. This system is simple. Since physical strength is needed to a minimum. You need to lay out the mat and plug it into an outlet. Today, a new design has been developed that has a durable coating, then a screed is not necessary and you can immediately lay the floor covering.- Infrared film. Thickness 3mm, power 100-220W/m2. Any coating is allowed.
- The electric-water system is a new development; there is no need for pumps or boilers. The cable is located in a polyethylene tube filled with antifreeze. When turned on, the antifreeze boils, as soon as the floor in one room heats up, thanks to the thermal inertia of the screed, the heat transfers to another room.
Warm floors are comfort. But how can you reduce energy costs when using an electric heating system?
Let's calculate the energy costs for one room.
For example:
- The area of the room is 20 m2, 70% of the room needs to be heated to a comfortable state - this is 14 m2.
- Heated floor power 150 W/m2;
- 150*14=2100 W – the amount of energy consumed for one room.
If the system operates for 6 hours per day, then the energy consumption per month will be 378 kWh.
To reduce costs you need to:
- Use a thermostat. With their help you can save up to 40% of electricity;
- Reduce heat loss. If you insulate the walls, this will help reduce energy costs by 2 times;
- Save money at the installation stage. Do not turn on the heating under the furniture;
- Reduce the temperature by 1 degree, consumption will decrease by 5%.
Thermoregulation and more realistic numbers
Energy consumption of electric heated floors is reduced by installing a thermostat. Without it, the surface temperature of the floor covering would be too high and not the most comfortable. The thermostat monitors the temperature of the finished floors, turning the power on and off as needed. Depending on the level of heat loss, actual consumption drops by 30-40%.
There is another way to save money - it involves turning off the heated floors when no one is home. This technique is relevant if the film is used as auxiliary equipment. If it works as the main heating, then it makes no sense to turn it off - during this time the house will cool down, and reheating it will take approximately the same amount of electricity as will be saved during the shutdown period.
In total, even if film heated floors work 60% of the total time (that’s 14.4 hours a day), the electricity consumption will be about 317 kW (or 216 kW when operating in auxiliary mode).
Let's see what we get in monetary terms. Since electricity tariffs are different in the regions, we will take an average figure of 4.5 rubles/kW. For a month of operation in the main mode, the consumption for film heated floors will be 1426.5 rubles/month, in the auxiliary mode - 972 rubles/month.
Real and nominal indicators
Electric heated floors have a certain power rating. The actual consumption that will be observed during the operation of the device will differ slightly from the nominal ones. We are talking about automating a device that simply will not work during those daytime hours when none of the family members are at home, and empty rooms do not need to be warmed up. In reality, the heated floor will be turned on no more than 5-6 hours a day. On warm days (late autumn), daily warming up is not necessary, so the actual indicators will be several times less than the original ones.
Example of power calculation (formula)
The use of additional electrical equipment such as a thermostat will help to significantly reduce energy consumption. If the device is of high quality, then costs will be reduced by 30%. Practice shows that the device spends no more than five minutes heating the surface, and it takes ten minutes to cool down, after which it turns on again. Within an hour, a powerful electric heated floor will work for only twenty minutes.
Calculation result
You can reduce costs as follows:
- When the optimal indicator decreases by one degree, electricity consumption is reduced by 5%. At the same time, a temperature regime not exceeding 21°C is considered comfortable for living;
- the surface of the room can be covered with heating elements by only 65-70%;
- using a warmer floor covering (definitely not tile);
- timely insulation of windows, walls and other areas that could create a draft.
To accurately determine consumption indicators, you should take regular measurements on the meter. In this case, it is advisable to completely turn off other devices in the house that are powered and operate by electricity.
AdminAuthor of the article
Did you like the article?
Share with your friends:
Comments (1)
- Egor Sep 17, 2020 at 10:21 am
Helped a lot, thanks!
Answer
Reduced energy consumption
The heat reflective layer allows you to maximize the effectiveness of the IR film by retaining and directing heat in the desired direction.
We were able to calculate very real figures on the consumption of electricity for the operation of film heated floors. The costs are not that terrible, but it will take some work to achieve compliance. First, you need to correctly lay the IR film, placing a heat-reflecting layer under it. Thanks to this, the heat it generates will not escape into the concrete screed or other underground structures.
It is also necessary to reduce heat losses, this will be somewhat more difficult. First, you should work on the walls of your home, since losses here can be up to 15-20%. This figure is reduced by installing thermal insulation and an additional layer of brick. It is best if all this is taken into account at the stage of building a home, otherwise you will face additional costs.
Ceiling insulation will help reduce the energy consumption of a film heated floor, from where another 10-15% of thermal energy can be lost. Ceiling structures should be insulated using basalt wool or any other similar insulation, in two layers. Such insulation will help reduce energy costs and prevent heat loss outside the home.
To reduce heat losses and a corresponding reduction in energy consumption for the operation of the film floor, you should work on other elements:
- Doors - you need to either install normal entrance doors in your house or endure the cost of electric heating;
- Floors are another place through which thermal energy can escape. This leakage is prevented with the help of an additional concrete screed, as well as with the help of serious heat-insulating materials. In wooden buildings, only thermal insulation is used, on top of which subfloor boards are laid - then the film is spread, and the finishing coating is placed on top of it;
- A large area of window openings and extra windows - all this contributes to an increase in energy consumption for the operation of film heated floors. Extra windows should be filled in, and openings that are too wide should be made narrower - the minimum ratio between the window area and floor area is the cause of losses.
How to calculate the power of a heated floor
First of all, the purpose of the heating system is determined:
- main heating of the house 150-200 W/m²;
- additional heating 110-150 W/m².
If an electric heated floor is installed, its power will depend on the purpose. As the main heating structure, its installed power should be no less than the value of the heat loss of the house, and preferably 30% higher. There are fewer requirements for additional heating, since compensation for heat losses falls on the communal heating system. The system's control equipment allows additional savings of more than 50% of consumed electricity.
How to calculate an electric heated floor
The calculation method is similar to what is written about a water floor. It is necessary to know the heat loss and method of using floor heating, the power of one meter of heating element. In this case, everything is somewhat simpler, because electric materials for floor heating have a specific number, which manufacturers use to indicate maximum heat transfer. They are not able to give out more than the stated figure. Therefore, the calculation of underfloor heating with electric heating is simpler and clearer. However, a fair number of variables remain. This is the thickness of the screed, its thermal conductivity, and the thermal conductivity of the finishing floor covering. They also need to be taken into account.

The calculation depends on the heater power per square meter
Effective heating area
The calculation of a heated floor with electric heating begins with determining the effective heating zone and its area. Most heating elements do not tolerate overheating (resistive cables, resistive cable mats, film heaters and infrared mats). An exception is self-regulating heating cables, but they are expensive, so they are rarely used. Although, there are also cables and mats made from them.
Once again: electric floor heating elements are laid only in an area where there will be no furniture and/or plumbing fixtures, carpets, etc. That is, an electric heated floor is placed where there will be a constant and certain heat flow.

To calculate the cable for a heated floor, you must first determine the area on which it will be laid
Before starting the calculation, we outline the proposed places for furniture/plumbing/carpets and calculate the remaining area. This will be the effective heating area. We will use it further in calculations.
How to calculate the footage of a heating cable for a floor
The calculation method is based on the amount of heat that needs to be replenished (heat loss) and the effective heating area. We divide heat loss by the effective heating area. We obtain the required thermal power, which we must obtain per square meter of area with the installed heating element.
For example, the area of a room is 16 squares; furniture will be located on 4 squares. Heated area - 16 sq. m - 4 sq. m = 12 sq. m. Heat loss of the room - 1100 W. Let's find out how much power is needed from one meter: 1100 W / 12 m² = 92 W/m².
Calculation of heating cable based on room area and meter power
Next, we look at the power of the cables for floor heating. For example, the power of one meter is 30 W. To get 92 W per square meter, you need to lay a little more than three meters of cable. Quite a real task. When developing a diagram, remember that it is better that for a screed with a height of 3-4 cm, the distance between the wires does not exceed 25 cm. Otherwise, the floor will have pronounced “stripes” - alternating zones of heat and cold.
There is another way. Buy a ready-made cable set of a certain power. Look for the right power and laying area. You have everything included.
Calculation of heated floors with cable mats
The essence of the calculation does not change. Heat loss and effective laying area are also needed. This is the same cable, but pre-attached to a polymer mesh. This heating element is easier to install. Most often used under tiles. It is simply rolled out onto a prepared base and the tiles are placed on top using special glue.
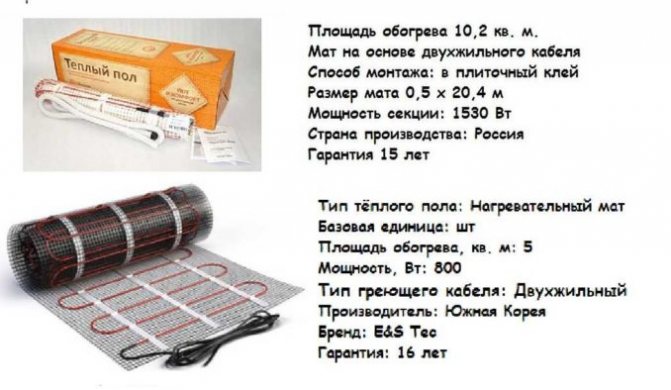
Heating mats are usually sold ready for installation.
With this type of floor everything is simple. It is sold in pieces of a certain capacity for a certain area. All you need to do is find the option that suits you.
Let's calculate the film heated floor
The film heating element is sold in sets and by the meter. Select the footage and power so that it provides the required amount of heat. The film panels should be laid close to each other. This is necessary to avoid temperature banding.
Warm floor film. The calculation is very simple: we select the power and width so that they provide the required amount of heat
The width of the film heated floor is 30 cm, 50 cm, 80 cm and 100 cm. It is quite possible to use different widths in one room. It is important that the heating elements do not overheat.
How much does an electric heated floor consume?
Summer is a time of endless renovations and, probably, many of you have thought about installing an electric heated floor in your home, for example, in the kitchen or hallway? Before making a decision to install a heated floor or not, it is worth calculating how much electricity it will consume, how much the payment for light will increase with a heated floor. In this article we will deal with this issue.
Heating element power
So, first of all, we need to decide what type of heated floor we will use. There are three types of underfloor heating: film, thermomat and heating cable.
The film is used mainly under linoleum and laminate, cable and mat under ceramic tiles. And these three types have different energy consumption, namely:
1. Film coating has a consumption of 150 to 400 watts per square meter.
2. Heating cable - from 10 to 60 W/m (average 30 Watt). In most cases, 4-5 turns are laid per square meter of surface, so that the total power is 120-150 watts per square meter.
3. Thermomat - available with power from 120 to 200 watts per square meter.
As you have already noticed, the average power varies from 120 to 250 watts per square meter, which is quite acceptable for both auxiliary and main room heating systems.
We count the costs
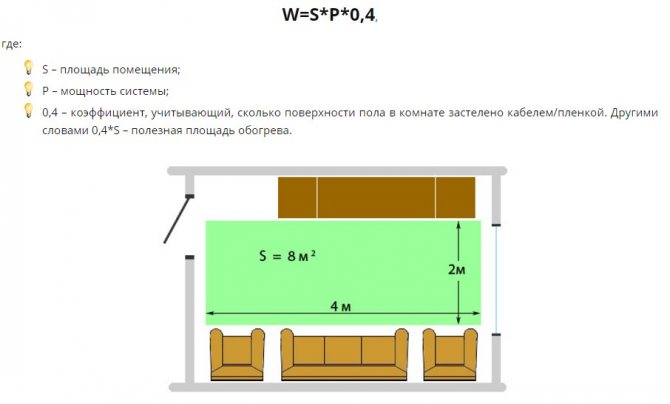
So, we have decided on the approximate power. Now let's move on to the actual calculation. And for this we need to use this simple formula:
Where S is the area of our heated room;
P – power of the selected electric heating;
0.4 – coefficient of coverage of the total area of the room with the “warm floor” system.
For example, you decide to calculate the consumption of underfloor heating with a power of 200 W/m2 in a room of 30 square meters. So the calculation will look like this:
That is, such heating will consume 2.4 kW per hour.
So, we have determined how much energy the heated floor will consume per hour, but this is not yet a complete calculation. In most cases, such heating will operate for a maximum of 9 hours a day, that is, the daily electricity consumption will be 9 * 2.4 = 21.6 kW.
Now we multiply the resulting number by the tariff in your region (for me it is 4.48 rubles) and it turns out that in my case, such heating per day will cost 96.76 rubles per day or 2,903.04 rubles per month.
How to reduce possible costs
So, you've already done the math and most likely thought that the game isn't worth the candle? But let's think about how we can reduce consumption and, quite possibly, after certain manipulations you will still decide to install a warm electric floor.
So, to reduce the energy consumption of underfloor heating, you should use the following tips: