To relax in the countryside in winter, you need a reliable source of heat (heater). It can be purchased in specialized stores. But there are summer residents who can easily design homemade heaters for their home, cottage and garage.
On this topic:
Efficient DIY garage oven
Oct 18, 2018
How to choose a walk-behind tractor for the garden
Aug 14, 2018
How to choose a chainsaw: practical advice
Aug 13, 2018
Types of electric heaters
May 7, 2017
BACK FORWARD 1 of 16
Not all summer residents and homeowners come to this decision, but only those who have special skills and abilities. Among them there are real self-taught engineers. They are able to calculate everything down to the smallest detail, carefully handle every detail, installing an original safe heater.
The cost of material for a homemade device for heating a room is minimal, since it can be found on the farm. Even if you buy the material for money, it will cost much less than a device from a store, and the effect of the work is the same. Why then spend money on purchasing ready-made equipment when you can install it yourself. How to make a home heater with your own hands?
Basic requirements for a homemade heater
Any type of heating equipment for the home, regardless of design features and manufacturing complexity, must meet the basic requirements:
- Simplicity and accessibility in assembly.
- Safety and reliability in operation.
- Efficiency in energy consumption.
- High productivity and working power.
- Affordable cost of structural elements and materials.
- Ergonomics and ease of transportation.
- Durability and practicality.
Among the existing heaters, the most efficient and productive are: infrared, quartz and ceramic emitters, and electric convector.
Creation of a future prototype and stages of work
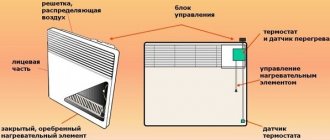
Heater "Good warmth" as a prototype of our
The design of a homemade heater is based on the principle of operation of “Good Heat” heaters.
They gained popularity due to the rapid heating of small rooms. Despite the fact that energy costs are low, the heat in the room is distributed evenly.
The design of these heaters is simple and practically safe. The fact is that the main heating element is enclosed in a material that eliminates the possibility of fire. In addition, the compactness of the device will allow it to take up little space in the garage.
By connecting a timer to such a homemade heater, you can regulate its operating mode. For the winter season, it is enough to set the mode “one hour on, two hours off.”
In one hour, the heater will completely warm up the garage for quiet car repairs over the next two hours without its operation. For warmer times of the year, the timer settings can be changed.
Advantages of homemade devices
Homemade appliances for heating a city apartment, country house or cottage have significant advantages over factory-made products. They are as follows:
- Possibility of manufacturing from accessible and cheap materials, which leads to a reduction in the cost of the finished device.
- Simple and compact design that can be used in various rooms.
- Ease of use and transportation.
- High efficiency with silent operation of structural elements.
- Self-assembled quality.
Today, infrared heaters are available for self-production, which are the safest and most efficient to use. If more powerful equipment is required, then you can assemble an oil radiator, an alcohol heater, a heat gun, a battery-powered and gas-powered device.
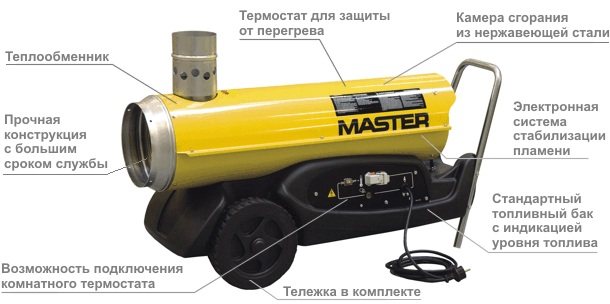
Types of diesel heaters
There are two types of diesel heater you can make yourself:
Direct heating type
Units with direct heating, operating on the principle of pumping air with a fan, which gains temperature in contact with the flame. That is, air currents travel directly through the fire, thus gaining heat. It releases it into the garage environment. The disadvantage of such garage heating is obvious. A heat gun of this type heats well, but along with the heat it “supplies” a lot of soot, smoke, and combustion products into the air environment of the garage. To avoid gas poisoning, it is necessary to equip your garage equipment with a reliable ventilation system. True, it will not save you from burning odors and combustion products of diesel fuel.
This type of diesel garage heater is simple and economical. You can make it yourself. A gun for heating a garage space consists of:
- made of steel body;
- burners;
- fan to supply air to the flame zone.
And this is all the technological content of a diesel garage heater. Everything is cheap, uncomplicated, durable, but does not promise comfort. But it can heat the garage to the desired temperature quickly.
Second type
The second type of diesel garage heater differs from the first type and has fundamentally advanced technological solutions. A heating gun powered by diesel fuel is designed differently. Here, when fuel burns, the coolant enclosed in the circuit is heated. And combustion products are disposed of in the atmosphere outside the garage walls using an exhaust chimney. In practice, there is no smell or soot in the room.
Which is preferable?
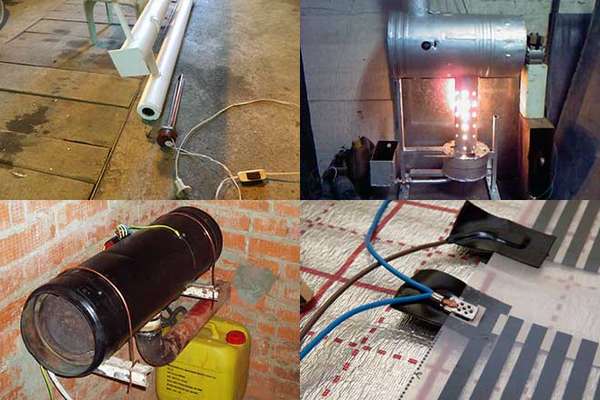
Diesel heater in garage
The question is being asked which type of diesel heater is best for a garage. Of course, the second option. Do-it-yourself diesel heat guns for a garage are preferable, but are more complex in design. In principle, you can make whatever you want with your own hands. But it is unlikely to be possible to achieve a factory guarantee of safety. Heated diesel fuel vapors are explosive. The utmost structural perfection of the unit and the same caution in handling it are required. A gun for producing heat using diesel fuel is a very complex and dangerous unit to operate. This also applies to factory products.
When starting to assemble a diesel heater for a garage with their own hands, car enthusiasts act at their own risk. Of course, this does not apply to those people who theoretically and practically know how to do this and from what materials.
Of course, the closed type of diesel heat generator is preferable in many respects, but practice shows that the majority of craftsmen among car enthusiasts still use direct heating heat guns. The phenomenon is explained by the simplicity of the design. The second type is more difficult to assemble. The direct blowing diesel heater is characterized by its design simplicity. It doesn't require a lot of material. In particular, you must have:
- fuel tank;
- a metal pipe of calculated diameter, tied to the volume of the garage;
- another small pipe used in the combustion zone;
- diesel fuel sprayer (nozzle);
- pump.
This is the entire set of structural elements from which a thermal generating structure can be assembled. Its operation on liquid fuel will be economical and useful for heating indoor air. The assembled diesel heater will faithfully serve the owner of the “motorhome” in the cold season.
The proposed layout is not dominant, but only one technical proposal among many options.
When assembling a liquid fuel heat generator, it is necessary to comply with some defining provisions:
- Use only non-flammable material for the fuel tank.
- Use refractory metals for the diesel fuel screen and combustion chamber.
- A diesel heater requires a thick and heat-resistant metal casing.
- It is good to isolate the fuel tank from the unit body.
- Install and operate the diesel heater in places away from materials that quickly ignite.
- Place the combustion chamber exactly in the middle of the housing.
- It is necessary to remove gases from the flame zone. A vertically installed pipe with a pre-calculated cross-section will do.
The diesel fuel atomizer (nozzle) sublimates with the combustion zone. This happens using an iron tube. A diesel heater will not need fuel if the connections are well sealed. Before installation in the functional position, the unit must be inspected for leaks. A priori they should not exist.
The fuel atomizer is connected to the pump and through it to the fuel tank. It is necessary to place a filter between the pump and the nozzle. A heat reflector is mounted in front of the combustion chamber. It is not recommended to touch it with your hands during operation. You can get thermal burns to your hands and other parts of the body. Using the screen, thermal energy will be accumulated in the “motorhome”, showing efficiency. Some users, to prevent this from happening, slide the screen inside the housing frame of the unit.
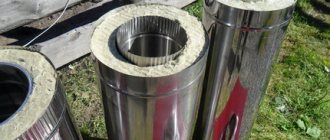
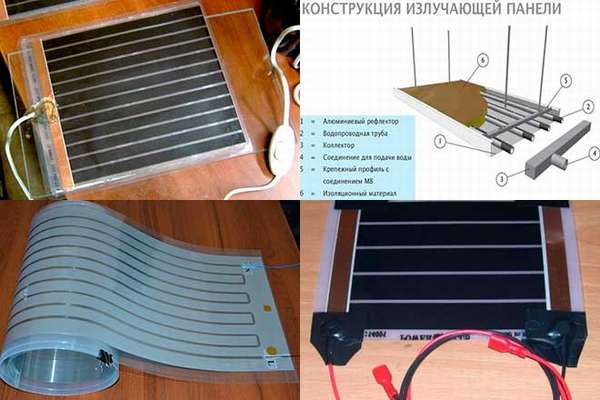
Making your own infrared heater
Modern IR emitters for heating homes are reliable, practical and have good efficiency. Such devices emit infrared radiation, which, without interacting with air, contributes to the rapid heating of various surfaces in the room. Thus, they effectively convert electricity into thermal energy.
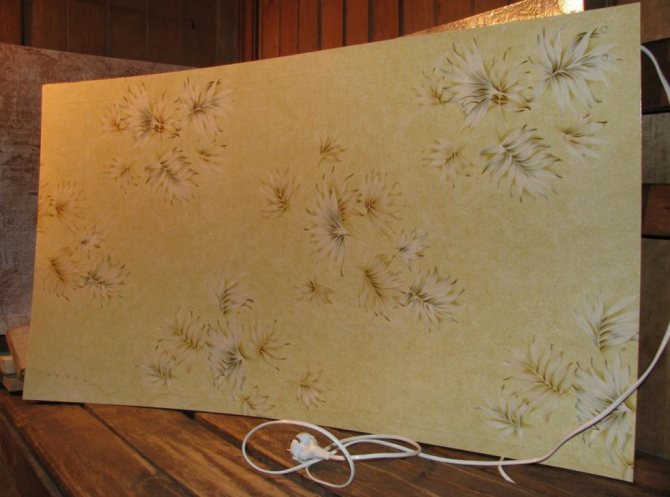
The most affordable option for home assembly is an economical film heater, the basis of which is a heating film.
To work, you will need to prepare the following materials and tools:
- two identical pieces of glass,
- aluminum foil,
- sealant,
- paraffin candle,
- epoxy resin glue,
- electrical cord with plug,
- candle holder,
- soot cleaning sticks,
- sponge for cleaning glass surfaces.
The infrared heater is assembled with your own hands according to the following scheme:
- The glass is thoroughly cleaned of dirt and degreased.
- A conductive base for the heater is assembled. Using a candle, soot is applied to the back side of the glass blanks, acting as a kind of current conductor. Before starting the procedure, the workpieces are slightly cooled.
- Along the perimeter of the workpieces, the surface is cleared of soot using chopsticks to obtain an even edge 0.5 cm wide.
- Strips of width equal to the area of the conductive glass base are cut out of foil. They will be used as conductive electrodes.
- One workpiece is placed on a flat surface with the smoked side up, and a thin layer of glue is applied around the perimeter. Foil strips are applied to the glued surface with a slight shift beyond the edges of the workpiece.
- It is covered with a second piece on top and, accordingly, the smoked side down is pressed to set the glue. All joints are carefully treated with sealant.
- Checking the power of the finished structure. If the power indicator does not exceed 100 W per 1 sq. m of room, then the heater is connected to the network using a conductive wire and plug.
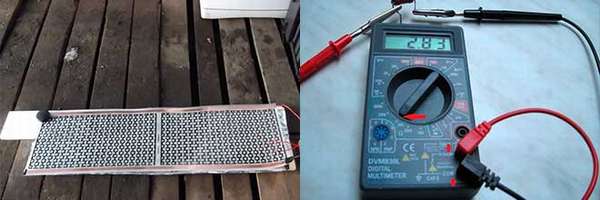
A multimeter measures the resistance of the heater's conductive base. To calculate power, use a simple formula: N = U×U/R, where
N – power, U – mains voltage (220 volts), R – resistance.
For example, R – 20 Ohm, then N = 220×220/20. The result is 2420 W. This power is enough to heat a room of 25 square meters. m.
Some practical tips for choosing an electric convector
1. Know exactly the area of the room that needs to be heated
The efficiency of the convector depends directly on how correctly you select the quantity and power. Contact a consultant in the store for help - they will definitely tell you how much equipment you need specifically for your footage.
2. Know the ceiling height and window location
But knowing the site is not everything. Heating efficiency is affected by how high (or low) your ceilings are, as well as how the windows are positioned in the room. This must also be mentioned when purchasing convectors.
3. Know the heat loss at home
And one more important point is heat loss at home. The extent to which your home “keeps” heat affects the required number of convectors and their power.
4. Know the maximum electrical power in the room that we will heat
5. Carefully study the instructions, warranty conditions and operating conditions when purchasing equipment.
11
- AZemelin_1964
- April 18, 2020, 2:06 pm responded to comment by Daria Episheva
- id393849299
- April 18, 2020, 2:36 pm responded to comment by Daria Episheva
- AZemelin_1964
- April 18, 2020, 16:38 replied to comment by Roman Kruglov
- Roman Kruglov
- April 18, 2020, 18:07 responded to comment by AZemelin_1964
- Ali-bastre
- April 24, 2020, 08:45 replied to comment by eded
No matter how rich a specialist’s experience is, and no matter how confident he is, sometimes he needs to consult with someone. Communication on the Internet has long become familiar to us. Various network users - whether a professional or a knowledgeable amateur - can post life hacks (simple useful tips on various topics) online that can be usefully applied to your home.
What are the advantages of using forum resources?
- A constant flow of interesting information about new building ideas.
- Simple and useful tips for construction.
- The opportunity to communicate with interesting people, experienced professionals in their field.
- Recommendations for choosing tools or materials.
- Also a pleasant plus is the lack of advertising, because users are consumers just like you.
Our forum contains all the latest construction news, because our specialists always keep their finger on the pulse of construction events. Here you will find useful information for the operation of the premises, equipment and so on. Many people find it useful to do more for the home with their own hands, because it is healthy, economically beneficial, and provides some moral comfort. And a logical question arises: “How to do it yourself?” You can get answers by browsing our website. It is after visiting this forum that you will fully experience all the advantages. On this online resource you will find information for arranging a summer house with your own hands. But many of those recommendations can be taken into account when arranging an apartment. To carry out household projects of various sizes, you need equipment. For general consultation of site visitors, an overview of tools is created, where the information is presented simply and accessible.
Popular articles
This ingenious method allows you to heat almost any room in a short time, and without wasting electricity.
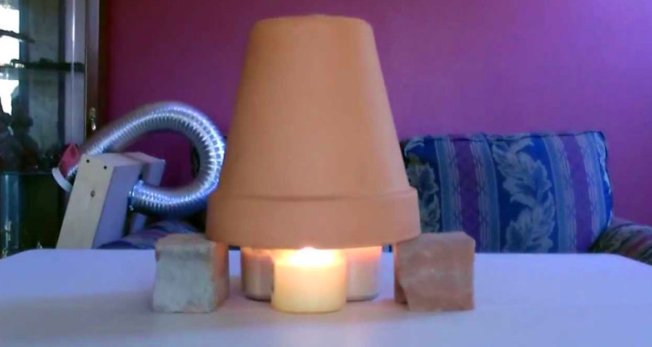
For a homemade air heater you will need:
Two clay flower pots, one long bolt, two nuts, three washers, three bricks, a couple of candles and a regular plate. You can also use an alcohol burner instead of candles.
Clay pots absorb the thermal energy from candles and convert it into heat. The temperature on their surface reaches 70–80 degrees Celsius, and inside it reaches more than 260 degrees, so be very careful!
Such a heater remains hot for several hours after “turning off”. Attention: it is strictly forbidden to place this heater next to flammable objects!
In a few hours your room will become very warm! Now you can stop wasting money on expensive heaters, and also significantly save energy!
Did you like the article? Subscribe to the channel to stay up to date with the most interesting materials
Making your own oil heater
A homemade oil heater is distinguished by functionality, safety and reliability. A similar device can be used to heat residential and technical premises.
Structurally, the device consists of a sealed metal housing filled with a coolant – industrial oil.
To make a powerful heater from a battery yourself, you will need the following materials:
- used battery,
- tubular heater,
- technical oil,
- heating temperature regulator,
- 2-core current-carrying cord with plug,
- electric pump with a power of 2.5 kW,
- metal corners,
- tubes that can withstand heating temperatures up to 160 degrees.
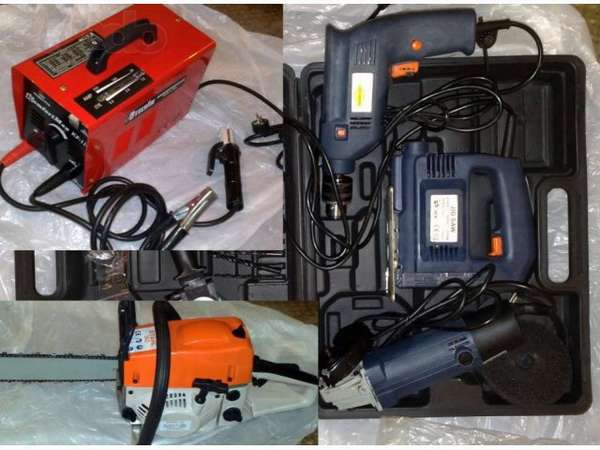
All work is carried out using a welding machine and an electric drill.
The technology for manufacturing and assembling an oil heater involves the following steps:
- Manufacturing a rectangular frame of the required size for mounting the device. The corners are cut into pieces of the required length and welded together into a rectangular structure. At the bottom, legs are welded to each corner.
- Holes are made in the prepared container for installing heating elements. The holes should be located at the bottom of the device. An additional hole in the top of the container will be required to fill the coolant. A grinder or welding is used for cutting.
- Installation of the electric pump on metal plates welded to the heater body.
- Heat-resistant tubes are used to fix the pump. They are welded to the body and connected to the pump using shut-off valves.
- Fixing heaters to bolted connections in the holes provided for this.
- A fitting with an external thread is welded onto the inlet hole for the coolant to install a protective cover. A simple version of the cap can be made from a piece of pipe with an internal thread, which is screwed onto the fitting from above. A rectangular metal plug is welded onto the other end of the pipe to prevent oil from spilling out.
- The container is checked for leaks by creating a slight internal pressure.
- Connecting heaters in parallel to increase the heat output of the heater.
- Installation and connection of the thermostat, as well as a current-carrying cable with a plug. Mounting the container on a prepared frame and additional grounding. Filling coolant into the radiator.
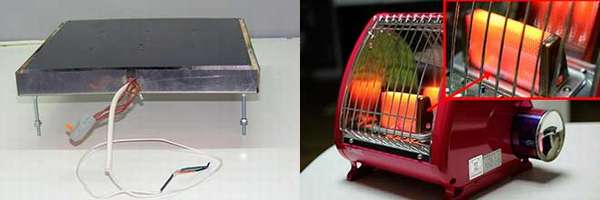
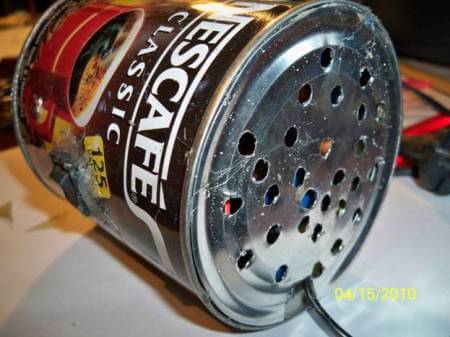
Idea No. 2 – Mini heater from a can
Another original model of a homemade electric heater, which is suitable for local heating in a garage or room. All you need for assembly is:
- coffee can;
- transformer 220/12 Volt;
- diode bridge;
- cooler;
- nichrome wire;
- square-shaped textolite with a side equal to the diameter of the can;
- drill with a thin drill bit;
- soldering iron;
- cord for connecting to the network;
- push button switch.
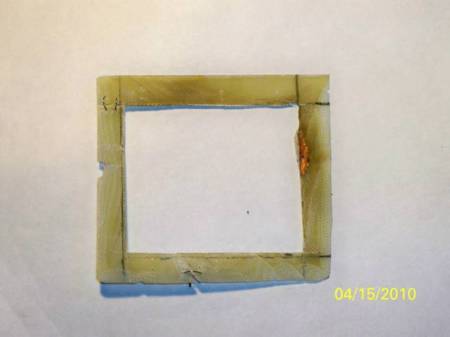
This instruction is even simpler and you can make an electric heater from a jar with your own hands in 1-2 hours. To begin with, you need to remove the foil from the PCB and cut out the middle in it, as shown in the photo below:
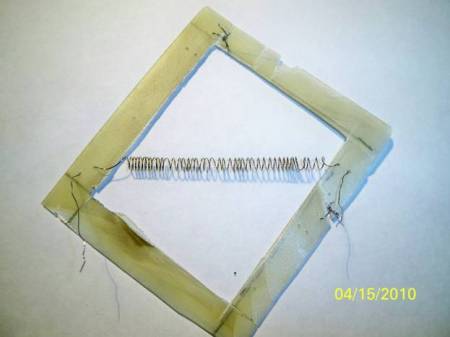
After this, use a drill to make diagonal holes. We fix nichrome wire of a certain diameter and length into the holes (we provided a separate calculation of the length in the article: https://samelectrik.ru/raschet-nihroma.html). We calculate these parameters using Ohm's law for a section of the circuit (U=R*I). Then we fasten the wires.
We connect the transformer, diode bridge, cooler, nichrome wire and switch into one circuit. We need a diode bridge to power the cooler, since it requires constant voltage.
We mount the fan in the jar using glue, after which we attach the PCB as shown in the photo:
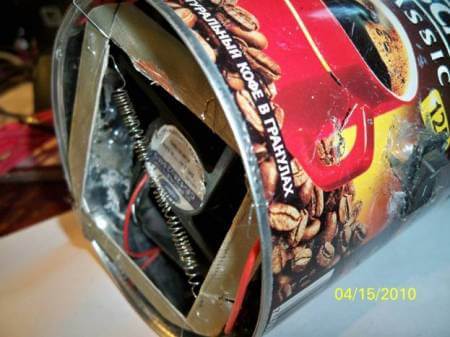
We place all the elements of a homemade electric heater in a jar, drill holes in the lid and check the functionality of the device!
If you want to make a more powerful device with a spiral, we recommend watching the video tutorial below:
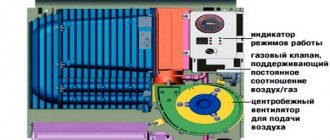
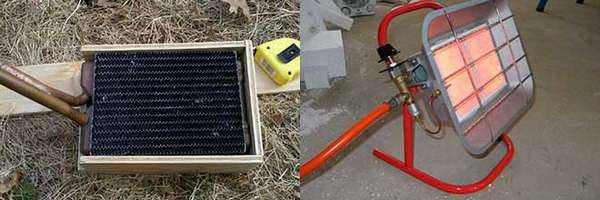
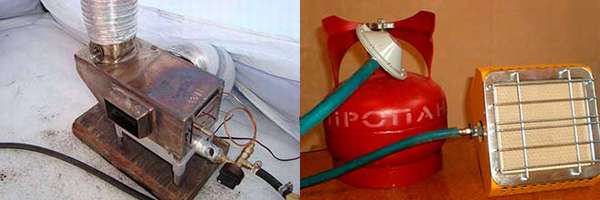
DIY gas heater assembly
No less popular for home use is a homemade, economical heater without electricity, powered by gas. Such a device provides heating of the room due to infrared radiation and air convection.
To make a gas heater, you need to prepare the following materials:
- gas burner and shut-off valve,
- hemispherical sieve,
- galvanized sheet steel,
- metal mesh.
The assembly diagram of the heating device is as follows:
- A pair of round blanks are cut from galvanized steel, the diameter of which is equal to the diameter of the sieve with small protrusions.
- A gas burner is bolted to one workpiece. Next, the projections are bent in the opposite direction from the installed burner. A sieve is screwed to them so as to close the burner. In this case, the sieve is used as a heat dissipator.
- The metal mesh is bent into the shape of a cylinder and fixed to the protrusions so as to cover the sieve with the burner. Fastening elements can be metal rivets. Visually, the device looks like a cylinder with a burner installed inside, and a sieve and mesh on top of it.
- The top of the cylinder is closed with a second steel blank with a bend and a protrusion outward. Next, the upper part of the structure is fixed to them.
- The finished heater is connected with a gas hose to a cylinder or a centralized gas supply line.
Comparisons
If we compare heating methods in general, excluding capital stoves and electrical appliances from the list, then we simply cannot find a better option than diesel heating. The resulting thermal energy is cheap. This is the most rational way to heat garage buildings. The infrared method of heating cold air to the required positive temperature may compete. An infrared heater from a good manufacturer can heat the air in a garage to plus 20 C°. In this case, thermal energy is distributed evenly throughout the air volume of the “motorhome”. The infrared heat generator does not produce odors. In this respect it is inert. But it's expensive. Today, electricity is constantly becoming more expensive. And such a heater likes to “eat” a lot.
During the final assembly process, it is necessary to protect the ends of the heat generator with mesh or screens. The outlet gas temperature can reach plus 250 C°. You might accidentally get burned. Therefore, for safety reasons, it is recommended to close the hot air outlets with grilles.