Electric soil heating system - Green Box Agro.
The quantity and quality of the harvest is influenced by many factors, including the temperature of the soil in the greenhouse or greenhouse. Electric heating of the greenhouse protects plants from cold and temperature changes, ensures timely formation of ovaries and fruits, and increases the fruiting period. The group offers to buy soil heating in a greenhouse.
It is a mistake to believe that Green Box Agro systems are needed only by those who grow crops throughout the year. Warm heating of the soil is also useful for owners of ordinary, seasonal structures. It allows:
- Plant seedlings at any time of the year, including before the onset of the warm season. Thanks to this, you can get a harvest by the time the price for it increases to its maximum.
- Minimize plant death associated with sudden temperature changes and the development of fungal diseases.
- Maintain yield under unfavorable weather conditions (cold summer, early frosts).
Crops located in warm soil have a developed root system and a well-formed above-ground part. They grow faster, bear fruit longer and produce maximum yield.
Green Box Agro: features and benefits
The soil heating system in Green Box Agro greenhouses is used in relatively small greenhouses (area from 2 to 15 sq. m). It consists of a heating section with an installation wire and a thermostat that maintains the desired soil temperature. The latter has a dust- and moisture-proof housing and can be installed directly in greenhouses. Advantages of the ground heating system:
- Safety, no electromagnetic radiation.
- Multiple layers of insulation to protect against accidental damage.
- Minimum power consumption.
- Easy installation and operation.
- Overheat protection.
- Absence of toxic components harmful to humans and cultivated crops.
Water heating of greenhouses and boilers for it
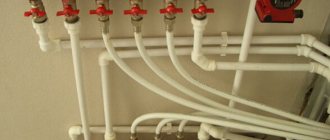
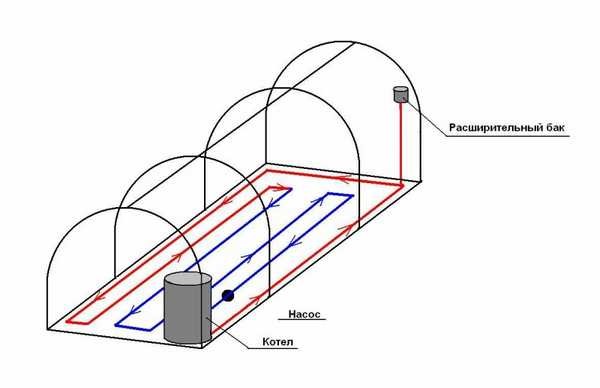
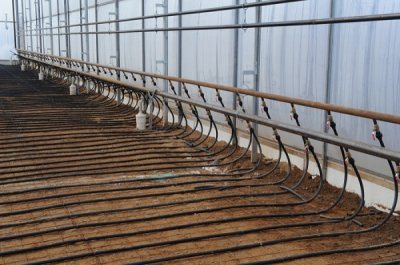
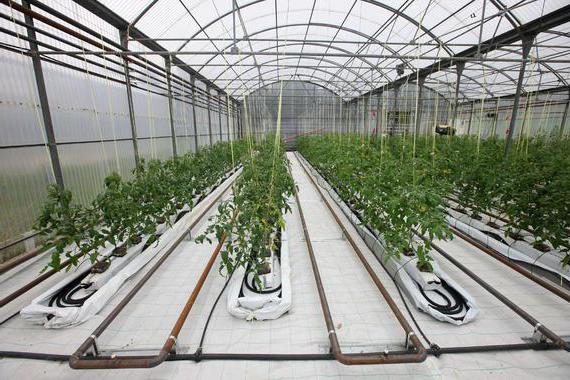
This option can be a very good and economical solution: in one fell swoop you can heat both the air and the soil. To do this, place radiators along the wall or walls (depending on the volume of the room, heat loss of the building and winter temperatures in your region). Moreover, in this case, the simplest single-pipe circuit with parallel connection of radiators would be ideal (see the figure below). Even a person far from construction can make such water heating for a greenhouse with his own hands.
The simplest single-pipe system is the best option for water heating of a greenhouse
Having passed along this circuit, the water will cool to about 50-40 o C. From the last heating device, you can run pipes into the soil, where the already partially cooled water will give off even more heat, but to the soil. And only after this the coolant (water) has cooled completely and is fed into the boiler. There can be several such combined circuits, and one boiler can heat them (if it has enough power).
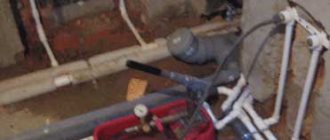
It is preferable to use polypropylene as pipes here, maybe metal-plastic - it bends well, and you will need few fittings, especially for heating the soil. One more nuance: the system must have a circulation pump, otherwise it will not work - the circuit is long.
How can you connect water heating of the soil from a boiler?
The whole difficulty is in selecting a boiler for this operating mode: there is a large difference between the supply and return temperatures. This is ideal for condensing boilers, and if you have the ability to connect gas, then this is the most economical of all possible solutions, except perhaps for heating from geothermal sources. But sources of underground heat in private use are much less common than a gas main in a garden. In addition, many condensing gas boilers have a very good feature: they can be adjusted to operate on liquefied gas. So this option for gas heating of a greenhouse is worth considering even for those who do not have a main gas pipeline. Read more about how condensing gas boilers work here .
How the Green Box Agro system works
Installation of ground heating in a greenhouse begins with laying the heating cable. It unfolds like a snake on a mounting grid located 30-40 cm from the ground surface. In the future, the roots of plants that most need warmth will be located here. A sensor is installed between the turns of the cable, which is connected to the thermostat and controls turning the heating of the greenhouse on and off when the set temperature is reached (+18…+27°C).
The Green Box Agro device is similar to the installation of heated floors and heating systems for open areas. To set the desired temperature, use the control button located on the thermostat. Light indication allows you to monitor the state of the system at the current time: whether it is heating up or cooling down. If necessary, heating of industrial greenhouses with pipes can be turned off for an unlimited time.
Economical greenhouse heating
In order not to spend a lot of money on maintaining the desired temperature, you need to take care of good thermal insulation. First of all, this concerns the dome - warm air rises, and if heat escapes from there unhindered, then significant resources will be required for heating. Therefore, despite its low cost, polyethylene is used less and less, and is being replaced by more expensive polycarbonate. After all, heating a greenhouse made of polycarbonate requires several times lower costs than a similar structure made of polyethylene.
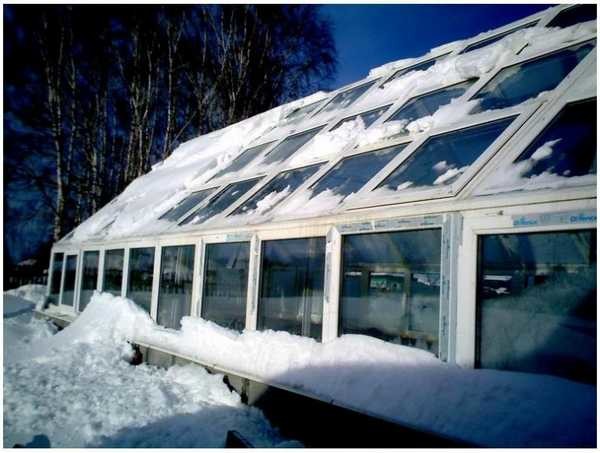
Without insulation, heating will not be economical
If the greenhouse is stationary, you need to take the insulation of the soil and walls seriously: a solid layer of thermal insulation is required to retain heat. But it’s better to spend money once on insulation than to throw away money on heating every year. You can even count. According to standards, 250-350 W of heat are consumed to heat one square meter of greenhouses for the Moscow region. But this is with a ceiling height of no higher than 2 meters. If the ceilings are higher, increasing factors are needed. But let the greenhouse have ceilings of 2 meters, its area is 20 m 2. It requires 300*20=6 kW/hour to heat it. A month requires 6*24*30=4320 kW/hour. The final result will depend on the type of fuel used, but it is clear that even at a price of 2 rubles/kW (this is not the most expensive option), the amount is 8620 rubles/month. And this is a small greenhouse. Therefore, without insulation, economical heating of a greenhouse cannot be achieved, even using cheap types of fuel.
Buy a soil heating system Green Box Agro
You can buy greenhouse heating in the group. We offer high-quality solutions for greenhouses of any shape and area. Heating the greenhouse with electricity will allow you to forget about such common problems as small harvests, death of plants due to soil freezing, the development of fungal diseases, etc.
You can buy a cable heating system for soil in a greenhouse at competitive market prices. When heating the soil in a greenhouse with a cable, the soil near the roots is heated. In this case, several types of cables are used: resistive and self-regulating. Both types have both their advantages and disadvantages. A cable for heating soil in a greenhouse can be purchased along with the system.
The price of heating a greenhouse depends on the area of the greenhouse and the length of the heating cable. You can find out the cost and ask other questions on the website using the feedback form. You can also contact us using the phone numbers provided in the “Contacts” section.
Greenhouse heating methods
To maintain a temperature inside the greenhouse of at least 25 degrees Celsius, powerful equipment is required.
The peculiarity of its choice is that it requires heating a fairly large area - sometimes up to 1000-5000 square meters. m.
For this use:
- gas boilers;
- solid fuel stoves;
- electric boilers;
- diesel and combined models;
- IR heaters.
Reference. The most inexpensive option in terms of maintenance is gas boilers. By spending money once on the purchase of the device itself, in the future you will have lower utility bills for gas, maintenance and repairs.
Diesel fuel and electricity are costly ways to heat a large greenhouse area. Coal, firewood, sawdust, and briquettes are a little cheaper, however, they must be constantly purchased, delivered, and stacked manually.
The power of gas heaters for greenhouses with an area of up to 400-600 sq. m should be at least 40-60 kW. This is quite heavy equipment ( from 100 kg ), which is often controlled using automation.
Air
This heating method is usually used using solid fuel stoves . A “potbelly stove” can be used as a stove, which is installed outside the greenhouse and connected to a pipe for removing flue gases. To ensure uniform heating of the room, a horizontal chimney is made along the length of the greenhouse.
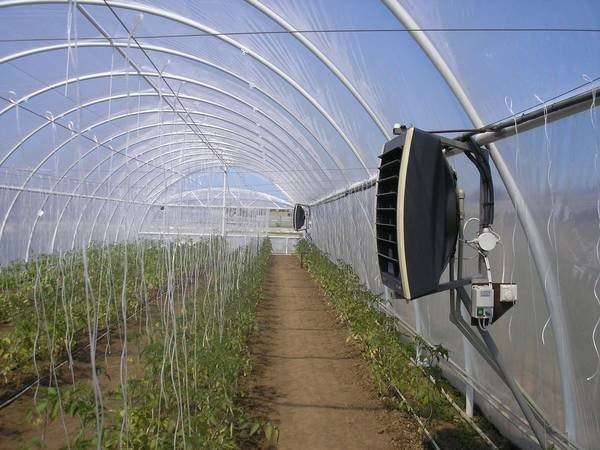
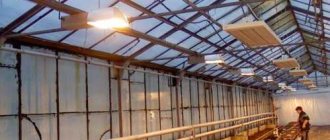
Photo 1. Air heating of the greenhouse: several convectors are installed around the perimeter of the room that heat the air.
For air heating use:
- electric, gas boiler, stove or regular outdoor fire;
- Heating elements/convectors;
- radiators and blowers.
Sometimes air heating also includes infrared heaters , which are mounted in the walls or ceiling of a building. They are completely dependent on the electrical network, but are capable of heating a large area of the greenhouse.
Air heating with a heat pump (a temporary way to solve the problem), as well as heating with steam, which is supplied inside the table through external pipes and returns back to the boiler through other underground pipes, is also considered air heating.
Advantages: easy installation, volumetric air heating (bottom, top, side).
Disadvantages: low efficiency, sometimes dry air.
Water
It involves supplying water through radiators and pipes along the walls or in the center of the greenhouse . Due to this, a large area of the room is heated. This may be single-pipe wiring or other types of piping.
The heat source is a boiler (usually gas, electric or solid fuel), to which the pipes are connected.
For water heating use:
- chimney for waste disposal;
- system for automatically adding coolant (to maintain a constant temperature);
- external and internal pipelines, boiler.
Water heating can easily work due to the natural circulation of water. You can buy a pump and use it as needed.
Reference. It is best to choose cast iron radiators or bimetallic, aluminum devices that are easily connected to the heating system.
Advantages: the ability to install it yourself, warming up not only the air, but also the soil.
Disadvantages: not suitable for large areas.
Selection table
| Name of the heating cable section | Heating cable length, m | Power, W | Recommended areas, m2 | Recommended layout steps, cm** |
| 14GBA-200 | 14 | 200 | 2 | 14 |
| 14GBA-300 | 21,5 | 300 | 3 | 14 |
| 14GBA-400 | 29 | 400 | 4 | 14 |
| 14GBA-500 | 34 | 500 | 5 | 15 |
| 14GBA-650 | 44 | 650 | 6 | 15 |
| 14GBA-815 | 56 | 815 | 8 | 14 |
| 14GBA-980 | 67 | 980 | 10 | 15 |
| 14GBA-1150 | 79 | 1150 | 11 | 15 |
| 14GBA-1480 | 103 | 1480 | 15 | 15 |
Boiler options for greenhouses
At the moment, the following boilers for greenhouses are widely used:
- wood;
- combined (wood-coal);
- pellet;
- gas;
- electric.
Conventionally, they are classified into two more subspecies. Solid fuel boilers are the first three types above. Long-burning boilers are included in a separate category, since the principle of their operation is not based on the combustion of materials, but on their smoldering, for which a system of controlled oxygen (air) supply is used. They are the most effective and economical, but are quite expensive.
The simplest heating boilers for greenhouses are gas and electric. However, it is impossible to call them economical and profitable in the current situation. Gas and electricity are already too expensive for heating, and further price increases are expected in the future. Therefore, such boilers are used only for emergencies, when other heating options are simply unavailable for some reason.
You can cook a wood-burning boiler yourself, but it will turn out to be a banal potbelly stove. Its advantages are low cost and efficiency, but its disadvantages are the inability to regulate the temperature, the need to constantly add fuel (wood or coal), as well as uneven heating of the greenhouse area. Their use will be justified only if we are talking about a polycarbonate or glass greenhouse with steam heating (or where the pipes are laid in the ground at a depth of about 50 centimeters). And such a boiler for heating a greenhouse is suitable only for small areas. If the greenhouse occupies more than 50 square meters, then several “bourgeois” will be required. Keeping track of them is extremely difficult and troublesome.
But there is also a very big advantage for wood-burning boilers and long-burning boilers for solid fuel greenhouses. The product of their waste is ash and ash, which are extremely useful “ingredients” for growing any vegetable and fruit crops. And in the case of beets, for example, ashes allow you to get rid of any insect pests and thereby save a considerable amount on the purchase of agrochemicals (pesticides and mineral fertilizers). For a vegetable grower, this is not the least advantage.
Gas heating
Gardeners are interested in how to make a heated greenhouse using gas. If it is small, then you can use bottled gas. If the greenhouse is of an industrial scale, then you need to take a permit and use a natural one. For gas heating, conventional and infrared burners are used. A conventional water heating system based on AGW is also used. Gas, of course, is profitable because it is cheaper than electricity.
When using such heating with burners, it is necessary to provide ventilation, and this already reduces the heating efficiency. If you make water heating based on heating water with gas, then the system can be fully automated. Without constant human control, the microclimate in the greenhouse will be maintained. The main thing is that it is profitable from a financial point of view, and the costs can soon be recouped.
Do-it-yourself electric heating of a polycarbonate greenhouse
Heating in a polycarbonate greenhouse is more expensive compared to other types of heating, but is extremely convenient to use. It is a good option for heating greenhouses in winter, spring and autumn, and can be fully automated or even controlled remotely.
There are many ways to make a heated polycarbonate greenhouse using electric heaters. Can be used:
- infrared heaters. They are installed on the ceiling and effectively heat the greenhouse, starting from the ground itself. They are one of the economical and heat-efficient types of electric heaters, but their cost is slightly higher than other devices;
- oil electric radiators. The best option for small greenhouses and organizing heating in the spring and autumn. But when installing them, you should be prepared for very impressive electricity bills;
- electric heaters with fans. They allow you to quickly and well warm up the entire volume of the greenhouse, but when installing them, you should take into account a lot of nuances. For example, as soon as you point such a heater at the plants, they will inevitably begin to dry out. It is also worth considering that models equipped with open spiral heaters burn out oxygen in the room.
Any types of heating using an open flame are also not suitable for use in greenhouses - they will simply burn out all the oxygen, which will lead to the death of the plants.
It is worth noting that if you plan to operate a greenhouse in winter, then pay attention to the thickness of the greenhouse material - the thicker the sheets of cellular polycarbonate, the better they will retain heat inside the greenhouse, which will reduce heating costs.
It is also worth paying attention to a rather extravagant method: heating using hot air.
A heated polycarbonate greenhouse is a fairly common design and can be easily implemented with your own hands. The main thing is to choose the right type of heating and pay attention to the thermal insulation of the greenhouse.
In special greenhouses, not only vegetables are grown, but also decorative flowers. You can regularly receive...
Polycarbonate material is widely used in many areas: construction, advertising, design, food industry. It is in the last...
Ready-made polycarbonate is used to cover roofs, greenhouses, verandas, canopies, swings, sliding windows, etc. Popularity…
A cozy bench with a polycarbonate canopy is a place where you can calmly relax in the shade in the fresh air...
The great popularity of swings with a polycarbonate roof is associated with the convenience and aesthetic appearance of this element of the garden landscape.…
Ventilation device
There are no vents for the ventilation system - everything is sealed and as simple as possible.
It will have two functions - to heat the ground in winter, and to ventilate the greenhouse in summer. For these purposes, a forced ventilation system is best suited. For her, I will install two fans under the roof to draw in warm air at the rate of one fan per bed. In winter mode, the fan will take air from under the roof of the greenhouse and drive it through the pipes under the beds, thereby heating the soil. In summer mode, two air valves will open on one side of the greenhouse. On the other side of the greenhouse, with the help of a throttle valve, the air flow will switch, and the fan will begin to drive air from the street inside. On the opposite side, air will exit through two open valves. Pipes are laid underground, through which warm air passes underground. The pipes are laid underground. Warm air comes out of the ground through the pipe.
Air outlet
This is what an air intake fan installed under the roof looks like.
Air intake
Through this pipe, the air goes underground and comes out on the other side of the bed. That is, warm air circulates in a vicious circle.
The ventilation pipe goes underground
At the top there is an exit to the outside, into which a throttle valve is installed. In winter mode, air circulates inside the greenhouse. In summer mode, the throttle valve opens and air is supplied from outside.
Throttle valve
The ART-18 thermostat is used to automatically turn on the fan. It was converted to work in the “cooling” mode. The temperature on the regulator is set to +25°C.
Thermostat
We cool the sensor in a glass of water - the fan does not work. We heat the sensor in our hand - the fan turns on and drives warm air under the beds. It turns out that the sensor will prevent the fan from cooling the pipes under the beds.
Thermal sensor
I will install the temperature sensor under the roof of the greenhouse. It will “control” the operation of the fan, and as soon as the temperature drops under the roof of the greenhouse, the fan will turn off to prevent cold air from entering the pipes underground.
Temperature controller test
Two valves for air outlet.
Inflow valves
As planned, I install fans for air intake in summer mode.
Air intake fans
Finally the system is configured. The fans are running.
Turn on the ventilation
The sun came out for the first time in several days. I take temperature measurements. It’s -5°C outside.
Ventilation works
Sensor T1 in the ground (placed in a gravel accumulator) shows –1°C. The second sensor - T2, which is installed at the exit from the ground - shows +4°C.
Temperature readings from the second sensor
The T2 sensor itself is installed at the outlet of the pipe from the ground.
Installation location of the T2 sensor
The third sensor, T3, is located under the roof of the greenhouse, where air is taken in. It shows +6°C.
Readings from the sensor under the roof
After four hours of operation of the ventilation system, we take measurements - the readings of the sensor under the roof T3 are +10°C, air comes out of the ground at a temperature of +7°C (according to sensor T2).
Sensor installed under the roof
Sensor readings T1 +1°С. That is, the heat accumulator from the pipes under the bed heated up by two degrees, from –1°C to + 1°C. Theoretically, there is an additional two degrees left in the ground. This proves that the ventilation system works with the heating of the beds.
Heated the earth by 2 degrees
For more information about installing ventilation and testing temperature sensors, you can watch the video:
Ads by
How to heat a polycarbonate greenhouse
To transform a greenhouse into a year-round greenhouse or winter garden, it is enough to develop an effective heating system. After all, for confident growth and fruiting, plants require not only light, but also warmth. And if a translucent polycarbonate sheet allows you to completely solve the problem of insufficient lighting of a greenhouse, then the issue of providing the necessary amount of heat (especially in spring and autumn) becomes extremely acute for the owners.
A do-it-yourself heated polycarbonate greenhouse allows you to grow plants not only in transitional seasons, but also in winter - the main thing is to choose the right heating option and skillfully implement it.
Installation of a heat pump for a greenhouse
Installing a heat pump with your own hands is quite simple, although the complexity of the installation work largely depends on what type of pump is chosen. It is most profitable to use an air heating system; it uses the warm exhaust air of a residential building or discharged water as resources.
To install it yourself, there is no need to dig a well, you just need to install an air heat exchanger.
It is most often recommended to install ground-water systems yourself. Soil today is a universal source of heat; at a depth of approximately 5-7 cm, the temperature is maintained at the same value all year round! The heat is collected using a heat exchanger buried in the ground, then it is accumulated in the evaporator, and then returned for a new portion. Non-freezing liquids are used as heat transfer agents.
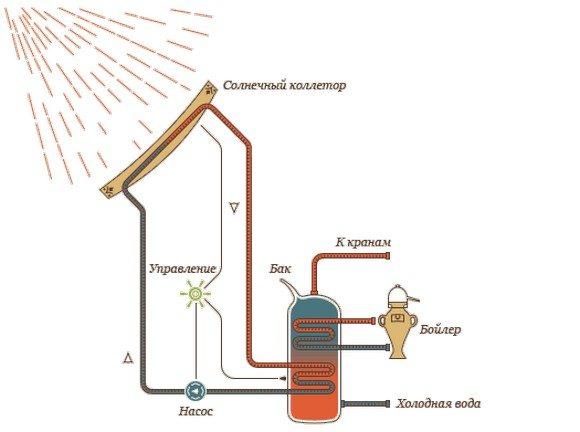
Solar collector connection diagram.
Today, two types of collectors are installed:
- A soil probe in the form of a long horizontal pipe laid in the ground and filled with propylene glycol or ethylene glycol. The burial depth is one m, the minimum distance between individual routes is 80-100 cm. When installing it yourself, you must give preference to moist soils with nearby groundwater. The approximate heat output per square meter is 20-30 W, that is, about 350-450 m of circuit is needed to provide heating of 400 sq. m. meters. The optimal laying depth is 1 m.
- A vertical soil probe is a long pipe lowered to a depth of 50-150 m into a specially prepared well. The value of the heat obtained in this way is 50-60 W per square m, that is, to obtain 10 kW you need a well with a depth of 170 m. This method is a little more expensive, but also more effective.
In some cases (if there is a large body of water nearby), it is recommended to place the collectors from the pump in water. With your own hands, the device is installed near the discharge points (use of waste water), on the surface of the reservoir (surface collectors), on the bottom of underwater wells. But this option is not very suitable for greenhouses; it is best to equip a residential building with such a heat pump.
A DIY air-to-air heat pump system for a greenhouse is considered the most reliable and economical. It uses steam heating, that is, discharges from a residential building in the form of ventilation emissions and flue gases. There is no need to install a well, just install a common pump block in any convenient place (preferably near emissions), a collector and a route for the greenhouse. A special feature is the use of an air heat exchanger, which makes this steam heating an ideal option for a greenhouse.
Cooling with a heat pump
A heat pump can not only heat, but also cool a room. This is achieved in this way: the air from the well does not heat up when supplied to the system, the compressor is turned off. Fan coil units are connected to an external collector, and the principle of operation is the same as for heating, only radiators are not used. There are two types of cooling: passive and active.
Passive cooling works in this way: the heat pump compressor is turned off, and the coolant circulates through the system between the fan coils and the well. The cold thus enters the general system, effectively cooling the air in the greenhouse.
Do-it-yourself active cooling for a greenhouse is used when passive cooling is not enough. To do this, it is necessary to install an additional unit; after installation, the compressor will automatically turn on, and the coolant from the well will be cooled using a pump. This installation is turned on in the summer months, when there is a need to reduce air temperatures.