Dangerous temperature
For comparison, consider a number of studies conducted by scientists in the twentieth century to monitor the effects of regular visits to a steam room heated to extreme values of 110-130 °C.
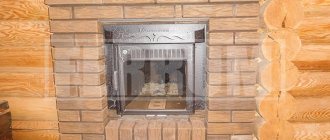
Professor H. Their in the 80s of the last century put forward an assumption about the connection between high temperatures in Finnish saunas and the occurrence of cancer, which was subsequently confirmed by the results of a large study. After considering a significant number of cases of lung cancer in those who like to steam at 110-130 ° C, it was found that staying in a steam room heated to such temperatures contributes to the formation of this disease.
The fact is that you can only be in such conditions when the air in the room is very dry, and this eliminates the hydrostatic effect of steam on the body. As a result, the blood does not supply the lungs well enough and they become burned due to their inability to adapt to the elevated temperatures to the required extent.
A number of other studies have also discovered that exposure to the dry, highly heated air of a sauna negatively affects sperm production and also leads to digestive problems in children born to mothers who frequently visited such saunas during pregnancy.
There are a lot of discussions about “what is the temperature of the stove in the sauna” or about the temperature around the stove in the steam room. Unfortunately, they are all carried out on an intuitive level and only a few specialists devote entire studies to this issue using pyrometers, thermometers and other equipment. How does the temperature of a sauna and steam room oven actually differ from the one that the thermometer shows us?
Bath lovers are not builders and, for the most part, coordinate the stove modes with their feelings. The other half of the steamers glance at the thermometer. I decided to find out what the difference is between our perceptions, between the data from the needle of a universal thermometer and what a digital remote temperature meter will show us.
Some temperature measurement data puzzled me, which I wrote about in the conclusions after the video.
By and large, we are not interested in the temperature of the oven, but in the conditions in the steam room. Your own skin is more expensive than the lid of a piece of iron. Therefore, I measured everything where the laser pointer of the device was shooting. I wanted to document the temperature measurements with a diagram, but decided to make a video with remarks
Attention! I used a device with a maximum measurement threshold of 330 degrees (footage in the furnace firebox)
The manufacturing technology of a sauna stove places special demands on the equipment of all its departments, including the chimney. Its design is slightly different from the chimney system of a home stove. It should ensure long-term heat conservation and safety for steam room visitors. Before organizing a chimney in a bathhouse, it is worth knowing several important nuances.
The design of sauna stoves includes 2 types of chimneys:
- Indigenous. They are organized next to the stove, using a special pipe for connection, through which the smoke goes into the main channel. One chimney can be used for 2-3 stoves. The main thing is that its internal diameter has the appropriate parameters, and the pipes from each heating device are located at different heights;
- Systems with a mounted pipe are mounted directly on the stove pipe and discharged through the roof. This chimney option is the most common for sauna stoves.
Classification of chimneys according to installation location includes 2 types:
- External. Their main part is located on the street and fixed to the wall using a bracket. They are not particularly recommended for baths, as they quickly cool down, losing precious heat.
- Internal. These are vertical structures with good traction, located inside the building.
Depending on the material used, chimneys are:
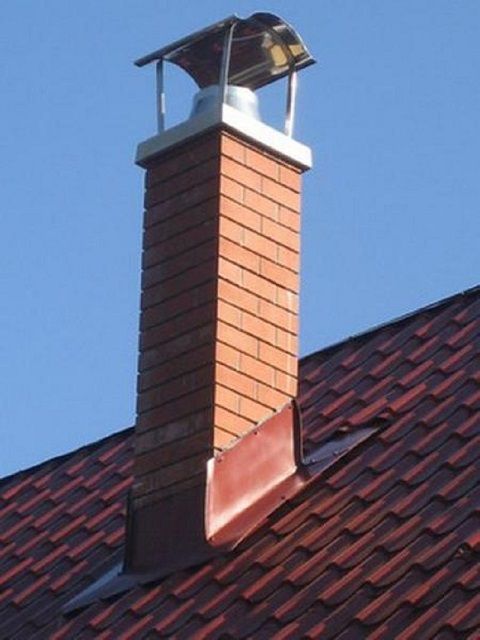
- Brick. A traditional look, characterized by labor-intensive masonry and high requirements for compliance with all parameters. They have a lot of advantages: durability, fire safety, strength, good thermal insulation and heat accumulation. Disadvantages include the roughness and angularity of the inner surface on which soot deposits accumulate;
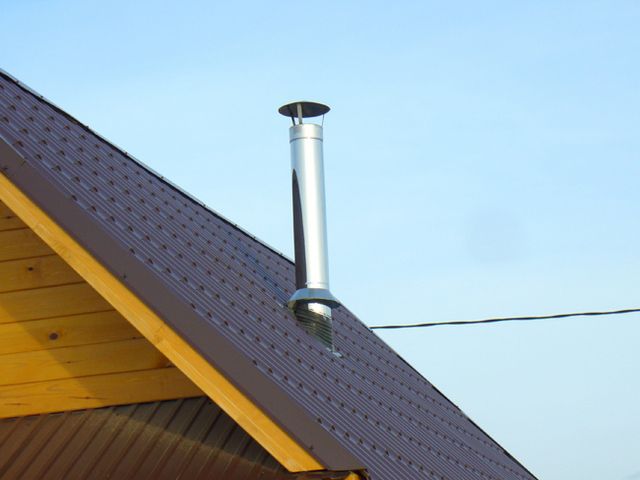
- A metal chimney is faster to install and costs less. It has a perfectly smooth surface, but weaker heat-retaining characteristics;
- A combined version, including 2 parts: the lower one is made of brick, the upper one is made of a modern sandwich pipe. Allows you to organize neat, small passages that are easier to cover with heat-resistant material.
Installation of a finished chimney for a bath
A chimney is a vertically installed device through which fuel combustion products are discharged from the combustion chamber into the environment.
The functioning of the chimney is based on creating a draft that pushes gases to an opening in the pipe located outside the bathhouse. A pipe mounted on a sauna stove performs certain tasks:
- removes gases, as well as smoke, soot, ash and soot, which, if the chimney is not manufactured correctly, can cover its internal walls and interfere with the removal of fuel combustion products;
- forms a draft that depends on the thickness and duration of the chimney channel and is formed by replacing warm air masses with cold ones.
For a home craftsman who has not gained experience in construction, it is more advisable to start making an internal chimney from metal pipes, which extends beyond the ceilings and roof. The installation of such a chimney involves the sequential installation of several elements, with each subsequent part being placed on top of the lower one.
Installation of an internal chimney includes the following steps:
- The first fragment of the pipe, to which a valve (gate) is added, is placed on the nozzle located above the stove. This element is needed to adjust the draft when burning wood and finishing the furnace;
The damper is partially closed to retain the resulting heat in the bath
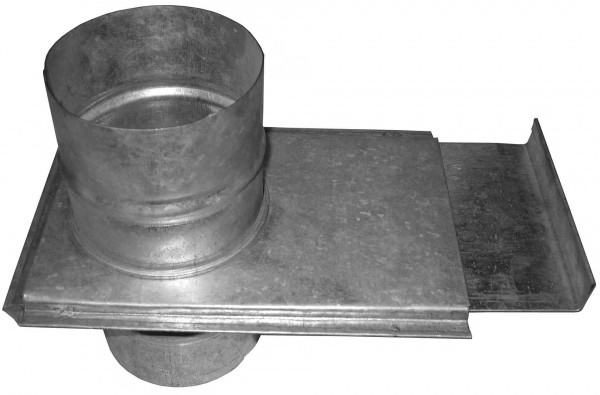
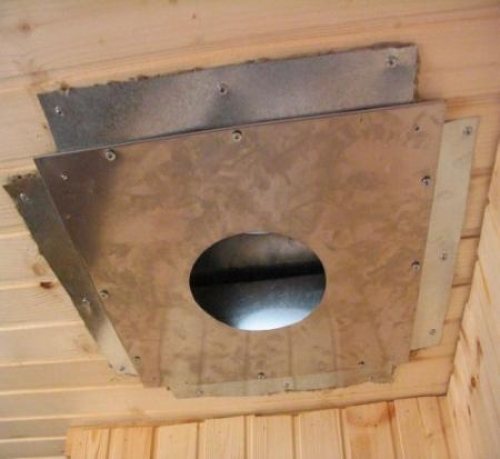
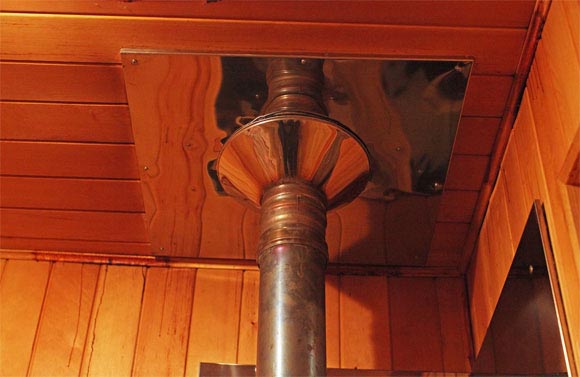
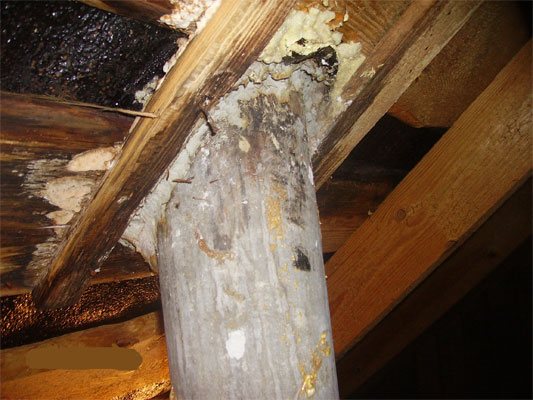
- A hole is made in the ceiling through which the chimney will go outside. The easiest way to install a metal box into the created hole is to attach it to the floors so that it is flush with the floorboards of the attic. The chimney is passed through a hole in the box, and the metal structure is covered with a layer of expanded clay or mineral wool. To prevent a fire from occurring due to the incandescence of the metal pipe, the ceiling around the chimney is covered with asbestos sheets;
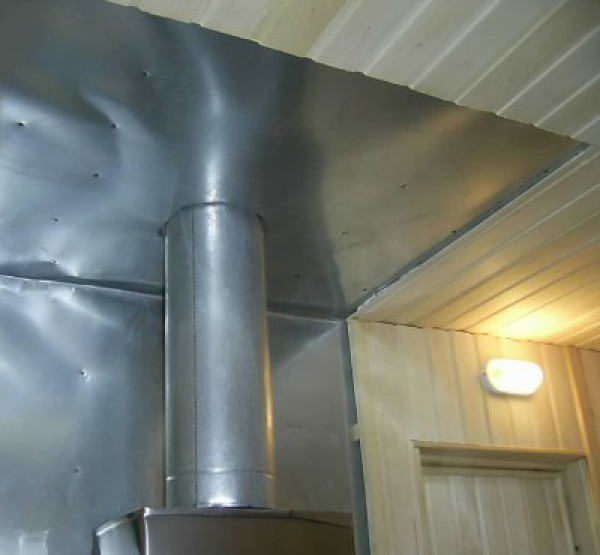
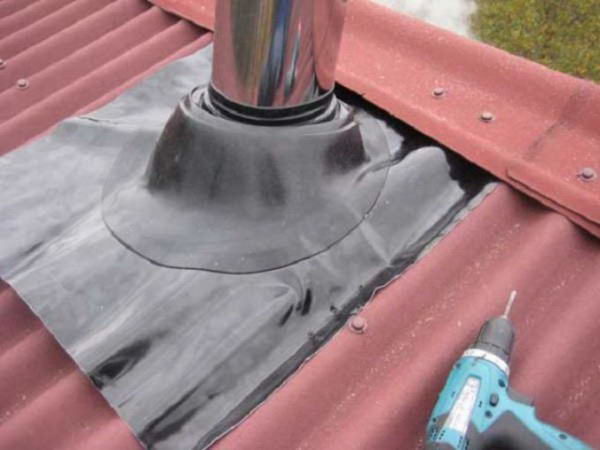
Attached sheets of material will prevent the tree from catching fire - Another hole is cut in the roofing material. To create a hole in the right place - between the roof rafters - bends are used. Roofing sheets that can deteriorate when exposed to high temperatures are covered with asbestos. The metal pipe is inserted into the hole, equipped with an elastic rubber seal and fixed in place with a fire-resistant sealing compound;
P - All elements of the chimney are mounted so that it reaches the desired size, and a metal umbrella is placed on the uppermost segment, which prevents the chimney from flooding with rainwater and becoming clogged with debris. The areas where the parts of the chimney combine are covered with sealant and tightened with wide metal clamps.
Naturally, there are also ready-made chimneys. They are easier to install and require significantly less time. In this case, it is also important to do everything as correctly and efficiently as possible; you should be especially careful if you do all the work without anyone’s help.
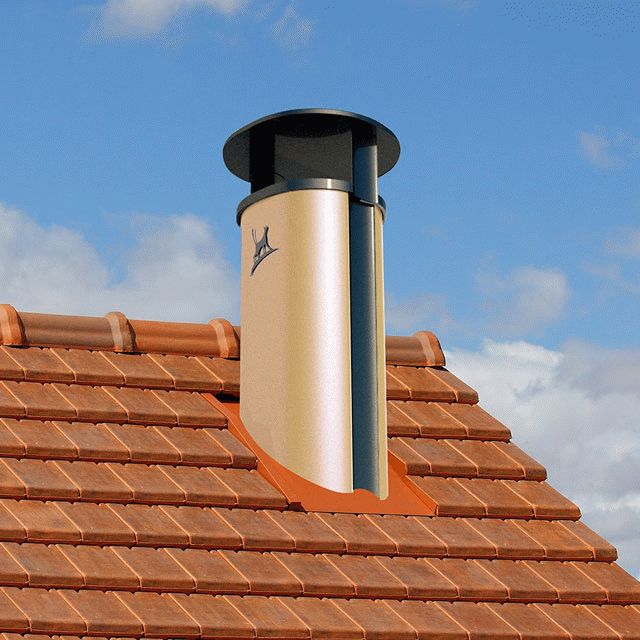
Whatever the chimney is, it is installed so that it protrudes beyond the building by exactly half a meter. At the junction of the roof and the pipe, you will need to make an “otter”, thanks to which precipitation will not get inside.
For those who make a chimney for stoves with their own hands, metal pipes are an ideal option, reducing material costs and installation time. Construction stores sell ready-made systems consisting of straight pipes, bends and clamps. In favor of metal pipes says:
- Affordable price. The cost of a metal chimney is several times lower than that of a brick chimney. In addition, I do the installation of a metal chimney with my own hands, and this saves the customer a considerable amount that he would have paid to a professional stove technician.
- The surface of a metal pipe is smooth, even slippery, so soot and other small particles do not linger on it. This allows the air, under the influence of the temperature difference inside and outside, to rise upward in a single, directed flow.
The only drawback of this method of organizing a stove chimney is that metal pipes do not have the same heat-insulating qualities as their brick counterparts, because of this, in winter, when the difference between the internal and external temperatures is maximum, condensation settles on the internal surface, this problem is solved by modern sandwich pipes protected by a layer of insulation.
Planning a chimney in a bathhouse is always associated with the choice of design. It is necessary to understand all types, know how to correctly calculate the size, display and install. Before drawing up the project, it is necessary to briefly study these aspects.
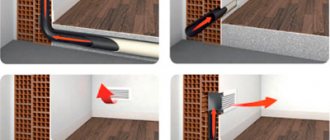
The chimney in a bathhouse can have two devices: external and internal. Each has its positive and negative sides:
- External arrangement is less fire hazardous, do-it-yourself installation and fastening is also easier. The disadvantages are that the pipe goes outside and heat loss increases.
- The interior arrangement is complex, but all the heat gets into the bathhouse. The main disadvantage is a high degree of fire hazard.
Design flaws can be prevented by using high-quality insulation. We advise you not to save on time and effort and install an internal chimney; although it is more difficult to install, it will reduce the cost of heating the steam room structure. For a small bathhouse in a summer cottage, it is easier to remove the external chimney. In any case, the choice is up to the user.
Various materials are used for the chimney: red brick, ceramics or metal. They withstand temperatures above 100 °C and are durable.
You can read reviews about using a chimney made of aluminum or asbestos, but it is not suitable for a bathhouse where temperatures are above 120 °C.
It’s easier to buy a ready-made sandwich chimney. It is easy to assemble and install, and the internal asbestos lining makes the device safe.
Before work, you must purchase all the necessary materials and components. All work takes place in stages: preparing holes for the pipe outlet, installing a protective box, assembling the pipe.
https://www.youtube.com/watch?v=twVwIHbWpaA
It is better to make holes in a new bathhouse under construction at the stage of assembling the floors and roof. In an already assembled structure, you will have to do it from scratch. If installation is chosen inside the bathhouse, then holes are cut out in the ceiling and roof; the external one is provided in the wall near the bathhouse stove.
When designing and installing a chimney with your own hands, you must:
- Select the correct pipe section. A pipe that is too narrow will not cope with smoke removal and will create smoke in the bathhouse. If the pipe is too wide, the smoke will pass through it too quickly, not having time to warm up the bath - as a result, more fuel and time will be required for heating. Depending on the power of the furnace, the pipe cross-section can range from 140 to 270 mm.
- The best pipe shape is cylindrical. It provides better passage, is less dirty and easier to clean.
- Choosing to place the chimney closer to the internal wall of the bathhouse will improve thermal insulation.
- The overall height must correspond to the instructions in the stove data sheet. If you assemble the chimney yourself, but there are no such instructions in the manual, you should choose a height of at least 4.5 meters.
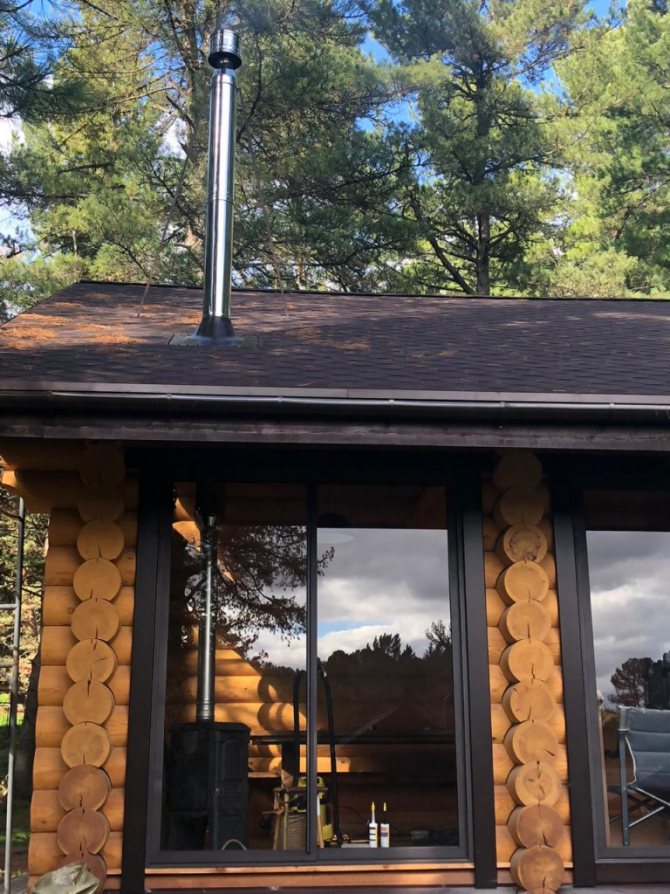
- The pipe must be installed above the roof ridge by at least 50 cm.
- The place where the pipe exits through the roof must be provided with reliable waterproofing.
- It is necessary to provide for the installation of a gate (valve) to regulate draft.
- Ensure that it is completely sealed to prevent smoke from leaking into the bathhouse. We must not forget that carbon monoxide contained in smoke can cause severe poisoning.
- It is advisable to additionally protect the walls and ceiling near the chimney with basalt wool, copper sheet or other non-combustible materials.
- In the place where the pipe passes through the ceiling, it is advisable to increase the thickness of the walls to prevent fire. Typically, the thickness of the walls increases by 5 cm. You can thicken the walls with your own hands by covering them with a layer of non-flammable material and enclosing them in a metal casing.
- The chimney can be whitewashed or painted white. This will not only improve its appearance, but will also serve as an indicator of tightness: the paint will darken in places where smoke penetrates.
And for clarity, a short video on installing a chimney in a bathhouse
What else to read on the topic?
For quite a long time, stoves were deprived of chimneys, which is why our ancestors had to take bathing procedures “the black way.” Today, such problems do not exist, so being in a steam room brings more positive emotions. Now anyone who has managed to build a bathhouse can install a chimney for a bathhouse, because it is not difficult if all the rules are followed - below, in fact, we will describe how to make a chimney in a bathhouse with your own hands - a step-by-step guide is attached.
Installing a chimney in a bathhouse requires special responsibility, because if even one mistake is made, the correct functionality of the bathhouse will be called into question. It is very important to create all conditions under which carbon monoxide would under no circumstances be able to penetrate into the steam room. To do this, before starting work, you should outline a plan, including all stages of construction.
Naturally, there are also ready-made chimneys. They are easier to install and require significantly less time. In this case, it is also important to do everything as correctly and efficiently as possible; you should be especially careful if you do all the work without anyone’s help.

Whatever the chimney is, it is installed so that it protrudes beyond the building by exactly half a meter. At the junction of the roof and the pipe, you will need to make an “otter”, thanks to which precipitation will not get inside.
It is worth noting that the appearance of soot on the walls after some time indicates poor installation of the chimney. In this case, it will be necessary to identify any gaps that have appeared and eliminate them as soon as possible.
Baths have always been popular in Russia. They are still used today not only for personal hygiene, but also to improve general health.
What are the benefits of a bathhouse for any Russian? The beneficial effect lies in the special effect of air temperature and humidity. In a Russian bath, the air is heated to a temperature of 60 to 90 degrees, and the humidity reaches 90% (this is achieved by pouring water onto the stove stones, which almost instantly turns into steam). In the human body in such a microclimate, the following changes occur:
- body temperature increases;
- pulse accelerates;
- breathing rhythm increases;
- sweat is released more intensely;
- the body is cleansed of waste and toxins;
- the load on the kidneys is reduced;
- muscles relax;
- Nervous tension decreases;
- blood circulation accelerates;
- stagnant processes are eliminated;
- The overall tone of the body increases.
Design features of a chimney for a steam room
The main purpose of a chimney in a steam room is high-quality and controlled removal of combustion products in order to completely eliminate the accumulation of harmful carbon dioxide and the formation of burning on surfaces. The resulting draft (with air suction into the combustion chamber) maintains a stable operation of the heat generator.
Features of heat distribution with different methods of connecting the heater to the chimney
The stove in the bathhouse is heated inconsistently. Accordingly, the smoke channel cools down completely between sessions, so the chimney parts experience the strongest repeated thermodynamic loads. The second important factor is operating temperature. Unlike boilers and furnaces used for heating, gases heated to 700 degrees or more are removed here.
Direct-flow stoves are often used in the bathhouse; due to the lack of heating shields or water jackets that remove some of the heat, the smoke turns out to be so hot. Therefore, the problem of chimney burnout (the danger of gas contamination and fire) always remains relevant. Chimneys for bathhouse stoves are made from high-quality materials. If these are factory products, they must be approved by the manufacturer for such difficult operating conditions.
Each individual building and each fireplace requires a suitable chimney with individual parameters and characteristics.
Parameters by which you should select a chimney:
- Chimney material;
- The location of its structure;
- Chimney made of steel. The steel chimney design includes pipes, insulation and an external circuit. Stainless or galvanized steel is used to make pipes. The steel chimney design is easy to install and lightweight.
Galvanized steel pipe has a lower cost, but it is less reliable than the previous model. Accordingly, the best chimneys are made of stainless steel.
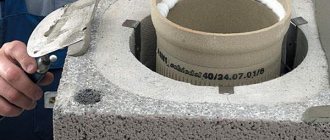
- Ceramic chimney design. Installing a ceramic chimney requires certain specialist training and, very important, accuracy. Ceramics provide excellent thermal insulation. The service life of the material is approximately 30 years. The ceramic structure consists of an internal ceramic liner, lightweight concrete blocks are located on the outside and, of course, a heat-insulating gasket that must be laid between the layers. (See also: )
- Glass construction is considered the most expensive and is very difficult to install. Some installation experience is required, but the glass fits perfectly into the interior of the house and looks very impressive and irresistible. Glass is very resistant to the formation of corrosive plaque, heat from the resulting combustion products and any exposure to moisture. Undoubtedly, these advantages of the design bring it to a high level of use.
- The chimney is a vertical structure mounted inside the bathhouse or on the facade of the building. Its main task is to remove fuel combustion products at a speed sufficient to maintain natural draft in the furnace.
- A well-designed design ensures quick heating of the bath, maintaining the necessary microclimate in the steam room and economical fuel consumption.
- The most common problems with smoke exhaust ducts: Extremely strong draft, which will lead to rapid burning of fuel without adequate heating of the steam room. Traction too weak. An inadequate amount of oxygen enters the firebox, as a result of which the combustion process is interrupted and the thermal conductivity of the stove decreases.
- Proper installation of the chimney is a guarantee of your own safety and the longest possible service life.
We invite you to familiarize yourself with a stove for a bathhouse made of pipes (92 photos): drawings and do-it-yourself manufacturing, homemade horizontal options from 530 pipes, diagram and dimensions.
You need to know that the likelihood of using the bathhouse without danger depends on how the chimney of the sauna stove is installed for Your health.
The chimney installation scheme comes in two configurations: internal and external. Depending on this, the chimney elements are selected.
Types of installation
Installation can take place on brackets through the wall or straight through the roof.
In the first case, the entire system is carried into the wall, and then rises, adjacent to the bathhouse, but without passing through it. This looks more aesthetically pleasing, and has the following advantages:
- the free space of the steam room is not used;
- there is no risk of getting burned on steel or stone;
- less chance of fire;
- It’s easier - you don’t have to make a hole through the entire attic.
- cases of smoke are easier to detect, as well as to track the general condition.
But at the same time:
- heat loss increases, since steam actually immediately enters the outside;
- the installation itself is more difficult due to the need to comply with the dimensions of the connection between the hole in the wall and the parts of the product;
- The heating of the pipe is greater due to the fact that the gases escape in the horizontal direction. With this arrangement, the resistance of the flue gases when moving through the channel increases;
- In terms of the number of elements, this option is 10% more expensive than the usual one.
When installing smoke exhaust systems in a straight line through the roof, the chimney is located straight, without bends, it departs from the boiler and goes upward, where it crosses the ceiling and exits on the back side of the roof. Advantages of such a connection:
- Stable draft due to the location of the chimney closer to the roof ridge.
- The condensate container is kept warm, so its cleaning pocket is dry and clean. This extends the service life.
- Cold bridges do not form in the walls, and thermal insulation is not compromised.
- The stability of the smoke exhaust duct is higher due to the fastenings to the roof. The fasteners themselves can be chosen cheaper than for the option on the facade.
- The aesthetics of the structure are not spoiled by side smoke outlets.
- Only a small part of the structure is located outside, which deteriorates over time from snow and rain. You can inspect and clean most of it without leaving the building.
- You can use non-insulated parts of the chimney that are located inside the bathhouse.
- This option is easier and 10% cheaper to install than when outputting through a wall.
- Flue gases go up, there is no obstacle to their exit. Heating is less than with a horizontal connection, since the resistance to smoke flow is minimal.
However, there are also weaknesses:
- The probability of “missing” the occurrence of a fire is higher, since smoke occurs in the ceilings that are located in the attic and on the roof, and they are simply not visible until the fire appears.
- Heat loss through the roof. Tightness is restored when waterproofing is installed before coating.
- Reduction of usable area, since according to safety requirements there should be nothing around the stove pipe for a bath.
- Increased costs for changing the roof and ceiling of the steam room, in particular, after finishing the final finishing.
- If the integrity of the smoke exhaust structure is damaged, the bathhouse begins to smoke.
- Condensation leaks and accumulated soot spoil the appearance of the roof.
- Burns from heated parts are possible in emergency situations.
When deciding on the installation method, the following nuances must be taken into account:
- dimensions of the building - if it is very small, then it is logical to make an external structure;
- the steam room is built from scratch or in an old room - in the first case, you can immediately think about the issue of insulation;
- Do you need to heat adjacent rooms?
External placement
An external smoke channel device is more expensive and difficult to install. This is due to increased requirements for compliance with the dimensions of the connection between the hole in the wall and parts of the product. For external installation, it is necessary to use double-walled chimneys to avoid the formation of condensation and fire.
It is external structures that are the least flammable, since the smoke is instantly directed outside, rather than circulating through a pipe located in the building. The advantage of such a system is the absence of the need to make a hole in the ceiling and roof and saving of internal space. This reduces the risk of carbon monoxide poisoning.
The main advantage of the internal location of the chimney is the easy provision of draft in the chimney structure, which is achieved by the vertical direction of the exhaust gases. In this design, the main part will be located in the interior of the building, which allows the bath room to heat up much faster.
Video instruction
A properly constructed chimney for a bath will remove combustion products, ensure heat preservation and fire safety. It can be of two types - external and internal.
External
External chimneys were invented in America. Their main advantage is the high degree of design safety.
In this option, the pipe is connected to the stove, and the chimney exits through the wall to the street. Disadvantages of this system:
- higher fuel consumption;
- the need for insulation of pipes located on the street.
Interior
Internal chimneys are located vertically, therefore, good draft is ensured. The advantage of this design is the rapid heating of the bath, maintaining heat in the room, as well as low fuel consumption. The disadvantages will be:
- complexity of installation;
- poor fire protection of the steam room;
- difficulties in repair and maintenance;
- danger of internal smoke.
Often combined chimneys are built - brickwork with a metal pipe mounted inside.
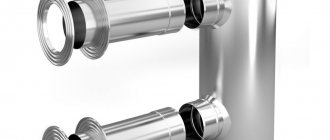
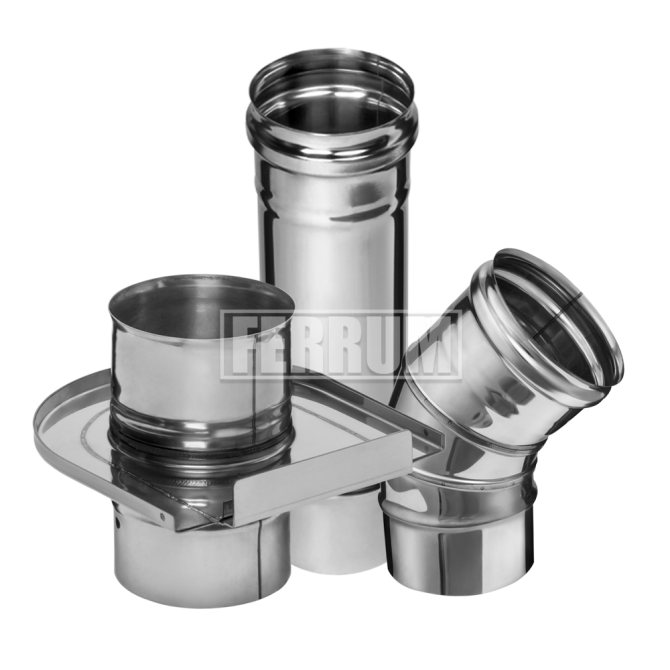
The main part of the chimney system is the stove pipe. There are 3 types with different sizes - 250, 500, 1000 mm in diameter.
The next element of the system is the throttle valve. It is used to adjust traction. It is a pipe with a built-in butterfly valve and an outward handle.
For installation you will also need tees, a cover, thermal insulation, a condensate collector, connections, an ash pan, special adapters, and various protective elements. Some of them are mandatory, while others serve as an addition to the combustion product removal system.
The bathhouse is an object of increased fire hazard. Therefore, when designing it, you need to select the right materials and equip the smoke exhaust system in accordance with all technical standards. The following can lead to trouble:
- improper arrangement of the passage of the chimney through the roof and ceiling;
- clogging with combustion waste (if cleaning was not done in a timely manner or if the hole was not provided for this);
- oven overheating.
The most reliable is the three-layer chimney design. The draft in it is created by heating the air between the middle and outer pipes. Thanks to this, the smoke from the burner moves upward and is replaced by fresh air. The outer shell in a multilayer pipe is most often made of lightweight concrete.
The pipe joints should not fall into the space between the ceiling and the roof. They are fastened with clamps and coated with sealant.
How to properly make a smoke exhaust system.
Modern modules made of stainless steel or ceramics allow you to carry out the installation process yourself. The main thing is to comply with the necessary requirements:
- good draft in the system (if the design is not hermetically sealed and incorrect, a reverse draft will be created, which is dangerous to life and health);
- ensuring the safe operation of the chimney, all nuances must be taken into account during installation;
- aesthetic appearance (although this is not a matter of primary importance, the external and internal appearance of the house depends on it);
- durability of operation
In a proper air duct, soot and condensation should not accumulate on the outer and inner surfaces. A good chimney has low thermal conductivity. There are also requirements for the shape and cross-section of the system. It should not be less than that of the boiler or furnace.
Before presenting a step-by-step guide to equipping a chimney with your own hands in a bathhouse, let’s note the main points of the device:
- correct choice of pipe diameter and design shape;
- optimal placement location (closer to the inner wall of the bathhouse, this will ensure good thermal insulation);
- chimney height (at least 4.5 meters);
- the pipe must rise above the roof by at least 50 cm;
- the junction with the roof is carefully insulated;
- a valve (gate) must be installed in the system, which will allow you to regulate the draft;
- the wall next to the chimney is protected with non-combustible materials;
- the outer part of the structure is whitened or painted, then if the seal is broken in the places where smoke passes through, the paint will become darker.
Arrangement of the passage of the chimney through the ceiling is a crucial moment. Fires often occur due to improper installation. According to safety regulations, direct contact of a hot pipe with flammable materials must be avoided. For this purpose, a special unit is constructed in the form of a box made of non-flammable galvanized or stainless metal.
You can make such a unit yourself. The dimensions of the iron sheet must exceed the size of the cutout for the pipe.
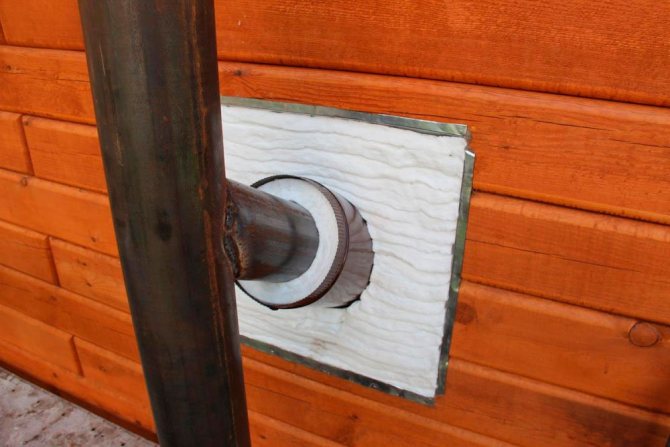
If the outer wall of the bathhouse is made of brick or other non-combustible material, then installation of the passage hole is easy. A round through hole is cut out, into which a metal sleeve is then inserted.
You can do without it if the opening is drilled perfectly round to the outer size of the sandwich. It will also not be possible to install a sleeve when the chimney passes through the wall at an angle other than 90°.
There should be no joints in the thickness of the wall. A pipe is inserted into the hole, and the space around it is filled with a fire-resistant seal. All that remains is to install and attach it to the vertical section. If the bathhouse is built of wood, then you should follow the same rules as when installing a ceiling-passage assembly.
The most optimal pipe configuration for a chimney is a cylinder. This shape will not create obstacles for smoke to escape and less soot will be deposited on the walls.
Pipe diameter
The cross-section of the chimney depends on the power of the stove and is strictly specified in SNiPs. Below are written the main dimensions of the exhaust vent depending on the power of the oven:
- 140×140 mm for furnaces up to 3.5 kW;
- 140×200 mm for furnaces 3.5 - 5.2 kW;
- 140x270 mm for furnaces 5.2 - 7.2 kW.
The diameter should not be less than the outlet of the furnace or boiler.
Pipe height
The height of the chimney is calculated taking into account the height of the building, the type of roof, and the size of neighboring buildings. When designing, it is especially important to take into account the height of the pipe located above the roof of the building. So, according to SNiPs, it should rise above the roof no less than:
- 0.5 m above the ridge when the pipe is located at a distance of up to 1.5 m from the ridge below;
- level or slightly above the ridge, if it is located at a distance of 1.5 - 3 m from the ridge downwards;
- at a distance of more than 3 m from the ridge, the chimney pipe should be at the same level or slightly higher than a line drawn down from the ridge, at an angle of 10° to the horizontal;
- the height of the ventilation duct for flat roofs is 1 m;
- if the pipe is 1.5 m above the roof level, it must be additionally secured with guy wires.
The pipe joints should not fall into the space between the ceiling and the roof. They are fastened with clamps and coated with sealant. The outer pipe must exactly match the design size, otherwise the draft will be poor.
How to make a chimney without the help of specialists? Before taking on such a complex job, consider all the pros and cons of such an installation. After all, the safety of bathhouse visitors will depend on the correct operation of the system!
When starting to install a pipe in a bathhouse, first of all you need to buy or make all the elements of the chimney structure yourself. You can make a pipe with your own hands only with a special tool and experience in this matter. It is much easier to buy ready-made parts and assemble the entire system from them. This type of work is within the capabilities of anyone who knows how and likes to do all the construction work themselves.
For installation, prepare the following tool:
- jigsaw;
- chisel;
- Bulgarian;
- screwdriver;
- screwdriver;
- level;
- roulette.
Before assembling the structure, you will need the following materials:
- clamps for securing joints;
- a head that serves as protection from precipitation;
- elements for creating a transition through the ceiling and roof structure;
- insulation materials;
- tees and adapters necessary to organize corners in the smoke path.
Before leading the bathhouse pipe through the roof or wall, also prepare in advance metal protective sheets that cover part of the wall and ceiling from exposure to high temperatures.
Think over the installation diagram in advance. It will take place in several stages. First of all, holes are made in the ceiling and roof equal to the size of the pipe plus ten centimeters.
The types of chimney passages can be as follows: through a wall, ceiling, roof. When installing metal, ceramic or sandwich pipes, first prepare a passage hole. The place where it should pass through the roof will be determined. The size corresponding to the installation of the roof trim is marked, and an opening is cut in the ceiling from the inside of the roof.
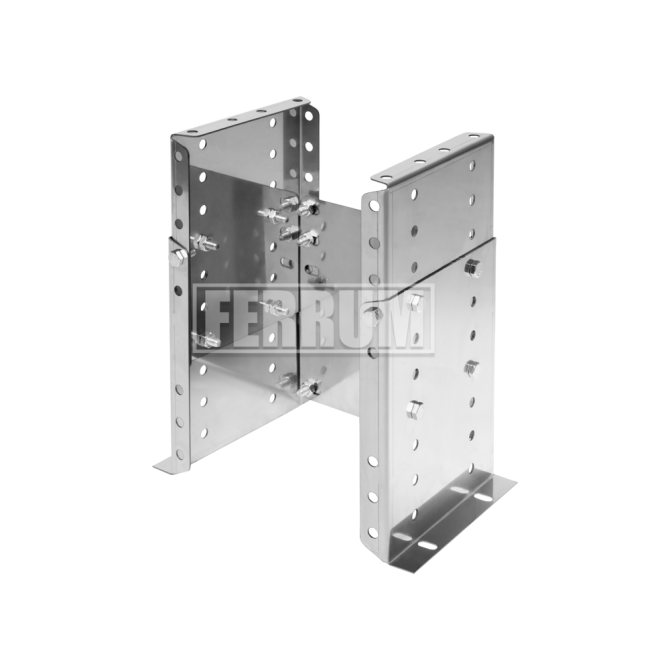
If necessary, beams are laid that will strengthen the structure and support the ceiling as well as the roof. Then the passage units are installed outside (box in the ceiling).
This unit is designed to lead the chimney through the roof or ceiling. Most often, galvanized iron, stainless steel, copper and profiled sheets are used to make boxes.
These materials have properties such as resistance to increased moisture, temperature changes and the absence of corrosive processes, as well as a long service life. A protective box is made according to dimensions that are removed from the finished chimney or according to pre-prepared drawings.
Before starting work on installing a chimney, you should study its main parameters. Not only the efficiency of the furnace, but also the fire safety of the bathhouse and human health depends on the correct choice of parameters. Each boiler manufacturer gives recommendations on the diameter and height of the chimney, depending on technical indicators; they must be followed as much as possible. Don’t think that the stronger the draft, the better the chimney.
Let's look at the main problems of chimneys.
- Insufficient traction. With weak draft, a limited amount of oxygen enters the firebox, the combustion process slows down, and the calorific value of the stove drops sharply. In addition, there is a risk of gases entering the room; incorrect dimensions of the chimney often cause back draft.
- Too much traction. Hot gases do not have time to give off heat to the furnace, and the fuel begins to “heat the atmosphere.”
Work on the installation of a chimney cannot be started without knowledge of the design features. For example, each sauna stove manufacturer recommends its own chimney diameter and height. Technical indicators require maximum compliance with certain requirements. The operation of the device will not be better if the thrust is stronger than the required standards.
With strong draft, hot gases will not have time to heat the stove; they will evaporate into the chimney. If there is insufficient draft, there will be little oxygen present in the combustion chamber. The room will be filled with smoke, which will lead to an uncomfortable stay in the bathhouse and the possibility of carbon monoxide poisoning.
Arrangement options require calculations that take into account the amount of incoming air that ensures fuel combustion. There are complex and simplified methods of calculation.
For the first calculation, you need the optimal characteristic features of the bathhouse chimney:
- gas temperature at the outlet of the pipe 120;
- minimum movement speed – about 2m/s;
- recommended length – 5 meters;
- combustible fuel with one addition to the combustion chamber - 10 kg/h.
To calculate the diameter of the chimney there is a formula: D=√ (2{amp}amp;4xVr/3.14x2)
Here D is the pipe diameter, and Vr is the amount of air.
The geometry of the section may be involved in calculating the height of the chimney. A graph is drawn up for this calculation. The graphical calculation involves the furnace area and the pipe area. The first value must be divided by the second and determine the percentage.
With a cross section of 10%, the minimum height of the chimney will be:
- 7 m. – with a round pipe;
- 9 m. – with a square pipe;
- 11 m. – with a rectangular pipe.
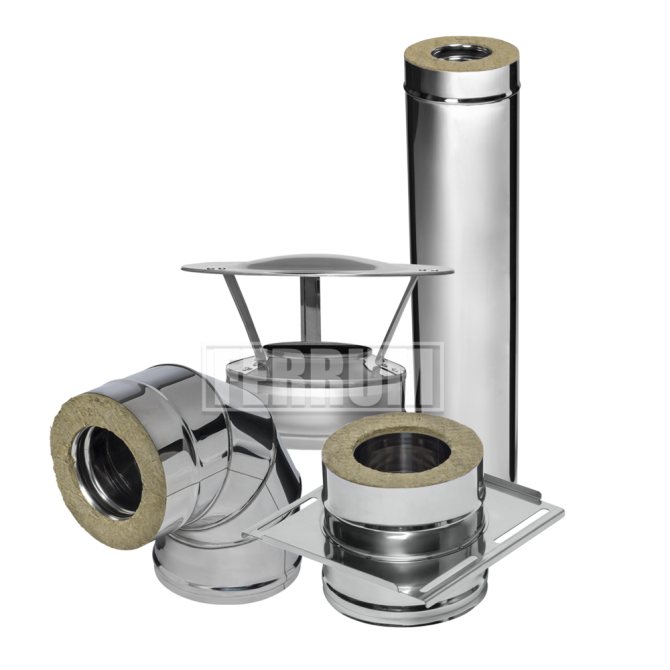
Standard kits include:
- cylindrical pipes or panels;
- adapters;
- tees;
- fastening elements (brackets and clamps);
- pipes;
- end elements of various shapes;
- tap-off elements.
In some cases, additional components are applicable. When assembling any chimney, it is important to be guided by building regulations and fire safety requirements. All components of the pipe that come into contact with flames or escaping gases must be made of sheet steel with fire-resistant characteristics. Equivalent similar materials are acceptable for use.
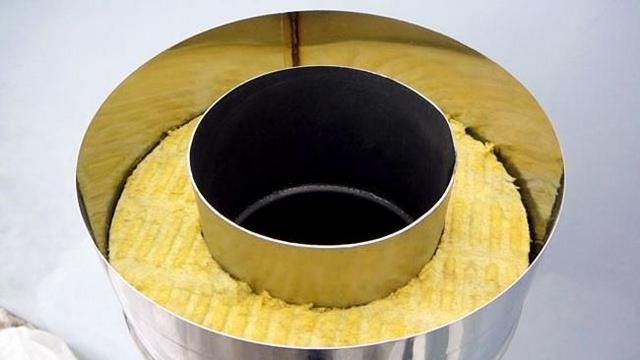
In production, chimney design elements are usually divided into two groups. The first of them includes double pipes, sandwich panels. The elements include an outer and an inner pipe with different diameters. They are insulated from each other with thermal insulation with non-flammable characteristics. This design provides faster and better heating. This causes the temperature to rise above the dew point in a short time, which reduces the amount of condensation that often causes corrosion.
Correct temperature in the steam room
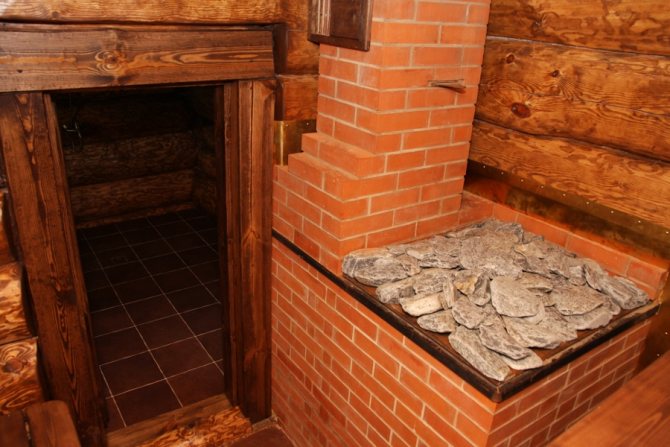
A lot can be said about the rules of classic health bath procedures, but in this article we will dwell in detail on the temperature. If we talk about the temperature in the steam room that is most suitable for health in all respects, then this indicator lies between 50 ° C and 70 ° C. In the classical Russian bathhouse, the stoves were always built of brick and, as a rule, they had closed heaters.
A ladle of water was poured onto the stones, heated red from the direct flame, which instantly turned into light, hot, finely dispersed steam, most comfortable for both the respiratory tract and the skin. A cloud of steam rose to the ceiling and a person lying on the shelf was gradually doused with small portions of this steam using brooms.
When designing your own sauna, it is important to understand that in addition to the correct temperature to obtain the full range of positive effects of steaming on the body, the sauna must also have a certain humidity. The optimal indicator is within 60%
It is this combination of temperature and humidity that provides ideal conditions for healing the entire body.
It is possible to ensure that the steam room has both the specified temperature and the correct humidity at the same time only if the stove is in it with a closed heater
To obtain high-quality finely dispersed steam, it is very important that the stones in the furnace are heated to at least 300 °C. And if the heater is open, then when the stones in it are heated to such an extent, the stove itself will be so hot that the temperature of the steam room will go beyond 70 ° C
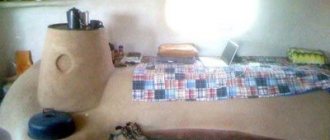
Stones for the heater
It is advisable to buy stones for the heater in specialized stores. Stones of unknown origin, picked up from various types of industries and roads, may contain harmful chemical compounds. For example, on railway embankments, stones are treated with creosote. Their use will be dangerous to your health.
To begin with, the stones should be washed in running water with a stiff brush. Large stones are placed on the bottom of the heater so that they are adjacent to the metal surface with the side with a larger area. This increases the contact area. Small stones are placed tightly between large stones.
There is no need to stack stones above the top level of the heater. They will not warm up to the temperature required for high-quality vaporization.
It is recommended to use a protective net for the heater basket. It protects the heater from overfilling, and can also be used to steam a broom and protect stones from getting leaves on them.
Correct placement of stones in a stove:
- The diameter of the stones should not be more than 15 cm,
- The best types of stones are: olivine, olivine-dolerite and peridotite. The popular gabbro-diabase is cheaper, but not the best option. It takes a long time to gain heat and cools down quickly. In addition, it can collapse and clog the furnace grates, i.e. it must be sorted regularly, throwing out collapsing stones,
- When laying, make sure that air circulates between the stones,
- Do not pile stones on or on top of the grate around the stone area.
- Do not place stones between the grate and the heater body.
We suggest you read: Is it possible to lay gypsum boards on the floor?
It is better to heat the stove using wood chips and finely chopped dry firewood. The firebox should be filled to 2/3 of its volume. Do not place firewood in the remote fuel channel. It is also prohibited to use waste containing flammable components as fuel.
When the draft becomes stable and half of the loaded firewood burns out, you need to add firewood to 2/3 of the full load of the firebox and open the ash pan.
After the optimal temperature has been established in the steam room, you need to cover the ash pan and maintain a stable temperature with coarsely chopped firewood. The optimal number of logs is 3-4 pcs.
When loading the next batch of firewood, you need to completely close the ash pan and only after loading smoothly open the door
5 steps for proper kindling:
- Empty the ash pan
- Place wood in the firebox. Air should flow freely between the logs in the firebox. Small firewood is placed on top of large firewood. Choose logs no larger than 12 cm,
- Place kindling chips on top of the firewood. This type of wood burning reduces emissions,
- Light the wood chips and close the door. By opening the ash pan, you regulate the draft in the firebox. Never light the stove with the door open,
- Add more wood to the firebox as the embers begin to die out.
Prolonged and strong heating entails a risk of fire!
Remember:
- Several full loads in a row can create excessive heat and cause the heater and chimney to overheat. This will shorten the life of the equipment and may also cause a fire.
- Based on experience, it can be argued that temperatures over 100 °C are too high for a bath,
- Use the amount of wood specified in the heating instructions. Be sure to let the heater, chimney and sauna room cool down.
The water you apply to the stones should be clean tap water. If it contains a high content of salt, iron, lime or humus, this can lead to rapid corrosion of the heater.
Using sea water guarantees the fastest corrosion of your heater
Requirements for tap water quality:
- Humus content less than 12 mg/liter,
- Iron content no more than 0.2 mg/liter,
- Calcium content below 100 mg/liter,
- Manganese content up to 0.05 mg/liter.
Water is poured only on stones, since if you splash water on very hot metal surfaces, the paint can swell due to a large temperature difference.
Their service life depends on a serious attitude to compliance with the operating rules of the stove and barrel bath. Follow simple steps and regularly monitor the condition of the equipment so that it serves you for a long time.
Kamenka
- Clean out the ash pan. The air passing through it should cool the grate well. This increases its service life. Collect the ash in a metal container,
- Soot and ash, which accumulate over time in the smoke ducts of the heater, must be removed through the round holes on the sides of the stone space,
- The stones must be repositioned at least once a year, since due to high temperatures they are destroyed during prolonged use. The remaining stones are removed, the destroyed ones are replaced with new ones. It is recommended to check gabbro-diabase stones more often, approximately once every six months,
- Use a damp cloth to remove dust and dirt from the heater.
Chimney
- The chimney and connecting pipes must be cleaned periodically, because Due to incomplete combustion of fuel, soot accumulated in the chimney may ignite.
If the operating conditions of the furnace are met, this situation will not arise, but you should know what to do in this case. It's just like you should be able to do artificial respiration in the hope that this skill will not be useful to you.
- Close the ash pan, firebox door and damper, if installed,
- Call the fire department
- Don't put out fire with water
The most popular models of electric heaters are produced and sold by the Finnish company Harvia. It has been in the market for more than half a century. During this time, their products have earned the love of a large number of bath lovers around the world. Harvia electric heaters are distinguished by their modern design, high quality of materials they use, convenient models and safety in use.
The steel body of the electric heater is coated with a special paint, which preserves the presentation of the stove for many years. Each model of the electric stove has a control panel. Some of them have a liquid crystal display that shows the temperature and humidity in the steam room, and also has a function for quickly adjusting the oven parameters.
The Harvia electric heater is easy to install, convenient and economical. Modern heaters are powered from a regular electrical outlet (220 V). They take a little electricity, which, given its constant rise in price, you must agree, is very good.
They are very compact. The Harvia Delta model is well suited for the smallest barrel sauna, 2 meters long. Power consumption, depending on the oven model, is only 2.3-2.9 kW. It is not suitable for a bathhouse 6 meters long; it is better to purchase a more powerful stove model, for example, Harvia Club with a power of 11-13 kW.
When choosing a stove, you need to pay attention to the volume and number of stones for the heater. This will affect the climate in the steam room. When there are few stones, the sauna will heat up faster, and the steam in it will be dry. A large number of stones and slow heating makes the steam soft and thick. The Harvia Club Combi model will provide you with such steam. There are already Harvia models with a capacity of up to 300 stones, as well as models with remote control.
Heavy crushed rough stones with edges measuring 5-10 cm are suitable for Harvia electric heaters. The manufacturer prohibits the use of soft (talc), light (ceramic) and smooth stones. They will not create the desired effect and can damage the heating element and the heater itself.
No similar publications
Choosing material for a chimney in a bathhouse
The market offers a wide range of raw materials for the production of smoke exhaust structures; let’s briefly name each of them.
It is low cost and easy to install, however, due to its porous structure it can accumulate condensate.
It conducts heat very well and heats up quickly, but lacks corrosion resistance. It has a large mass, which complicates the installation process and requires the construction of a foundation.
The model is quite expensive and difficult to install, although its appearance is very pleasant. If you do not line the inside, the structure becomes clogged with soot, susceptible to condensation, dampness, and subsequently cracking and allowing carbon monoxide to leak.
We suggest you familiarize yourself with How to attach a cable duct to a concrete wall
Due to its strength, ceramics can withstand high temperatures, are durable and can be used with any type of boiler. However, the installation of such a chimney is very expensive, and the design itself is poorly maintainable. Therefore, installation should only be carried out by a qualified technician, and the owners will have to treat this ventilation system with care.
Most bath complexes - home or commercial - use this option. This is due to excellent resistance to atmospheric agents; soot virtually does not accumulate, and the installation will last for many years. The appearance fits well with any bathhouse exterior; the shiny surface is pleasing to the eye. In addition, this design is quite easy to maintain.
Our production
Single wall chimneys
Double wall chimneys
Mounting elements
A glass smoke duct is a good choice, since this material has minimal inertness and is resistant to moisture and corrosion. The constant increase in the cost of installing such a structure is due to the complexity of the process and the high cost of fire-resistant glass in general. Therefore, such chimneys are the most expensive systems these days, although the cost is fully justified by the advantages of this option.
Before purchasing materials, you need to determine the structural features of the chimney.
Brick system
The construction is made of heat-resistant brick using a special dry mixture or oven clay. In addition, you may need material to create a fungus over the pipe.
Before purchasing material for the manufacture of a metal chimney in a bathhouse, it is necessary to draw up its exact diagram with the detailed location of all corners and turns of the pipe.
You will also need 2 iron sheets with holes corresponding to the diameter of the pipe. They are fixed on the ceiling of the bathhouse and on the floor of the attic. You will also need a heat-resistant material that will be secured around the pipe at the point where it exits into the wooden attic.
To create waterproofing around the chimney on the roof, you need to prepare a sealant or a special rubber seal.
Choosing pipes: what to look for
When purchasing iron chimney pipes, you need to decide on their cross-section. Basically, it depends on the power of the stove, but for most bath options this parameter is 15-20 cm. You should not take a diameter that is too large, as it will not retain heat well. And if it’s too small, it won’t create the draft necessary for removing smoke. Whatever it is, the cross-section of the pipe should not be less than the diameter of the outlet pipe of the heating structure.
There are a number of other requirements for the elements of a chimney in a bathhouse:
- The minimum pipe height is 5 m. Neglecting this requirement may result in deterioration of traction. The exact value is calculated depending on the location of the pipe on the roof. In any case, it should rise above the ridge by at least half a meter. The ideal height from the ridge is 1.5 m, but this is not necessary;
- The minimum thickness of the metal used to create the pipe is 1 mm;
- If it is planned that the chimney system will be equipped with a hot water tank, then it must be reflected in a previously drawn up diagram. It is better if the tank is made of stainless steel.
Pipe installation process
- Preparatory work
- Installation procedure
- Wall mount
- Passage through the attic
- Roof passage
- A sandwich chimney is the simplest option for self-installation of a combustion product exhaust system. Lightweight and compact structural elements are quickly assembled using auxiliary elements. Of course, when assembling a sandwich pipe for a bathhouse, a number of points must be taken into account.
The dimensions and design of the chimney in a sandwich pipe bath are influenced by the following requirements:
- The optimal length of the pipe from the stove to the fungus on the roof is 5 m.
- The pipe is mounted vertically, without ledges. The permissible deviation of the pipe from the vertical is 30 degrees, with a maximum deviation to the side of 1 meter.
- If the size from the roof to the pipe head is more than 1.5 m, install a brace to secure the structure.
- If the roof is covered with flammable materials, install a spark arrestor mesh with 5x5 mm cells at the end of the pipe.
- The pipe on a pitched roof should protrude 50 cm above the ridge. The pipe on a flat roof should be located 1 m above the roof.
- The horizontal part of the smoke exhaust tract is up to 1 m.
- The joints of pipe elements must remain visible; they are not allowed to be located inside the roof slabs.
- It is prohibited to place cleanouts and horizontal outlets in the attic. The pipe in the attic should point upward.
A sandwich chimney is made by connecting individual parts of a 1 m long chimney. Each section of the structure consists of three components - an inner and outer pipe with a heat-resistant layer. The chimney also requires fastening elements and auxiliary products. Double-wall chimneys are produced in many designs and differ in their parameters - diameters, type of insulator and its thickness, pipe material, etc. To avoid mistakes when choosing sandwich pipe elements, use the recommendations.
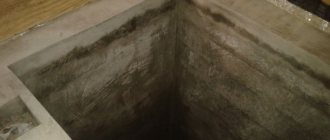
- Holes 45x45 cm are cut out in the roof and ceiling of the bathhouse;
- Two 50 cm square plates are cut out of metal, with which the chimney will be attached;
- It is necessary to make mounting holes in the corners of the prepared plates;
- A round hole is made in the middle of one of the blanks;
Round hole for chimney
- The second plate will be attached to the roof slope; for this you need to make an oval hole in it;
- A galvanized casing is put on internal and pre-insulated pipes;
- The ends are jammed with rings and the edges of the tube are bent from the outside;
- The insulated end of the lower chimney is inserted into the round hole of one of the metal plates, and the non-insulated end is pushed onto the pipe;
- The metal sheet is screwed to the ceiling, and it is imperative to ensure that all gaps are in the same position;
- Using a pre-welded pipe, the upper pipe is placed on the lower pipe, connecting them with a clamp;
- A second metal plate is screwed to the inner surface of the roof;
- Clay or expanded clay is used to fill the space between the pipe and the wooden components;
Pipe passage filled with expanded clay
- Where the pipe passes through the roof, a layer of waterproofing is laid and a seal is installed;
- Then a special protective cap from precipitation is placed on it.
Whatever the chimney is, it is installed so that it protrudes beyond the building by exactly half a meter. At the junction of the roof and the pipe, you will need to make an “otter”, thanks to which precipitation will not get inside.
It is worth noting that the appearance of soot on the walls after some time indicates poor installation of the chimney. In this case, it will be necessary to identify any gaps that have appeared and eliminate them as soon as possible.
In white - this type of bathhouse is smokeless, that is, smoke will be removed from the washing room using a pipe called a “chimney”.
In a black way - the room is equipped in such a way that the smoke circulates, envelops the walls, settling on them (hence the name for this type of Russian bath).
A chimney is built in a bathhouse to remove combustion products from the wood used to heat the bathhouse. It can be made from pipes of various materials:
- metal (with high heat transfer, therefore requires thermal insulation so that the chimney does not burn out);
- ceramic (asbestos-cement material with good thermal insulation is not recommended);
- brickwork (heats up slowly and also cools down slowly).
Depending on the location, the chimney is built internally and externally. An internal chimney is more common in our country, since it does not violate the architectural style of the entire building and saves heat, which remains inside the steam room, and does not require additional insulation.
Instructions for installing an internal chimney in a Russian bath with your own hands:
- Decide what material you will use to build the chimney.
- Make the necessary calculations - the height and width of the chimney pipe.
- Prepare the necessary materials.
- Start installation from the bottom of the base upwards (remember that the chimney should be as far as possible from the log walls).
- If pipes require connections to each other, use clamps for fastening.
- When venting the chimney pipe through the ceiling, make a hole of the required size with your own hands (do not forget to insulate the junction of the pipe and the ceiling with a heat-resistant lining).
- Also install an insulating cap on the roof to keep the heat inside.
- Be sure to install rain protection on top of the chimney.
One of the few secrets of a good Russian bath is proper smoke removal. If you are not sure that you can install a chimney yourself, experts advise turning to specialists.
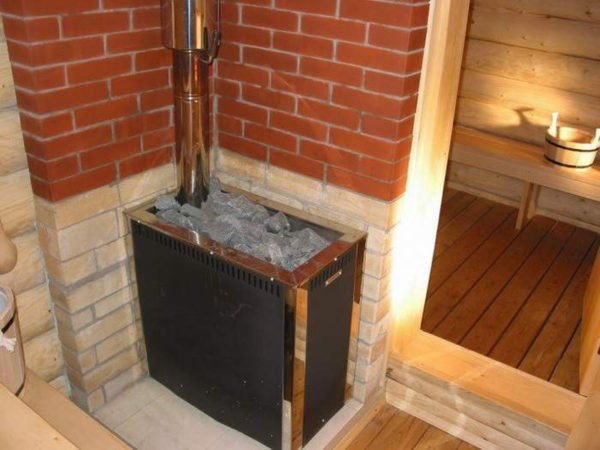
Protective thermal screens
As the main protection of the walls of the bathhouse, heat-resistant screens are used - special insulation shields to cover the side surfaces of the stove and reduce the intensity of the spread of IR radiation in the room.
Screens are divided into two categories: metal and brick.
Metal
Protective screen made of sheets of steel or cast iron. It is mounted around the perimeter of the sauna stove, while maintaining small technological gaps (3-5 cm) between the screen and the outer walls of the heating structure to ensure additional air convection.
Depending on the characteristics of the walls of the bathhouse and the type of stove, metal screens can be front and side. Some models of metal stoves are produced with an additional protective casing, which is installed when installing the firebox.
Installation of metal screens is carried out using adjustable legs and secured to the floor with bolts. In addition, the legs allow for clearance at the bottom of the structure for additional ventilation. To increase service life, the screens are coated with a fire-resistant paint layer.
Advantages:
- reduction in the intensity of IR rays;
- improvement of air convection between the oven walls and the screen;
- reduction of the overall heating temperature of the external walls of the heating structure.
Brick
A protective screen made of brick is intended for enclosing the walls of a sauna stove.
The masonry is done in ½ brick around the perimeter, maintaining technological gaps of 6 cm. The lower part of the structure is equipped with additional air ducts at a distance of 2.5 cm from each other.
To construct a brick screen for furnaces, heat-resistant fireclay bricks without voids are used. As a connecting mixture - a thick solution of cement or clay.
The finished screen walls should be 22–25 cm higher than the wall of the heating structure.
Advantages:
- low thermal conductivity of the material from which the screen is made;
- resistance to high humidity and high temperatures;
- long-term accumulation of heat in the room;
- receiving soft heat from the stove.
Highlights of exiting through the roof
Now the next stage: we need to “punch holes” in the roof and roof. The work is unpleasant, but necessary. Again we start with the markings. If we compare it with the ceiling, then here we mark it differently. The roof usually has a slope. And the greater this slope angle, the larger the area of the hole cut for the chimney will be.
With the lateral vertical markings, everything is simple: we retreat 10-15 centimeters from the sandwich pipe and cut out the wooden sheathing. With horizontal upper and especially lower markings it is more difficult. Here you should take into account the slope of the roof and be more careful with the bottom sheathing board. Make sure it is not too close to the chimney.
The roof itself will have to be cut in the form of an oval. Again, the greater the angle of the roof, the more stretched the hole will be. To close the cut hole from the street side, special rubber seals are used. In common parlance they are called “flash drives”. They are called roof penetration seals. A very convenient and practical thing.
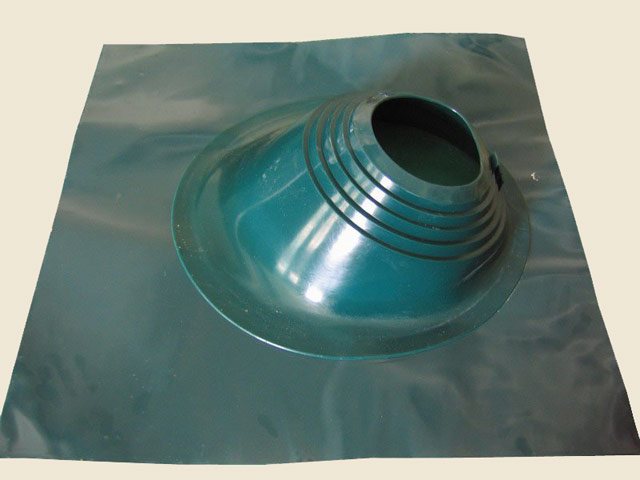
Flash drive - roof passage seal
By the way, about the “flash drive”. Always purchase it with the desired slope, at the angle of your roof slope. Often managers in retail chains offer a direct version of the flash seal. In practice, it can only be properly placed on a horizontal surface. Take this point into account.
Before you build a brick chimney in a bathhouse with your own hands, you need to determine what elements it consists of. At the very beginning there is a supernatant pipe, which is laid out in compliance with a special dressing. 6 rows before the overlap, this component must be completed, since after that the neck of the fluff begins.
The fluff is an expansion of the chimney, but the cross-section should remain the same as along the entire length of the pipe. The expansion occurs only on the outer part of the fluff; the thickness is 25-40 centimeters. The part of the chimney that will go into the attic is called a riser; this element goes exactly to the roof.
Installing a chimney in a bathhouse with your own hands requires the presence of an otter, which acts as the next unit. This element is an expansion on four sides; it should not be less than 10 centimeters. Thanks to this element, precipitation does not penetrate into the grooves between the chimney and the roof.
After the otter, a neck should be laid, its size is the same as that of the chimney itself. Its arrangement must be completed with an extension that forms the head of the chimney. A cap made of metal is mounted on it; this element can be replaced with a deflector, which will prevent the chimney from entering snow and rain, as well as debris and small birds. Actually, this element is also necessary for traction.
When arranging a chimney, you should use fireclay or ceramic solid red brick. The difference between them will be only in the temperature that each of these materials is able to endure. Thus, red brick will be able to withstand 800 degrees, while fireclay brick can withstand 1000 degrees.
All other options such as porous, hollow or lightweight bricks should not be used. When choosing a solution, it is necessary to take into account that below the roof level you need to use a mixture based on lime and cement. Whereas areas located above the roof should be laid using a mortar of sand and cement.
What should you pay attention to when installing a chimney in a bathhouse?
When choosing a chimney design, you need to pay attention to the following factors:
- The chimney exhaust material needs to be stable so that it can withstand the high temperature of the exiting products; (See also: )
- Must withstand a mixture of soot and condensation;
- The design of the chimney must fully comply with all required standards (construction, fire, technological, operational).
For a fireplace that will be fueled by gas, a chimney made of stainless steel is perfect; for coal, it is better to choose a chimney made of brick, and for firewood, a design made of ceramics, brick, and stainless steel is suitable.
Below are guidelines on what to focus on first.
The small cross-sectional size will prevent the removal of fuel products in the required quantity. The volumetric section, on the contrary, contributes to the movement of smoke too quickly, which will not allow the bathhouse room to be properly heated. This, in turn, will increase fuel costs. You should take this point seriously, since the result will depend on it.
Deciding on the form is easy if you take into account the basic principle of its operation. Chimneys tend to heat up unevenly, as a result of which smoke comes out to the roof surface along the central axis. It follows that the correct shape is a circle. Cylindrical structures heat the room much faster and do not require unnecessary financial costs.
A chimney with a rectangular cross-section provokes turbulence that interferes with the necessary draft. A rectangular configuration is permissible only when we are talking about heating devices that do not require powerful traction.
Pipe diameter
The scale is determined by the degree of power draft of the sauna stove and is located in the intermediate range from 115 to 270 (mm). However, in order to accurately determine the diameter, you need to familiarize yourself with some of the requirements specified by the manufacturer in the instructions. If you do not have a diagram for installing a chimney for a bathhouse with your own hands, then it will be enough to know the ratio of the cross-sectional diameters of different shapes. It looks like this:
- cylindrical – 1 to 10;
- rectangular - 1 to 1.5.
For brick chimneys, the minimum cross-sectional diameter should be 140x140 mm.
The successful operation of a chimney system primarily depends on how accurately the pipe size is determined.
Flue height
According to the standard, its height should be at least 5 meters. The calculation of the height of the chimney is carried out in accordance with the basic technical characteristics of the materials.
We invite you to familiarize yourself with a DIY chimney for a potbelly stove
The channel should be located at least half a meter above the roof ridge and not below its level. In this case, it is worth taking into account the thickness of the roofing covering and the angle of inclination of the roof slope. The height is selected without taking into account the chimney “umbrella”.
Step-by-step installation of a chimney pipe outlet
The selection and installation of a place for future ceiling cutting is carried out in the following sequence:
- To accurately select the place where the chimney goes out, it is recommended to use a special plumb line used by builders.
- After the hole of the required size is made, it would be useful to decorate it on all sides so that the ceiling does not lose its aesthetic appeal. For decoration, you can choose a galvanized sheet of metal or stainless steel.
- The finishing material is cut with metal scissors in a size that should exceed the size of the finished hole by several centimeters.
- The cut sheet of metal is attached to the ceiling with ordinary nails or stainless steel screws.
It is imperative to keep in mind that you need to start marking the vertical holes from the roof of the bathhouse, and control the center using a plumb line.
Brief description and dimensions of the metal stove
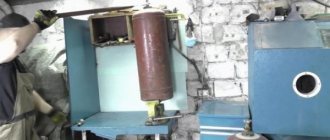
Our design will have a separate tank for heating water and a heater built into the top of the stove. The flame heats the heater from all sides, this significantly increases the efficiency of the stove. You can take arbitrary sizes, take into account the parameters of the steam room and the number of people washing at the same time. We give the dimensions of our stove as an example.
- External heater. Width 50 cm, length 50 cm, height 80 cm.
- Internal heater. Width 40 cm, length 40 cm, height 50 cm. The distance between the walls of the inner and outer heater is five centimeters around the perimeter.
- Bake. Width 50 cm, length 90 cm, height 50 cm. You can change the length of the stove, make it only for an external heater 50 cm long (then the water tank will have to be mounted on the side on stops) or increase the length to increase the volume of the tank.
- Water tank. Width 40 cm, length 50 cm, height 60 cm. The tank holds 120 liters of water, which is enough to wash three or four people. Of course, hot water needs to be diluted with cold water.
What types of chimneys are there?
A do-it-yourself installed chimney for a bathhouse can be external or internal. In Russia, you can most often find the second option - it fits perfectly into the architectural style of the steam room, and does an excellent job of saving the heat generated by the stove. External chimneys are typically installed on American farms.
The internal type of chimney is good because it has more efficient draft and is easier to maintain. In addition, there is no need to insulate such a chimney.
The external chimney is notable for the fact that there is no need to violate the integrity of the roof; moreover, it is clear that such a design is safer for the bathhouse itself and the visitors inside. The internal brick chimney in the bathhouse must have a wall thickness of at least 12 cm, while the external chimney will require a thickness of more than 38 cm.
General installation recommendations
It is necessary to study in as much detail as possible the information on how to properly make a chimney pipe in a bathhouse and all the details related to its installation, because reliability, service life, performance and, above all, your safety will depend on its quality. Any seemingly insignificant mistake can provoke irreversible consequences.
First you need to familiarize yourself with the main instructions of specialists and instructions (if available).
The areas where the smoke channel passes through the ceilings must first be protected. The step-by-step guide for this stage of installing a chimney in a bathhouse with your own hands is as follows:
- Preparing the passage pipe. It is required to fill its exterior with basalt wool.
- Next, you need to insulate the inside of the unit - decide on the installation point on the ceiling and prepare a hole of the desired shape.
- In the area where it meets the ceiling, spread another thermal insulation layer and then proceed to the cutting device.
- Be sure to leave a small gap between the passage unit and the smoke channel.
Roof work
Start this stage by dismantling the roof:
- It is necessary to determine the dimensions from both the internal and external areas of the roof, taking into account the roof slope (slope).
- Cut a hole inside the roof. To do this, cover the opening areas with metal sheets on both edges, the thickness of which should be 0.5 (mm). You need to make 4 holes measuring 450 by 450 (mm), using the square section method. The scale depends largely on the adapter.
- A roof flashing or master flash is used to pass the chimney through the roof. Their main task is to seal the passage and protect against moisture.
Please note: the master flush must be placed under the top edge of the roof to avoid leakage. Also, seal the joint with the pipe and secure everything with roofing screws.
Passage through the wall
We invite you to familiarize yourself in more detail with two installation schemes with detailed descriptions.
How to properly make a chimney from asbestos pipes
One of the reasons why the asbestos pipe has become widespread is that the installation of a homemade chimney from an asbestos pipe can be easily done with your own hands. During installation, fire safety requirements and standards, as well as current SNiPs, are taken into account.
Reliable fastening, heat and waterproofing are carried out, and also, if the pipe is cracked, smoke is prevented from entering the room. Below are the most common mistakes and solutions that take into account the characteristics of asbestos-cement pipes.
How to fix an asbestos-cement chimney
One of the most difficult things to do when installing a smoke exhaust system yourself is the accurate calculation and arrangement of external chimneys made of asbestos-cement pipes. Existing standards stipulate in detail what parameters a chimney pipe must meet in order to provide sufficient draft and be able to resist wind loads.
To secure the external chimney, special clamps and braces are used. When installing a free-standing pipe, or its part above the roof, adhere to the following recommendations:
- Calculate the diameter and height of the chimney from an asbestos pipe. The higher the chimney, the greater the wind load it experiences. To secure the pipe on the roof, raised above the ridge by more than 2 meters, roof braces are installed. The height is calculated depending on the distance of the chimney from the ridge of the building, the diameter according to the volume of the combustion chamber (recommended cross-section is at least 120 mm).
- A free-standing chimney is fixed to the wall every half meter using pipe clamps. To securely secure the pipe to the roof, a special roofing base is used. Sealing against leaks is mandatory.
- When installing an asbestos pipe in a brick channel, the pipe is securely fixed using special spacer fittings. The minimum distance between the pipes of a multi-channel chimney made of asbestos-cement pipes is at least 10 cm. A plate is installed on top of the structure, covering the channels from moisture. If you do not fix the asbestos pipe in a brick chimney, then over time the pipe at the joints will lose its tightness, which will result in the appearance of oxides and destruction of the walls.
- When passing through the roof and interfloor slabs, a fastening bracket made of asbestos cement is used. A distance of at least 10 cm is left between flammable materials and a very hot surface; a non-combustible chimney support is installed on the wooden floor.
- In a house made of aerated concrete blocks, it is not recommended to install free-standing chimneys. The wall to which the pipe is attached will not be able to withstand the wind load. The optimal solution would be to install an internal smoke exhaust system. If it is necessary to make an external connection, the use of guy wires is chosen as a method of attaching an asbestos-cement chimney pipe.
It is extremely important to secure the pipe to the roof to reduce the effects of wind loads. When heated, asbestos loses its strength. Any gust of wind can lead to loss of integrity of the chimney walls.
How to build up an asbestos-cement chimney pipe
The regulatory documents regulating the use of asbestos-cement pipes as chimneys, in particular SP 60.13330 (formerly SNiP 41-01-2003), indicate that asbestos chimney pipes are designed vertical. It is allowed to use asbestos-cement materials or prefabricated structures in which the top layer is made of stainless steel.
When laying chimneys, free-flow pipes are used. Stainless steel sleeves can be used as adapters when connecting to heating devices. To connect an asbestos pipe to a metal pipe, CAM type couplings are installed. The design of the adapter includes machined grooves, which ensures maximum tightness of the joints.
There are heat-resistant sealing gaskets on both sides of the coupling. To extend the pipe from the side of the asbestos chimney, remove the rubber band and fill the groove with a heat-resistant mixture to connect the asbestos-cement elements of the chimney pipe. If two asbestos pipes are connected, the sealing compound is used on both sides.
To connect asbestos-cement pipes to each other in a brick chimney, an inspection hole is made at the joining site, allowing installation work to be performed on site.
An adapter from an asbestos-cement pipe to a metal one compensates for the difference in heating and the ability of the material to expand. It is prohibited to use improvised means as a transition coupling.
How and with what to insulate an asbestos chimney
The asbestos-cement chimney pipe can withstand temperatures up to 300°C. At the same time, the material has high thermal conductivity and instantly transfers heat to the environment. The heating of the chimney surface is almost identical to the temperature of the exhaust flue gases. Surface insulation with non-flammable thermal insulation material is required for several reasons:
- Insulate the asbestos chimney pipe from wood or any other combustible wall sheathing.
- Reduce the amount of condensate produced and avoid freezing.
- Waterproof the pipe.
Modern insulation technologies can significantly reduce the volume of condensate in an asbestos pipe and significantly increase the service life of the chimney.
As practice shows, it is not enough to simply wrap an asbestos pipe with thermal insulation material in order to achieve good thermal insulation characteristics; work is carried out according to the following installation diagram:
- Choice of insulation - basalt wool or any other non-flammable thermal insulation is suitable for the work. It is better to choose a material that has a low water absorption coefficient. If necessary, it is possible to insulate with mineral wool insulation.
- Fixing the thermal insulation - the insulation is wound onto the pipe and secured using special clamps. Alternatively, tie wire can be used.
- Protective layer - insulation is carried out on top of the mineral insulation with foil insulation. A layer of foil protects the basalt wool from moisture and serves as additional protection against fire.
- Frame - the rules for installing and insulating asbestos-cement pipes provide for the use of a metal frame that protects a free-standing chimney or the outer part coming out of the roof. As an alternative, it is possible to use sandwich systems, with an outer layer of stainless steel and an inner layer of asbestos.
Normal temperature of gases leaving the furnace
In order for the water present in hot gases to evaporate better, the temperature of the latter must be increased. On well-heated pipe walls, settled drops of moisture quickly evaporate.
The normal temperature of gases leaving the furnace before exiting into the pipe is 12O...14O°C, when leaving the pipe into the atmosphere - not lower than 100°C.
If the flue gases, when exiting into the chimney, that is, at the view, reach a temperature of about 250 ° C, then condensation does not form, draft improves, the stoves heat up faster, while consuming less fuel.
The temperature of the exhaust gases can be determined using a dry splinter, which is placed across the view hole during combustion. If after 30...40 minutes you remove the splinter and scrape off the sooty surface from it with a knife, you can set the temperature of the gases. The color of the splinter does not change at temperatures up to 150°C. If the torch turns yellow (to the color of a white bread crust), it means the temperature has reached 200°C;
Thus, when firing the furnace, the temperature of the gases must be adjusted so that at the viewer it is within 250°C.
You should know that in the summer, condensation either does not form at all or occurs in small quantities. The formation of condensate largely depends on the size of the grate, the correctly raised hearth and the design of the furnace in a Russian stove, the size of the channel, the thickness of the walls, clay and height of the chimney, the temperature of its heating, the humidity of the fuel used, the temperature of the gases leaving the chimney and the excess number of chimneys in the stove.
The height of the chimney must be at least 5...6 m, counting from the level of the ash chamber or the hearth of a Russian stove. The thickness of the pipe walls should be half a brick, 20 mm). Thinner pipe walls heat up quickly and cool down quickly, which leads to the formation of condensation.
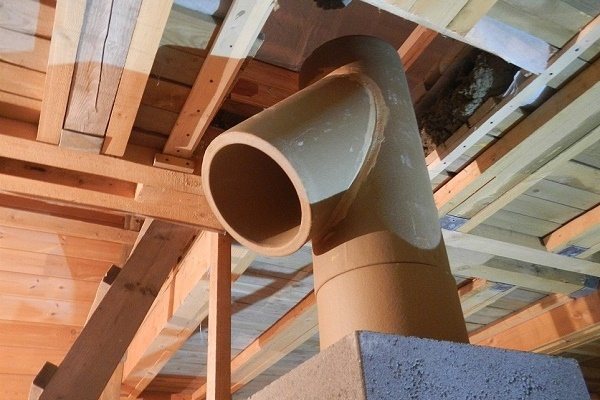
Such pipes must be insulated. Various cracks in the pipe and the stove, through which cold air penetrates, also contribute to the cooling of gases and the formation of condensation. When the cross-section of the pipe channel (chimney) is higher than required for a given stove, the flue gases rise through it very slowly and the cold outside air cools them in the pipe.
Sometimes, to improve draft in stoves, it is necessary to rearrange the pipes, reducing the size of the chimney, lowering or raising the height of the pipe on the roof. This is done until a satisfactory result is obtained. Where the chimney narrows, right angles should be cut off to ensure a smoother transition of gases.
Do-it-yourself stove laying
The chimney and its installation are only the main thing
Where to start arranging an exhaust gas removal system? To begin with, it doesn’t hurt to study all the nuances of his work. Let's start with them. The main task of any chimney is to remove combustion products and supply air.
The operation of all equipment depends on how correctly the model is chosen. Impaired draft can lead to smoke entering the room, which can lead to carbon monoxide poisoning.
When choosing a design, you should comply with building standards, as well as fire safety rules. When deciding who will carry out the installation and how to make the right chimney for a bathhouse, consider not only the costs, but also your own knowledge. If they are insufficient, then it is better to entrust this stage of work to professionals.
Types of structures, materials
Choosing the right chimney is the key to arranging a bathhouse in compliance with all existing standards. Conventionally, constructive solutions are divided into two types:
- External extension
- Interior
The first is chosen regardless of the structural features. It is quick and easy to assemble and easy to repair. The only drawback of its design is the need for insulation.
How to make a chimney in a bathhouse? Internal - installed during the construction of the building. It is capable of retaining a significantly larger portion of the thermal energy in the room and does not require insulation. Its shape depends on the design features of the building; it is very difficult to repair.
When solving the problem of which chimney to choose for a bathhouse, you need to take into account the fact that the characteristics of the chimney depend, first of all, on the material from which it is made and on the type of pipe. If the construction of the bathhouse is made of brick, then the chimney can be made of brick, or of metal and
ceramic chimney pipe
. It is also possible to create a combined version using two or more materials. But if the main part of the structure consists of metal, then the exhaust gas exhaust system should be metal or ceramic.
Today, a brick chimney for a bathhouse is installed less and less, which may be due to some complexity of its construction and maintenance (read: “
DIY brick chimney
“). That is why prefabricated types of construction are increasingly being used, which are much easier to install and maintain and retain heat better. Their construction can be completed without serious construction skills.
When installing a chimney for a bathhouse yourself, you need to understand
how to make a chimney in a bathhouse
and be sure to follow a number of rules that are explained by certain characteristics of the materials. First of all, this applies both to the materials themselves and to the components of the riser. The reason for such a number of conditions is very high temperatures, and due to the fact that wood is often used as a construction material, environmental, sanitary, and fire safety standards must be adhered to.
- According to all the rules, it is worth installing a chimney for a bathhouse made of brick, ferrous or galvanized metal or ceramics. Aluminum and asbestos-cement chimney pipes should not be used for fire safety reasons, but galvanized chimney pipes are perfect.
- It is best to insulate the outlet channel with fire-resistant environmental materials; in this case, expanded clay and stone wool are suitable. Their combustion temperature significantly exceeds the temperature generated inside the furnace.
- Thermal insulation is provided by materials lined with foil.
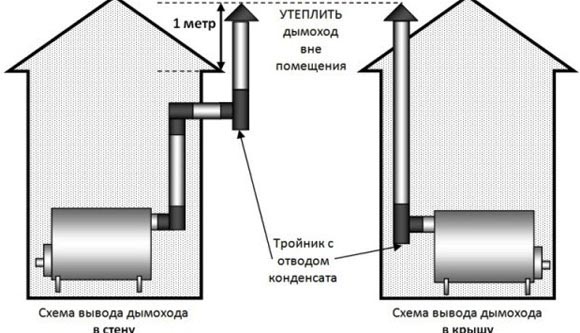
- You need to make sure that the outer part of the smoker does not come into any contact with the elements of the wall, ceilings and roof, since high temperatures can cause a fire in the roof. The furnace space can be lined with sheet metal for additional reliability.
- The chimney pipe for a sandwich sauna is also filled with expanded clay or basalt wool (read: “Do-it-yourself sandwich chimney”).
- When leading the pipe through the roof, it is important to ensure that the distance between it and the roofing material is not too small. This can be achieved using a special metal casing.
- To seal the joints between system parts, special foil or aluminum tape is used.
Advantages and disadvantages of ceramic chimneys for fireplaces
The advantages of a ceramic pipe include the following characteristics:
- the material is very quick to install and assemble;
- is a guarantee of high efficiency;
- long service life;
- the range of blocks is large, which makes it possible to mount a chimney opening with any configuration;
- the presence of a special hole that makes it possible to clean the chimney;
- the condensate that appears drains away thanks to the hole located at the bottom of the chimney.
Among the disadvantages of block ceramic pipe systems, it is customary to highlight the following:
- relatively high price;
- Due to the fact that most of these chimneys are manufactured abroad, the delivery time is sometimes very long.
Video installation of a sandwich chimney with your own hands
A feature of modern sauna stoves is their heating temperature, which can reach 400 degrees. An important indicator of the efficiency of the furnace is instant heating of the body and maximum heat transfer.
The entire heating process is accompanied by the release of infrared radiation, which is distributed on surfaces adjacent to the furnace. Under the influence of high temperatures, the wooden structure of the bathhouse can char or ignite.
This is why it is so important to ensure that wooden surfaces are reliably insulated from the heat of the stove. A protective screen and lining made of fire-resistant materials are suitable for this.
Useful tips for stove makers: pay attention...
- Be sure to use a ceiling passage box, even if you are using a sandwich. Fill it with expanded clay, foam glass or mineral wool. Do not fill the space around the pipe with earth, especially sand. Sand tends to get very hot and retain heat for a long time.
- The most optimal chimney height is 4.5-5 meters. Try to stick to these parameters.
- The upper edge of the pipe should rise above the ridge by at least 50 centimeters. But, if the roof is flat, then the height here should be at least a meter. For large chimney heights, special guy wires are installed.
- In a steam room, if the pipe passes near a wall or partition, then a protective screen must be installed on the wall. It can be in the form of stainless steel or basalt cardboard.
- When installing a flash drive, it is recommended to use a special thermal and weather-resistant sealant. He copes well with the task assigned to him. By the way, during the assembly of a chimney sandwich, the same thermal sealant, and sometimes crimp clamps, are often used.
- If flammable roofing material is used, a spark arrestor is required. You can do it yourself by using a used KAMAZ air filter.
- Try to avoid sandwich pipe joints in the ceiling passage. At this point the smoke channel must be solid.
That's all for now, I'll end it. If I didn’t explain something clearly, ask questions in the comments. I'll try to answer. Anyone who finds this information useful and informative can share it through the social buttons. networks. I will be very grateful. And now - bye, bye... See you in the next article...
Wisdom Quote: If you want the world to change, be the change.
When making a chimney into a bathhouse with your own hands, you must leave holes for cleaning the structure. The walls of the chimney should be smooth, while the corners should be set so that they are straight. The internal base of the structure should be finished with plaster, which will ensure smoothness. This need is due to the fact that the uneven surface will prevent the penetration of gases, in addition, soot will begin to settle.
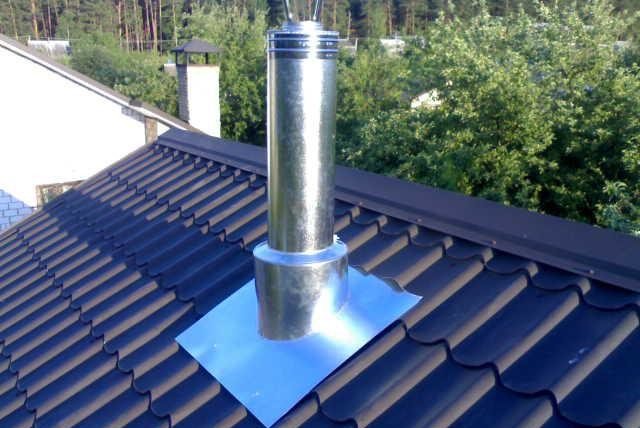
If you install a chimney into a bathhouse with your own hands near the wall, then for higher reliability it is worth fixing it with steel anchors in increments of 30 cm. Where the structure will be connected to the ceiling and roof, you need to install asbestos-cement fabric, which is sometimes replaced with fiberglass. Although brick heats up slowly, the risk of fire must be reduced to a minimum.
Another requirement is that the chimney must rise 0.5 meters above the ridge, which is very important. The outer part of the structure, which is located above the roof, must be thermally insulated and also finished with facing bricks. Roofing trim can also be used for work.
- At a height of 0.5 meters above the roofing ridge, provided that the distance from the pipe to the ridge is 1.5 meters.
- At the same level as the ridge or slightly above it, provided that the distance from the pipe to the ridge is 1.5 - 3 meters.
- If the distance from the pipe to the ridge is more than 3 meters, then the pipe must be laid slightly above a line drawn from the ridge at an angle of 10° relative to the horizon.
- On a flat roof, the smoker should be 1 meter high.
- The pipes that exceed the roof level by 1.5 meters are fixed with guy wires.