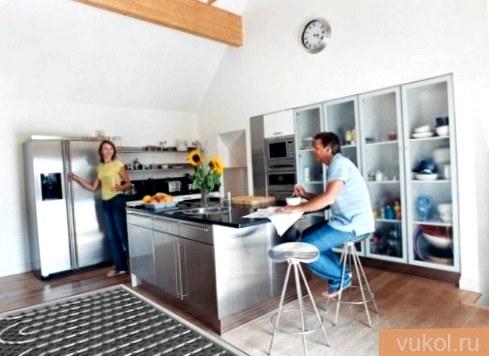
- Combining kitchen and living room
- Using a window sill as a table top
- Expansion of the kitchen due to the adjacent balcony
Organizing comfort in the home is a matter of paramount importance in every family. And an electric heated floor in the kitchen becomes one of the optimal solutions for its creation.
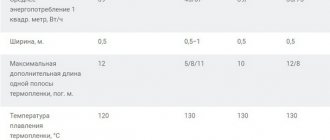
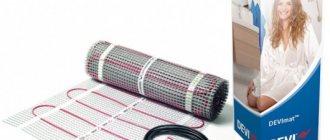
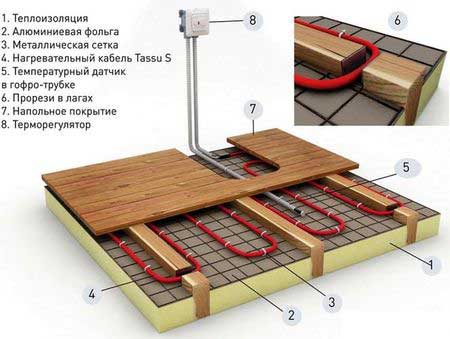
Ceramic tiles are considered the most popular kitchen flooring. Heating mats from THERMO or DEVI, which are used both as additional and main heating, are suitable for underfloor heating under this material. Installation of heating mats occurs without forming a cement-sand screed into a layer of tile adhesive. A good alternative would be the self-regulating underfloor heating UNIMAT Rail/Boost; it can be installed either in screed or in tile adhesive.
If you initially abandoned tiles and are more inclined to laminate, then CALEO infrared heating film is suitable for heating your kitchen, which does not require cement screed and glue for installation. How to properly install a THERMO electric heated floor, watch our video.
Thin mats for THERMO tiles from RUB 4,881.
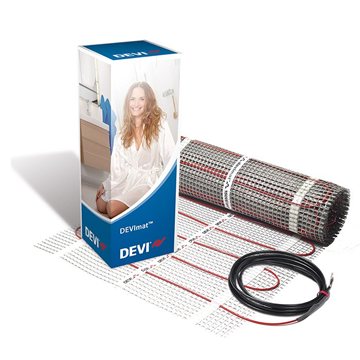
Thin mats for DEVI tiles from RUB 5,195.

Rod heated floor UNIMAT from RUB 3,158.

Film heated floor CALEO from RUB 1,664.
There are also often cases when underfloor heating becomes a necessity, the most common of which are the following:
Should I install heated floors in the kitchen?
Installing an additional heating system requires certain financial costs, so before installing such a system you need to familiarize yourself with the advantages and disadvantages of using heated floors and weigh everything carefully. And only after this you can begin installation work.

Several reasons for installing heated floors in the kitchen under tiles or other materials:
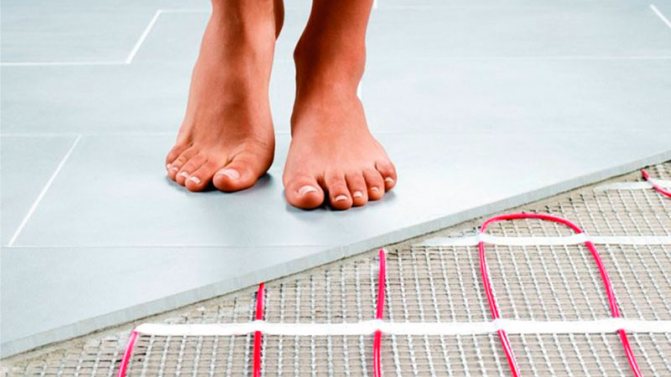
- High level of comfort. Many residents like to walk on the flooring barefoot. The warm surface is not only pleasant for the feet, but also helps preserve human immunity, especially in the winter season.
- The heated floor system can be used by owners of private houses and owners of apartments on the ground floor. In this case, cold air will penetrate into the room through the floor slab. An additional heating source built into the screed will prevent this.
- Additional heating of the room when the efficiency of the central heating system is low will not be superfluous.
- When combining a kitchen with a balcony or loggia. Here a warm floor is essential.
- The need for additional heating of the room. Such communication is necessary if household members love warmth. Local heating can be turned on if necessary.
There are not many arguments against installing heated floors. First of all, these are additional financial costs. It is not recommended to install such a system with efficient central heating, or in cases where the windows of the room face the south.
It is not advisable to install warm floors if the room is supposed to have cork or linoleum flooring.
Arguments for and against heated floors in the kitchen
Warming a room with underfloor heating is becoming more and more popular from year to year. But this technology has both adherents and critics, who claim that a heated floor in the kitchen is not a very suitable thing. Let's give some arguments for and against.
Trivial advantages of heated floors:
- Comfort. As common as it may seem, the main advantage of the “warm floor” system is the feeling of a hot surface and the ability to walk around the kitchen with bare feet (very important if the floor is tiled).
- Uniform heat distribution. In accordance with the laws of physics, the warm air moves upward, and “pockets” of cool air appear below. Thus, standard heating radiators warm the ceiling. The introduction of heated floors contributes to the accumulation of warm air masses in the lower plane of the room.
- The abundance of modern floor heating systems allows them to be used under different surfaces: tiles, linoleum, laminate, etc.
- It is in the kitchen, during the preparation of food, that critical ventilation situations often arise. This may cause the floor to fog up. The “warm floor” system prevents such phenomena.
- Most housewives refuse to install paths and carpets in the kitchen or loggia, due to the impracticality of their use. In such a situation, heated floors are a good solution.
- Temperature gradient. It's no secret that a person feels comfortable and comfortable if his feet are in a higher temperature range than his head. Such characteristics can be achieved using heated floor technology.
Critics of floor insulation focus on the high cost of installing and operating the system. Some people note that when using windows with heat-saving double-glazed windows and modern radiators, there is no need for heated floors.
It must be emphasized that the effectiveness of heated floors in the kitchen greatly depends on the correctness of its choice. When arranging the system, it is necessary to take into account the type of room (house, apartment, etc.), the presence of personal heating, the type of flooring (laminate, tiles, etc.), the thermal insulation properties of the building and other characteristics.
Pros and cons of heated floors
Important ! Before installing a heated floor, it is recommended that you familiarize yourself with all the advantages and disadvantages of this system before preparing design documentation and carrying out installation work.
Advantages:
- Uniform heating of the floor covering. Temperatures can be adjusted to a comfortable level.
- Quick drying of the floor after wet cleaning.
- Easy operation of the heating system. There is no need for complex settings, just set the desired temperature on the sensor.
- Long period of work. With proper use, heated floors can last up to 40 years.
There are few disadvantages to engineering communications, but they exist:
- To install the structure, it is necessary to remove the old floor covering. This will lead to additional financial costs.
- It is impossible to store cereals and other products in the lower cabinets of the kitchen unit. This is due to the increase in temperature in the lower part of the room.
- High cost of an additional heating system.
- Additional financial investments to pay for electricity.
Important ! To heat the kitchen, you can also use heated water floors with hot coolant. The liquid is heated in a solid fuel or gas boiler.
Warm floor. What types are there?
Warm floors can be:
- water;
- electric.
Electric, in turn, is divided into:
- cable;
- film (aka infrared);
Based on this, warm floors are divided into:
- a solid system that acts as the main heating;
- and auxiliary, which exists in conjunction with another heating system;
Water heated floors and cable heated floors often act as the main heating. We will have the main conversation about these species.
Types of heated floors
In practice, four types of local heating are used. Everyone has both strengths and weaknesses. Let's take a closer look at them.
Water floors
This system works by moving coolant inside the pipes. Apartment owners can supply hot water from central heating, but this requires special permission from the relevant services.
Water moves through the system thanks to a circulation pump, gives off some of the heat and returns. The main disadvantage of a water heated floor is the additional cost of purchasing a pump, as well as certain difficulties in obtaining permission. When installing such a system, cooled water may flow to neighbors below, which may cause dissatisfaction on their part.
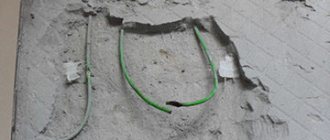
Cable floor
This heating system operates using a special electrical cable. Thanks to the use of special alloys, electricity is quickly converted into heat. You can make a cable floor yourself. The cable is laid on a flat base, after which the floor covering is laid. A thermostat is used to regulate the temperature.
Electric underfloor heating will last longer than water heating. Another advantage of such a system is considered to be low energy consumption, but installation work will cost a significant amount.
There is no need to obtain a special permit for the installation and operation of a cable electric floor. It can be installed in the kitchen or in any other room under tiles, laminate or other covering.
Important ! It is not recommended to install heavy furniture on such a covering, so the cable is laid in free areas.
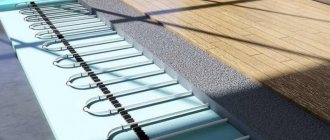
Film floor
To heat the room, heating film mats made of carbon paste are used. When connected to an electrical source, such material emits infrared radiation.
The paste is applied in a spiral to the mats with a certain pitch between the stripes. Pieces of film are glued together into a single structure. This allows you to increase the efficiency of heating the room.
The main disadvantage of film flooring is its high cost. Also, heavy furniture should not be placed on the flooring. This may lead to destruction of the heating elements.
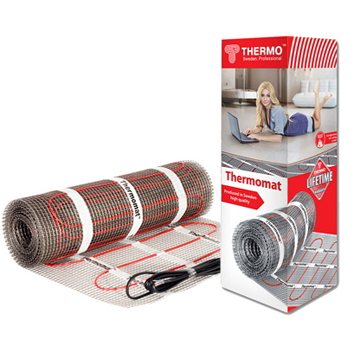
Rod floor
This heated floor design is highly efficient, reliable and has a long service life. The heated floor works using carbon rods that are connected into a single system.
The main advantage of the product is considered to be self-regulation of heat; the mats can be laid on the base in a continuous layer. Overheating of thermal elements through the load is completely eliminated, so heavy furniture can be installed on the floor covering.
The system is resistant to sudden temperature changes and high humidity, ideal for the kitchen. The main disadvantage of a rod floor is its high cost.
Warm floors in the kitchen: the benefits of using them
Most people believe that a heated floor is just a comfort, thanks to which you can walk barefoot at home and not worry about getting sick. In fact, this is a little different - there are situations that simply dictate the installation of underfloor heating instead of traditional radiators. There can be many such situations, but the most common of them are the following points.
- The so-called window sill-countertop, the task of which is to effectively use the kitchen space. By covering the battery under the window with a tabletop and forcing it into cabinets, you reduce the efficiency of its use to almost zero. Yes, you can make technological holes in the countertop and cabinets for air convection, but this is not aesthetically pleasing and ineffective. Usually in such situations the battery is moved to another wall, where it also interferes with something. This is where people remember this method of heating a room, such as a heated floor - here is your first answer to the question, do you need a heated floor in the kitchen?
- The second answer to this simple question is the situation with redevelopment, when the kitchen is either expanded due to the adjacent balcony, or is completely moved there. Whatever one may say, after such a redevelopment the battery turns out to be out of place in its original location. Should I move it to another place? According to all legislation, changing engineering systems, and even more so moving the battery onto the balcony, is a gross violation. And where should it be moved, to the other side of the former window sill, where it would also be out of place? The solution is simple - the radiator is removed, the riser is hidden in the wall (no one forbids doing this), and instead of it, a warm floor is installed both on the balcony and in the old kitchen area.
- Another example of the advisability of using heated floors concerns private houses and apartments with individual heating. When making a heating system during the renovation process, it would be simply unreasonable to lose sight of this heating method. Essentially, you turn the floor of your home into one large heating device that warms the room from floor to ceiling - it’s hard to imagine a more efficient heating system.
You can see how to install heated floors in the kitchen in this video.
Well, now as for the shortcomings - by and large, there is only one, and even then, one might say, insignificant. This is the energy consumption of a heated floor, which will increase by thirty percent - it is for this reason that when making a verdict whether or not to have a heated floor in the kitchen, you need to carefully weigh everything. It should be understood that after its installation you will have to pay more for heat - you will need to pay bills for both standard heating and for this small innovation. Perhaps you need to think about giving up some of them. Well, in general, it’s up to you to decide - many people install heated floors in the kitchen under the tiles, simply out of a desire to follow fashion or because they just want it.
Do-it-yourself warm floor in the kitchen
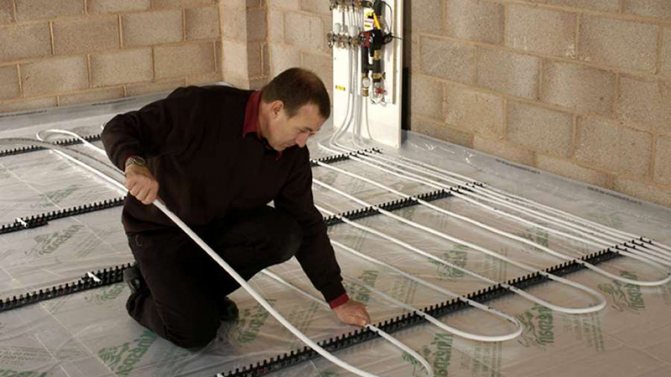
Let's get acquainted with the technology of installing water heated floors:
- At the initial stage of work, it is necessary to determine the installation location of the collector. It is best to install such a device in a cabinet on the wall. This device is installed at a certain height above the floor, which will prevent problems with air exhaust.
- Thermal insulation material is laid, a damper tape is installed around the perimeter of the room.
- Next, reinforcement mesh or special mats are laid.
- Pipes are fixed in increments of 10-30 centimeters. Pipelines are laid in loops, spirals or snakes. They are secured to the mesh using plastic clamps.
- The inlet and outlet parts of the pipe are connected to the manifold, the tightness of the system is checked under a pressure of 5-6 bar, and the circuit is inspected for leaks.
- The screed is poured.
- After 3-4 weeks, the flooring is laid.
When using other heated floor options, the heating mats are connected to each other and laid on a pre-leveled base. After this, the finishing coating is installed.
Installation of cable heated floors in the kitchen
Preparation for installation
The installation of a cable floor begins with calculating the area of the heated surface. To do this, prepare a kitchen plan with locations of stationary furniture and appliances, however, this does not apply to furniture with legs.
The usable area will be equal to the difference between the areas of the kitchen and the surface occupied by these items.
To calculate the length of the heating section, the specific power value is multiplied with the calculated area value. The specific power value is standardized and cannot exceed 120 watts per m2 when using the system for auxiliary heating and be more than 150 watts per m2 if this is the main heat source.
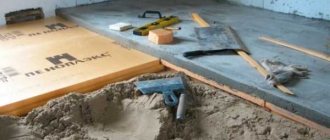
Among the preparatory work, it should also be noted the dismantling of the old floor covering and subsequent leveling of the base. If necessary, special leveling mixtures can be used.
The next step is to prepare the location for installing the thermostat. Using a hammer drill, a niche is prepared in the wall corresponding to the dimensions of the installation box of the device, and then down the wall and floor there is a groove for cables - power, sensor, etc. A corrugated tube is placed in the channel along the surface of the base parallel to the direction of laying the heating element - a place for the sensor . The plugged end of the corrugated tube should be approximately 6 cm away from the wall. The groove is sealed with plaster.
Cabling
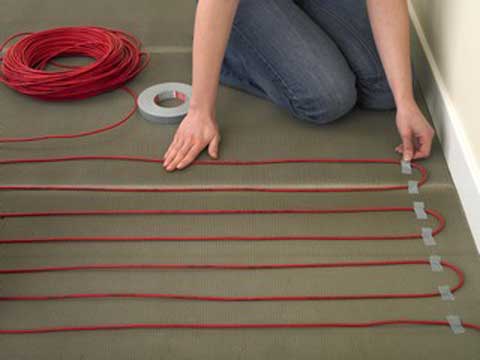
Reflective insulation is spread on the cleaned and leveled subfloor, foil side up, sealing the joints with tape. A mounting tape is attached to the thermal insulation, with which the heating sections will be fixed. For this purpose, it has special brackets. The tape is attached to the base using dowel nails. The cable is laid evenly, smoothly, without kinks or intersections. After which the sections are filled with a concrete screed in a layer of 3–5 cm. After the final hardening of the screed, a decorative coating is laid using standard technology.
The heating system is turned on for the first time at least 28 days later - the period necessary for the final hardening of the screed.
Advantages of electric heated floors
A kitchen underfloor heating system based on an electric cable has the following advantages:
- The efficiency of such a warm floor is increased by heating the entire surface of the floor in the kitchen;
- The safety of electric heating is determined by a shielded cable and reliable insulation laid in several layers;
- The ability to set any floor temperature reduces energy consumption, which indicates the efficiency of this system;
- A warm floor creates an optimal microclimate for a person, since it is warmer in the foot area than in the head area. In addition, the required level of humidity is constantly maintained and the amount of dust in the air is reduced.
We are installing electric heated flooring in the kitchen.
“Keep your head cool and your feet warm” is an old saying. Hypothermia of the feet often leads to a cold. An electric heated floor eliminates this problem, especially during those transitional periods when it has already gotten colder and the heating has not been turned on. Electric heated floors can be used both as the main source of space heating and as an additional source. Before you purchase everything you need to get started, you should decide on the purpose of the heated floor and perform simple calculations.
We decide on the necessary materials.
Before you start installing an electric heated floor with your own hands, you need to draw a kitchen plan to scale, put on it all the stationary objects that will stand on the floor (electric stove, cabinets, refrigerator, washing machine, etc.). Furniture with legs should not be taken into account. Then the area is calculated, excluding that occupied by the listed items. This will be the required heating area.
The length of the heating section is determined as the product of the heating area and the specific power of the section, which must be at least 120 W/sq.m if the heated floor is used as an additional heat source, and at least 150 W/sq.m - as the main one.
My kitchen is in a town house with central heating. Required heating area – 9 sq.m. Thus, the power of the heating section is 120x9 = 1080 W or 1.08 kW. Based on the catalog of one of the many companies selling equipment for heated floors, I chose a heating section with a power of 1.35 kW. Its length is 65 m, maximum current is 6.6 A. Heating elements must be connected to the network through residual current devices - RCDs. In our case, a two-pole 10 A RCD is suitable. In addition to the heating section and the RCD, we purchased: a thermostat with a temperature sensor, mounting tape and a roll of foil thermal insulation 4 mm thick.
Preparatory work
First you need to remove all the furniture and other items from the kitchen. The old floor covering is removed. The screed is cleaned and checked for flatness using a straight edge. If necessary, it must be leveled using special mixtures, for example, self-leveling flooring. After this, you need to use a diamond bit and a hammer drill to prepare a niche for installing the thermostat.
Since my thermostat is additionally equipped with a calendar and clock, I placed it slightly below eye level. From the niche downwards a channel is cut for the power cable, as well as the cables for the heating section and temperature sensor. In order to ensure the possible replacement of the sensor in the future, a corrugated pipe is placed in the channel, parallel to the plastic pipe intended for laying cables.
The sensor itself is subsequently inserted into it. The plugged end of the corrugated pipe is released onto the subfloor at a distance of 600 mm from the wall. The groove with a tube and hose inserted into it is sealed flush with the wall with construction plaster. Similarly, the thermostat mounting box is attached to the building plaster in the niche.
Installing electric heated floors
Thermal insulation is spread on the prepared surface of the subfloor, with foil facing up.
The thermal insulation strips are connected to each other with tape. On top of the thermal insulation, at approximately 0.5 m intervals, a mounting tape is attached to the floor using dowel-nails. It is designed to fix the hinges of the heating section.
The laying step is determined by the formula: Step (cm) = 100xLaying area (kW.m) / Length of the heating section (m) In my case: 100x9/65 = 14 cm. The cable is laid evenly, without intersections, in compliance with the calculated step. The loops must be made smooth, without kinks. The minimum distance to the walls is 50 mm. The ends of the cable loops are attached to the mounting tape using the tabs on it. The laid heating section is filled with a cement-sand screed 3-5 cm thick.
The screed is leveled by the rule.
After the screed has completely dried, a decorative coating is laid on it in the usual way. I laid the floor with ceramic tiles. The heating can be turned on for the first time no earlier than 28 days after pouring the screed. Good luck with the renovation everyone! similar materials for you:
- The use of plasterboard structures for self-renovation in the bathroom.
- Kitchen renovation in modern style. A short history of kitchen renovation in the photo.
- Do-it-yourself insulation of a concrete floor using wooden joists and plywood..
- Laying parquet with your own hands.
- Do-it-yourself floor screed. We level the floor of the apartment before laying the flooring.
< My functional and beautiful kitchen.
Kitchen floor. Floor tiles and linoleum for the kitchen are an ideal option. >