Home/Warm floor. Installation/Installation of heated floors on the ground. Warm soil in a greenhouse./Warm floor on the ground: Features, selection and installation
Many people, when building private houses from scratch, strive to achieve the desired microclimate in their living space. Currently, there are several ways to achieve these goals. But still, according to consumer reviews, the best option is considered to be a water heated floor on the ground. Having at hand the necessary materials, tools and SNiP manual, these works can be carried out independently, without the services of a specialist.
Features of water heated floors on the ground
Such a floor consists of multi-layer layers, the base of which is a concrete screed, with built-in contours of the water system. This design makes it possible to save on foundation costs and reduce energy consumption. The installation itself is divided into three types:
- installation of the rough foundation;
- installing a heated floor on the ground;
- checking the operation of the heating system.

The reliability and strength of a heated floor directly depends on the characteristics of the soil. The soil must meet the following requirements:
- The occurrence of groundwater should not be closer than 5 - 6 meters to the upper layers of the soil.
- Aerial soils, such as chernozem and sandy soils, are not allowed.
Before starting installation work, you should also take into account the load that will fall on the structure.
Preparatory work for heated floors on the ground
In order for the water heated floor on the ground to provide the necessary comfort to the room, it is necessary to purchase the following materials:
- large river sand;
- crushed stone with a diameter of at least 3 cm;
- waterproofing layer;
- thermal insulation;
- pipes and all components;
- polyurethane foam strips;
- reinforcing mesh;
- distribution board.
Having acquired the necessary materials, you can begin the following work.
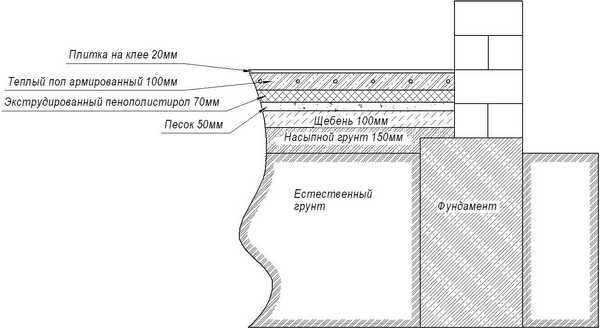
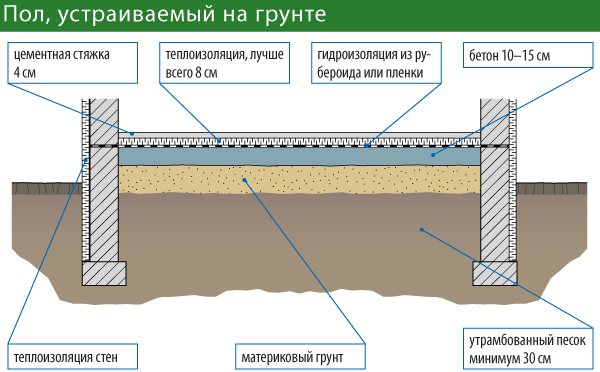
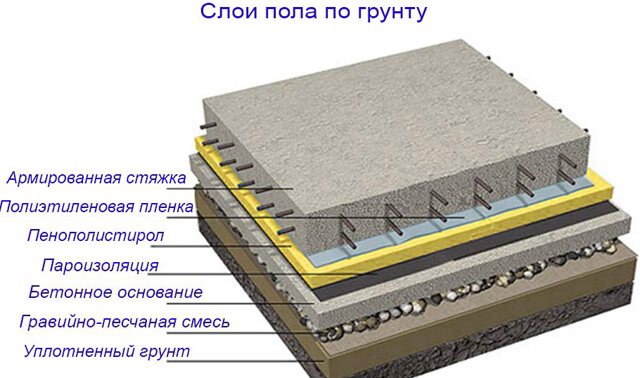
Pie designs
A warm water floor consists of a multi-layer structure, which is located under the floor covering. Therefore, before starting installation work, control lines must be drawn on the walls of the building (along the entire perimeter). They will subsequently help regulate the underfloor heating pie on the ground.
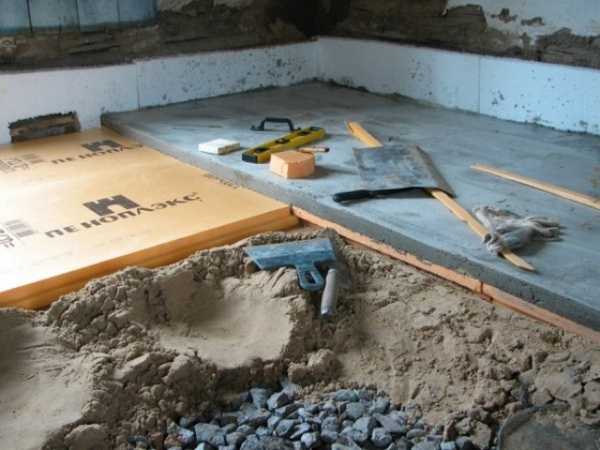
Preparing the base
It is necessary to remove the surface layer from the soil - humus, which contains animal remains and plant roots. If you skip this stage of preparatory work, you will end up with an unpleasant smell in the room. Then, having cleared the soil of debris and stones, it is recommended to compact it thoroughly. Next, this will be the basis for the subsequent construction; the soil needs to be leveled using a level.
After making sure that all materials and the base of the room are ready, proceed to installation work.
System pressure testing
Concrete floor insulation scheme.
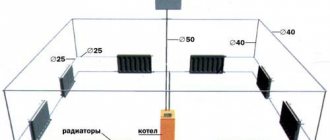
Before making a cement floor screed, it is necessary to check the operation of the water heating system, i.e. perform a pressure test of the system. At this point, the entire water heated floor system must be completely installed, all heating circuits of the pipes must be connected to the distribution manifold.
Each pipe is filled with water through a distribution manifold. The water should displace air from the pipes through the drain valves. At this time, automatic air vents must be closed.
A heated floor system consisting of metal-plastic pipes must be checked with cold water. The test is considered successful if the pressure in the inlet pipes is equal to the outlet pressure.
A heated floor system consisting of polyethylene pipes is tested in a completely different way. Increase the pressure in the system by approximately 2 times compared to normal operating pressure, and then reduce it. Repeat this check twice. Leave the system alone for a day, then notice how much the pressure in the system has decreased. Normally, it should not decrease much; they also check for leaks in the pipes. Only after this the system is considered to have passed the test.
The system should also be checked for thermal stability. To do this, it is heated to +85 degrees for half an hour and the pipe connections are checked. Only after checking the system can you begin to pour the cement-sand screed.
Basic installation of heated floors
Before laying a water floor in a private house, coarse sand and crushed stone should be distributed in layers over the prepared soil. Their depth should be about 30 centimeters. Then they need to be watered and compacted thoroughly. Thus, having made the “pillow”, you can move on to the next work.
Waterproofing layer
In order for a heated floor to last for a long time, it must be protected from the harmful effects of water and other liquids. To do this, it is necessary to lay a waterproofing layer of thick polyethylene at the lower level of the threshold. Installation is not complicated and is done in the following way:
- The roll unwinds over the area of the room.
- Use a sharp knife to remove excess areas.
- The waterproofing material is laid overlapping.
- The polyethylene joints are taped with construction tape.
Other, more practical polyester membranes can be used as waterproofing. However, they will cost significantly more.
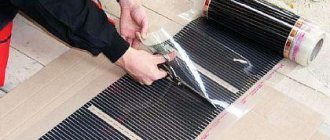
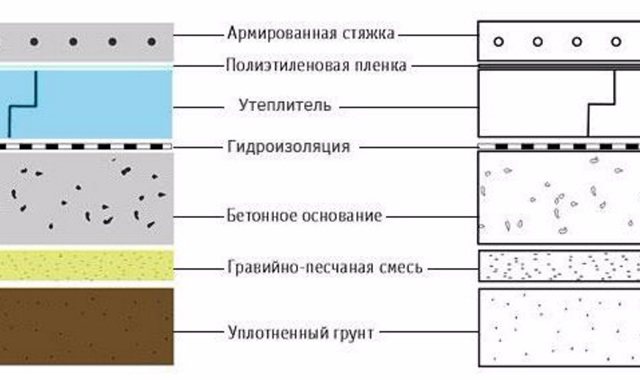
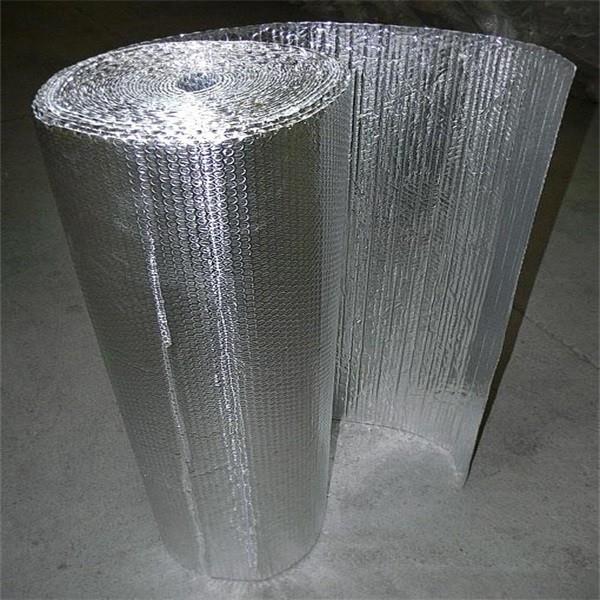
Thermal insulation layer
According to the instructions, it is important to include a thermal insulation layer in the heated floor cake, which will help protect the base of the room from freezing and leakage of heat flow. And the heat-reflecting substrate will direct the heat flow inside the building, and not outside it. Thus, when using a thermal insulation layer, it will be possible to achieve not only uniform heat throughout the entire floor, but also save up to 20% on electricity. There are several types of thermal insulation materials intended for water heated floors, such as: pure polystyrene foam, extruded material and aluminum-coated polystyrene foam. Each type has its own installation technique, which is indicated in the accompanying instructions.
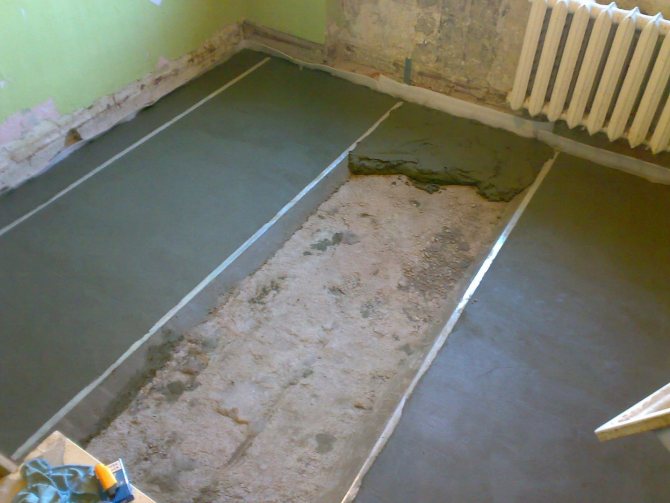
Pouring the concrete layer
For high-quality strength of underfloor heating with a water system, the floor threshold must include a reinforced concrete layer, since it will serve to protect the structure from further loads. Before pouring, you will need to use slats to divide the base of the room into sections, in increments of 1 meter, which will simplify the work process by performing it one by one. Next, a reinforced mesh is laid and the solution is poured. As it dries, the slats must be pulled out of the concrete, and the grooves from the seams filled with mortar. To prevent the concrete from cracking and deforming the walls in the future, damper tape .
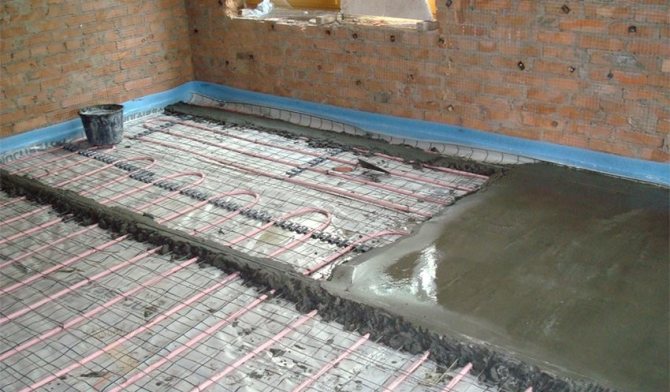
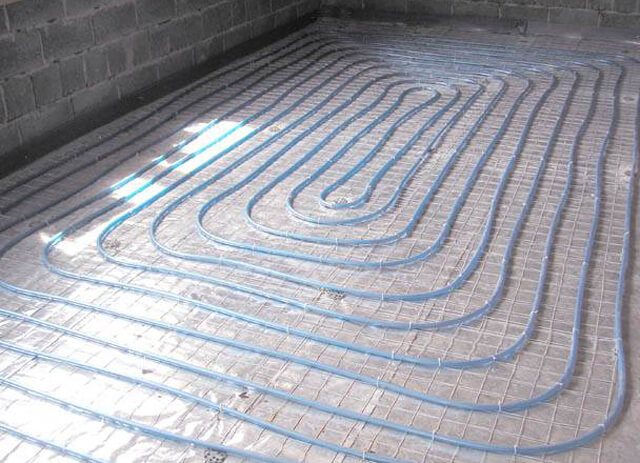
Laying the heating circuit
After making sure that the concrete screed is completely dry, proceed to laying the pipes. The choice of coolants is based on the desires of the users themselves. However, according to experts, metal-plastic pipes are more reliable and easier to install. Contours are laid in the following ways:
- snail;
- snake;
- combined.
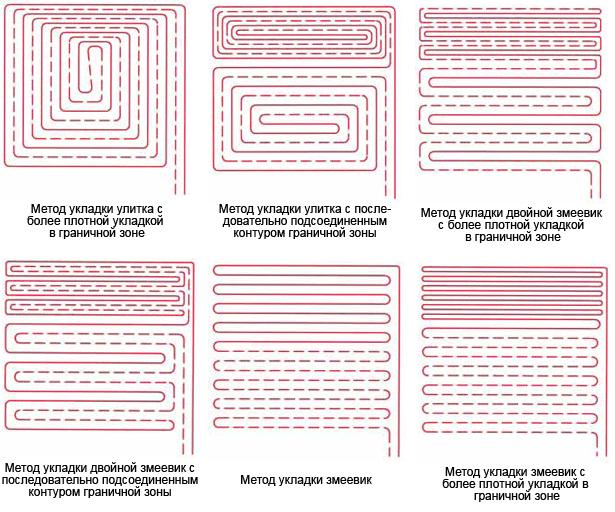
Regardless of the type of installation, the pipe branches must end in the manifold cabinet. And also during their installation, the following rules must be observed:
- The circuit must be made without joints, from a solid pipe.
- Regardless of the pitch , the length of the coolant should not exceed more than 200 meters.
- The pitch should depend on the diameter of the pipe.
- During installation, stretching of pipes is not allowed.
And also during the installation process, you must not step on the coolants, thereby subjecting them to deformation.
After laying the pipes, it is necessary to carry out pressure testing.
Filling the screed
Having checked the functionality of the water floor on the ground, they proceed to fixing it with a screed. To do this, you need to prepare a solution of fine sand and cement, in a ratio of 3: 1. For the strength of the solution, you can add 1 gram of fiber to 1000 grams of cement. The pouring process is similar to a concrete threshold, but the drying time will take longer. In this case, the screed will dry no earlier than after 30 days.
After making sure that the cement mortar is completely dry, proceed with the installation of the floor covering.
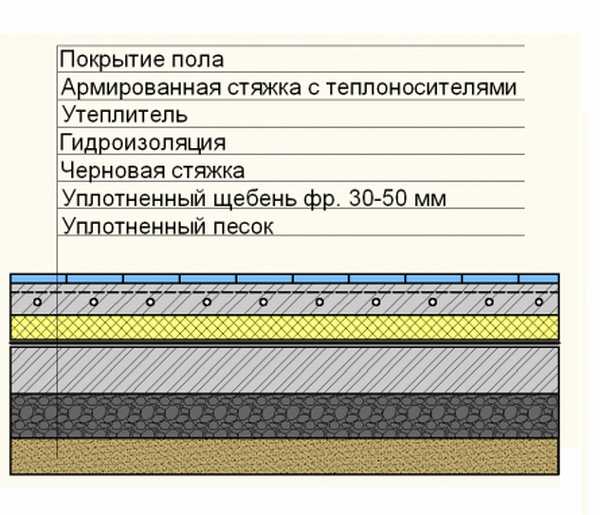
Step by step guide
To carry out the process efficiently, it is necessary to strictly follow the rules for installing a heated floor on the ground:
READ MORE: Is linoleum in an apartment harmful to health?
- Remove the top fertile layer, remove large debris and stones. Level and compact the bottom of the resulting pit. This will be the basis for the layers being laid, so it is best to check the level using a level.
- Next, a layer of sand is poured, and any sand is suitable for filling. It must be compacted well and leveled.
- The next layer in the composition of a warm floor with water heating is expanded clay or crushed stone. However, it should be remembered that crushed stone has lower thermal conductivity. It is better to take stones of small or medium size. It takes a long time to compact until the surface becomes almost monolithic.
- Now it’s the turn of the preliminary screed, for the manufacture of which you can use two options. In the first case, sand and crushed stone are spilled with a liquid solution of sand and cement in a ratio of 2:1. In the second case, a rough screed 5-7 cm thick is poured with reinforcing mesh laid. This option is considered more reliable, capable of withstanding significant loads.
- After the screed has set and the concrete solution has hardened, they proceed to laying the waterproofing layer. In most cases, polyethylene film 200 microns thick, laid in two layers, is used for this.
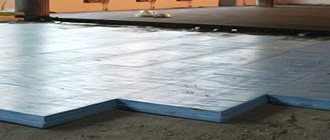
- Expanded polystyrene slabs are laid on the waterproofing; the joints must be taped to prevent leakage of the solution.
- Metallized waterproofing must be laid on top.
- Then they begin installing the “warm floor” system. Install fasteners, lay cable and heating tubes.
- The entire structure of the heated floor on the ground is filled with reinforced heated floor screed.
Before making a heated floor in a private house, you need to take into account all the nuances. The thickness of each layer is determined by the climatic conditions of the region; for colder areas, thick layers of cake are required; for the southern regions, the layers can have a thickness of 2 to 5 cm. Careful compaction and leveling of the layers is the key to a higher quality and durable heated floor.
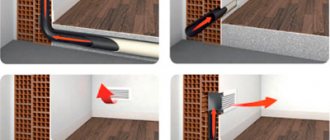
A fairly important point in the arrangement of a water heated floor is the waterproofing and thermal insulation of the foundation. It is expected that the surface of the base will be treated with waterproofing material before the start of all work. In addition, it is recommended to lay polystyrene foam boards around the perimeter, which will become an obstacle to the path of cold air inside.
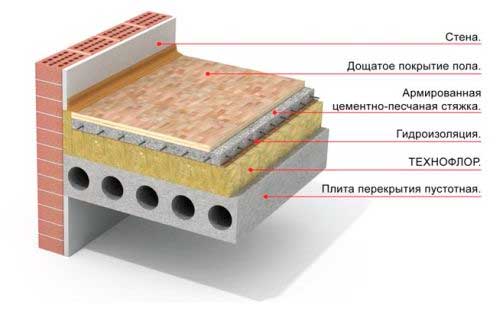
Choosing a floor covering for water heated floors
Currently, there is a wide choice of flooring, but not all types are compatible with warm water floors. Some can reduce thermal conductivity, while others, on the contrary, can increase the risk of fire. Therefore, for a water system, the best option would be the following floor coverings:
- ceramic tile;
- carpet;
- laminate;
- parquet board.
Using the attached instructions, you can also install the flooring yourself, without the help of specialists.
As you can see, building a heated floor on the ground is not difficult. Having patience when carrying out all the step-by-step work, and following the recommendations of specialists, you can achieve high-quality heating of the entire living space, without additional costs.
AdminAuthor of the article
Did you like the article?
Share with your friends: