“Warm window sill”: how does it help get rid of drafts and condensation on the windows?
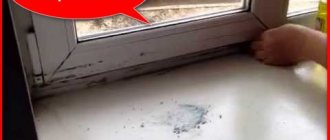
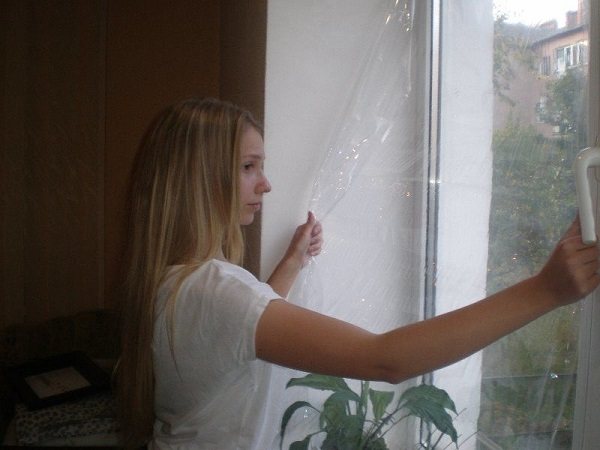
It would seem that the window frame and double-glazed windows are installed flawlessly, the seal is of high quality, the joints are securely sealed, but in the window area you still feel a cold “blow” and the glass becomes covered with condensation. What is the reason?
And the reason lies in the window sill, which becomes a conductor of cold into the room. However, competent developers, learned from the experience of others, are aware of this problem and take appropriate measures in advance.
To heat window sills in private houses, taps are made from the water heating system with a pipe laid over the wall under the window; — they stretch the electrical cable here; — install a heating film (including along slopes), used in infrared heated floors.
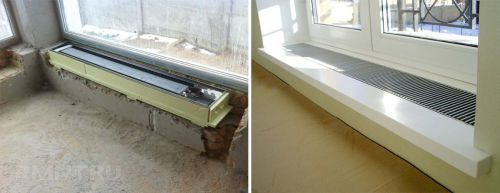
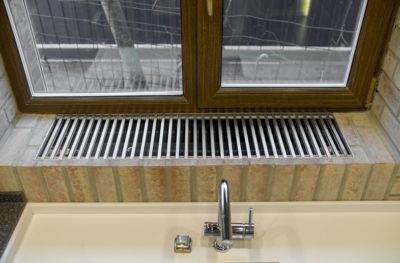
An in-floor convector is built into the window sill
There are also options such as installing a perforated window sill so that the air from the radiator can freely rise to the glass; embedding an in-floor electric convector into it, creating a thermal curtain near the window; or even point integration of heating sleeves into the window sill.
It must be said that water heating is tied to the operation of the heating system, while electric heating depends on the stability of the energy supply, requires sufficient allocated power and increases overall operating costs. A ready-made ceramic or PVC window sill with a built-in cable is not cheap in itself, and the low-voltage IR system, being the most economical in terms of energy consumption, needs to be equipped with a step-down transformer or converter. In a word, although with varying degrees of costs, the problem is solved one way or another. However, today you can deal with it in a much simpler, more effective and financially less burdensome way.
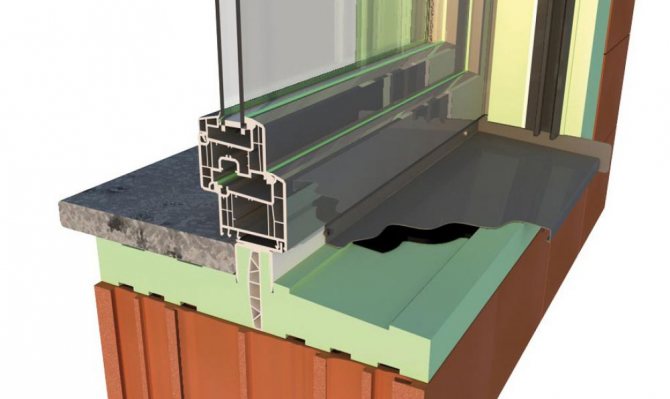
Warm window sill on a polystyrene cushion
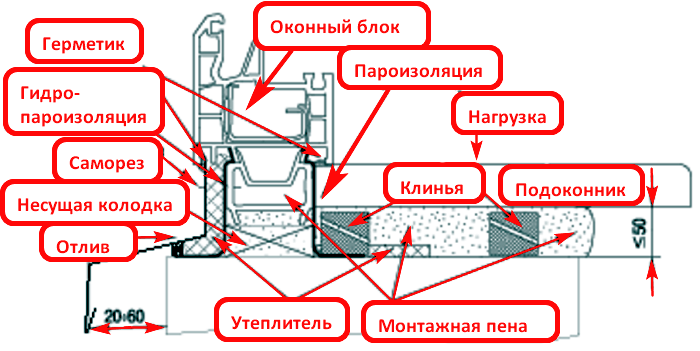
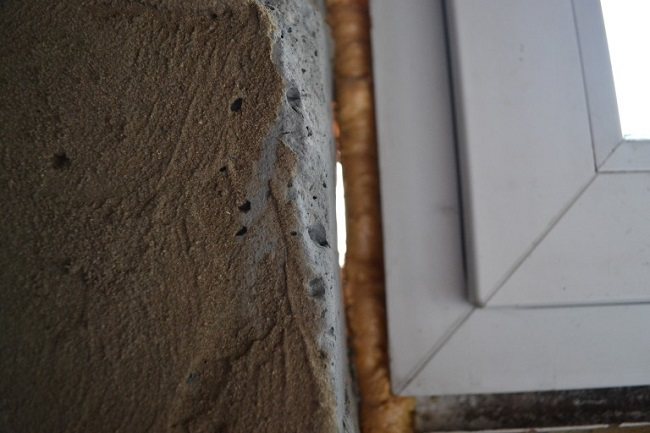
The essence of the technology is to seal the joint between the window sill and the partition on which it rests - this is the weakest point in the sealed window contour, becoming an area for cold air to penetrate into the house and heat to leak out of it. Moreover, even heating the window sill is not able to prevent air from blowing under it.
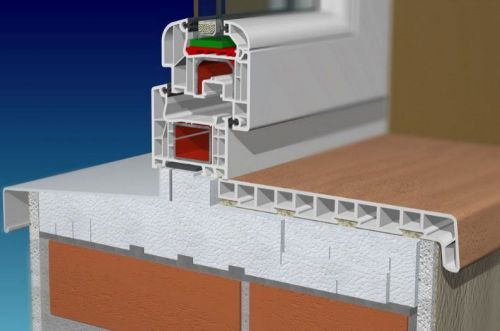
This solution is based on a special block of polystyrene foam, which serves as a kind of pillow for the window sill. It forms a strong, load-resistant, stable base, which also provides high-quality hydro- and thermal insulation of all joints in the area of the window slab from inside the room and from the ebb - from the outside. Plus, installing such a cushion eliminates the need to level the window structure using wedges during installation.
The blocks are made from extruded polystyrene foam XPS (or its cheaper variety EPS) in the form of profiled products with a standard length of 1200 mm. The material is safe, has high heat-insulating properties and is not destroyed by water, is not susceptible to rotting and other biological damage. In addition, it does not put pressure on the load-bearing support, is easily cut with a regular knife and lasts for decades. At the top of the blocks - in the area adjacent to the window structure - an expanding sealing tape is laid, which ensures complete tightness of the connection.
Expanded polystyrene blocks-pillows are “compatible” with windows made of any materials (wood, PVC, aluminum), however, each type is designed for use with certain profile systems, and this circumstance is important to take into account when choosing products
Installation
Installation of pillow blocks is simple, but requires special care, since any carelessly made joints here will negate the idea itself. First, you need to level the upper plane of the wall with plaster (or screed if the wall is brick), be sure to check the horizontal level, and then apply a layer of water- and frost-resistant insulation to the surface. Next, the pillow is cut to size (as a rule, it has to be spliced together from several elements of a polystyrene profile), tried on, and appropriate markings are made on the base. In this case, small gaps must be left along the edges of the opening for subsequent filling with sealant.
When working with expanded polystyrene, you should use specialized compounds that do not contain components that destroy this material (toluene, acetone, etc.) and are designed to fix it to a specific type of base
A special polystyrene foam adhesive is applied to the wall surface along the outline line of the block and into the grooves on the back side of the block itself, put it in place and pressed well. If the pillow is prefabricated, after installing all the elements, the joints between them are carefully sealed with the same compound, making sure that the seams are absolutely even, otherwise the frame will not fit tightly on them, and this is already a flaw in the sealing contour. Excess glue should be removed immediately before it has time to harden.
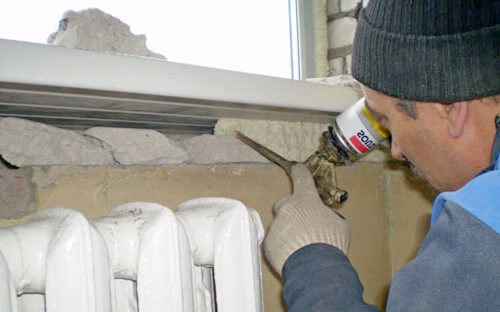
Finally, the gaps between the side walls of the opening and the finished block must be carefully foamed and, after making sure that it is installed correctly and evenly, you can begin installing the window frame, window sill and ebb.
The “warm window sill” technology based on polystyrene profiles produced by illbruck and Klinar is already used by many window companies operating in our market. When preparing to order a window, ask whether the company you choose offers such an insulation system
How to understand where it's blowing from?
Before you begin work on insulating a window, you should make sure that it is actually blowing from it. Very often, a room “freezes” for other reasons; the air circulation in it is disrupted - a cold flow moves near the windows, which creates the illusion of a draft.
There are several ways to determine the source of window ventilation:
- Tactile - in case of a strong draft, it is enough to move your palm along the perimeter of the window to feel the air movement;
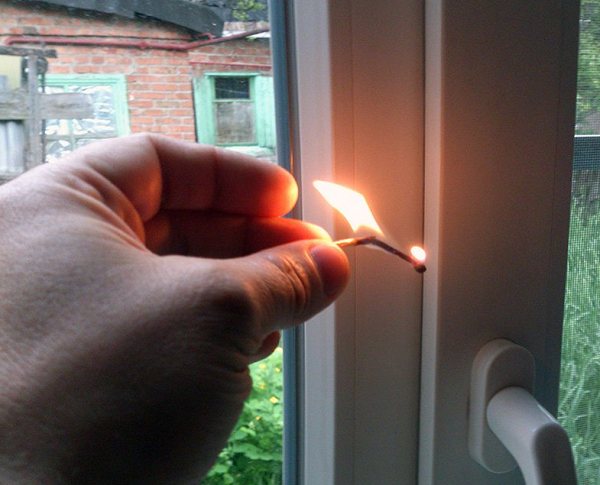
- With the help of a lit match or candle, the light will begin to oscillate at the slightest movement of air;
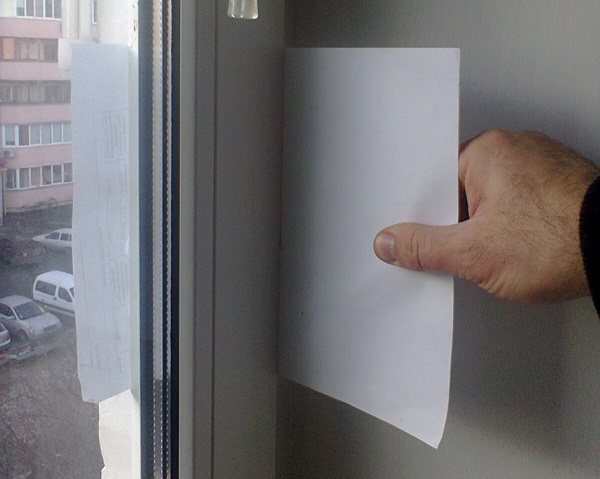
- Using a paper sheet pressed by a closed sash - if the sheet moves easily between the sections of the glass unit, then the problem is in the seal.
It is necessary to check the window along the entire perimeter, as well as in the area under the window sill. It is also worth paying attention to specific details on the window, which most often cause drafts - the bead holding the glass unit, the rubber seal, fittings (hinges, handles).
New windows or warm windowsill?

Any resident of an apartment or private residential building eventually asks the question: is it possible to make warm window sills yourself? As a rule, the window sill is not insulated, but protrudes on top of any insulating layer. If we look from the inside of the room, then cold air will blow from such a window, because there is no insulation between the lid itself, the window block and the stove. Outside, the situation is similar, but here water can also flood in when it rains, and moisture can simply seep under the inner layers of external insulation.
The ebbs should stick out from the wall so that water can drain normally and not collect under the window frame. Without it, rainwater will flow down the walls, saturating the entire structure and foundation with moisture. This will eventually cause some problems.
Initially, the materials under the window frame look like this: concrete or brick slab - plastic or metal - window block frame. As a rule, many people make the mistake of leaving everything in this order. As a result, home owners receive obvious design flaws with this installation:
- Wet insulation (inside and outside).
- Mold growth.
- Poor indoor air quality.
- Cold air infiltration.
- Cold floors.
- Low energy efficiency for the whole house.
- Additional cooling of heating devices (radiators).
- Reduced efficiency of window openings.
- Premature rotting of the wooden frame.
Alternative options for dealing with drafts
There are times when it is not possible to replace window parts or do insulation work, but you need to get rid of drafts “quickly”. Alternative options for insulating PVC windows can come to the rescue .
Here are some of them:
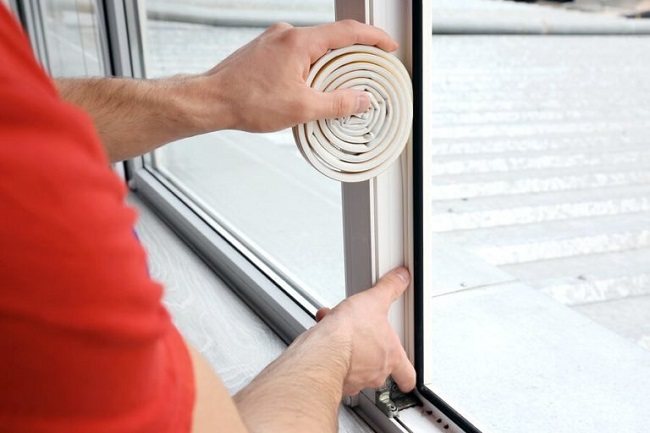
- gluing an additional layer of sealant around the perimeter of the window - this can be done before the winter period, when windows are rarely opened;
- gluing mounting tape at the joints and cracks of the window frame - a method known since Soviet times;
- using heat-saving film on glass is a good option for additional window insulation and retaining heat in the room;
- filling joints and cracks with improvised materials (soaked paper, strips of fabric, cotton wool, etc.) is another method that our grandparents used;
- Using thick curtains made of “warm” fabrics will help avoid the problem of heat “leakage” from the room through the window.
How to insulate the window sill of a plastic window?
Window sill insulation should begin at the stage of replacing old wooden windows, before installing new plastic profiles.
This is an ideal solution, since the thermal insulation of plastic windows is carried out precisely at the stage of their installation. In this case, the work will proceed in stages, as installation progresses, starting from the base of the window opening to plastering the internal and external slopes.
The main method is to use liquid foam to fill voids and formations in the hollow space under the window. Before using it, it is necessary to cover all cracks inside and outside with a waterproof solution. Additionally, we lay out the waterproofing film in one layer. We directly blow on the wetted surface (you can use a primer instead of water, this will increase the adhesion strength).
In our case, if you already have good windows that you do not plan to replace, you will need to organize insulation work in one of several ways. Absolutely all methods converge either on the use of additional thermal insulation materials, or on replacing the window sill itself and increasing the thresholds for outdoor use.
Why does it blow from a plastic window?
Determining the reason for the blowing of a plastic window begins with whether it is new or old. In the first case, the problem can be safely attributed to poor quality installation of the product, which means that the installers will have to solve it.
In this case: poor-quality installation seam of plastic windows
Often, plastic windows are installed by companies whose workers do not have sufficient qualifications. Mistakes are also possible when trying to install windows yourself. That is why it is not recommended to save on specialists when replacing PVC windows with new ones. But if you are faced with a problem with improper installation or an obvious manufacturing defect, warranty repairs should cover all additional costs.
In the second case, the appearance of a draft is associated with the characteristics and duration of operation of the window. Among the reasons are:
- “Warpness” of the window frame and depressurization of joints due to shrinkage of the newly built house;

- Wear of window components - seals, sash pressing mechanisms, etc. after a long period of use;
- Untimely or absent maintenance of PVC windows.
Some of the problems can be fixed yourself, which will save both time and money. Others are best left to specialists. Namely:
- if replacement of fittings is necessary (“original” parts can often be ordered only through the installer);
- when performing external high-rise work (for windows located above the second floor);
- when insulating a window in winter (specialists will be able to do this quickly and without significant heat loss in the room).
With your own hands you can insulate the window from the inside or along the contour, replace the sealing material, and insulate the window sill.
How to insulate the window sill of a modern plastic window?
The simplest and most commonly used method is to add a new layer of insulation on top of the existing one, with a wider width, and properly glue and insulate it under the window opening. For such purposes, a PVC plate made of modern polymer of varying densities is ideal. An additional lining will not look bulky and will stand out from the overall interior. Plastic thresholds are very cheap and easy to install.
Another option would be a solid piece of stone or concrete along the entire length of the window. In this case, the monolithic slab will be installed on a concrete base along its entire width. For such installation, waterproofing mixtures or cement with the addition of liquid glass are used. Visible areas of cement masonry are treated with a starting or finishing coating to give the window an aesthetic appearance.
Heated window sills - types, advantages, installation methods
The topic of “warm windowsill” is relatively new, but no less topical. Many owners of houses and apartments, especially residents of the northern regions of Russia, are not satisfied with the quality of heating of their homes. Some insulate their facades, others supplement their heating with a “warm floors” system, and, to be fair, this gives some results. It also came to the window sills.
Easy way
For those who live in regions with harsh climatic conditions, window sills with a heating function are becoming in demand. The subzero temperature lasts for more than six months. Fogging and condensation are common even with very high-quality double-glazed windows.
Building materials are created that are used to make window sills. Today they are actively promoting in the construction industry. New manufacturing methods and technologies are being developed that use available heat sources, primarily central heating and electricity.
- The essence of all heating variations, regardless of the coolant, comes down to one thing: make a window sill like a heater or battery. Heating elements, heat-conducting tubes for connecting them to the central heating system and other innovative solutions are used as heating.
There are several ways to heat a room.
- Electric. The operating principle is based on the technology of warm baseboards and floors, where heating elements are used. This system is convenient as an additional source of heating on very cold evenings. They consume a lot of electricity, but they have one significant advantage - the ability to adjust.
Electric option
- Water heated – the absolute leader. Instead of heating elements, metal tubes are used, placed inside the window sill. It is possible to regulate the amount of heat generated and turn it off completely; this is done using taps. The method is budget-friendly because central heating is connected.
- Heating film is a new product in the world of heat. The method is becoming popular. The technology is very easy to install, efficient and economical: the power of a conventional device is 20 W.
Benefits of the latest technology
Infrared film is used not only for heating window sills; it is used in systems of heated floors and baseboards. Installation of this device is simple, and no special tools or skills are required.
The heating film has the following qualities:
- It heats up in a very short time: one or two minutes, and it is in the operating temperature range. It warms up efficiently, evenly, affecting the entire area.
- Electricity consumption is striking in its economy - 20 W. Three window sill plates - three 20 W each - the energy consumption is equal to one incandescent light bulb.
- Excellent aesthetic appearance. It does not damage the base at all, since for installation it does not require either a cement screed or an adhesive solution: it is applied to the surface using the dry method. This is very important: if it fails, there is no need to do “dirty” work. Replacement will require about an hour of free time.
- Sold in kits that include all the necessary accessories and elements for its installation: special tape, mounting wires, an insulating block, several clamps.
- To control such a heating system, a convenient electronic control has been created. There are both simple hand-held devices and programmable ones with an LCD display.
- Invisible to prying eyes. It is more convenient to measure thickness not in millimeters, but in microns.
Installation
Warm window sill slabs are an expensive pleasure, unless they are made by hand.
The easiest way is the method of installing “warm” floors, but you will need to create a window sill. There are several technologies. We are not talking about a heat source here. The essence of the question is this: will the window sill itself act as a heater, or will a base be installed underneath it.
A simple solution is to equip the load-bearing base with a heater, and form 1-2 convection grilles in the window sill. A more complex and labor-intensive, but no less effective (and maybe more) design is a concrete block with heating elements (heating elements or water pipes).
Preparation of materials and tools
To install the heating device, you may need the following tools and materials:
- grinder (angle grinder) with a set;
- hammer drill and various attachments (chipper, mixer);
- welded metal mesh;
- foil isolon;
- adhesive solution (tile adhesive or the like);
- cement with sand (for a monolithic concrete window sill);
- copper tube (for water coolant);
- heating elements (for electrical devices);
- materials for creating molding formwork, etc.
Step by step process
Let's consider two main methods of installing heating. Let's start by arranging the base on which the window sill with convection grilles will be attached.
Water coolant
Approximate installation
- Before installing the heating, the base should be prepared. To do this, use a hammer drill to deepen it by 5-6 cm.
- Formwork is formed from the side of the room with a height of 2-3 cm: two slopes, the bottom of the window block and a wooden board make up a container, which will later be filled with screed.
- Foil-coated isolon is placed in it with the foil facing up.
- A screed about 1 cm thick is poured.
- Foil is placed on it, on which heating elements (electric or water) are placed. They must be fixed in any convenient way (glue, screws, etc.), the main thing is not to damage them.
- Everything is filled with cement mortar.
After the solution has hardened, the window sill is attached to the resulting base. Products with high thermal insulation properties, for example, polyurethane foam, cannot be used as a binder.
The resulting device is connected to a heat source. If water is used as a coolant, the heater must be equipped with shut-off valves and a Mayevsky valve. When installing an electrical system, you need a step-down transformer, a control unit and a protection system.
Video about another installation option:
Approximate order of work
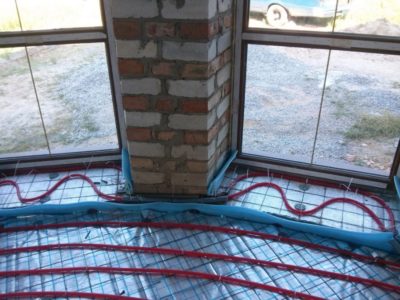
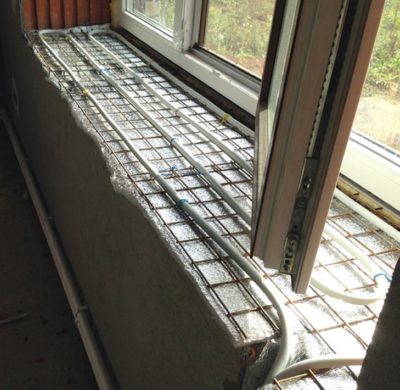
The simplest design solution is to form a concrete slab with heating elements or water pipes placed inside.
Heater from scratch
- A form is being prepared for pouring a concrete slab. A plywood sheet of suitable shape is selected in accordance with the required dimensions. It is better to choose high-quality plywood with a smooth surface. This will avoid the finishing putty step. Sidewalls sufficient to pour a layer of concrete of the required thickness are attached to it.
- In the resulting form, a small-diameter copper water pipe or electric heating wire is laid at a distance of at least 1 cm from the plywood. You can attach these elements in any convenient way. For pipes, fastening for polypropylene tubes is used.
- A metal welded reinforcing mesh is placed on top of the heating elements. You can attach it to a binding wire or plastic ties.
- The pipes must be equipped with a Mayevsky tap and other fittings.
- A concrete solution is prepared for pouring: the ratio of materials is maintained in accordance with the brand of Portland cement.
- Concrete hardens within one day, and gains strength after 2 days.
- The rough window sill is ready, we move on to finishing it. The corners are rounded with a sanding machine. If necessary, when there are defects on the front side, the surface should be puttied.
- It is coated with paint and installed in place.
- Connect to power supply or heating
How to help a bird?
If problems with goiter arise due to candidiasis in the bird, certain measures must be taken. First of all, you need to empty the thymus sac every day of fluid containing pathogenic candida fungi. This procedure is done as follows.
The chicken is picked up, pressing the wings to the body. They feel the crop with their right hand and begin to gently massage it in the direction from the stomach to the head of the bird, holding it upside down. At the same time, gurgling sounds are heard. After a few seconds, a whitish liquid pours out of the chicken's throat. Massage of the goiter sac is carried out for several minutes so that the goiter is completely emptied.
After cleaning the crop, an antibiotic is injected into the bird's throat. Before using the drug yourself, you should consult a specialist. Most often Baytril is used, 2 times a day, for 5 days.
If you notice in time that the crop sac is clogged with feed, this can be easily corrected. To do this, take a few milliliters of vegetable oil into a syringe and pour it into the beak of the sick bird. After this, the goiter should be gently massaged. If the blockage is small, using this simple method the food will soften and pass further down the esophagus.

However, most often the owner discovers a problem when the organ is quite clogged. In this case, in order to relieve inflammation, prepare a weak solution of potassium permanganate and carefully pour it into the beak.
It is more convenient to pour the solution using a rubber tube from a dropper, which is pre-lubricated with Vaseline for better permeability. The tube is carefully inserted into the esophagus and half a glass of potassium permanganate is poured into the goiter sac.
After injecting the pink solution, it is recommended to hold the chicken upside down for a while to achieve the best effect. At the same time, you can gently massage the goiter.
In some cases, repeated infusion of a pink solution of potassium permanganate is required. The use of potassium permanganate stops fermentation processes and destroys pathogenic bacteria. It is important to ensure that all crystals are dissolved in the finished solution, since their entry into the goiter can cause a burn.
During treatment, the chicken must be put on a light diet. Heavy and high-calorie food is completely excluded. During the diet, the bird can be given boiled eggs, light wet mash, and lactic acid products. A small amount of potassium permanganate can be added to the water.
If none of the methods help, then you should immediately call a veterinarian who will open the crop and carefully remove the stagnant contents. You should not carry out such manipulation yourself, as there is a high risk of the bird dying from incorrect actions.
Immediately after the operation, the chicken is kept on a starvation diet. It is advisable to separate it from other birds until the wound heals. On the second day, you can start giving soft food in small quantities.
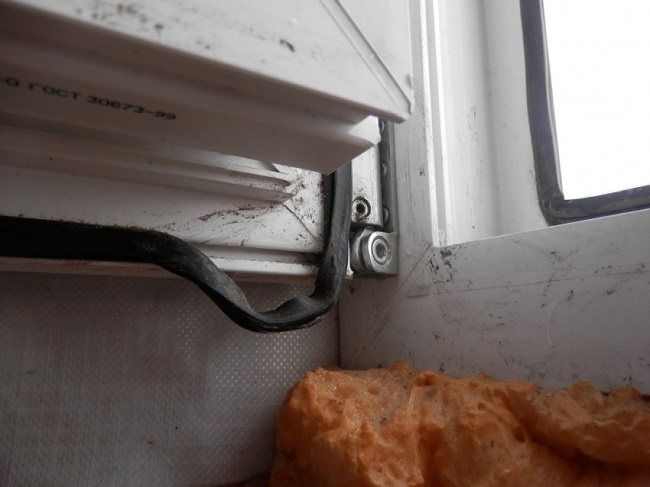
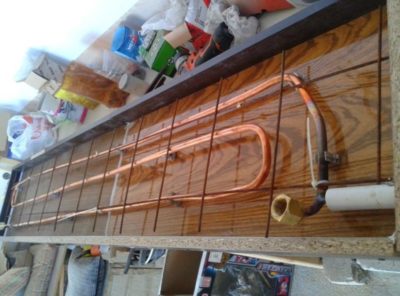
I'm making a heated window sill to prevent the windows from sweating
I'm making a heated window sill. Two long windows 4 meters + 2 meta in a row. The main goal is to eliminate condensation on the windows. I want to discuss on the merits. I know that you still need to think about ventilation, please do not lead the topic in this direction. I stretched a stainless steel corrugation from the heating riser directly under the plastic window sill. I thought I would close all the gypsum boards and make ventilation holes in the window sill. But for some reason the heating is delayed, and the windows have already begun to sweat. I realized that I need to add electric heating so as not to depend on the heating season. Now there is a dilemma. You simply cannot stretch a cable like a pipe under a window sill - you need either a screed or tiles, and accordingly you will have to remove the PVC window sills. I was also thinking about film heated floors, then what kind of finishing coating should I use? There needs to be enough heat to create convection across the windows. I would be happy to hear practical advice and options. Maybe someone has already done something similar.
R_V You are so confused.
Two winters with puddles on the windowsills, floors and mold on the slopes left no options.
Strongly. We're talking about a private home, right?
Heating devices should be almost equal to the length of the windows, and the window sill should be very narrow, protruding no more than 5 cm. How about you? Heating the windowsill may not help.
I'm almost sure that cable heating of the window sill will not help you. You are fighting the consequence, not the problem. The problem is something else. Describe in more detail the room (type, characteristics), walls, windows (characteristics), floor, heating and ventilation sources. Several times I calculated the cable for similar cases, but the task was always different - not the cold surface of the window sill (the customer wanted it that way).
No, it's an apartment. Attached loggia.
Vo.VA wrote: Heating devices should be almost equal to the length of the windows, And the window sill is very narrow, protruding no more than 5 cm. How about you? Heating the windowsill may not help.
It’s not possible to do this, so I’m thinking of an alternative option.
MersGM wrote: I'm pretty sure cable heating on the windowsill won't help you. You are fighting the consequence, not the problem. The problem is something else. Describe in more detail the room (type, characteristics), walls, windows (characteristics), floor, heating and ventilation sources. Several times I calculated the cable for similar cases, but the task was always different - not the cold surface of the window sill (the customer wanted it that way).
The reason is high humidity. Poor ventilation is to some extent to blame. But even with normal humidity of about 50%, there must be heating devices under the glazing to prevent the windows from sweating. The main heating will be from stainless steel. corrugations and central heating, but in case of a “delay” in the heating season, as now, I think you also need to lay a cable. I'm just thinking about how to implement it. Cable and metal corrugation in a small tie together or Cable in a small tie and a pipe under the window sill and holes or Infrared TP on the surface and a pipe under the window sill and holes, then what is the finishing coating?
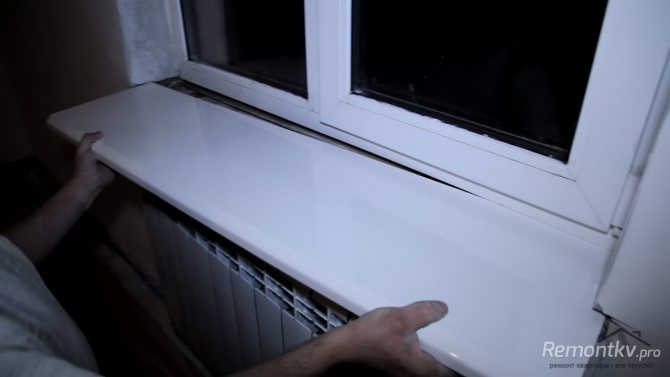
DIY window sill installation
VKTwitterOKYandex
video content
Rating: 4.0; Votes: 1 In this video I will show you how you can install a window sill yourself and save a considerable amount of money. The window sill is selected from the appropriate material and the required color (natural or artificial stone, PVC, window sill with acrylic coating, wooden window sill, etc.) Options for using the window sill: - a shelf for flowers and other decorations - a habitat for pets - you can use it in as a sitting place for deep thoughts and dreams - in the kitchen the window sill can serve as a tabletop (or its extension) - in a small room (loggia) the window sill can be used as a workplace (computer, sewing machine, etc.) Depending on the purpose of using the window sill You should choose the right material from which the window sill is made. And what is important is to take into account the possibility of caring for the window sill. Date: 2020-03-24
← FUN Apartment in a new building. Horrors of renovation from the developer
LED interior lighting →
Related videos
White openwork (French) blouse. Pointelle cardigan.
• Fashion Knitting
FELT-TIME POINTS - PAINTS! WATERCOLOR SET OF FELT TIPS WITH WATER BRUSH! HOW TO DRAW WITH THIS?
• Suzi LifeArt - drawing Anime
DIY Cute DIY ORGANIZER FROM PAPER! Back to School Desk Organizer DIY Kawaii
• Lum Planets
THE SIMPLE Anti-stress from 1 sheet of paper in 5 minutes! NOT ORIGAMI!
• Lum Planets
Welding thin stainless steel semi-automatically Do-it-yourself tank in 15 minutes
• Gori Duga
A method for welding profile pipes that even a beginner can weld!
• Gori Duga
Comments and reviews: 10
Konstantin My reviews and wishes)1. Saving on window sill ears is not advisable) It looks primitive without ears. 2. The customer’s desire is of course the law - but it is better that the window sill does not block the heating radiator (air circulation in the window area is disrupted)3. When sawing a metal corner with a grinder, it’s a good idea to not only wear glasses and gloves, but also to protect the glass unit from hot metal particles (which, if they get on the glass unit, nothing will be able to remove them)4. The window sill is not installed perpendicular to the window, but at a slight slope (1 degree) into the room - if water gets in, it will not flow into the seam, but will drain from the window sill5. Theoretically, you don’t need to use a level to level the window sill - but low-quality window sills come across crooked (hilly) - a level (or rule) will allow you to determine this and, if desired, eliminate it6. The centering of the window sill can be carried out not along the slopes (which may not exist) but in the center of the window. 7. About foaming the cracks in the area of the support profile - yes, this is the most problematic place. We definitely go through them. It wouldn’t hurt to run a strip of foam along the entire length of the stand profile (this will ensure even greater tightness)8. The load is placed on several points (as in the video. It was shown - but said no) After installing the load, the geometry (slopes) of the window sill is checked. so that it is in the same plane. 9. After the foam has completely dried (12 hours), check whether the foam has lifted the window sill.
SergBolek Personally, in my own little experience, I have worked out for myself the following sequence of actions (on slopes of 40 cm): 1) mark a line level from the edge of the frame on both sides and continue it onto the wall to the required length of the protrusion beyond the edge of the slope, usually about 5 cm ; 2) with a diamond wheel I cut this line with a depth of 1-1.5 cm as far as I can reach the window (with a circle of 230 mm under the arm 2 cm to the frame without catching the mounting strip of the window sill, I also trim the lower edge of the slopes from the corners, I select the rest with a hammer drill; 3) I cut out the window sill with an allowance of 5 mm under the slopes (less long and more winding) and 10 mm under the wall, oblique slopes and uneven installation of frames, this is class 4 of Soviet geometry; 4) I place wedges on the base of the frame (brick, concrete, or whatever) so that when it is put in place, the window sill is pressed against the frame and I prepare wedges under the front part, after 0.5 m; 5) after such fitting, I remove the window sill, prime the base, apply foam under the frame, then after 10 cm along the length I stick the window sill in place; 6) I foam the edge against the wall and load at least 25 kg per 1 m, closer to the edge.
Loginin Some unfortunate window installers install windows incorrectly, so that the cracks remain, other unfortunate installers install window sills and seal the cracks with foam, and in the end the customers suffer, either it blows from under the windows or moisture and dampness comes from somewhere. Before installing a PVC window, waterproofing tape is glued to the window frame around the perimeter, then the window is installed, foamed, and the foam is closed to the wall with the same tape. it looks like a fabric tape impregnated with bitumen mastic, there are no cracks left and moisture does not pass through. The window sill is also placed after the window frame has been hydro-insulated and the lower part of the opening and cracks are not blown in with foam, but are done initially according to the correct method. for ala collective farm it will do just like in the video, the customer still doesn’t know how to do it correctly) although it was possible to lengthen the installation by one operation and kill two birds with one stone, get rid of future leakage of moisture and air from outside, and also not pay for your work be ashamed later. Gentlemen, installers, as well as customers, at least watch the video
Jarub It’s not that it’s wrong, it’s just that before inserting the window sill you need to foam the end at the stand, that is, the distance between the frame and the window opening, this is the weakest point of the windows since the profile (Frame) can be 752 mm and the stand 30 mm and water I would not recommend installing it during the day, as it may result in a lens (magnifying glass) effect, i.e. the sun can burn through the window sill. The ears of the window sills are usually made 5 cm and the window sill should not overlap the radiator (battery) by more than 50%, and also - It’s better to cut out the side plugs at the window sill and insert them right away; before installing the window sill, it’s easier this way, although you can challenge it.
Alexander I don’t know if they wrote it or not, because there are a lot of comments. Everything is described correctly except for the angle, but this has already been discussed and pay attention to the video, it’s a little visible. A small GAP between the window sill and the window, where the window sill fits into the groove. There it is necessary either to support it so that it does not sag (especially if the window sill is long) or some people screw the window sill from the outside through a support profile. I would not recommend Noah because he is bursting. Or the third option is special clasps. And so is fire)
Artemy The customer said this, the customer said that, customer, customer, customer. Sheer tediousness The bottom line: The customer asked to save money, so we’ll buy fucking expensive window sills, cut off half of each, and. TA-DA-MM We saved twice, and we only need five window sills, instead of ten, although we spent significantly more money than on ordinary window sills, but we installed expensive ones. It doesn’t matter that we ruined them all, BUT, we’re like- would save money That's why the economy is always in trouble.
BROKER A window sill without ears is not a window sill, this block will have condensation accumulated at the joint because there is no point in the thickness of the PVC profile if there is no thermal insulation at the joint, the stand profile is the coldest place in the window block, because a cold metal FLOW is attached to it from the street . AND AT LEAST THE WINDOW WILL SIT IN THE MIDDLE, YOU HAVEN'T EVEN APPLIED A SUPPORT ON THE WINDOW ITSELF AND THE WINDOW STILL KEEPS THE FORM STANDS EVEN, AND OVER TIME IT WILL SIT ON THE CONCRETE.
Channel Alexander, super Tell me, please. Is it necessary to tilt the window sill from the window to the room? What should it be, if necessary? I have the following situation: the window sill is already inserted into the window frame from below using foam, but it dangles and there is a void at the bottom. How can I do it better? It won't be possible to thoroughly vacuum and prime it; I won't be able to crawl under it. Is it possible not to prime, but to foam straight away? Or come up with something else somehow? Thanks for the answer.
Vo Your channel is good. On the window sill: underlapping the battery by 5 cm is necessary for air to rise up the glass unit, otherwise a lot of condensation is guaranteed, but if the owner wants it that way, I think it’s necessary to simply warn about the consequences. And along the window sill you need to set the slope from the window into the room to 5 degrees, the condensation will still be there, the water will slowly go to the radiator to warm it up and dry out. Thank you, I wish you good luck
Mikel Thanks for the lesson. In general, you are very helpful. I do repairs and often turn to your videos. But I’ll say it here. That in addition to all the rules for installing a window sill, you did not indicate one important point. When installing a window sill, it is necessary to take into account its width, respectively. installed radiator. If you cover the radiator with a window sill, you can get fogging of the windows, or even worse, a puddle on the windowsill.