In what cases is it compiled?
The act is required when:
- Commissioning of new equipment. The certificate will confirm that each element is in its place, the installation was carried out responsibly, and the system is working.
- The heating season is approaching. After a summer break in work, the pipes could fail. After checking their capacity, a report is drawn up.
- Already carried out repair work.
- The occurrence of contained emergency situations on the pipeline. In this way, specialists identify the amount of work required and the weak points of the existing heating network.
For the uninterrupted operation of the heating system, preventative control checks and reliable information about the quality functioning of the system upon startup are necessary.
System hydrotesting technology
Pressure testing can be carried out in two cases:
- After completing the repair of the heating system.
- Before the start of the heating season.
Note! More experienced people do pressing immediately after the heating season ends. This allows all equipment malfunctions and defects to be identified in advance, and there will still be enough time to eliminate them - after all, almost everywhere the heating season ends in mid-April.
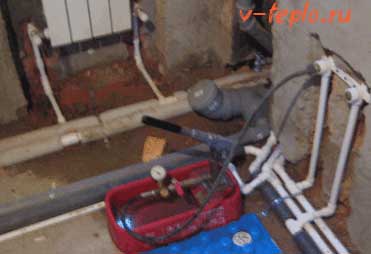
Often hydrotests are the consequences of detecting malfunctions in the operation of the system, when it is necessary, for example, to flush it. Below are the main stages of crimping:
- First, the entire heating system is filled with liquid.
- Then the pressure in the system is gradually increased.
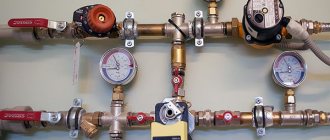
- All pressure measuring devices are carefully monitored and their performance is recorded.
- Check the system (visually) to see if it is leaking.
- If something is faulty, repair work is carried out.
- Then they draw up a pressure test report for the heating system.
- The heating system elements are filled with coolant again.
Thus, the whole procedure begins with filling the system with coolant. If we mean a system that is already functioning, then on the contrary it needs to be stopped, cooled and all the water released.
When filling the system, you should use a special tap, which is often located in the boiler room on the return pipeline. Don't forget to check if this tap is leaking! When filling occurs, air will be released from it, as well as air plugs will be removed. This process must also be accompanied by a leak check.
Another characteristic feature of pressure testing is that water in the system must be supplied from below. If you do this from above, there is a risk that air will enter the system along with the coolant. In general, you will be able to avoid air jams.
The essence and types of crimping
Nowadays heating is most often carried out by a “water circuit” system. At the same time, heated water circulates through the works, imparting its thermal energy to the premises. Leaks are unacceptable; the pipeline must be completely sealed for normal operation. Pressure testing specifically creates a larger volume in the pipe than normal.
When this is done using air, it is called pneumatic pressing.
When using water, then hydropressing. The latter method is considered safer and therefore more popular. For this reason, an example of hydropressing is provided as a form.
When testing, it is recommended not to exceed the pressure inside the pipe more than 15 MPa. If we are talking about raising pressure with water, then there are limitations. The maximum possible pressure should not exceed the normal operating pressure by more than 30%.
In multi-storey buildings they resort to pneumatic pressure testing if the pipes are very old and there is a risk of flooding. But then there is a level of risk and all residents must be notified of the tests being carried out.
The work process is simple, but multi-stage. The algorithm looks like this:
- The necessary materials and equipment are being prepared.
- Draining the liquid that was previously in the heating system.
- Uploading a new one.
- Create the highest possible test pressure.
- Taking control measurements after 10 minutes.
- Flushing, adjusting the heating system to normal pressure levels inside.
- Documentation of work performed, generation of reports and acts.
But this is how the list of procedures looks only if there are no “thin spots” in the heating system and, accordingly, the tightness in it is not broken. If the pressure drops quickly and does not hold, then the system needs repair work. In such a situation, the specialist performs the necessary actions (replacing the pipe, sealing connections, cleaning, etc.), and then begins crimping from the very beginning. Only a heating system that has passed the test is allowed into the heating season.
Important nuance! Pressure testing should be carried out after cleaning and flushing the pipes. Otherwise, salt and other deposits inside them can mask possible external damage and breakthroughs.
If there are deposits of about 1 cm on the inner surface, then this reduces the overall heat transfer and efficiency by 15 percent or more of the overall indicators. To document the cleaning, a special report is also drawn up.
Characteristic features of crimping a private house
Hydrotesting of private country houses and cottages is characterized by the fact that in these objects the pressure in the system is low, often not exceeding two atmospheres. Therefore, for testing you can supply liquid directly from the water supply, where the pressure is exactly the same. Here, additional devices, as well as excessive pressure, are not required. Just check if there are any leaks anywhere, if the welding seams are fogged up, if there are any breaks, etc.
When the tests are completed, immediately fill the system with water (it must be chemically purified) or use antifreeze.
When the maximum pressure is finally reached, it must be maintained for at least another fifteen minutes (during this time, the devices should be monitored especially carefully, and also checked for leaks). It is imperative to check each device separately.
Note! Pressure testing is considered complete only when the pressure does not drop and no damage or leaks are found in the system.
If the pressure during the procedure is too high, then you should start looking for leaks. Hydrotests must be carried out until the location of the leak is identified.
Text details
System pressure testing process
When carrying out pressure testing in order to identify problems, adhere to the following rules. During testing, it is necessary to take into account the water consumption rate from all points of consumption. The flow rate should be 0.2 liters per second. The level of flow pressure is also taken into account.
This parameter is important for water intake units that are located high. The pressure should be approximately three meters. During the inspection, the compliance of all system indicators specified in the documents is verified. It is important to check the length of the pipeline, the cross-section of the pipes, and the material of the parts. First, a visual inspection of all communications laid inside and outside is carried out. This will eliminate severe leaks in case of defects during testing. During pressure testing, water is supplied into the pipeline at high pressure.
Attention! The system is tested for more than ten minutes.
When water is supplied to the pipes, the pressure must exceed the permissible standards for these communications by 1.5 times. Eg:
For a household pipeline supplying water, the maximum permissible pressure is 0.45 milliamps, or 45 m of water column. To test the system, you need to use a pressure of 0.675 milliamps, or 67.5 m of water column.
Attention! The pressure testing process can be considered successful if there are no leaks or pipe breaks when they are exposed to water.
Final completion of testing documents
At the end of the inspection, fill out a test report for the communication systems at the time of tightness. Enter data equal to the nominal pressure indicator for this pipeline according to the pressure gauge, as well as the values used when testing the pressure level using the pressure gauge. The documents indicate the brand of the pressure gauge device that was used during crimp testing. This indicates the installation height of the pressure gauge relative to the axis of the pipeline.
The research report includes the period of time during which the system was tested by pouring water. Then note the nominal value to which the pressure was reduced at the end of the test.
Specialists from the commission visually inspect pipes and sewers and indicate the results in the report. The documents must indicate each stage of the pipeline network inspection that was used for this communication system. For example, was the pressure reduced from time to time when water was supplied, or was the pressure changed?
If no water supply leaks were found during the inspection, then in the column with the inspection results it should be written down that no leaks or breaks were detected during the inspection. Next comes a column in which the decision of the members organizing the inspection is indicated. If the tests are successful, the commission makes a decision to allow the water supply network to be put into operation. Specialists from the commission sign below, indicating their last name and initials, and writing down their positions.
Sequence of hydraulic tests of the heating system
When crimping, work is carried out in stages:
- At the beginning of hydraulic tests, the pressure in the system is raised to the set value at least twice. This is usually done for half an hour, increasing it every 10 minutes. Over the next 30 minutes, the pressure is maintained at a level of at least 0.6 bar.
- At the second stage, the pressure must be at least 0.2 bar. If a leak is detected in the flanged or threaded assemblies of the heating system, tightening them is permissible. When deficiencies cannot be corrected, this connection must be replaced.
Carrying out hydraulic tests is complex and must be approached responsibly. It will not be possible to perform high-quality crimping on your own. It is advisable to resort to the services of special organizations, which, after completion of the work, will issue a certificate of hydraulic testing of the heating system, and then with the onset of cold weather the house will be warm and cozy. Read also: “How to do pressure testing of a heating system with your own hands.”
Detailed video about hydraulic testing of the heating system:
Features of filling out the first paragraphs of the act
Before starting pressure testing of the water pipeline, you must purchase a report form in which the testing data will be entered. According to SNiP 3.05.04 - 85, the act refers to official documentation. The first data in the act is the name of the city where the tests are carried out and the date of the inspection. The following lists the specialists who test the system installed inside or outside the building.
The commission includes representatives:
1.company that built communications.
2. service that carried out technical supervision of the customer.
3.operating organizations.
The act should indicate the name of the organization that includes the specialist participating in the inspection, and the position of this commission member in this organization, indicating his last name and initials. Next, detailed information about the object that is subject to inspection is written down. It is necessary to write down its name without abbreviations (information can be taken from the design documents), picket numbers that are indicated at the ends of the object, the length of the pipes, their diameter, and what material they are made of, how the joints of the elements are sealed. The header of the act consists of this data.