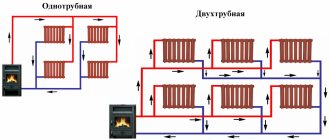
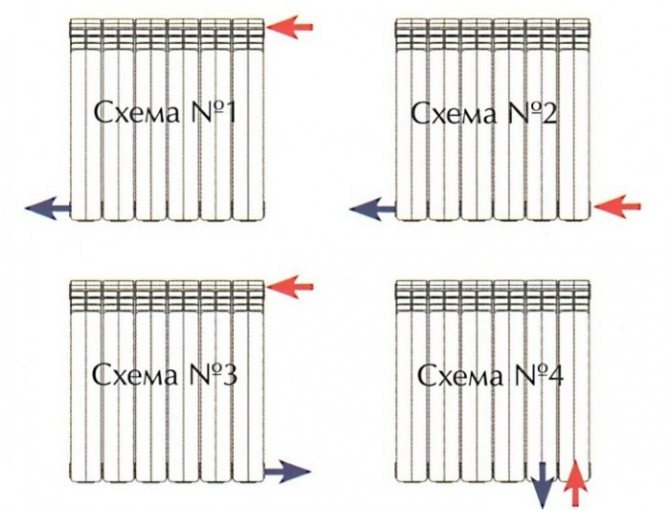
Possible radiator connection diagrams
Before you begin the process of installing heating radiators, it is extremely important to determine the connection diagram. There are several options for how to do this; this is also indicated in the snip. Each of them has both certain advantages and disadvantages. Connection methods:
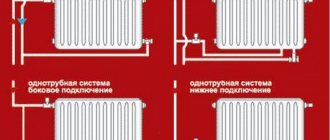
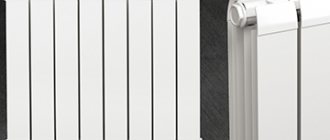
- side connection. This method is perhaps the most common, since it is this method that allows for maximum heat transfer from radiators. The installation principle is quite simple - the inlet pipe is connected to the upper radiator pipe, and the outlet pipe is connected to the lower one. Thus, both the inlet and outlet pipes are located at one end of the battery.
- diagonal connection. This method is used primarily for long radiators, since it allows for maximum heating of the battery along its entire length. In this case, the inlet pipe should be connected to the upper pipe, and the outlet pipe to the lower one, which is located on the other side of the battery.
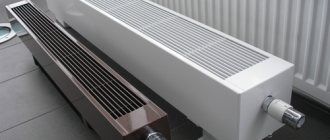
- bottom connection. The least efficient connection method (compared to the side method, efficiency is 5-15% lower), used primarily for heating systems located under the floor.
Installation method
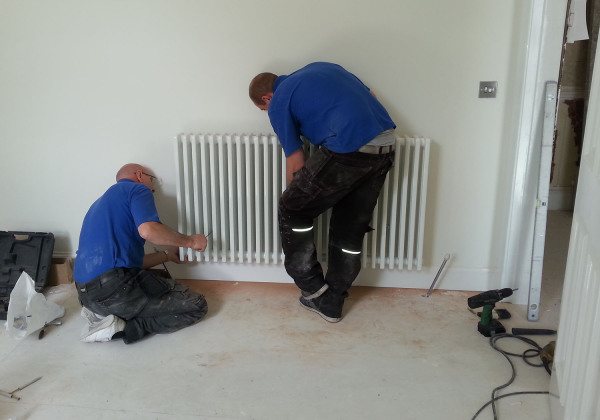
Wall option
When doing installation work yourself, it is much easier to mount the battery on the wall. This task is less labor-intensive compared to floor installation, but all operations must be performed very efficiently.
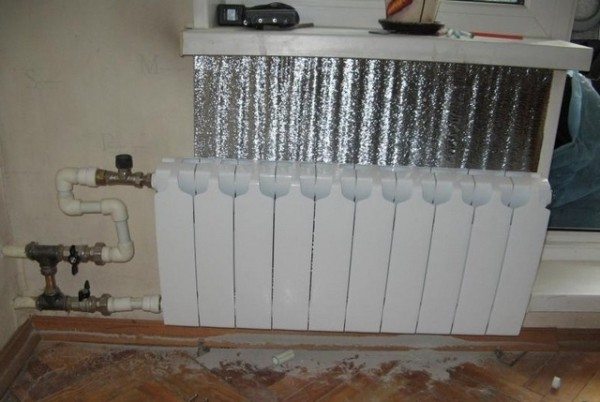
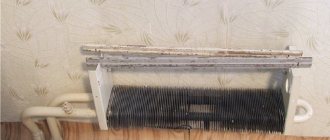
Photo of the foil thermal insulation layer behind the heating device
The installation process itself includes the following steps:
| Installation of fasteners |
|
| Radiator installation |
|
| Work stage | Operations Performed |
| Site preparation |
|
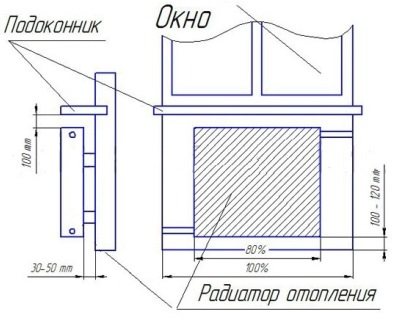
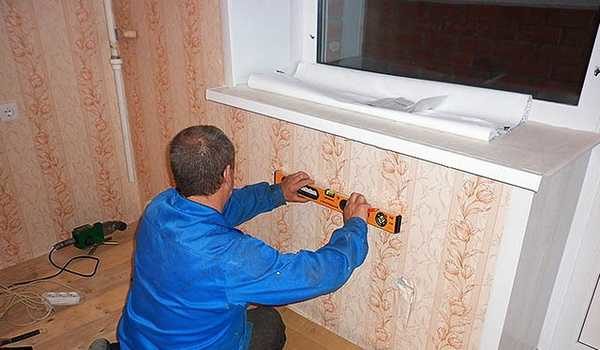
| Marking | We apply markings to the surface for installing the battery (in principle, this should be taken into account when purchasing a radiator, but duplication here would also be useful): |
- From the floor to the bottom edge - 80-100 mm.
- From the top edge to the window sill - 80 - 100 mm.
- The width is no more than 80% of the window width.
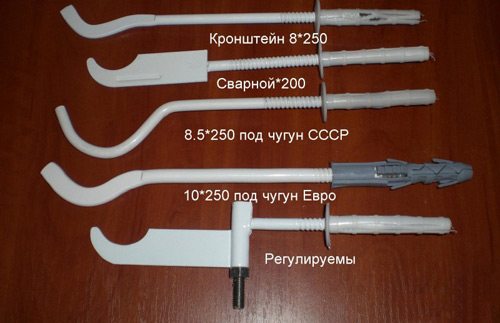
Most commonly used brackets
As you can see, the instructions are not complicated, but you need to control the quality of the work at every stage.
Floor option
Sometimes the battery turns out to be too heavy to hang on the wall - there is a risk that the material simply will not hold up. In this case, installation is carried out using floor brackets. Yes, the price of such products will be slightly higher than that of wall mounts, however, the margin of safety is incomparable.
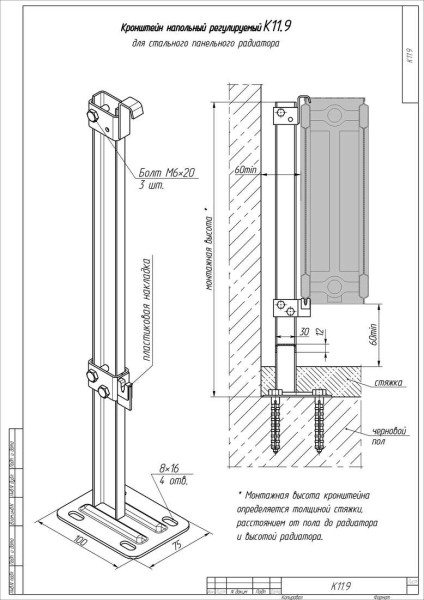
Floor Bracket Drawing with Mounting Diagram
The installation process itself involves the following steps:
- We select a pair of brackets whose load-bearing capacity is sufficient to support the weight of the battery.
- We install racks on the base of the floor, which we fix with anchors. We select the distance from the wall so that the minimum gap between it and the mounted radiator is 60 mm.
Advice! It is better to mount the floor brackets before pouring the screed - this way we can disguise the attachment point.
- We fill the screed, hiding the bases of the brackets and the caps of the mounting anchors.
- We put hooks on the racks, set them to the desired height and secure them with bolts. If the product package includes this, we install metal gaskets that will protect the radiator material at the point of contact with the hook.
- We hang the radiator on the hooks, which we then carefully level.
Despite the great complexity of implementation, this system has obvious advantages: the load from the battery is transferred not to the wall, but to the floor, so the risk of loosening the fasteners will be minimal.
Instructions for installing heating radiators
So, how to hang radiators correctly? You have purchased radiators and even decided exactly how they will be installed. Now you need to familiarize yourself with all the requirements of SNIP - and you can begin installation. It's actually quite simple.
Most radiator manufacturers, trying to make life as easy as possible for users, include detailed instructions and rules for installing heating radiators with each battery.
And they really need to be followed - after all, if the radiator is installed incorrectly, if it breaks, repairs under warranty will be denied.
If you want to protect the device from scratches, dust and other damage that may occur during installation, then during the installation process you can not remove the protective film - this is allowed by the rules for installing radiators. The single most important requirement that must be strictly followed is strict adherence to the indentations necessary for normal circulation of heated air. Here are the rules for installing heating radiators to indentations put forward by SNIP:
- According to current standards, the distance from the window sill or the bottom of the niche should be at least 10 cm. It should be taken into account that if the gap between the radiator and the wall is less than ¾ of the depth of the radiator, the flow of warm air into the room will be much worse.
- Equally strict requirements are imposed on the installation height of radiators. How to properly place heating batteries? So, if the distance between the bottom point of the radiator and the floor level is less than 10 cm, then the outflow of warm air will be difficult - and this will negatively affect the degree of heating of the room. The ideal distance is 12 cm between the floor and the radiator. And if this gap is more than 15 cm, then there will be too large a temperature difference between the upper and lower parts of the room.
- if the radiator is installed not in a niche under the window, but near the wall, then the distance between the surfaces should be at least 20 cm. If it is smaller, air circulation will be difficult, and in addition, dust will accumulate on the back wall of the radiator.
In order to get maximum useful information regarding the installation of radiators, you can use our resource. You can find many valuable tips and recommendations on how to properly install a heating radiator.
Rules for installing heating radiators
Length requirements are not all recommendations. There are also rules for location under the window relative to the floor, window sill and wall:
- The heating device must be located strictly in the middle of the window opening. When editing, find the middle and mark it. Then to the right and left you set the distance to the location of the fasteners.
- The distance from the floor is 8-14 cm. If you make it smaller, it will be difficult to clean; if you make it more, zones of cold air will form below.
- The radiator should be 10-12 cm away from the window sill. With a closer location, convection worsens and thermal output decreases.
- The distance from the wall to the back wall should be 3-5 cm. This gap ensures normal convection and heat distribution. And one more thing: at a short distance, dust will settle on the wall.
Heating radiator installation procedure
It should be noted that SNIP also prescribes the procedure for installing the radiator. Using it, you can do everything correctly:
- First of all, you need to determine the location for the fasteners. Their number depends on the size of the battery, but even if the smallest radiator is installed, there must be at least three brackets;
- The brackets are being attached. For reliability, it is necessary to use dowels or cement mortar;
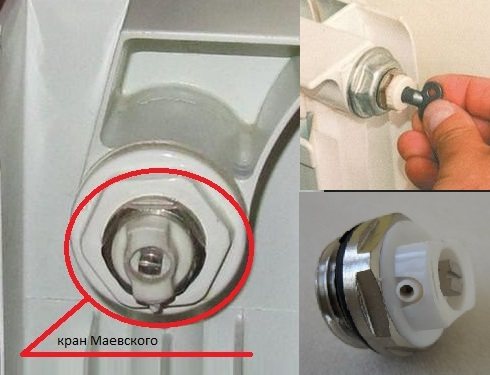
- The necessary adapters, Mayevsky tap, plugs are installed;
- Now you can begin installing the radiator itself;
- The next step is to connect the radiator to the inlet and outlet pipes of the system;
- Next you need to install the air vent. According to modern SNIP, it must be automatic;
- After the correct installation of the heating radiators is completely completed, you can remove the protective film from the radiators.
If during the installation of heating radiators you adhere to all the rules and requirements described above, then you will enjoy the warmth that your correct installation of radiators and a well-made heating system provides for a long time.
Heating radiator assembly procedure
Before you begin installing the battery, you need to determine the location of the fasteners. The number of fasteners is determined by the size of the heating device. But even when installing a radiator with minimal dimensions, the number of attachment points should not be less than three.
Marking the mounting locations for the new battery
The next step is to install the brackets to mount the battery. To increase the reliability of the system, you can use dowels or cement mortar. Work on installing the battery must begin by checking the radiator configuration. Then you can begin installing the components (plugs, fasteners, adapters) onto the heating device.
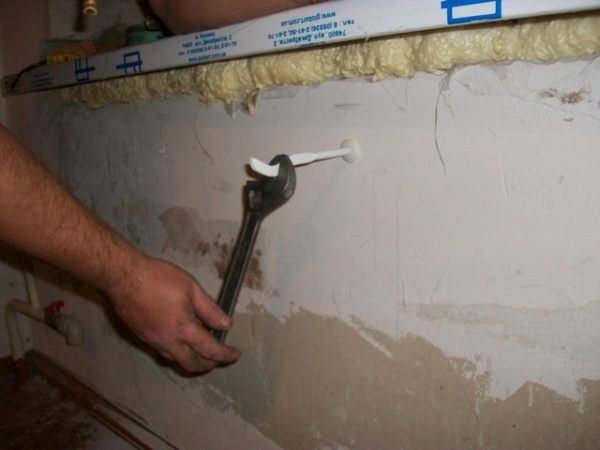
Brackets for heating radiators
The requirements of regulatory documentation determine that automatic air vents must be installed on heating radiators. If possible, it is advisable to use a Mayevsky crane.
In addition to the devices installed on the heating radiator, it makes sense to mount ball valves at the inlet and outlet. Their presence will allow you to avoid difficulties with dismantling if repairs are necessary. By turning off the taps, the radiator can be easily removed.
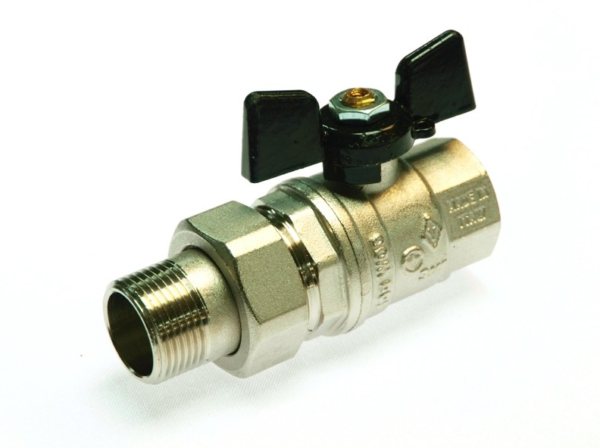
Ball valve for heating radiators
It would not be superfluous to install thermostats. Their presence will allow you to regulate the heat supply to heating devices, which will create a comfortable temperature in each room.
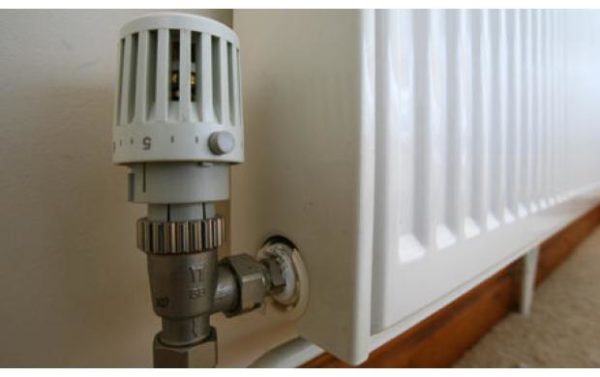
Thermostat on the radiator.
After installing all devices and fittings, you can connect the pipelines. The method of connecting them to the radiator (traditional welding, crimping or threaded connection) depends on the scheme of its inclusion in the heat supply system. The type of connection between the pipes and the battery is determined by the material from which they are made.
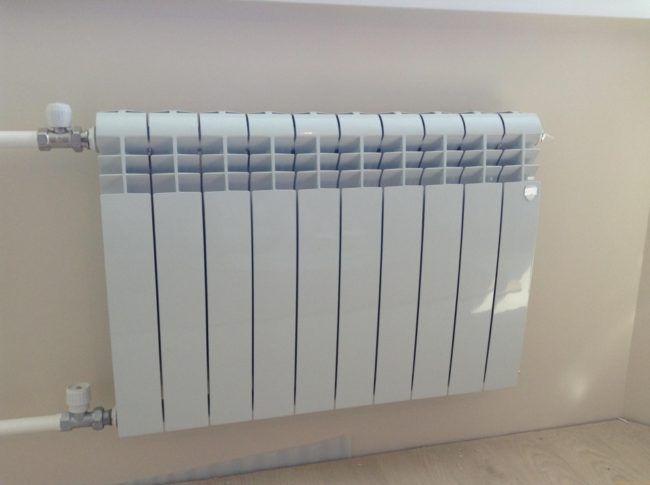
Lateral connection of heating radiators
The last step is to test the heat supply system. It must be remembered that during the tests, pressure 1.5-2 times higher than the nominal pressure is supplied to the pipes and radiators. It is advisable to keep the system under high pressure for some time. This will help installers see how joints on pipes and connections to radiators behave.
Important! The coolant must be supplied both during testing and when starting the system by gradually opening the tap. Otherwise, you can provoke a phenomenon such as water hammer, which can lead to the destruction of components of the thermal energy supply system.
Why are batteries placed under the window? Reasons for placing heating batteries under windows
Windows are the most vulnerable places in an apartment, since it is through them that most of the heat is lost. Regardless of the material from which the windows are made, you will feel the cold air emanating from them, even in summer, let alone in winter. The glass will always be cold even in the highest quality double-glazed windows. By the way, if you are interested in this issue at the stage of planning the heating network and have not purchased radiators, then we advise you to look at the Magazik.in.ua store, where you can always find a huge assortment of models at affordable prices. To do this, you just need to follow the link https://magazik.in.ua/catalog/radiatory/. But let's return to our problem.
In addition to the window, a source of heat loss can be:
- floor;
- door;
- joints between ceilings;
- ventilation system.
But the window opening is still considered the undisputed “leader” in this regard. It is worth noting that some people blame it on incorrect installation or lack of insulation material, but in reality, even those windows that were installed in accordance with all requirements draw out the greatest amount of thermal energy.
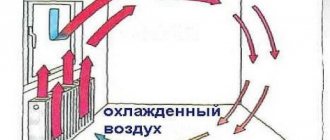
Note! Radiators heat homes through physical laws such as air circulation. Cold air goes down because it has more weight than hot air, while the latter, accordingly, rises up.
So, why are batteries placed under windows? Because when cold air enters the room from the street, it falls down, and there it is immediately warmed up by heating radiators. When heated, it rises, which ensures that same air circulation. In other words, the cool air coming from the windows is also used to make the heating network more efficient. You can get acquainted with the features of installing radiators by watching the video below.
Placing the battery under the window. Types of heating batteries
The efficiency of heating a room will depend not only on how far from the floor the radiator or radiator is hung, but also on their connection diagram, the material and design of the heating devices themselves. The following models are available on the market today:
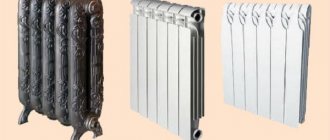
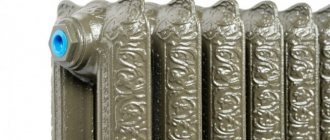
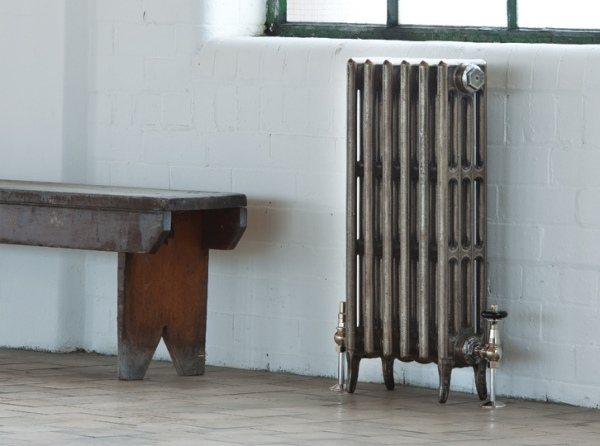
- Cast iron batteries. The adult generation probably knows them firsthand. During the Soviet Union, only these models were used in heating systems. Today they have a more presentable appearance. They are characterized by a high level of heat capacity, long-term heat transfer, absence of consequences from water hammer, and they also have an increased service life.
- Steel radiators. They have low heat transfer rates - heating occurs quickly, but they cool down no less quickly. The welded structure is sensitive to hydraulic shock. There is no way to add sections yourself. At the same time, the weight of the product and ease of installation attract many homeowners. Products of the German brand “Kermi” are in particular demand.
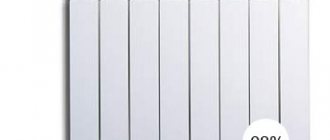
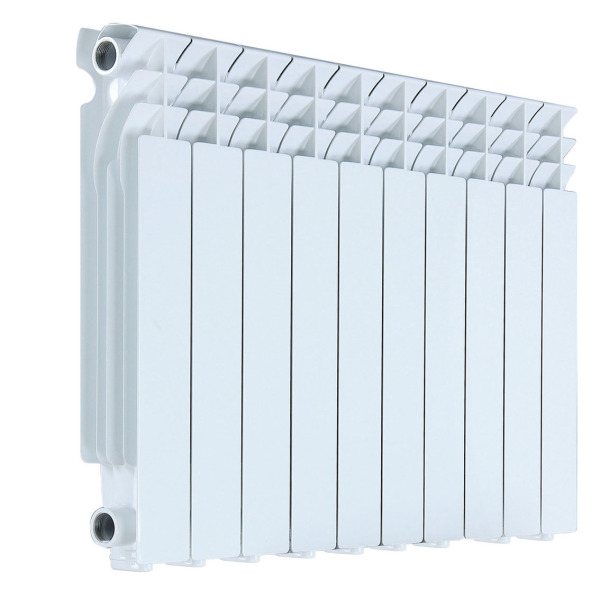
- Aluminum radiators. They are characterized by low weight, beautiful shape, and increased thermal output. They are presented on the market in two versions, where in the first the design consists of one monoblock, with a volume that provides different powers, in the second - a stacked sectional one.
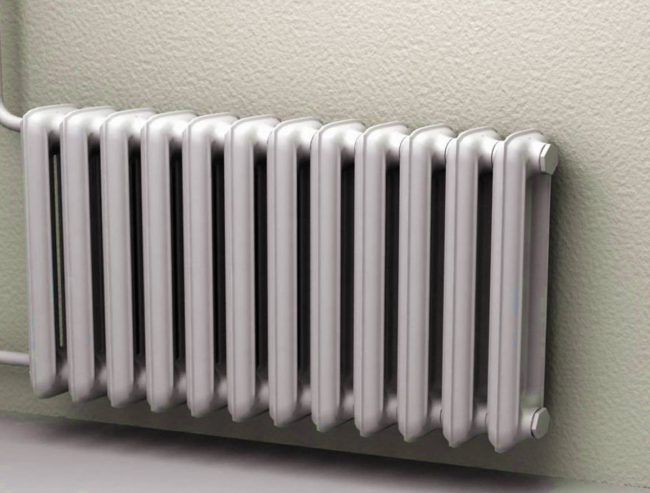
- Bimetallic batteries. The innovative design of the placement of heating collectors made it possible to achieve the level of heat transfer of aluminum models, as well as the strength and reliability of their cast iron counterparts.
Do-it-yourself installation of heating radiators: VIDEO
When installing a heating system ourselves, among other issues, we need to decide at what distance from the wall to hang the radiator. Although this aspect may not seem important enough to some, in fact, the efficiency of the system largely depends on compliance with the installation parameters.
In our article we will tell you why it is necessary to monitor the distance from the battery to surfaces, and also provide recommendations for installing a radiator on a wall or floor.
Why are batteries placed under windows? Why are batteries mounted at the bottom of the wall?
Many of our fellow citizens ask the question: “Why are batteries still placed directly under the windows?” It would seem that the space near the window is the least protected from the penetration of cold from the street, so why not place heating radiators away from such places?
Closer to winter, when the first frosts arrive, the heating season begins. And, indeed, radiators placed under windows warm the space more effectively than radiators installed in other places. The fact is that the window is the place of greatest heat loss in the entire space of a house or apartment, and it is the weakest point in terms of thermal protection. Go to the window and place your palm on the glass. You will feel that the glass is cold, perhaps even feel a slight breeze of cold air. Even if the most modern, high-quality and reliable double-glazed windows are installed in the window openings of your home, and all the necessary technologies for their installation are followed, they still let in more cold air than, for example, walls or doors.
All batteries heat the space according to the same principle, using the ability of air to circulate. Let's turn to the laws of physics. Everyone knows that cold air is heavier than warm air and therefore sinks. The same thing happens with the air from the window. Frosty street air, entering the room through cracks and micropores, falls down to the floor. But thanks to the radiators attached under the window, the cold air has time to heat up and rises to the ceiling, giving way to the next “portion” of frost. Thus, the cold does not have time to spread throughout the entire area of the room, but, on the contrary, by warming up, it provides the home with warmth. What happens to cold air if the radiators are located away from the window? Due to the temperature difference, cold air circulates from the window deep into the room, and only after reaching the radiator does it begin to heat up and “travel” to the ceiling according to the already outlined pattern. Therefore, if the battery is located far from the window, the heating process of the room slows down significantly.
Is it possible to remove the battery under the window. Why are batteries placed under windows?
Many of our fellow citizens ask the question: “Why are batteries still placed directly under the windows?” It would seem that the space near the window is the least protected from the penetration of cold from the street, so why not place heating radiators away from such places?
Closer to winter, when the first frosts arrive, the heating season begins. And, indeed, radiators placed under windows warm the space more effectively than radiators installed in other places. The fact is that the window is the place of the greatest heat loss in the entire space of a house or apartment, and it is the weakest point in terms of thermal protection . Go to the window and place your palm on the glass. You will feel that the glass is cold, perhaps even feel a slight breeze of cold air. Even if the most modern, high-quality and reliable double-glazed windows are installed in the window openings of your home, and all the necessary technologies for their installation are followed, they still let in more cold air than, for example, walls or doors. All batteries heat the space according to the same principle, using the ability of air to circulate. Let's turn to the laws of physics. Everyone knows that cold air is heavier than warm air and therefore sinks. The same thing happens with the air from the window. Frosty street air, entering the room through cracks and micropores, falls down to the floor. But thanks to the radiators attached under the window, the cold air has time to heat up and rises to the ceiling, giving way to the next “portion” of frost. Thus, the cold does not have time to spread throughout the entire area of the room, but, on the contrary, by warming up, it provides the home with warmth. What happens to cold air if the radiators are located away from the window? Due to the temperature difference, cold air circulates from the window deep into the room, and only when it reaches the radiator does it begin to heat up and “travel” to the ceiling according to the already outlined pattern. Therefore, if the battery is located far from the window, the heating process of the room slows down significantly.
Construction portal No. 1
12/19/2018 admin Comments No comments
Heating installation is a serious stage in preparing a house for operation. Attaching heating radiators to the wall is not the only, but quite big difficulty in this process. To do everything correctly and get a good result of your work, you need to understand what mounting options exist, types of batteries, and the intricacies of work.
The first question is still worth considering the types of batteries that can be used by you both in a country house and in an apartment.
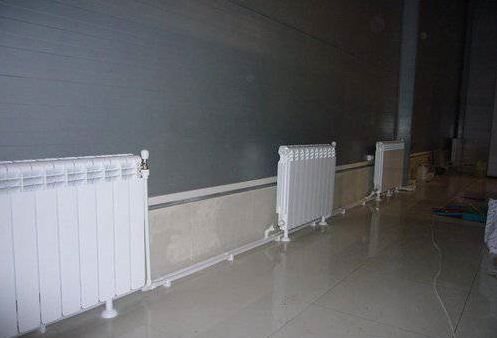
Installing a heating radiator on supports
If there is no embedded support, then the radiator cannot be mounted, since the brackets will not stick to the drywall.
In this case, you can install it on support stands, securing them to the floor. Radiators are installed on these or similar supports in front of stained glass windows:
How to use a laser level?
Electric heating boiler - advantages and disadvantages
The heating radiator mounting bracket is the main element that ensures reliable installation of the product. Even the lightest aluminum batteries, when filled with water, place a significant load on the load-bearing surfaces, and there is nothing to say about cast iron products. So we can’t do without high-quality fasteners and their correct installation, so beginners should study the recommendations below very carefully.
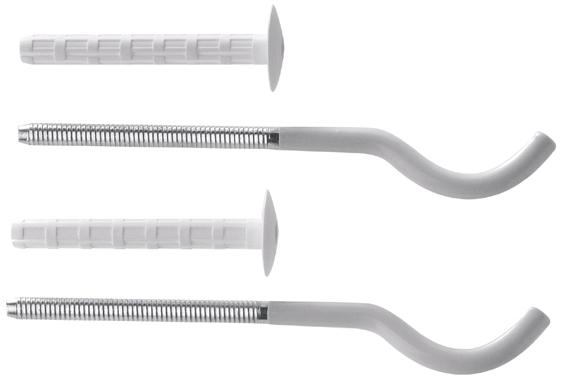
These are the hooks on which batteries are most often hung.
Types of radiators for heating systems
An important factor when choosing a battery is the price-quality ratio. In this market segment, the heat transfer coefficient is considered to be an indicator of quality. But each material also has advantages and disadvantages. To make your final choice, you should familiarize yourself with all the parameters of the main types of radiators.
Cast iron batteries
The advantages of this type are as follows:
- Cast iron batteries have very thick walls, which adds to their durability.
- Cast iron is resistant to corrosion formations.
- Such radiators give off heat for a long time even after you have turned off the heating system.
- Compared to other types, cast iron batteries have the longest service life.
- Attaching cast iron radiators to the wall is difficult due to their heavy weight. When installing them, you must use supporting stands.
- Disadvantages also include their unattractive appearance and massiveness.
Radiators made of steel
Manufacturers and consumers consider the advantages of this type to be:
- Light weight, which facilitates the installation process.
- High heating rate of the system, and as a result, rapid heat transfer.
- Low heating temperature and rapid cooling of the system.
- Short service life.
- The operating pressure of such batteries should not exceed 10 bar.
- Low resistance to hydraulic and pneumatic shocks.
Aluminum radiators
Advantages of this type:
- Neat and aesthetic appearance.
- High speed of attaching aluminum radiators to the wall due to their low weight.
- Maximum heat transfer.
- Working pressure up to 20 bar.
- Possibility of an unlimited set of sections (it all depends on the room in which the radiator will be installed).
Types of radiators:
- Cast iron.
- Steel.
- Aluminum.
- Bimetallic.
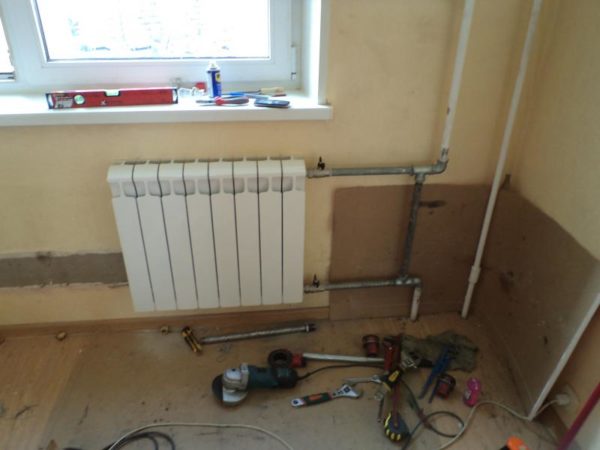
Cast iron radiators
Heating radiator installed in the apartment
Cast iron radiators are perhaps the real “long-livers” on the market. Just a few decades ago, such batteries were in almost every house and apartment. But even today, despite technical progress and the emergence of newer modern radiators, cast iron products are very popular among our compatriots. Why are they so good?
It should immediately be noted that today these heating systems have been significantly modified and technically improved. Therefore, speaking about the advantages and disadvantages, we will focus on those radiators that are currently on the market. One of the main advantages of such batteries is their long service life. Manufacturers provide a guarantee of at least 50 years, but with proper care, this period can be doubled or even tripled. Of course, during this time the aesthetic appearance of the heating radiator may become obsolete, but there is a purely technical possibility of operating for such a long time!
Due to the massiveness and high heat capacity of cast iron, these radiators are able to maintain a high temperature for a long time after the coolant is turned off. They are quite resistant to pressure changes and aggressive environments. But due to its massiveness and heavy weight, installation of cast iron batteries is a rather lengthy and labor-intensive process. In addition, they are not very different in their beautiful appearance, unless, of course, the cast-iron construction is the “highlight” of the style concept of the interior.
Steel radiators
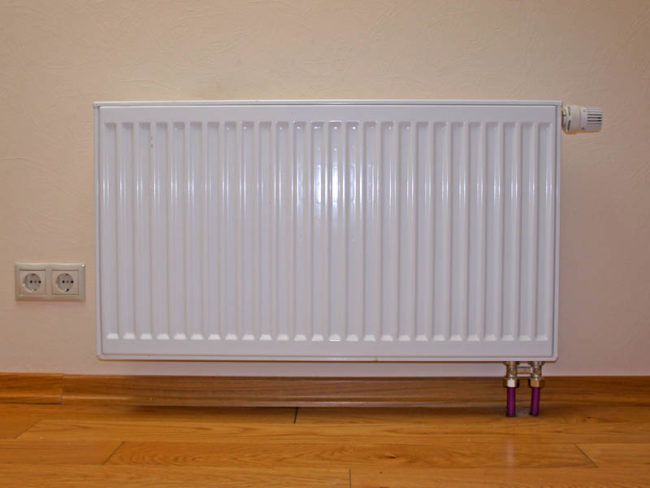
Steel radiator in an apartment - photo
These products belong to the new generation of batteries and come in two types: panel tubular.
Steel radiators are characterized by high heat transfer, increased energy saving, and high efficiency. The design consists of two steel plates connected by welding. These products are manufactured with two types of connection: side and bottom. The choice depends on the original location of the heating circuit. Their high popularity in the market is due to their light weight, ease of installation and attractive appearance. When purchasing, be sure to carefully examine the coating, as this affects further operation.
Tubular radiators are a structure consisting of several sections fastened together by welding. Depending on the area of the room and the heating effect, it is necessary to calculate the power of the finished module and select the optimal size. Tubular steel batteries are characterized by excellent heat dissipation, a high level of performance characteristics and a low price.
One of the advantages of these radiators is also their main disadvantage, if you turn off the heating system - steel radiators very quickly lose their heat and, on the contrary, “help” the ambient temperature to cool the temperature of the liquid in the system. If cast iron radiators remain warm for a few more hours, their steel counterparts will become cold within 15-20 minutes.
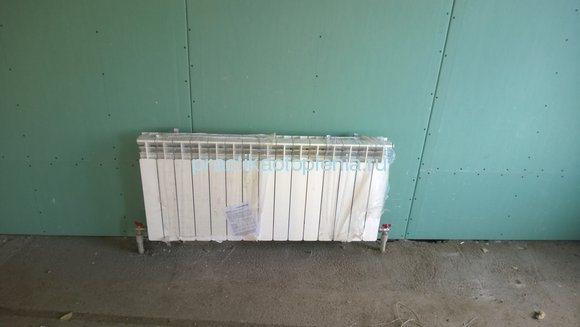
Aluminum radiators
Aluminum battery for 10 sections
Made from aluminum alloy and painted with powder enamel. Due to their high heat transfer capacity, such batteries quickly and efficiently warm up the room. Smooth, aesthetically pleasing and lightweight. They are very popular on the market today, but they also have a number of disadvantages.
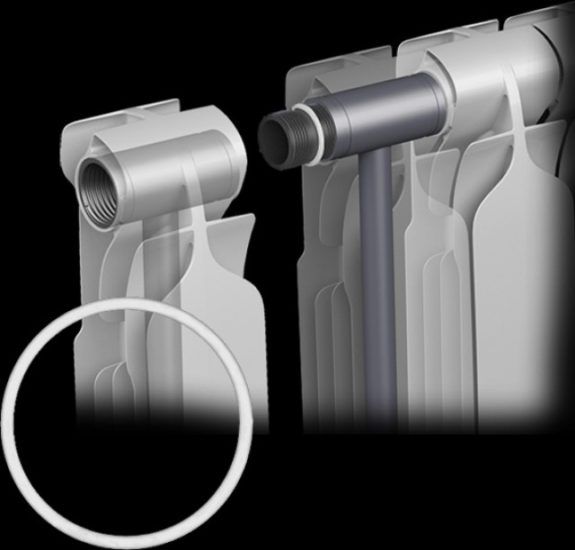
The connection of individual sections is made using the coupling thread method, which allows for fairly quick installation of the battery. The high tightness of aluminum batteries is achieved through the casting method. Each section is cast in a separate mold and then joined into one overall structure.
Due to the chemical properties of the metal, aluminum radiators are not able to withstand the high pressure that is often created in central heating systems. Therefore, for installation in an apartment with a central heating system, it is better not to use these thin batteries. They are more suitable for a private home with a self-regulated level of water pressure in the system.
Bimetallic radiators
Bimetallic radiator design
These products occupy one of the leading positions on the market today. Made from high quality alloys, they are of double construction. The outer layer of the panel is made of aluminum, which ensures lightness, excellent appearance and high heat transfer. And the core of the structure is made of an alloy of metals that are resistant to corrosion and high pressure drops.
Thus, bimetallic batteries combine the best technical solutions from steel and aluminum radiators. The only drawback of these products is their high cost, which, however, is justified by their long service life and excellent energy-saving factor.
High technical properties and attractive appearance allow them to be used as an easily controlled and efficient heating system for an apartment.
Another undeniable advantage is the ability to independently determine the number of sections. Based on your needs, the area of the room and the required volume of heated air, you can personally assemble a radiator consisting of at least three or thirty-three sections, which, naturally, is not available when choosing cast iron or aluminum analogues.
Stages of work
If you decide to do the battery installation work yourself, you need to know what steps the process involves.
The instructions for carrying out such work divide it into:
- Preparation of materials and equipment.
- Location calculation.
- Installation of brackets.
- Production of the actual installation.
- Soldering or sealing the joint.
- System check.
Preparatory stage
This stage applies to all types of construction work. First of all, pay attention to what type of system your heating system is. They come in single-pipe and double-pipe. If you are the owner of a one-pipe heating system, you will need to additionally purchase a bypass, which will allow you, if the need arises, to turn off any part of the system without resorting to completely shutting it off.
These operations are not recommended to be performed in winter, especially in severe frosts - this is unsafe. Even if you decide to do all the work yourself, you will still have to call a plumber from the housing office to disconnect your apartment from the common riser. In preparation for installing the system, you will need to purchase or find the following tools and additional materials, such as:
If you still choose, for example, cast iron batteries, you will probably have to purchase Mayevsky taps and install them yourself. In bimetallic and aluminum sections they are already built-in. This device allows you to bleed excess air from the system and maintain its functionality, preventing airing.
How to install correctly
Installation of a battery, including a bimetallic one, has a number of rules. You must determine for yourself the parameters that must be adhered to.
Mounting the battery to the wall
You should know that the battery is attached taking into account the distance from all surfaces and planes next to which it is located. To ensure the necessary air flow to the system, you must leave a gap of at least 10 centimeters from the floor. In order for the air to spread evenly throughout the room from the window sill to the radiator, it is also necessary to leave a space of 10-15 centimeters. The distance from the wall to the radiator should not be less than 3 centimeters.
So, you already understand how to fix the heating radiator correctly and place it in the appropriate niche, but in addition to the indentations, you also need to know other nuances. You must maintain the correct angle of inclination, calculate the required number of sections and brackets. Very often people come to the store and do not know certain parameters, without which the choice of quantity does not make sense and is done at random. We do not encourage such experiments, since you can buy fewer materials, which will lead to the system not being able to cope with heating the room and you will be cold. The next part of the article is devoted to issues of correct calculation.