Living in a private house, you want to create maximum comfort for your family, ensuring a high standard of living, so it is very important to think in advance about such an important issue as sewerage. You can do sewerage in a private house with your own hands. This article will help you complete all the work correctly, competently and without harm to the environment.
When you independently build a sewer system in a private house, you can save a lot, but it is very important to carry out all the work correctly, in accordance with all the requirements for construction and installation work of this kind.
The choice of sewer system layout should be made in accordance with the layout of a particular house. When planning a house, it is recommended to provide for compact placement of rooms for which water supply and drainage will be provided (showers, bathrooms, laundries, bathrooms and kitchens). But the best option would be a placement in which all plumbing equipment will be tied to one pipe (collector), through which wastewater will flow into a cesspool or septic tank.
Experts advise that if you have a large house, which has several different rooms with drainage and supply of water located in different parts of the building, to give preference to a sewer system design that will have at least two (and sometimes more) cesspools or septic tanks. In addition, if your house has two or more floors, and bathrooms, toilets and kitchens are located on different floors, then in this case you will need to install risers.
Types of sewerage
All work on the construction of sewerage in a private house comes down to the arrangement of external and internal sewerage. Internal sewerage work includes installation of a drain pipe, riser and pipe distribution to rooms such as a shower room, kitchen, toilet, etc. External or external sewerage includes everything that is located outside the house, that is, a system of pipes running from home to a deep cleaning station (a rather expensive ready-made solution) or to a homemade septic tank (with a filtration field or storage).
Of course, if you have the opportunity to connect to a centralized wastewater disposal system, the task will be greatly simplified. But this article will consider precisely an autonomous system, including the effective treatment of wastewater in a septic tank, and such a primitive method as a cesspool.
Internal sewerage
First of all, it is necessary to deal with the internal circuit. Even at the stage of designing a house, it is necessary to think about ensuring that all the rooms to which the sewage system will be connected are located as close as possible to each other, since subsequently this approach will significantly simplify the arrangement of the internal sewerage system. Each house requires an individual sewerage system, which can be very diverse.
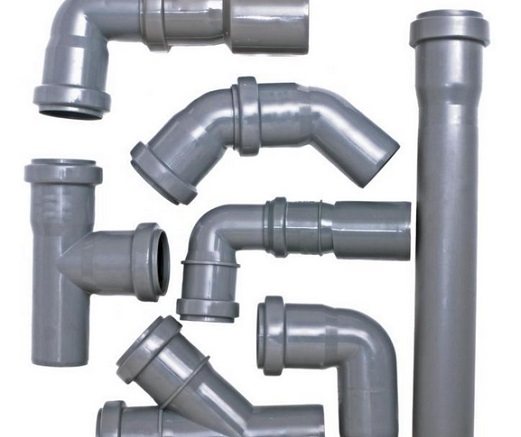
In this case, one should take into account the fact that in the toilet, pipes with a diameter of 100-110 mm must be used to drain wastewater. For gray waste that will flow into the sewer from the kitchen or bathroom, PP or PVC pipes with a diameter of 50 mm should be used. All turns must be made using two plastic elbows bent at an angle of 45 degrees, as this will further minimize the possibility of clogging, which is quite problematic to remove.
It is more reliable and cheaper to use polyvinyl chloride (PVC) or polypropylene (PP) pipes in the sewerage system, as they are more durable, more reliable and cheaper than cast iron. And besides this, installing an internal sewage system using such pipes is much easier.
First of all, you need to decide where exactly the collector pipe or riser will be located, and only then do further wiring from it.
But before that, you should more accurately understand how you can independently develop a sewerage scheme for your home, because in the future, using this scheme, it will be possible to make a full calculation of everything (plumbing equipment and materials) that you will need to arrange a sewerage system.
You can make a sewerage diagram on a piece of checkered paper, but it is advisable to purchase several sheets of graph paper for this task. In addition, you will need a tape measure, a ruler and a sharp pencil.
For a private house, the sewerage diagram is drawn up in the following sequence:
- First you need to draw up a plan of the house to scale. If you don’t know the dimensions of the house, you will have to walk around with a tape measure and measure everything;
- Next, you need to decide where the risers will be located;
- after this, it is necessary to mark on the plan the locations of plumbing fixtures and decide how they will be connected;
- at the next stage, you need to mark the pipes that will go from the fittings and riser to the plumbing fixtures, as well as all connecting elements (tees, bends, etc.);
- everything listed above should be done for each floor of your house;
- then you need to decide on the dimensions of the fan pipe and riser;
- now all that remains is to sum up the length of all the pipes related to the internal sewage system;
- the next stage will be the external system, at which it is necessary to draw up a diagram of the external sewerage system, which includes pipes running from the deep treatment station or septic tank to the outlet. Do not forget to take into account all existing SNiPs.
Important points when choosing
External communications are very difficult to install, and even more difficult to redo the work. Therefore, before choosing a material, pay attention to:
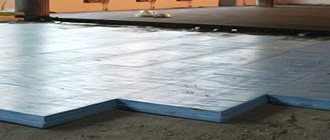
- The type of soil on your land. The best option is sand. Any type of plastic is suitable for it. Such a water supply system will serve reliably, because the soil pressure on it is minimal. Mixed clay and sandy areas are also not an obstacle to installing plastic. Dense clay significantly increases the load on the canal. Here you should give preference to corrugated products. They withstand soil pressure much better than a straight PVC pipe. But rocky terrain is often not conducive to installing plastic. After all, dense soil masses can crush a rather fragile pipe. Here it is better to use more durable materials, or combine cast iron with plastic. This will increase the cost of laying communications;
- Budget for outdoor pipes. Excessive savings can cause problematic pipeline operation. If you use simple material, do not forget about insulation and insulation of the pipe. Otherwise, the water supply will only work effectively in the summer. Choose those types of sewer pipes that are affordable within your budget. But don't skimp on the little things.
You might be interested in this:
- What pipes should be used for pressure and storm sewerage
- Is it worth using ceramic pipes for sewerage?
- How to cut a cast iron pipe into a plastic sewer pipe
Sewage pipes
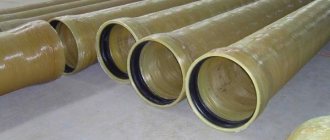
Since the conditions inside and outside the house are very different, the pipes used for these two sewerage schemes are different. Currently, PP and PVC pipes, which have a characteristic gray color, are most often used for laying internal sewerage pipes. For sun loungers and risers, the diameter of such pipes is 110 mm, and for drainage - 40 and 50 mm. But do not forget that these pipes are intended only for internal sewerage, and for external sewerage it is necessary to use other solutions.
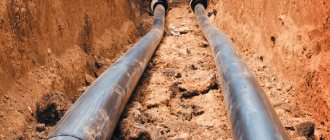
Most often, the pipes that are laid underground from a deep treatment station or septic tank to the outlet are painted orange, which can be explained very simply - bright orange is more noticeable in the ground compared to the rest. But pipes for external sewerage differ from others not only in color - they are subject to completely different requirements.
Such pipes have greater rigidity, since they will have to withstand significant loads while underground. There are also more durable structures, an example of which is double-layer corrugated pipes. But the depth of laying pipes when constructing a sewerage system for a private house is usually small (most often up to 2 meters), so there is no need to use such pipes. Red pipes most often have a diameter of 110 mm, this should be sufficient to drain wastewater from the house.
Next, all the advantages and disadvantages of pipes made of various materials will be considered, among which will be only the most frequently used:
Cast iron
Advantages: able to withstand heavy loads, durable and strong.
Disadvantages: expensive, heavy and fragile, roughness can form on the inside due to corrosion, which can cause a blockage.
Polypropylene
Advantages: lightweight and flexible, making them most popular for indoor sewerage. They can withstand high wastewater temperatures without problems.
Disadvantages: if used as intended, there are no disadvantages.
Polyvinyl chloride
Advantages: similar to cast iron, inexpensive and lightweight. Most often used for external sewerage.
Disadvantages: they do not tolerate high temperatures of wastewater, they are fragile (they do not bend, but crack).
You have JavaScript disabled.
1. In paragraph 4.10 of the no longer valid SNiP 2.04.03-85 Sewerage. External networks and structures, requirements for the selection of bases for pipes are formulated more specifically:
“The type of foundation for pipes must be taken depending on the bearing capacity of the soil and loads:
- In all soils, with the exception of rocky, quicksand, swampy and subsidence type I, it is necessary to provide for the laying of pipes directly on the leveled and compacted bottom of the trench (that is, on a natural foundation - see paragraph 2.1 SP 129.13330.2011 External networks and structures of water supply and sewerage and set of rules SP 45.13330.2012 Earthen structures, foundations and foundations - approx. );
- In rocky soils, it is necessary to provide for laying pipes on a cushion at least 10 cm thick from local sandy or gravelly soil, in muddy, peaty and other weak soils - on an artificial foundation " (see also the similar requirements of paragraph 11.30 of SP 31.13330.2012 Water supply. External networks and buildings).
2. Detailed requirements for pipeline foundations, valid for all underground sewer networks, are formulated in paragraphs 3.34 - 3.50 of the Technical Guidelines for the design and construction of rainwater drainage (the document is referenced in paragraph 8.3.1 SP 401.1325800.2018 “High-rise buildings and complexes. Rules for urban planning” :
- «3.34. The type of foundation for drainage water pipelines is selected in each specific case, based on the geological and hydrogeological conditions of the construction site, the size and design of the pipelines, and the operating loads.
- 3.35. Pipelines are laid either directly on the ground or on an artificial base.
- 3.36. Pipes are usually laid on a natural foundation. However, if the bearing capacity of the soil is insufficient (standard soil resistance is below 1.5 kg/m2) lying under the pipelines, there is a need to construct an artificial foundation.
- 3.37. Natural bases for pipes can serve as: medium and coarse-grained sands, dry sandy loams, fine and coarse gravel, sand mixed with crushed stone or pebbles, clays and heavy loams in the absence of aquifers in their thickness, as well as rocky and similar ones. rock strength.
- 3.38. When laying pipes on the ground, it is necessary that it remains in a natural (undisturbed) and dry state at the bottom of the trench. A bed for pipes of large diameters is arranged simultaneously with their laying in such a way that it is well leveled and the pipe throughout its entire length is in close contact with the soil of an undisturbed structure of at least 1/4 of the circumference.
- 3.39. In rocky soils, pipes are laid on a sand cushion with a thickness of at least 100 mm.
- 3.40. In subsidence soils, all pipes are laid directly on the soil, compacted to a depth of 200-250 mm, with preliminary soaking of the soil with water.
- 3.41. In water-saturated soils that release water well, pipes are laid on a layer of crushed stone, gravel and coarse river sand 150-200 mm thick with drainage trays to drain water.
- 3.42. Artificial foundations for pipelines are made of: sand and gravel, crushed stone, concrete, reinforced concrete and reinforcement clips. Concrete and reinforced concrete foundations can be monolithic or prefabricated.
- 3.43. In silty and peaty soils, in quicksand and other weak soils, pile foundations (grillages) are installed for pipes of all diameters , and pipe joints are sealed with elastic materials.
- 3.44. If under the pipeline there are soils with standard resistance (at least 1 kg/cm2), but with possible uneven settlement (freshly poured soils, places of contact of soils with sharply different physical and mechanical properties), then a monolithic reinforced concrete foundation is installed.
- 3.45. The dimensions of concrete foundations must be taken from the condition of ensuring the construction of a concrete chair with a pipe wrap angle of at least 90° and pressure on the ground within the permissible values.
- 3.46. Prefabricated reinforced concrete foundations, consisting of BO-3 and BO-4 blocks, are used when laying pipes with a diameter of 3000-3500 mm. NIIMosstroy has developed a design for a fully prefabricated base for pipes with a diameter of 2000-3500 mm, consisting of two standard elements - transverse beams and rand beams.
- 3.47. To lay drains at a depth exceeding the permissible backfill height, you can use pipes of normal strength with a reinforced concrete base (clip).
- 3.48. Reinforcement clips are also used when laying pipelines under roads, if the backfill under the pipe is less than 700 mm.
- 3.49 When laying a pipeline from reinforced concrete rings with a length of 1000-1500 mm, a concrete preparation device is mandatory in all cases, primarily for above-ground overlap of joints from below.
- 3.50 The main design solutions for laying underground non-pressure pipelines are given in the standard design Series 3.008.9-6/86 “Underground non-pressure pipelines made of asbestos-cement, ceramic, plastic and cast iron pipes. Issue 0. Materials for design" and standard project series 3.008-4 "Prefabricated reinforced concrete free-flow round pipes", vol. 1".
3. Thus, when designing external sewer pipelines, foundation calculations are required only for artificial foundations, the need for which is caused by the low standard resistance of natural soil (see also paragraphs 9.2.1 - 9.2.3 SP 66.13330.2011 Design and construction of pressure water supply and sewerage networks with using high-strength nodular cast iron pipes). Instructions for calculating the foundations of buildings and structures are contained in section 5 of SP 22.13330.2011 Foundations of buildings and structures and SP 50-101-2004 Design and installation of foundations and foundations of buildings and structures.
4. Without carrying out calculations and constructing a foundation, in addition to the above Series 3.008.9-6/86, it is possible to use the following materials:
- Album SK 2108-92 “Album SK 2108-92. Underground pressure pipelines made of plastic pipes. Materials for design";
- SK-41/11 Designs of non-pressure pipelines for rainwater and domestic sewage systems using corrugated polypropylene pipes with a two-layer wall “Pragma” (https://tk-i.ru/wp-content/uploads/2014/10/PipeLife_solution_for_pipes.pdf );
- Album SK 2111-89 Underground non-pressure pipelines made of asbestos-cement, ceramic and cast iron pipes. Design materials;
- SK 2417-06 “Designs of non-pressure pipelines for domestic and storm sewerage using polyethylene pipes with a two-layer profiled wall “Corsis”” (https://integra-chita.ru/all_docs/docs20091222095457.PDF);
- Album SK 2103-84 Underground non-pressure pipelines made of plastic pipes. Design materials;
- Album SK 2104-86 Underground pressure pipelines made of asbestos-cement and cast iron pipes. Design materials;
- Album SK 2101-84 Pipeline structures made of pressure reinforced concrete pipes DN = 500 - 1600 mm. Design materials;
- Album PS-347 Underground non-pressure pipelines made of spiral polyethylene pipes Dу = 600 - 1800 mm. Design materials;
- Album SK 2102-89 Designs of non-pressure pipelines for domestic and storm sewerage using reinforced concrete pipes DN = 400 - 3500 mm. Design materials;
- Album PP 16-12 Laying sewer networks on artificial foundations.
6. We recommend that you pay attention to the following materials:
- R NOSTROY 2.17.7-2013 External engineering networks. Sewerage and drains. Recommendations for the design, installation, operation, repair and disposal of pipelines made of polyolefin pipes with a structured wall (available for review at: https://files.stroyinf.ru/Index2/1/4293772/4293772379.htm);
- SP 40-102-2000 “MSP 4.01-101-2000. Design and installation of pipelines for water supply and sewerage systems made of polymer materials. General requirements";
- VSN 20-95 “Departmental construction standards for the design and installation of underground sewerage and water supply networks made of polyvinyl chloride pipes” (including clause 2.5);
- Recommendations for the calculation and design of pipelines made of thermoplastics;
- “Sewerage. Textbook for universities. Ed. 5th, revised and additional M., Stroyizdat, 1975. S. V. Yakovlev, Ya.A. Karelin, A.I. Zhukov, S.K. Kolobanov (including § 34 “Foundations for pipes and collectors laid in an open way”)” (https://www.proektant.org/books/1975/1975_Yakovlev_S_V_Kanalizaciya_Uchebnik_dlya_vuzov_Izdanie_5 .pdf).
Pipe laying
Probably the most labor-intensive process when constructing an autonomous sewer system in a private house with your own hands is the routing and laying of pipes. If you decide to do this work yourself, be sure to call someone for help, as this will affect not only the quality of the work, but also the speed. It is also recommended to first check the tightness of the system by flushing it with clean water, and only then, having made sure that all seams are secure, you can begin full operation.
Pipe connection
It was said earlier that the simplest option would be to use PP or PVC pipes for sewerage. Currently, there are a large number of offers of these products on the construction market, so it will not be difficult for you to find revisions, tees, elbows and plastic pipes that are securely and easily connected at the joints due to the presence of rubber cuffs.
If desired, all joints can be additionally treated with a special plumbing sealant. And in those places where labor passes through a wall or ceiling, it is recommended to install a sleeve.
It is also necessary to remember about the slope of the pipes. In accordance with SNiP, in a free-flow system, the angle of inclination of the pipe depends on its diameter. For example, for a pipe with a diameter of 50 mm it is necessary to create a slope of at least 3 cm per meter, and for a pipe with a diameter of 110 mm - at least 2 cm per meter. Do not forget about this, since you will need to place different points of the pipeline at different heights to ensure the required slope.
Sewer outlet
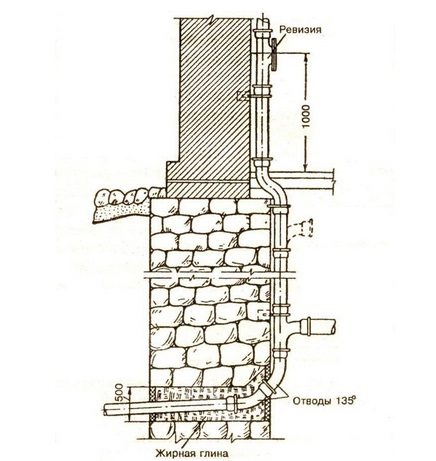
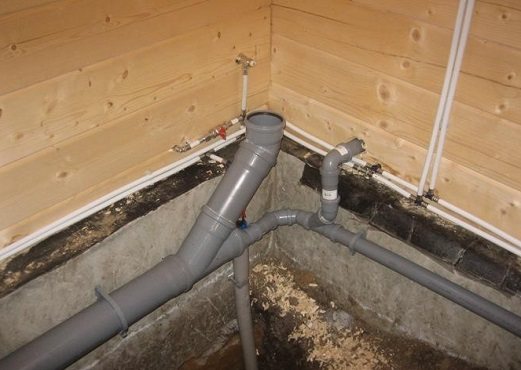
In order not to encounter a discrepancy between the internal and external sewerage systems, it is necessary to begin the installation of sewerage in the house from the outlet. The outlet is the boundary part of the sewer system that connects the pipe leading to the septic tank with the pipe that leaves the house (riser).
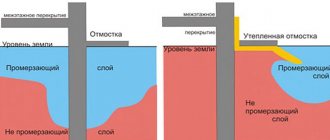
The outlet must be installed through the foundation at a depth exceeding the soil freezing depth that corresponds to your region. You can install the outlet higher, but to do this you will need to insulate the pipe so that it does not freeze in winter. If this is not done, then there is a high probability that you will only be able to use the toilet in the spring, after the weather warms up.
If this was not taken care of during the construction of the foundation, then you will need to punch a hole in the foundation into which the outlet pipe with the sleeve can fit. A sleeve is a small piece of pipe whose diameter is larger than that of a sewer pipe (130-160 mm). Such a sleeve should protrude at least 15 cm on both sides of the foundation.
Summarizing the above, we can say that at this stage you need to make a hole in the foundation (if it is not there) and insert a sleeve with a pipe into it. Do not forget that the diameter of the outlet pipe must be no less than the diameter of the riser. And the sleeve is needed in order to set the required slope of the pipe towards the septic tank (2 cm per meter).
Pipe routing and riser installation
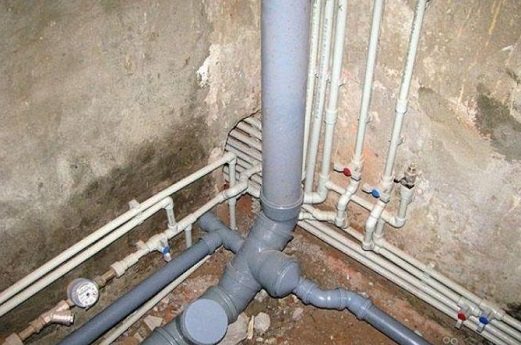
It is best to place the riser in the toilet, since the recommended size of the pipe that goes from the toilet to the riser is 100 mm. It can be mounted either openly or hidden, depending on how the pipes will be mounted - in special boxes, walls, channels and niches or next to walls (fastening with pendants, clamps, etc.).
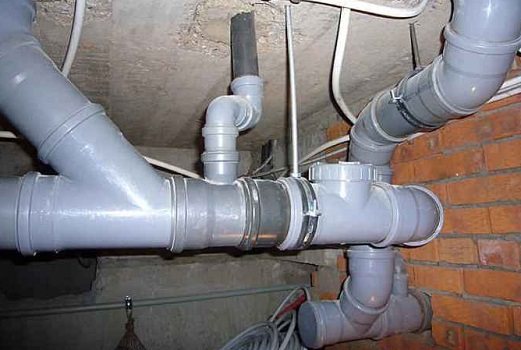
In order to connect sewer pipes to the riser, oblique tees should be used, and adapters should be used at the joints of pipes that differ in diameter. Where pipes from sinks, bathtubs and showers intersect, it is necessary to install a collector pipe with a diameter of 100-110 mm. Also, don't forget about water seals, which will help protect your sense of smell from unpleasant odors.
It is imperative to install a special tee (inspection) on each riser, with the help of which it will be possible, if necessary, to clear the blockage. In order to avoid having to carry out sewer cleaning work in the future, it is necessary to install cleaning after each turn.
Internal sewer system
Installation of plastic sewer pipes included in the internal sewer network of a house or apartment is carried out taking into account the following points.
Namely:
- To connect to the sewer riser or the toilet sewer outlet pipe, a plastic sewer pipe with a diameter of 100 mm is used.
Other sources of waste, such as a bathroom, sink, sinks, bidets, are connected to the riser using pipes with a diameter of 50 mm. Burying a pipe into a wall - A special glue is used to connect polyvinyl chloride sewer pipes. The glue is applied to the previously degreased and cleaned surfaces of both pipes being connected (on the outer surface of one pipe and on the inner surface of the second pipe or fitting), after which the pipes are pushed tightly and without rotation into each other.
- Plastic sewer pipes connected in this way are laid with a slope of no less than 2 and no more than 2.5 cm towards the drain.
Fastening of internal sewerage
Note! A smaller slope of the pipe leads to the formation of blockages in it. And in a pipe laid with a large slope, due to an increase in the speed of movement of wastewater, the self-cleaning process is disrupted - due to the separation of the drain, heavier particles settle at the bottom of the pipe, which over time also leads to blockage.
- Installed sewer pipes must be secured. To do this, we use special clamps for fastening sewer pipes - their diameter must correspond to the diameter of the sewer pipe.