general information
Dachny basement siding is installed on the sheathing.
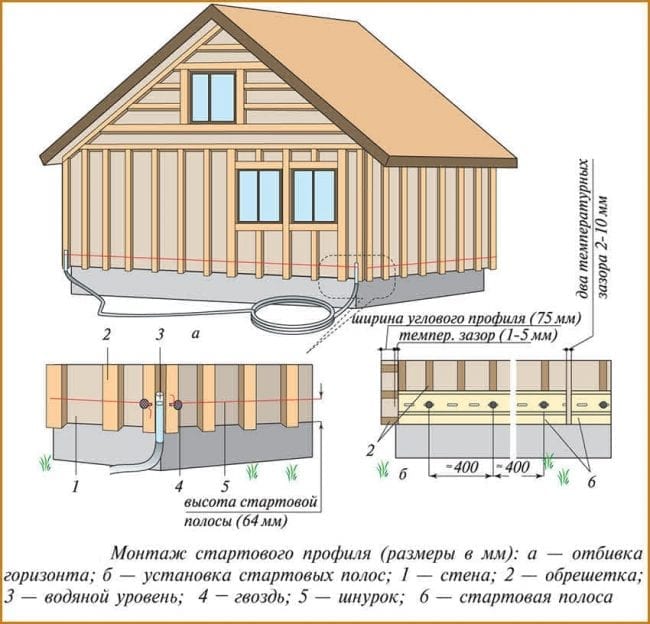
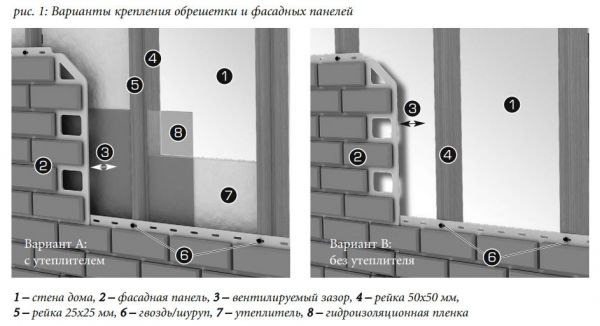
It is fixed horizontally over the entire surface of the walls, individual bars are installed around the openings of windows and doors, along the upper and lower edges of the cladding, and at the corners of the building (vertically). For the sheathing, wooden blocks of 40x40 cm are used. They are pre-impregnated with an antiseptic and fire retardant. Wood moisture content is up to 20%. For the first row, the distance between the bars is 43.5 cm for facade panels of the “Wild Stone” series and 42 cm for the “Large Stone” series. Subsequent bars are fastened in increments of 44 cm. Insulation can be placed between the sheathing bars, and other insulating elements can be placed underneath them. The façade panels are high. To make the cladding more rigid, employees recommend installing additional horizontal slats between the main sheathing bars. When installing bars and slats, check the correctness of their position horizontally and vertically. They should form a flat plane.
Fasteners for facade panels are nails or self-tapping screws made of galvanized steel. The length of the leg is such that it fits into the sheathing bars at least 3 cm. The cap is wide, 9-10 mm, the leg is 3 mm.
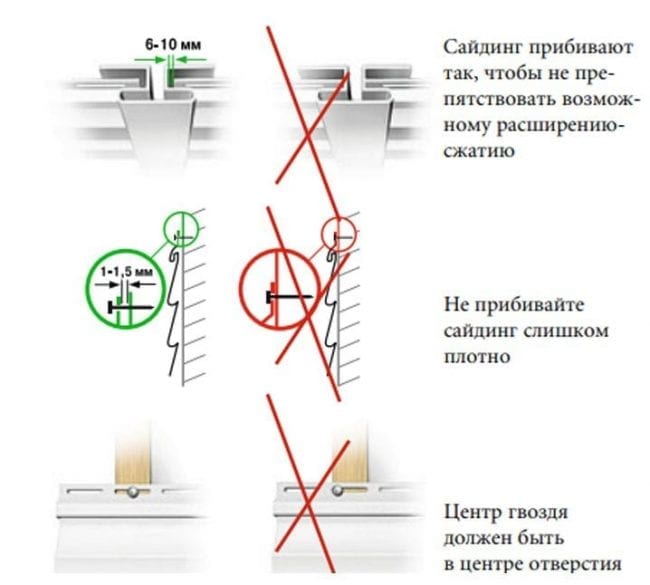
The Dachny base siding and its components are fastened through perforation holes (made along the edges of each element). The leg of the fastener must fall strictly into the center of the hole and enter perpendicular to the plane of the cladding. It is not allowed to hammer nails or screw in screws at an angle, skew, or bend them.
Facade panels are not fixed rigidly: the fastener must fit so that a temperature gap of 1-1.5 mm remains between its head and the surface of the basement siding (see Fig. 4). Each panel is fixed at least at five points.
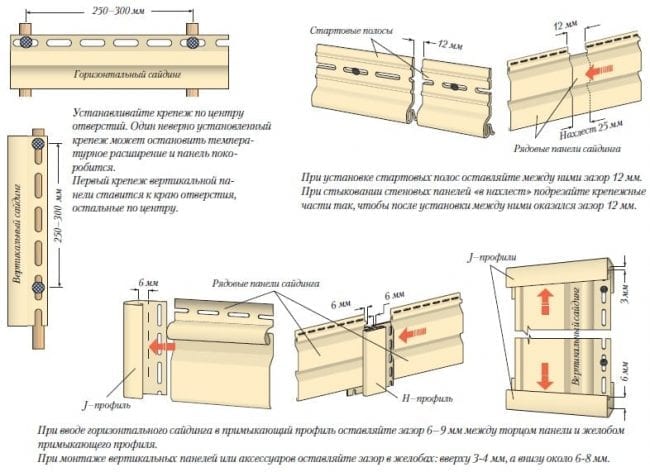
Country base siding is made of polypropylene and can slightly change linear dimensions when heated by sunlight or cooled in winter. To avoid deformation due to temperature changes, compensation gaps are left between the ends of the row panels and the components during installation. If work is carried out in summer, the gap is 5-6 mm. At negative temperatures it is increased to 9-10 mm. Installation is possible at temperatures down to -10° C. When carrying out work in cold weather, the basement siding is first kept warm for 10 hours (in a heated room, but away from heat sources).
Fastening vertical profiles, corners, slats starts from the top. The leg of the fastener should be located at the top edge of the hole so that the element hangs on it. The remaining fasteners are placed in the center of the holes (see Fig. 6). The fastening step is no more than 25 cm.
The order of fastening row panels on the main surface of the walls is shown in Fig. 3. They are placed horizontally, starting from the bottom row, moving from left to right.
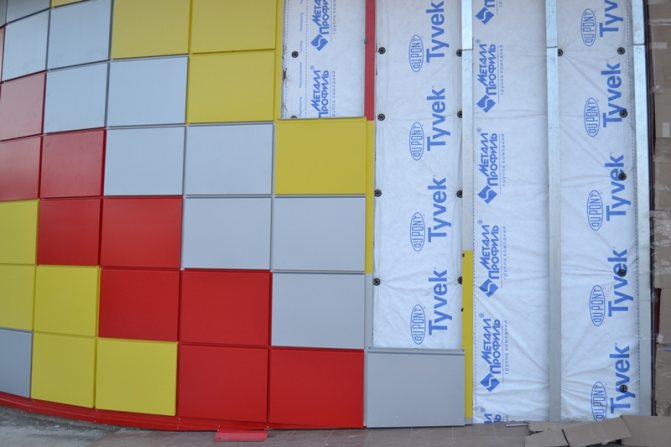
Facade cassettes: scope of application and features of cladding
Each element of this facade cladding is a completed metal structure curved on the sides. They are manufactured on an automatic line; the process involves cutting out sheet steel with a polymer coating and subsequent stamping of the metal. The most popular are rectangular and square cassettes, but their shape can be any: trapezoidal, triangular or any complex shape. To give the facades an aesthetic and complete look, various 3D configuration elements are used, for example, vertical and horizontal corner cassettes.
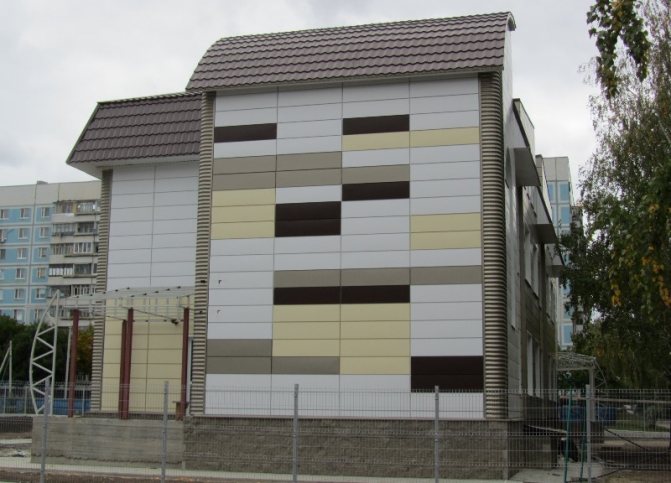
Various shapes and sizes of the material allow the formation of curtain facades on objects of any architectural form. Cassette cladding gives buildings a spectacular and expressive appearance. The facade has an attractive cellular structure, emphasized by rustication between the cassettes, which creates the effect of visual volume.
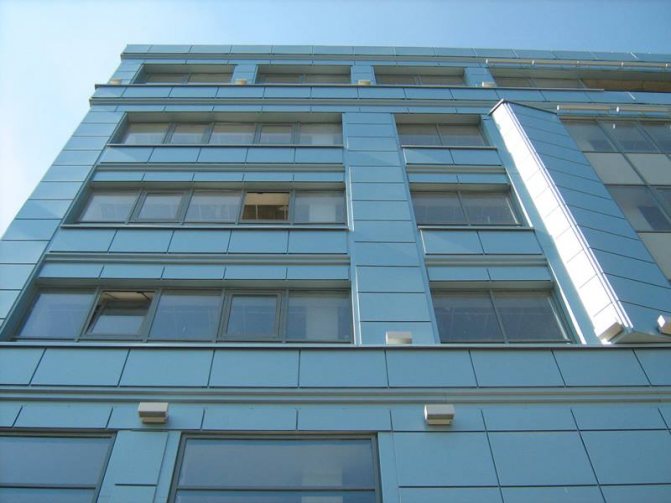
Thanks to its modular structure, the cassette facade will help to implement any modern architectural idea and create a facade of any color. produces cassettes of any shades from the RAL palette, as well as metallic shades. Bright, unusual facades make buildings of even the simplest shapes unique and expressive and are capable of turning a typical urban development into a unique one. This opens up wide opportunities for the implementation of new ideas and for the renovation of existing buildings.
Design features
Puzzleton facade cassettes are available in versions with hidden and open (Puzzleton Z) fastening systems. Hidden fasteners, implemented by hooking the upper cassette onto the lower one, ensure a perfectly smooth surface. Standard cassettes have one fixed size in height (H) or width (W), where the second corresponding size can be in the range from 470 to 1500 mm. If necessary, they can be trimmed during installation using special electric scissors. The cut areas after trimming are aesthetically hidden with cassette strips. The standard cassette depth is 25 mm, the amount of rust can vary from 5 to 30 mm. The supporting frame uses a vertical hat profile, which can be covered with a decorative strip of any shade. This provides the façade with a holistic appearance.
Cassettes with an open fastening system are mounted on the load-bearing subsystem of the facade in an open way, using hardware. They are matched either to the color of the cladding or in contrast to it. The design is adapted for the simplest and fastest installation, and the flanges of the cassettes are bent for fastening with hex head screws.
The standard Puzzleton and Puzzleton Z dimensional grid developed by the manufacturer can satisfy almost any need, but if the order is completely unusual, then the Metal Profile Company will produce facade cassettes of any non-standard size.
The material for the production of Puzzleton cassettes is hot-dip galvanized cold-rolled steel with a thickness of 0.7 or 1.2 mm, with zinc coating and several types of polymer coating: PURMAN, Colorcoat Prisma, PVDF Matt or polyester.
Stable geometry
Some architects are distrustful of façade cassettes because they are afraid of the so-called “lens effect” - deflection of the panels, due to which the facade loses its aesthetic appeal and takes on a sloppy appearance. Such a problem really existed, and façade systems produced using outdated equipment and low-quality steel still suffer from this drawback.
However, Puzzleton cassettes are completely free of this defect. Their characteristic feature is their perfectly calibrated geometry, thanks to which the facade turns into a system with parameters that are stable throughout its entire service life. This result was achieved thanks to the use of the most modern equipment and advanced metal processing technologies, as well as due to its high quality. Even with an increased size and minimal thickness of the steel sheet, Puzzleton cassettes do not have a lens effect, have an ideal plane and stable geometry. They do not deform during operation either.
Cladding with facade cassettes
The assembly of façade cladding begins with attaching shaped products - painted decorative strips - to the vertical hat profiles of the load-bearing subsystem. At the same time, flashings are attached along the lower edge of the facade.
Before installing the cassettes themselves, it is necessary to remove the protective film from their sides. Installation of Puzzleton cassettes with hidden fastening is done from the bottom up. The lower part of the panels is snapped onto the starting strip, the upper part is fixed with galvanized screws to the vertical supporting profiles. The second and subsequent rows of cassettes are snapped with the bottom part behind the top of the previous row. To maintain the same width of the vertical rustication, use a template.
Cladding with Puzzleton Z façade cassettes with open fasteners is carried out from bottom to top and from left to right. The panels are attached to the vertical supporting profiles with self-tapping screws with a colored head.
Upon completion of cladding with façade cassettes, the protective film is removed from the front surface of the elements.
Facade cassettes are a modern, technologically advanced and aesthetic type of cladding for suspended ventilated facades of buildings of any type, including complex architecture. Thanks to their advantages, they allow you to implement almost any visual concept. Modern cassettes, such as Puzzleton, do not have a lens effect and are distinguished by ideal geometry that is maintained throughout its entire service life.
The categories mentioned in the article are:
Facade
Installation of basement siding Dachny
The cladding elements are installed in the following order:
- starting bar;
- corner elements, auxiliary profiles;
- ordinary panels.
Installation of the starting strip:
- located along the lower edge of the cladding, along the entire perimeter of the building;
- fastened strictly horizontally (checked by building level);
- interrupted by 30 mm at the edges at the corners of the building 30 cm from them to avoid temperature deformations (Fig. 1);
- The mounting lines of the planks are checked at each corner (must be on the same level and coincide);
- the bar is placed at the level of the first bar of the sheathing;
- fastening is carried out in increments of 30 cm.
If the foundation line is uneven, cladding is performed without installing a starting strip. To do this, the panels are cut at the bottom. Holes similar to perforation holes are drilled in their lower part. The panels are attached to the wall material.
Installation of external corners:
- at the corners of the building, the cladding is assembled from several corner elements installed one above the other;
- The lower outer corner is attached first. It is installed on the starting strip, nails are driven into the upper perforation holes at their upper edge or screws are screwed in;
- the second and subsequent corners are inserted into the locks of the lower element and secured at the upper edge (Fig. 2.);
- each of the corner elements is attached at least 6 points (three screws or nails on each side);
- the fasteners should not press the corners tightly against the sheathing (a gap of 1-1.5 mm is left between the head and the surface of the cladding). The corner elements should move slightly - this will protect them from deformation due to temperature changes.
Installation of internal universal corner:
- installed at the junction of walls approaching each other at right internal angles;
- attached to the sheathing through perforations in the same way as an outer corner;
- The façade panels that fit the corner are fixed in its grooves, as shown in Fig. 5.
J-profiles can be used as a frame for door and window openings and a finishing strip (see Fig. 6, 7).
Installation of row panels:
- the first row is installed on the starting bar;
- the panels are connected to each other and to the starting strip using L-shaped locks (located on the inside);
- The first panel is inserted into the starting strip with its lower edge, moved to the corner, leaving a temperature gap. The next panel is inserted in the same way and connected to the previous one using grooves (see Fig. 2, 3);
- The first and last panels in a row are installed with preliminary trimming. It is performed at right angles so that the seam lines in adjacent rows do not coincide, and the last panel in the row is longer than 30 cm;
- the remaining scraps can be used as the beginning or end elements of subsequent rows;
- Before trimming, the panels are assembled in a row; fastening with nails or self-tapping screws is not performed. Mark cutting lines;
- if the edge of the panel goes under the outer corner, it is cut at a right angle in place.
After finishing is completed, additional elements (canopies, shutters, etc.) can be installed on the façade. To install them, holes similar to perforation holes are drilled in the basement siding. They are placed so that the fasteners fit into the sheathing bar.
Mounting methods
Finishing the facade with metal cassettes is done in two ways:
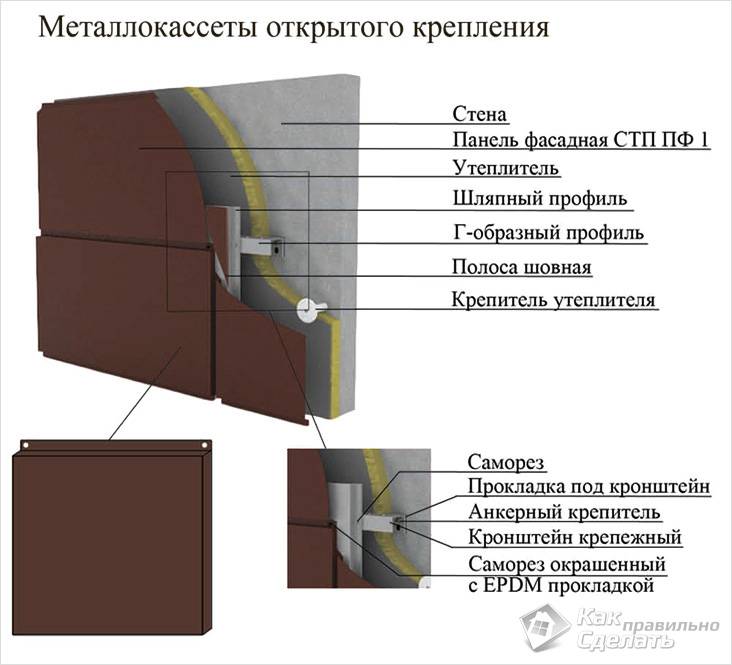
Open mount
- Open fastener. Facade cassettes, made for visible fasteners, have bent edges with perforations. Each panel is attached separately using self-tapping screws. The cassettes are overlapped and attached to the vertical posts of the frame. This option makes it easier to carry out repairs in the future.
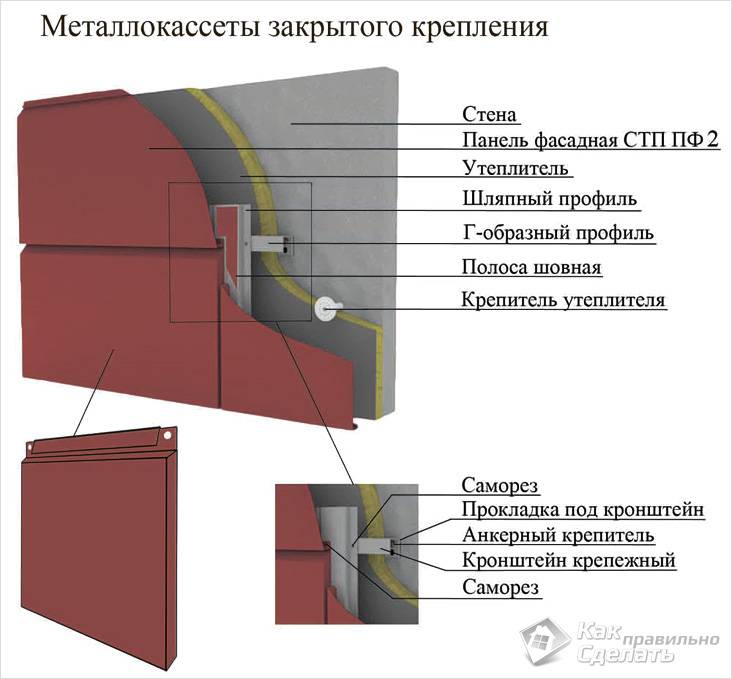
- Hidden fasteners. The method is used for thin panels, their upper part is screwed with self-tapping screws to the sheathing, and the lower edge of each cassette is snapped into the panel located in the bottom row. These panels have only one bend, located at the top. The edge formed by it becomes the place where the edge of the adjacent tile is fixed. In the first row, the cassettes are attached to the starting rail, and then to each other. The connection point is invisible. It is difficult to disassemble such a structure, but it looks attractive on the facade of the building.
Closed mount
The choice of fastening method is influenced by the shape of the panels, their weight and the architectural features of the facade.
How to install siding correctly
It is worth taking care of the equipment in advance. Installation of facade panels will definitely require the following things:
- For marking surfaces: an ordinary mounting level, a tape measure, a plumb line, a water level or a laser level, a chalk cord, a square, a pencil.
- For sawing and cutting panels, sheathing: fine-toothed saw or hacksaw, jigsaw and grinder to speed up the process, metal scissors, cutter knife.
- To install facade panels: screwdriver, screwdriver.
Installation of siding
Before starting work, it is wise to sketch out a drawing of the building to ensure the correct distribution of panels over the entire surface, determining the required quantity in order to avoid a large number of unusable scraps. The most important event in the installation of facade panels is preliminary preparation of the plane: marking the vertical guides of the frame in steps and according to the scheme recommended by the manufacturer, installing the sheathing with a starting horizontal strip exclusively according to the level. Further actions are primitive and do not cause any particular difficulties.
Building drawing for correct distribution of panels
Features of installation work
Installation instructions for façade panels:
- To cut products and sheathing, you will need a hacksaw (you can use a saw with fine teeth), a grinder, a jigsaw, metal scissors, and a knife-cutter.
- For marking you need: tape measure, level, plumb line, pencil, square, coated cord.
- For installation work you will need a screwdriver and a screwdriver.
Surface preparation, lathing installation
Work is carried out at any time of the year at a temperature not lower than -15 0C. Wooden or galvanized sheathing is used, the pitch of which is determined by the size of the panels. The sheathing is installed vertically (under vertical fastening points and corners) and horizontally (under horizontal fastening points, under the starting and J-profile).
Rules for installation work
Based on the fact that Docke-Rs expand and contract as temperatures change, there are certain rules that can be followed to ensure a reliable installation.
- Self-tapping screws should be screwed into the center of the hole strictly horizontally
- You need to leave a small gap (up to 1 mm) between the surface and the screw head.
- The products are inserted into each other until they stop - this ensures a thermal gap.
Installation of starting bars
Using a water level, measure the base of the building along the perimeter “to the horizon”.
If the foundation is perfectly level, “starting corner strips” are installed at the corners of the house. Between them (for installing base panels) “starting strips” are mounted horizontally.
If the foundation is uneven, with a slight slope a blind area is made (parallel to the horizontal line measured earlier). Starting profiles are mounted (they are not used if the slope is too great). If the slope is large, the height of the second row of panels is determined.
And from this level the required size is measured, the lower parts of the profile are cut to the required size. Facade slabs are mounted by fastening them in vertical side and horizontal top holes. You can make additional holes (in the “seam” areas).
Attention! You cannot screw in self-tapping screws outside the nail holes (directly into the panel) - this can lead to irreversible deformation of the material.
Installation of the universal J-profile
Used for lining internal corners, as an edging profile.
Installation work
- J-profile for finishing internal wall joints . Two façade J-profiles of the required length are taken and installed in the inner corner. In the upper nail hole, the self-tapping screw is screwed in at the top, the remaining screws are screwed in the middle of the nail holes. Step – 150 mm-200 mm.
- J-profile as edging for the top of profiles . It is fixed to the sheathing at the top installation point (or under the roof overhang) to complete the finishing. Attaches similarly to all elements. To insert the slab into the universal J-profile, you just need to bend it.
- Installation of Deke facade panels. Work is carried out strictly from bottom to top, from left to right. To calculate the length of the first and last slab, the length of the facade is measured. To obtain the desired size, the left side of the profile is cut at a right angle.
The lower part of the slab is mounted on the starting profile and secured with self-tapping screws according to the attached instructions. The next one is mounted on the starting profile and inserted into the previous one until it touches the temperature compensators. The second slab is mounted on the sheathing, the installation of subsequent profiles is carried out by analogy.The last plate is cut to the required size and secured with self-tapping screws in the upper part. The first row is ready. You can begin installing the second row.
Important! For the effect of a natural look of stone (brick) masonry, each subsequent row is shifted by one brick (or by an arbitrary amount.)
Installation of corners
The corners are installed on the starting strips and secured with self-tapping screws in the upper part (self-tapping screws up to 50 mm long are used). It is important that the corner covers 15 mm of the facade slab, the distance to the inner edge of the corner is 12 mm. The corners are mounted sequentially - after installing each row.
Deke facade slabs are a modern, high-quality, outwardly respectable finishing material for facades. With proper installation, such a facade will delight you and your loved ones for many years!
Step-by-step instructions for installing siding
The entire technology for installing facade panels can be divided step by step into 6 parts:
- wall preparation;
- installation of vertical sheathing guides, laying insulation if necessary;
- fastening the lower starting horizontal trim of the facade;
- installation of J-profile;
- arrangement of corners;
- covering with facade panels.
Preparing the wall surface
If the wooden wall is smooth, which is rare, then the siding can be attached directly to it, without lathing. By flat we do not mean a perfectly smooth surface, but the absence of bulges and dips, which are revealed by a thorough visual inspection. The seams of log walls must be caulked, and the wooden surface must be treated with an antiseptic and dried. On an old building, the wall surface is cleaned of previous finishing, nails, crumbling blocks or rotten boards, and weak points are strengthened. Work is underway to insulate the building.
Basic installation rules
The bars under the frame must be dried and treated with bioprotection, otherwise over time the entire siding will fail. In this regard, it is more reliable to install facades with lathing made of galvanized metal profiles, using corrosion-resistant nails or screws. Beacons with a stretched rope are installed for the outermost vertical guides, then the remaining planks are plumbed.
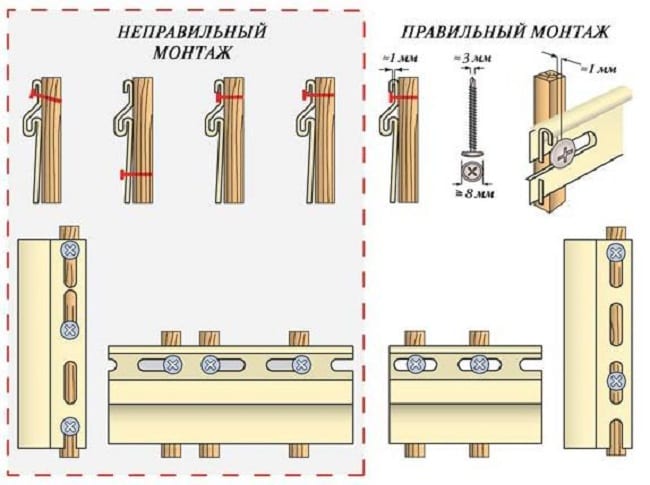
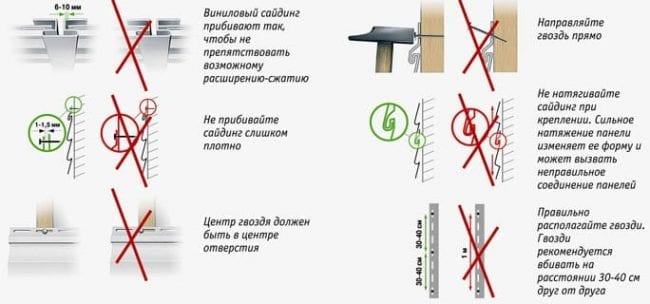
Correct and incorrect installation of siding
The easiest way to achieve perfect evenness is with a metal profile and drywall fasteners, with which you can adjust the gap between the guide and the wall. Installation of basement siding from Docke vinyl panels under brick or natural stone requires a step between vertical slats of no more than 400 mm. In general, you need to calculate so that the sheathing strip corresponds to the attachment point in the middle of the panel - there should be a total of three fastening points along with the central one.
In this matter, it is better to follow the recommendations of the siding manufacturer, especially for heavy or long materials, for example, porcelain stoneware, wood, steel. For the less common vertical arrangement of façade panels, horizontal lathing is performed in the same way. Siding installation is done from left to right, rows from bottom to top.
If you are installing metal siding, then at the attachment point it is important to leave a gap of 1 mm between the screw head and the perforated strip, taking into account the thermal expansion of the material. Before mating the panel with the corner, a gap of at least 6 mm must be maintained. If the temperature during installation is below +5 C°, the interval should be increased to 9 mm. Such amendments are especially true for vinyl siding (Deke or Viola), which “walks” when heated, and warps when there is no room for “walking.” Temperature clearances must be observed at all points of connection with the profile.
Siding installation rules
Setting up a starting profile
The starting strip, from which the fastening of the façade panels will begin, is marked along the entire perimeter of the building with a chalk cord secured to nails driven into the corners. The place of driving in is determined by the water level with alignment to the “horizon” from the lowest point of the wall. The profile is fastened from this point. If the house is on a slope, it may turn out that in some places the length of the sheathing is not enough. To make adjustments, cut the planks to the required size and build up the frame.
Installation of the starting profile
At the corners, mark the width of the corner profile, after which you can begin installing the starting strip indented from the corner marks. When joining and fastening the profile, the rules for observing temperature gaps apply. It is imperative to check the evenness of the horizontal installation with a regular level. If the mounting of the base ebb is provided, then the starting profile is placed on top of it along the horizon line.
Installation of a universal J-profile
For edging the slopes of window and door openings, the plant of facade panels, a J-profile is attached, and it can also replace the internal corner profile. When making openings in the profile, cuts are made from the mounting side in increments of 50-100 mm. External joining can be done either directly or at an angle of 45° using cuts and bends, having previously analyzed the necessary parameters of the external appearance. Internal corners are connected using one or two universal J profiles.
Mounting corners
The last preparatory step before installing the siding is installing the outside corners. The fastener should extend from the roof eaves by 3 mm, with the lower end protruding beyond the starting strip by 4-6 mm. Verticality is checked with a level. The joining is done at the same distance at all corners of the building, overlapping with the upper element overlapping the lower one.
Installation of cassette facade cladding
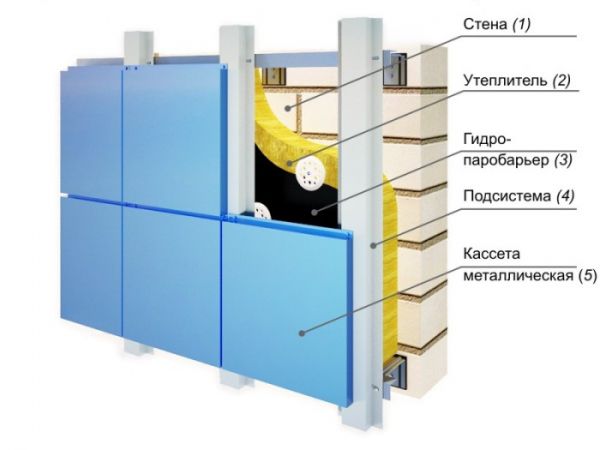
Any ventilated facade, organized using cassette blocks made of steel, aluminum or composite material, is a single design system , which consists of the following structural elements:
- metal profiles;
- mounting brackets for indoor and outdoor use;
- strips and platbands;
- slopes;
- fasteners;
- windproof panels.
A short educational film about installing façade cassettes
Thanks to the large number of structural elements, a ventilated cassette façade can be erected in the shortest possible time for any building or structure, even the most architecturally complex.
Installation diagram of facade cassettes (simplified)
Installation of a cassette façade seems possible in two different ways. One of them was called “ visible fasteners ”, the second - “ hidden fasteners ”. The variation in the approach to installation is primarily due to the architectural features inherent in a particular building and its geometric shape. Let's consider each of these methods in detail.
Visible method of fastening a ventilated cassette façade
Scheme of fastening the façade cassette to the profile
Steel cassettes with a visible fastening option have an original curved shape, which significantly speeds up and simplifies the installation process and allows you to do without any specialized tools and expensive construction equipment.
Cassettes with concave surfaces, in which there are special mounting holes, are secured using self-tapping screws directly to the metal hat profile.
Hidden method of fastening a ventilated facade
Detailed installation diagram of facade cassettes
Metal or composite cassettes intended for so-called. hidden fasteners are characterized by one technological feature: they have a convex edge only on the upper surface. Thanks to this feature, the cassettes are attached to the base like a Lego constructor - using edges. Thus, all seams remain invisible and hidden. This approach not only guarantees the strength and reliability of the structure, but also its original external aesthetics, perceived by the eye as “solidity.”
Installation of cassette facades is carried out sequentially, in several stages:
- A supporting frame consisting of horizontal metal profiles is being installed;
- The insulation is laid, on top of which a special film is necessarily attached to ensure waterproofing of the load-bearing walls. In this case, the thermal insulation material together with the waterproofing film is mounted using a plastic dowel-plate.
- On top of the heat-insulating layer, an L-shaped profile is attached to the main metal frame using self-tapping screws;
- Installation of façade cassette panels is underway.
Hidden method of installing façade cassettes
| In order for the ventilation of the space formed between the load-bearing wall of the facade and the cassette panels to be of high quality, you must first correctly calculate the expected height of the hat profile. |
Recommendations from experts
- Start installation from the least visible wall of the building, which will give you the opportunity to “get your teeth into” and eliminate shortcomings.
- Every 2-3 rows of facing panels, check the façade structure for horizontalness with a level.
- 2 days before installation, store the panels in a warm room to begin installation with optimal thermal expansion of the material.
- Screw the screws into the center of the mounting hole.
Recommendations for installing siding
Where to order and how much does installation of facades cost?
Services for the installation of facade panels are provided by construction and repair teams specializing in the external cladding of buildings. You can find these through the recommendations of friends, advertisements in news publications, or online, using the services of construction portals. In June 2020, the following prices for siding installation were established:
- installation of wooden sheathing per sq.m. from 100 rubles, metal - from 380 rubles, the cost of performing work on a brick or concrete wall increases by 20-50%;
- installation of vinyl panels per sq.m. – from 250 rubles, metal – from 210 rubles, fiber cement boards – from 680 rubles, basement siding – from 300 rubles.
Facade cassette installation technology
The method of fastening closed-type metal cassettes is largely similar, but there are some significant differences. Let us consider in detail the technologies for installing closed and open type cassettes.
Installation of metal cassettes
The creation of ventilated facades requires, first of all, the installation of a metal frame, which is attached to the load-bearing surfaces using anchor dowels and a system of metal brackets.
Installation work can begin after the load-bearing capacity of the walls has been checked. The essence of the test is as follows: several dowels are driven into the wall, onto which a section of the frame with the corresponding load is hung. Further installation is carried out in the following order:
1. The first step in performing installation work is to mark the mounting locations of the brackets for attaching the frame. Maximum marking accuracy is ensured by the use of a laser level, but if one is not available, you can use a conventional hydraulic level. Marking should begin from the bottom of the building. Correct marking will ensure the verticality of the frame plane.
The distance between the profiles is determined by the size of the cladding panels used. If the panel length exceeds 700mm, there is a need to install additional brackets. A hammer drill is used to effectively drill holes in brick or concrete walls. During the installation process, you should, if possible, avoid driving fasteners into the connecting seams of the wall, as this can lead to destruction of the brickwork.
To ensure a tight fit of the bracket to the wall surface, a paronite gasket is placed between them. When attaching the bracket to a concrete base, the length of the anchor must be at least 80 mm; when attaching to brick walls - no less than 100 mm.
2. After attaching the system of metal brackets, metal frame profiles are attached perpendicular to them, which are fixed with special screws.
3. The next step is laying the insulation. It is advisable to use fire-resistant materials with low thermal conductivity as thermal insulation. High levels of thermal insulation and fire resistance are ensured by the use of various modifications of mineral wool or extruded polystyrene foam as insulation. The insulation is attached to the surface using special mushroom dowels with a large round head. The consumption of hardware is 5 pcs. per 1 m2.
4. To reliably protect the heat insulator from moisture, water vapor and weathering, a synthetic wind membrane is fixed to its surface. The material is overlapped and fixed in this position using self-tapping screws. In some cases, it becomes necessary to lay additional waterproofing material.
5. To install the load-bearing vertical sheathing, use a hat-type profile. The profile height provides space for free air circulation between the cassettes and the thermal insulation layer. Installation of the first bottom row begins with the installation of the starting profile and base ebb.
6. Installation of facade cassettes begins from the lower left corner of the building. Before installation, you must remove the protective film from the sides of the cassette. The lower flange of the facing panel is fixed in the starting profile, and the upper flange is fastened with self-tapping screws to the metal profile of the sheathing.
The laying of all subsequent elements is carried out according to the same principle: the lower part is fixed to the adjacent panel, and the upper part is attached using self-tapping screws to the sheathing. As a result, the cassette is held in place by two screws located in the upper flange. To ensure greater structural rigidity, additional fastening of the product at intermediate points is allowed.
When installing open-type decorative cladding slabs, laying on the frame can begin from any corner of the building. Thanks to the curved configuration of the cassettes and special slots for fastening, the installation process is significantly simplified and the time required to complete the work is reduced.
Features of installation of metal facade panels
Fastening the panels involves installing special structural elements that provide an attractive appearance of the cladding and additional protection from harmful atmospheric influences. These elements include:
- flashing;
- slope;
- clypeus;
- external and internal corner;
- crutch.
The absence of these elements significantly worsens the aesthetic characteristics of the cladding. In addition, most of the benefits of ventilated cladding will be lost.
When choosing the material and thickness of the cladding panel for installing a ventilated facade, you should focus not only on the manufacturer’s recommendations. Wind load, climate characteristics, magnitude and intensity of mechanical influences are of great importance.
In the presence of unfavorable weather conditions and significant mechanical loads, thicker material should be used and, if possible, the frame should be strengthened with additional profiles.
When installing cladding from metal cladding panels, strict consideration of all technical aspects is required. In addition, the slightest misalignment during installation of the supporting system can negatively affect the performance characteristics of the entire ventilated structure.
Video: DIY siding installation
Among well-known siding manufacturers, it is distinguished by the high quality of its products, traditional for German manufacturers. The division operating in Russia consists of 3 factories that successfully produce various facade and roofing materials.
One of the most promising materials that is gaining popularity and is actively developing in production is basement siding or, as it is more often called recently, facade panels.
They have high functional and decorative potential, making it possible to make the appearance of the house completely updated without making significant changes to the design. The growing popularity of the material deserves a detailed discussion of its qualities and installation procedures.
Facade panels
Docke facade panels are an external cladding material that was created for finishing the plinths or lower levels of buildings. In practice, it turned out that basement siding looks much more attractive if it is used to decorate the entire facade of the house.
The result is a high-quality imitation of natural stone finishing that can radically transform the appearance of the simplest home. Such qualities prompted the change in the name of basement siding, which for some time now has been called “facade panels.”
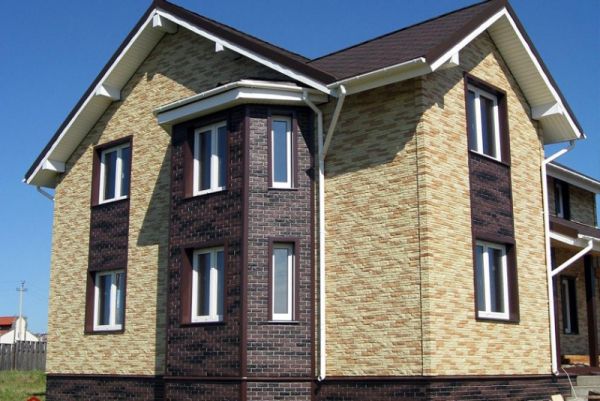
The main distinguishing quality of facade panels is the imitation of brick or stone masonry , while ordinary siding imitates different versions of wooden walls.
The level of imitation turned out to be very high, since casts from natural fragments of walls made of one or another type of finishing or building stone, brick, etc. are used to make molds.
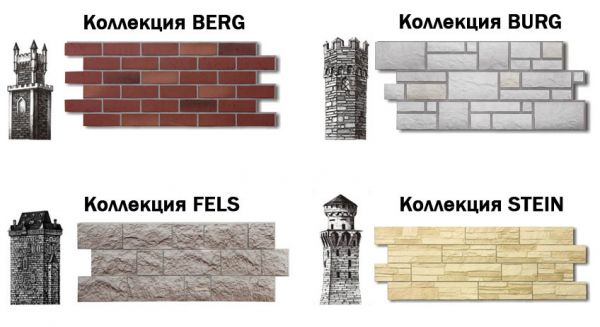
The company's product range includes several lines of material:
- BERG (rock) . The material replicates the masonry of blocks hewn by hand from natural rock. The line has 6 color options, from light gray to dark brown.
- BURG (castle) . The basis for the development of this direction was ancient legends telling about knightly castles. The material was created to imitate the appearance of fortress walls, solid and durable. The collection has 10 color options.
- STEIN (under the stone) . There are 5 color options for the panels, representing the masonry of the hewn sandstone walls.
- EDEL (noble) . The panels have the texture of masonry made of rocks of heterogeneous size, the line is made in 5 color options, repeating the color of noble types of stone - jasper, rhodonite, quartz, onyx and corundum.
- STERN (star) . A set of realistic looking blocks of different sizes, all matched to each other. High precision in conveying the texture of the stone, there are 6 color options.
Features of panel installation
Deke polypropylene facade panels have technical characteristics close to most plastic cladding samples - vinyl, acrylic, etc.
Accordingly, the conditions of installation work, in particular the mandatory observance of thermal clearances, are equally relevant for Deke panels.
The fact is that a solid sheathing sheet, being tightly assembled without gaps, will begin to expand when heated and go in waves . In some cases, destruction of nail strips is possible - strips along the edge of the panel with oblong holes for fixing to the base using nails or, more often, self-tapping screws.
In order to avoid damage or disruption of the appearance of the skin, it is imperative that temperature gaps - gaps between all contacting elements of the skin - be observed. This condition is especially relevant for elements that require longitudinal joining (for example, starting strip, J-bar, etc.).
For the same reasons, nails and screws cannot be driven in/tightened all the way . About 1 mm is left between the head and the part to allow movement when changing sizes. The holes in the nail strips have an oblong shape.
The self-tapping screw is screwed exactly in the middle so that there is the possibility of slight movement in one direction or another. The only case when this rule is violated is the installation of vertical elements (for example, corner strips). For them, a self-tapping screw in the upper hole is installed at the top point so that the part does not fall down. The remaining screws are arranged according to the general pattern.
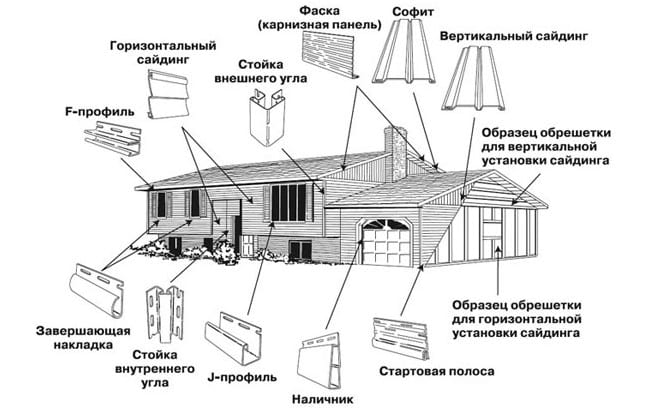
Accessories
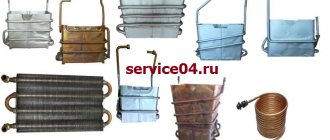
In addition to ordinary panels, additional elements are required to install the sheathing. Components, or, as they are also called, additional elements , without which it will be difficult to sheathe a house (photo below):
- Starting bar . This is a special rail with a groove for installing the bottom row of panels.
- J-bar . Serves to complete the cladding fabric, or for any design of the junction of the fabric to other planes (for example, when decorating window openings, it limits the window frame from the side of the window block).
- Corner profile . An element used to finish external corners. For Deke panels, installation of corner profiles is much easier, since they are mounted on top of the panels on both sides of the corner and cover them. They do not have a typical groove into which the sides of the panels are inserted. To ensure reliable installation, there is a starting corner profile that serves as a reference point for the corner profile.
- Curb . Used to decorate the end sections of the canvas, overhangs or other areas. To install it use
- Basic plank . Used for decorating internal corners, attaching borders, etc.
- Facade near-window profile . Serves as a support strip when finishing window or door openings.
- Internal corner . Used to decorate the internal corners of the surface.
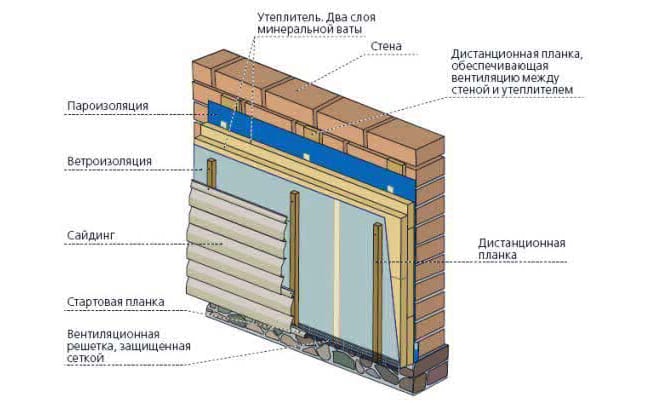
Installation of a ventilated facade
A ventilated facade is a method of cladding a house in which an air gap of at least 3 cm is provided between the outer layer - the cladding - and the inner layers - the wall, insulation and waterproofing.
This sheathing device has an important property - water vapor escaping from the thickness of the wall materials can freely exit the insulation. To put it simply, there is a constant opportunity to dry the wall and insulation.

This option allows you to increase the service life of all materials that make up the thickness of the wall and ensures high-quality performance of the insulation. For facade panels, a ventilated facade is the usual type of installation, although installation without it is possible, directly on wooden walls.
How to choose the right insulation for a ventilated facade made of cassette blocks
The best option for choosing insulation for ventilated facades made of cassette blocks is mineral fiber, as well as any other materials that are environmentally safe and not subject to combustion.
If the facade is to be insulated in two layers, the choice of insulation should be approached as follows. The first (inner) layer of insulation should have a slightly looser structure (for example, mineral wool), and the second (outer) layer should have a more stable and dense structure (for example, penoplex).
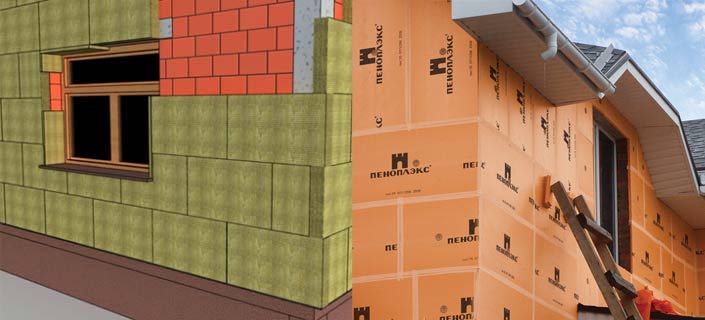
In the case of two-layer insulation, it is recommended to use insulation with a loose and dense structure, for example mineral wool and penoplex
The technology of a ventilated facade requires the mandatory use of protection of the insulating layer from weathering. The thin membrane fabric recommended for these purposes reliably copes with this function. Moreover, it is able to control and inhibit the penetration of moisture into the insulation layer.
After the insulation and wind membrane insulation are secured to the facade walls using dowel plates, you can begin installing metal or composite cassettes to the frame made of a guide profile and L-shaped brackets.
Selecting lathing for panels and its installation
The sheathing for the panels is a load-bearing structure . Its configuration is usually complicated by the presence of insulation, which must be installed between the slats. Therefore, for work, a material is selected that is most convenient to work with and is sufficiently strong and durable.
The traditional type of lathing is a system of wooden planks . This option is acceptable, but requires straight, dried planks, which should be soaked with an antiseptic immediately after installation to avoid rot, mold, etc.

A more successful option is the construction of a metal sheathing . Metal guides are used for plasterboard sheets. They are straight, the galvanized surface prevents corrosion processes, installation and adjustment of the plane is much easier than when working with wooden blocks.
In some cases, metal and wooden planks are combined, which is sometimes convenient for complex surface configurations.
Installation procedure:
- Cleaning the wall outside the house, complete surface preparation - putty, plaster (if necessary), primer, drying the surface.
- Marking the wall for load-bearing elements - brackets or straight guides.
- The sheathing for Deke panels has both horizontally and vertically directed strips. Therefore, if it is necessary to install insulation under it, you need to build your own sheathing . It is needed to install supporting strips for panels on top of it.
- The insulation is installed between the planks of the primary sheathing . A layer of waterproof membrane is laid on top of the insulation.
- The carrier is installed on the primary sheathing strips . Its thickness must be at least 3 cm to ensure the required ventilation gap. Vertical strips are used for mounting corners and sides of panels. Horizontal ones serve as a supporting surface for starting and J-planks, the upper sides of panels, and other elements of the canvas.
- The pitch of the horizontal strips corresponds to the height of the panel, the pitch of the vertical strips corresponds to half its length.
The main task when installing the sheathing is to ensure that the sizes of the panels and the distances between the planks match, and also to ensure the presence of a flat plane, which allows you to obtain the correct geometry of the sheathing sheet.
Storage and protection
When working with facade material, you must adhere to safety rules, and also use tools that cannot damage the product or spoil its front covering. It is prohibited to cut cassettes using abrasive tools or using fire. High temperatures and sparks generated during the cutting process will damage the facing material.
You cannot install any additional hanging elements on the surface of the cassettes, except for fastenings for the drainage system . Firstly, this will increase the load on the facade, which is not included in the project. Secondly, holes made independently are subject to rapid rusting of the metal. If there is a need to install signs, billboards, lighting fixtures, etc., then they should be mounted directly on the wall.
Another important component of keeping the façade in good condition is its protection from moisture that drains from the roof. Water leaks will ruin the appearance and paintwork of the cassettes, so it is necessary to keep the drainage system and drains in good condition.
How the panels are fastened
The panels are attached to the sheathing strips taking into account temperature changes, i.e. not tightly, but with a gap between the screw head and the part of about 1 mm . A correctly installed element can be freely moved left and right within the width of the mounting holes.
The screw head must be at least 10 mm in diameter, its length must be at least 30 mm. You cannot drill holes for self-tapping screws yourself; you must use standard mounting holes and components.

DIY installation instructions
Installation work is carried out in the following sequence:
- Installation of the starting bar . The lowest point of the canvas is determined, a horizontal line is drawn along the level, all corner starting strips are installed along it, after which the ordinary starting strips are installed.
- Internal corners, if any, can be formed using a J-bar or a specialized internal corner profile . To do this, pre-install the base strip with a shelf to the corner so that the panels on one side of the corner fit into the groove, and on the other they are attached over the nail strip. When the panels are installed, the inside corner will be inserted into the groove of the base strip and cover the joint of the planes.
- Facing is carried out in the only possible direction - from left to right and from bottom to top . the first panel is trimmed to obtain an even side line, inserted into the groove of the starting strip, aligned with the corner and fixed with self-tapping screws. The next panel is inserted into the side grooves of the previous one, into the starting strip from below, and secured from above with self-tapping screws. The entire row is laid in this way. The following rows are mounted in a similar way.
- The frames of window and door openings are mounted in the same way as corners . A J-bar is used to connect the design of the slopes and the window (door) frame.
- The canvas is completed by installing a J-bar , which forms the upper edge of the panels.
Installation of facade panels for exterior decoration of a house is simple and can be done independently. To do this, you need to familiarize yourself with the rules for carrying out work and constantly remember the need to maintain temperature gaps between parts, and do not tighten the screws all the way.
Fulfilling these requirements will allow you to complete the work with high quality and obtain a solid and stylish appearance of the house, imitating masonry at a relatively low cost.
Material calculation
An important stage of high-quality installation is its planning and calculation. In this case, the design will allow the system to be installed without construction errors. In addition, the calculation will eliminate the overuse of material and the presence of a large number of unused scraps. For the calculation, the following conditions must be taken into account :
- base and frame structures;
- weather conditions, operating environment, wind loads;
- direction of installation system;
- dimensions of the distances between the facing elements;
- façade ventilation;
- thermal expansions;
- presence of required and necessary holes;
- use of strips;
- number and sizes of window and door openings;
- mounting method, cassette sizes;
- use of vapor barrier material and insulation.