Principle of operation
Not a single heating boiler system can operate without a copper heat exchanger. The operating principle is simple. Water begins to circulate through the coils in the pipes, heats up, flows into the system pipeline, into the radiators, from which it returns back, already cooled.
In private homes, a heat exchanger is installed to convert the stove into a water heating boiler. When making a homemade device, it is important to consider the size and shape so that the exchanger matches the dimensions of the stove chamber.
Radiators, a pipeline are connected to the exchanger, the pipes are heated evenly, and the heat is distributed throughout the house.
Design and principle of operation
Modern models of heat exchange devices have several parts. Each has its own important role:
Advantages and disadvantages
The obvious advantages of the heat exchanger include:
- simplicity of its manufacture and installation;
- heating can be combined; in addition to heating, a water heating system can be installed;
- fuel for the device can be varied: solid, gas - liquid;
- The devices are beautiful in appearance; you can give the interior a national style.
The heat exchanger has two disadvantages:
- there is no automatic control over media heating;
- The efficiency is not too high.
Heat exchanger using tube sheet
Repair of secondary heat exchanger
Secondary heaters often clog, especially models with narrow channels. Without cleaning, they break down over time and finally fail. A layer of scale inside the unit reduces heat transfer, causing the boiler to consume more gas.
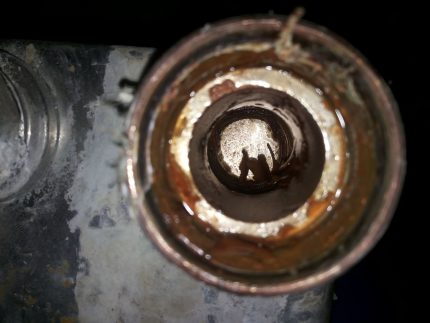
Salt deposits, scale and rust form the bulk of the contamination: in addition to the secondary heat exchanger, it doesn’t hurt to also check the heating and hot water circuits
Problems with heat exchangers will be indicated by codes on the boiler display. There is an action plan for this case.
Let's take a closer look at the problem with the secondary heater:
- We take out the secondary heat exchanger.
- We look at the joints, internal and external threads. After the last cleaning, their condition may have worsened. This happens due to aggressive acids. We replace worn out removable elements.
- We check the integrity. The heat exchanger could experience a water hammer. Only a specialist will find a very small fistula (hole).
- We better inspect the exchanger, and for this we call a specialist. We replace a severely damaged unit.
- Even at the very beginning, contamination can be found. We look for plaque visually in the inlet openings. We blow air into the part and also focus on the sound. We clean it if the exchanger is clogged. Pieces of scale may fall out of it even after a slight knock.
- You need to choose 1 of 3 cleaning options: home remedies like detergents and solutions with citric acid, special mixtures, or professional cleaning.
First of all, rinse the exchanger with a stream of water from a cold tap. Then pour citric acid into the device and place it in a bucket of water. Afterwards, take out the heat exchanger and pour water into it to check the permeability.
If it comes in slowly or does not move, then prepare a saturated solution of vinegar in water and pour it there. Then rinse with hot water and blow off. If possible, use an air pump. Do several cycles with vinegar.
Among the arguments for professional cleaning, it is worth noting the inconvenience of the design for cleaning, difficulties in assessing contamination, and the risk of damage due to independent mechanical action
If the steps described do not help, try special cleaning solutions: cleaning gel or low-percentage adipic acid solution. If this method does not work, then call a specialist or order professional cleaning.
Necessary materials, tools, drawings
For the heat exchanger it is worth choosing:
- Capacity 90 -110 liters.
- Anode.
- Copper tube up to 400 cm long for a thermal heater. If there is no copper pipe, you can use aluminum or plastic, as long as it bends well.
- Power regulator for regulating heat supply.
There is no need to make a coil from steel, the material is bad for heat transfer, it doesn’t matter how it bends, the air heats up thanks to copper many times faster. When using steel, you will additionally need a pipe bender.
Material of manufacture
- Copper. Due to its ductility, copper is most optimal for the manufacture of a heat exchanger. A copper tube is easy to bend and give any shape. It has a high thermal conductivity coefficient - more than 380. But copper is also not a heat-resistant material and is expensive.
- Stainless steel. Also quite flexible and responsive material. Although it has a lower thermal conductivity coefficient. But it is resistant to temperature changes. Any configuration can be welded from it. IMPORTANT: Galvanized steel cannot be used; when heated, it releases toxic zinc compounds into the air.
- Metal-plastic. Easily accessible practical material. Easily found, but it has a low thermal conductivity! Almost two orders of magnitude lower than that of copper. But this material is durable and resistant to temperature changes.
Types of maintenance
Diagram and operating principle of a recuperative heat exchanger
Based on the operating principle, the equipment is divided into recuperative and regenerative. In the first, moving coolants are separated by a wall. This is the most common type and can come in various shapes and designs. In the second case, hot and cold coolants alternately contact the same surface. High temperature heats the wall of the equipment during contact with a hot medium, then the temperature is transferred to the cold liquid upon contact with it.
According to their purpose, heat exchangers are divided into two types: cooling - they work with cold liquid or gas, while cooling the hot coolant; and heating ones - interact with the heated environment, giving energy to cold flows.
There are several types of heat exchangers by design.
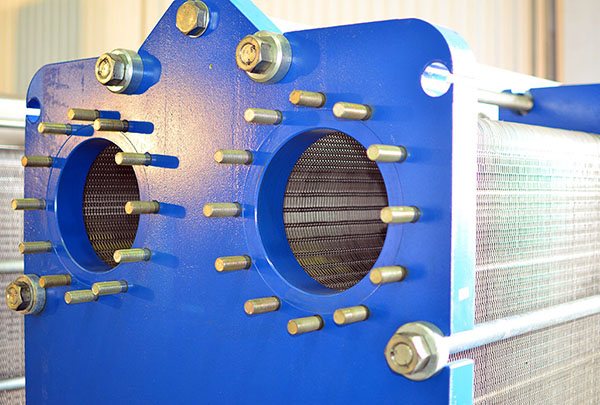
Collapsible
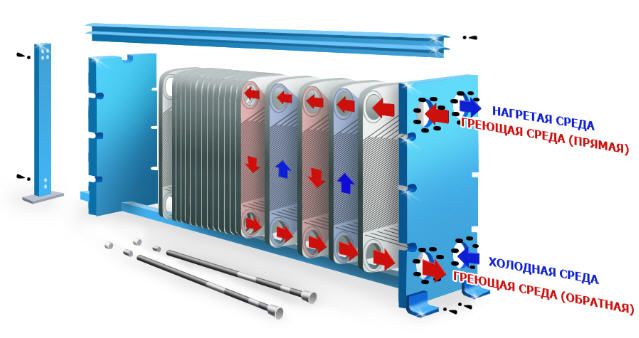
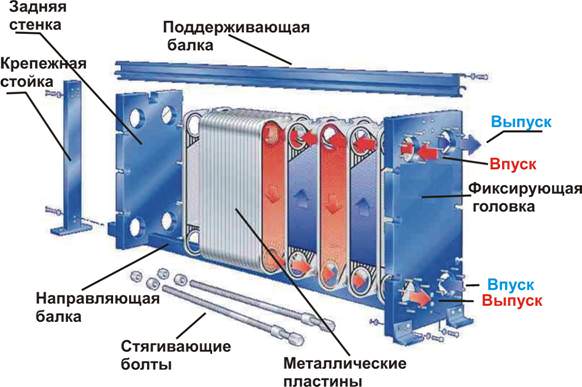
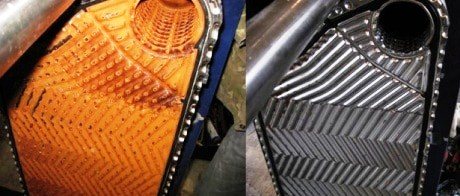
They consist of a frame, two end chambers, separate plates separated by heat-resistant gaskets and mounting bolts. Such equipment is easy to clean and can increase efficiency by adding plates. But collapsible maintenance units are sensitive to water quality. To extend their service life, additional filters must be installed, which increases the cost of the project.
Lamellar
A plate heat exchanger requires the installation of additional filters on the coolant.
They differ in the method of connecting the internal plates:
- In brazed TOs, corrugated stainless steel plates 0.5 mm thick are made by cold stamping. A gasket made of special heat-resistant rubber is installed between them.
- In welded plates, plates are welded together to form cassettes, which are then arranged inside steel plates.
- In semi-welded maintenance, cassettes are fastened together using paronite joints in a structure consisting of a small number of welded modules. These modules are sealed with rubber gaskets and connected by laser welding. Then they are assembled between two plates using bolts.
Plate heat exchangers are used in high pressure and extreme temperature environments. Such devices require minimal maintenance, are economical and are highly efficient. In addition, the efficiency of the equipment can be increased or decreased as needed by increasing or decreasing the number of steel plates.
The only drawback of a corrugated stainless steel heat exchanger is its sensitivity to the quality of the coolant; it requires the installation of additional filters.
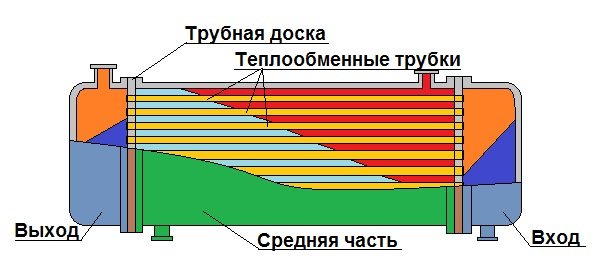
Shell and tube
They consist of a cylindrical body in which bundles of tubes arranged in grids are placed. The ends of the pipes are secured by flaring, welding or soldering. The advantage of such equipment is that it is undemanding to the quality of the coolant and can be used in technical processes where aggressive environments and high pressure are present (in the oil, gas, chemical industries). The disadvantages of shell-and-tube maintenance are relatively low heat transfer, large dimensions, high cost and difficulty in repair.
Principles of marking heat exchangers
Currently, the symbols of shell-and-tube heat exchangers are consistent with the TEMA international standard, which reflects the basic principles of marking this type of equipment.
TEMA standard heat exchanger designations
Types of front fixed heads according to the TOPIC designation system:
- A – type – channel, cover – removable;
- B – type – cap, cover – solid;
- C - full channel type, has a tube sheet and a removable cover;
- N - completely channel type, there is a tube sheet and a non-removable cover;
- D - equipped with a special head with a cover for operation under high pressure conditions.
Types of casings according to the TEMA designation system:
- E - casing with one stroke in the annulus;
- F - casing with two passages in the annular space with a longitudinal partition;
- G - casing with distributed flow;
- H—dual expanded flow casing;
- J—split flow casing;
- K - reboiler;
- X - casing with transverse flow in the annular space.
Types of rear heads according to the TEMA notation system:
- L - with a fixed tube sheet, as in a fixed head type A;
- M - with a fixed tube sheet, as in a fixed head type B;
- N - with a fixed tube sheet, as in a fixed head type N;
- P - with a floating head, sealed from the outside;
- S - with a floating head with a support device;
- T - with a floating head that can be removed from the casing;
- U - head with a U-shaped tube bundle;
- W - head with externally sealed floating tube sheet.
Type BET
Application:
heating of liquid media at low vapor pressure in the housing; cooling of gas or oil in the hull space.
AES type
Application:
often used at oil refineries with increased pressure in the hull space.
Type BEP
Description:
Removable tube bundle, external grille mounting, tubesheet can be made of forged steel to meet the design pressure requirements of the body, available in different material designs, maximum allowable pressure in the tubes is up to 3000 psi, the body is completely sealed.
Application:
when using particularly dangerous gases, at increased pressure in the pipe part, where gasket failures must be identified as quickly as possible.
Type BEM
Description:
fixed tube sheet with permanent tube bundle, welded directly to the inner surface of the body, one or two stroke design.
Application:
Chemical industry; working media – air (at elevated pressure), nitrogen (gas in pipes, freon in the housing).
Type BEU
Description:
U-type tubes; removable or non-removable tube bundle; multi-pass design; wide range of operating pressure both in the body and in the tubes.
Application:
Chemical industry; liquid heaters; various types of evaporators.
Type AEW
Description:
Removable tube bundle; one or two pass design; double floating tubesheet seal with "O" rings and threaded retainers with inspection holes to detect possible leaks, housing sizes 6 to 42; wide range of operating pressures.
Application:
industrial and household coolers.
Do it yourself
Before starting to manufacture a heat exchanger, it is necessary to decide what principle of heat transfer will be implemented in such a device.
Manufacturing of plate heat exchanger
To make such a device, you need to prepare the following materials and tools:
- welding machine;
- Bulgarian;
- 2 sheets of stainless corrugated steel 4 mm thick;
- flat sheet of stainless steel 4 mm thick;
- electrodes;
Build process:
- from stainless, corrugated steel , in the amount of 31 pieces.
- Then , a tape with a width of 10 mm and a total length of 18 meters is cut from a flat stainless steel. This tape is cut into pieces 300 mm long.
- The corrugated squares are welded to each other , with a 10 mm strip on two opposite sides, so that each subsequent section is perpendicular to the previous one.
- As a result , you get 15 sections facing one way and 15 facing the other in one cubic body. The corrugated surface of such sections allows you to effectively transfer heat from one coolant to another, while there is no mutual movement of different or homogeneous media.
- In the case when not an air mass, but a liquid is used to transfer heat, a stainless steel manifold is welded to those sections in which water will circulate. The collector is made of flat stainless steel. For this purpose, rectangles are cut out with a grinder: 300 * 300 mm – 2 pcs; 300 *30 mm – 8 pcs. Thus, you get a kit from which 2 collectors are welded, which resemble in shape a square box lid.
- A hole is made in each of the collectors , to which a pipe is welded for subsequent connection to the pipes of the heating system or to provide hot water supply.
- Holes on the collectors are made at one of the corners a, and when installing them on a heat exchanger, the inlet pipe should be located in the lower part of such a structure, and the outlet pipe in the upper part.
The heat exchanger discussed above is installed with the open side into the hot gas circulation system.
Thus, the hot gaseous coolant will transfer heat to the corrugated walls of the stainless steel plates, which, in turn, will heat the liquid.
A heat exchanger of this design can be used to transfer heat from one liquid to another. To do this, a steel jacket with a pipe of the above-described design is welded onto the open parts of the plates on both sides.
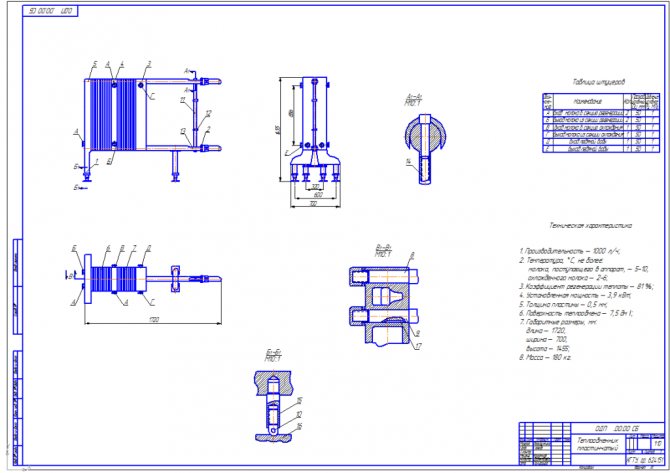
Drawing:
Manufacturing a water heat exchanger for a furnace
A conventional wood stove can not only heat a room in the traditional way, but can also be used to heat water for heating rooms in which this heating device is not installed.
To make such a device you will need the following materials and tools:
- steel pipe with a diameter of 325 mm, a length of 1 meter;
- steel pipe with a diameter of 57 mm, a length of 6 meters;
- steel sheet 4 mm thick;
- welding machine;
- electrodes;
- cutting torch;
- white marker;
Manufacturing process:
- A cylinder made of a pipe with a diameter of 325 mm is installed vertically on a steel sheet and outlined with a marker or chalk.
- The outlined circle is cut out with a gas cutter. Then, using the resulting metal pancake, another circle of the same diameter is made.
- In each of these pancakes, 5 holes with a diameter of 57 mm are cut. Such holes should be equidistant from each other, as well as from the middle of the pancake and its edge. The pancakes are welded to the cylinder so that their holes are located opposite each other.
- A 57 mm pipe is cut with a grinder into sections 101 cm long. It is necessary to prepare 5 such sections.
- Each piece of pipe is installed in the holes so that the edges of this pipe protrude 1 mm from the holes of the upper and lower “pancakes”. Pipe sections are welded using electric welding. The result is a metal cylinder, inside of which there are pipes of smaller diameter. Hot air and flue gases will pass through these pipes, as a result of which the pipe will heat up and transfer heat through its walls to the liquid that will be located inside the cylinder.
- To circulate liquid inside the metal cylinder, pipes are welded in its lower and upper parts. Cold water will be supplied from the bottom of this design, and the liquid heated in this way will be taken from the top.
Types of heat exchangers
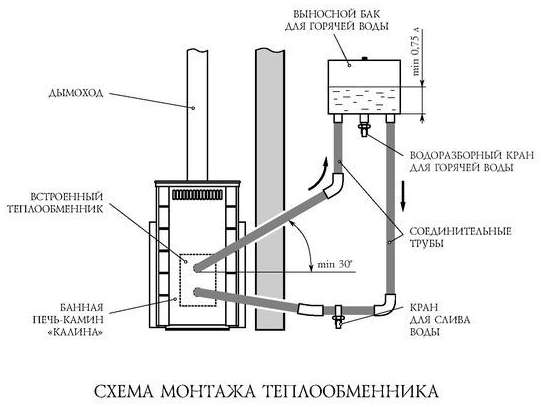
When choosing a fireplace stove with a heat exchanger, please note that they can use two types of heat exchangers, in which there is a fundamental difference in the heating system:
- An open system is indirect heating of the heat exchanger. In this system, the liquid moves along a coil, which is open in the firebox. Such a system requires the presence of an open expansion tank, which in most cases is located in the attic of a country house.
In such a system, water moves according to the principle of natural gravity and circulates naturally. This system was often used during the USSR. Nowadays, they are actively being replaced by closed systems.
- A closed system where direct heating of the coolant occurs. In this option, heating is performed directly in the combustion chamber. In this case, when the liquid is heated to 90ºC, it is forcibly supplied to the heating system; for this purpose, a water pump is installed in the system. When cooling, the liquid is fed back under pressure. A membrane type water tank is used here.
The heat exchanger can have a different design. In this embodiment, they can be divided into types of manufacturing:
- An internal type heat exchanger is either a container inserted into the combustion chamber, or a coil that can be installed in any part of the combustion chamber or designed as a “jacket”, that is, it will envelop the entire combustion part.
- External heat exchanger. In this case, the chimney module is surrounded by a container, which is made hermetically sealed.
From the above we can draw a conclusion. What if you need to heat a small room where you do not live permanently. Then there is no need to install compressors with forced circulation of liquid. It just costs more and will not pay for itself soon. But if you have a large house and you live in it constantly, then you simply cannot do without forced circulation of the coolant. Therefore, you need to approach this issue wisely, and on our resource you can learn how to make water heating.
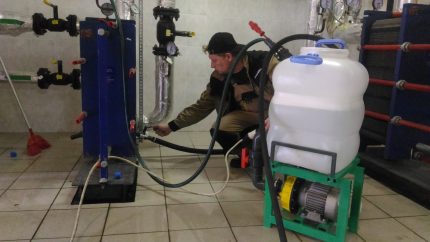
How to make a booster for flushing a heat exchanger
The booster consists of a reservoir, a pump for water circulation and an electric heating element. There is no need to disassemble the heating boiler for flushing, just disconnect the pipes, connect a hose to one of them and pump a chemical solution through it into the unit. The solution will pour out through the other pipe, but you also need to connect a hose to it.
Of the chemical reagents, hydrochloric and sulfuric acid are mainly used; phosphoric and nitric acid can also be used.
Cleaning the heat exchanger is not difficult, but it is necessary to follow safety precautions, that is, first disconnect the device from the power source, be it gas, water, or electricity. Dismantling must be done carefully; a damaged seal can lead to leakage of the structure, and the equipment will quickly fail.
Classification of heat exchangers for boilers
Heat exchange elements for a gas boiler can differ significantly in design and use. The following devices are most often used in thermal equipment:
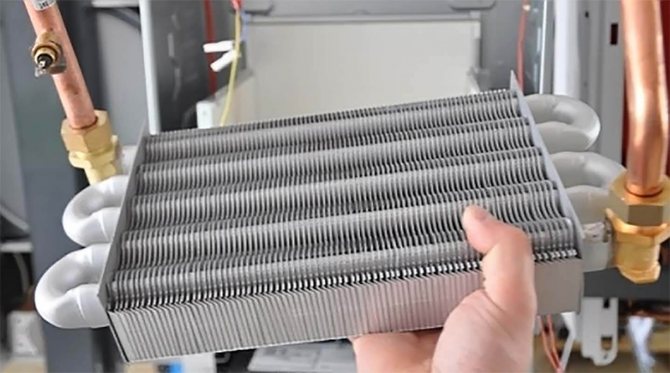
Primary
This category of devices is used to transfer thermal energy directly into the fuel combustion chamber.
Attention ! Primary heat exchangers are operated in very harsh conditions, so they must be made of very high quality materials.
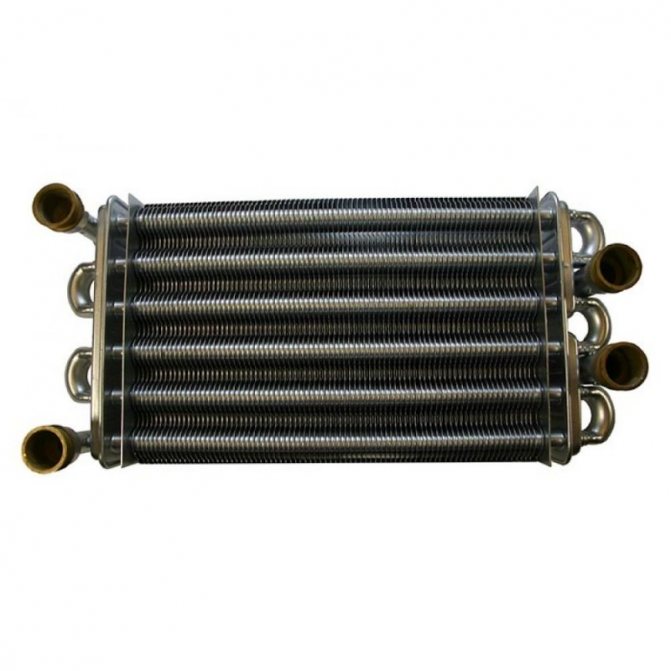
Secondary
The secondary heat exchanger is heated by transferring energy from the coolant to another liquid.
This device is ideal for meeting the need for hot water in the presence of a separate heating circuit.
Bithermal
A bithermic heat exchanger is a modern and practical element of a heating boiler.
This design consists of 2 separate tubes installed one inside the other. Products of this type are used primarily for simultaneous heating of water for heating and domestic needs.
Tips and tricks
- It is important to design a heat exchanger correctly , calculate economic efficiency, the percentage of hydraulics, indicate heat losses, calculate the design according to the geometric parameters of the unit and its components, and calculate the thermal insulation of the device.
- simpler design for making it yourself
- You can connect the heat exchanger to the system using fittings , place one at the bottom for cold water inlet, the second at the top for hot water inlet.
- When installing the exchanger, install the pipes at a slope according to the diagram.
- When installing the unit to a furnace and using coal for combustion as a material for the exchanger, it is better to choose cast iron; it is durable and fireproof.
- To make an exchanger with your own hands, take any model as an example and follow its parameters.
- When using the stove for heating and water supply purposes, the exchanger should absorb no more than a tenth of the heat generated.
- Pellets are good fuel and cheap in price, they do not emit soot, which is very important for cleanliness.
- Check the seams at the exchanger , you must not allow them to leak; under pressure or high temperatures, the entire structure can become unusable.
- Make the calculations correctly , otherwise your work will cost you dearly.
- A heat exchanger of the pipe-in-pipe type is easy to clean , lasts a long time, is simple to manufacture, and can operate under pressure. It is considered the most acceptable option for making it yourself.
As you can see, making a heat exchanger yourself is not difficult. For a simple design, a tank, two copper tubes of different diameters, a coil and a fan are enough. Thanks to the device, you can not only heat the room, but also cool it.
A thing like an exchanger in one form or another is found in almost every home. Approach the work constructively and thoroughly, prepare drawings, decide on the choice of material, follow the instructions described above for the manufacture, assembly and connection of the device.
If you wish and follow consistent steps, you will assemble a design no worse than a store-bought one, the house will be warm and cozy, and the device will work flawlessly for a long time.
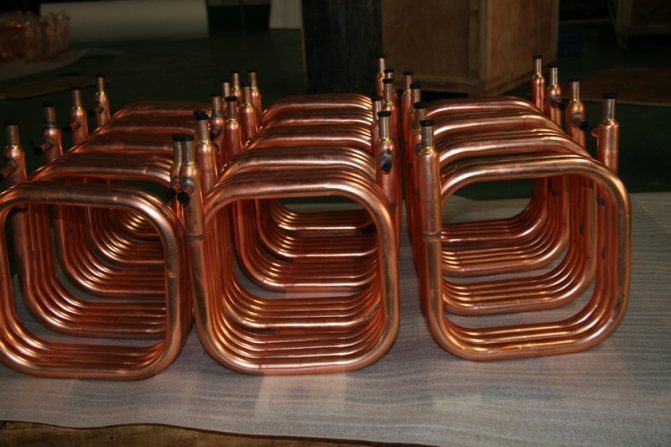
How to make a water-to-water heat exchanger from a copper tube?
- Capacity. It's essentially a steel tank. The shape of the tank is not particularly important for the efficiency of the device. It should be installed near the beginning of the heating system. It should have two tubular branches for water circulation. The entrance for cold is located at the bottom, and the entrance for hot is at the top. Of course, the tank must be sealed.
- Copper tube. Spiral blocks of copper tube are placed inside the tank. Why is copper tube used? The answer is simple - copper has the best thermal conductivity. For a hundred-liter tank, 4 meters of such pipe is enough.
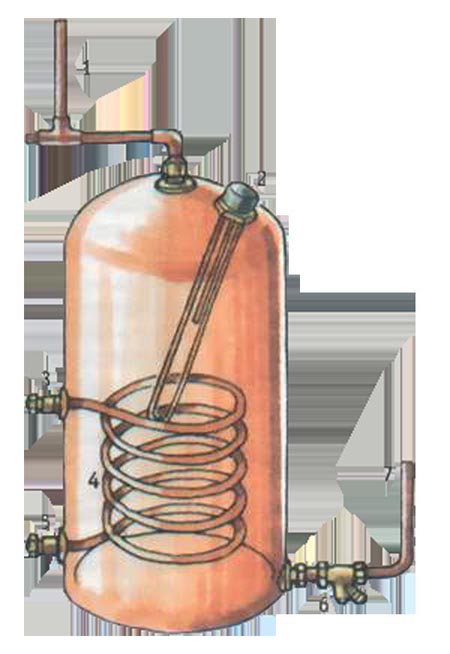
- Power regulator. There are power regulators with a heating element. These are the ones you should use when making a heat exchanger with your own hands for heating a room. The regulator is connected to a copper tube.
- Anode. Temperature changes and possible pressure changes destroy the container. To protect it, an anode is most often installed near the heating element. After the above parts of the copper tube heat exchanger are securely installed, the tank is hermetically sealed and filled with water. The system can be checked.
Specifications
Plates and gaskets can be made of various materials; their choice depends on the purpose of the unit, because the scope of application of such heat exchangers is very wide. We are considering heating and hot water systems, where they act as thermal power equipment. For this area, the plates are made of stainless steel and the gaskets are made of NBR or EPDM rubber. In the first case, a stainless steel heat exchanger can operate with water heated to a maximum temperature of 110 ºC, in the second - up to 170 ºC.
For reference. These heat exchangers are also used for various technological processes when acids, alkalis, oils and other media flow through them. Then the plates are made from titanium, nickel and various alloys, and the gaskets are made from fluorine rubber, asbestos and other materials.
Calculation and selection of a heat exchanger is carried out using specialized software according to the following parameters:
- required liquid heating temperature;
- initial coolant temperature;
- required flow rate of the heated medium;
- coolant consumption.
Note. The heating medium flowing through a plate heat exchanger for hot water supply can be water at a temperature of 95 or 115 ºС, or steam heated to 180 ºС. This depends on the type of boiler equipment. The number and size of the plates are selected in such a way as to obtain water at the outlet with a maximum temperature of no more than 70 ºС.
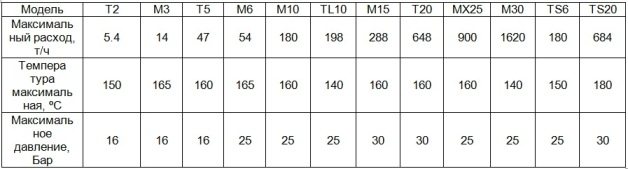
It must be said that the advantages of plate heat exchangers lie not only in their modest size and ability to provide high flow rates. The fact is that the range of selected exchange areas and costs for the units under consideration is extremely wide. The smallest of them have a surface area of less than 1 m2 and are designed to flow 0.2 m3 of liquid in 1 hour, and the largest - 2000 m2 with a flow rate of over 3600 m3/h. The table below presents the technical characteristics shown by the operation of plate heat exchangers of the famous ALFA LAVAL brand:
According to their design, heat exchange units are of the following types:
- collapsible: the most common option, allowing for quick and high-quality repair and maintenance of a high-speed heat exchanger;
- soldered or welded: such devices do not have rubber gaskets; the plates are rigidly connected to each other and placed in a solid body.

Note. It is brazed heat exchangers that many craftsmen use for private homes, adapting them for heating or cooling water.
Selection of material
It should immediately be noted that at home it is almost impossible to create a heat exchanger like in a factory. At the same time, a homemade design will not be inferior in functionality to one created at the enterprise.
The structure can be given any shape, but the most popular options are a system made of several metal pipes in the form of a lattice or plates. Due to the fact that the combustion temperature is quite high, especially when coal is used as fuel, special attention should be paid to the choice of material, as well as the level of quality of welding seams. In addition, the type of metal plays an important role, since each has its own thermal conductivity. If you take a copper pipe, it will have a thermal conductivity coefficient 7 times higher than a similar pipe made of steel. With an identical diameter and volume of transferred heat, 3.5 meters of copper pipe is sufficient; with the same parameters, a steel pipe will require 27 meters.
Copper heating elements are the most expensive, but effective. If you cannot spend money on purchasing such materials, you can purchase steel pipes, but their diameter must be at least 3.5 centimeters.
For reference! If coal is used as fuel, then the most rational option would be to install a cast iron heat exchanger. This is the most durable and heat-resistant metal. In addition, old cast iron batteries can be used as a heating element.
How to clean the heat exchanger of a gas boiler
To clean the heat exchanger from scale, mechanical, chemical and magnetic cleaning methods are used. The first option is performed using a cleaning rod and scraper.
Tools can be manual or electric. The chemical option involves the use of crustacean chemicals that can loosen and dissolve contaminants.
To flush the heat exchanger using this method, use a special pump circuit and a flushing agent specified by the manufacturer, for example, for a Baxi gas boiler.
Algorithm for cleaning the heat exchanger from scale:
- Turn off the boiler.
- Prepare liquid for flushing heat exchangers of gas boilers according to the manufacturer’s recipe.
- After complete cooling, utility networks are disconnected from it and the water is drained.
- Remove the tie rods, move the pressure plate aside and then carefully remove each plate one by one. The work is carried out with gloves so as not to injure your hands.
- When working with acid, change gloves to rubber ones.
- Prepare a container for cleaning the plates so that they are completely covered with the working solution.
- The plates are immersed in the composition for 1 hour, after which the remaining deposits are removed under tap water using a brush.
- Assembly of the cleaned structure is carried out in the reverse order.
After washing the heat exchanger, check the tightness of the boiler under the operating pressure of the coolant. All utilities, gas and electricity are connected and the equipment is started for the first time after flushing.
If a leak is detected, it is necessary to tighten the nuts or install a new gasket on the heat exchanger.
Washing methods
There are simple variations that practically do not involve any expenses, there are budget ones with minimal investments, and professional ones - they cost much more, but are highly effective.
How to flush the secondary heat exchanger of a gas boiler in one way or another? And when is it logical to use them. It all depends on the volume of deposits.
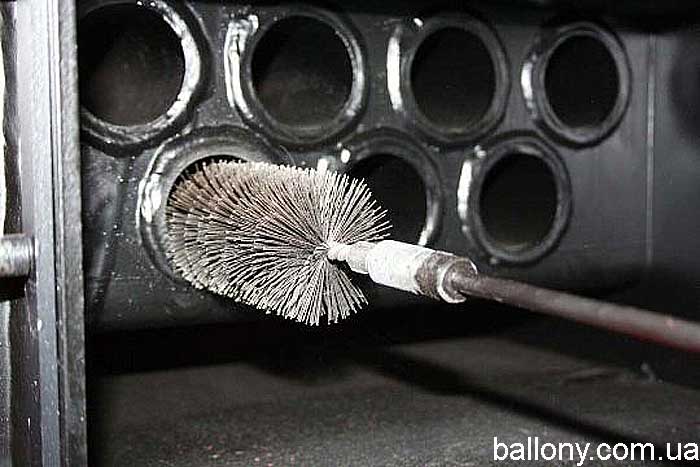
In the simplest situation, mechanical cleaning is sufficient. The outside of the VT ribs are cleaned. The work uses any hard brush, spatula, scraper or cable. It is very important here not to damage the plates.
The second method is washing with a special composition. In practice, it is combined with the first method and follows immediately after it.
The part is placed in a container with an acid mixture. Type of acid used: hydrochloric or citric. Suitable proportions: 100 grams per 10 liters. Water.
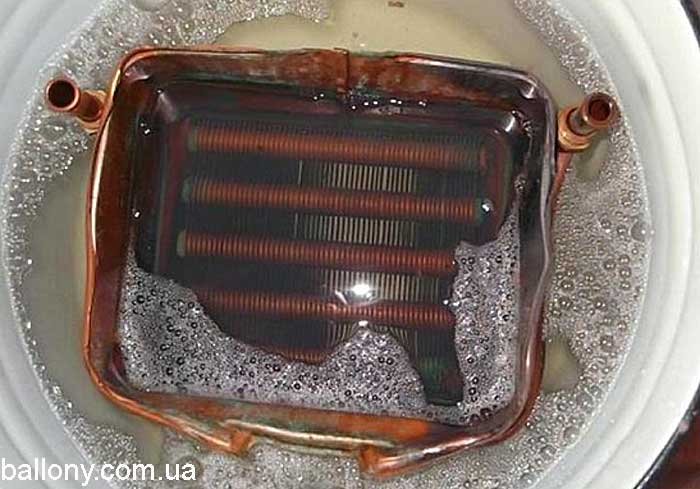
Acids can be replaced with any anti-scale preparations. After 30-40 minutes, the VT is removed from the container. The remaining scale is carefully wiped off.
At the same time, the coil is also cleaned. A special steel brush is used here.
The third method is chemical. More aggressive substances are pumped through the VT using a special pump. It attaches to the pipes of the part.
We recommend: Inverter for a heating boiler: the most detailed instructions for choosing a voltage converter 12 V to 220 V, review of the best models for gas and solid fuel boilers, characteristics and prices
Suitable tools for the job are shown in this table:
| Facilities | Description | Proportion to water: grams: liter | Water temperature | Product price (RUB) |
| Lemon acid | Popular folk remedy | 100 : 10-12 | 50-70°C | 50 – 1 sachet. |
| Thermagent Active | A versatile liquid with a powerful effect | 1 : 9 | 40-50°C | 1500 – 10 kg canister. |
| STEELTEX Cooper | One of the most effective preparations, but suitable for working with light alloy parts | 1:6 to 1:10 | 40-60°C | 1300 – 5 kg capacity |
| Detex | Concentrate with effective biological substances. Excellent cleaning of steel, cast iron and copper parts | 200-500 :10 | 40-50°C | 4900 – 10 l canister. |
| Hydrochloric acid | Effectively removes heavy scale | 100 : 10 | 50-70°C | 50 – 1 kg |
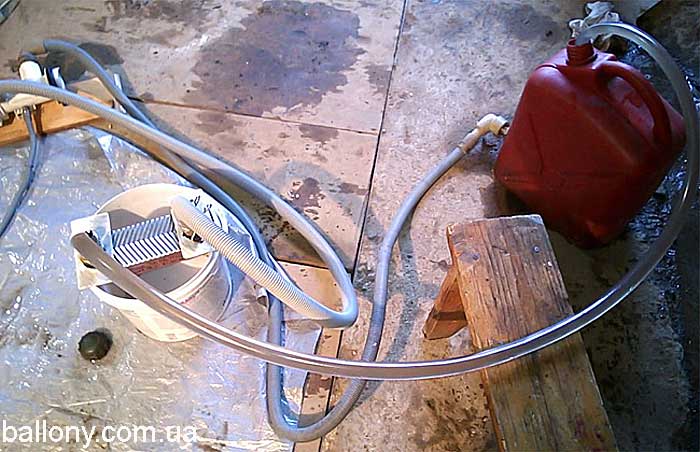
A hose is placed in the container with the mixture almost to the very bottom, one side connected to the VT, and the other to the pump. This creates the necessary circulation. The procedure lasts 30-40 minutes. Then the part is thoroughly washed with plain water.
The fourth method does not involve extracting the component. This is a hydrodynamic flushing of the secondary heat exchanger of a gas boiler. But it is carried out only by professionals. This requires special technology and compliance with safety criteria.
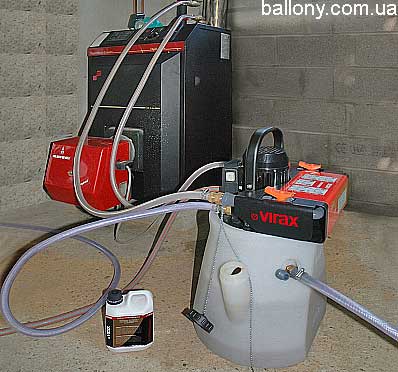
Its principle is to run a special composition through the boiler system under powerful pressure (1.5-2 bar). The work is done by a booster. Abrasive elements are added to the cleaning liquid.
This is the most effective method, gently removing all deposits and cleaning the part to a commercial appearance.
If you doubt the success of self-cleaning, you can order this service. All operations are carried out within a day. Their price tag is determined by the following factors:
- region,
- power and boiler modification,
- company's markup,
- the equipment and chemicals used.
In Moscow and the central region, clients pay about 3,500-9,000 for services. In St. Petersburg - 3,000 - 7,000 rubles. In other regions: 1700 – 4500 rubles.