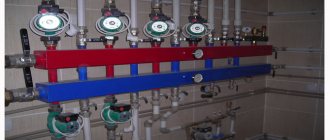
What is needed for installation
Installation of heating radiators of any type requires devices and consumables. The set of necessary materials is almost the same, but for cast iron batteries, for example, the plugs are large, and they do not install a Mayevsky valve, but instead, somewhere at the highest point of the system, they install an automatic air vent. But the installation of aluminum and bimetallic heating radiators is absolutely the same.
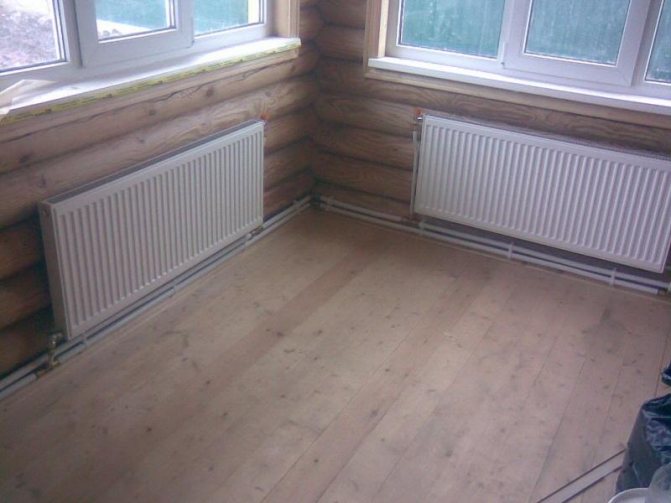
Steel panel ones also have some differences, but only in terms of hanging - they come with brackets, and on the back panel there are special arms cast from metal, with which the heater clings to the hooks of the brackets.
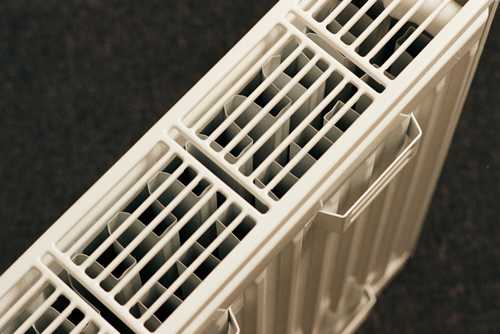
These are the arms that hook the hooks
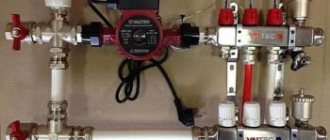
Mayevsky crane or automatic air vent
This is a small device for releasing air that may accumulate in the radiator. Placed on the free upper outlet (collector). It must be on every heating device when installing aluminum and bimetallic radiators. The size of this device is significantly smaller than the diameter of the manifold, so you will also need an adapter, but Mayevsky taps usually come complete with adapters, you just need to know the diameter of the manifold (connection dimensions).
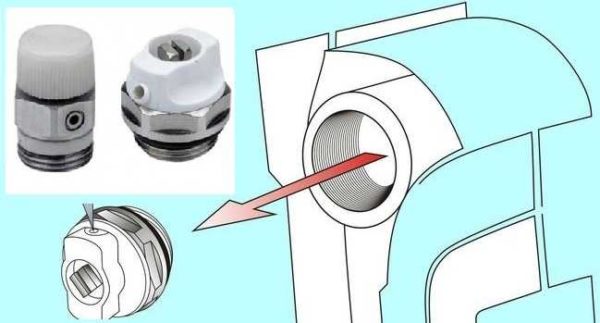
Mayevsky crane and method of its installation
In addition to the Mayevsky crane, there are also automatic air vents. They can also be installed on radiators, but they are slightly larger in size and for some reason are only available in a brass or nickel-plated case. Not in white enamel. In general, the picture is unattractive and, although they deflate automatically, they are rarely installed.

This is what a compact automatic air vent looks like (there are more bulky models)
Stub
The side-connected radiator has four outputs. Two of them are occupied by the supply and return pipelines, on the third they install a Mayevsky valve. The fourth entrance is closed with a plug. It, like most modern batteries, is most often painted with white enamel and does not spoil the appearance at all.
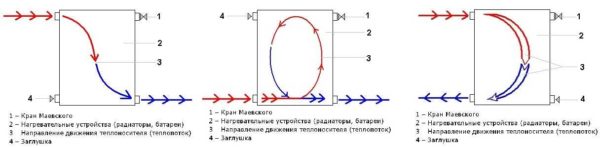
Where to install the Mayevsky plug and tap for different connection methods
Shut-off valves
You will need two more ball valves or shut-off valves that can be adjusted. They are placed on each battery at the input and output. If these are ordinary ball valves, they are needed so that, if necessary, you can turn off the radiator and remove it (emergency repairs, replacement during the heating season). In this case, even if something happens to the radiator, you will cut it off, and the rest of the system will work. The advantage of this solution is the low price of ball valves, the disadvantage is the impossibility of adjusting heat transfer.
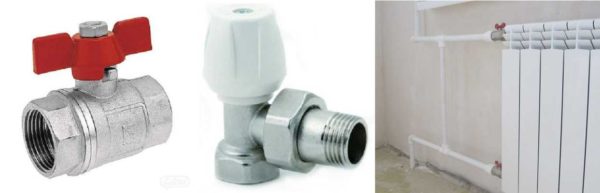
Radiator taps
Almost the same tasks, but with the ability to change the intensity of the coolant flow, are performed by shut-off control valves. They are more expensive, but they also allow you to adjust the heat transfer (make it less), and they look better externally; they are available in straight and angular versions, so the piping itself is more accurate.
If desired, you can install a thermostat on the coolant supply after the ball valve. This is a relatively small device that allows you to change the heat output of a heating device. If the radiator does not heat well, you cannot install them - it will be even worse, since they can only reduce the flow. There are different thermostats for batteries - automatic electronic ones, but more often they use the simplest one - mechanical.
Related materials and tools
You will also need hooks or brackets for hanging on walls. Their number depends on the size of the batteries:
- if there are no more than 8 sections or the length of the radiator is no more than 1.2 m, two mounting points on top and one on the bottom are sufficient;
- For every next 50 cm or 5-6 sections, add one fastener at the top and bottom.
You also need fum tape or linen winding and plumbing paste to seal the joints. You will also need a drill with drills, a level (preferably a level, but a regular bubble one will do), and a number of dowels. You will also need equipment for connecting pipes and fittings, but it depends on the type of pipes. That's all.
Wall marking
Before you begin installing steel heating radiators, you need to select a location and make markings. To do this, you will need to mark on the wall all the points where the heating device will come into contact with the wall. You will also need to mark the places where the fasteners will be installed. If the radiator needs to be attached to a plasterboard base, you will need to use plastic dowels for fastening. A metal anchor would be a more optimal solution for fixing a radiator to a wall made of stone or brick. Usually the radiator is sold complete with fasteners, so it is important to make the correct markings on the wall.
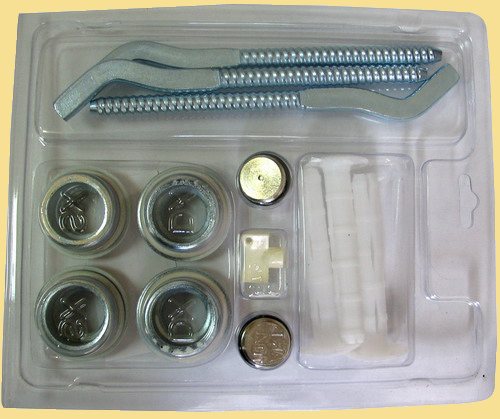
Metal radiator installation kit
Of course, you will need to make calculations for steel heating radiators. For this, there are several formulas for how to calculate steel heating radiators. To do this, parameters such as the type of house, the area to be heated, the power of steel heating radiators, and the region of residence are taken into account. Based on this, steel heating radiators are already selected; calculating their power is very important.
Hanging the heating radiator on the wall should be done at a slight slope. This is explained by the fact that in this case the structure will be better and faster filled with coolant.
The lifting angle depends on where the hole for the coolant inlet into the radiator is located. If this connector is on the left side, then the radiator must be slightly raised on the right side.
In order to make holes in the wall, you will need tools such as a drill and a drill. The diameter of the drill must be identical to the diameter of the dowel. Also, the fastening must have high strength and quality. After the dowel has been inserted into the hole, you will need to casing the dowel. To do this you will need a tool such as a hammer. Using the same method, we fasten the remaining dowels to the wall. This is necessary so that the second strip can be secured under the radiator.
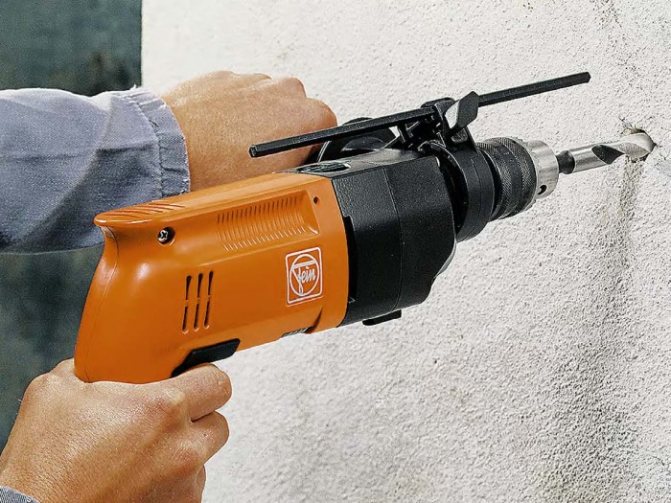
Drilling a hole for a dowel
Radiator strips are installed immediately after fixing the dowels. The slats must be attached using the bolts that were included with the heating radiator and slats. In order to tighten the bolts, you will need an adjustable wrench, but do not touch the dowel when tightening.
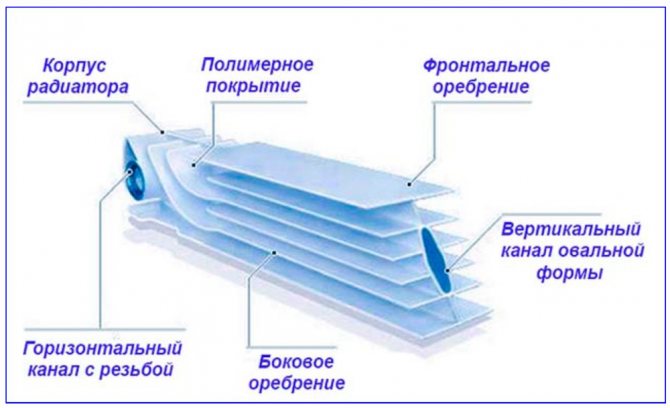
Bimetallic battery design
It should be noted that the design of bimetallic heating radiators is quite simple.
The structure consists of the radiators themselves, as well as steel pipes adjacent to them. Connection areas are processed using spot welding. The radiator is a metal pipe. There is iron inside. This is an ideal material that fits perfectly with a metal heating system. Because it holds pressure more effectively. The top of the pipe is covered with an aluminum layer. Which improves thermal conductivity characteristics. And since two metals are used in the production of the battery, it is called bimetallic. Using bimetal, heating radiators become more durable and have high performance characteristics. You can read more about the technical characteristics of bimetallic radiators here.
Bimetallic radiators can be of two types:
- with reinforced channels;
- based on a steel frame. Such devices are better protected. Since contact of water with aluminum is excluded. In addition, they are not afraid of corrosion and are much stronger than options with reinforced channels.
It is recommended to install bimetal batteries in apartments with a central water heating system based on iron and steel. It should be noted that the cost of bimetallic heating radiators is quite acceptable and depends on the power characteristics of the model and the size of the equipment.
In order for the radiator installation to be correct, it is important to accurately calculate the number of sections.
Determining the number of sections
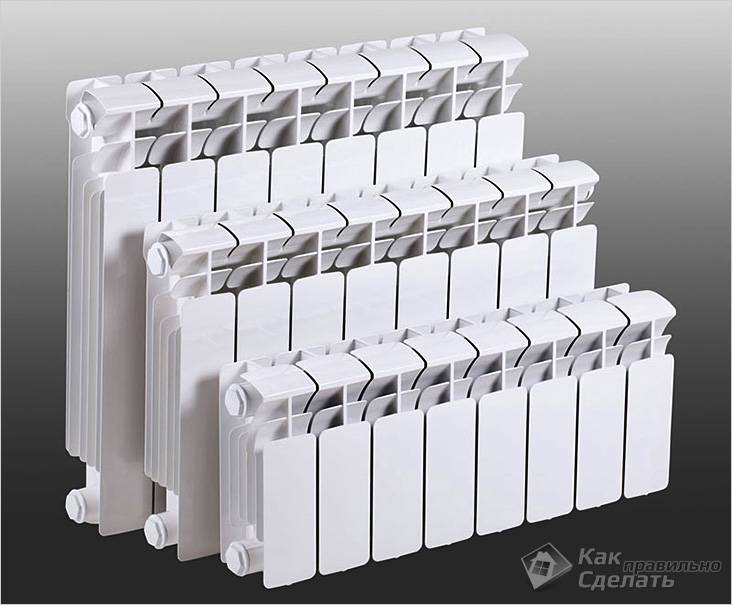
Radiators differ in height
To ensure a comfortable temperature in the room, and the boiler does not work at the limit of its capabilities, you need to perform simple calculations, thanks to which you can find out how many sections are required for each room. You need to find out the area of the room and the power of a separate section of the heating device.
- We find out the area of the room by multiplying 3 sides - width, length and height.
- The radiator power is indicated in the product data sheet.
The importance of correct calculation
How comfortable the room will be in winter depends on the correct calculation of the sections of bimetallic heating radiators. This amount influences the following factors:
- Temperature. If there are not enough sections, the room will be cold in winter. If there are too many of them, then the air there will be too hot and dry.
- Expenses. The more sections are purchased, the more expensive it will cost to replace the batteries.
Calculating the number of sections of bimetallic batteries is quite difficult. When calculating, take into account:
- fans that remove some of the heat from the room;
- external walls - corner rooms are colder;
- whether heat packages are installed;
- is there thermal insulation of the walls;
- what are the minimum winter temperatures in your region of residence;
- is steam used for heating, which increases heat transfer;
- whether it is a living room, a corridor or a warehouse;
- What is the ratio of the area of walls and windows.
In this video you will learn how to calculate the actual amount of heat
To calculate bimetallic heating radiators for an apartment, different methods are used. Of these, three are the most effective: in terms of area, volume and taking into account correction factors.
By room area
This is a simplified form of calculating bimetallic heating radiators per square meter. It gives a fairly correct result only for rooms with a height of no more than 3 m. According to plumbing standards, heating one square meter of a room located in central Russia requires a heat output of 100 W. Taking this into account, the calculation is made as follows:
- determine the area of the room;
- multiplied by 100 W - this is the required heating power for the room;
- the product is divided by the heat transfer of one section (it can be recognized from the radiator’s passport);
- the resulting value is rounded up - this will be the required number of radiators (for the kitchen the number is rounded down).
You can calculate the number of sections based on the area of the room.
This method cannot be considered completely reliable. The calculation has many disadvantages:
- it is only suitable for rooms with low ceilings;
- can only be used in central Russia;
- does not take into account the number of windows in the room, the material of the walls, the degree of insulation and many other factors.
By room volume
This method gives a more accurate calculation, since it takes into account all three parameters of the room. It is based on the sanitary heating standard for one cubic meter of room, equal to 41 W. To count the number of sections of a bimetallic radiator, perform the following steps:
- The volume of the room is determined in cubic meters, for which its area is multiplied by its height.
- The volume is multiplied by 41 W and the heating power of the room is obtained.
- The resulting value is divided by the power of one section, which is found out from the passport. The number is rounded - this will be the required number of sections.
This method is more accurate than the first. But it is also only suitable for central Russia, and many factors are not taken into account. To make it more accurate, correction factors are used.
Using odds
Their use allows many factors to be taken into account. The coefficients are used as follows:
- If the room has an additional window, 100 W is added to the heating power of the room.
- For cold regions, there is an additional factor by which the heating power is multiplied. For example, for the regions of the Far North it is 1.6.
- If the room has bay windows or large windows, then the heating power is multiplied by 1.1, for a corner room - by 1.3.
- For private houses, the power is multiplied by 1.5.
Correction factors help to more accurately calculate the number of battery sections. If the selected bimetallic radiator consists of a certain number of sections, then you need to take the model in which it exceeds the calculated value.
The calculation determines the number of sections that will create a comfortable temperature in the room and will allow you not to overpay for replacing radiators. Different methods are used for it. The most correct value is obtained by using correction factors.
Calculation example

Let's do the counting
- For example, a room has dimensions of 3x4x2.6 m. Multiplying these numbers, we get 31.2 m3.
- Conventionally, we will assume that each section of the bimetallic radiator has a power of 200 W.
- For ease of calculation, let's divide the power by 100: 200/100=2.
- Now we divide the area of the room by the resulting figure: 31.2/2 = 15.6.
- The resulting figure is the result, which reflects the number of sections required for installation in the room.
- Since it is unrealistic to purchase 15.6 sections, we round the figure up. The result was 16 sections.
The above calculation of the number of sections for a room assumes that the walls are warm and the windows are not ventilated. Otherwise, the number of radiator sections will have to be increased.
How to calculate the number of sections?
In order to get an accurate calculation, it is better, of course, to entrust this work to specialists.
If you decide to install a bimetallic radiator yourself, then you should know the calculation features. You will need two indicators: the area of the living space and the power level of the selected battery model. Manufacturers indicate the power of bimetallic heating radiators in the device passport. The size of the area must be divided by 10. This is necessary to calculate 1 kW per 10 sq.m. The resulting number should be divided by the power of the bimetallic heating device. The number obtained as a result of division must be rounded to whole numbers (up). This allows you to obtain information about the required number of sections.
Operating rules for bimetallic radiators. Expert advice
When operating the heating system, you must follow the following rules:
- Cleaning the battery twice a year - before and after the end of the heating season.
- You can completely drain the heating system for a maximum of 14 days.
- It is forbidden to suddenly open the shut-off valves.
- Do not paint the hole from which air is escaping.
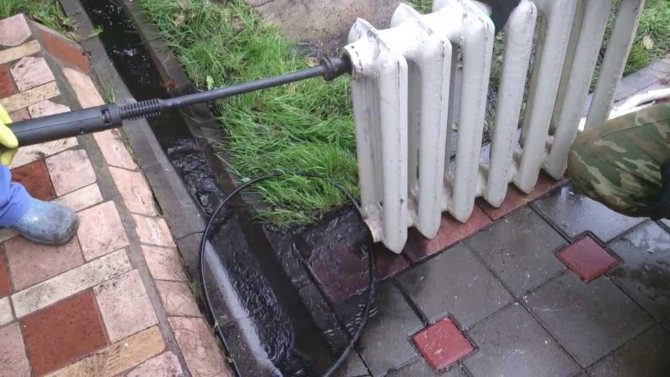
Cleaning the Battery
Knowing how to install a bimetallic heating radiator with your own hands, you can save on paying for the services of a specialist. The main thing is to adhere to the rules for installing batteries and the developer’s instructions. If the battery is installed correctly and all necessary conditions are met during its operation, it will last a long time.
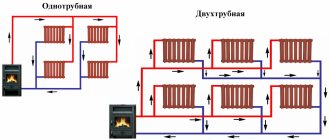
Methods for connecting bimetallic radiators
Depending on the number of pipes in the circuit, heating is of two types: one-pipe and two-pipe. The diagram and connection option for the battery depend on this. In addition, the type of construction is also taken into account: one-story or multi-story building.
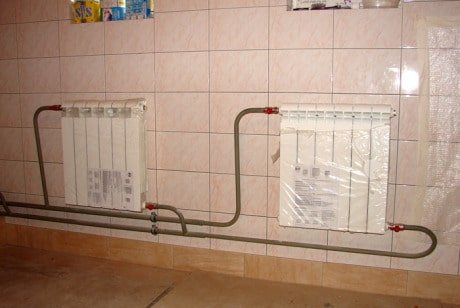
Connecting bimetallic heating radiators with a single-pipe system
The single-pipe system is considered the most economically profitable. More often, such wiring is used for high-rise buildings, but it is also found in private houses where there is a closed type of heating with forced circulation. Bimetallic devices in a one-pipe system are connected in series. During circulation, the coolant passes through each radiator in turn.
In a one-pipe system, all radiators are connected to one pipe, which acts as supply and return
The weakness of a single-pipe system is the temperature difference. Due to the sequential passage of the coolant, the bimetallic outer batteries on the circuit are always colder. The second disadvantage is the inability to equalize the heating of each heating device. If a regulator is installed on a bimetallic battery, due to the serial connection, during regulation, the heating temperature will still change throughout the entire system.
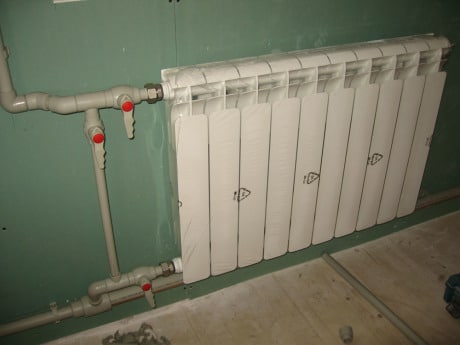
Connecting bimetallic heating radiators with a two-pipe system
From the name it is already clear that the system involves the use of two pipes: supply and return. Each bimetallic device is connected in parallel. This scheme ensures that the coolant passes at the same temperature through all batteries. In addition, each radiator can be equipped with a regulator to set optimal heating.
In a two-pipe system, bimetallic heating devices are connected in parallel
The downside is the need to use more pipes. However, the efficiency of such heating is better. In addition, a two-pipe system in a private house is capable of operating with natural circulation without a pump. You just need to maintain the slopes of the pipeline and radiators relative to the location of the boiler.
Preparing to install bimetallic radiators
Preparing for the installation of batteries is no less important stage than the main work on installing heating devices. Bimetallic radiators are lighter than cast iron, but heavier than aluminum. This is due to the design features.
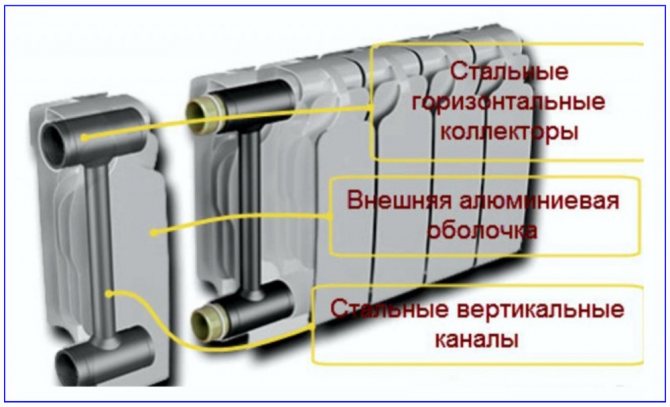
The internal part of the sections is a system of a steel manifold and vertical heat-conducting channels. The outer part – the “body kit” responsible for heat transfer – is made of aluminum.
The installation of bimetallic heating radiators begins with an inspection of the walls and an assessment of whether the vertical surface can withstand the load. If the wall is load-bearing or interior brick, it is designed for the installation of heating devices. But partitions made of plasterboard or ridge slabs may require reinforcement. In any case, it is safer to mount radiators using dowels and attach hooks and brackets to them.
Then they proceed in the following sequence:
- create a battery layout;
- determine the type of connection - side one-sided, bottom, diagonal, serial or parallel;
- flush the heating system (if possible);
- carry out dismantling of old heating devices;
- prepare brackets and hooks for hanging radiators.
Experts recommend a diagonal type of connecting batteries: with this wiring, heat loss is only 2%.
The preparatory stage also includes the purchase of the necessary accessories - fittings, connecting pipes. Experts recommend meeting the following conditions:
- the material of the heating system pipes and additional elements must be the same;
- Shut-off valves should be provided at the inlet and outlet of the radiator;
- Mayevsky valves are useful for releasing air from the system.
IMPORTANT TO KNOW: High-quality bimetallic radiators can withstand pressure up to 100 atmospheres, but they must be protected from water hammer. This can lead to rupture of heat-conducting channels, because they have a small cross-section, and the pressure inside the batteries themselves is higher than in the system as a whole.
Shut-off valves allow for better operation of the heating system
Types and features of heating radiators
In the retail chain, the buyer is offered a wide range of heat exchange radiators made from various materials in various shapes to choose from. Based on the materials used, they are all divided into the following groups.
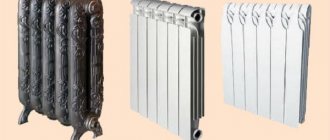
Cast iron
Cast iron batteries are classified as classic; unlike their predecessors, modern products are painted in different colors and give them an aesthetic appearance. Cast iron radiators received a second life as decorative elements to emphasize the designer's retro style.
The molded battery sections have a pattern, are installed on legs and painted in colors that match the color scheme of the room or style.
Features of cast iron radiators are their heavy weight, high thermal capacity, and the ability to change the number of sections connected to each other by nipples. Cast iron has fairly high corrosion resistance and can be used for about 50 years; it can withstand pressures of up to 50 bar (low-grade Chinese can burst at 20 - 30 bars) and high temperatures of liquid or vapor coolant up to + 120 ° C. Due to the relatively low thermal conductivity, the thermal power of one cast iron section is 140 - 150 Watts.
The most famous manufacturers of cast iron batteries: the Russian company Nova (produces budget options), companies Viadrus, Konner, Bohemia with higher prices for their products.
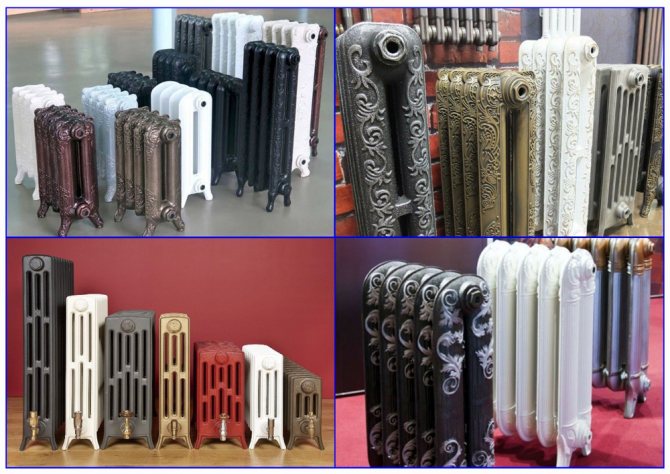
Rice. 2 Designer batteries made of cast iron
Aluminum
Heat exchangers made of aluminum, or more precisely its alloy with silicon (silumin), today occupy a leading position in use in any heating systems. They are manufactured in the form of separate aluminum sections, inside of which passage channels are created for coolant circulation.
Methods of industrial production of aluminum radiators - casting and extrusion.
The main physical and operational characteristics of aluminum heat exchangers: light weight, heat transfer of one standard section 80 by 80 mm - about 180 W, maximum coolant pressure 10 - 15 bar for cheap products and up to 50 bar for expensive Italian ones, working environment temperature no more than 115 ° WITH. Due to their high thermal conductivity and low thermal capacity, they can quickly warm up a room.
The disadvantages of radiator heat exchangers made of aluminum include low strength characteristics for certain operating conditions (silumin, unlike pure aluminum, is a brittle alloy). Also, aluminum radiators have low corrosion resistance when used in a working environment with a high or too low pH value.
If the pH of the coolant exceeds the range of 7–8 units, either increasing or decreasing, the protective Al2O3 oxide film on the metal surface, which gives it anti-corrosion resistance, is destroyed.
Rice. 3 Construction of an aluminum radiator section
The metal constantly forms a new protective film to replace the destroyed one, while its layer gradually becomes thinner until a fistula forms. Also, the process of the appearance of a new oxide is accompanied by the release of hydrogen H2, which further accelerates the destruction of aluminum.
If a consumer leaves water in the radiators of an aluminum heat exchanger for the summer, the appearance of hydrogen from the formation of an oxide film and the activity of bacteria can even lead to rupture of sections of a closed battery.
Aluminum heat exchangers are not recommended for installation in a central heating system due to the inability to control pH.
The best manufacturers of such radiators are Italian companies Green, Sira, Group, Fondital.
Bimetallic
As the name bimetals suggests, radiators of this type use two types of metals - steel and aluminum.
A bimetallic radiator consists of sections, each of which is a steel pipe channel placed in an aluminum heat exchanger.
Despite the heavier weight compared to aluminum ones, the introduction of an internal steel collector into the design made it possible to increase the strength and temperature characteristics of bimetallic batteries. They can withstand a coolant pressure of 50–100 bar (depending on the manufacturer) at temperatures up to 135 °C. In this case, the hydrogen index of the working environment does not play a significant role. The heat output of bimetallic radiators is about 160 - 170 W.
Rice. 4 Design of bimetallic heat exchangers
Steel
Inexpensive, simple and reliable radiators made of steel come in two types - panel (Fig. 5) and tubular.
The simplest tubular convection radiator consists of two front metal sheets, between which there is a pipeline with heat exchange plates through which the coolant circulates. Heating of rooms occurs due to convection of air masses.
On top, the outer metal panels are covered with a protective layer of varnish, applying it using high-temperature firing in ovens.
Steel heat exchangers are produced using spot welding technology; they are not sectional or collapsible.
The maximum operating fluid pressure thresholds for tubular products are 9 - 15 bar, for panel products 5 - 11 bar, the heat transfer of one battery ranges from 1200 to 1650 watts. Steel radiators can withstand operating environment temperatures up to 115 °C. The hydrogen index is not significant for steel and can deviate from the neutral value of 7 units by several points in one direction or another.
However, the problem of corrosion is urgent for steel, that is, the high oxygen content in water leads to its rapid destruction.
Therefore, it is not recommended to install steel radiators in communal apartments and supply coolant to them through pipes that are not protected from oxygen diffusion.
Also, steel panel heat exchangers are sensitive to pressure changes and often cannot withstand water hammer, which in centralized heating networks reaches values of the order of 35 - 40 bar.
Bimetallic heating radiators
Comparative characteristics with other types of batteries
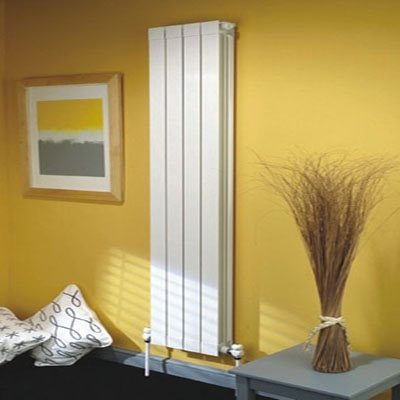
The photo shows a tall narrow device.
First you need to understand what kind of heating radiators there are, and how they differ from each other.
We list the main types:
- Cast iron batteries are one of the most common types, found in most Soviet-era apartments. It is a system of connected cast iron sections with fairly thick walls and a large mass. It is characterized by high strength and durability, but has low efficiency and heat transfer, and one can also note high thermal inertia;
- Steel tubular registers are a system of pipes of sufficiently large diameter, or one pipe in the form of an S-shaped bend (for example, a heated towel rail). This type of device is usually installed in large premises - concert halls, cinemas, sports complexes, supermarkets. They are distinguished by high power and large volume of coolant;
- Steel heating panels . They are welded profiled steel plates, inside of which there are channels for coolant circulation. They have a fairly low resistance to water hammer and low strength, are susceptible to corrosion and are not very reliable;
- Aluminum radiators are a more modern type of battery, which is characterized by increased heat transfer and efficiency, low coolant volume and low weight of the device. Due to low thermal inertia, they lend themselves well to automatic and manual temperature control. They are demanding on the quality of the coolant and its acidity, have average strength and service life;
- Copper batteries are a system of tubes with plate fins. They are distinguished by the highest heat transfer and efficiency, high strength and resistance to water hammer, lack of corrosion and long service life. The only drawback of copper units is the high price;
- Bimetallic radiators resemble aluminum devices in appearance and design, with the difference that the inner walls of the channels are made of steel or copper. In this way, it is possible to increase the efficiency and heat transfer of the battery, but maintain its strength and durability.

A cast iron battery familiar to many.
To understand the main distinguishing feature of a bimetallic device, you should better understand its design. The main task of any liquid-cooled battery is to ensure maximum heat transfer from the coolant to the environment, while at the same time having a sufficient supply of mechanical and corrosion strength for long-term efficient operation.
The degree of heat transfer directly depends on the thermal conductivity of the metal and the thickness of the walls. The most thermally conductive materials are aluminum and copper, so the most efficient devices are made of non-ferrous metals.
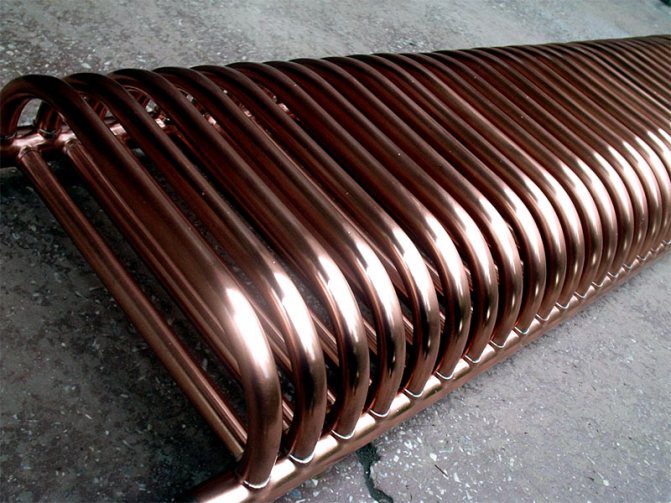
The most efficient radiators are made from copper.
On the other hand, steel and ferrous metals demonstrate the highest strength. But they are susceptible to corrosion and have low thermal conductivity. At the same time, steel is much cheaper than copper and aluminum, which is also an advantage.
The design of the bimetallic radiator is distinguished by the fact that the internal walls of the channels are made of durable anti-corrosion steel or pure copper, and the external walls and fins are made of lightweight and heat-conducting aluminum. This solution made it possible to combine the advantages of steel and non-ferrous metals in one device.
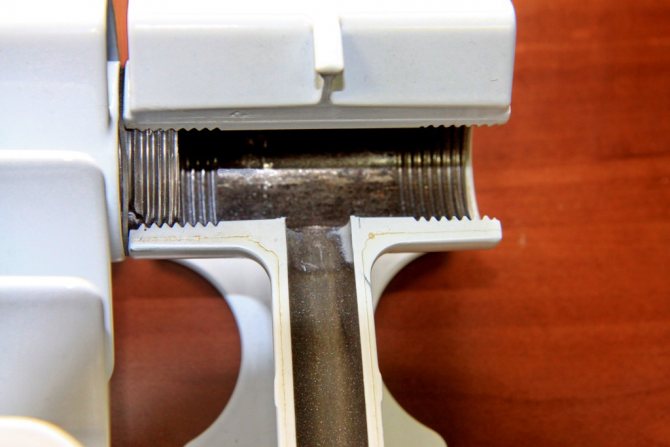
The inner surface of the channels and manifold is made of steel.
Important! Bimetallic radiators combine the advantages of products made of ferrous and non-ferrous metals, becoming the most progressive and modern type of heating devices.
Advantages and disadvantages
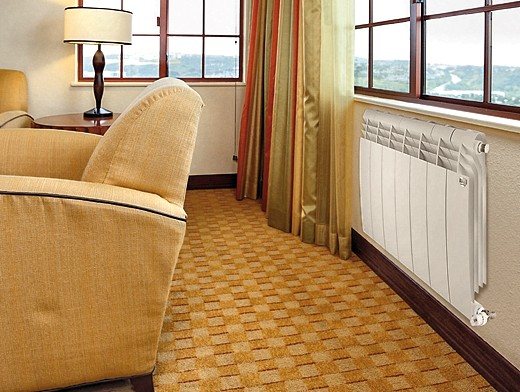
The convector fits perfectly into a modern interior.
Let's consider the positive and negative aspects of using units with combined metals in their composition. Let's start with the advantages:
| Advantage | Description |
| High mechanical strength | The core of the device is made of high-strength anti-corrosion steel, which is capable of withstanding operating pressure within 40 atm, significant water hammer and external mechanical influences |
| Durability | The service life of this type of battery ranges from 20 to 50 years. This is achieved by high build quality and the use of the most suitable materials. |
| High heat dissipation | The thermal conductivity of aluminum is four times that of steel, and copper is twice the thermal conductivity of aluminum. The heat transfer of one bimetal section is 150 - 180 W, which is significantly higher than that of single-element models |
| No electrochemical processes | Since the internal surfaces of the channels are made of steel, like pipes, galvanic processes and electrochemical corrosion do not occur in the system |
| Good adjustment | The units are characterized by a very small coolant capacity, which, combined with the good thermal conductivity of the materials, allows for effective temperature control through thermostatic valves |
| Beautiful design | Aluminum’s ability to cast allows you to create any shape of case, and modern types of paints and coatings make the appearance of batteries especially attractive |
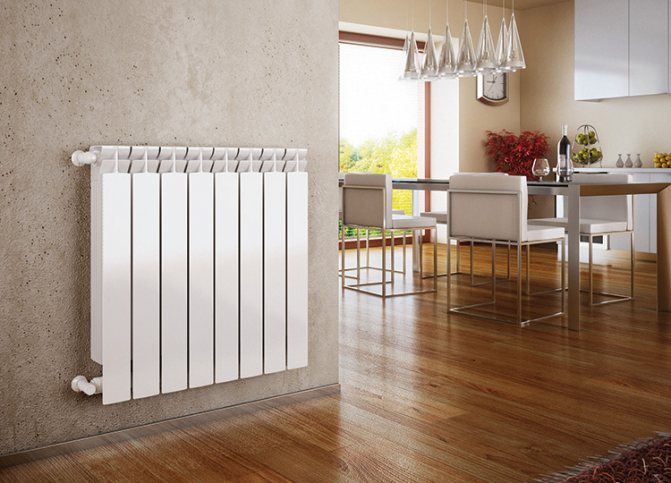
Attractive appearance is a distinctive feature of the product.
The disadvantages of the model include its high cost and requirements for the quality of manufacturing and assembly. Materials should be combined with strict adherence to technology, otherwise the device will not last long and will not meet the listed criteria.
Important! The bimetallic convector can be considered one of the most successful and progressive types of heating devices.
DIY installation
Bimetallic batteries do not belong to the category of complex heating equipment. However, due to the specific features of installation, it is recommended to entrust the work to specialists in this field. The cost of installing bimetallic heating batteries differs in different regions, the average price is from 3,500 rubles. If the owner of the house decides to install a bimetallic heating radiator with his own hands, then it is necessary to become familiar with the rules and features of connecting devices.
Installation recommendations
Before starting work, you must read the technical documentation for your specific radiator model. It is worth paying special attention to the features of the device, operating and installation requirements. Next, you need to decide on the list of necessary materials and tools.
Main stages of preparation for installation:
- Assemble the radiator according to the manufacturer's instructions and check its configuration for the presence of all elements.
- Turn off the heating system and make sure there is no water in the pipeline.
- Familiarize yourself with all SNiP requirements that must be complied with.
- Select connection diagram.
To carry out installation, you must have the skills to carry out plumbing work; if necessary, consult with specialists. The use of abrasive tools must be avoided.
Installation and location rules
Installation of bimetallic devices must be carried out in accordance with the instructions contained in SNiP. Each heating system must comply with certain standards and requirements. Deviations, inconsistencies or non-compliance with regulations can result in serious accidents, damage and ineffective operation of equipment.
For efficient operation of devices and air circulation, it is necessary to follow recommendations for the location of batteries and dimensional elements of the room.
Requirements:
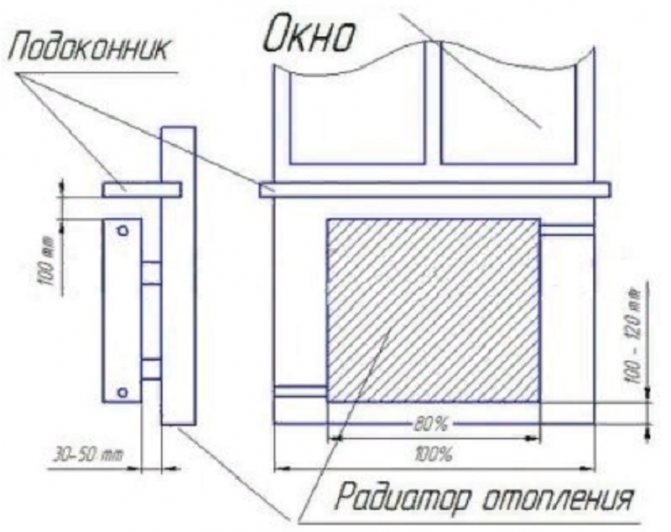
- The vertical axis passing through the center of the battery must coincide with the middle of the window. The permissible deviation from the norm is 2 cm in one direction or another. The battery should be approximately 20% narrower than the window opening.
- Excessively wide window sills are not allowed. The permissible excess should not be more than 30–50%.
- The distance from the floor to the bottom edge of the radiator should be at least 12–14 cm, and from the top of the radiator to the window sill - 10 cm.
- The distance between the rear plane of the heater and the surface of the wall on which it is installed should be within 3–5 cm. The exception is walls with heat-reflecting surfaces.
- If there is no radiator under the window, then the cold air descends along the wall and spreads along the floor. Warm air from the installed radiator prevents the penetration of cooled air masses from the window to the floor.
Required materials and tools
Installation of radiators requires the use of conventional and special tools. To mark the location of the brackets you need: tape measure, ruler, level, marker.
To install the brackets, you will need a drill or hammer drill, a corresponding drill of a certain diameter, and dowels. To connect to the heating network, you must have: a set of adjustable and open-end wrenches, universal clamping pliers, fum tape.

Marking places
First, you need to decide on the location of the radiator and the number of suspension points, the number of which depends on the size of the battery. SNiP recommends fixing at least 2 brackets at the top and 1 at the bottom.
Procedure:
- We measure the distance from the top point of the radiator to the mounting location of the bracket. We mark this value on the wall where the device is installed.
- We measure the distance to the second fastening point and put a mark on the wall, using a level.
- If there are more than two attachment points, then we continue measurements to the next attachment points.
- We draw a horizontal line (using a level or level) on which all attachment points should be located, and drill holes.
- We make similar measurements and markings for the bottom row brackets.
Installation
Installation of bimetallic heaters is carried out taking into account all requirements and procedures for carrying out operations.
Instructions:
- Select a suitable connection diagram.
- Mark the location of the brackets in accordance with the above method.
- Drill holes in the marked places and secure the brackets. If there is a plasterboard partition, it is necessary to fasten it on both sides.
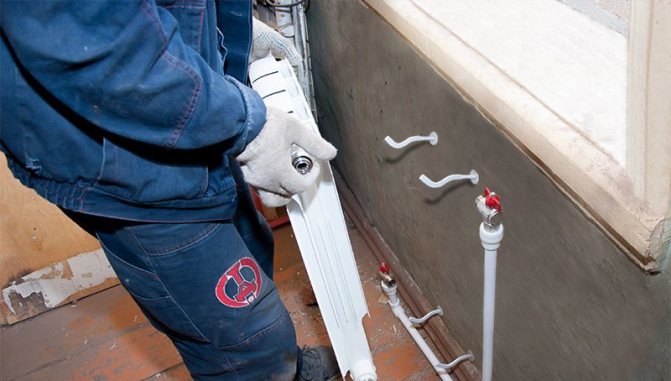
- The radiator must be assembled. Do not remove the protective film. Install the radiator on the brackets, first checking their horizontal installation using a level. Reverse battery slope is unacceptable.
- Connect the heating system pipes to the radiator using the necessary tools. During installation, it must be taken into account that bimetallic radiators use left- and right-handed threads.
- To seal joints, you can use flax with sealant, FUM tape or other materials intended for this purpose.
- Install an automatic air vent in accordance with SNiP standards.
After installation is completed, it is necessary to remove the protective film from the devices and smoothly open the valve to allow coolant to flow in. Bleed the system. Inspect the battery for leaks at the connections.
Expansion of additional sections
To independently build up sections, it is enough to have the following tools: a regular installation kit, as well as a radiator, pipe wrench, special nipples from the section kit, and paronite gaskets for joining. Work should begin by draining the coolant from the system, as well as eliminating the possibility of its supply.
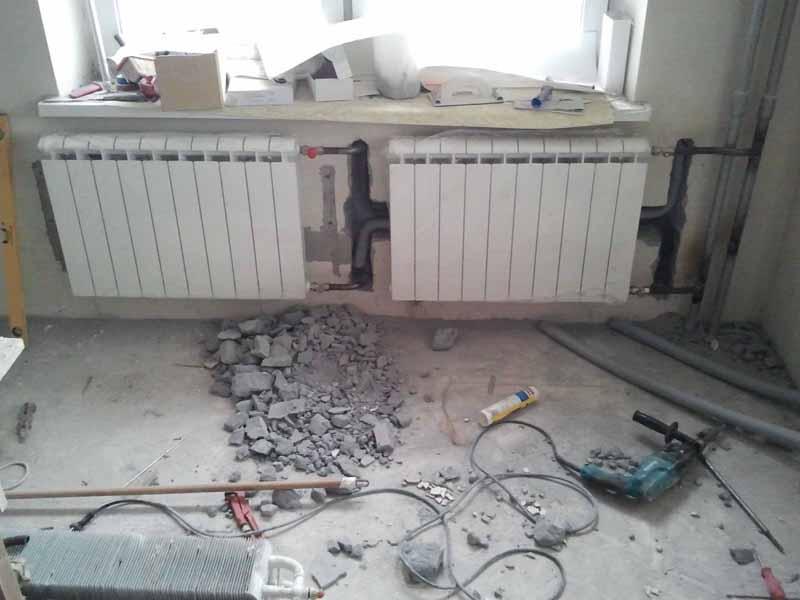
Then you need to dismantle the radiator: disconnect the heating system pipes from the battery and remove it from the brackets. The dismantled device must be carefully inspected and cleaned of dust and dirt using special means. Carefully inspect the condition of the threaded part and surfaces that ensure tightness.
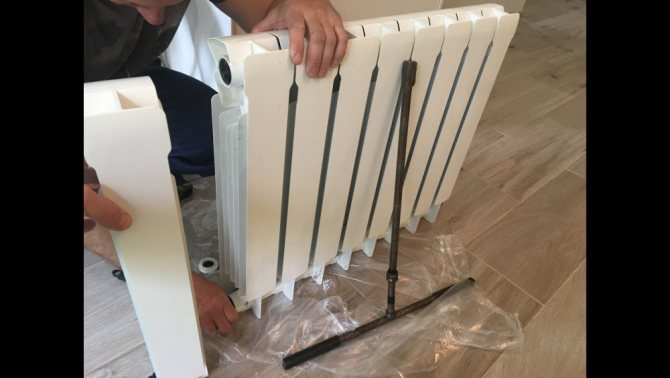
If it is necessary to add a large number of sections, then there may be a need for additional fastening. For ease of work, the radiator must be laid on a flat surface, which will help to avoid various types of distortions during connections, which can subsequently affect the strength and tightness of the connections.
Next you need to assemble the battery with additional sections. To do this, move the elements and install gaskets with nipples between them. Before installation, it is necessary to check the quality of gaskets, nipples, and thread condition.
The connection begins with carefully tightening the nipple. It has two types of threads designed for screwing in different directions. When the nipple is tightened, the sections located opposite each other are connected. To carry out this type of work, you cannot do without a special radiator key.
After preliminary connection of all nipples, it is necessary to tighten them tightly, ensuring uniform screwing to avoid distortions and thread breakage. This completes the assembly of the radiator, it is ready to connect to the heating system.
Operating rules and problem solving
All necessary information on use is presented in the technical and operational documentation that comes with the device.
Rules for operating radiators:
- Before the onset of the heating season and at its end, carry out a number of preventive works related to the inspection and cleaning of batteries.
- Do not leave the system without coolant for a long time.
- The shut-off valves must be opened and tightened smoothly.
- Keep the air vent hole clean.
- Ensure unhindered flow of warm air from the battery, avoid covering the surface with any material or box.
- To protect the internal surfaces of the radiator from the effects of low-quality coolant, it is recommended to use filter elements.
Bimetallic devices are reliable in operation, provided that all requirements for use are met. But they are also prone to malfunctions.
The most common are:
- presence of battery leakage;
- complete or partial lack of heating;
- various kinds of noise in the heating system.
Compared to other types of batteries, bimetallic ones are the most resistant to the effects of low-quality coolants. However, their constant influence negatively affects the condition of the radiator walls. Deposits on internal surfaces reduce the cross-sectional dimensions of pipes and reduce the speed of fluid movement, which leads to a decrease in heating temperature.
Assembling an additional radiator section
To connect, you need to take the nipple and position it correctly: the right side turns towards the new element, the left - towards the previously installed battery. Sealing intersection gaskets made of paronite are put on the nipple. They eliminate leaks when working under pressure. The seal should be positioned as evenly as possible, without distortion.
The thread is gradually tightened on both sides; the process requires care and precision. The sections gradually attract each other until there is no free space between them. Using a pipe wrench, the side plugs are screwed in and the paronite gaskets are secured. After assembly is completed, the enlarged battery is hung on brackets and connected to the heating pipes using threads or welding.
Connection diagrams for auxiliary radiators
Another option to solve the problem of insufficient heating is to connect auxiliary batteries to the system. The most common option is a single-pipe scheme: another heater is built into the system and increases the heat exchange area, heating devices are connected using a bottom connection. The two-pipe scheme is more difficult to install; it will require laying an additional pipeline, but will ensure the same temperature in all heaters.
To find the optimal solution, use. Our employees will choose the most profitable option, increase the area of heating devices or add additional heaters to the system. We are waiting for you today!
Heating system connection options
In addition to choosing the radiator itself, during installation you will also need to decide how to connect it to the centralized network. There are several different options available to you, each of which has its own scope of use:
- Diagonal connection. This scheme is the best choice for long multi-section heating batteries. It is distinguished by the fact that the water supply pipe is attached to the pipe from above on one edge of the radiator, and the outlet pipe is attached to the lower pipe on the other side. Among the disadvantages of such a system are difficult repairs in case of problems: the scheme does not imply removing the battery without completely turning off the heating.
Radiator connection options
Important! When supplying water from below, you will lose about 10% of the possible heat. . Bottom connection
This wiring diagram looks the most inconspicuous. It is used if pipes are located inside the floor or hidden under baseboards. The supply and outlet pipes are directed perpendicular to the floor surface. The main disadvantage is that this system involves the greatest possible amount of heat loss. Lateral one-way connection. It is the most common and effective. Maximum heat transfer is ensured by connecting the inlet pipe from above, and the outlet pipe from below on the same side of the battery. When inverted, the heating power is significantly reduced, so it is not recommended to swap pipes.
- Bottom connection. This wiring diagram looks the most inconspicuous. It is used if pipes are located inside the floor or hidden under baseboards. The supply and outlet pipes are directed perpendicular to the floor surface. The main disadvantage is that this system involves the greatest possible amount of heat loss.
- Lateral one-way connection. It is the most common and effective. Maximum heat transfer is ensured by connecting the inlet pipe from above, and the outlet pipe from below on the same side of the battery. When inverted, the heating power is significantly reduced, so it is not recommended to swap pipes.
Important! If the distant sections of the battery are not warmed up enough, a water flow extension is used.
- Parallel connection. It occurs through a heat pipe built into the heating system. The withdrawal is implemented in the same way. This system allows you to replace batteries without turning off the central heating, but the main disadvantage is that if there is insufficient pressure in the system, the batteries do not warm up well.
Important! Connecting a heating radiator with your own hands in this way is quite difficult; it would be better to entrust this work to experienced installers.
- Serial connection. In this case, heat transfer through the system occurs due to air pressure in it. Excess air is drained using a Mayevsky tap. The main disadvantage of such a system is also the impossibility of repairs without shutting down the entire heating system.
How to install correctly
Now about how to hang the radiator. It is very desirable that the wall behind the radiator is level - this makes it easier to work. Mark the middle of the opening on the wall, draw a horizontal line 10-12 cm below the window sill line. This is the line along which the top edge of the heating device is leveled. The brackets must be installed so that the top edge coincides with the drawn line, that is, it is horizontal. This arrangement is suitable for heating systems with forced circulation (with a pump) or for apartments. For systems with natural circulation, a slight slope is made - 1-1.5% - along the flow of the coolant. You can’t do more - there will be stagnation.

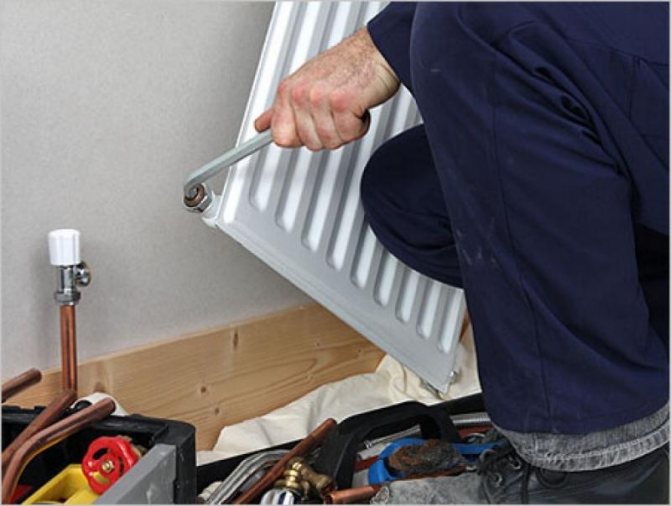
Correct installation of heating radiators
Wall mount
This must be taken into account when installing hooks or brackets for heating radiators. Hooks are installed like dowels - a hole of a suitable diameter is drilled in the wall, a plastic dowel is installed in it, and the hook is screwed into it. The distance from the wall to the heating device is easily adjusted by screwing in and unscrewing the hook body.
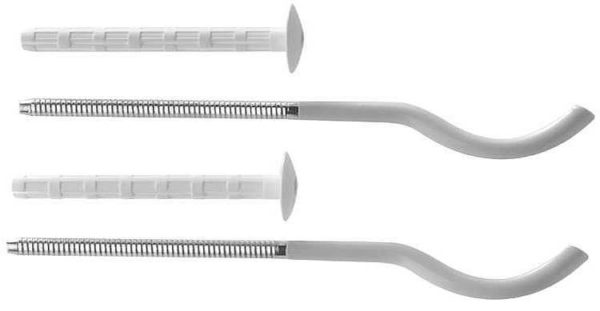
Hooks for cast iron batteries are thicker. This is a fastener for aluminum and bimetallic
When installing hooks under heating radiators, keep in mind that the main load falls on the upper fasteners. The lower one serves only to fix it in a given position relative to the wall and is installed 1-1.5 cm lower than the lower collector. Otherwise, you simply will not be able to hang the radiator.
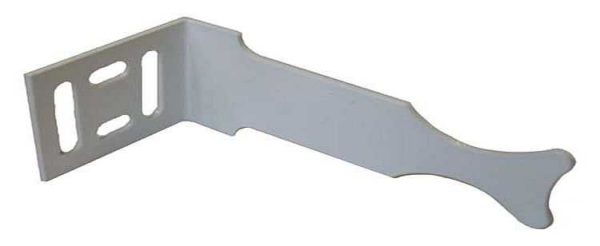
One type of brackets
When installing the brackets, they are applied to the wall in the place where they will be mounted. To do this, first attach the battery to the installation location, see where the bracket “fits,” and mark the location on the wall. After placing the battery, you can attach the bracket to the wall and mark the location of the fasteners on it. In these places, holes are drilled, dowels are inserted, and the bracket is screwed. Having installed all the fasteners, hang the heating device on them.
Floor fixing
Not all walls can support even lightweight aluminum batteries. If the walls are made of lightweight concrete or covered with plasterboard, floor installation is required. Some types of cast iron and steel radiators come directly with legs, but not everyone is satisfied with their appearance or characteristics.
Legs for installing aluminum and bimetallic radiators on the floor
Floor installation of heating radiators made of aluminum and bimetallic is possible. There are special brackets for them. They are attached to the floor, then the heating device is installed, and the lower collector is secured with an arc to the installed legs. Similar legs are available with adjustable height and some with a fixed height. The method of fastening to the floor is standard - with nails or dowels, depending on the material.
Connection diagram
Any connection method can be used in a one- and two-pipe heating system. In the first type, the batteries are installed so that they form a single chain through which water flows from top to bottom. It is not profitable to install such a heating system in a private house, since the first radiators will heat up very well, but the rest will heat up poorly. This occurs due to the flow of cooled coolant to the last devices.
A two-pipe system is more profitable, since hot water comes from one riser, and cooled water flows into the other. This type of heating network piping is carried out in all private houses, because it allows you to maintain a constant specified thermal regime and makes it possible to control this regime.