Thanks to modern finishing materials, an ordinary cold loggia from a banal smoking room, a clothing warehouse and a place for drying clothes can be turned into a warm and cozy extension of the living space - an office, a workshop, an extension to the kitchen or a comfortable relaxation area. An important stage in this transformation is insulating the floor on the balcony.
Features and Benefits
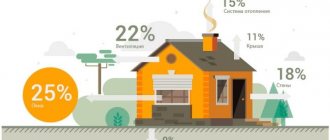
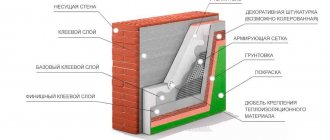
Considering a warm balcony an unnecessary luxury means losing not only additional square meters of your home, but also its thermal insulation and the possibility of more rational landscaping. After all, usually the base of the loggia consists of concrete slabs, which freeze strongly in winter and quickly collect condensation in summer. Therefore, to achieve maximum effect when changing the functionality of the balcony space, it is necessary to combine the construction of a heated floor there with wall insulation and high-quality glazing.
The advantages of this arrangement are quite obvious:
- a significant increase in useful square meters, which is valuable for small-sized housing; - a change in the microclimate in the adjacent room for the better;
- excellent sound insulation device;
- a significant reduction in heat loss across the entire area of the apartment.
The main feature of insulating a balcony is that connecting the apartment’s central heating to it is unlikely, but it is possible to arrange its heating using electric radiators and a convenient “warm floor” system. The optimal thermal insulation material for such work should be selected especially carefully.
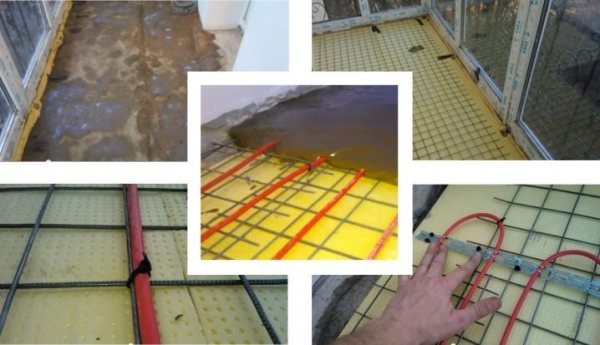
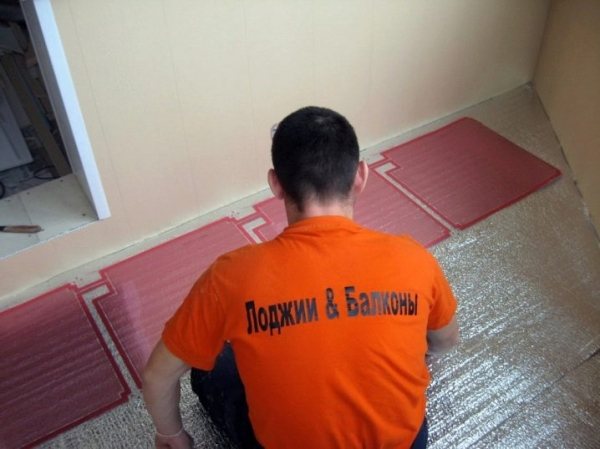
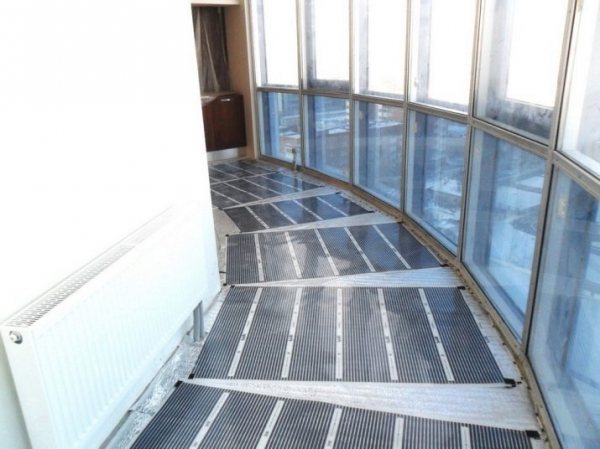
Heating system using mats
To do this, use a special mesh onto which heating cables are attached. These mats are then laid out on a base, which can be a simple concrete floor. Covered with laminate and connected to electricity. This method is good because it does not require special styling skills and at the same time has only positive qualities.
First of all, this floor is very safe for both adults and children.
When using this type of insulation, the floor only rises slightly and therefore does not cause any discomfort when moving from the apartment to the balcony and vice versa.
READ MORE: We insulate the balcony with mineral wool
In order to lay a heated floor with your own hands, you need to do the following work:
- Clean the surface of the concrete floor from dust and other debris.
- To secure the mats, coat the surface with primer.
- Check the serviceability of the mesh you are going to use.
- Install the adjustment sensor in a convenient place.
- Unroll the heating system and connect to the power supply.
Types of insulation
A balcony is a remote structure, usually located on one concrete slab, which connects it to the house. This means you can’t overload it with heavy finishing materials. Therefore, for thermal insulation, you should select those insulation options that are light in weight, easy to cut and easy to install.
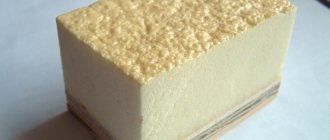
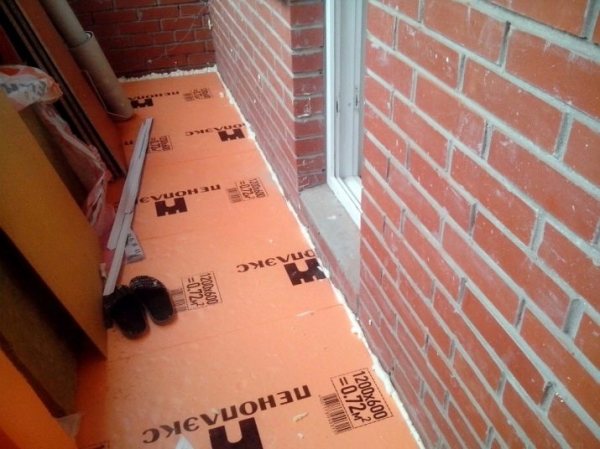
Polystyrene foam is the cheapest material option for insulating the floor on a balcony. However, all its indisputable advantages in the form of low price, excellent thermal insulation properties, lightness, hygroscopicity, bactericidal properties, frost resistance, long-term operation and easy installation more than outweigh the disadvantages: complete vapor tightness, high flammability and toxicity. Therefore, it is better to lay foam plastic only under the screed - this way its vapor permeability will not be so important, and it will no longer be able to catch fire. Typically, polystyrene foam is produced in white sheets with a thickness of 2 to 10 centimeters. To insulate the floor on a balcony, the thickest sheets are most often used.
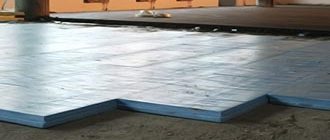
Extruded polystyrene is an inexpensive material for insulating floors on balconies with a chemical composition and positive properties similar to polystyrene foam, but with fewer negative characteristics. Extruded polystyrene is capable of transmitting light, is quite resistant to negative environmental influences and temperature changes, is not prone to rotting, maintains compressive strength and does not require the use of additional insulation for high-quality thermal insulation. Available in slabs measuring 60x120 and 60x240 centimeters. The main disadvantage of polystyrene is its flammability.
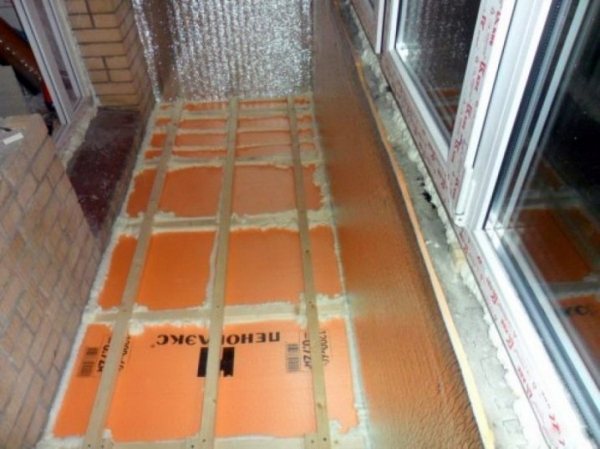
Penoplex (foamed polystyrene) is a new generation of heat insulators. It, like polystyrene foam, is lightweight, has low vapor permeability, is easy to install, is very effective as insulation, and is also available in the form of slabs with a thickness of 2 to 10 centimeters. At the same time, to insulate a balcony floor with penoplex, the thinnest slab is enough - after all, it compares favorably with polystyrene foam with a denser, moisture- and heat-resistant structure, excellent sound insulation, and is strong and durable in use. The only significant drawback of penoplex is its significant cost. Although some manufacturers note that the styrene contained in penoplex is poisonous and volatile, and therefore they advise covering it with plaster or drywall very tightly, without leaving any gaps.
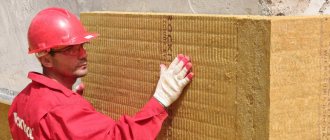
Mineral wool is considered the most optimal material for insulating balcony floors. It is made from porphyrite, slag, gabbro, diabase and other minerals and is produced in the form of rolls or mats from 5 to 10 centimeters thick.
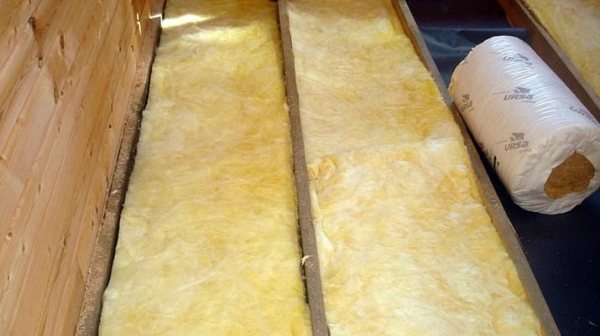
Mineral wool is most often used not only because of its low cost, but also due to the abundance of its positive properties:
- high refractoriness (does not burn even at +1000°C);
- minimal thermal conductivity;
- excellent sound insulation;
- breathability;
- resistance to negative biological influences;
- environmental friendliness.
Minor disadvantages of mineral wool include fear of moisture (eliminates when installing the film), intolerance to compaction, and therefore to installation under a screed (with the exception of high-density basalt mineral slabs) and an increased content of formaldehyde in low-quality samples. It is better to insulate the wooden flooring on the balcony floor with “stone” (basalt) mineral wool laid under it.
The “ warm floor ” system is the most comfortable solution for insulating a balcony. Its main advantages are the establishment and uniform distribution of the desired temperature throughout the room (allows you to rid the balcony of settling dust and regulate air humidity there), immunity to corrosion (the thin aluminum tubes of the structure are covered with plastic on the outside and inside), safety, compactness and aesthetics (all heating devices are hidden in the screed), as well as ease of installation, ease of operation and further maintenance.
At the same time, equipping a balcony with heated floors can also bring some inconveniences:
- it slowly heats up and cools down due to the need to warm up the concrete screed;
- during major repairs it is easily damaged and difficult to restore;
- not all finishing materials are compatible with heated floors;
- furniture installed on it should not restrict the free circulation of air.
Expanded clay, although inexpensive, is far from the best material for insulating the floor on a balcony. Firstly, it is not able to retain heat as well as mineral wool or polystyrene foam. And secondly, creating a reliable thermal insulation layer will require a lot of expanded clay, which will significantly increase the weight of the balcony, and this is undesirable. But expanded clay is completely environmentally friendly. It is also sometimes mixed with the concrete mortar of the leveling screed or used in the “dry” technology of its installation.
Features of floor insulation on the balcony
To insulate the floor on the balcony, choose high-quality material.
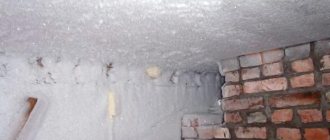
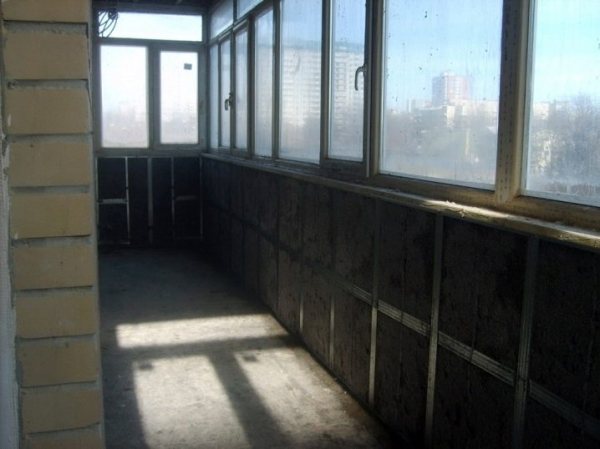
The balcony is more susceptible to the negative effects of the environment than other rooms in the house, since it is actually located on the street. This design does not have a heating system; the concrete flooring constantly attracts cold. That’s why it’s always cold and damp on the balcony. All this can largely compensate for its insulation.
However, when thermally insulating a floor, it should be taken into account that cold and high humidity leave their mark on the choice of insulation and the course of the entire operation.
When choosing insulation and insulating the floor on the balcony, you should consider:
- technical condition of the structure itself (integrity, strength), characteristics of the balcony floors - what they are made of (solid concrete slabs, concrete floors), their angle of inclination;
- climatic features of the area, humidity level in the room, whether the balcony floor is covered with condensation;
- whether it is planned to raise the floor of the balcony, what decorative coatings will be used in the future.
Important! Properly performed insulation should be based on calculations. This applies to the required thickness of the insulation and the load on the floor. According to SNiPs, the permissible load on the floor should not exceed 200 kg/m2, which is taken into account when choosing thermal insulation material and organizing insulation of the balcony.
Which material is better
Typically, we need thermal insulation of a balcony to save us from winter cold and summer heat, as well as to protect its façade and supporting structures from temperature changes and precipitation. Conventionally, all insulation materials can be divided into traditional (expanded clay, foam plastic, mineral wool) and innovative (foam plastic, polystyrene, penoplex, heated floor, etc.) or according to the composition of the raw materials used for their production (organic, inorganic and mixed).
By the way, all thermal insulation materials with similar characteristics cost approximately the same, so you should not consider price as a determining factor for their choice. But before you buy insulation for the floor on the balcony, decide what its finishing coating will be and who will do the installation - you yourself or a specialist. And also remember that insulation should not greatly increase the weight of the balcony, otherwise it may collapse.
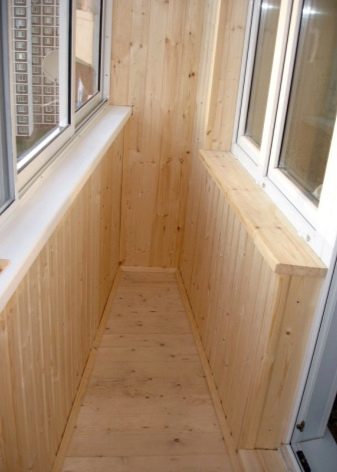
If your balcony is reliably protected from moisture from the street, and the base floor is fairly flat and dry, then the cheapest way to improve and at the same time insulate it is with wood. You can lay the boards directly on the concrete base or fasten them to specially installed logs. In this type of insulation, it is preferable to use coniferous wood (its natural resin content will increase moisture resistance) and it is necessary to arrange a slope in the flooring to drain any accidentally trapped moisture. If you want to insulate the wooden flooring itself, then with good waterproofing, ordinary mineral wool will do, and if the joints are sealed well, polystyrene foam will do.
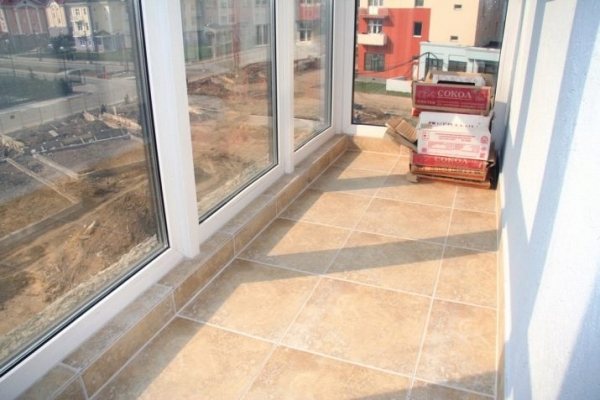
As insulation for tiles or tiles, it is better to choose one that is not afraid of installation under a screed (foam plastic, polystyrene, penoplex, basalt mineral wool or “warm floor”) . However, the construction of a concrete screed along with laying tiles on the floor of the balcony will ultimately significantly increase its weight, and this, as we know, is unsafe. To thermally insulate a floor under linoleum, you need a fairly strong, springy insulation with good water-repellent properties - such as penoplex. You can insulate the floor under the laminate on the balcony with expanded clay, polystyrene foam, mineral wool, plywood, and even foil - depending on whether it will be laid on a concrete or wooden base. Well, the most environmentally friendly, most durable and at the same time the most expensive insulation option is cork panels.
As for the installation of insulation, the easiest to install are heat-insulating boards made of polystyrene foam, penoplex, polystyrene and mineral wool . It will be more difficult to equip active heating of a “warm floor”, which is recommended to be insulated with polypropylene, expanded polystyrene, cork panels and metallized lavsan film.
We raise the level of floors on loggias and balconies
Preparations are complete. It’s time to move on to the final choice of a method by which the floor height on a rebuilt balcony can increase from 10 to 50 cm.
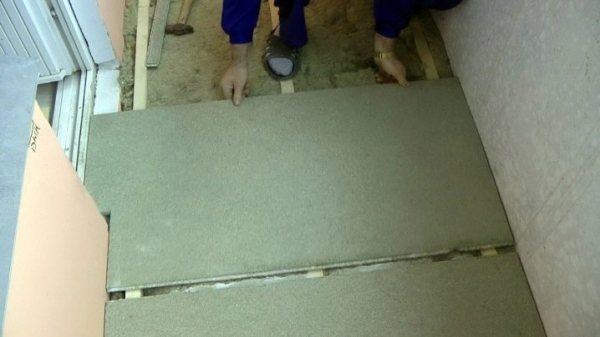
All the secrets of dry screed
This method appeared relatively recently and began to quickly gain popularity, as it allows you to quickly create a reliable structure from available materials (expanded clay or fine-grained slag).
This method is suitable for redoing the floor on a balcony in a Khrushchev building. After all, when creating such structures, you don’t have to worry about the collapse of the floors even when the floor covering is raised up to 20 cm.
Note! Expanded clay successfully performs the functions of an additional thermal insulation layer. Therefore, when using this material, insulation is not required.
We begin work by purchasing the necessary materials and preparing tools, and then proceed according to the following scheme:
- thoroughly clean the floor of debris;
- take polyurethane foam and seal all the balcony cracks;
- stick damper tape around the perimeter of the balcony;
- we lay waterproofing in the form of a film on the floor with a “margin” of 20 cm on each side;
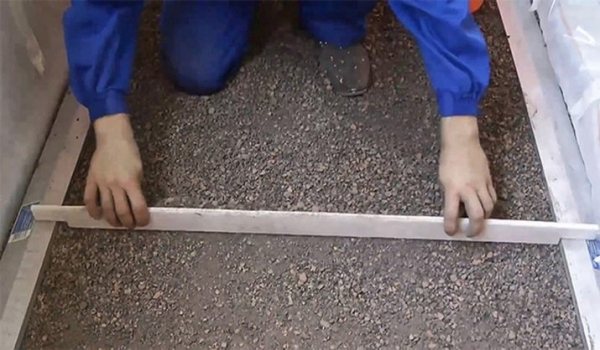
- We fix the edges of the film on the walls with tape and pour medium or small expanded clay onto the waterproofing;
- we install guide rails along large walls and level the expanded clay layer using a rule;
- carefully compact the expanded clay, moving along its surface on a piece of plywood or board;
- remove the guides, pour expanded clay into the recesses from under the slats and finally level the surface;
- we cover the expanded clay with gypsum boards, the ends of which should be pressed tightly against the balcony walls;
- We fasten the plates together using glue applied along the joints, and cut off the remnants of the edge tape and film.
The base of the floor is ready. Now you can lay any finishing material on it, the choice of which depends on the preferences of the apartment owner. For example, laminate (for more details, “ finishing a balcony with laminate ”) or linoleum (for more details, see the article “linoleum for the balcony”)
Attention! You can calculate the amount of expanded clay and other similar building materials needed for a dry screed using a calculator in specialized online stores.
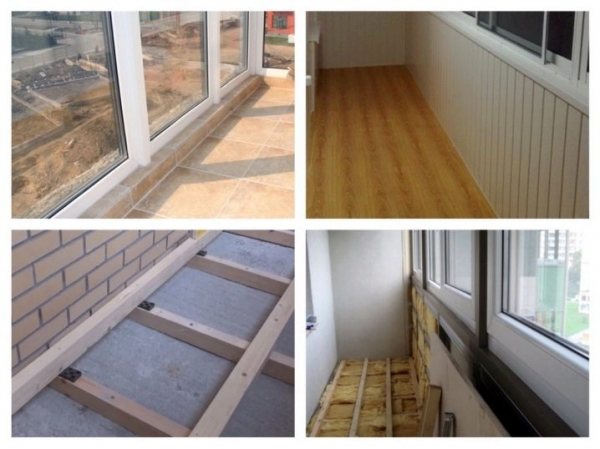
Raising the floor level on the balcony using wooden logs
This method of correcting the level of floor coverings does not require special skills from the performer and can be used on modern loggias and old balconies even if the base needs to be raised to a height of more than 20 cm.
After all, structures made from wooden logs are very light, which automatically prevents the collapse of balcony ceilings. Therefore, some zealous owners, when remodeling a balcony, equip such structures with a kind of cellar for storing household goods.
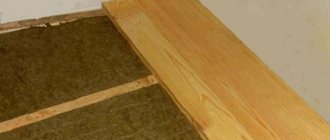
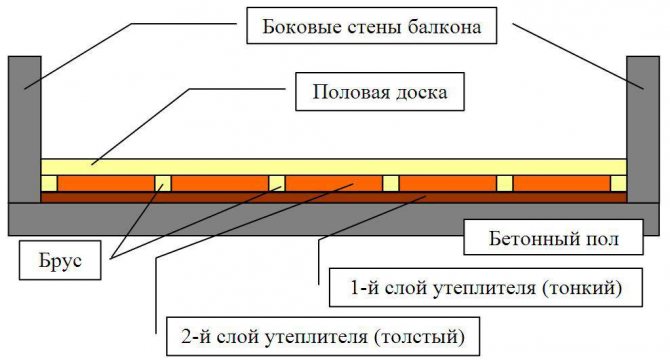
Plank flooring on joists
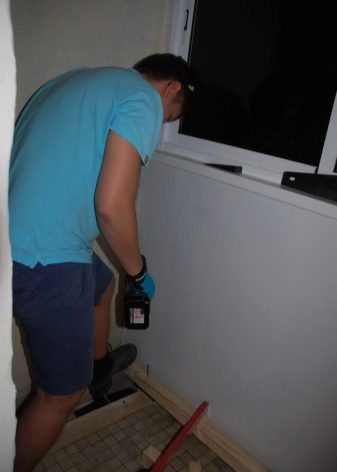
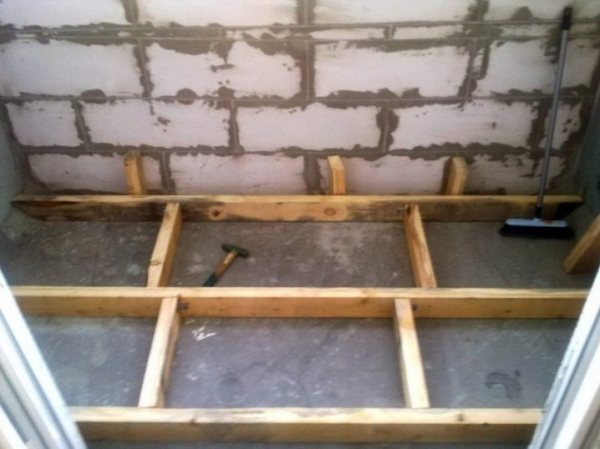
Installation work begins with laying the waterproofing layer (described above). Then we move on to directly raising the level of the balcony floor, which consists of only four steps:
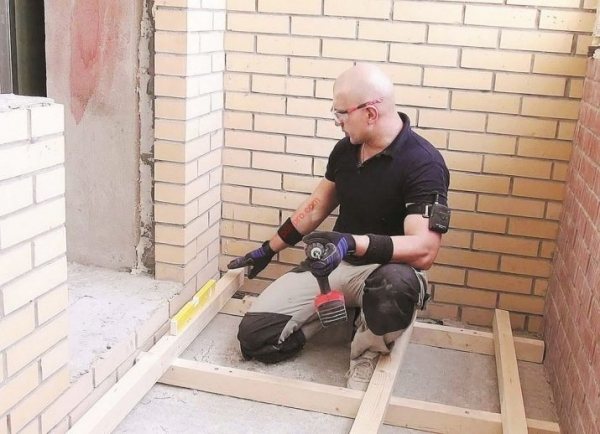
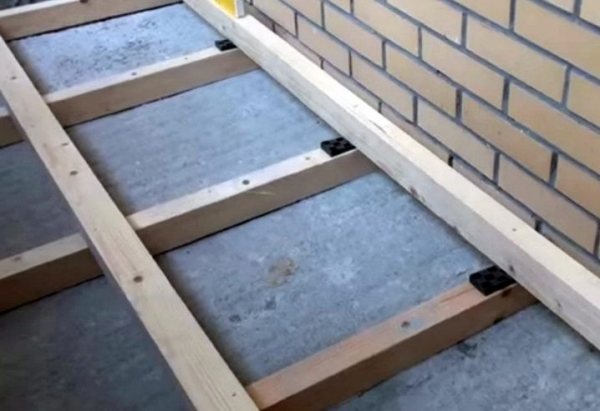
- The bars are laid on the rough base of the concrete slab. Installation starts from one of the side walls and is carried out in increments of 40 centimeters. In this case, each block is attached to the base using anchors;
- The assembly of the sheathing is completed by laying long bars that run perpendicular to the installed crossbars and are fastened to them using self-tapping screws.
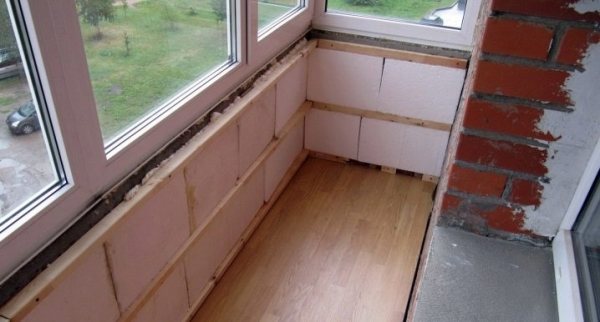
- Thermal insulation boards can be placed in the cells of the sheathing. The cracks formed in this case are sealed with polyurethane foam.
- We cover the sheathing with plywood sheets, which are securely attached to the base of wooden joists using self-tapping screws.
This floor can be used immediately. However, apartment owners can install additional flooring on the base or combine this option with other methods of raising the level of flooring.
Choosing a metal frame
This method is used to raise the floor level to a significant height - at least 30 cm - in spacious loggias of modern houses. At the same time, it is simply impossible to assemble a reliable steel structure without a welding machine. Therefore, a novice master will have to master welding.
Are you ready to take a risk? Then stock up on a steel corner with a size of at least 50x50 mm and iron rods with a diameter of 1 centimeter. These materials are necessary to create a frame from a corner reinforced with rods at intervals of about 50 centimeters. Legs are welded to the finished frame, the length of which depends on the height of the floor covering.
Then you need this metal structure:
- cover with a protective layer of paint;
- install on a concrete base;
- securely secure the support legs using anchors;
- sew up with any finishing material - plywood, boards, etc.
Attention! To correct design defects, which in this case are difficult to avoid, you can try using pads under the support legs. These pads will give the “crooked” metal frame greater stability.
We use cement screed
A cement screed is the first thing that usually comes to mind for an apartment owner when thinking about how to raise the floor on the balcony. The popularity of this method is explained by the fact that no special skills are needed to implement it. After all, this technology, according to the average person, has been worked out to the smallest detail.
At the same time, many people forget that mistakes cannot be made when pouring a concrete screed, so as not to have to dismantle the entire structure.
Therefore, this method requires strict execution of the instructions:
- we install the formwork on the side of the balcony railings (we use pieces of plywood or old boards for these purposes);
- lay a waterproofing layer on the balcony slab (read the instructions above);
- seal the cracks with damper tape;
- we install beacons or metal mesh to control the filling level;
- mix the mixture of water, sand and cement according to the instructions;
- pour the solution and level the surface using the rule laid down for beacons;
- two days after pouring, when the screed has set slightly, it is necessary to remove the beacons and cover the recesses;
- Do not forget to periodically moisten the concrete base during the first days after finishing work so that cracks do not appear along the screed.
How to insulate a balcony: step-by-step instructions
Making the floor on the balcony warm, but not glazing it and not insulating the walls and ceiling is like throwing money away . Especially if it has a sunroof or panoramic windows. Only proper thermal insulation of all balcony surfaces without exception and their combination with high-quality further finishing will allow you to stably maintain the room temperature level there even in winter and even without heating. And by inserting a second glass into the window frame, you can make the balcony suitable for habitation, and this will increase its chances of being legally connected to the room, which is especially valuable in a small-sized “Khrushchev” building. By the way, the balcony will look especially advantageous if the space of it and the adjacent room is combined using a stained glass window or partition - this way the play of light, color and shadows can decorate and diversify both of these rooms
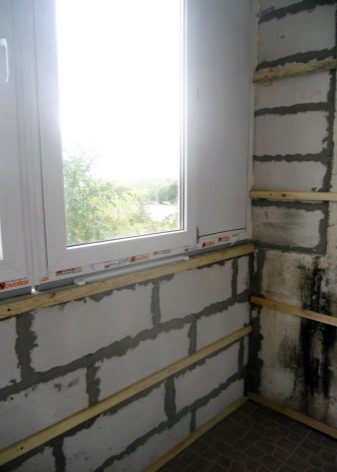
Insulation should be installed on the balcony floor only after installing high-quality glazing, sealing all cracks, removing the previous floor covering and thoroughly cleaning the room from debris and dust. If it is necessary to wash the floor, then work on its thermal insulation is possible only after the concrete of the balcony base has completely dried.
In addition to insulation, you may need a hammer, a construction knife, a jigsaw (preferably an electric one), a construction gun, dowels, a drill, self-tapping screws, a hammer drill and, of course, a tape measure with a marking pencil.
Having prepared all the necessary materials and tools, you can begin laying floor insulation on a balcony without heating:
- fill all unevenness in the base with epoxy resin or sand-cement mortar;
- We fill the junctions of the floor and walls with polyurethane foam or a solution of cement and sand;
- prime the area prepared for insulation and let the primer dry;
- waterproof the balcony base (prevents drops of moisture from condensation);
- we install wooden logs (at the height of the door threshold - for convenient connection to the room adjacent to the balcony);
- we lay out the required number of layers of the selected insulation between the joists;
- we fix a vapor-permeable diffuse waterproofing membrane;
- lay plywood or plank flooring to install the finishing coating;
- We install boards, linoleum, tiles, laminate or other selected material as a finishing coating and fasten the baseboards.
For an active insulation device (such as a warm floor), the procedure after laying the insulation will be different.
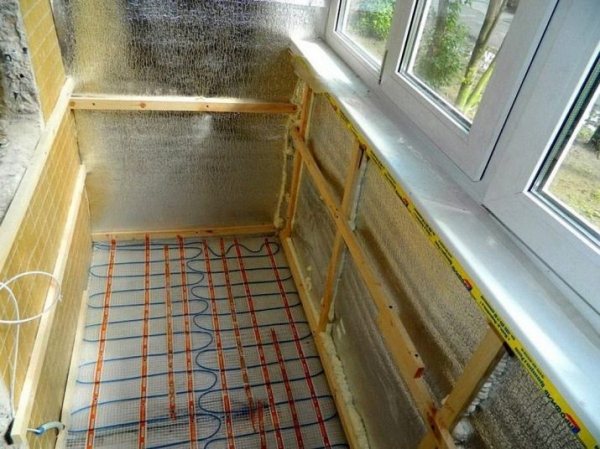
All insulation boards must be tightly joined to each other (so that they cover the entire floor) and to the waterproofing covering them. We lay reinforcing elements on top (strengthening the outer part of the balcony), fill the screed along the exposed beacons, carefully level it and dry it for at least 6 hours (you can safely walk on it in just a day). Then we fasten the mounting tape with dowel nails (we use pre-marked and drilled holes) and lay the “warm floor” heating cable on it with a snake.
By the way, it is more convenient to start laying the cable from the end section, placing a plug there, and finish by connecting it to the power supply network using a thermostat. After securely fixing the heating cable to the mounting tape, we install the beacons again, fill in another level of subfloor screed and let it dry completely.
cover the “ warm floor ” of the balcony with a finishing coating made of laminate, tiles or other material only after the screed has completely dried - this will avoid deformation and avoid mold. Typically, the drying process of cement screed takes about 7 days - provided that the beacons have been set correctly. If it’s warm outside at this time, you can open the windows - this will allow the floor to dry faster and gain the necessary strength. But in winter, the screed should only be dried with the doors closed.
Most popular options
Apartment owners should understand that they can raise the floor on the balcony with their own hands in different ways. However, starting such work only to seal up holes or create a convenient entrance is inappropriate. Therefore, the installation of a suitable structure is usually combined with work on waterproofing the balcony and insulating the floor covering (for details, see the article “Insulating the floor on the balcony”).
These arguments are usually enough for homeowners to take a responsible approach to choosing the method by which they will raise the floor on the balcony. After all, there are quite a lot of options, and the most popular of them are:
- dry screed;
- wooden logs;
- cement screed with sand;
- metal frame.
A dry screed is a lightweight structure made from inexpensive building materials, which is quickly installed and instantly ready for use. After all, when using this technology, you do not need to wait for the moment when the concrete has completely hardened. In addition, this method is suitable in cases where the floor on the balcony needs to be raised to a height of up to 20 cm.
If the owner of an apartment needs to raise the concrete floor on his balcony much higher, then it is worth using a technique that involves the use of wooden logs. After all, this lightweight structure will not harm the balcony ceilings and will not lead to their collapse.
Experts attribute the advantages of this option to fairly simple installation, environmentally friendly materials and low weight. In addition, lathing made of wooden logs is excellent for laying insulation and fastening floorboards, plywood, chipboard, and other facing materials.
Another method will come to the aid of a homeowner who does not yet know how to raise the floor on the balcony above 20 cm. We are talking about using a metal frame that can be covered with almost any facing material. The main advantage of this technique is the durability and reliability of the structure, if it was correctly assembled and covered with a protective layer of paint.
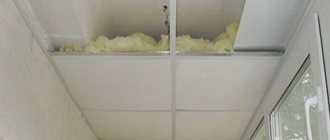
We insulate inside
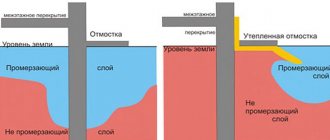
Without scrupulous sealing of all cracks at the joints of literally all surfaces of the balcony, its further internal thermal insulation is meaningless. But its proper design allows you to avoid the occurrence of “ cold bridges ” and helps to shift the freezing points of the balcony from the inside to the outside.
Equally important is high-quality waterproofing of the concrete elements of the walls, ceiling and floor of the balcony, with the installation of ebb and flow and treatment of the window frame with hydrophobic antiseptics - especially if you don’t want to one day find fungus or mold in some corner of it and at the same time safely maintain a comfortable temperature on the balcony and ventilation. Therefore, you should not ignore the vapor barrier of the insulation - a vapor barrier placed in front of it will not allow unwanted accumulation of moisture and will ensure the required degree of air circulation. In addition, good internal thermal insulation helps to get rid of extraneous street noise.
When choosing insulation for the interior space of a balcony, you need to pay attention to its thermal conductivity coefficient. For modern materials for thermal insulation, its average is 0.03-0.04 W/mS , and the higher this value, the lower the thermal insulation qualities will be. This means that to insulate a balcony, you should choose materials with a minimum thermal conductivity value, but a high cost, or simply increase the thickness of the thermal insulation, which will inevitably lead to a loss of usable area of the balcony.
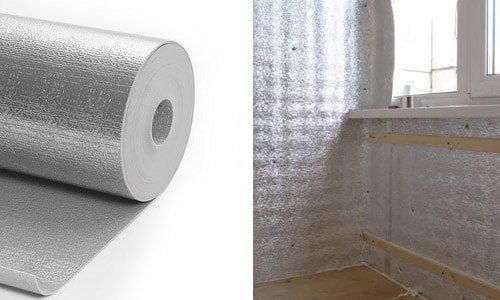
Types and properties of penofol
Penofol has high thermal insulation qualities and also helps create protection against evaporation and moisture. The material is polyethylene, foamed in a special way in a production plant, one side is covered with polished foil.
It is the foil that provides the material with good thermal insulation qualities. The form of release of penofol is sheets rolled into rolls. The material is quite flexible and lightweight; these characteristics provide additional convenience during installation. If necessary, such a heat insulator can be folded as desired, measured and cut into pieces of the required size. This allows you to use insulation more economically.
Such thermal insulation can be selected in different thicknesses, depending on specific conditions. Additionally, penofol also acts as good sound insulation, which in a noisy city is a rather valuable quality.
READ MORE: Choosing insulation for a balcony
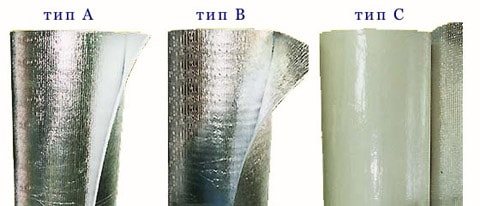
In building materials stores, penofol can be presented in various forms:
- The simplest type is designated as A - the polyethylene foam panel has only 1 foil side. During installation of the canvas, the foil layer is turned inside the room. The heat will thus be reflected from the foil layer and stored inside without escaping to the street.
- Penofol type B has a 2-sided coating. Such equipment helps to retain heat in the winter, and in the summer it prevents excessive heat by preventing the sun’s rays from entering the room.
- Type C, like type A, has a layer of foil on only one side. The other is coated with an adhesive composition, which is covered with a film on top for protection. This insulating material is convenient to use for thermal insulation of areas that are difficult to access. It is often used for thermal insulation of rounded surfaces.
- Varieties are also produced, marked as M and R. One of their sides is flat, the other has a relief. These types are intended for use in structures composed of several layers.
Within the named types of insulation there are also subtypes that differ in the thickness of the main layer of foamed polyethylene.
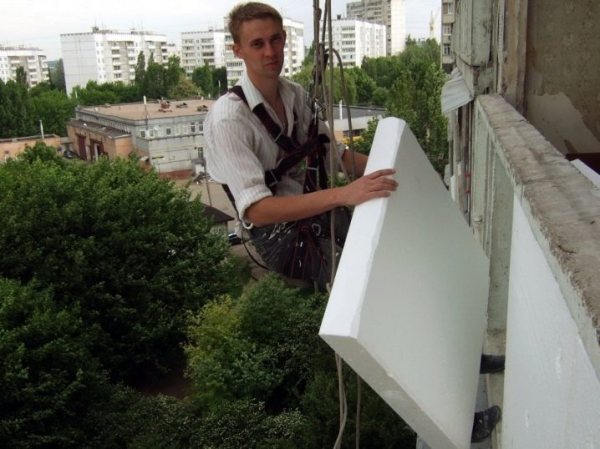
We insulate from the outside
It is believed that external insulation of a balcony not only allows you to preserve its usable area due to the use of thin insulation on the inside, but also helps to save almost 30% of the cost of heating an apartment. However, residents of high-rise buildings will be able to take advantage of such external insulation only with the help of industrial climbers. But by using various materials to decorate the balcony, the owners will be able to significantly change its appearance and even its configuration.
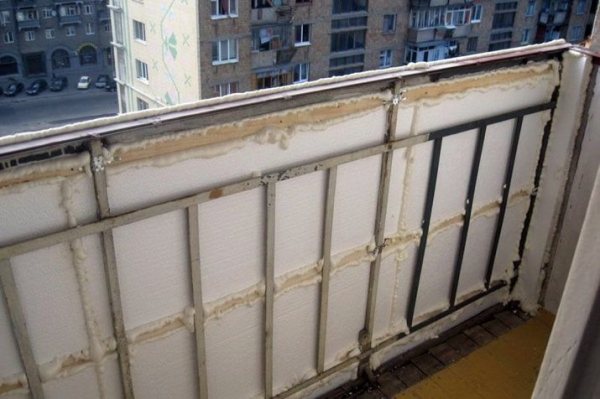
How to insulate walls
The insulation of balconies and loggias has some differences due to their design features. If you want to properly insulate your balcony, you should strengthen and lay the roof, as well as build walls.
Keep in mind that some balconies may not be properly insulated if it is determined that the structure will not support the weight of the added materials.
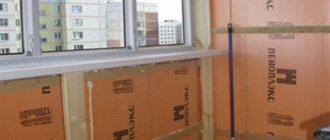
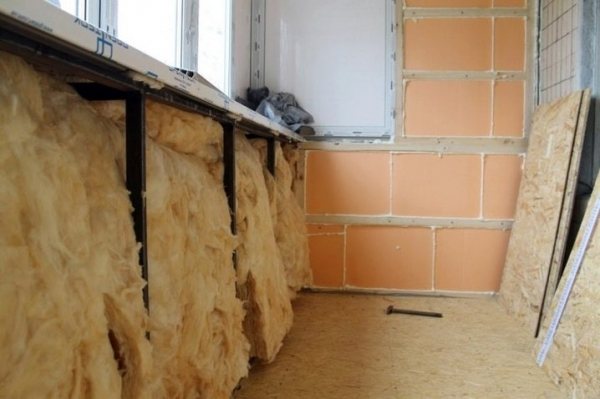
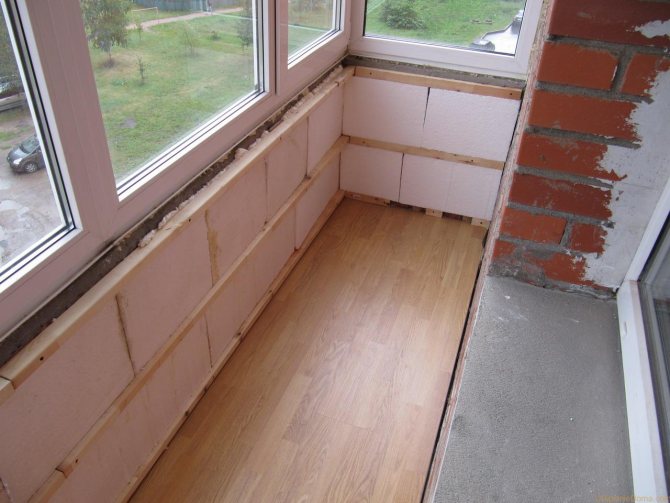
If the walls of the balcony are ready, the further process of installing the insulation does not make any special differences. Penoplex is applied to the walls, for fastening which glue is used. The slabs can be secured using dowels - “fungi”. Penoplex is cut to the required size if necessary.
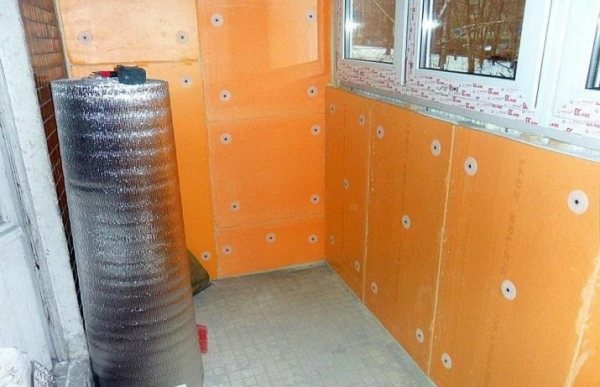
After completing the installation of the first layer, fill all joints with polyurethane foam. Then comes the turn of penofol. The canvas is cut into fragments of the required size, after which they are fixed in place using self-tapping screws with a wide head or a construction stapler. The foil side faces inward, the strips are installed end-to-end. Then the joints are taped with foil tape.
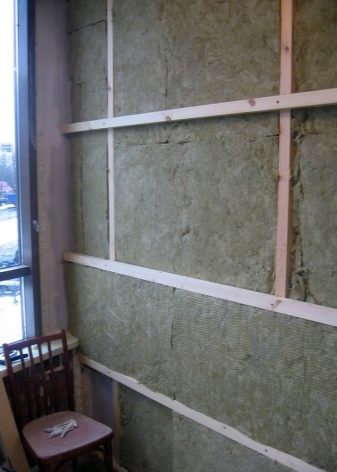
The next step is the sheathing. Its creation will ensure the presence of a layer between the insulation and the finishing material, and in the future it will be covered with a decorative coating. You will need slats 20 X 40 mm, which are arranged parallel to the floor surface in increments of 45 cm. Using a level, their position is adjusted. When installing the first of the slats in place, do not forget to leave space for the installation of the plinth. The facing material is installed after the sheathing is completely completed.
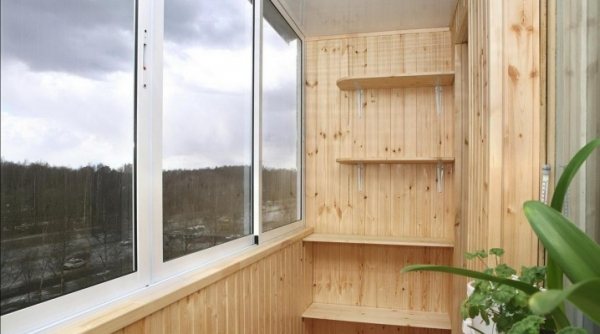
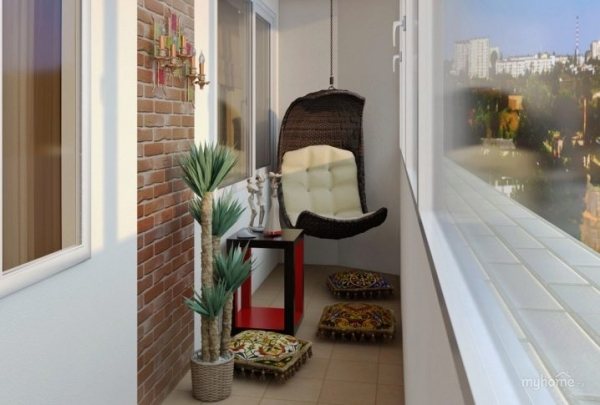
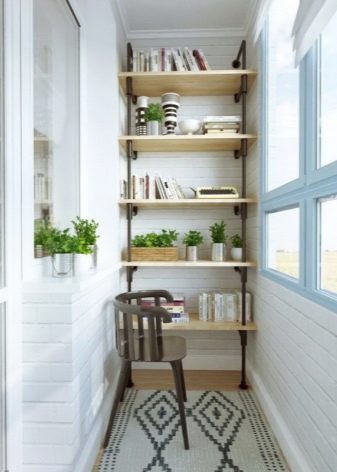
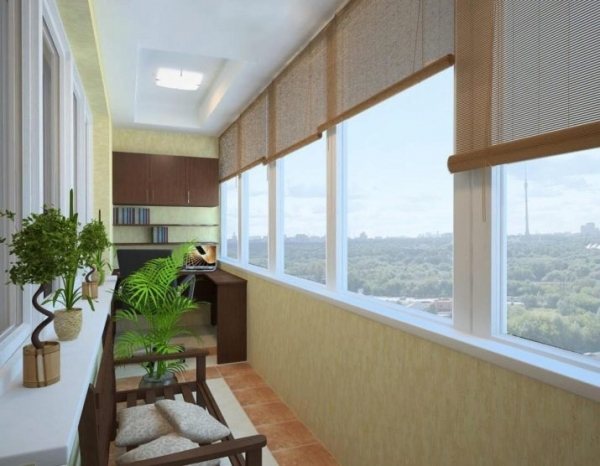
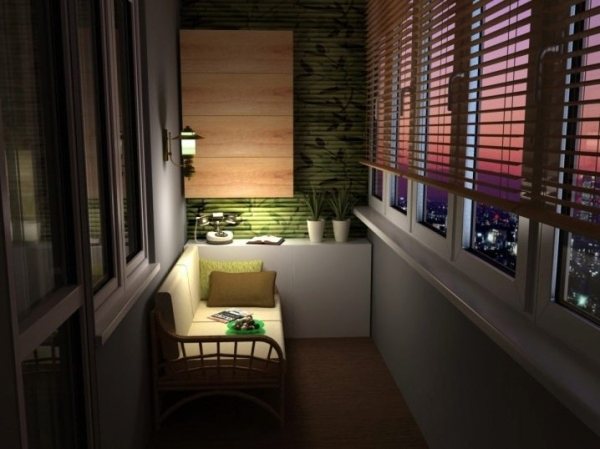
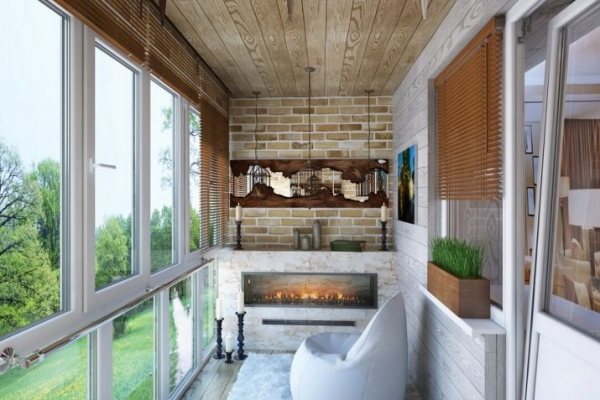
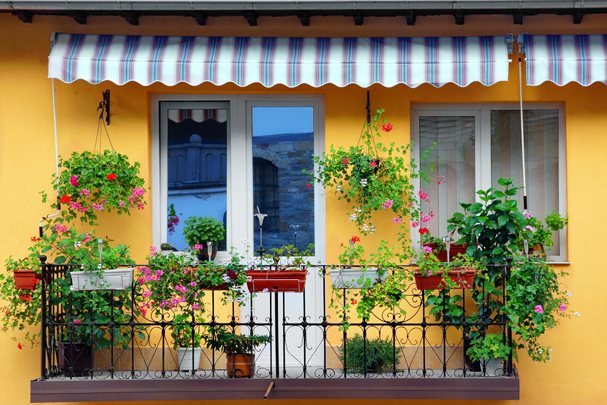
Interesting solutions in interior design
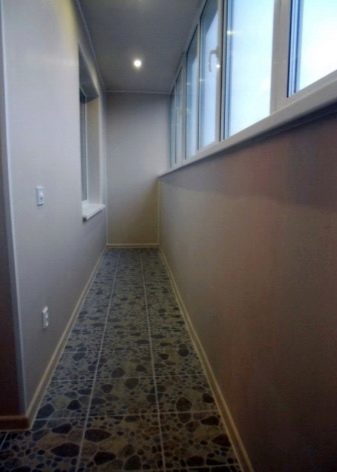
After insulating the balcony structures, there are wide possibilities for changing its functionality and interesting solutions in the design of its interior. By attaching an insulated balcony to the living space of the apartment, you can arrange a cozy office, hookah room, children’s activity corner, dining area or even a small spa there. When the balcony is warm, dry and comfortable, the development of its space depends only on the imagination and capabilities of its owners.
Our video will tell you how to cut, lay and attach polystyrene foam insulation. We wish you a pleasant renovation!
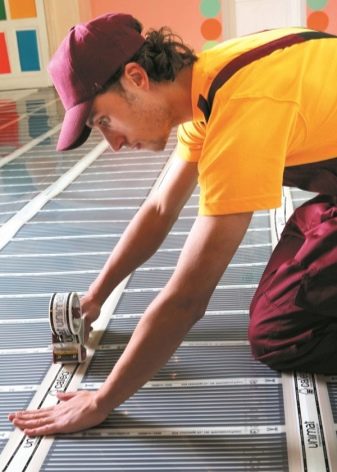
What is infrared heated floor
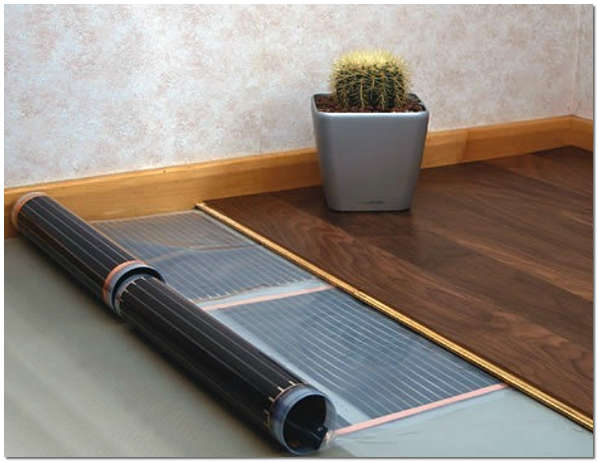
Many people have heard the phrase “warm floors” and even walked on them, but still don’t really know what it is or how it’s done. It's actually simple. A heat-producing element is placed on the floor, and the finishing is placed on top: laminate, parquet, etc. This is to put it very briefly.
Now let's get a little more detailed. In general, there are three types of underfloor heating: water, cable and infrared. All have their advantages and disadvantages. For example, a cable cable is ideally placed under a tile; it heats the air well and evenly, while consuming almost half as much electricity as, for example, a heater. But this requires pouring a concrete screed, which is not always included in the plans of homeowners.
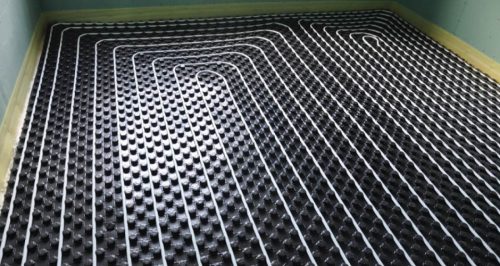
Water heated floors are made using pipes laid on the floor through which hot water flows. Essentially, this is the same heating radiator, but located under the floor covering. It heats well, cools slowly, and is absolutely environmentally friendly. But, again, there are disadvantages: expensive complex installation and the same concrete screed as in the case of the cable.
How is infrared floor different from the above? Let's get a look. Outwardly, it looks very simple: a piece of film into which elements that conduct heat are sealed. Heating is carried out by infrared radiation. It happens like this:
- All nearby objects are exposed to radiation: walls, furniture and the flooring itself.
- As soon as they heat up enough, they immediately begin to share excess heat with the surrounding atmosphere.
In this way, all the air in the room warms up, and very quickly. The temperature level can be set manually and can vary up to 25°C.
Unlike water and cable floors, infrared does not require filling it with a concrete screed. Moreover, it can be placed under anything: laminate, carpet, linoleum, tiles, and so on. The only point is that the coating made of wood can gradually dry out under the influence of heat.
There are other advantages to this system:
- the air is heated evenly from floor to ceiling;
- thermal conductivity is quite high compared to other types of floors;
- electricity consumption is very low - when compared with heaters, it is about three quarters less;
- heating occurs much faster than with other systems;
- the lifespan is very long, and performance does not depend on the degree of wear, the system always works as if it had just been installed;
- The thermal elements are sealed in film so that they are independent of each other. Simply put, if suddenly one of them breaks and stops working, this fact will not affect the others at all;
- Safety is another of the most important benefits. The infrared floor is resistant to fire and frost, and will never cause an electric shock. And in general, the conductive elements are located only at the edges, and accordingly, the electromagnetic radiation is much weaker than that of the same cables, for example;
- installation does not require special permissions from official authorities (unlike, for example, a water floor, which is generally prohibited in houses with centralized heating), and can be carried out in any room, even on an open, unglazed balcony;
- The installation process is very simple and takes a minimum of time, literally a couple of hours. And if the need arises, the system can just as easily be dismantled and moved to another location.
With such an impressive list of advantages, there are only two disadvantages:
- Sometimes it is technically difficult to connect the system to the power supply; some cannot cope with connecting the contacts. However, there are not so many of them in the set, so the number of attempts is limited;
- Before installing the system, the floor should be carefully leveled. In principle, many manufacturers claim that the infrared floor is not afraid of uneven surfaces. But, judging by the reviews of many experienced people involved in repair work, such installation sometimes leads to damage to the contacts. Therefore, you will have to work hard on alignment. But we will talk about this in detail below.
Obviously, these shortcomings, in general, relate not to the system itself, but to its installation. That is, if you approach the matter with all the attention and hard work, then such shortcomings will not occur.
Laying insulation
Insulation is placed in one or two layers in the resulting honeycomb between the joists. In this case, it is necessary to remember the following points:
- A layer of air is required between the insulation and the floor surface.
- Severe deformation of the insulating material is unacceptable.
USEFUL INFORMATION: Adjusting a plastic balcony door yourself (video)
- Hygroscopic material, such as mineral wool, must be covered with a waterproofing membrane on top.
- After laying the insulation, all cracks and joints should be filled with foam.
The entire process of laying thermal insulation on the balcony is shown in more detail in the video.
At the final stage, plywood is laid on the logs, acting as a subfloor, and a finishing coating is laid. A balcony insulated in this way can be used throughout the year.
What kind of film floor is there?
Retail chains have 2 types of film. One, produced by more than 20 brands, with heating carbon strips. Width – 0.3; 0.5; 0.8; 1m; thickness – 0.4 mm. The guaranteed service life of such floors is 7 – 15 years. Cost 1 m2 from 300 rub. Sold by cut and with mounting kits.
The second type appeared on the market for the first time in 2011, released by South Koreans. It is a continuous carbon fill between layers of film, providing powerful hydro- and electrical insulation. It is so durable that no mechanical damage reduces heat transfer. Covered with an ionizing layer with an anti-spark mesh.
It can even be mounted into a screed or under any floor covering. Useful service life is 50 years. Sold in rolls 50 or 100 cm wide, and in installation kits. Cost of 1 m2 from 1000 rubles.