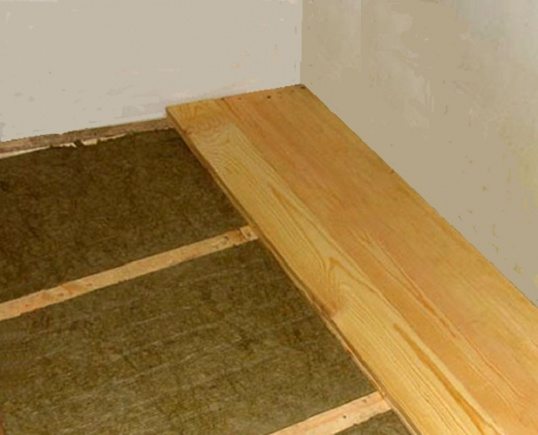
It is necessary to carry out insulation of the floor on the ground if it is the floor of a heated room. If (for example), the ground floor is installed in the basement, and it is unheated, then there is no point in insulating the floor; you need to insulate the ceiling between the basement and the first floor. Thus, if a ground floor separates the ground from a heated room, it must be insulated, otherwise significant heat loss will occur through the uninsulated floor. The floor will be cold, and “bringing” it to a comfortable temperature will require higher costs for heating the room.
A guide on how to make a self-leveling floor for a garage
It is currently very difficult to make a choice among the variety of building materials.
For example, today they produce flooring that is not spread, but poured. That's what it's called, a self-leveling floor. What this type of flooring is, and whether it can be used in a garage, will be described below. An overview of types of rubber floors for garages is here: https://kakgarazh.ru/pol/obzor-vidov-rezinovogo-pola-dlya-garazha.html. The photo shows a self-leveling floor for a garage
Can it be used in a garage?
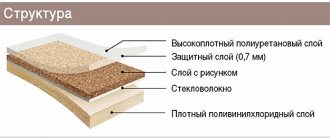
Self-leveling flooring is also called liquid linoleum; its surface is smooth, without seams or gaps, and feels smooth to the touch like a monolithic tile. This material is presented in 12 color shades, plus additional colored chips are offered, which are sprinkled on the newly poured floor, creating an original decorative effect. Chemists call this floor a special seamless polymer coating.
This type of flooring is used in rooms where special requirements are imposed on the flooring: high strength, abrasion resistance and sanitary and hygienic requirements. Most often, production areas, including garages, fall under these requirements. Read the guide to choosing the type of cellar for your garage.
Self-leveling floor in the garage - pros and cons. If we compare the self-leveling floor with other floor coverings, only with linoleum, laminate and ceramic tiles. When we consider organizing a good, durable garage floor, linoleum and laminate are not even considered. What remains is tile, which has the main disadvantage in comparison with self-leveling flooring; it is a large number of seams.
You can also consider the positive and negative characteristics of this flooring. Advantages:
- External – a variety of colors, solidity, good appearance, gloss;
- Service life can reach 40 years;
- Resistant to moisture and chemicals;
- It is easy to care for; it is enough to wash it with plain water without special products;
- Hygienic;
- Features good adhesion to any surface;
- No seams;
- Simplicity and ease of installation, which you can do yourself without any help in 12 hours.
Colored self-leveling floor in the parking lot
- No variety in design compared to other surfaces;
- Very long service life, mentally annoying, although you can renew the coating or use a different shade;
- There are types of self-leveling floors that can turn yellow when exposed to ultraviolet radiation. Not very pleasant given the high cost of the material;
- Before applying the self-leveling floor, the surface should be thoroughly prepared, leveled and puttied; this takes a lot of time and effort;
- If it is necessary to remove this coating, difficulties will arise; it is difficult to remove;
- The material is completely artificial;
- High price.
There are several types of self-leveling floors for garages on the domestic market:
- Methyl methacrylate (from methyl methacrylic resins) is used quite rarely, since drying such a floor requires a chemical reaction where the solvent evaporates, releasing a pungent odor;
- Epoxy (from epoxy resins) – have high chemical resistance;
- Cement-acrylic (prepared on the basis of a dry construction mixture and an additional liquid component) is the most affordable option, which helps to even out all the unevenness errors of the original floor.
- Polyurethane - used mainly in residential buildings.
If the floors were previously covered with paint, it must also be removed by sanding. The self-leveling floor will fit well only on a similar coating previously. At the very end, the floor is tested with a hydrochloric acid solution to determine if there are any other stains or coatings that need to be removed. Afterwards you can apply the coating. Read the instructions on how to decorate the walls in the garage.
The use of polymer self-leveling floors in garages has long proven itself. The polyurethane base of such floors belongs to the elastic group and can withstand heavy loads and the negative impact of external factors. This type of material is applied in several layers, which makes it possible to level out concrete defects, such as large porosity.
A self-leveling self-leveling floor in a garage is a cement or gypsum screed that contains a large amount of polymers. This material spreads well on its own and is distributed over the entire surface of the main floor and creates a perfectly flat and highly durable surface. In addition, the self-leveling self-leveling floor is absolutely safe for human health and fire-resistant.
Self-leveling rubber flooring for garages is made from crumb rubber obtained from used car tires. After several stages of rubber processing, the necessary mixture is obtained, which is diluted with water. As a result, the self-leveling rubber coating in the garage is soft and elastic, and at the same time quite durable. The floor surface has a perfectly smooth coating that does not slip. Read the instructions on how to cover the walls in the garage on this page.
A cement-based self-leveling floor is the most affordable way to make self-leveling floors in a garage. This material is applied to a flat and clean surface; it will take about 20 days for the coating to dry completely. Such floors are susceptible to mechanical stress and also do not like water. These factors quickly render the self-leveling cement floor unusable.
Special colored chips will allow you to diversify the monochromatic floor surface, giving it originality, resulting in an imitation of natural materials.
The photo shows an epoxy self-leveling floor in a garage with chips
Any self-leveling floor requires preparation of the floor surface. One of the main requirements for a concrete base is an almost perfectly flat surface.
The picture shows an example of an excellent concrete screed for self-leveling flooring
Despite the fact that polymer-based self-leveling floors are recommended for use in residential buildings, they are also successfully used in garages and parking lots.
Polymer self-leveling floors are often used to organize covered parking lots, as in the photo
The installation of self-leveling floors in a garage requires the presence of a smooth concrete screed. It must be cleaned before direct installation of the self-leveling floor, and also primed. The surface may need to be sanded, depending on the quality of the primer. The self-leveling floor solution is poured in parts onto the floor and leveled using a toothed roller. Depending on the type of self-leveling floor, the floor will dry in a period of 2 hours to a month. You can find a guide on how to make a vegetable pit in your garage here.
Cost of self-leveling floor in garage
The cost of a self-leveling floor is influenced by the manufacturer and the country where it is manufactured. Thus, imported self-leveling flooring costs from 2,000 rubles per sq. m. m, and Russian-made self-leveling floors cost from 500 to 800 rubles per sq. m. m.
Where to buy a self-leveling floor for a garage?
Where to buy in Moscow:
- Teohim company, st. Suvorovskaya, house 10, office 15, Contact phone;
- TemaPol Company, Moscow Region, Mytishchi, Olimpiysky Prospekt, no. 38, Contact phone number;
- Company Self-leveling floors Polyushko, st. Privolnaya, house 70, Contact phone.
Where to buy in St. Petersburg:
Of course, the cost of a self-leveling floor will cost a pretty penny, but it’s worth it. High-strength, reliable and perfectly smooth floors will last for decades.
Features of wintering laminate flooring on the balcony. Precautions, installation features
Laminate is a universal floor covering that can be installed in any room of the house, with the exception of the bathroom. If you choose a floor for a loggia or balcony, then a laminated coating is also suitable. This is a beautiful, simple and durable solution. In order for laminate flooring on a balcony or loggia to last for decades, you should follow certain installation rules, which we will discuss in this article.
Advantages of laying laminate flooring on the balcony
The basis of the laminate floor is a high-density HDF wooden board. She is not afraid of frost. The wear-resistant coating of the boards copes well with mechanical stress and temperature changes. The only danger is humidity. Therefore, traditional laminate flooring is not used for open, unglazed balconies. The exception is a special waterproof vinyl laminate, which can be purchased in our catalog.
The following advantages allow us to recommend laminate as a covering for a glazed balcony or loggia.
- Low price. Compared to ceramic tiles, natural boards and parquet, laminate flooring will cost you much less. Considering that the number of square meters of area on a balcony rarely exceeds 3-4 m2, the cost of laminate flooring is minimal.
- Great looks. Laminate flooring harmoniously combines with any natural balcony finishing materials: wood, vinyl siding to look like stone or tile. You can choose from hundreds of different decors.
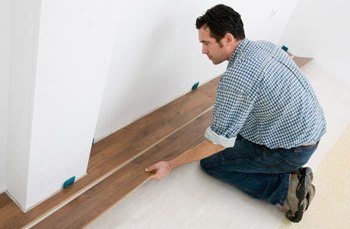
- Easy to install. You can buy and install laminate flooring yourself, without the help of professional craftsmen.
- Practicality. In domestic use, laminate flooring demonstrates excellent wear resistance. If you get tired of its pattern, you can easily update the interior by laying a new laminate floor in just 2-3 hours.
A balcony or loggia is exposed to freezing temperatures in winter. Especially if the glazing is made with ordinary glass. In the case of insulating the loggia and installing two and three-chamber windows, laying laminate flooring in it is no different from installing the floor in an ordinary room. On a cold balcony, certain rules must be followed.
- Laminate flooring requires a flat and rigid base. As a rule, this condition is met on balconies and loggias. But it is worth checking that the residual unevenness is less than 2-3 mm per 1 meter of area. Installation of floorboards is carried out on a dry surface.
- Temperature and humidity changes often occur on the balcony, so when laying laminate flooring you need to strictly maintain a gap of 10-15 mm from the walls to compensate for the expansion of the floorboards. Laying with glue is not recommended; it is better to provide the floorboards with freedom of movement.
- The use of floorboard seam sealer is highly recommended by most professional installers. In addition to its main function - preventing moisture from getting under the board, the sealant helps reduce the likelihood of squeaking when walking on the floor.
- If you plan to use a heated floor system, carefully study the instructions on the laminate packaging. Manufacturers indicate the maximum temperature of underfloor heating threads that will not harm the floorboards.
- The laminate should also be insulated from the cold and damp concrete floor of the loggia and balcony. Waterproofing is carried out with an approach to the walls of 10-15 mm. The edges will be hidden by the baseboard. It is worth buying a cork backing for laminate flooring made in Portugal. This natural and environmentally friendly material will stop water, cold and noise. Due to its frost resistance and insulating properties, cork is also used as a material for finishing the walls of balconies.
- It is better to give preference to the more durable laminate collections of class 33 and 34. It is better with waterproof (wax) impregnation. In cold weather, the loads when walking increase sharply compared to the calculated ones, so a safety margin will not hurt.
- When using laminate flooring on loggias and balconies, you should provide protection from rain and snow. Don't leave the window open when you go on vacation. If the laminate is still flooded with water, read our article, which provides recommendations for this case.
- The laminated floorboards are laid parallel to the large window. Follow the staggered laying method for laminate flooring to ensure maximum floor strength.
READ MORE: Laying paving slabs with your own hands: step-by-step instructions
Using similar rules, you can lay a laminated floor in any other unheated and cold room, with the exception of rooms and storerooms with high air humidity or poorly protected from rain and snow. You can buy laminate flooring in Moscow and the region at a competitive price in the BSPol online store.
how to lay artistic laminate;
a story from a laminate installer;
laminate structure;
Is it possible to lay laminate flooring on linoleum?
how to choose laminate for an apartment.
Laying laminate flooring on a balcony in winter is not particularly difficult.
Laminate flooring is used in almost all types of residential and commercial premises. Some types of laminate can even be used in rooms with high humidity or outdoors.
Since balconies and loggias initially belong specifically to open spaces that are not protected from the effects of precipitation and sudden temperature changes, in this article we bring to your attention we will pay special attention to choosing the most suitable laminate for your balcony (loggia) so that you do not focus on advice from “experienced” would-be finishers, but proceeded from the expediency of choosing the type of laminate that is suitable for you. In terms of ratio: price-quality.
The basis for the production of almost all types of laminate is chipboard, which, in accordance with European requirements for determining the quality and physical characteristics of building and finishing materials, undergoes 18 different tests.
In accordance with the European standard (EN 13329), laminate is assigned “classes” that allow it to be divided into:
- for home use (in residential premises);
- for commercial use (offices, sales areas, warehouses);
- in rooms with high humidity.
The cost of laminate of different classes differs quite significantly as the class of the laminate increases. The price difference between 21 and 43 classes can be a ratio of 1:5.
Traditionally, class 21-23 laminates are used for domestic use in dry rooms.
- 21 – for rooms with low floor load: bedrooms, storage rooms;
- 22 – for rooms with medium load: living rooms, common rooms;
- 23 – for rooms with high load: corridors, hallways, kitchens, children's playrooms, gyms.
“Industrial” laminate is characterized by higher resistance to mechanical damage and surface abrasion due to the content of a larger amount of epoxy resins, which are the main binding element of the wood base of the board for the manufacture of laminate.
- 31 – for work rooms;
- 32 – for most office premises with 2-10 employees;
- 33 – for halls, corridors, reception areas, warehouses.
In both classes, “moisture-resistant” types of laminate are distinguished. Their ability to withstand high humidity lies in the production technology of the base plate. In addition to a larger amount of epoxy resins, the filler in moisture-resistant laminates is not wood “flour” - waste from the wood processing industry, but wood chips, in which the bonds between the wood fibers are not broken.
As a result of processing at high temperatures and pressure, wood becomes denser and its hygroscopic properties are significantly reduced. It practically stops absorbing moisture.
Classes 41-43 - although in appearance they are indistinguishable from ordinary laminate, they have a completely different basis. These laminates do not contain wood flour or wood chips. The role of fillers is performed by mineral materials: talc, sand, crushed volcanic rocks. Class 4xxx laminate is completely insensitive to water and can remain in it from several days to several months.
All types of “moisture-resistant” laminate have a greenish backing color (the back side of the board is “Eurostandard”). In addition to the color of the substrate, the packaging must contain the following symbols: “Umbrella” with images of drops placed above it. The more drops above the “umbrella”, the higher the resistance of the laminate to moisture.
After familiarizing yourself with the properties of different classes of laminate, you can decide which one is more suitable specifically for your balcony (loggia). In any case, for open (not glazed) balconies that are planned to be used as home greenhouses (conservatories) or for drying clothes, only moisture-resistant laminate should be laid!
It is not always possible to carry out finishing work on the flooring on the balcony during the warm season. But, even in winter, this type of finishing work can be carried out without any damage to quality. It is enough to follow the recommendations that we will give you, and the laminate on your balcony (loggia) will serve you for many years.
The initial stage of arranging any floor covering is leveling the base (balcony slab). Traditionally, leveling building mixtures (self-leveling floors) are used for this purpose to create a screed. But in winter, when the air temperature is below 0°C, a number of conditions must be observed.
To prevent freezing and crystallization of water into ice, special additives can be added to construction mixtures that reduce the freezing threshold of water. These are:
- UPDM. An additive that allows screed to be poured at temperatures down to -25°C. It will not only speed up the process of “setting” the solution, but also prevent water crystallization;
- Federal Tax Service. Additive based on alcohol-sodium formate components. It is introduced into water, which is used to prepare cement mortar. Effective at temperatures down to -15°C;
- Hydrozim. Liquid antifreeze, allowing concrete work to be carried out at temperatures down to -15°C;
- Axol-K. A complex complex of substances of mineral and organic origin. Effective at air temperatures down to -10°C;
- Will win. The most suitable additive for dry mixtures, which is used to accelerate the “setting” of the solution. The temperature depends on the concentration (from 2 to 8%), but not lower than -15°C;
- Lingopan 4. Will accelerate the “setting” and subsequent loosening of concrete. Used at temperatures down to -18°C.
Peculiarities
To choose the best type of floor, do not forget that:
- A garage is not built in order to end up with a good place to store homemade preserves. This room houses a personal vehicle that has significant weight. This means that the floor will be subject to enormous impact from this mass.
- Having a car means constant care for it and carrying out repair work within the walls of the garage. This type of work can involve the use of all kinds of tools. These rather heavy devices can fall out of your hands and fall onto the floor, ruining it. The strength of coatings in such rooms must be very high.
- These days, it's hard to find a car that doesn't have at least an occasional leak in one of its systems. Car repairs and battery recharging are often carried out in the garage. The floor here must be resistant to various aggressive substances and not be afraid of moisture.
- Equipment should not be kept dirty and therefore the process of cleaning the garage is often significantly difficult. An uneven floor with cracks is sometimes difficult to remove from dust and debris. It follows from this that a properly selected floor should be perfectly flat.
- The selected coating must also comply with fire safety regulations. When repairing a car, its owner can use a blowtorch and a welding machine. In this case, the selected coating for the garage floor should not have flammable properties.
For these reasons, beautiful and durable self-leveling floors are simply ideal for modern garages. They will not crack even in very severe frosts. Such coatings are not afraid of temperature differences and are completely safe. Dust and dirt will not stick to them, because the bulk material does not have the property of electrification. The surface of these floors is flat, so you can quickly clean the room if necessary.
Even a self-leveling film with a thickness of only 1.5 mm already has excellent waterproofing and thermal insulation qualities. Oils spilled here will not be absorbed into the coating and will never damage the floor.
There is, however, one negative aspect in purchasing such coatings. Filled floors are quite expensive. Installing just one square meter can cost about $100. True, to save money, you can apply this material in the thinnest layer.
Manufacturers of building materials today offer interested parties special liquid compositions - these are self-leveling coatings that tend to self-level. Today, their role is played by compositions from one binder component (this can be either cement or gypsum), the required amount of additives, polymer additives and various fillers. When mixed with water, highly mobile solutions are formed, which are actively used for leveling coatings of any type (can be mineral, wooden or soil), as well as for quick installation or high-quality repair of areas with defects.
The main condition for application is the most even surface, thoroughly sanded with a special industrial grinding machine. The presence of even a small bump or dimple - and the poured floor instantly wears out or begins to chip off. But if you follow all the instructions, the coating actually forms a durable film base that is resistant to aggressive substances and water, which will withstand 5-7 years of the most active use.
There are many types of self-leveling floors for garages:
- The most popular nowadays are epoxy coatings with an optimal balance of cost and quality. The quartz sand included in their composition gives the product excellent resistance to abrasive materials (to avoid abrasion). The presence of resins will protect the surface from exposure to chemical elements. For all the properties to work, you just need to apply a layer of such a floor 0.1 cm thick. Water resistance and frost-resistant characteristics are clear advantages to the positive characteristics of such floors. But there is also a minus - low elasticity.
Stele flooring
What is so special about laminate, why has it become so popular?
There are several factors that have a positive effect on the demand for the material:
- Wear resistance is a very practical property, which is exactly necessary for a summer cottage, where you often have to enter the house in shoes, and dirt and sand remain on the soles.
- Environmentally friendly - this, of course, is not natural wood, which is “fragrant” in its own way, but there are no obvious chemicals in the laminate that would begin to evaporate over time. All studies have been carried out to confirm that the floor covering is considered safe for its entire service life.
- Durability - the operational period of the laminate is equal to 10-15 years.
- Dozens of different shades will allow you to find the most optimal option for your house: identical to natural materials, similar to tiles, similar to decorative stone.
You can actually choose one for any interior.
However, this list of qualities does not answer the question of whether it is possible to lay laminate flooring in a country house, where the temperature is below zero for about 5 months, there is no heat, and a “cool wind” blows from all sides (even if the room is thoroughly insulated, the air still freezes).
READ MORE: How to choose bathroom scales for your home, tips for choosing
Not every material can withstand such conditions, especially those that do not have increased protection from moisture.
There are only two answers: it is possible and it is necessary, they differ in how water resistance will be implemented.
Most of the products offered on the construction market will not withstand even a few drops from a direct hit. But a specialized material that has undergone hydrophobic impregnation perfectly prevents swelling of the joints.
And higher quality products, in particular class 33, require general water resistance when the panel is “dipped” into a moisture-proof mixture.
Moisture-resistant laminate is also used in bathrooms
Surely everyone knows that the flooring material is attached to each other using two locking systems: click and lock, but there is another option, which, in principle, can be used in the countryside - joining the panels with glue: the quickly hardening mixture perfectly insulates the ends of the parts from moisture and does not will allow even a plentiful puddle to damage the structure.
Which of the above options is suitable for your dacha is up to you to decide: either ignore the costs associated with moisture-resistant high prices, or decide on the fragility of the glue, but the most important thing is the prepared surface.
If you want your dacha to be warm, insulate the floor before laying laminated panels
Any work begins with preparing a tool that is simply necessary in some situations, in this case, laying laminate does not require special “ammunition”, but still, it’s better to know what and how:
- A jigsaw or a hacksaw – you must admit, a power tool works faster, so even if you don’t have one, rent one. Working with your own hands is not easy work, so it’s worth using any opportunity that can make the work process easier.
In such cases, a jigsaw is simply irreplaceable
- A hammer is the most important tool in laying laminate flooring.
- Roulette.
Let’s move on directly to the process of laying laminate flooring in the dacha; the instructions below or video lessons on finishing the premises will help with this:
- Work begins from any corner, but not near the interior door. It is better to lay in the direction of the sun's rays so that the joints are less noticeable.
- Place the first panel at the corner on the backing.
- The second laminated board is applied: at an angle of 20 degrees with gentle pressure - using the click system; at a right angle, using a hammer and a block (as shown in the photo) - using the lock system.

The ends are punched through a special block or any rectangular product without sharp edges
- First, one row is laid out completely, where the last panel is usually trimmed.
- The rest of the laminate is laid in the same order as the original row.
Difficulties may arise when laying laminate flooring near a wall, when almost the entire floor is covered: you will need to saw off the material lengthwise.
Types of self-leveling floor for garage
First, let's understand a little terminology. Manufacturers of mixtures offer special compositions for construction work - the so-called self-leveling self-leveling floors. These are compositions of binders (cement or gypsum), special additives, polymer additives and fillers. When mixed with water, highly mobile solutions are formed, which are used for leveling all types of bases (mineral, wooden, soil), as well as for repairing defective areas.
This type of material has more than enough advantages:
- It can be applied in a layer from 1 mm to 10 cm. Working with it is much more convenient and practical than with a traditional cement-sand mixture.
- They are used indoors and outdoors, that is, they are universal, frost-resistant and can withstand significant temperature changes.
- They are produced in a huge range, for different purposes. For example, to smooth a concrete slab, you should choose an inexpensive thin-layer gypsum-based leveler, which will not shrink and harden in a few days. And to form a full-fledged screed, it is better to purchase cement-gypsum mixtures that are ready for laying the floor covering within 7-10 days.
- Sold at very affordable prices. The cost of bags starts from 200 rubles.
There is another class of self-leveling floors - decorative finishing. In fact, this is a one- or two-component paint on a polymer base, which is applied to concrete in a layer of 1-4 mm and creates a high-strength coating that is resistant to abrasion, mechanical and impact loads, as well as chemically aggressive substances. Elastomers such as polyurethane or epoxy are used as a base.
Polymer self-leveling floor in the garage.
Polymer self-leveling flooring for garages is produced by domestic (Novbytkhim, KrasKo) and foreign (Enecon, RustOleum) enterprises in several colors, sold in cans, often in combination with a hardener. Additionally, it comes with chips for decorating the coating.
The most important condition for application is a perfectly flat surface, polished with industrial grinders. The slightest bump or hole - and the self-leveling floor for the garage is instantly erased or chipped. But if you follow the instructions, the coating actually forms a highly durable film, inert to chemical compounds and water, which can withstand at least 5-7 years of active use.
In the last couple of years, on the Internet you can find mention of such a new product as a self-leveling rubber floor for the garage. Although the term elastic coating is better suited for this product.
Almost all well-known manufacturers of paints and varnishes produce this material under the name rubber paint. Purpose: roofs, swimming pools and other unloaded surfaces. It withstands water, direct sunlight and temperature changes from -50 to +60 ºС. The instructions state in black and white the limitation - not suitable for painting floors.
The Russian company Moskraska claims that their technologists have created a rubber product intended for use in garages, parking lots, warehouses, car service centers, car washes, etc. Moreover, the basis is not traditional solvents, but an aqueous dispersion of acrylate copolymers. The extent to which the advertising information corresponds to reality is unknown, since there are practically no reviews in the public domain, and the product is not available as a class in the assortment of large dealers and retailers.
Rubber coating Moskraska.
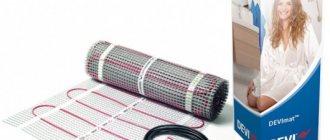
Instead of unknown rubber paint, it is better to use a proven product - mats and modular slabs made of pressed rubber crumbs (Unidor, etc.). As a rule, they are used when arranging outdoor sports and children's playgrounds, in gyms, on terraces, and parking lots. They are water and frost resistant and can easily withstand significant weight and abrasive loads. A very convenient, albeit expensive alternative to standard garage coverings.
Modular tiles for garages, parking lots, sports grounds.
Rice. 5 Modular tiles for garages, parking lots, sports grounds
Which option to choose depends on your capabilities, including financial ones. And in the category of self-leveling floors for garages, it is more correct to include self-leveling mixtures of thick-layer application.
How to choose the right type of self-leveling floor for a garage
The garage floor material must meet the following criteria:
- Exceptional compressive and abrasion strength . The average passenger car weighs 1 ton or more. In this case, the weight is actually distributed over four small areas - at the points of contact between the wheels and the base. In addition, when driving, tires act as a rough abrasive that destroys the base.
- Resistance to various loads . A garage is not only a covered parking place for a car, but also often a repair shop, a kind of storage room for storing various things and equipment, and often a meeting place for neighbors and acquaintances. Accordingly, the floor must withstand frequent washing and mechanical or impact loads, and not react with chemically aggressive compounds (solvent, gasoline, oil, antifreeze), etc.
- Weather and frost resistance . Temperature differences in garages are significant. It is enough to open the gate for half an hour in winter for frost to form on the surfaces. If there is no desire to constantly repair cracked floor coverings, the compositions must contain frost-resistant additives and be classified as a material for external use.
- Easy to use . Experienced buyers know that concrete or wood is incredibly difficult, and sometimes impossible, to clean from spilled gasoline, oil stains or tire marks. Therefore, this criterion is no less important than all the others.
Let's summarize: the floor must be highly durable, weather- and water-resistant, washable and chemically inert. These parameters correspond to a complex of two products:
1st layer - Self-leveling self-leveling mixtures for external use.
These are high-strength compositions exclusively based on cement. Chemical industry giants such as Ceresit, Bergauf and others produce materials recommended for use specifically in garages, basements, warehouses, workshops, terraces, etc. These are Ceresit CN76, Bergauf Boden Street and others. This layer will allow you to level the cement screed, thereby preparing the floor for the next layer. These compositions can also be used as an independent coating, without further finishing, but for better results a 2nd layer is necessary.
2nd layer – Finish epoxy coatings for garages, parking lots, parking lots.
This is a specialized series, which is produced only by some factories. The coating is so durable that it can withstand even heavy pedestrian and vehicular traffic. Among the well-known: Epoxy Shield, Eneklad SFS, epoxy paint for garage Novbytkhim, SdelaiPOL, etc.
We won’t say which one is better or worse; when choosing, you should pay attention to the basic parameters. For example, Boden Street forms a coating with a strength corresponding to the M300 cement grade and can withstand up to 50 freeze-thaw cycles. That is, this mixture is great for owners of passenger cars and heated, insulated garages. But Ceresit 76 has a grade strength of M350 and frost resistance of up to 100 cycles. That is, it is better to use it for cold rooms under heavy, oversized cars.
Do-it-yourself self-leveling floor in the garage: pouring technology
Floor installation is traditionally carried out in 4 stages.
Step 1. Preparing the base
At the insistence of manufacturers, the base for self-leveling mixtures must comply with the requirements of sanitary rules and regulations 29.13330.2011 and 3.02.01-87. The grade strength of the concrete screed or slab is at least M250.
Advice! The best result is achieved at a temperature range from +10 to +25 ° C, humidity no more than 50% and a complete absence of drafts.
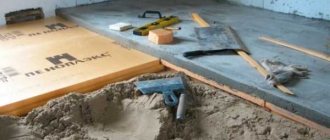
It all starts with cleaning the surface from dirt, dust, paint residues, varnishes, glue, oil and everything that significantly impairs the adhesion of the solution to the base. If there are loose areas of protrusions, they must be sanded, and cracks and holes should be expanded, primed and filled with putty or repair compounds. Afterwards, treat with a deep penetration primer or a strengthening primer in 1-3 layers.
Cleaning the concrete base.
If the base is completely loose, damp or heavily soiled, the best solution would be to install an independent, floating screed. The same technique is suitable for installing a self-leveling compound on bulk or natural soil. To do this, a separating layer - polyethylene with a thickness of at least 150 microns - is laid on a leveled and compacted base.
Advice! When forming a floating floor, the thickness of the self-leveling layer should be at least 4 cm. The optimal layer size for garages is 4-6 cm.
If the garage is installed on damp soils with a high level of groundwater, capillary rise of moisture is possible, then it is better to use coating-type waterproofing agents for concrete. Flooring (roofing felt, rubimast, hydrostekloizol) are not suitable in this case.
If you plan to form a slope or pour a thick layer, then you need to mark the walls with a construction marker or paint cord. The best solution is to use a laser level. When pouring, you will also need reference beacons.
When installing a floor in an unheated room, it is advisable to use a special damper tape around the perimeter or 1-2 mm polyethylene foam, cut into narrow strips.
Step 2. Preparation of the solution
Pour clean, free water at a temperature of +5 to +25 °C into the container in a pre-calculated amount, gradually add the dry mixture and mix thoroughly with a construction mixer at a speed of up to 500 rpm. Let the solution mature for 5-10 minutes, stir again. The finished mixture should be used within 20-30 minutes.
Step 3. Pouring self-leveling compound
It should be taken into account that the composition should be thicker and less fluid than a regular self-leveling floor. This is due to the need for a tilt device.
Application begins from the far corner with gradual progress towards the exit. The mixture must be poured out, carefully leveled with a squeegee or wide spatula, and rolled with a needle roller to compact it. Each subsequent portion is poured with a partial overlap of 2-4 cm onto the previous one. Deaeration of the entire coating is mandatory.
Formation of self-leveling floor.
If the room in accordance with SP 29.13330.2011 along the perimeter exceeds the dimensions of 3x6 m, then it is necessary to install expansion joints one day after pouring the floor. Subsequently, the seams must be separately filled with a thick solution of the bulk mixture and carefully leveled. After 7-14 days the base is ready for finishing.
Step 4. Applying a decorative protective coating
Before work, you need to carefully inspect the floor again, smooth out any unevenness with an emery cloth, and thoroughly remove any dust.
Applying epoxy paint for a garage.
The hardener should be poured completely into the paint, stirred for 5 minutes and wait 30-60 minutes until all chemical reactions are completed. You must first apply it with a brush along the perimeter, thoroughly coating the corners. Then use a brush or roller to paint the entire surface in one layer. To reduce the sliding effect, scatter decorative chips. After 3-6 days, the coating will be completely polymerized and will be ready for use.
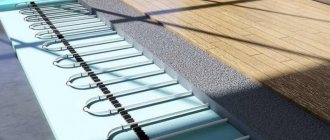
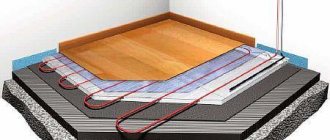
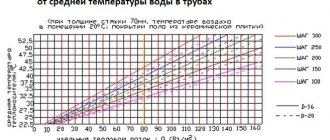
Electric and water heated floors
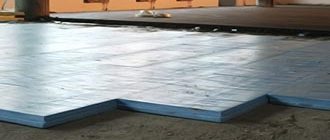
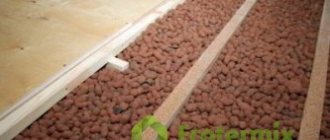
You can install an earthen floor in a residential building yourself, armed with electric or water heated floors. If you plan to make a warm water floor on the ground, you must first lay thermal insulation slabs in the basement of a residential building. Then a masonry mesh is laid, making the concrete pour more durable. Then pipes are laid for the future warm water floor. Concrete solution is poured on top. For high-quality thermal insulation, it is necessary that the thickness of the concrete screed be at least four centimeters.
For an electric floor, you need to lay a roll of waterproofing material on the ground. For example, it could be roofing felt, the price per roll of which is 250-350 rubles. Next, slabs of heat-insulating material are laid, a rough screed is performed, leveling the surface. Then a reinforced mesh is laid for the quality of the concrete screed and uniform heat distribution.
After installation is completed, it is necessary to check the functionality of the electric floor. Only after this can you start pouring the floor with concrete screed. You can use the finished floor only after 30 days, so that the concrete has completely hardened.
The main advantage of electric and water heated floors is the uniform distribution of temperature over the entire surface of the floor.