Solar air collector (heat generator) made from metal beer cans
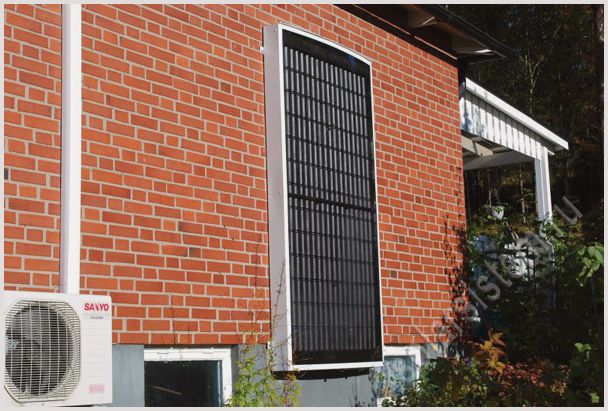
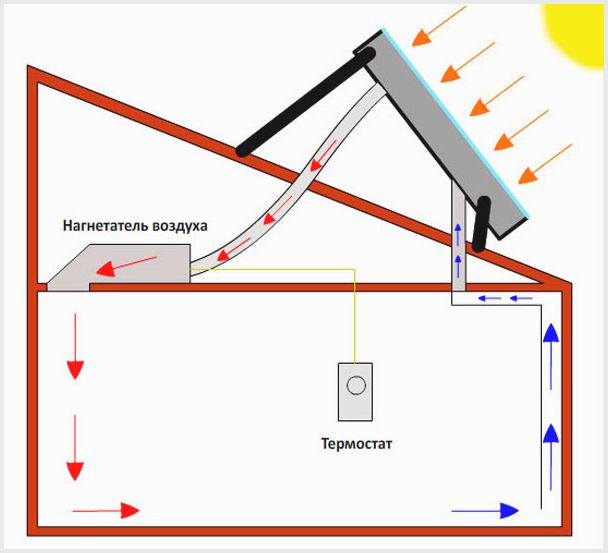
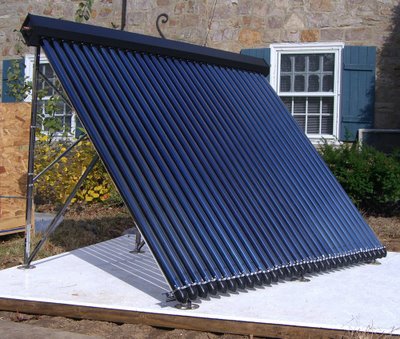
A solar air collector (hot (warm) air generator) is used to heat a room with warm air in the autumn - spring period. It is placed in the south of the house, on the roof or directly on the surface of the wall. You will need to cut two holes in the wall for the air flow in and out. Using a fan, we supply air pressure into one hole, and from the second hole we get warm air with a temperature of up to 80 degrees.

Structurally, the air “heat generator” can be created in two types:
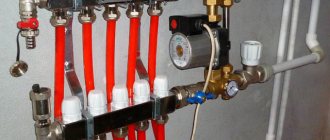
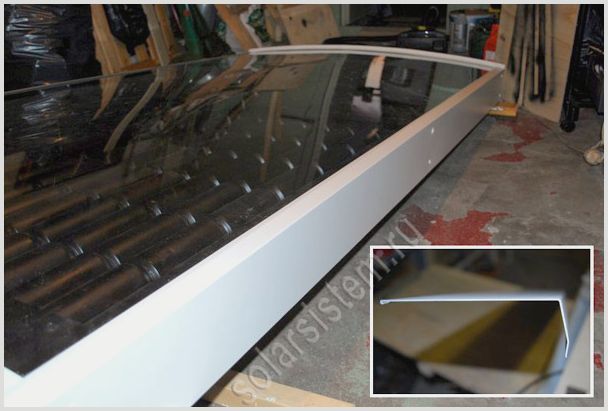
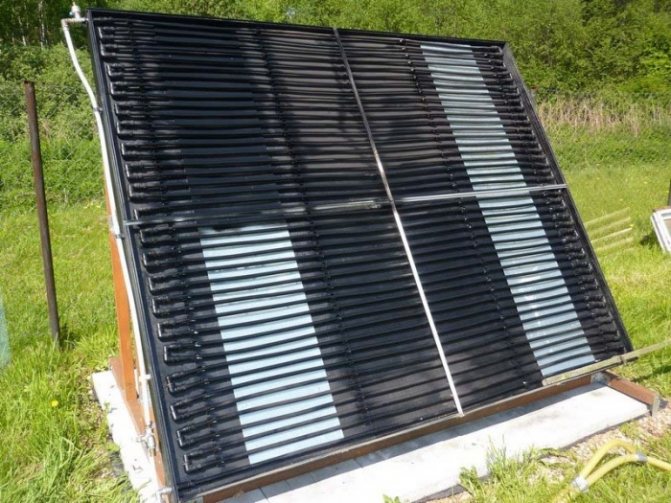
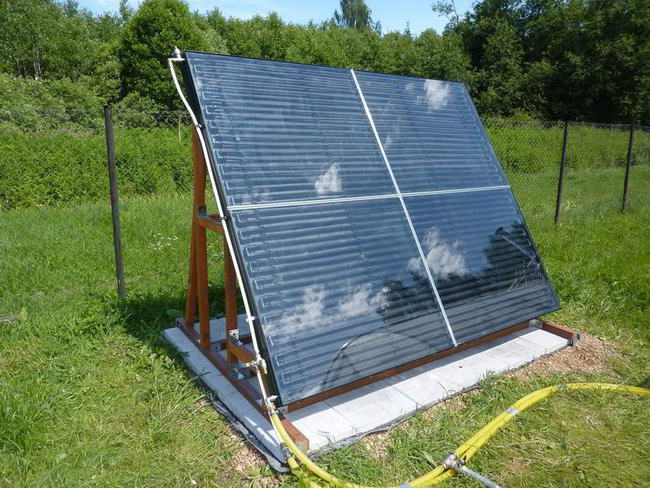
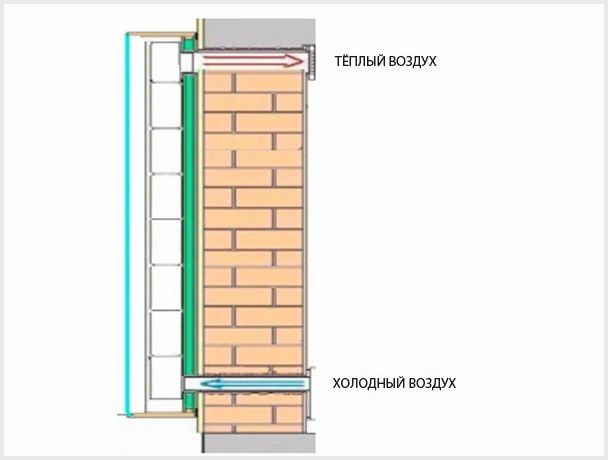
1. Air supply from below, exhaust from above (as in the top picture)
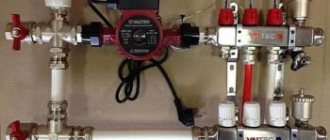
2. Feed and eject from below (as in the bottom picture). In terms of heating the room, this option will be much better, because as we know from physics lessons, warm air rises to the top and cold air sinks.
The materials for the production of a solar air collector (heat generator) can be very different, but the most inexpensive and successful option is the use of metal beer or beverage cans .
An alternative option is to use iron drain pipes, but in this case we lose heat at the outlet, because iron is less thermally conductive than aluminum.
Positive qualities of manufacturing a collector from metal cans
1. Free material for construction.
2. The result is a lightweight design
3. Due to the roundness of the cans, the collector area in this case becomes larger from 2.55 sq. m., to approximately 3.6 sq. m.
Let's start making an air collector (heat generator) from beer cans:
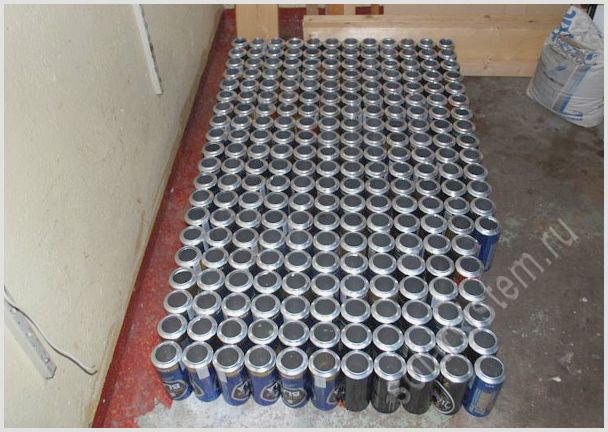
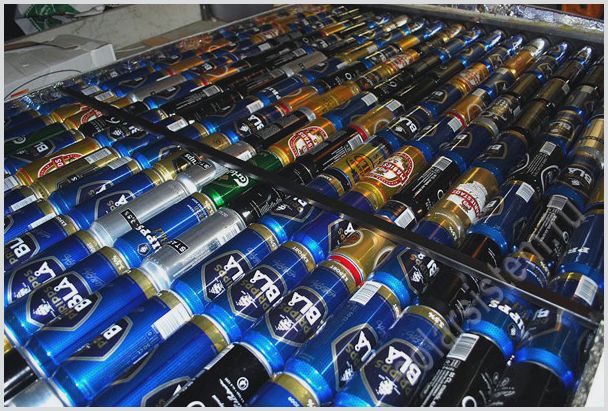
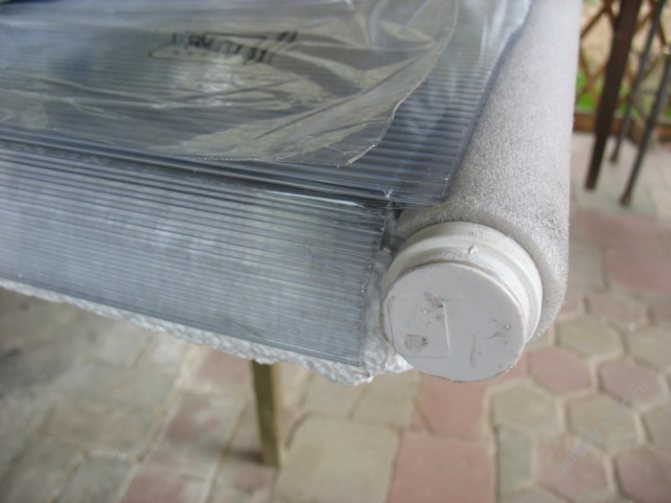
The dimensions of this solar heat generator are 2400 x 1265 mm and contains 234 metal cans of the same size.
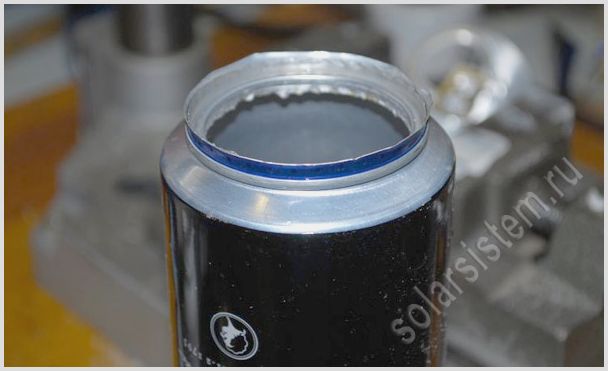
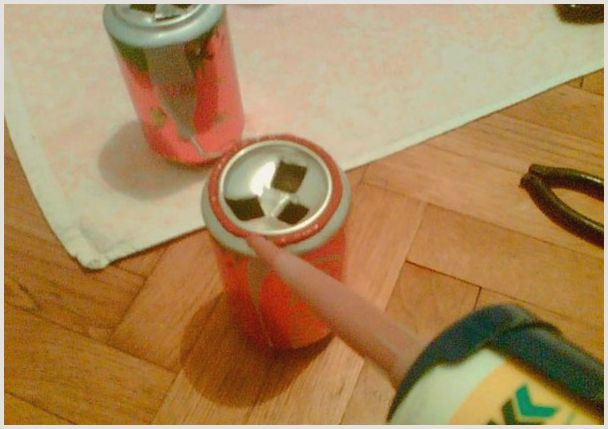
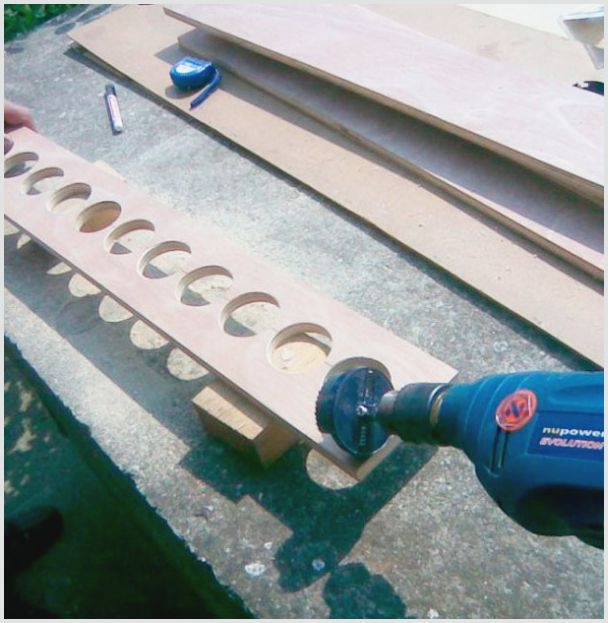
Once all banking institutions have been collected, we will begin processing them. To do this, we cut a hole in the bottom using a metal crown with a diameter of 44 mm. It is quite convenient to use a drilling machine. It is quite difficult to hold the can so that it does not spin, and at the same time not to crush it, for this purpose a second bit of d 51 mm was attached to the bottom of the drilling machine.
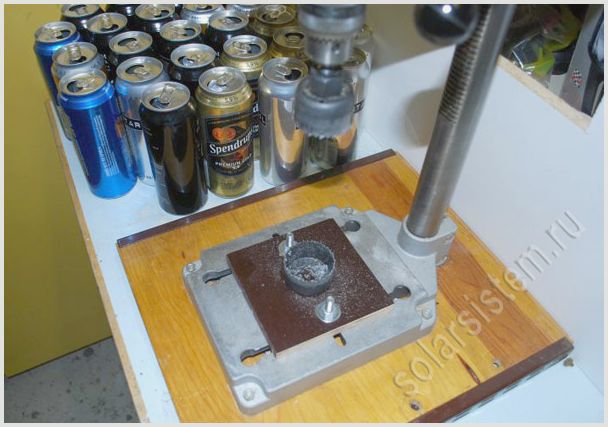
In this way we acquire a perfect hole. If you don’t have a drilling machine, then you can use an ordinary drill at low speeds. But it would be a good idea to fix it in advance or work with an assistant, so that one holds the drill and the other substitutes the cans. It is worth considering that in this case, be extremely careful not to get injured.
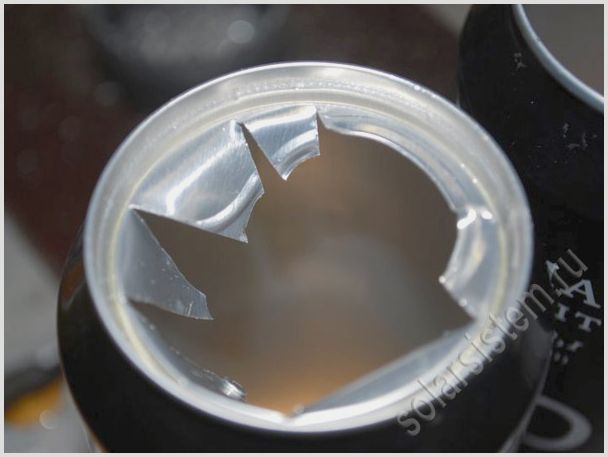
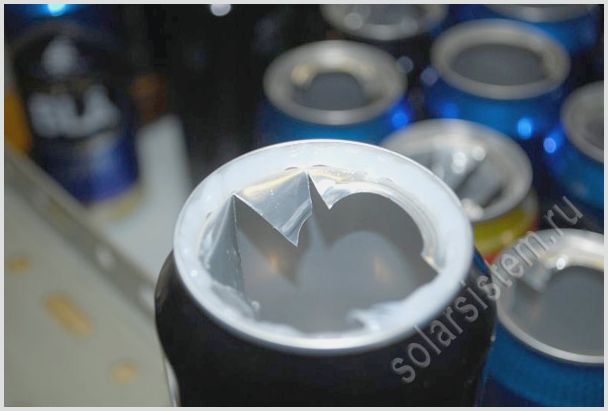
The top of the can is cut into strips and bent inward. This is done to create turbulence from within the system. In this case, the air will hit the walls of the cans, thus better receiving heat.
Holes were cut out on both sides of 18 cans.
Now all 234 cans are ready, and we will begin diligently washing and degreasing. To remove dirt and grease, you can use any cleaning product, especially pay attention to the aroma !
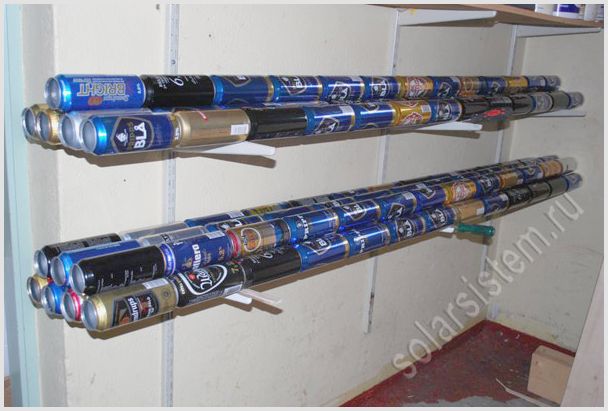
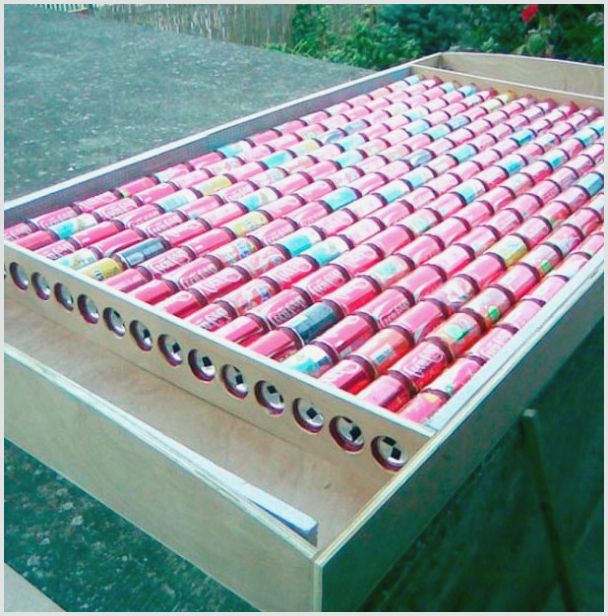
When the cans have dried, we begin gluing them into a single channel (pipe), where each pipe will consist of 13 cans and a total length of 2150 mm. There will be 18 channels in total.
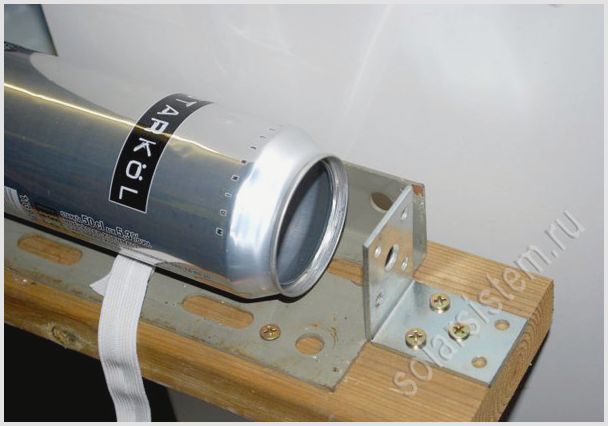
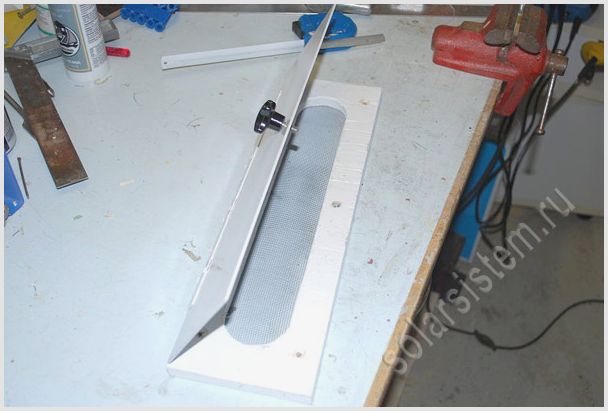
To make the channels ideal, you have to use a guide (conductor). To do this, use a metal corner or put together a guide from two boards. And at one end of the guide there will be a stop, and at the other end there will be a clamping screw.
The first to be placed is a jar with 2 holes, in the direction of the neck towards the stop.
For gluing the cans, aluminum sealant was used, with a temperature from -50 to +250 degrees. You can use any other, non-toxic, fire-resistant adhesive composition capable of maintaining temperatures of more than 200 degrees
The sealant is applied to the inside of the neck of the jar in an even layer.
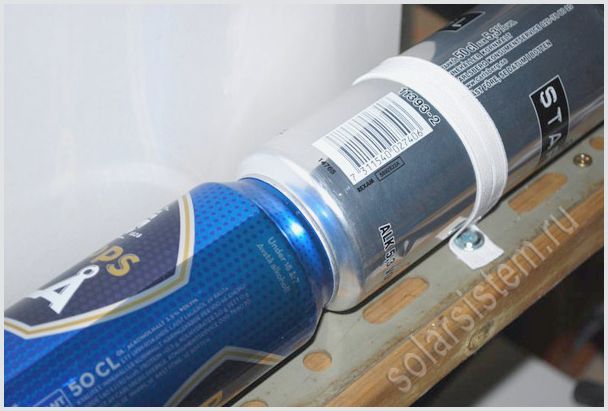
When gluing, each can is secured with a wide rubber band.
We glue the last can and compress the entire structure with a clamping screw.
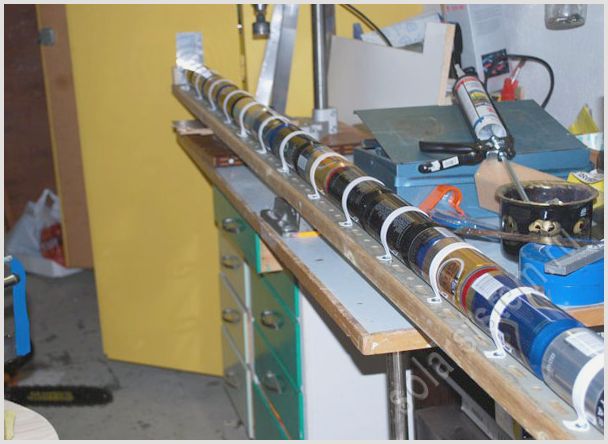
We leave the structure in this state for a day until the adhesive composition dries.
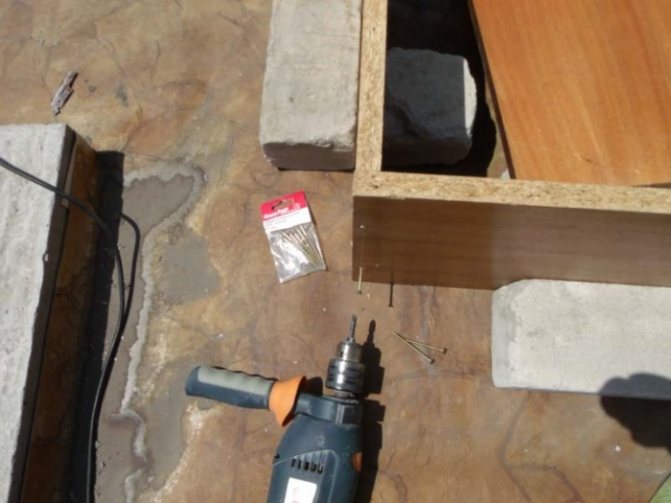
Let's start making the hot (warm) air generator box.
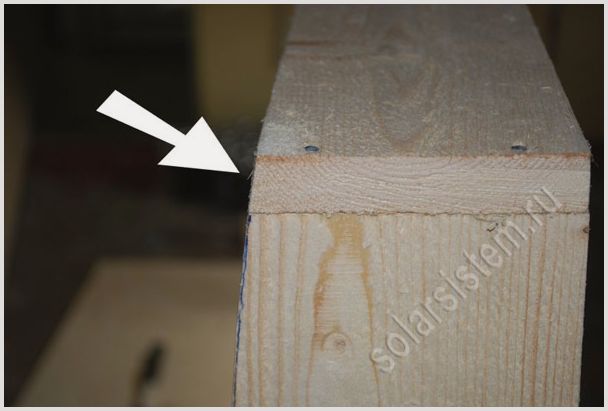
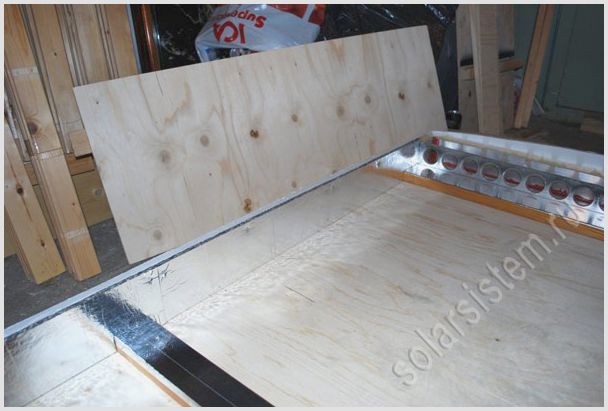
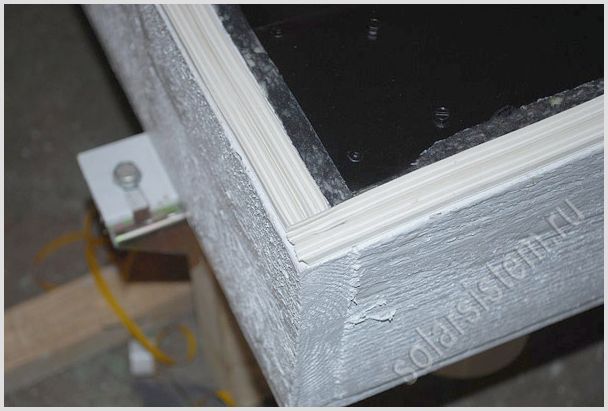
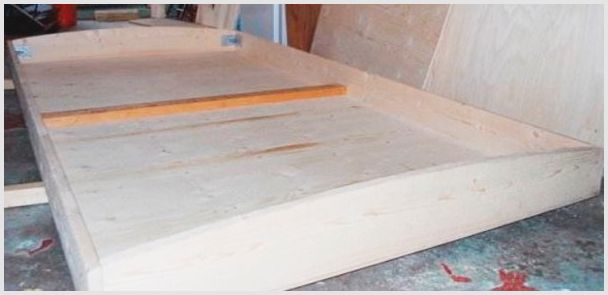
The frame of the box is made of wood, moisture-resistant plywood or OSB board. The outer size of the box is 2400 x 1265 mm. The thickness of the box in the smaller part is 120 mm. at the top of the bend 160 mm. The wall at the back is made of 12 mm plywood. The walls on the sides are made of 20 mm wood boards. The corners are reinforced with steel corners. A rail is placed in the middle to support the pipes.
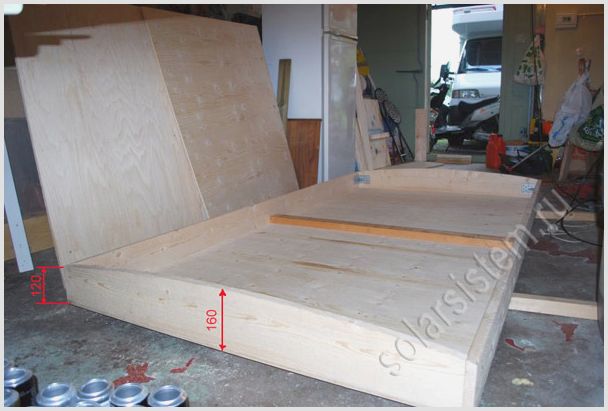
The convex outer side gives the collector not only a luxurious look but also has a good effect on the angle of incidence of the sun's rays. In order to outline a good radius on the workpiece, tie a rope to a pencil, and tie the other end of the rope at a distance of 4.75 m from the workpiece.
First of all, make a bevel on the side walls so that the polycarbonate plastic fits snugly along the entire plane of the collector.
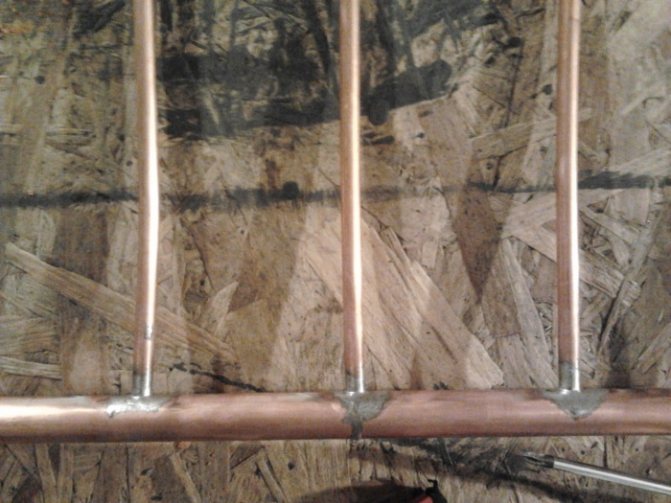
Manufacturing of air channels.
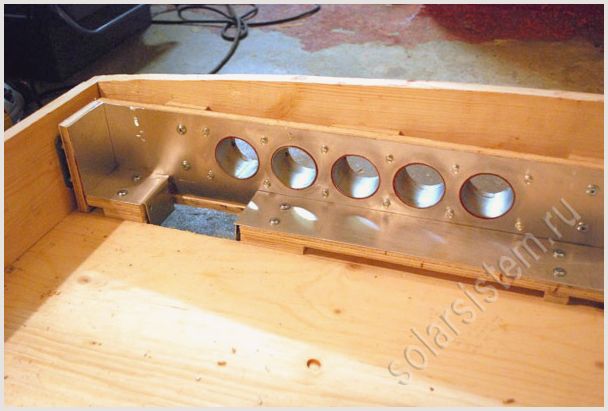
Air channels on both sides are built locally. Made from 12 mm. plywood covered with a thin layer of 1 mm aluminum. All joints are first lubricated with sealant to prevent air leaks.
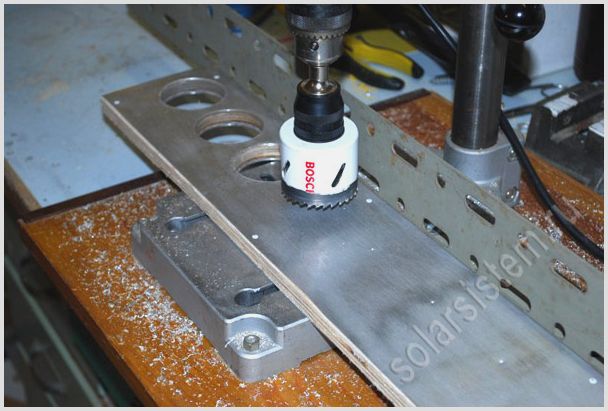
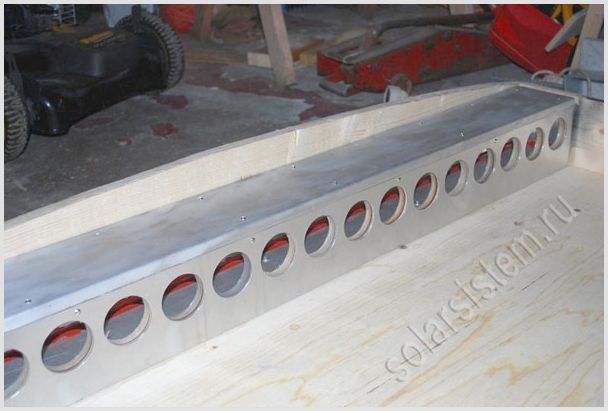
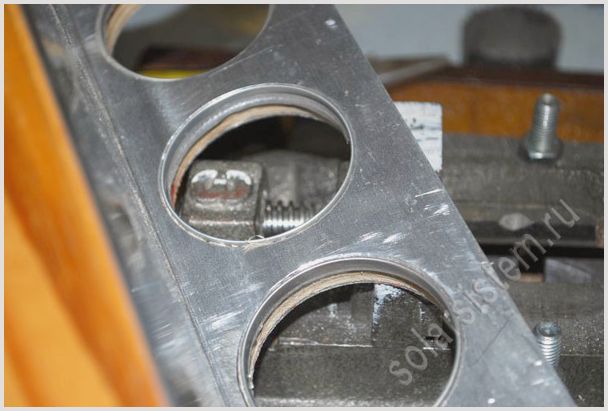
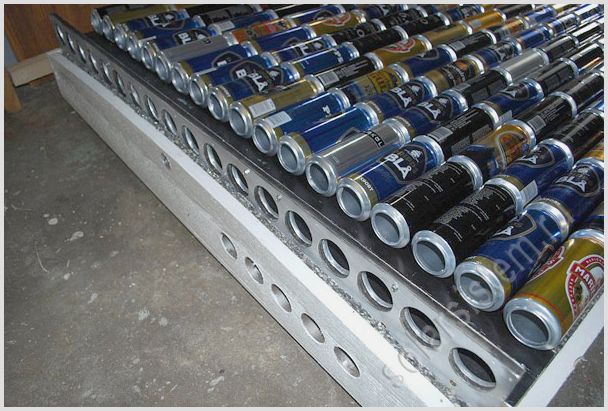
The holes in the air channel were drilled 54 mm. crown All 18 holes must be equally spaced across the entire width of the manifold and be symmetrical with the lower air channel.
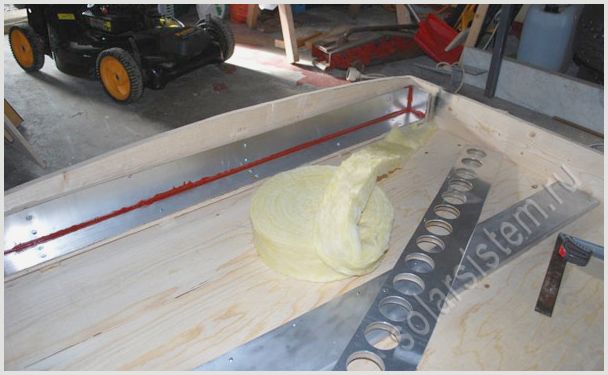
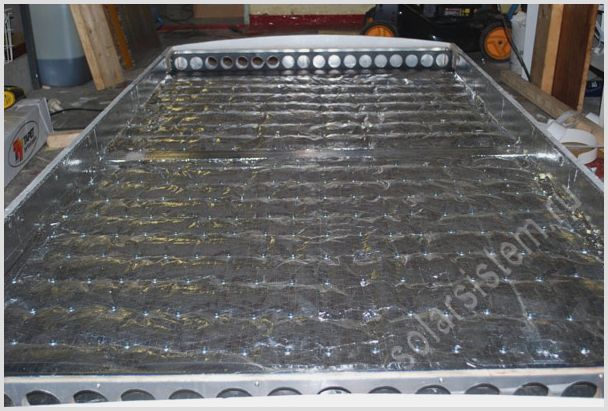
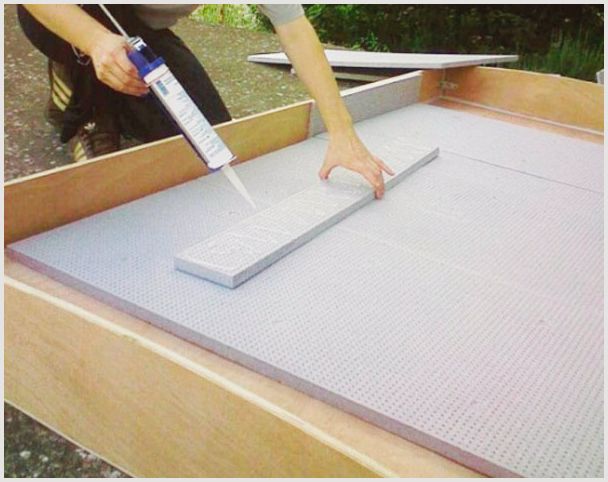
Before the air channel closes, the space between the air channel and the back wall should be insulated with mineral wool.
During final assembly, make sure that all cracks are sealed with sealant.
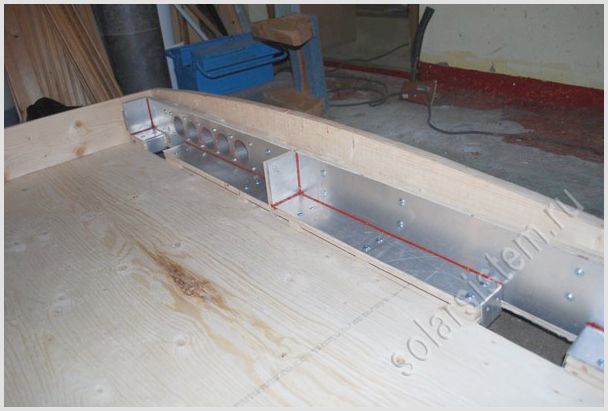
To make the process of installing air ducts from cans more comfortable, you need to make a stand for cans from plywood and cover it with aluminum foil. Similarly the upper air channel is ready.

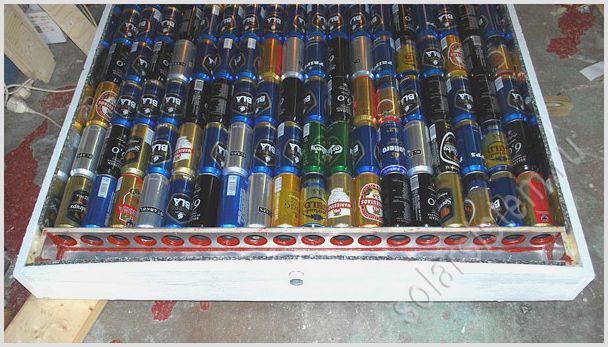
The manufacture of the lower air channel occurs in the same way as the upper one, except that there will be additional holes for ventilation. This makes it possible to get clean air (under conditions that it is not very cool outside).
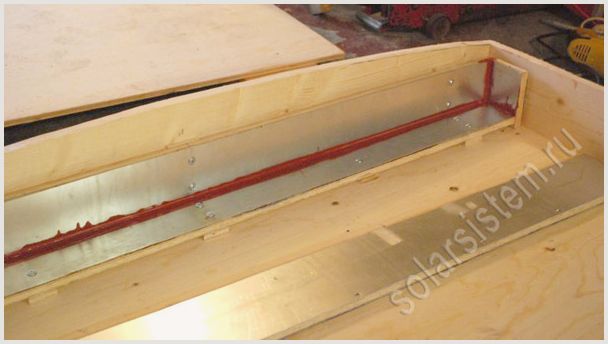
Here you can see how the air channel is divided into two halves. The cold air will be taken in from the far hole (shown in the figure below), and the hot air will be released from the near hole (shown in the figure below). Just in case of a fire, all seams are coated with high-temperature sealant to ensure the tightness of the system.
For good fixation of cans on the lower air duct. You need to do the following procedure: take 18 cans (can be dented), and use scissors to cut off the part on top (rings).
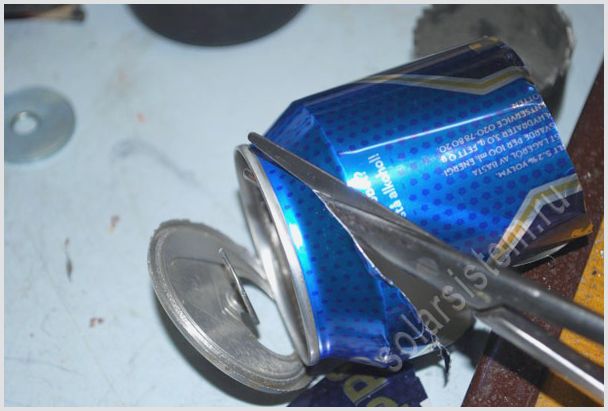
appearance of the finished ring.
The rings are placed in the air channel, with obligatory sealing with sealant.
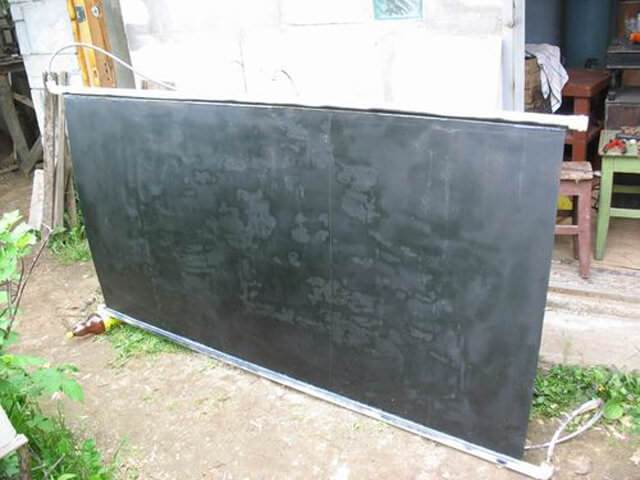
The lower air channel is ready, it is sealed and painted black. it is located at a distance that will ensure a tight fit of the pipes. To control the density we use several pipes.
We completely paint the collector frame to protect it from external atmospheric influences. It would be a good idea to additionally use antiseptics.
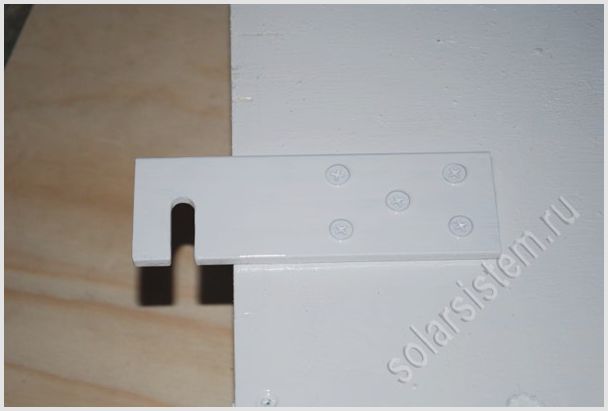
The wall mount is made of a strip 4 mm thick and 40 mm wide, and is designed in the form of a hook.
The mosquito cover will be placed at the final moment (so as not to damage it during the construction of the collector) on the holes for ventilation. The mesh is fixed using a stapler.
Insulation
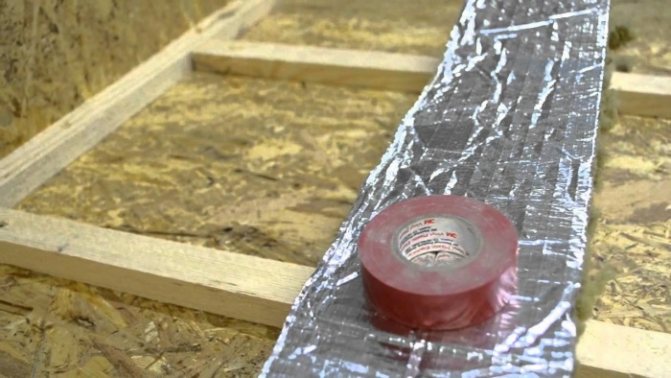
The insulation of the collector plays a special role, because heat escapes through the sides and the back cover. Thermal insulation needs to be done at the last stage, when the frame is completely ready and painted. The walls on the sides were insulated with foil-based insulation that will withstand temperatures of 120 degrees (it is used to insulate chimneys).
The rear wall was insulated with mineral-based wool coated with a layer of aluminum-based foil.
Ventilation system
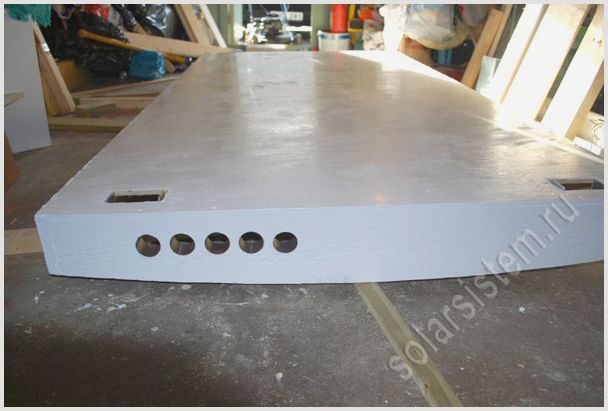
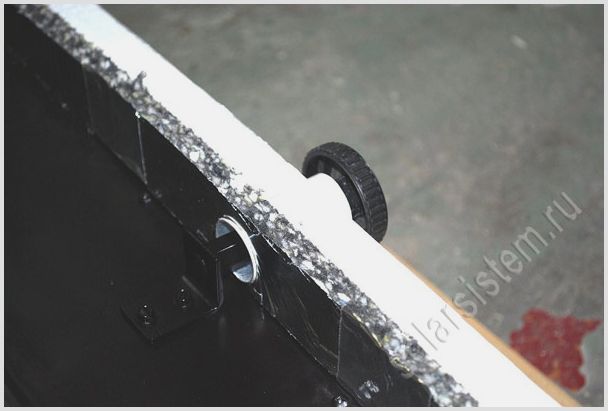
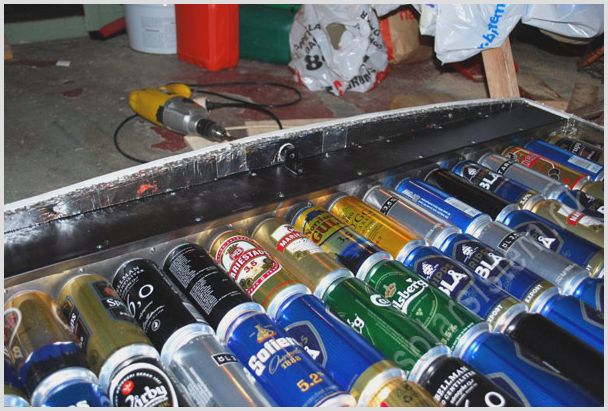
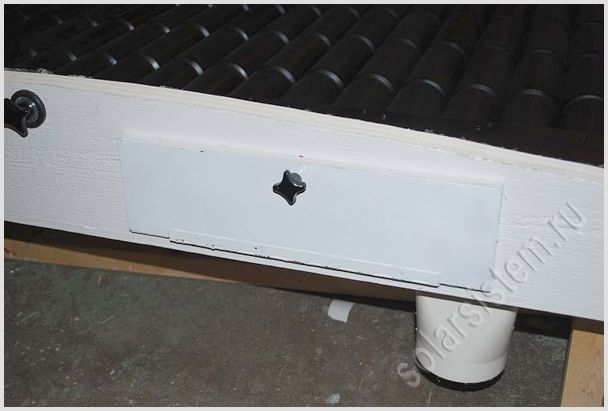
Since the box will be completely sealed, I advise you to make holes for ventilation in advance, in case condensation occurs. Ventilation openings must be able to close. In this case, bolts with a large plastic head were used. To do this, a hole is drilled in the side of the frame for a 1/2″ or 3/4″ pipe, and a bend is pressed into this hole.
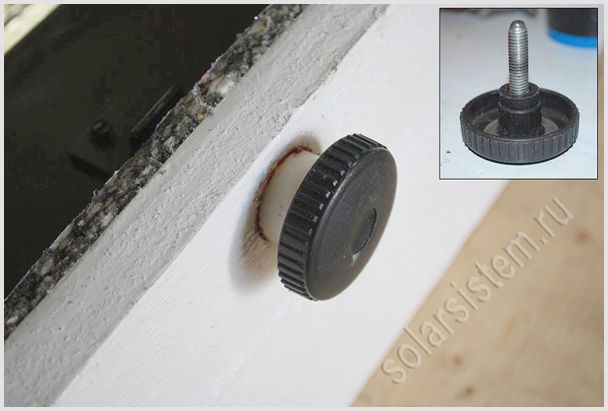
View inside. An axle box (with thread) is fixed in the corner into which the bolt is screwed. It comes out when the bolt is fully screwed in, the head of the bolt covers the hole in the tube. And by unscrewing the bolt, you open holes for ventilation.
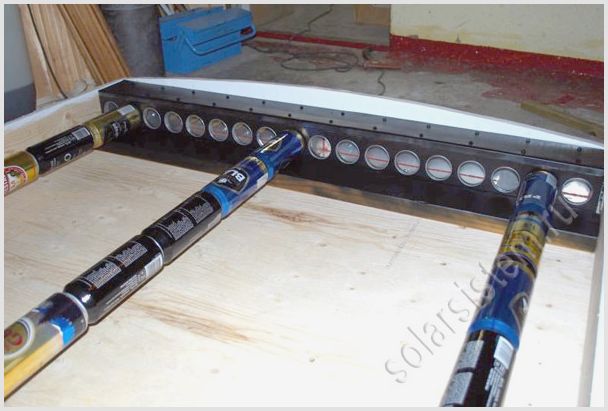
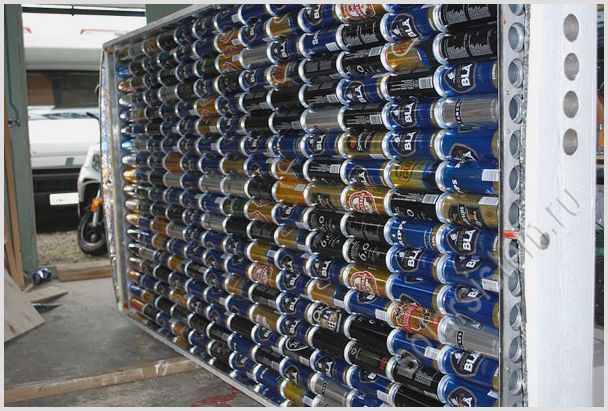
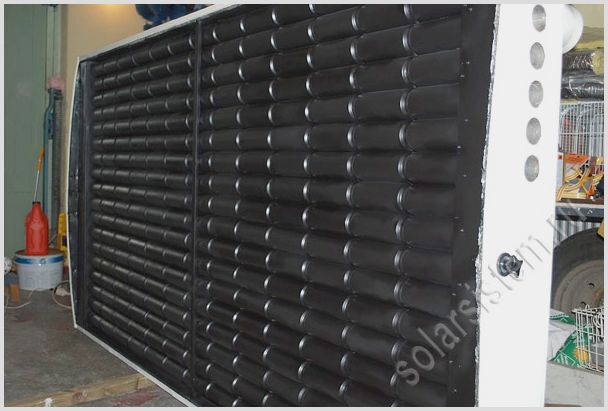
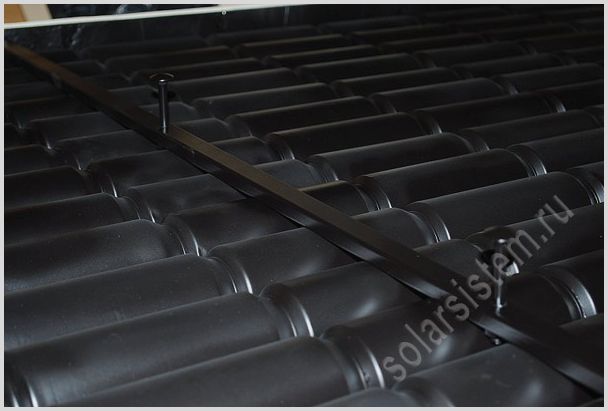
Everything is ready, now, finally, let's start joining the pipes, it is especially important that all the pipes are parallel to each other. The pipes are placed in the direction of the neck towards the upper air channel.
Using the lower air channel, we adjust the joining of the pipes, and apply sealant to all joints. After that, close the air channel cover.
In the middle, to be sure, we assemble the thrust rail.
In the upper air duct, we also coat all the joints inside.
Close the upper air channel.
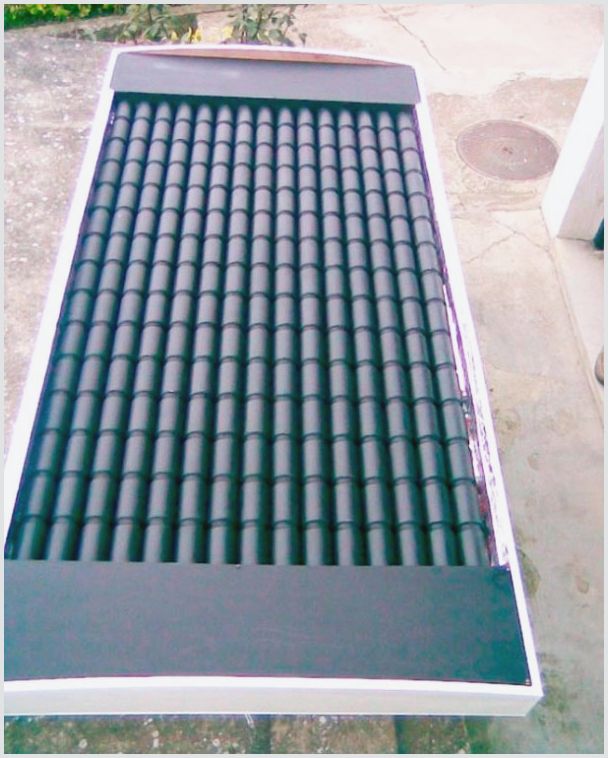
Everything is ready, now you can start painting. For painting, you have to use matte black heat-resistant paint, which is used for painting car mufflers and barbecues. Sold in cans on the automotive market.
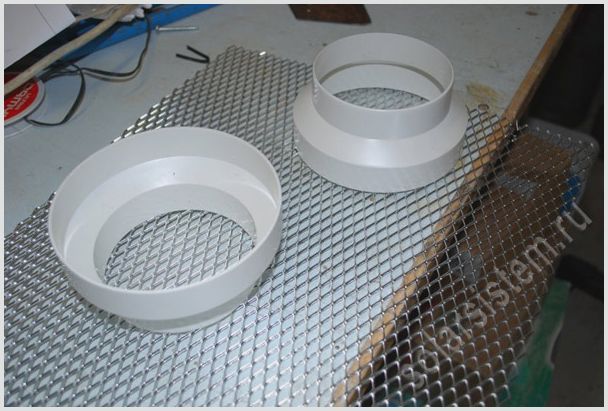
To connect ventilation holes, transitions from a quadrangular shape to a round shape were used.

We glue a rubber seal along the perimeter of the collector frame to prevent heat from escaping through the cracks between the transparent coating and the wood.
Assembling the ventilation hole cover.
We screw furniture bolts (with a round head) into the thrust strip to support the transparent coating.
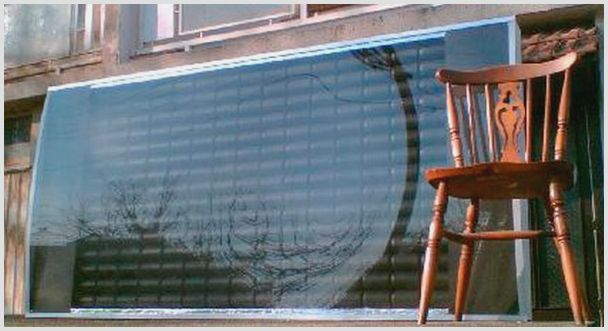
I recommend using cellular or molded plastic as glazing. Screw 4 mm. cast plastic to the frame, for this, holes were drilled in advance along the edge in increments of 10 - 15 cm for screws. When screwing in the screws, the main thing is not to overdo it so that the polycarbonate plastic does not crack.
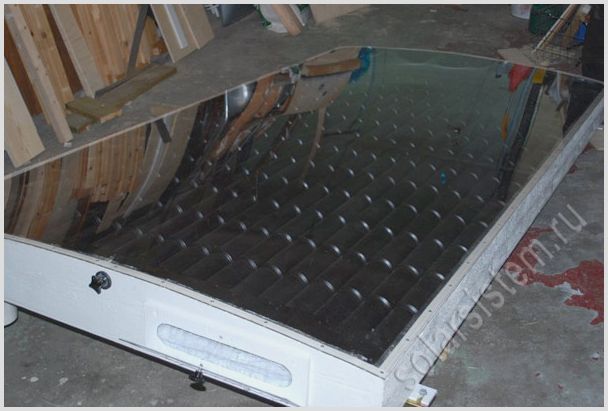
For decorative cladding, panels were made of thin metal on a sheet bender and painted with powder-based paint. Those who do not have a sheet metal bender should contact companies that make skates and visors.
We install the hot (warm) air generator on the wall.
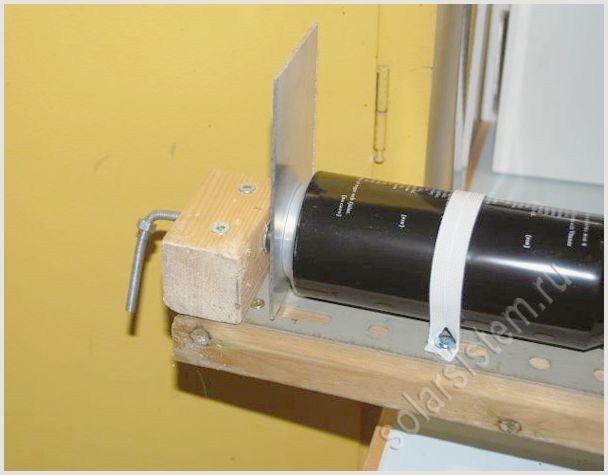
Let's start installing the fan.
For these purposes, I advise you to use a fan with an operating capacity of 200 - 270 cubic meters per hour. If you use a fan with less efficiency, then in this way you reduce the efficiency of the collector, because due to the resistance from inside the pipes, the productivity is almost halved.
In this design, the fan must be placed on the exhaust pipe in order to be able to use holes for ventilation (under conditions that it is not very cool outside). In other words, open the lid and you get warm fresh air in the middle of the room.
Start.
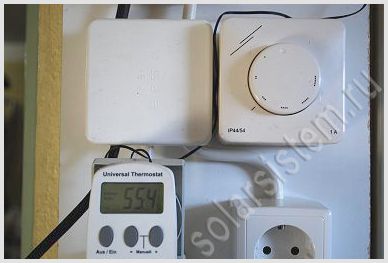
The first measurement was on October 15 at 14.00 with a slight wind. Outside temperature +4.6° C. The temperature was measured at a distance of 50 cm from the exhaust pipe and was 78° C
The second measurement was carried out on October 17 at 14.00. Outside temperature +7.8 C °. Cloudy and windy. The measurements were carried out as before. Release temperature 69.2°C
The 3rd measurement was made under heavy clouds (see photo below). The outside temperature was 5.9° C, the emission temperature was +23.3° C

The fourth measurement was on February 12 with an outside air temperature of -4.2° C and bright sunshine. The ambient temperature produced by the manifold was 55°C (under the conditions that the temperature of the intake air was 12°C, i.e. the temperature difference between the air at the inlet and outlet was 43°C).
Muffler
The major problem was the large fan noise. However, this kind of problem was quickly solved by manufacturing a muffler. For this, two plastic adapters and a metal mesh were purchased.
We twist the mesh into a pipe and place it inside the adapter. The length of the muffler was 60 cm.
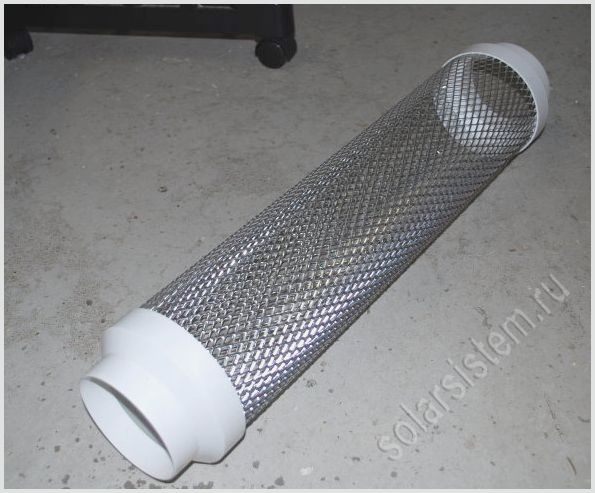
We wrap a thin layer of padding polyester on top, which will act as a filter. Mark securely on both sides with tape. The filter will prevent dust from entering the room from min. cotton wool.
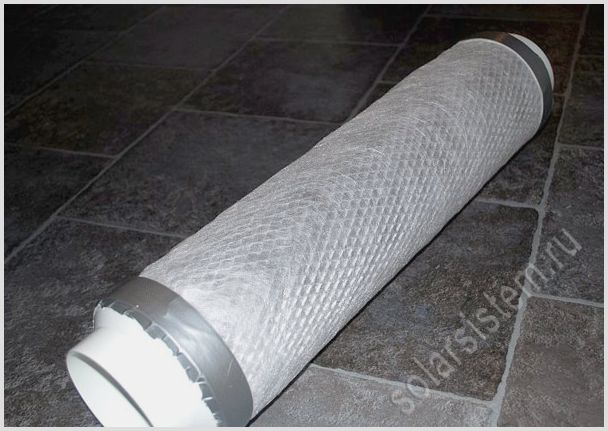
The last step is to wrap it in mineral wool with foil applied for sound absorption.

The muffler is ready. The result was significantly higher than expected. Almost silent air release while maintaining fan performance.
To automate the heat supply process, you should install a thermostatic valve with a remote sensor. On which to set the fan to turn off if the exhaust temperature is, for example, below 22° C
Likewise, you do not need to observe the sun regularly.
Finally, I want to emphasize:
To reduce the use of electricity. fan (in this case 75 W), a photovoltaic battery can be used. Moreover, when the sun is there, the fan does not stop working, naturally there is no sunlight and electricity is not needed.
If you want to deliver hot air to another room, then use insulated ventilation ducts. Otherwise, all the heat will dissipate along the way.
share with a group of friends >>>
Manufacturing of a solar collector
Preparation
Preparation is an important step in creating a polycarbonate manifold. Before you begin, you need to collect the necessary materials. Otherwise, at the most crucial moment, you will not be able to complete the assembly of the structure.
Few people know, but the materials for creating a polycarbonate solar collector can be found in any hardware store. Of course, the efficiency of the device will be lower than that of the factory analogue, but the cost will be corresponding.
To create a polycarbonate solar collector you will need:
- Copper tubes. They are needed to make a high-quality coil. In this case, the diameter of each should be 18 mm.
- Thermal insulation materials.
- A metal sheet. In this case, its thickness should be about 1 mm.
- Corner transitions. Their size corresponds to the diameter of the copper tubes. Plumbing adapters are also needed.
- Honeycomb type polycarbonate. It is best suited for creating a manifold.
- Of course, you can’t do it without a soldering iron.
- Absorberg and mineral wool.
- Black paint in aerosol form.
- Plywood reinforced with aluminum corners. As an alternative to an aluminum frame, you can use wooden blocks.
Before starting work on creating a structure, you must have all these materials and tools available. Only after a preliminary check can you proceed to creating a polycarbonate solar collector with your own hands.
Making a coil
An important design element of a polycarbonate solar collector is the coil. This is a tube through which water heated by solar energy circulates. It usually has a rather sinuous shape.
Attention! If you wish, you can buy a ready-made coil.
For a solar collector made of polycarbonate, both a coil bought in a store and a part made by yourself are suitable. Moreover, you can be smart and finish off a finished device, for example, from an old, broken refrigerator.
Creating a coil yourself requires much more effort. But, in turn, you receive a completely new part, made specifically for the needs of your polycarbonate solar collector.
The process of creating a coil is not particularly complicated, but quite labor-intensive. First you need to get some copper tubes. Ideally, you need to buy them. As an alternative, the use of steel analogues is allowed.
Attention! Then you just need to take a soldering iron and weld the tubes together.
Polycarbonate as the main material
Polycarbonate has many beneficial properties that make it ideal for polycarbonate solar collectors. But it is necessary to take into account that there are many varieties of this material. The best for this type of design is cellular.
When using it, it is possible to greatly reduce the cost of creating a structure. Moreover, its characteristics fully meet the requirements of the future solar collector.
Attention! When manufacturing a solar collector in a factory, special glass is used. But at home, its use is associated with a number of difficulties.
When choosing cellular polycarbonate for a solar collector, special attention must be paid to its transparency. In order for the device to effectively perform its functions, high light transmittance is required. Moreover, the material must be durable to withstand the influence of the environment.
The structure of cellular polycarbonate allows you to heat large volumes of water in the shortest possible time. This can be achieved by creating a greenhouse effect. But for this to become a reality, high-quality thermal insulation is necessary.
Stages of manifold manufacturing
In order for a polycarbonate collector to have sufficient efficiency, and at the same time be reliable and easy to operate, it is necessary to strictly follow the algorithm presented below:
- Prepare the coil. If you use a part from a strictly refrigerator, it must be thoroughly cleaned. Otherwise, the system efficiency will be low.
- If you don't have a refrigerator you don't need, use copper pipes. You need to cut them according to pre-created markings. Corner transitions play a special role in this design. They must be soldered especially carefully to avoid depressurization.
- Install plumbing adapters at the ends of the coil. This will allow you to connect to the water supply system as simply and quickly as possible.
- Paint the metal sheet. In this case, you can only use paint that will not deteriorate under the influence of high temperatures. It is very important that it is black in color. It is best to apply it in two layers.
- After the sheet is painted, it is necessary to attach it to the coil. Moreover, the unpainted part is used as a connection. Of course, you will need to use a soldering iron for this operation.
- Finally, you can begin assembling the polycarbonate solar collector housing. For this you will need bars and plywood. They will serve as the starting material for a durable box.
- You need to make holes in the box, with their help you need to mount the polycarbonate.
- First, you need to put mineral wool in the box you have made. The absorber is placed in the second place.
- Don't forget to leave a gap between the heating panel and the polycarbonate.
- Treat the body with a water-repellent compound.
- You need to cover the entire structure in addition to the front surface with enamel.
The polycarbonate solar collector is now complete. But for it to function properly, something else needs to be done. Namely, mount it so that as much direct sunlight falls on it as possible.
You also need to install a water tank. Thanks to it, you will always have hot water, and you will have a complete heating system, which is an autonomous source of heat.
Solar collector made of cans: drawings, photos
Handmade solar collector from beer cans: drawings, assembly diagram, photo and video showing the collector in operation.
In a previous publication, we examined in detail how to make a solar collector with our own hands; plastic bottles were used for the key material; in this case, we will use metal beer cans.
At the end of this article there is a video showing the solar collector in operation, when the air temperature outside was 10 degrees; in good weather, the collector released pleasant air into the room with a temperature of +51 degrees. Essentially, you will receive free heating of your living space, but only during the day and of course in good weather.
Build process
Assembling a collector from beer cans is quite simple; the main thing is to follow the technology and take into account the purpose of the design (heating rooms or heating water).
Preparing jars
Using tools, three holes (no larger than a fingernail) are punched in the bottom of each jar. A star-shaped cutout is made in the upper part and the free ends are bent outward (using pliers). This is necessary to improve the turbulence of heated air (if solar panels will be used for heating, for example, a cottage or garage). If the solar battery is planned to be used for water heating, then the lids and bottoms of the cans must be cut off in such a way as to turn them into familiar pipes. You also need to provide a side hole in one of the cans for the water supply hose.
Next, the homemade collector is assembled like this. The jars are thoroughly degreased and placed into tubes of the required length. The bottom and the lid fit almost perfectly to each other, so the connection will be quite tight, and the gaps will be filled with silicone. We must remember that the sealant must be designed for strong, long-term heating, otherwise it will collapse under the influence of temperature and the solar panels assembled with your own hands will crumble.
When assembling the pipes, the cans must be securely fixed so that they do not move until the silicone has completely hardened. This is best done using so-called “templates”, which are wooden boards knocked down at an angle (in the form of a gutter). They will allow you to firmly fix the cans from lateral displacement.
The working principle of a can solar collector.
The device does not stop working according to the following principle. The sun's rays penetrate the adsorbers (in our case, these are metal cans painted matte black) and transfer heat energy to them.
Air moves regularly from inside the cans, which receives heat energy from the heated adsorbers. Heated air from the collector enters the ventilation duct into the room space and raises the temperature in it.
Cooled air is also taken from the room back into the collector.
If you are interested in this homemade product, I suggest you look at the step-by-step production of a solar collector.
DIY solar collectors (cool video compilation)
Super video selection! DIY solar collectors
Enjoy watching!
The story was produced by regional TV in order to popularize solar collectors and energy-saving equipment in Russia in the sunny regions of Russia (Khabarovsk, Primorsky, Krasnodar Territory, etc.)
How to make solar hot water for a summer house, summer kitchen, summer shower
If we compare this “solar heater” with an electric boiler, then it will be better in the case of a summer house, summer kitchen, etc., but in the case of a private house, an electric boiler will most likely be better
Pool heating, do-it-yourself solar collector
Solar collector for a summer residence
Water heater made from plastic bottles Heats water even in cloudy weather. Made from PET bottles and polypropylene pipes. The system works without pumps.
Solar collector made of aluminum cans, manufacturing
Homemade solar collector from a sheet of cellular polycarbonate
How to make a solar air collector with your own hands and get free heating Stages of creation, testing, comments, tips. A solar collector for heating your home is a good idea to save gas for heating. An air solar collector for heating a house is only suitable as an auxiliary module, since solar energy can only be used during the day in clear weather. My solar collector is assembled practically from waste - an old window, plywood, polystyrene foam, an old computer cooler...
PYRAMIDAL SOLAR RUNNING WATER HEATER
Consists of a PMD-40 meter hose. Base 150x150cm and Arc 2 meters. 10mm plywood is painted blue, from the north there is a sheet of iron painted blue, everything is covered with polycarbonate. Lies on the roof 3 meters from the ground
How to make a very effective summer shower Some useful tips for those who want to make a simple summer shower with a solar collector in their dacha
Solar collector, step-by-step assembly of a solar system with your own hands
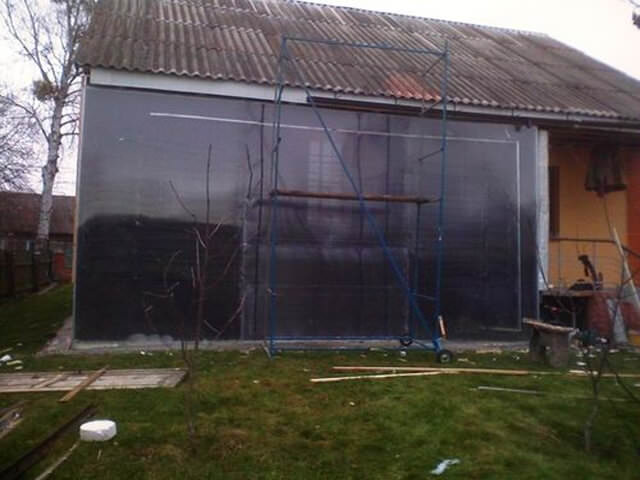
Solar air collector Brief history of construction
Autumn testing of an airborne solar collector built directly on the pediment of a country house.
20.05.2017
See also:
- Highly efficient DIY solar collector
- Homemade solar collector from an old refrigerator
- Solar collector (photo, calculation, step by step)
- Heating by solar rays
- DIY solar collector made from aluminum cans
Rate a homemade product, a master class, an idea. Comments
DIY solar collector made from beer cans.
Let's prepare the materials, we will need:
- Metal cans for beer or carbonated drinks approximately 234 pcs.
- Plywood sheet 2.4 x 1.265 m with a thickness of at least 10 mm.
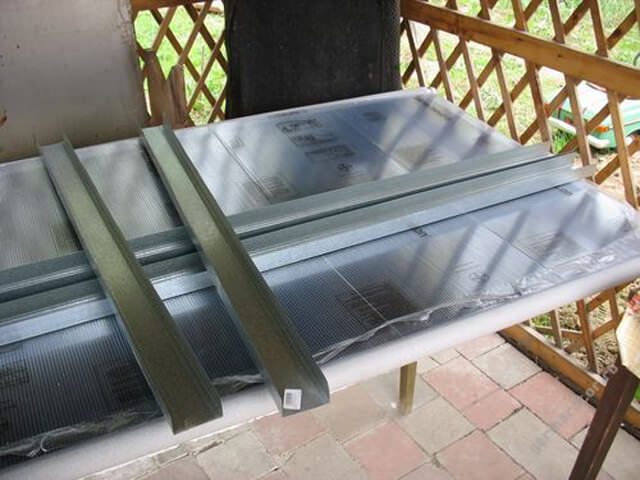
- A sheet of plexiglass or polycarbonate material of the same size.
- Thermal insulation material is polystyrene foam or penofol.
- Adhesive composition and sealant.
- Matte black paint.
- Ventilation pipes.
- Fan.
Let's start by preparing the jars, take the jar and enlarge the hole in the neck, and punch 3 large holes in the bottom.
All banking institutions must be prepared in a similar manner; after this, the jars should be very carefully washed to remove food residues with warm water and detergent, otherwise they will produce a foul odor when heated.
Now we will make pipes from cans, for this we use an adhesive compound and a sealant. You can create a regular device from two boards that will make it possible to hold the cans while they are glued.

We place the cans on the adhesive mixture by connecting the neck of one can with the bottom of another, each pipe will require 13 standard metal cans, mark the pipe from the cans in the device and press down with a small weight for better contact of the cans with the glue. Let it stick for a day.
In total you will need to make 18 pipes.
Let's make a box for the collector. We cut out a back wall measuring 2.4 x 1.265 m from a plywood sheet.
The sides of the box can be made of plywood or boards, additionally fastening them together with metal corners. Two long sides have a height of 12 cm, two short sides will be rounded, the height at the edges is 12 cm, and the height at the center is 16 cm.
We glue the heat insulator to the wall of the box.
Let's make two holders for pipes from cans; we will need two strips of plywood measuring 126.5 x 12 cm. Using an electric drill and a 54 mm wood bit, we drill holes for the pipes.
We find places for the holes by placing beer cans very tightly against each other, and we outline the bottoms on plywood. We drill 18 holes on any rail.
We try on the pipes in the box.
Pipes from cans must be painted black, this will significantly increase the absorption of solar energy; they must be coated with paint on a matte basis, glossy will reflect part of the light.
We install the cans in the box, mark them with support slats with holes. In the back wall of the box we will make lower and upper openings for air channels; cool air from the room will enter into the lower one, and already heated air will exit through the upper one. We install a fan in the inlet for more intensive air exchange in the system.
We cover the front part of the box with a sheet of plexiglass or polycarbonate material, fasten it with self-tapping screws with temperature compensation washers, and seal all the cracks with sealant in advance.
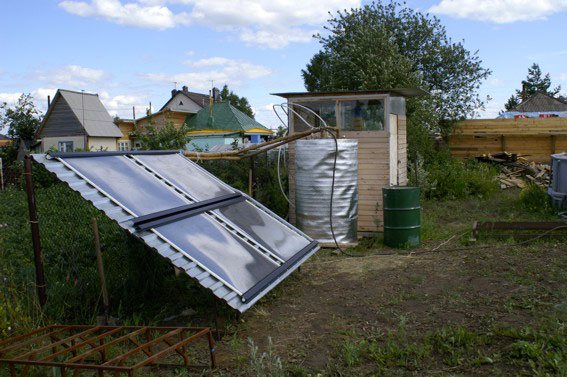
The solar heating device is installed on the surface of the wall of the building, the air channels are led into the space of the room, the figure shows the installation diagram of the air collector.
Essentially, a solar collector can be made from ordinary metal cans, which many simply throw in the trash, and this installation can greatly save most of the cost of home heating even in winter.
Of course, such a solar system will not be able to completely change the heating system in the house and it does not stop working only during the daytime, but it can be successfully used as an additional heat supply, which will make it possible to significantly reduce the use of fuel for the boiler for heating in the house.
I suggest you watch an interesting video - the production process of a solar collector.
Another video of a solar collector made from cans in action.
What do you need to create a polycarbonate manifold with your own hands?
We list all the components and materials for assembling an effective homemade collector based on cellular polycarbonate:
- copper tubes with a diameter of 20 millimeters, using them you will form a coil (the same tubes are used when assembling heating systems);
— black matte paint, resistant to high temperatures;
— mineral wool for assembling the heat-insulating layer;
- sheet of metal (copper, iron, steel) 0.8 mm thick;
— corner transitions 18x18 millimeters;
— plumbing transitions 18 mm x ¾ (needed to connect to the water supply system);
— cellular polycarbonate (front covering of the collector);
We make the front part of the collector from polycarbonate
- a sheet of aluminum and aluminum corners to create the body of the product, in the absence of such - wooden planks and a sheet of plywood for the rear wall of the heater;
— all the tools necessary for soldering work.
It is important to determine in advance the dimensions of your collector. Based on its size, calculate in advance the required number of tubes, transitions and other materials. Calculate the amount of water that will be required to ensure heat exchange in the entire system. To do this, decide in advance for what purposes the collector will be used - either it’s just washing dishes, or arranging a shower, or providing all household needs with hot water supply in your home. To heat water for washing dishes or taking a shower, it will be enough to assemble a collector measuring 200x100 centimeters; the distance between the tubes in the coil should be from 8 to 10 centimeters.
Assembling a solar collector from a sheet of cellular polycarbonate.
You need to start assembling this solar energy device by making a coil. If you were able to pick up a ready-made coil, final assembly will take much less time. The selected coil should be washed very thoroughly under running water (preferably hot) in order to wash out all blockages from the inside and get rid of freon residues. If you do not have any suitable tubes, you can purchase the required quantity in the store. But in this case you will have to make the coil itself. To make it, cut the tubes to the required length. Next, using corner transitions, solder them in the form of a coil structure. So that the collector can be connected to the water supply system, solder ¾-sized plumbing transitions to the edges of the coil. There are several options for the shape and design of the coil, for example, you can solder tubes in the shape of a “ladder” (if you are going to implement this option, then do not buy corner adapters, you will need tees).
Then you apply a selective coating with matte black paint to a pre-prepared sheet of metal; it is advisable to do this in at least a couple of layers. Wait until the air flow dries the paint and begin soldering the coil (on the side that is not painted). The entire coil structure must be soldered along the entire length of the tubes; by doing this, you guarantee the most efficient heat exchange and, as a result, maximum heat transfer to the water supply system. If you do everything correctly, the solar collector you assembled will work as intended.
Painting a sheet of metal with black paint
The final step is to assemble a housing that will hold all the components of the device together into a single structure. Using a sheet of plywood and wooden blocks, you need to knock down a strong box. Cut grooves in the wooden blocks in advance; you will then insert a polycarbonate screen into them (groove depth is about 0.5 cm). The outlet holes for the tubes can be made after all the main components are installed. Next, you lay mineral wool insulation into the already assembled wooden box to create an air pocket. Attach a panel with a coil over the insulation. Tuck the edges of the cotton so that the coil does not touch the walls of the box. The heating panel and the polycarbonate panel should also have some distance between them and not touch each other.
The final stage consists of treating the body with a special solution with water-repellent properties and coating it with enamel (except for the front part).
That's it - your solar absorber is ready. In order to activate it, place it on a supporting structure, turning its front part towards the sun so that the rays fall on the front part at the most right angle. Install a water storage tank on the roof, it will serve as a reservoir. Run a hose connected to the upper tube of the manifold to its upper part, and to the lower part of the tank - to the lower tube. By connecting the water according to this scheme, you will ensure operation in natural circulation mode.

According to the laws of physics, hot water will rise upward in the direction of the tank, and the displaced cold water will enter the collector to be heated in the coil. Don’t forget that you need to attach a hose and valve to the tank to draw water from the tank and also fill it with new water.
Working principle
A solar collector is essentially a tubular heating device that is fixed in a wood or iron frame. On one side the frame is covered with an absorber (a material that accumulates solar energy), and on the other with insulation so that the accumulated heat does not escape outside. Passing through the absorber, the sun is transformed into heat and heats the walls of the tubes in which the water is located. The collector is considered the main part of the solar system. The simplest water heating circuit consists of three components: a solar heating device, an expansion tank and a storage tank. The installation does not stop working according to the thermosiphon principle, when the heated liquid rises up and displaces the cold one. In such a system, the movement of water along a closed circuit occurs for real, which makes it possible to do without a pump.
How to make a polycarbonate solar collector with your own hands?
solar collector
Solar collectors made of polycarbonate are equipment capable of converting light energy received from the sun into heat. The main purpose of its use is to heat water and heat the interior of the room.
What is needed for production?
To make solar air collectors from polycarbonate, you will need to prepare and subsequently use a certain amount of materials, which include:
- Hoses with threaded connections. You will need at least two of them.
- Fitting-type corners made of propylene with metal threads. You will need at least two units.
- At least two pieces of pipe plugs.
- Pipe for water supply made of polyvinyl chloride, two pieces. Its length should be one and a half meters, and its diameter should be 3.2 centimeters.
Types of designs
There are two types of solar polycarbonate collectors: panel and vacuum (air). Both types of collectors have their own distinctive features.
Panel-type collectors are used in seasonal institutions (sanatoriums, recreation centers), in which water needs to be heated in the summer. In winter, in seasonal institutions, this type of collector is not used.
Vacuum collectors cost significantly more than panel collectors, however, they have twice the productivity. Collectors of this type can be used throughout the year, regardless of the outside temperature, because they are able to heat the fluid inside the system.
Also read: Shower partitions made of cellular polycarbonate.
How to assemble the structure?
Manifold assembly
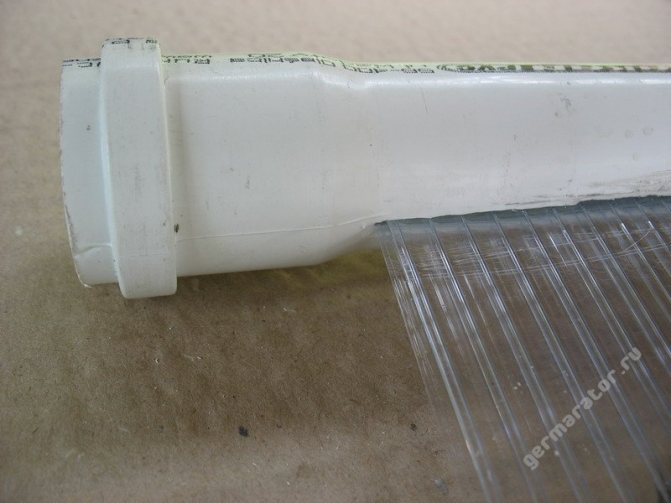
The first step that needs to be taken when starting the construction of a homemade collector with one of two types of polycarbonate (cellular or monolithic) is to make longitudinal cuts in both types of pipes. Next, slabs of cellular thermoplastic are inserted into the cuts made the day before. The supplied liquid through the pipe enters the grooves of the panel and is subsequently heated in them. A “thermal siphon” effect is created, which affects the liquid in such a way that it rises up the pipe and is fed through it into the storage tank.
The ends of the pipes should be left untouched. This will allow you to mute or connect them later, if necessary. The size of the pipe cut should be equal to the width of the collector part.
When inserting polymer panels into cuts, an important nuance should be taken into account. The kerf can converge under the influence of internal stress of the thermoplastic. Therefore, when inserting the plates, you should make sure that the polycarbonate material does not go very deep into the inside of the pipe. This is an important point, since very deep penetration has a negative impact on the normal process of fluid circulation.
It is not recommended to specifically engage in widening the cut. Thanks to its considerable tension, the pipe can be firmly held by the polymer, and this allows the pressure of the internal part of the slab to be compensated. However, a small adjustment in the size of the cut is acceptable.
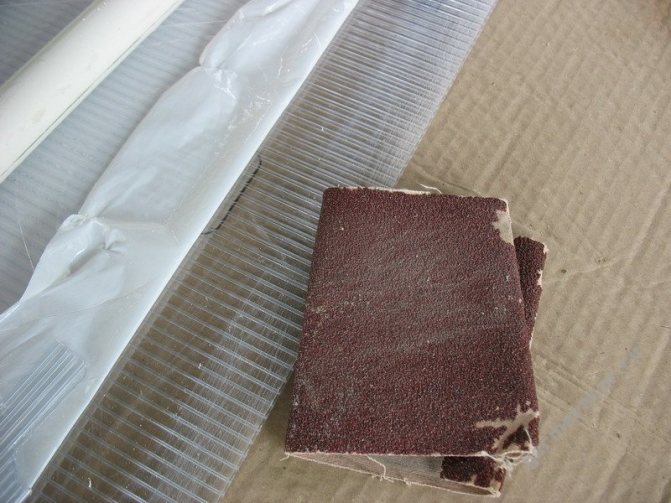
Good to know: To improve the adhesion of the sealant to the surface of the panel, before inserting it into the pipe, treat the edges of the polymer sheets with a piece of sandpaper.
It is necessary to degrease the joints.
At the next stage, the process of sealing the working side of the collector surface with the pipe joints is carried out. This stage is of great importance. You need to use a high-quality sealant, although it will be expensive. If you use a regular silicone-based sealant, the level of sealing of the seams will not be high.
To increase the degree of thermal absorption, you should paint the outer surface of the solar collector made of polycarbonate with your own hands. Painting of the collector surface should be carried out every 3-5 years. To avoid frequent painting, while saving money on buying paint, a matte black polypropylene tape is attached to the surface.
After painting is completed, it’s time to work with the corners with metal threads. The corners are attached to the ends of the pipes with hot glue. The use of hot melt, reinforced flexible hose makes it easier to disconnect or connect the manifold.
When starting to install the collector, the first thing to do is to attach sheets of polystyrene foam to the rear wall of the frame with glue or foam. After this, you can begin the direct installation of a homemade polycarbonate manifold. Plastic or metal clamps tightly fasten the foam and the collector together. The final step is to attach the polycarbonate plates to the front side of the product. The sheets are fastened with self-tapping screws.
Installation plan
Installation of the structure
A volumetric tank of 160 liters is installed in the attic of the building to accumulate water. The tank should be insulated with mineral wool. The tank is connected to a water system through which hot water is supplied to it. Hot liquid is supplied from the tank by gravity. To supply cold water, it is necessary to connect a pump that delivers water from a well.
Note: Do-it-yourself installation of a polycarbonate air manifold is carried out so that the storage tank is located above the top of the manifold.
This arrangement allows the liquid to circulate naturally. That is, hot water replaces cold water, rising and filling the tank. In order for hot water to be able to accumulate in the upper part of the tank, the pipe through which the liquid is supplied should be secured slightly above the middle part of the storage tank.
To increase the water that enters the tank and to heat it stably, two or more units are installed. A solar collector made of polycarbonate is attached to each side of the installation.
Video about a homemade polycarbonate manifold
Classification of solar collectors
Depending on the design features, solar heaters are divided into three main types:
Modern solar heating devices, even those created with your own hands, have a high efficiency and are able to heat water to boiling temperature, regardless of the outside air temperature. And this property can be used to organize the heating of water tanks located on the street. For example, a solar collector for a swimming pool. It is not difficult to do it with your own hands, the main thing is that there is enough sun.
Flat-plate collector
The collector is a specific sandwich. The back panel is covered with thermal insulation. A tubular system is placed above it, which is covered with an absorber. The front wall should be transparent. Very often it is made from stalinite or corrugated polycarbonate. The entire system is placed in a flat wooden or iron (usually metal) box. The walls on the sides are also covered with insulation. The entire panel should not let air in, so all cracks are carefully sealed.
Vacuum manifold
The solar collector for hot water and vacuum heat supply systems consists of individual double tubes. Their device is simple: in a transparent outer pipe there is a smaller one filled with water or the rest of the coolant. The inner tube is coated with a specialized compound that helps capture solar energy. The structure is hermetically sealed and the air is pumped out of it (evacuation occurs). The vacuum layer makes it possible to save about 95% of the concentrated heat energy. Double tubes are connected into a single circuit using their own internal component. These systems are better suited for use in cold regions, since the number of sunny days is not very important for them. But, unlike flat ones, they cannot self-clean from snow, so you will have to monitor the cleaning. It is very difficult to create a vacuum solar collector with your own hands, so it is better to purchase ready-made systems.
Air manifold
This type of solar heating device is only suitable for heating a home. Its work is based on the “greenhouse effect”, when the air enclosed inside a sealed box is heated thanks to the upper absorbent coating. The space inside the air collector must be arranged so that the heated air penetrates into the space of the room. Basically, it's something like a labyrinth. Convection can be natural or forced, using a fan. It is most comfortable to place this device on the most illuminated wall of the house and directly integrate it with the room.
Homemade solar collector (part 2)
I continue the description of the process of making a homemade solar collector from cellular polycarbonate, which began in the last post.
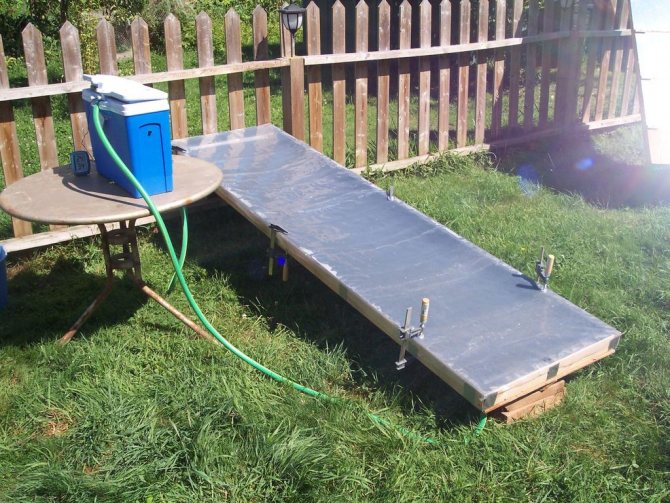
We begin assembling the manifold. It is necessary to make a longitudinal cut in the supply and discharge pipes. A sheet of cellular polycarbonate will be inserted into this cut. Water will flow from the lower pipe into the channels of this sheet, where it will be heated by the sun and rise upward under the influence of the thermosiphon effect. The heated water is discharged through the top pipe.
It should look something like this:
To make a longitudinal cut in the pipe, I used a regular drill with a circular saw attachment. An angle grinder (grinder) can also be used, but I simply didn’t have one on hand.
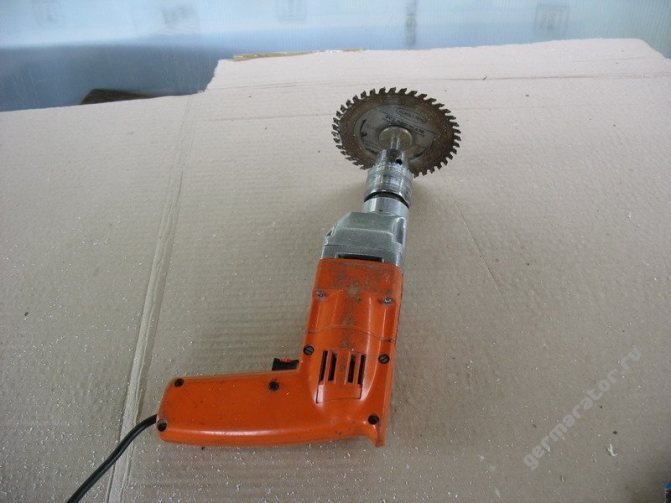
At first I tried to make a cut by holding the pipe with my hands, but this turned out to be almost impossible to do. The pipe slips in your hands and constantly jerks due to the forces created by the saw. I suffered for about 5 minutes, cutting through only 10-15 centimeters during this time. The cut turned out to be uneven, and considering that I had to cut a total of 4 meters (two pipes of 2 meters each), I had to come up with something.
Clamping thin-walled PVC pipes in a vise is a bad idea. Therefore, a simple clamp was invented and hastily assembled from two slats and scraps of rope.
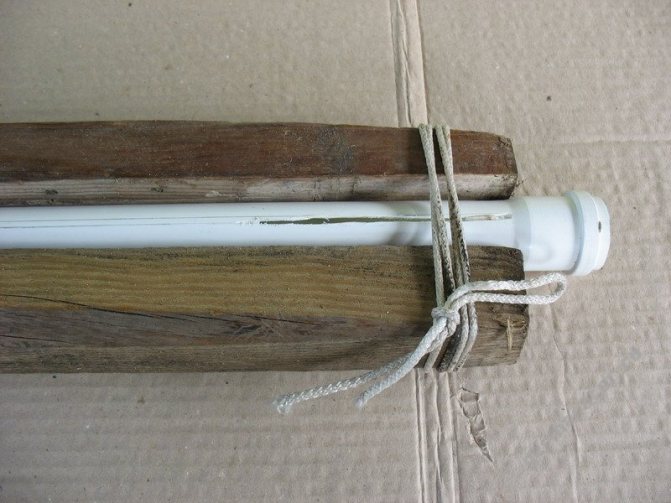
This photo also shows the poor quality of the cut obtained when holding the pipe manually.
With this device the work went much faster. We managed to cut through two pipes in about 5 minutes.
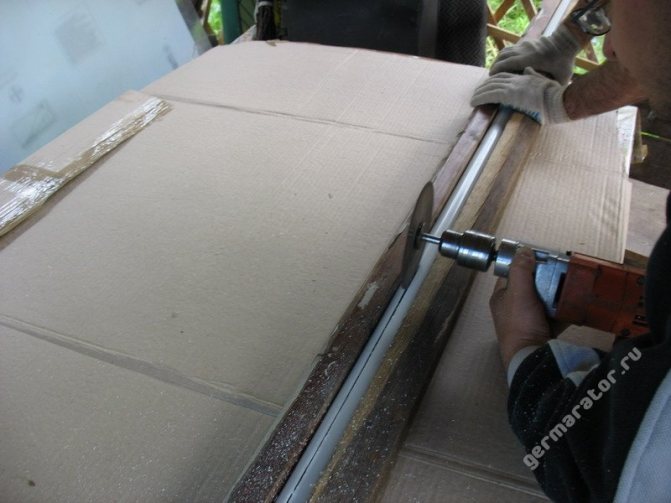
The quality of the cut was also quite satisfactory. It can be seen that it is much smoother compared to the cut that was made when the pipe was held by hand.
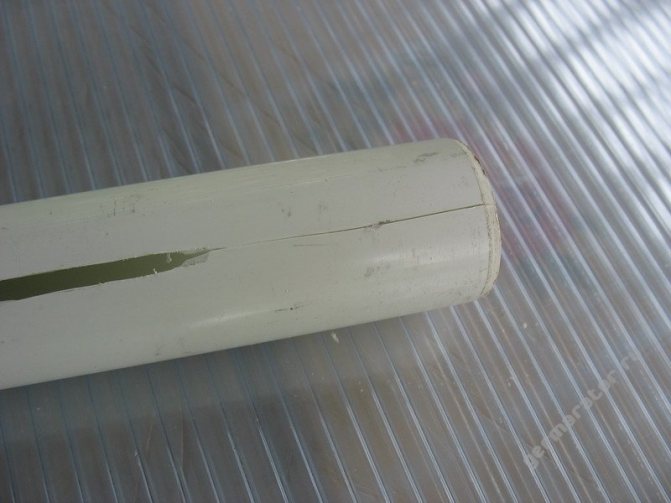
The length of the cut must exactly correspond to the width of the working part of the future solar collector. In my case it is a little less than 2 meters. The beginning and end of the pipe must remain intact so that they can be used for connection or plugged in the future.
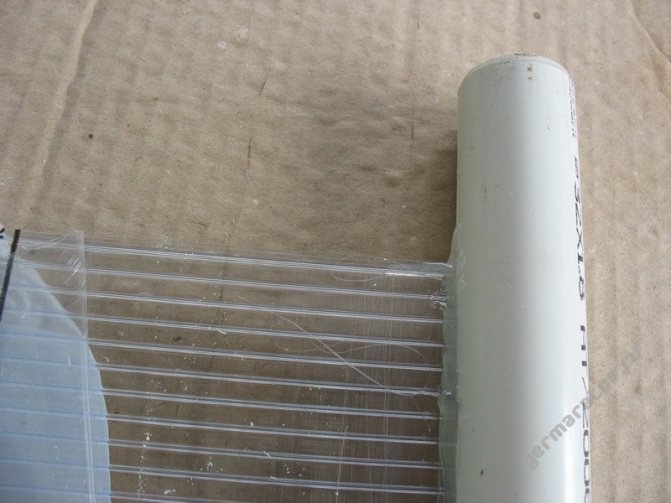
I think everyone understands what needs to be done next. You need to insert a sheet of cellular polycarbonate into this cut. But there is one difficulty. Due to internal stress in the plastic, the cut in the pipe simply “collapsed” along almost its entire length. This can be seen in the photo. It turned out to be difficult to insert the sheet into such a gap. It would be possible to expand it so that even after this collapse we would still have a width of 4 mm, but I decided not to do this. By expanding the cut, we will reduce the diameter of the pipe in the middle part. And if you leave everything as it is, then the internal stress forces in the plastic will compensate for the slight pressure inside the collector. This will also allow the pipe to hold onto the sheet more tightly.
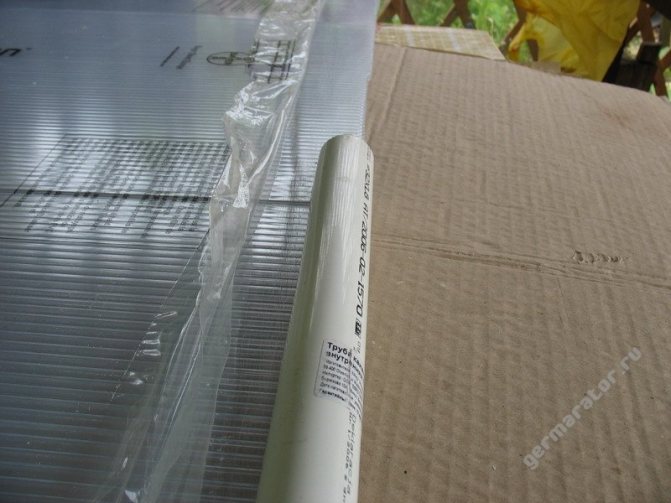
To drive the polycarbonate sheet into the cut in the pipe, I simply cut the end of the pipe with a utility knife:
And then through this cut I simply “pulled” the pipe onto the sheet.
Next you need to do some minor adjustments. The main task is to ensure that the pipe remains straight and that the cellular polycarbonate does not go too deep into the pipe. This is what I got (this is not the light at the end of the tunnel, this is the light at the end of the pipe)
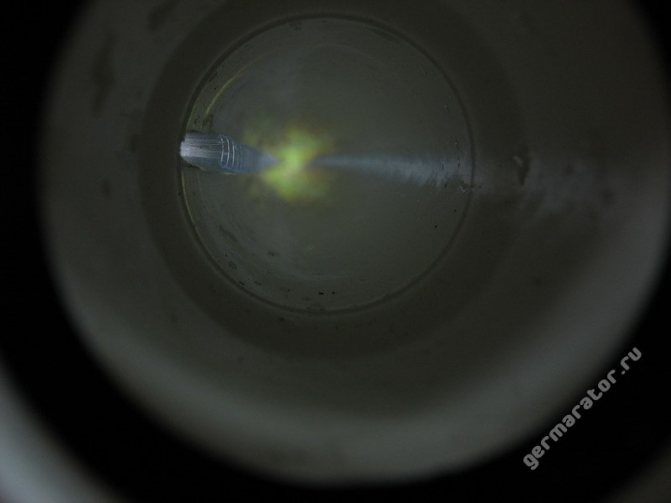
By the way, before putting on the pipe, I recommend pre-treating the polycarbonate sheet with sandpaper. The sealant will adhere better to the rough surface. For better adhesion when gluing, it is also necessary to degrease the future joint.
You can also see in the photos that the cellular polycarbonate sheets are covered with a protective film on both sides. I decided not to remove it to protect them from damage and contamination. I'll take it off before painting.
Now we proceed to one of the most critical stages of assembling the solar collector. It is necessary to seal the joint between the working surface and the pipes. Craftsmen from Western sites use various silicone sealants for this, but, to be honest, I have great doubts about the strength of such a connection. Although my collector will not experience the pressure of the main water supply, I would still like to be sure that it will not leak. Moreover, I have already experimented with different sealants.
As a result, I chose hot melt adhesive to glue and seal the solar collector. I bought a hot glue gun, glue sticks for plastic and off I went.
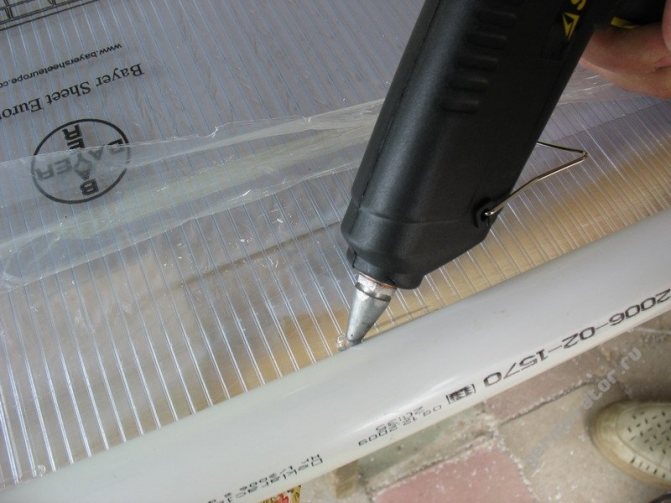
The sealing process was surprisingly simple. True, the consumption of glue sticks could be less. I just didn't spare the glue. I walked along the joints in two passes. First, I tried to push the melted hot melt adhesive into the joint so that it filled all the cracks, and with the second pass, I formed an even outer seam that would hold the load. I didn't skimp on glue on the ends either.
At first I had doubts whether the hot-melt adhesive would hold the PVC-polycarbonate joint well. So to test it, I first glued a small piece of polycarbonate to a PVC pipe. I'll tell you honestly - then I barely tore it off. Now my main doubt is whether the hot melt adhesive will soften when the collector heats up
My next step will be painting. To better absorb solar energy, I decided to paint the collector with regular matte spray paint.
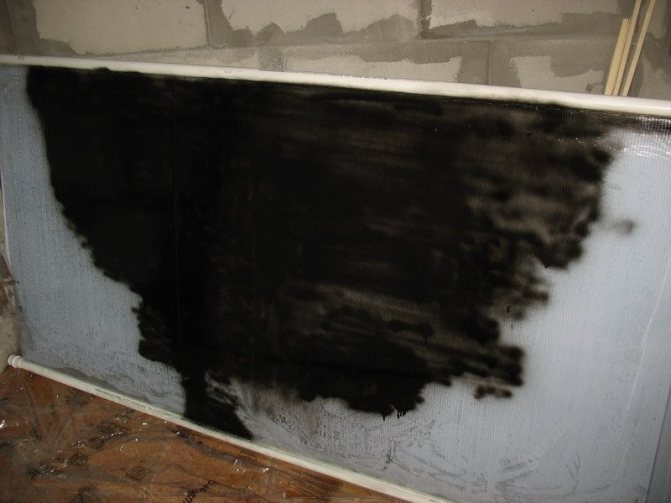
Unfortunately, this method is not perfect. The paint does not apply evenly, leaving poorly painted areas. In addition, one can (though not full) was not enough for 2 sq.m of surface. Subsequently, I had to buy another can of paint. It turned out to be based on a different solvent, so when applying the second layer for dense painting, it began to warp the old paint. In short, the result was not very good.
Therefore, if you want to avoid unnecessary problems with painting the solar collector, it is better to use black opaque cellular polypropylene as the working surface material, not transparent polycarbonate, like mine. It will not have to be painted, which will significantly reduce costs.
To be continued…
Source
___________________________________________________________
When building an energy-efficient house, you need to save wisely; some things can be done with your own hands, but, for example, you cannot save on building materials. You can only save on promotions, such as when purchasing wallpaper from 30 rolls of a jar of mastic as a gift or other building materials.
How to make a solar collector
Before you begin the process of installing a homemade solar collector, you need to decide on the dimensions of the device. It is not easy to calculate the power of a solar system on your own. You need to take into account the location of the house, the material it is made of and the intensity of sunlight in the area. Of course, the larger the device, the more heat energy it will be able to generate. But the dimensions will also depend on the place where the device will be installed. Having calculated the dimensions of the collector and prepared the required amount of initial material, we proceed to the manufacture of the heating system.
Hose manifold
The easiest to manufacture is a solar collector made from a hose. It will require:
- A hose made of rubber material or a black polyethylene pipe, with a diameter of 20-25 mm;
- Plywood 6 mm thick;
- Bars made of wood 40 x forty millimeters.
First you need to make a box from plywood. Its dimensions will depend on the number of turns of the pipe that will be laid in it. The finished box should be treated with an antiseptic, primed and painted black. The hose is laid in a spiral, starting from the center. The edges of the pipe are brought out through the holes made in the sides.
The coils of the hose must be secured so that they do not move during installation on a flat plane. You can expand productivity by combining several heating devices from a hose into one system. Similar units have one characteristic - the movement of water along a closed circuit can only be ensured by force. Due to this, when connecting them to a storage tank, you will need a water circulation pump. This type of solar collector is often used to heat water in a swimming pool by connecting it to a filtration system.
Window frame collector
An old window frame that opens like a book can serve as a box for a solar collector. One glass is removed from it and replaced with plywood. This will be the wall located behind the collector. Inside the frame, insulation is placed on plywood and covered with a sheet of galvanized steel, and its doors are covered with sealant and sealing gum. A sheet of metal in such a design will act as an absorber, so it should be coated with black paint on a matte basis to reduce the reflective effect. The final stage is the installation of a pipe through which water will circulate (heat exchanger). A half-inch copper or plastic (metal-plastic) tube will be most suitable for this. It lies in the form of a snake and is attached to the absorber with clamps. All that remains is to close the frame, tighten it with bolts, install the completed collector in place and connect it to the heating or water supply system.
Collector made of bottles made of plastic
To make it you will need:
- Translucent (colorless), plastic bottles of the same shape;
- Tetra packaging for juice or milk;
- PVC pipes and tees designed for hot water systems.
The heat exchanger is assembled in the form of a heating device made of plastic pipes. The role of solar energy accumulator will be played by bottles, and terta-packs will serve as absorbers. The cleanest bottles are cut at the same level. A piece of juice or milk packaging, cut to size and painted black, is placed inside. It is therefore necessary to choose the size so that when stringing bottles onto a pipe, when they fit into each other, the workpiece is tightly clamped between them.
The heat exchanger accumulates in the form of a ladder. The number of “crossbars” is arbitrary. But the more of them there are, the more powerful the collector will be, because the heating process will actually take place in them. Prepared bottles are strung onto the “crossbars”. The first one is put on with the neck forward, the next one is also tightly driven into the previous one through the cut off bottom. The advantage of such a homemade collector over others is its productive work not only during the day, but also in the morning and evening hours.
Beer can collector
From metal beer cans (or from other drinks) you can install an air-type solar collector, which can be used as an additional heat source for the home. It should be placed on the roof of the crowbar or on its side from the south. To supply heated air and take in cold air, you will need to make two holes in the wall. The main thing is that the containers used in the work are clean.
The bottom of washed and dried cans is cut with scissors (or other tools), leaving the hard part intact. The part on top is cut into strips (also to a hard edge) and bent inward. This is necessary to increase turbulence. Next, the cans are made into kind of pipes, gluing them together: the neck of the next can is glued to the bottom of the previous one. The adhesive composition used must be heat-resistant.
While the pipes are drying, the collector body and its thermal insulation are installed. The dimensions of the frame will depend on the length of the pipes and their number. Air channels are installed in the lower and upper parts of the housing, with holes drilled according to the number of pipes. The glued cans are put in holes and fastened. After which it is painted matte black. The outer transparent panel can be made of glass or transparent plastic.
This completes the assembly of the airborne solar collector from metal cans. You just need to install it in a permanent place and combine the air channels with the holes in the wall. When assembling, great attention should be paid to thermal insulation and tightness of the structure. Collector from an old refrigerator Old refrigerators have a similar part - a capacitor. This is a tubular grille mounted on the rear wall of the unit, along which freon and lubricant for the air blower move. Such an element can be used as a pipe coil in a homemade solar collector. A box is made according to the size of the condenser, thermally insulated, and painted. Foil is placed on top of the heat insulator, which will serve as a reflector. The grid of the pipe coil is fixed to it. The entire system is covered with glass. The solar collector from an old refrigerator is ready.
Polypropylene manifold
Cellular polypropylene is a translucent panel that consists of two layers, fastened with rigid ribs. It turns out that between the two transparent sheets there are ducts through which liquid can circulate, which means that cellular polypropylene is perfect for creating a solar hot water collector.
Basically, the sheets of this material have a size of 2x3 m. To assemble the collector, you will also need two PP pipes, a little longer than the narrow side of the future pipe coil and an inch and a quarter in diameter, two plugs, hose tips and a specialized adhesive composition.
A longitudinal cut is made in the pipe, one edge of the polypropylene is placed in it and glued. The manipulation is repeated with the second pipe. Holes are drilled in the plugs, tips are placed in them and tightly fastened. After the glue has completely set, the structure is examined for impermeability. To do this, it is filled with water. If there is a leak, the water is drained and the minus is eliminated. The operation is repeated as many times as possible until the entire device becomes completely impenetrable. After which the collector is painted black, the prepared frame is installed and covered with glass. A similar technique is used when developing a solar collector made of transparent plastic with your own hands.
Installation of a homemade solar collector
A storage tank is usually installed in the attic of a building, from where warm water is supplied to the points of consumption. It must be insulated by wrapping it in a layer of mineral wool. Cold water is supplied to the tank from a centralized water supply system or from a well using a pump. Hot water is drawn when necessary; its pressure is determined by the high location of the tank relative to the points of consumption.
A homemade solar collector is mounted on the roof of a building or on the surface of the ground. For this purpose, special fasteners or entire installation structures are used. It is advisable to direct the panels to the south side.
The storage tank should be located above the highest point of the solar collector, and the pipe entering the tank should be closer to its top. In this way, natural circulation of water is created in the system.
The use of solar collectors made of polycarbonate sheets allows you to heat water for domestic needs quite efficiently, quickly and conveniently. And several of these structures can even heat a house. Considering that energy is accumulated free of charge, the use of solar collectors in practice is relevant and justifies manufacturing costs.
Polycarbonate solar collector
On the Internet I saw a lot of different technologies and methods for making solar water heaters and decided to share my own experience. I consider this project to be very successful, since literally every centimeter of the surface of the collector is in direct contact with heated water. In addition, using the technology as a basis, you can easily build a collector of the required size.

What can a solar system be made from?
First, you need to understand what operating principle a solar water heater uses. The internal structure of the block contains the following components:
- frame;
- absorber;
- a heat exchanger within which the coolant will circulate;
- reflectors to focus the sun's rays.
The factory solar water heating collector works as follows:
- Heat absorption - the sun's rays pass through the glass located on top of the body or through vacuum tubes. The internal absorbent layer in contact with the heat exchanger is painted with selective paint. When sunlight hits the absorber, a large amount of heat is released, which is collected and used to heat water.
- Heat transfer - the absorber is located in close contact with the heat exchanger. The heat accumulated by the absorber and transferred to the heat exchanger heats the liquid moving through the tubes to the coil inside the heat storage tank. Water circulation in the water heater is carried out by forced or natural means.
- DHW - two principles of heating hot water are used:
- Direct heating - hot water after heating is simply discharged into a thermally insulated container. In a monoblock solar system, ordinary household water is used as a coolant.
- The second option is to provide domestic hot water with a passive water heater based on the principle of indirect heating. The coolant (often antifreeze) is sent under pressure to the solar collector heat exchanger. After heating, the heated liquid is supplied to a storage tank, inside of which a coil (playing the role of a heating element) is built, surrounded by water for the hot water supply system. The coolant heats up the coil, thereby transferring heat to the water in the container. When the tap is opened, heated water from the heat-storing tank flows to the water collection point. The peculiarity of a solar system with indirect heating is its ability to operate throughout the year.
The operating principle used in expensive factory-made solar systems is copied and repeated in do-it-yourself collectors.
The working designs of solar water heaters have a similar structure. They are only made from scrap materials. There are schemes for the production of collectors from:
- polycarbonate;
- vacuum tubes;
- PET bottles;
- beer cans;
- refrigerator radiator;
- copper tubes;
- HDPE and PVC pipes.
Judging by the diagrams, modern “Kulibins” prefer homemade systems with natural circulation, thermosiphon type. The peculiarity of the solution is that the storage tank is located at the top point of the hot water supply system. Water circulates through the system by gravity and is supplied to the consumer.
Polycarbonate manifold
They are made from honeycomb panels with good thermal insulation properties. Sheet thickness from 4 to 30 mm. The choice of polycarbonate thickness depends on the required heat transfer. The thicker the sheet and the cells in it, the more water the installation can heat.
To make a solar system yourself, in particular a homemade solar water heater made of polycarbonate, you will need the following materials:
- two threaded rods;
- propylene corners, the fittings must have an external threaded connection;
- PVC plastic pipes: 2 pcs, length 1.5 m, diameter 32;
- 2 plugs.
The pipes are laid parallel to the housing. Connect to the hot water supply via shut-off valves. A thin cut is made along the pipe into which a sheet of polycarbonate can be inserted. Thanks to the thermosiphon principle, water will independently flow into the grooves (cells) of the sheet, heat up and go into the storage tank located at the top of the entire heating system. To seal and fix the sheets inserted into the pipe, thermally resistant silicone is used.
To increase the thermal efficiency of a cellular polycarbonate collector, the sheet is coated with any selective paint. Heating of water after applying selective coating accelerates approximately twice.
Vacuum tube manifold
In this case, it will not be possible to get by solely with improvised means. To make a solar collector you will have to buy vacuum tubes. They are sold by companies involved in the maintenance of solar systems and directly by manufacturers of solar water heaters.
For independent production, it is better to choose flasks with feather rods and a heat-pipe thermal channel. The tubes are easier to install and change if necessary.
You also need to purchase a concentrator block for a vacuum solar collector. When choosing, pay attention to the performance of the node (determined by the number of handsets that can be simultaneously connected to the device). The frame is made independently by assembling a wooden frame. Savings when manufacturing at home, taking into account the purchase of ready-made vacuum tubes, will be at least 50%.
Solar system made from plastic bottles
To prepare you will need about 30 pcs. PET bottles. When assembling, it is more convenient to use containers of the same size, 1 or 1.5 liters. At the preparatory stage, the labels are removed from the bottles and the surface is thoroughly washed. In addition to plastic containers, you will need the following:
- 12 m of hose for watering plants, diameter 20 mm;
- 8 T-adapters;
- 2 knees;
- roll of Teflon film;
- 2 ball valves.
When making solar collectors from plastic bottles, a hole is made at the bottom of the base equal to the diameter of the neck, into which a rubber hose or PVC pipe is inserted. The collector is assembled in 5 rows of 6 bottles on each line.
On a clear day, within 15 minutes. the water will heat up to a temperature of 45°C. Considering the high performance, it makes sense to connect a solar water heater made from plastic bottles to a storage tank of 200 liters. The latter is well insulated to prevent heat loss.
Aluminum beer can collector
Aluminum has good thermal characteristics. It is not surprising that metal is used to make heating radiators.
Aluminum cans can be used in the manufacture of homemade solar systems. Cans made of tin or any other metal are not suitable for production.
For one solar panel the following components will be needed:
- jars, about 15 pcs. per line, the body accommodates 10-15 rows;
- heat exchanger - a collector made of a rubber hose or plastic pipes is used;
- glue for gluing cans together;
- selective paint.
The surface of the cans is painted dark. The box is covered with thick glass or polycarbonate.
A solar collector made of aluminum cans is often made for air heating. When using water coolant, the thermal efficiency of the device decreases.
Solar system from the refrigerator
Another popular solution that requires minimal time and money. The solar collector is made from the radiator of an old refrigerator. The coil is already painted black. It is enough just to place the grille in a wooden case with insulation and connect it to the hot water supply using soldering.
There is an option for making an air conditioner from a condenser. To do this, several radiators are connected into a single network. If it is possible to purchase cheaply about 8 pcs. capacitors, manufacturing a collector is quite possible.
Copper tube collector
Copper has good thermal properties. In the manufacture of a copper solar collector, the following is used:
- pipes with a diameter of 1 1/4″, used in the installation of heating and hot water supply systems;
- 1/4″ pipes used in air conditioning systems;
- gas-burner;
- solder and flux.
The radiator grille body is assembled from copper pipes with a large diameter. Holes equal to 1/4″ are drilled into the surface. Pipes of the appropriate diameter are inserted into the resulting grooves. The radiator is covered with glass or polycarbonate. Copper is painted with selective paint.
Solar boiler made of HDPE pipes and PVC hoses
In the production of solar systems, almost any available material is used. There are solutions that allow you to make a collector from corrugated hose, a rubber hose used for watering plants.
Solar systems are not made from metal-plastic pipes due to rubber fitting seals that cannot withstand strong heat. With intense solar radiation, heating in the collector reaches 300°C. If overheated, the gaskets will definitely leak.
It is possible to manufacture a solar collector from corrugated stainless pipe. The popularity of the solution is due to the speed and ease of installation. Corrugated stainless steel pipe is laid in rings or snakes. The disadvantage is the relative high cost of stainless corrugated pipe.
Despite the existing options described above, solar collectors made of propylene and HDPE pipes remain the most popular. Each option has its own advantages:
- Solar collector made from HDPE pipes - a material that is resistant to heating is chosen for manufacturing. A large number of fittings are sold to facilitate the assembly of a heat storage radiator. Pipes made of low-density polyethylene are initially black or dark blue in color, so they do not require painting.
- A solar collector made of PVC pipes is a popular solution due to the ease of installation of the structure, carried out using soldering. The presence of a large number of angles, tees, American females and other fittings facilitates the assembly process. Using soldering, you can create a collector heat exchanger of any configuration.
Making a solar hot water collector from PEX pipe:
All the pipes described are used with varying efficiency as a core in the manufacture of a homemade solar collector from plastic bottles and aluminum cans.