DIY decorative radiators
There are several ways to transform this heating device, these are:
- decoupage;
- painting;
- decorative screens;
- pasting;
- camouflage behind a false wall.
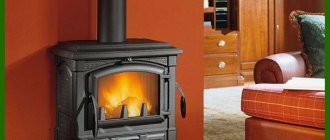
Painting your battery is one of the easiest ways to upgrade it. Moreover, now there are new methods that will allow you to achieve interesting effects. With such an interesting bronze tint, it will end up looking like an object made of a noble metal. Before you begin the conversion work, you need to prepare:
- gauze;
- latex gloves;
- acetone;
- black and red paint in a can or gold paint in a spray can.
If the battery has not been painted before, it must first be treated with an alkyd primer. If there is rust on the heating device, it must be removed.
Next, the surface to be treated is degreased with acetone; you can also use a blowtorch for this. If you want to paint the battery so that the paint goes on in a thin layer and evenly, take a rectangle of fur, fold it in half, and stitch the two sides. You will get something like a bag. Put it on your hand and have fun painting the battery.
To get a beautiful bronze color, you need to mix black and red paint. If you wish, when decorating the battery, use spray paint.
If you have artistic abilities, then transform this heating device by drawing something suitable here. Look how nice these pencils look, each of them is made on a specific section of the battery.
If you have a modern radiator, turn it into a small piano by drawing the keys here. If you want to cheer yourself up, then use paint in several colors. To create smooth transitions, you can mix color additives with white paint and change the consistency. This way you will get lighter and darker shades of the same color. This option and the other are suitable for those who are not confident in their artistic abilities. Draw white and black stripes on the protruding parts. Cut out a tail from cardboard, paint it, stick it in place and you have a zebra. If you want to go even further, make the head of this animal out of cardboard or plastic, decorate it, and attach it to the side of the battery opposite the tail. If you have a modern battery that is time to upgrade, then take:
- acetone;
- stickers;
- scissors;
- soft cloth.
Degrease the surface of the washed and dried battery with acetone, then attach the selected sticker to it.
If it is large enough and matches your idea, then use the entire sticker. This is how the heating radiator is decorated. You can turn it not only into a blooming oasis, but also into a cozy fireplace. Perhaps for some the radiator will become an imaginary cellar for storing wine. This way you can decorate the battery in the nursery using large or small stickers. But if your heating radiator is made of cast iron, this method of transforming it may not be suitable, since the surface is uneven and voluminous. In this case, it is better to repeat the following idea. You can use stickers that will turn the battery into a musical instrument. If you have an unnecessary button accordion whose bellows are torn, you can implement another creative idea by gluing one and the other part of the keyboard to the radiator.
How the Multifuoco system works
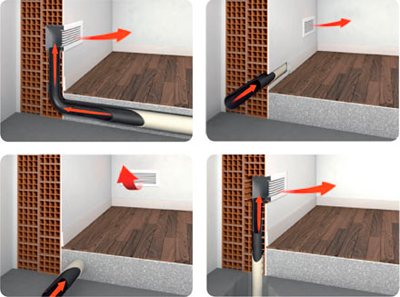
The secret of the system is the use of a fan. The fan takes air from the room and directs it into the fireplace casing. In the casing, the air is heated by the fireplace insert and is exhausted by a fan through the grates into the lower part of the room. And so, we quickly and correctly heated the fireplace room.
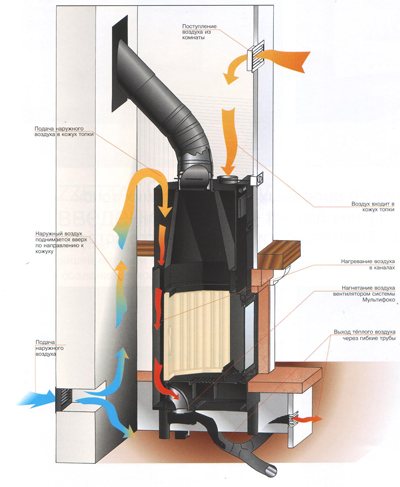
It’s not difficult to guess how you can heat the whole house. From the fan, you can route air ducts to adjacent rooms and to other floors. The length of the air ducts can reach 10 meters, which is enough for a large house.

As can be seen from the figure, air ducts can be hidden in walls and interfloor ceilings.
It is also important that the fan creates an air flow of such speed that you feel only a gentle spread of heat.
No feeling of draft or blowing. Well, that's basically all. What can I add on my own behalf:
1. You probably noticed that the fan can also take in fresh air from the street. On the one hand, this is useful. And the air in the house changes, and the draft during ignition increases. But on the other hand, firstly, this cold street air needs to be heated, and secondly, with an increase in draft, it is impossible to ensure long-term combustion. For this reason, I recommend making sure that you can shut off the outside air intake. 2. Air ducts need to be insulated. It's clear why. Recommended pipe diameter is 75 mm. 3. Provide the ability to adjust the air flow. To do this, use dampers, and if this is not possible, then grilles with blinds. 4. Air circulation is needed, otherwise no heat will spread throughout the house. To do this, I recommend laying air ducts to return air from all heated rooms to the fireplace room. Fence gratings should be placed closer to the ceiling. 5. If you have unstable electricity, use a UPS. The cost of Multifuoco equipment is 450 Euro. Can be used with all Piazzetta fireboxes except MA.
Battery decor using decoupage technique
This option is also suitable for those who have long-lasting cast iron batteries. Here's how to do decoupage in this case. Take:
- decoupage cards;
- acrylic paints;
- sandpaper;
- decoupage varnish;
- PVA glue;
- brush;
- light enamel.
Using sandpaper, level the surface of the battery, but do not try to remove the entire paint layer.
Now you need to wash the radiator and wipe it dry. The next step is to paint it with white enamel. Enamel has a strong specific odor, so work in a ventilated area. It's even better if you cover your breathing organs with a respirator.
While the enamel is drying, open up the decoupage cards so that each piece covers part of the radiator. After the paint has dried, glue the prepared parts using PVA mixed with water. If you want, leave the painted fragments (not decorated with a blend) light, cover them with white acrylic paint. You can use the same shade as in the picture; in this case, blue acrylic paint was used. Once any of these solutions are completely dry, coat the radiator with 2-3 coats of varnish, allowing each coat to dry. You can use napkins for blending and decorate a heating device with them. To do this, only the top layer with the pattern is taken and glued to a pre-painted, dried battery. After the glue has dried, to secure the decoupage, you need to cover the radiator with a couple of layers of varnish. But you need to choose one that can withstand the intense heat of the heating device. If you want to give the batteries a chic look so that they look like antique ones, then use a self-hardening mass and a stencil to apply a design. Then cover with paint. Such stucco molding will adhere firmly to the battery, as it adheres well to similar metal surfaces. The next type of radiator decoration is making a screen for it. Moreover, you can buy a decorative panel, there are those that are inexpensive, and make a box for it with your own hands.
Making a screen for decorating a battery
Before you start making it, prepare:
- waterproof plywood 2 cm 2 mm thick;
- paint;
- a slab of painted plywood, fine wood chips or edged boards;
- connecting elements measuring 50x32 mm made of pine;
- brackets;
- wood glue;
- screws;
- wooden corks dowels.
First, determine the dimensions of the battery by knowing its height, width and depth.
To prevent the room from becoming cool during the heating season, when installing a screen, it is necessary to ensure that warm air circulates unhindered. To do this, space must be left between the battery and the screen. Determine the size of the panels. You already know the width of the radiator, and if its height, as in the figure, is 72 cm, you need to add 8 cm for air circulation, so the height of the vertical panel will be 80 cm. If the radiator has a temperature control, or a pipe fits here, then you need to determine where these components are located, so that you can then make cutouts in the edging of the screen at this place. Now you need to attach connecting elements, which act as bars, to the vertical wooden sides using wood glue and wooden plugs or screws. Attach the top panel to the sides. If you make the front panel yourself, then use a horizontal strip 18 cm wide and two vertical strips, each 12 cm wide. They are attached to each other using holes and dowels.
Look in more detail at how panels need to be prepared for this. First, mark with a pencil where the end holes will be located. In another board you need to do them at the same level. Pour wood glue here, insert wooden plugs into the holes on one side first, then attach the second board. To ensure the attachment point is secure, carefully pull the two boards together by lightly tapping first one, then the other with a rubber mallet. In the same way, you will attach the four horizontal crossbars using dowels and holes. Please note that 60mm wide gaps are left between the cross members for air circulation. You can make adjustments to these parameters or make the screen for the battery more elaborate, for example, by stuffing slats here in the form of a sheathing. You have determined in advance where you need to make cutouts in the sidewalls. Using a drill attachment, complete this part of the job. To make the hole smoother, after cutting it with a hole saw, you need to process it with a hacksaw. To install the battery screen, you need to provide it with support bars. First, they are fixed inside the screen at the top. Then you need to determine the location of the support strips on the wall, above the battery. Determine the length of the support bar, do not forget to leave room for the tap that regulates the temperature. If it is located on the side, then leave a distance of at least 18 cm so that the support bar can move freely. If you wish, you can use a magnetic one instead of such a mount. If you assemble the box yourself, and you already have a decorative panel, then the screen for the radiator may look like this.
Top 5 articles
- Review of the cost of heated floors per m2, installation cost
- DIY installation of electric and water heated floors
- Which heated floor is better
- What flooring can be used for heated floors?!
- How much does underfloor heating cost per month?
It has been proven in practice that underfloor heating systems are much more convenient than radiator heating. What to do if the house has no batteries or boiler at all? The main thing is that there is a wood source of energy in the room. For example, a fireplace or stove
, it is easy to lay a hydraulic underfloor heating system from them.
This wood heating method has significant advantages:
- saving on energy resources;
- there is no need to purchase a boiler or expensive home gasification equipment;
- environmentally friendly heat - no electromagnetic radiation, as in cable heating systems;
- always a favorable indoor microclimate.
How to make a warm floor without screed? (Read)
Nothing prevents the stove from performing its direct duties and at the same time indirectly influencing the heating of the heated floor. This expands the area of useful heat exchange: the walls of the stove, stoves for cooking (if provided), chimney ducts (combustion products leave residual heat in them) and an additionally determined floor area.
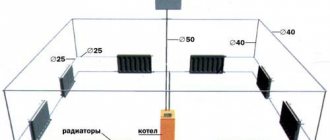
Installation of executive modules
The heating circuits from the fireplace or stove will be pipes laid according to the user-selected pattern with the required laying step. In order for the thermal energy from burning wood to be transferred to the coolant, a heat exchanger must be installed above the firebox. This could be a coil of pipes or a storage metal tank. From it, pipe contours are laid to the required rooms.
In order for the cooled coolant to return unhindered to the stove, it must be located below floor level or a circulation pump must be installed in the main line. With the auxiliary module, the water circulation in the system will be optimal, be it circuits made of 16 mm or 24 mm pipes.
The length of the contour should not be more than 100 m\n
A three-way valve can be used to regulate the temperature on the cheap, but you will still need a circulation pump to create the required pressure. In addition, cold water should be suitable for mixing with hot water.
Three-way valve
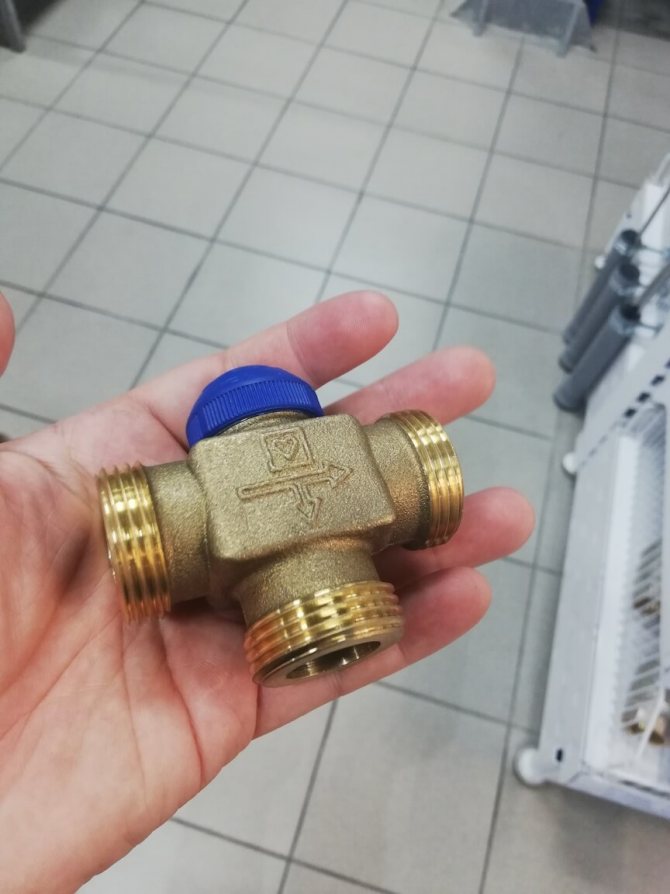
Another important block is the mixing unit. It is impossible to regulate the temperature in the oven. The water in the system can warm up to boiling temperature, at the recommended +40°C for a comfortable heated floor. We need automatic control with a mixer to mix in cold flows and maintain the required temperature background.
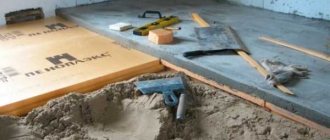
Preparing the base for a heated floor is no different from the same process in houses with boilers:
- waterproofing. In a layered structure, condensation and capillary moisture, which invariably rises from the ground, should not settle;
- laying thermal insulation to direct thermal energy into the room, minimizing heat loss through the floors below will increase efficiency by 45%;
- screed for leveling the surface, reinforcing mesh;
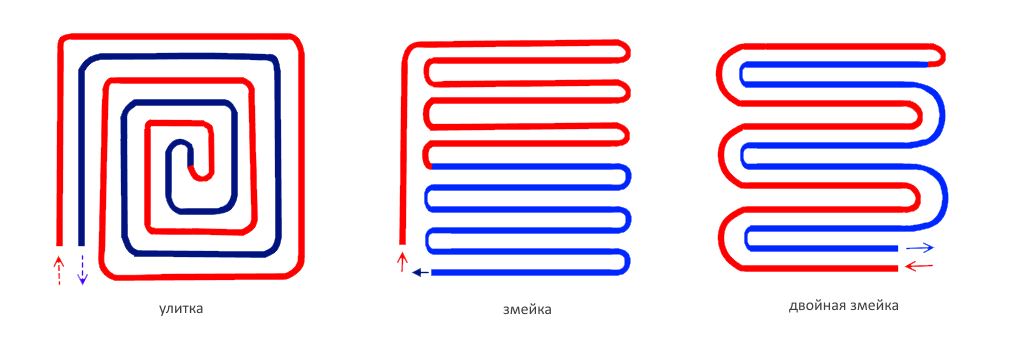
- a pipeline system laid with a snake, spiral, etc. These can be copper or metal-plastic pipes;
- top layer of mortar to cover pipes and protect against mechanical damage, evenly distributing the load over the entire floor surface;
- finishing coating.
Basic schemes for laying heated floor pipes
To lay the floor on the ground, additional insulation is needed in the form of a sand-gravel cushion and expanded clay.
If the use of the stove is sporadic (for example, this is your dacha or a seasonal house), the water system is idle in winter, you need to drain the coolant to avoid deformation and cracking of the pipes. You can use antifreeze instead of water.
In addition, an electric boiler can be installed into the system as a heating system during the “rest” of the stove.
Warm floors from a stove are easy to install in wooden houses. Hot water pipes and wood are safer neighbors than heating cables. And if you also take into account the risk of damage to the insulating braid due to improper installation, the fire hazard increases significantly. And the wiring in seasonal houses may not withstand the load. Laying the pipeline does not require lengthy preparatory work: you have determined the locations of the holes in the joists or laid polystyrene foam boards with bosses on top of them, and you can begin installing the pipes.
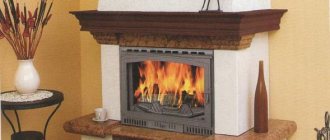
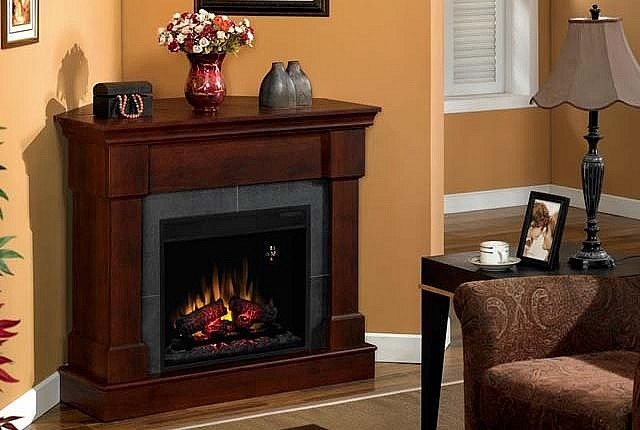
Should I buy a false fireplace or make it myself?
This question invariably arises among those who want to create the atmosphere of a country house in a city apartment. At the same time, you can “kill” two birds with one stone, not only create such a piece of furniture, but also hide an unsightly battery. Not everyone has it under the windowsill; for some, this heating item is mounted almost in the most visible place in the room.
See how such an unsightly sight can be turned into a cozy, almost fairy-tale corner. To do this you will need some materials, these are:
- plywood 9 mm thick;
- wooden layout;
- bars with a cross section of 50 mm;
- self-tapping screws;
- fragment of a garden fence;
- construction glue gun;
- decorative plastic panel depicting brickwork;
- furniture stapler;
- stain;
- polyurethane skirting boards;
- putty;
- fine sandpaper;
- acrylic paint;
- brush;
- long lamp;
- bath stones.
All this will help in a truly magical transformation, because very soon, instead of an unsightly radiator, you will have an imitation fireplace.
Mark the location of the front part of the fireplace. Cut a rectangular hole in the center of the plywood. Using a furniture stapler, attach a decorative panel to the center of the portal, trim it with a wooden layout, attaching these elements to a glue gun. Paint the furniture panel with stain, when it dries, attach it using self-tapping screws as a shelf on. Glue the polyurethane baseboard to where the plywood meets the floor and to the top. If they do not hold well here, then additionally secure them with self-tapping screws. You will cover these places with putty; when it dries, carefully go over it with fine sandpaper. If it happens that there is no putty on the farm, you can replace it with sealant or liquid nails. After these soft materials have dried, you need to smooth the surface using sandpaper.
Now paint the fireplace portal with the first layer of white acrylic paint, when it dries, apply the second. To simulate a fire, place a long lamp in the firebox so that you can plug it into an outlet. Nearby, closer to the viewer, you need to put stones for the bath. It remains to attach one more element - this is part of a decorative garden fence, in this case, it will serve as a metal lattice. In this case, you can even use a plastic fence, covering it with metallic or golden paint.
This is how unusual and very stylish a DIY battery decor can be.
This option is suitable for those who have a lot of heat in winter. It will not be cold in such a room, the radiator is closed, but warm air will escape through the rear side openings. But if the boiler room is not working at 100%, in the cold season you cannot do without a hot battery, then do not close it almost completely, as in the option presented above. The following idea will suit you.
To implement it you will use:
- drywall;
- metallic profile;
- self-tapping screws;
- drywall knife;
- putty;
- acrylic paint white and golden;
- sealant in a tube;
- construction gun;
- polyurethane skirting boards and glue for them.
Manufacturing instructions:
- As in the first case, cut a hole in the drywall sheet. Make a base from a metal profile, attach a plasterboard blank to it using self-tapping screws. From the same material, make a rectangular shelf that will become the top of the false fireplace.
- In this part you need to connect the front and top elements by gluing here polyurethane skirting boards in front and two small ones on the sides. These same parts need to be attached between the floor and the sheet of drywall below.
- Put the sealant in the construction gun, feel like a real sculptor, as now you will make various monograms on the top of the fireplace. If something doesn’t work out, remove the excess before the composition hardens. The end of the extruded strip will be straight if you simply trim it with scissors.
- Allow the sealant to dry thoroughly. Now paint the fireplace portal with white acrylic paint in two layers. When it dries, take a thin brush and use it to paint the monograms with golden paint. If you want to decorate the top of the fireplace, you can use a laminate board for this.
- Of course, the battery must also be painted in a suitable color.
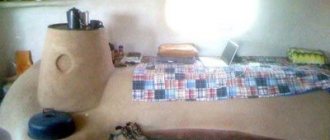
By making a fireplace portal from plasterboard, you can show your imagination. The inner hole does not have to be cut rectangular; it can be of a slightly different shape. If desired, you can not only decorate the battery, but at the same time turn this part of the room into a comfortable table or cat bed. After all, these animals love to take a nap in the warmth and lie on the windowsill. To implement this radiator decoration option, take:
- thick sheet of foam rubber;
- thick fabric;
- drywall;
- polyurethane ceiling plinth;
- drywall saw;
- acrylic paints;
- metallic profile;
- self-tapping screws
Next follow these instructions:
- Assemble a rectangular base from a metal profile, use self-tapping screws to attach it to the sides of the wall, top to the window sill, and bottom to the floor.
- Now, again using self-tapping screws, you need to attach a sheet of drywall to this metal base; of course, you first need to cut out windows of this size or smaller ones in it. You need to glue the baseboard onto the top of the drywall, and then paint this decorative element with white acrylic paint.
- Cut a sheet of foam rubber to the size of the window sill and sew a cover of thick fabric on it. Insert a zipper on one side so that this part of the mattress can be removed and washed. You can also make rollers from foam rubber. To do this, you need to connect the small edges of the rectangle and roll it up. A pre-sewn cover is placed on top.
This area of the room can also be turned into a table.
If you attach shelves made of wooden planks to the side, then you can store newspapers, magazines and other small things here. Here's how, if you wish, you can decorate the battery, turning this not always attractive element into an object of your joy and pride. If you want to see a few examples of converting a radiator and window sill into a sleeping place, bench, table, then watch the following video collection.
If you want to carefully study how to decoupage a battery, then the next review is especially for you.
On frosty winter days like now, heating saves our houses and apartments. Therefore, the presence of heating radiators
in homes this is undoubtedly a plus. But often batteries become a stumbling block when you want to decorate a room beautifully.
So where should we put the hated batteries? After all, no matter how modern they are, the appearance of the rooms, alas, is still spoiled because of them...
The problem with the design of heating radiators is especially relevant in children's rooms and rooms where children often play, not only for aesthetic reasons, but also because kids run around a lot and can hit the radiator.
If modern radiators have such an appearance that they can easily fit into a room in a high-tech or minimalist style, then Soviet cast-iron radiators look completely depressing. to disguise the battery like this
, so that it was not visible, but it did not stop warming us in the cold.
How to prevent the fireplace from smoking during the heating period? This is usually due to cold air stagnating in the smoke ducts, especially in the spring and autumn. This can be avoided by first burning paper, shavings, and straw.
How to prevent smoke from escaping from the top of the firebox? This emission occurs in fireplaces with a short chimney or narrow chimney. This can be avoided by installing a small canopy at the top of the portal, and the effectiveness of the canopy increases if you leave a gap of 10-12mm between the canopy and the arch. If this turns out to be insufficient, it is necessary to increase traction by installing a deflector on the head.
How to increase the heat transfer of a fireplace during operation? This can be achieved using air heating devices temporarily installed in the firebox of the fireplace. Such a device with natural circulation consists of thin-walled steel pipes, bent to the shape of the firebox arch and connected to each other at the bottom by jumpers, used as a grate for burning wood. The efficiency of such a device can be increased by equipping it with forced ventilation from any suitable device - a vacuum cleaner, window fan, hair dryer.
How to choose the size of the fireplace? To best choose the size of the fireplace in accordance with the size of the room, the following figures may be useful: - if the power of the fireplace in kilowatts is known, then proceed from the calculation that 1 kW provides heating of 10 m2 of area. -the area of the fireplace portal should be approximately 1/50 of the area of the room; a large fireplace will overcool the room and cause drafts. A fireplace that is too small will not warm the room. -the area of the fireplace hearth is usually 0.7, and the cross-section of the chimney is 0.1-0.15 of the portal area. For a fireplace to work well, all its elements must be connected by harmonious numerical relationships.
What to do with smoked fireplace parts? No matter how well the fireplace works, over time, traces of soot may appear on its transparent quartz door, on the top of the stone portal and on the metal parts. Manufacturers of fireplaces have provided for this as well. They offer a wide range of cleaning pastes for glass, stone, and cast iron. But if you haven’t purchased these products yet, you can get by with baking soda or dishwashing concentrate. Wipe smooth surfaces with a sponge, rub rough stones with a brush and rinse with water. Our grandmothers, who had long worked with stoves, hearths and fireplaces, removed soot stains with turpentine. And the marble was cleaned with half a lemon wrapped in a cloth. Dipped in warm water, then in boric acid powder and wiped the marble surfaces and rinsed with warm water.
Further
How to hide the battery
Editorial “So Simple!”
I have prepared for you 14 practical ways to
hide a nondescript radiator
and at the same time transform the interior. Now, looking at the radiators in the house, I get aesthetic pleasure!
- The easiest way is to paint the battery.
For this, use special paint that is resistant to elevated temperatures. The color must be selected to match the interior of the room. This option is best applied to modern aluminum batteries. Painted cast iron items will stand out a lot. But if you decorate them with various designs, that’s a completely different matter! This is especially true in a children's room or kitchen. If artistic skills are completely absent, you can use special stencils. - A very original idea! To implement it, you need to have several skeins of twine, 3 hours of time and perseverance.
- You can cover the radiator using a cotton curtain.
This option is only suitable for products installed in a niche. You can attach the curtain to the window sill using Velcro; the fabric should match the color of the wallpaper. As an alternative, blinds can be used. - And this idea is simply 2 in 1! We hide the batteries and get a new place for reading or pleasant gatherings.
- Or you can hide them under special grilles or perforated screens. Such devices are made from a variety of materials and have a variety of shapes and designs.
- Thanks to the screens, the battery can be used as an additional place for rest, as a shelf or stand for decorative elements.
- How do you like this method?
- Screens made of thick glass will successfully cover the unsightly battery.
Such products look beautiful and very stylish. However, glass screens only cover the outside of the battery. They are secured using screw holders with elastic protective pads. - Another interesting idea is a nightstand with lattice doors. Practical and convenient, isn't it?
- You can hide radiators using hanging grilles. Most often, such products are used for cast iron batteries located in a niche under the window sill. And a nice bonus is that everyone can handle the installation. All that is required is to hang the structure on the heating device.
- Great idea for a children's room!
- Please note that the choice of material from which the screen will be made must be approached no less scrupulously than the design of the product itself. After all, the material must be resistant to high temperatures.
- Another great idea: a battery hidden in a box with a perforated panel. Stylish and tasteful!
- And finally decoupage.
Using ordinary napkins and PVA glue, you can also decorate a heating device. This is easy to do with your own hands; special skills and expensive materials are not required. It is enough to choose napkins to match, cut out the necessary elements and cover the radiator with them. You can apply a special heat-resistant varnish on top.
Heating is the most important part of every winter. Thanks to it, we live the cold season in warmth and comfort, which makes the presence of a battery in the room an advantage, but its bulkiness and inelegant design interfere with planning renovations.
Large and protruding pipes are difficult to imagine in a sophisticated classical style, a modern high-tech direction, as well as in any other.
The usual location for the battery is the wall under the window. Due to its design, the battery stands out strongly in front of the wall. A protruding piece of metal does not add beauty to the room, which led the designers to think about how to beautifully decorate the battery in the interior.
Especially considering that the problem of protruding heating threatens the health of children. Batteries are essential in a child's room. They maintain the desired temperature, which prevents hypothermia and colds in the child’s body.
But what about children's activity and clumsiness? Children are easily hit, burned and cling to protruding parts of the heater.
Modern apartments are released for sale with newer models, they are more reliable and safer, but their appearance is far from ideal. And I don’t want to talk about old houses with huge “monsters” for heating. The hardest part is not hiding the heater, but doing it without losing the basic heating properties.
Screen
The most popular solution for masking old radiators is a screen. It is most often made of metal. Knowing such parameters as the width, height and length of the heater, you can easily select the appropriate model. Screens are stamped in large quantities and for different parameters.
The advantages of this solution include maintaining the main function - heating the room. The material also has high strength and wear resistance, does not change shape at high temperatures, and is cheaper than other options.
Among the shortcomings is not the best appearance. It looks, of course, much better than a battery without it, but it still won’t fit every interior. You can look at the photo of hidden batteries in more detail. If you have limited finances, you can decorate the screen yourself.
Wood screen
A more expensive and beautiful option is a wood screen. It is difficult to find a ready-made option that fits the parameters, so such things are made to order by professionals and done by hand. The type of wood chosen to match the color of the furniture and the appropriate texture will serve as a stunning example of how to hide a battery.
The pattern is chosen in the form of a sieve or weaving. They perfectly mask the shortcomings of the heating system and have high heat transfer. The cost is much higher than the price for metal screens. But in return you get a detail that perfectly matches the design.
Depending on the desired result, the screen can be created in the form of a high bench, a cabinet, a chest, or simply with additional shelves. The advantage is that it can be manufactured at home.
STONE WILL HELP TO RETAIN HEAT
Most finished fireplace mantels are made of lightweight concrete, and this material hardly accumulates heat. However, you can order a finishing set made from natural soapstone magnesite or soapstone, which has a very high specific heat capacity - about 980 J/kg * K (about 1.6 times higher than that of oven bricks).
Similar products are available in the assortment of “Warm Stone”, “Energoresurs-T”, etc. If you purchased a popular firebox model, then you just need to make an advance payment - and in 3-4 weeks the craftsmen will install the kit, the cost of which will be 90-260 thousand rubles . depending on the dimensions and design of the structure. To ensure enough heat for the night, the thickness of the vertical cladding must be at least 60 mm, and the top cover - 100 mm.
Another option is to find a stove maker who will put together a casing made of brick or fireclay blocks for the firebox. In this case, it is necessary to leave a gap of about 10 mm between the metal walls and the masonry, which compensates for the thermal expansion of the device. The working solution is prepared from crushed fireclay clay with the addition of 10% cement.
But a brick box, even with embroidered seams, is unlikely to become an interior decoration - it needs finishing, for example, stove tiles. Prices for flat tiles start from 500 rubles. per 1 m2, for box-shaped (tiled) - from 4 thousand rubles per 1 m2.
The first one is fixed with heat-resistant glue (“Plitonit SuperFireplace”, “Terracotta”, etc.). The tiles are additionally secured with wire during installation. In addition, the heat-accumulating casing can be lined with natural stone (best sawn soapstone, but ordinary sandstone is also suitable) or decorative brick.
Unfortunately, it is unlikely that it will be possible to cover a factory fireplace stove with bricks. It's all about the inconvenient configuration of the body; moreover, such devices are usually installed without a foundation: the ceiling most likely will not withstand the additional load. All that remains is to mount a heat-accumulating panel with an area of 2-5 m² on the wall closest to the unit. This work is easy to do even in a wooden house: a gypsum fiber sheet (GVL) is attached to the logs (beams, sheathing boards) through a heat-insulating substrate (for example, Rockwool Fire Batts or Minerit LW Sauna), and stove ceramic tiles or thick natural stone are glued to it 30 mm.
Plastic screen
A screen made of plastic is a cheaper option than a wooden one. But when purchasing, be sure to ask for quality certificates. And do not buy such an important part of the interior in non-specialized places and unknown brands.
Plastic is not the most reliable material and a product purchased simply based on price can release toxic fumes at high temperatures or even melt on the battery.
A more elite option is special built-in furniture, which is made to order according to individual measurements and sketches. The easiest way to hide pipes is in a table, closet, chest of drawers, seat, etc. But an important condition is the free circulation of air from the heating site, which will allow both to close the radiator and to heat the room without interference.
If you are an ardent opponent of noticeable pipes or unnecessary elements in the room, then you can wall up the heating system under the walls. There are several options for execution and both are not the simplest.
The first option is to make adjustments at the stage of building the house, which will allow you to install the system behind the wall. If you live in a house or apartment that has already been completely built, you can create a false wall. Just covering everything a short distance from the radiator.
The disadvantages include a reduction in free space and a clear reduction in the room. And also the room will be heated a little worse. Natural difficulties will arise, as well as costs in the event of a breakdown.
For a long time, including now, batteries have been masked using heavy curtains made of thick fabric. The good idea is that it does not require extra costs or investments. And curtains are a natural part of the interior and do not attract much attention.
You can paint or wallpaper the heating pipes. This will help reduce their visibility indoors. But everything must be done efficiently. Paint with smudges or wallpaper hung askew will only attract unnecessary attention and will involuntarily catch the eye.
Budget cardboard false fireplace for apartment decoration
The easiest and fastest way to “try on” a decorative fireplace in an apartment is to make it from cardboard boxes. This imitation is suitable for decorating premises for the New Year or a themed party. Investments are minimal and even a child can handle the installation. There is a minus - a cardboard fireplace has only a decorative function. Simply put, you can’t put a stack of books on it, at most a couple of photo frames.
Cardboard false fireplace in the New Year's interior. Source: pinterest
In order to make a cardboard fireplace, you will need several boxes of the same shape (the number of boxes depends on the shape, size and design of the fireplace, whether there will be a chimney, etc.). Cereal boxes are often used for pedestals. And the finishing depends on your imagination - imitation stone from painted cardboard, paint, whitewash, etc.
Cardboard false fireplace in the living room. Source: annekaz.com
Cardboard imitation fireplace made from crockery boxes. Source: annekaz.com
Unusual ideas for hiding a radiator
You can get rid of all the pipes and replace them with safer underfloor heating. The method has its advantages, first of all, you will not depend on the heating season, the free space will increase, the chance that you will be doused with boiling water from your own battery will be zero.
The downsides are electricity prices, the possibility of short circuits, fires, etc. increases. And also in the absence of light, in winter you will have to look for another place to spend the night.
Fabric covers for radiators are gaining popularity for children's rooms. Most often they are made by hand. They are created in the form of a favorite character or canvas with a magical story, letters, numbers, etc.
It all depends on the age and hobbies of the baby. This detail will go perfectly with the atmosphere of the children's room and will protect the child from burns and bruises.
Particularly original people hire artists. They use a battery instead of a canvas and paint on it with heat-resistant paints, creating unique masterpieces that match the interior of the room. The advantage is the ability to draw a new picture if you suddenly want to change the design of the room.
To hide a battery in a house or apartment, it is not necessary to organize a major renovation or large-scale redevelopment; it will be more economical to choose a couple of new design ideas and solutions that use modern experience in this area, and special finishing materials.
Typical Application
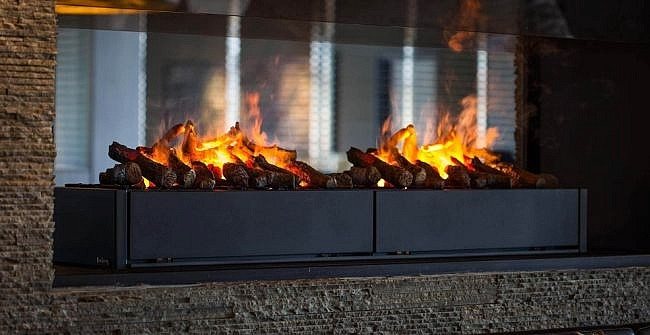
When installing an electric analogue of a traditional fireplace in the house, we first of all evaluate it from the decorative side. It is important for us that it takes its rightful place in the interior of our apartment. However, we also need the additional heating capability included in the functions of such devices. There are two reasons worth noting here:
- When you feel the warmth from the fireplace and see an imitation of fire in it, then pleasant images are born in your subconscious and the necessary atmosphere is created.
- The fireplace apparatus is partly capable of replacing conventional oil heaters or wind blowers (heat fans), which we often use in the off-season, when the heating system does not work and the apartment is cold.
The heating function has nothing to do with the decorative function, so two different systems coexist perfectly in the electric fireplace. In addition, we do not always need the heat emanating from the device. For example, on a warm and dark summer evening, we need exclusively a visual component to create coziness in the house.
In addition to conventional and simple systems with a heater and fan, an infrared electric fireplace, which does an excellent job of distributing heat in a room, can be an original solution. With its radiation, it not only heats the air, but also transfers some of the energy to surrounding objects, and they also become sources of heat. It is believed that such a device will easily heat the air in a room within 20 square meters. m. by a couple of degrees.
A harmonious interior that exudes warmth
Choosing an electric fireplace that meets all your requirements is not an easy task. There are a huge number of models of such devices, which is why they are classified according to various criteria. The simplest gradation is by location:
- The wall-mounted option is the most traditional. You purchase a full-fledged electrical appliance, built into a beautiful portal and ready for use.
- If you want to place the device in a wall niche or a specially built portal, then you will need a built-in option. Note that in some cases, owners build electric fireplaces into the fireboxes of real brick buildings that they do not use.
- A corner electric fireplace is good because it saves you useful living space. At the same time, this arrangement of the heater allows you to successfully distribute air flows in the room, and therefore effectively warm it up.
- The wall-mounted appearance of such devices is somewhat reminiscent of a living picture of fire, or a TV with one program, who has any associations about this.
You are not limited in choosing a place in your apartment to install an electric fireplace. You can place the device in the living room, which is most common, bedroom, study, kitchen, bathroom and even children's room. It all depends on where exactly you plan to create an atmosphere of calm and comfort. A heater in the form of a fireplace will definitely become a real home, around which it will be pleasant to gather with the whole family.
Wall-mounted option for the living room
Note that when choosing a suitable electric fireplace, you should carefully consider the interior of the room and its dimensions:
- For large rooms, a large device would be a good solution, while for small rooms, a small device would be a good solution.
- The design style of the portal should be chosen based on the general direction of the interior. For modern rooms, simple contours, glass and metal are suitable, for classic ones - natural materials or their imitation in decoration, patterns, and additional accessories.
For the convenience of household members, the fireplace system is often installed closer to the center of the room. In this case, there will be a good view from anywhere in the room, and the immediate recreation area will be located nearby. By adding decorative elements, replicas of firewood and stove accessories, you can achieve a harmonious and balanced interior.
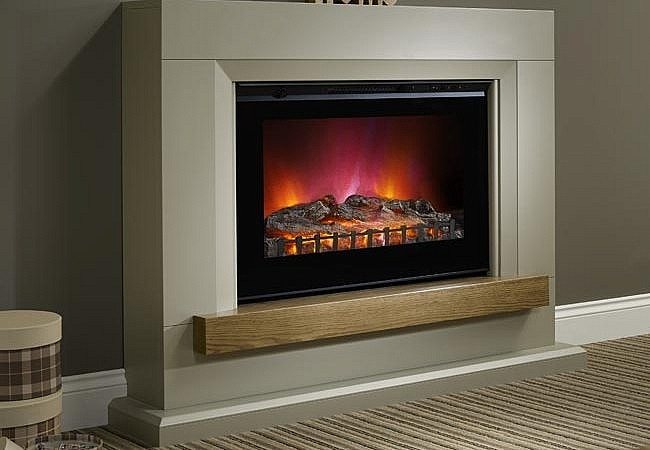
Simple modern design
However, besides an electric fireplace, there are other options for additional heating of an apartment.
How to hide batteries in a room with your own hands.
The most popular method for masking batteries.
Sheathing a wall with plasterboard is often used to achieve this goal (to hide the battery). However, this method has both pros and cons. This is done easily, quickly and cheaply, but it visually reduces the area of the room. Having practical experience and knowledge about working with drywall, such a solution can be implemented independently; otherwise, masking the battery will turn into a long and painful independent work.
We should not forget that if the heating devices are tightly closed, the heat will not pass through, so this is not recommended. To solve this problem, holes are cut out in the material, which ensures the necessary air circulation. For a better aesthetic appearance, decorative screens are installed on top of the drywall, which makes radiator maintenance easier in the future.
Another advantage of using drywall is the ability to hide the pipes that lead to the radiators. However, this solution is more relevant when performing renovation work on the entire room, since this involves covering the entire wall with the material.
The easiest way to hide a battery in a room with your own hands.
It is much easier and more economical to use a hanging screen. There are a large number of different models and alternative options for any interior in this area, for example:
- hinged screen with cover;
- screen boxes;
- metal screens;
- wooden screens;
- glass screens;
- MDF screens.
The advantage of hanging screens is that they can disguise batteries, regardless of the age of renovation in the room or any other factors. To install such models, it is not necessary to have special knowledge or put in a lot of effort, because the installation process involves simply hanging them on the battery. Screens of this type are suitable for two options for pipe connections (as provided by manufacturers) - one-sided and two-sided. Disguising the batteries in such a way as using a hanging screen does not interfere with air circulation and heating of the room, facilitates the process of servicing the heating device and will decorate the room interior.
Also worthy of special attention are box screens, which are often installed along blank walls or in the hallway. Their function is to become an excellent decorative element of the home and create a cozy atmosphere. Most often, such screens are used as shelves where some simple things can find a place.
For pets, such a product can become the main resting place, especially in winter. Due to the fact that the boxes can vary in size, if you have low radiators, you can use small products that can be turned into mini-sofas or benches. The technique and materials for the box can be varied. The most budget-friendly solution is painting, where the main trick will be the correct combination of colors, including applying any image to the box.
The following battery screens can also be made in the form of a box: wooden, metal and MDF. They can have a flat shape, which can be ideally used to disguise batteries hidden by drywall or built into niches. The modern screens offered have a non-standard design for any room design, for every taste and imagination. An alternative to choose from are carvings, forged decorations and designs, which are selected individually to preserve the interior and perform the main function of hiding radiators perfectly.
An original approach for hiding batteries in an apartment.
If the previous options may seem too difficult, costly or complicated, then you can show initiative and originality, using only your creative and design qualities. With their help, you can visually disguise the battery in the interior of the room. Method 1 – painting the radiator in the same color scheme as the walls. Method 2 – make your battery the highlight of the room.
Modern printing companies provide services for applying unique images to self-adhesive paper. Having selected and ordered an image, it can be easily placed on the radiator, which will bring originality to the interior. You can also paint the batteries yourself with colored pencils; you can give them the color of your favorite animal or depict your favorite flowers, patterns, etc.
A somewhat more difficult task is faced by those who want to give the batteries an original look using various shapes and textures. To do this, you can easily find master classes that teach how to decorate heating devices if you don’t have your own skills. There they teach how to decorate batteries with various covers that look like animals. If there is any yarn left, you can wrap it around the battery, which can be of different colors and shades.
If you have the skill of working with beads or beads, a curtain of woven beads or a curtain made of beads will look original. For such an idea, you first need to prepare a frame according to the size of the battery, because the curtain or curtain is then attached to this frame.
How to achieve maximum fireplace efficiency
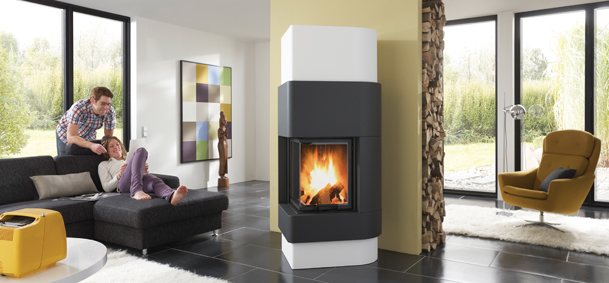
It is unlikely that anyone will find it strange and unusual that rational Germans consider a fireplace not only as a symbol of prestige and interior decoration, but also as a source of heat. Moreover, the functionality of the fireplace plays a paramount role for the German consumer. Let's look at the example of German fireplaces to see what ways exist today to increase the efficiency of a fireplace or stove.
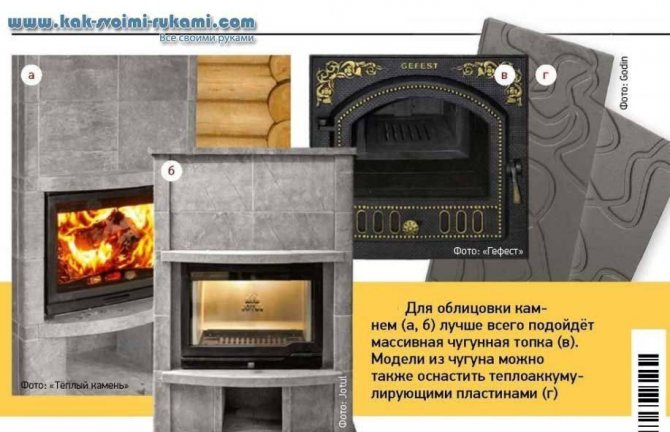
A closed firebox, which is the technical basis of a modern fireplace, has a very high efficiency (unlike a classic open fireplace). However, these high efficiency and power indicators, which are indicated by manufacturers in certificates, under real operating conditions depend on many parameters and conditions. For example, the power of the firebox and fireplace as a whole depends on the quality of the wood burned, the draft force in the chimney, the amount of air entering the combustion chamber, and the materials used in the lining. Therefore, if you plan to use the fireplace not only as a romantic symbol of family comfort, but also as a heating device, it would be advisable to use heat-accumulating materials in the design of the fireplace convection box, and supplement the firebox with technical elements that effectively increase the power of the fireplace.
Schmid fireplace insert with heat accumulator system
Thus, almost any fireplace insert produced by Schmid (Germany) can be supplemented with special elements that increase efficiency. For example, a ready-made structure made of fireclay is offered, which is installed on a cast-iron smoke collector of the firebox and performs the function of additional smoke circulation channels (analogous to stove smoke circulation channels). The energy of hot flue gas streams is accumulated by fireclay, after which it is transferred to the surface of the fireplace lining, which significantly increases the heat transfer time. Naturally, in such a fireplace the convection box must be made of materials that have good thermal conductivity - for example, fireclay slabs.
If you set a goal to increase the heat transfer of the fireplace, then this can be achieved using the design of a turbo convector installed in a cast-iron smoke collector and increasing the hot surface area of the fireplace insert, which, in turn, increases the strength and temperature of convection currents.
To distribute warm air to various rooms, you can use a convection casing, which is attached to the firebox body. From here, warm air is distributed through insulated corrugated pipes to various rooms of the house. With such a fireplace insert, you can quickly heat not only the room in which the fireplace is installed, but also other adjacent rooms.
Fireplace insert Schmid with water heat exchanger
The Schmid company also offers a wide selection of water heating equipment and produces fireboxes of various capacities, both with a built-in water circuit and with a series connection to a smoke collector. These two types differ in the percentage of energy split into water and air (in the first option, 70% goes to heating water and 30% to heating air, in the second, on the contrary, 30% to heating water and 70% to heating air). And also the possibility of installing accumulating smoke circuits or a bypass (bypass for flue gases), which allows you to light the fireplace when there is no need to heat water in the heating system (for example, in early autumn or spring). Schmid water circuits are designed for closed-cycle systems with connection to a hot water storage tank, which sequentially, if necessary, releases the accumulated energy into the heating system and for heating the water supply. In our practical experience, such systems can be ideally complemented by other alternative energy sources, for example, solar panels.
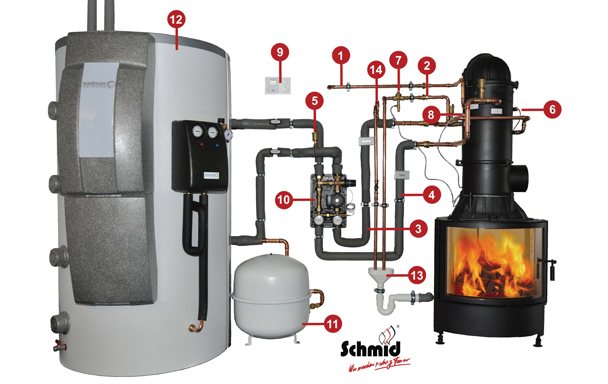
Connection diagram of a water heating fireplace to the heating system. 1. Cold water supply line when the overheating protection sensor is triggered 2. Water discharge line into the sewer when the overheating protection sensor is triggered 3. Return line from the buffer 4. Supply line to the buffer 5. Air vent 6. Temperature sensor for pump control 7. Thermoventilator 8. Overheating protection sensor, controls the thermovent 9. Remote temperature controller 10. Pump group with temperature controller 11. Expansion tank 12. Accumulation buffer 13. Drain column into the sewer 14. Bypass valve