Effective cellar ventilation is considered a prerequisite for ensuring the safety of various food products, including vegetables and fruits. Any disruption of air circulation leads to changes in humidity and temperature; in addition, in particularly dangerous cases, a decrease in oxygen concentration in the atmosphere is possible, which poses a threat to human life. That is why the design and installation of a ventilation system for basements should be approached with all responsibility.
Features of cellar ventilation
The question of how to properly ventilate a cellar was asked by all owners of their own home or garage (which are also often supplemented with basements for storing supplies for the winter). First of all, you need to know and understand the main features of cellar ventilation.
- In most cases, the basement has a small area, so effective ventilation can often be achieved using the simplest design schemes and solutions.
- Excessive ventilation of the cellar in winter can lead to a sharp drop in room temperature. This causes spoilage of food stored in the cellar.
- Insufficient ventilation can lead to increased humidity, which can lead to mold and mildew. As a result, not only the products, but also the structural elements of the cellar itself may suffer.
- Metal pipes should be used for laying ventilation lines; galvanized pipes are quite suitable. It is not worth using polymer elements; they are often damaged by rodents, and performing repair work with the replacement of communications is a rather complex and expensive process.
When choosing an air duct, be guided by the following ratio - for every square meter of area you need a pipe with a cross-section of 26 square centimeters. So for a basement area of 7 square meters you will need a pipe with a diameter of 14 cm.
Installation of natural ventilation in the garage
When deciding to install natural ventilation, it is still necessary to take into account some of the disadvantages of this system:
- Such ventilation depends on the temperature gradient, which may be ineffective in the summer.
- Freezing of air ducts during cold periods due to temperature changes. This can lead to hypothermia in the room.
- Supply and exhaust openings must be placed strictly according to the instructions, otherwise the desired result will not be achieved.
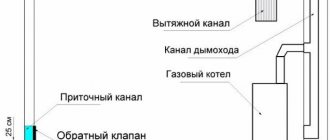
As already noted, natural ventilation involves the placement of two openings: exhaust and supply. In this case, they should be placed on opposite sides, diagonally. For example, the following scheme can be used: the supply air supply is located at a height of 15 cm from the floor on the non-wind side, and the exhaust air supply is located on the opposite wall, approximately 15 cm below the ceiling.
Subtleties of garage ventilation
A pipe is installed in the supply hole, approximately 40 cm above the ground. To prevent animals from entering the hole, you should put a protective grill on it. The pipe coming out of the exhaust vent is located above the roof, also at a distance of approximately 40cm. When installing such a system, the height difference between the holes is very important; it is desirable that it be at least 3 meters.
The simplest methods for arranging cellar ventilation
Ventilation in the cellar of a house can be arranged with minimal financial investment. Most often, to ensure air circulation during the construction process, special vents are left at the base level of the building. Keep in mind that this scheme is applicable only for small cellars (up to 5 square meters). If the area of the basement increases, the air exchange provided by the vents will not be enough.
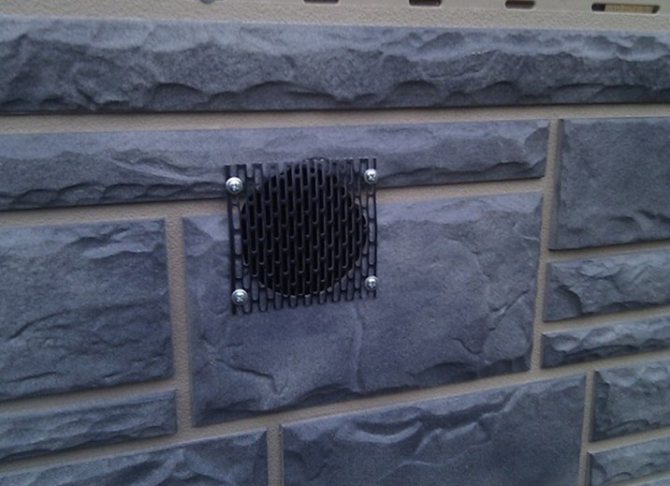
In order to prevent rodents from entering the cellar, it is necessary to close the vents with a metal mesh (it is not recommended to use polymer ones, they break down quite quickly).
In addition, it should be remembered that the ventilation scheme with vents requires the vents to be closed in the winter, otherwise the temperature drops to negative values very quickly.
You can often hear the question of whether ventilation is needed in a cellar that has a small recess. This design (with an additional earthen embankment) can be found in many village farmsteads. In this case, you can get by with a single-pipe system, the essence of which is as follows:
- An exhaust ventilation pipe is installed through the ceiling of the cellar and the earthen embankment, which is raised at least 50-70 cm above the surface.
- The flow of fresh air is usually carried out through the entrance staircase, for which special holes are made in the lower part of the entrance door.
Such a system fully meets the needs of a small cellar, but it is not practical to use it for serious basement structures. In this case, you should pay attention to natural supply and exhaust ventilation.
Problems associated with natural ventilation in winter
When constructing private houses in our country, natural ventilation is most often used. It has a lot of advantages, among which the most significant for the developer are ease of implementation and low cost of execution. But its use also has one drawback - the influence of the temperature difference between the house and the street on the circulation of air flows: the greater the difference, the better the air exchange.
The problem with natural ventilation at home during the cold season lies precisely in increased air exchange, during which up to 40% of the heat is released into the atmosphere along with exhaust air and, as a result, heating costs increase.
But if we are talking about the ventilation system, we cannot help but touch upon the problem of underground ventilation in a private house in winter.
The space under the floor must be ventilated to prevent condensation from occurring on joists and insulating floor structures.
When organizing uncontrolled ventilation of the subfloor in winter, heat loss through the floor can reach 20%. If we add to this the possible losses that increased air exchange creates, we get a significant figure. Many owners of private houses with basements solve the problem of heat loss during natural ventilation of the subfloor in wooden houses in winter by closing the vents. This, as a rule, helps to reduce losses, but there is a risk of condensation, rot and mold damage to wooden structures in the “pie” of the floor.
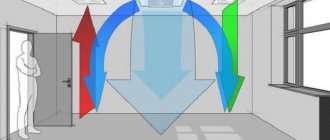
We cannot ignore the issue of organizing ventilation of the attic space. If there is insufficient air circulation in the attic in the summer, a hot roof will increase the air temperature in living spaces, which may result in additional costs for creating an air conditioning system. In winter, on the contrary, good air exchange in the attic will contribute to significant heat loss through the ceilings. At the same time, condensation may form in the roofing pie and the attic room, which will negatively affect the condition of the rafters and the thermal insulation layer.
Conclusion 1: Natural ventilation cannot fully guarantee high-quality air exchange and heat retention in a private home.
Two-pipe cellar ventilation systems
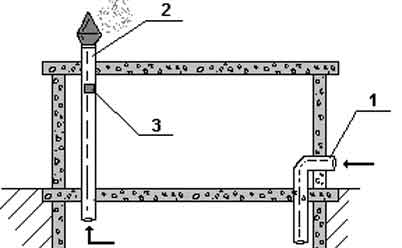
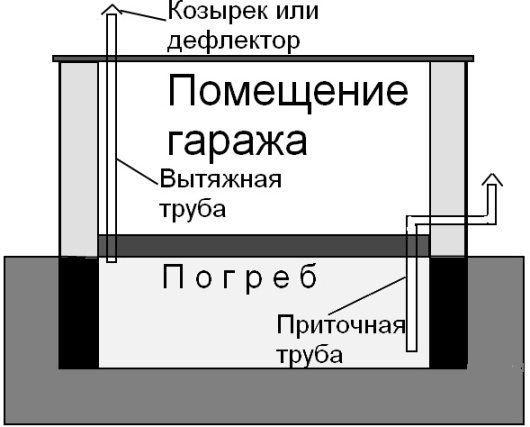
Natural ventilation in the cellar if there are two pipes (supply and exhaust) will work quite effectively. When constructing such circuits, the following rules should be followed:

- The installation of ventilation in the cellar begins with the installation of an exhaust pipe (its diameter is determined from the ratio already stated above). The pipe is routed through the ceiling of the cellar; if the basement is located under a house or garage, then the hood should be routed to the wall of the building. In this case, you should ensure that the pipe is higher than the roof slope.
Experts recommend laying ventilation ducts in close proximity to the chimneys of stoves or fireplaces. In this case, it will be possible to ensure stable traction in all weather conditions.
In order to be able to regulate the ventilation flow, a special damper should be installed at the bottom of the pipe. With its help, you can also block the channel during the winter cold. And to protect against debris and fallen leaves, it is necessary to install a special enclosing device on the hood.
- Supply ventilation of the cellar should be provided by a second pipe, which should exit to the surface significantly below the hood. The lower edge of the supply pipe should be located at the level of the cellar floor on the side opposite to the hood.
You can check the operation of the ventilation system after installing both pipes in a fairly simple way. To do this, you need to attach a simple sheet of paper to the inlet of the supply pipe. If it is attracted to the ventilation element, then the stream of fresh air is directed correctly into the cellar. To check, you can also use match fire, smoke, dry ash; all of them are considered fairly accurate indicators.
If the check shows that the natural ventilation of the cellar is not effective enough (weak air flow), then the length of the supply pipe should be reduced; in many cases this is quite enough. In addition, it is worth trying to increase its diameter. If these actions do not lead to the desired result, then you should resort to forced ventilation of the basement.
Installation diagram

- A visor is installed at the end of the exhaust duct.
- To ensure proper ventilation, it is necessary to place the upper end of the exhaust duct higher above ground level.
- The radius of the air ducts must be the same.
- When calculating the diameter of the pipe, you need to use the formula: for every 1 m3 of the cellar located below ground level, there should be 20 cm2 of the diameter of the ventilation pipe.
This approach is used for both natural and forced ventilation. To properly install ventilation, you must first make a calculation, namely, establish the cellar area and air flow rates. This ensures proper air exchange and will allow in the future to completely renew the air in the cellar every 30 minutes. This level of circulation can be ensured by laying 25 cm of channel for every 1 m2 of space.
Important! After installing any type of ventilation, there should be no extra holes in the pipes through which air will penetrate into the room. The gaps significantly reduce ventilation, so damp air can enter the garage. Therefore, condensation can settle on car parts, which is very undesirable.
In principle, installing ventilation in the cellar is a job that can be done independently by the homeowner with great desire and ordinary non-professional tools. Start with design - basic drawings, calculations of materials, determination of the operating features of the ventilation system under different temperature conditions.
- Author: Maria Sukhorukikh
Rate this article:
- 5
- 4
- 3
- 2
- 1
(0 votes, average: 0 out of 5)
Share with your friends!
Forced ventilation of the cellar
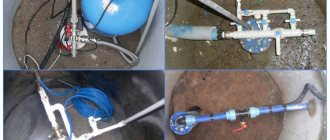
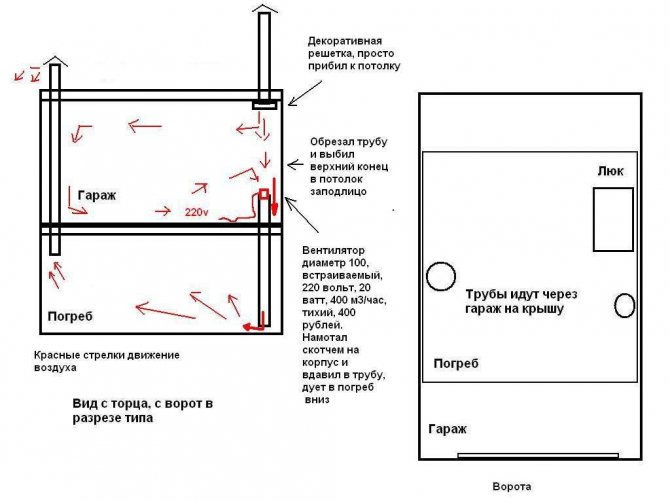
Forced ventilation in the cellar can be implemented using low-power fans (100-200 W is sufficient), which is installed in the exhaust or supply pipeline (you should ensure the correct direction of the air flow created).
This ventilation scheme is characterized by stable operation regardless of changing weather conditions. The only drawback of the system is its energy dependence; when the power is turned off, the ventilation efficiency is significantly reduced.
A solution to this problem can be forced ventilation in the cellar under the garage or house using deflectors or special turbines that use wind power. The essence of the method is to install a deflector on the upper part of the exhaust air duct (instead of a standard hood). Under the influence of wind on the blades of the device, the impeller begins to rotate, and the created air flow provides a vacuum sufficient to ensure ventilation.
The principle of operation of the turbine is somewhat different. Its rotation is transmitted via a flexible shaft to a conventional mechanical fan, the rotation of which provides the necessary vacuum.
These simple mechanisms can significantly increase the efficiency of natural supply and exhaust ventilation, so their installation is advisable in most cases of self-installation of ventilation systems.
As you can see, installing effective ventilation for a cellar is quite simple, the main thing is to adhere to all the rules described above. If you have no experience in laying communications, then it is better to seek the help of a specialist who can take into account all the features of your buildings and choose the most optimal scheme.
We also recommend reading:
Hood in the garage cellar: installation instructions
This instruction does not include construction work on thermal and waterproofing of the cellar room
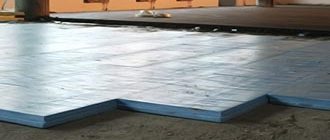
If a cellar under the garage was provided during the construction stage, it is important to pay attention to the finishing of the walls and floor. To prevent rodents from getting into the habit of feasting on supplies, they use ecowool, and the floor is insulated by laying a “cushion” of sand and crushed stone, on top of which they make a screed
If the groundwater level is fairly close, in order to avoid an additional source of moisture formation, it is recommended to cover the walls as follows: coat them with clay (layer at least 3-4 cm thick); veneer with brick; plaster; whiten with slaked lime.
Step #1 Design
Detailed diagram from a competent homeowner
Before starting installation work, you need to decide:
what kind of ventilation system will there be: natural, mixed or fully mechanized; determine the location where the “entrance” for the supply pipe will be located; calculate the length and diameter of the pipe; If a decision has been made to install ventilation using equipment (forced air exchange), purchase it, paying attention to the power.
Step No. 2 Preparation of equipment and materials
First, determine the diameter of pipes made of asbestos, galvanized iron or PVC. The calculation is made according to the formula, based on the area of the room and the pipe cross-section established by the standards for basement premises - 26 square meters. cm of pipe diameter should correspond to 1 square. m of premises. In addition, in order for the ventilation in the vegetable pit to work more efficiently (taking into account the “neighborhood” of the garage), the estimated diameter of the exhaust pipe is increased by 13-15%.
The length of the incoming pipe is calculated based on where it starts. If a mixed type of ventilation is used for air exchange, then an option is possible: a pipe enters the garage at the height of the middle of the above-ground part of the foundation (25-35 cm), then, through the garage floor, enters the cellar, not reaching 30-40 cm to the floor level cellar
The exhaust pipe leaves the cellar at a height of 1.5 m from the floor, passing through the entire building, exiting through the roof to a height of at least 50 cm above the ridge. If the garage is a separate building, then the pipe will be shorter, however, the requirement for external height (50 cm above the ridge) remains.
For natural ventilation, in addition to pipes, you will need:
- condensate container;
- protective grille with a fine mesh for the inlet;
- pipe visor; insulation for pipes.
For forced air exchange - fans, electrical wiring, deflector.
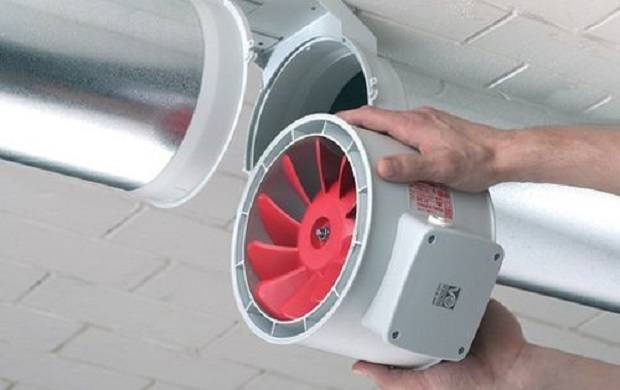
Exhaust device for forced ventilation system
Step No. 3 Installation sequence diagram
Installation of exhaust and supply pipes. The supply pipe is led from the garage to one of the corners of the cellar. Its entrance hole (from the street side) is covered with a grill or mesh to prevent the entry of rodents, birds, and debris. The hood is installed in the opposite corner (diagonally) and goes out through the roof. In the place where the pipe passes through the attic, it must be insulated. To regulate the movement of air masses, dampers are installed on the pipes.
Ventilation in the garage cellar with one pipe provides the following options:
- Only an exhaust pipe is installed, and the air flow comes from the garage. Since the air in the garage contains toxic substances, there is a possibility of them getting into food products.
- installation of one pipe with two doors.
To constantly supply fresh air to the basement, install a fan on the supply pipe and connect it to the electrical network. Such a forced system will allow you to maintain the proper operation of the ventilation system at any time of the year, regardless of temperature changes.
How to make sure that the air coming from the garage immediately “leaves” the cellar? The solution to this problem is an exhaust fan. The electrical appliance market offers many models. You can choose an axial fan with a humidity sensor, which is relevant in this room.
Another device that improves ventilation is a deflector installed at the end of the exhaust pipe. Its task is to suck in exhaust air through special channels and improve the performance of the ventilation system by 15-20%.