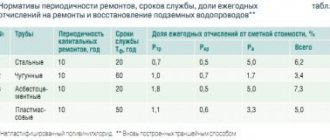
One of the most important stages in the construction of a bathhouse is the installation of a chimney. And its insulation is a mandatory process during construction, which has two goals: fire safety and corrosion protection.
If you do not make thermal insulation, then under the influence of temperature changes condensation will form, gradually flowing inside and contributing to the destruction of the structure itself.
Insulated smoke exhaust channels warm up faster, making the stove in the sauna work much more efficiently.
Depending on what the sauna chimney is made of, various materials are used for its thermal insulation.
There are several types of already insulated chimneys for sauna stoves, the most common of which are sandwich pipes made of stainless metal. A good option is ceramic sections, which are already installed in expanded clay concrete modules.
Why insulate a chimney?
During operation of a sauna stove, its chimney becomes hot, and the inevitable proximity to flammable materials can lead to a fire.
If the chimney pipe is made of brick, it heats up less, and if the chimney is made of metal, then much more.
Metal pipes heat up over 600 C°, and their proximity to the wooden lining of the steam room is very dangerous, especially if the bathhouse is close to residential buildings.
The second, no less important problem is the appearance of condensation in the chimney. Condensation is the main enemy of all smoke removal systems.
This is not just moisture that forms on the walls of the chimney, but an aqueous solution of sulfuric acid, which can destroy almost any material. It appears as a result of the passage of heated air through a still cold chimney.
As a result of the impact of condensation on an uninsulated brick chimney, the masonry is destroyed, since it has the ability to penetrate microcracks in the brick, and when freezing, it expands. Metal chimneys also suffer greatly from condensation.
Metal of ordinary brands is not resistant to acids, so it quickly becomes unusable when exposed to condensation.
The only way to combat the appearance of condensation is to insulate the smoke exhaust ducts, in which the pipe will cool less and the sauna stove will return to operating combustion mode faster.
Insulation materials
Chimney insulation can be done using various methods using non-combustible materials.
The most common are:
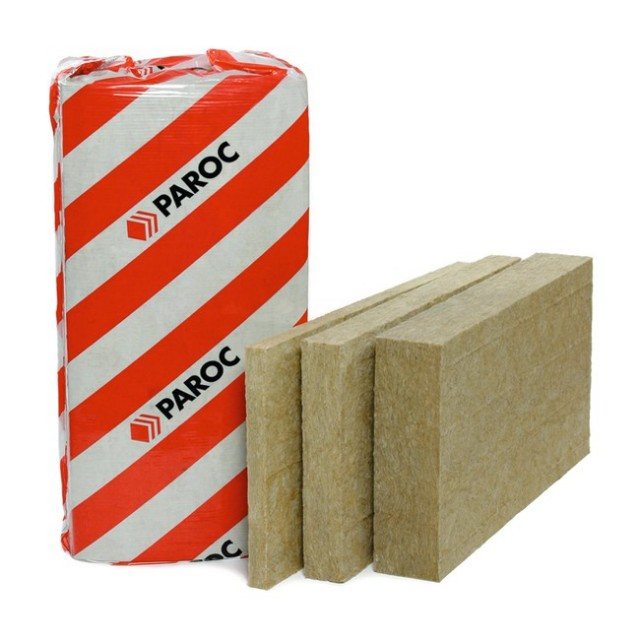
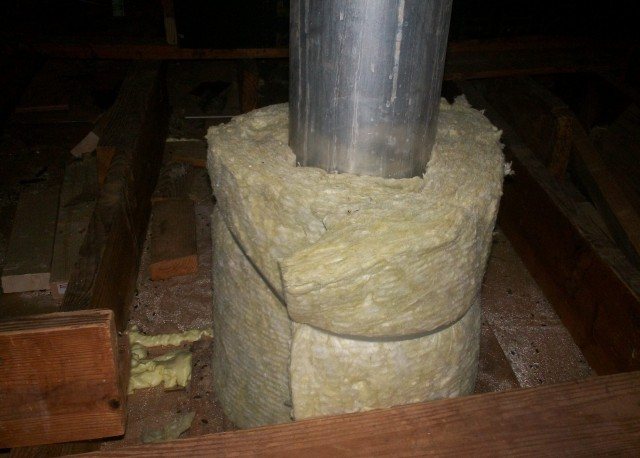
- Thermal insulation of the chimney with basalt wool and glass wool. Insulation materials used for both large surfaces of brick chimneys and pipes of relatively small diameter. Available as filler, in rolls or in the form of mats. For its use, it is recommended to manufacture an additional casing.
- A method of filling the space around the chimney with heat-insulating material: expanded clay, slag, broken bricks, special heat-insulating granules. This method involves making an additional chimney casing.
- Plastering. This is the most common, until recently, method of insulating brick chimneys. For this purpose, a slag-lime solution was used, applied in a layer of 5-7 cm to the reinforcing mesh. After drying, a sand-cement mortar of the same thickness was applied to it. But when the smoke exhaust system was heated and cooled, such insulation cracked and required annual repairs, so this method is considered unjustified from the point of view of labor costs and efficiency.
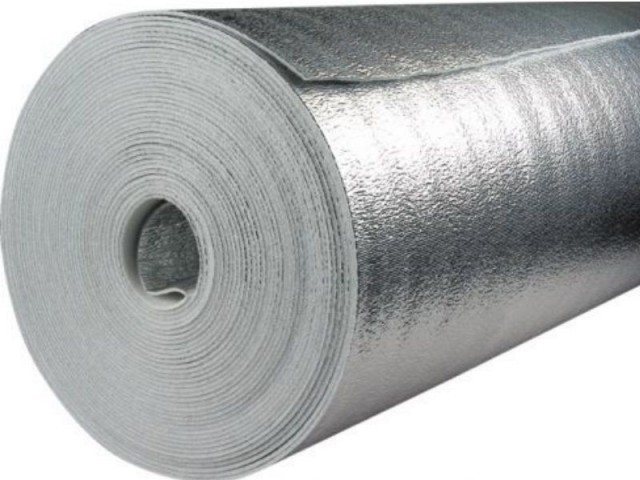
- Chimney insulation with modern materials made of foamed polyethylene. “Teploizol” or “Folgoizol” is available in rolls, is light in weight and has good elasticity, and cuts well, which makes it accessible to even non-professionals to work with. This is the simplest and most inexpensive method of insulating chimneys, widely used today.
Examination
To check how well the thermal insulation layer is laid, you need to light the stove. For diagnostics it is better to use a thermal imager. The optical-electronic system will help determine the quality of sealing of the outer casing. With proper installation of the wall of the chimney structure, the seams at the joints do not allow heat to pass through. The places where the heat flow leaks will be indicated by the device screen. Incomplete sealing leads to overheating of the insulating material. If a problem is detected, the outer casing is dismantled and re-insulated.
Insulation work should be carried out after the installation of the chimney system and ventilation elements is completed. When installing chimneys, it is necessary to use modern types of insulating materials. It is better to use finished products with thermal insulation.
Choice of insulation
The choice of insulation to insulate a chimney must be approached carefully and seriously. You shouldn’t buy the cheapest one, because it should have good thermal insulation properties, be easy to use, not require additional reinforcement of the load-bearing structures of the roof and ceilings, be non-toxic and non-flammable.
Stone or basalt wool is an excellent thermal insulation made from basalt stones.
This insulation can withstand prolonged exposure to fairly high temperatures and does not burn, even when in contact with an open fire. When heated, it does not emit any toxic or unpleasant odors. Such insulation can be safely called an environmentally friendly material.
Glass wool is a type of mineral wool insulation made from waste from the glass industry. There are a large number of voids between its fibers, so it retains heat well.
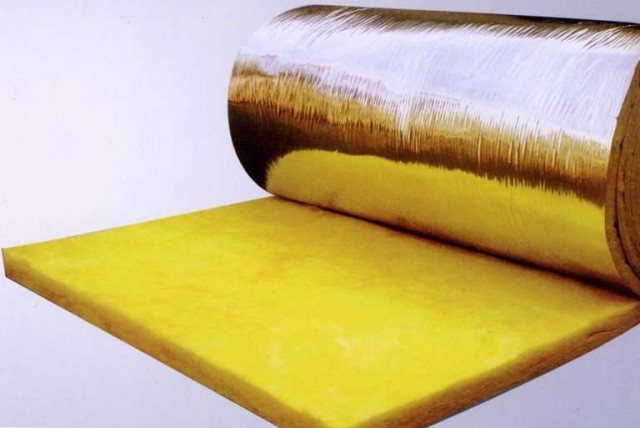
Glass wool does not burn and does not absorb moisture, is not susceptible to rotting and rodents. It is not expensive and easy to use. Most often produced in slabs and rolls.
Teploizol or folgoizol are multifunctional types of insulation made of polyethylene foam and covered with a sheet of aluminum foil. It is produced in rolls and has a thickness from 2 to 10 mm. They can perfectly insulate the chimney of a bathhouse, since these insulation materials can withstand heating up to 150C°-170C°.
Do-it-yourself insulation installation
Chimney insulation using mineral, basalt or glass wool can be done in two ways: insulation under a casing or insulation of a chimney without a casing.
In order to insulate a chimney using mineral wool mats, you need to cut out several pieces of slab from them that will correspond to the sides of the pipe from the outside.
Then, using wire stitching, secure them to the chimney.
After securing the insulation to the chimney, it is recommended to make a casing to protect the insulation from atmospheric agents or to carry out the process of lining the chimney with bricks or asbestos-cement slabs.
Important! There should be no voids left between the layer of thermal insulation, otherwise the insulation will lose its effectiveness.
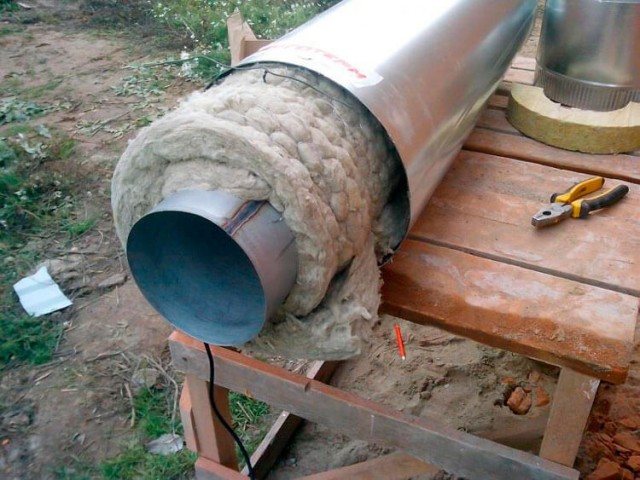
To insulate a metal pipe, you need to wrap it with basalt wool and secure it with wire around the entire perimeter. After that, put a second pipe of larger diameter on the chimney to make a kind of sandwich.
This method of thermal insulation of chimneys is the most effective and simple, but it allows reducing heat loss by more than half, as well as significantly reducing the fire hazard and the formation of condensate in smoke exhaust systems and protecting them from destruction.
Thus, thermal insulation helps to increase thermal efficiency and safe use of stoves. At the same time, it gives the building and the structure itself a more aesthetic appearance.
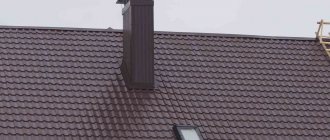
The stove is folded, and the chimney proudly rises above the roof of the house. Do you think the work is finished? Not at all - it's time to think about how to insulate the chimney pipe and protect the house from fire and the roof from leaks. It’s good if you thought about this issue while designing the stove - in this case, the insulation of the chimney will be reliable and safe. It is more difficult to insulate an already built chimney; sometimes this work entails changing the design of the floors and roof. However, the costs will be offset by a feeling of security and comfort.
Metal apron
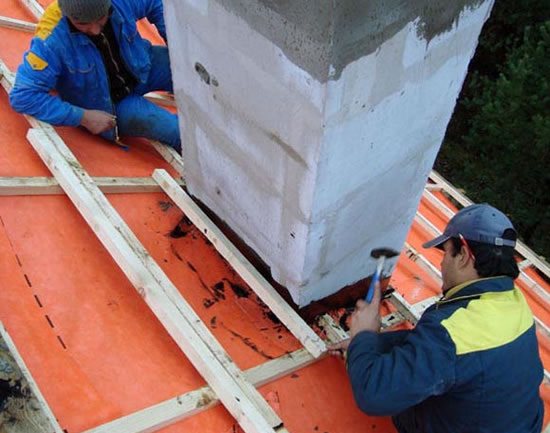
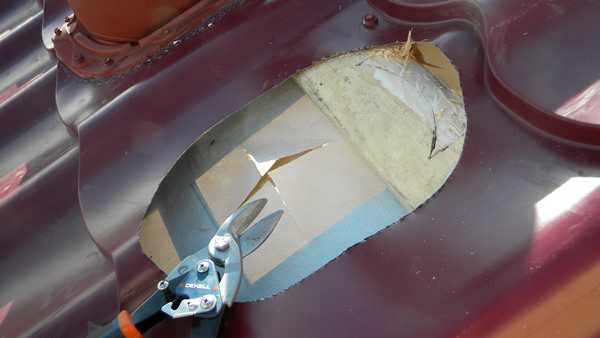
It is best if the chimney is insulated before covering the roof with corrugated sheeting. The chimney opening in the roof is made wider by several centimeters, the joint is filled with heat-insulating and preferably hygroscopic material. Next, the chimney is placed in a steel box. A heat-resistant material is placed between the pipe and the box and the first layer of waterproofing is made from a film sheet and fixed tightly.
When the corrugated sheeting is already in place, external waterproofing work is carried out. For this, ready-made sealed elements are used, or everything is done manually. The sealed material is adjusted to the size of the pipe and put on top, its upper edge rises to the walls of the chimney and is attached using a clamp and adhesives, and the lower edge is pressed to the roof using a rigid sealant.
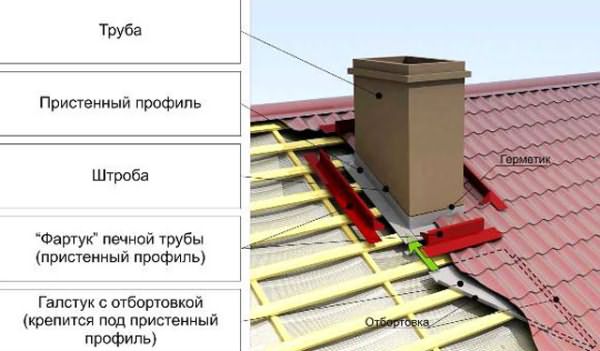
Brick pipes passing through the roof have expanded masonry ( fluff) and ledges ( overlap), which serve as a heat and moisture insulator. Insulation of a brick chimney from moisture is done using a steel, lead apron, which is placed on the roof trim. First, the space in front of the pipe is covered with a layer of roofing felt with the edge raised to the wall. Corrugated sheeting or tiles are laid.
A steel apron according to the dimensions of the chimney is attached to special grooves on top. Then all joints are filled with sealant. Sometimes the chimney apron is part of an insulating steel wall, which is necessary in some cases (when condensation forms, when insulating walls). At the same time, the steel sheet in the lower part is bent to match the slope of the roof (corrugated sheeting) and has no joints, which increases the level of reliability against leakage. Metal aprons are also placed on round pipes if the temperature of the combustion products at the outlet is over 100 degrees.
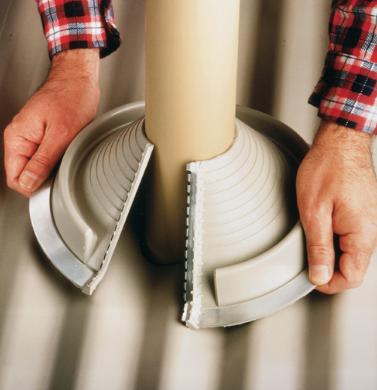
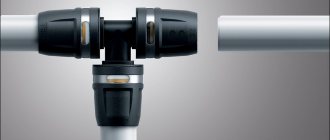
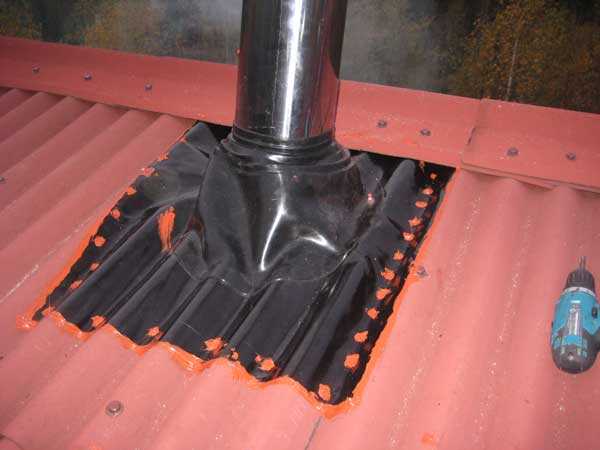
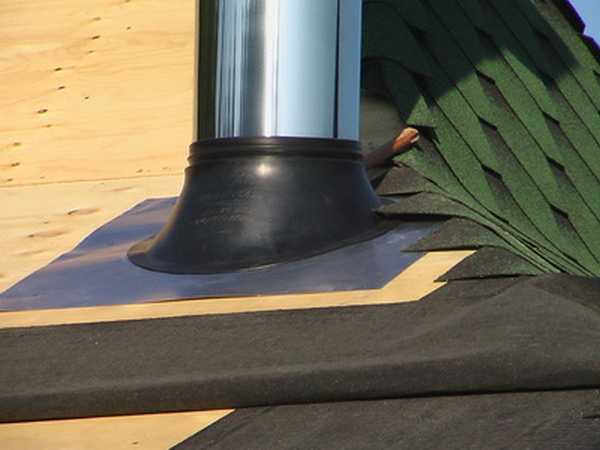
You can insulate round pipes using a ready-made apron-cuff (master flush) made of rubber or silicone. It is placed over the pipe and attached to the corrugated sheet with a special clamp that adjusts to all bends. Its peculiarity is that it is corrugated into rings of different diameters, the required opening is cut out manually, and it can be immediately mounted on the roof.
Also, this element is suitable for installation on any angle of roof inclination (corrugated sheeting). Due to the characteristics of the material, master flash can withstand low temperatures up to 260 degrees. Installation is quick: an opening is cut out with a smaller diameter than the diameter of the pipe (by 20%), it is pulled onto the pipe, a flange is used for crimping, or the edge is attached to the corrugated sheet using sealant and self-tapping screws.
The most dangerous option for arranging a chimney in terms of fire safety is a pipe made of metal products that is not protected by a heat insulator. The distance between it and wooden or plastic elements should be at least 60 centimeters.
But even the presence of such a gap cannot protect against burns in case of accidental contact - for this reason, it is advisable to insulate the pipe before problems arise.
When deciding how to wrap a pipe in a bathhouse or house, if it is single, it is to use non-flammable insulation, for example, basalt wool, which is protected on top with metal or plaster. This heat insulator has a melting point of 1000 degrees.
The sequence of actions is as follows:
- Mats 5 cm thick, consisting of basalt wool, are overlapped around the pipe and secured with steel wire.
- Wrap the insulated chimney with reinforcing mesh, secure it and apply plaster on top in two layers.
- Instead of plastering, you can use thin sheet iron, which is rolled up and riveted where the edges touch.
Types of chimney insulation
It is necessary to insulate the chimney from two negative destructive factors: from overheating of structures and from leaks at the joints. Therefore, in this article we will consider two types of chimney insulation:
- Fireproof thermal insulation;
- Waterproofing.
It is recommended to immediately carry out comprehensive insulation, solving not only the main problems, but also improving the operating conditions of the furnace. For example, insulating a pipe running through an unheated attic reduces the risk of overheating of wood roofing elements and reduces the risk of condensation that can lead to excessive soot deposits, corrosion or pipe failure. Waterproofing the pipe will help avoid rotting of the rafter system and ceilings, as well as pipe destruction if it gets wet.
Methods of fireproof insulation of chimneys
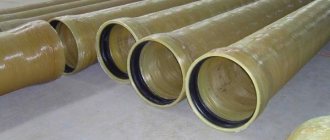
The simplest and most reliable, but not always the cheapest, way is to install a “sandwich” chimney made of ceramic or metal. In such chimneys, the inner pipe, which performs the function of removing smoke, is made of heat-resistant steel or ceramics and is thermally insulated with non-flammable insulation: mineral, stone or basalt wool. The outer layer of a sandwich chimney is made of steel or ready-made expanded clay concrete blocks.
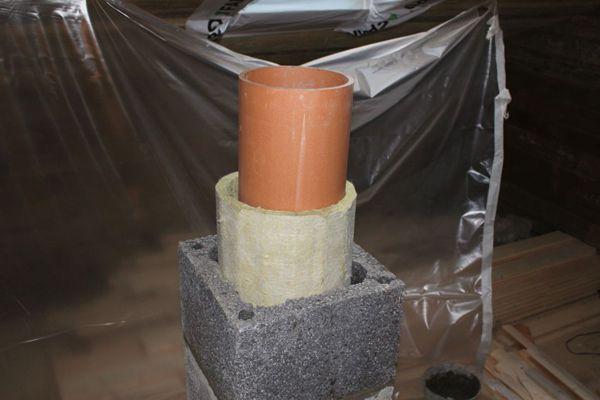
Prefabricated ceramic chimney - a safe solution to the problem
Prefabricated chimneys are equipped with elements for fastening, inspection, maintenance, as well as for connecting several heating devices. Installation of such a chimney is simple, but requires following the instructions, only then will it be completely safe.
Thermal insulation of sandwich type pipes
Video - sandwich diaphragm for passing pipes through ceilings
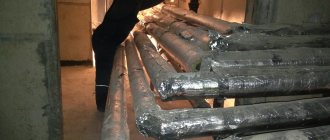
Another insulation method used when building a stove is a brick chimney. Due to the low thermal conductivity of the brick, its walls do not heat up to dangerously high temperatures, so no additional measures to insulate such a chimney are required, except for the correct implementation of fireproof cutting of the floors and roof. To save money and facilitate construction, a brick chimney is sometimes finished with a pipe made of metal or ceramics. In this case, they are thermally insulated using the technology described below.
Thermal insulation of metal and ceramic single pipes is possible using boxes made of non-combustible materials and mineral non-combustible thermal insulation - stone or basalt wool. It is possible to operate such chimneys without thermal insulation, but fire-proof cutting according to all the rules is mandatory in any case.
Methods of waterproofing chimneys
Chimney waterproofing is installed where it exits onto the roof. The larger the pipe and the farther from the ridge it is located, the more difficult operating conditions await it: when it rains, more abundant flows of water, in winter - an increased snow load. Rain and melt water, if waterproofing is insufficient, penetrates inside the house, leading to leaks, rotting of wood and destruction of concrete and brick structures, including the chimney itself.
The method of waterproofing depends largely on the shape of the pipe and the type of roofing. For round pipes, metal or polymer grooves are used, for rectangular pipes, metal aprons and junction strips are used. How to waterproof a pipe is described in detail in the article “Roof cutting of a chimney”, and then we will talk about the technology of thermal insulation of a chimney.
Some tips for installing thermal insulation
Before insulating a chimney pipe, you need to make sure that it is installed correctly.
- The combustion product exhaust pipe should be 5 m high. This figure ensures optimal draft in the heating system.
- A distance of at least 250 mm is required between the roof slab and the outer element of the boiler room.
- If the building is covered with flammable materials, in particular slate, roofing felt, ondulin, then the insulated smoke exhaust structure must be equipped with a spark arrester.
After making sure that the system is installed correctly, you can begin subsequent work on winding with thermal insulation.
Among the most reliable structures for passing a pipe through a roof is a specially made box - similar to a rafter system. Instead of wood, which is a flammable material, it can be made from galvanized roofing, but according to the same scheme.
The design of modular chimneys has ready-made thermal insulation, but they differ in configuration. For example, there is a double pipe with a layer of basalt wool or a special ceramic core and an outer casing made of concrete. The assembly of modular blocks is quite simple - a diagram is included with purchase.
It is possible to install an asbestos gasket followed by sealing with an asbestos solution. Each new module block is attached above the previous one with the same mixture composition. After installation is completed, the pipe is isolated from leaks in the roof window using any described method.
Modern roofing with corrugated sheets has its own characteristics - here it is better to make the window for the chimney a little wider. All joining surfaces are also filled with materials with thermal insulating properties. The chimney, before being wrapped with basalt wool, is placed in a steel box. Carefully cut the film layers of vapor and waterproofing and secure them by the edges of the box. Be sure to make a heat-resistant filling between it and the pipe.
Roof penetration
Next, external waterproofing is carried out - a sealing cap material corresponding to the size of the chimney pipe is put on top, the edge is secured with a clamp using glue. The lower edge fits tightly to the roofing material and is firmly fixed with sealant. A steel cap is often included with such a chimney. They are put on round pipes. Installation is recommended when the smoke output from a solid fuel boiler has a temperature of more than 100°C.
If you properly insulate the chimney pipe, then you will not be at risk of dampness and a rotten ceiling.
Chimney pipe insulation
Before proceeding with the insulation of the chimney pipe, it is necessary to check compliance with the requirements of SNiP 2.04.05-91 and, if necessary, correct the shortcomings:
- The height of the pipe to ensure good draft and permissible temperature of the flue gases at the outlet should be 5 meters or more;
- If the roofing is a combustible material - slate, ondulin, roofing felt - a spark arrester - a fine-mesh metal mesh - must be placed on top of the pipe;
- The distance between the chimney pipe and combustible structures - floors, walls, rafter system - must be at least 250 mm;
- A fire distance must be maintained between the upper ceiling of the stove and the ceiling. For metal stoves it is at least 1.5 meters, for brick stoves with a two-row ceiling - 0.5 meters, with a three-row ceiling - 0.25 meters, provided that the ceiling above the stove is finished with non-combustible materials;
- In places where a brick chimney passes through the ceiling, fluffing is performed - thickening the pipe. The thickness of the fluff is 1-1.5 bricks.
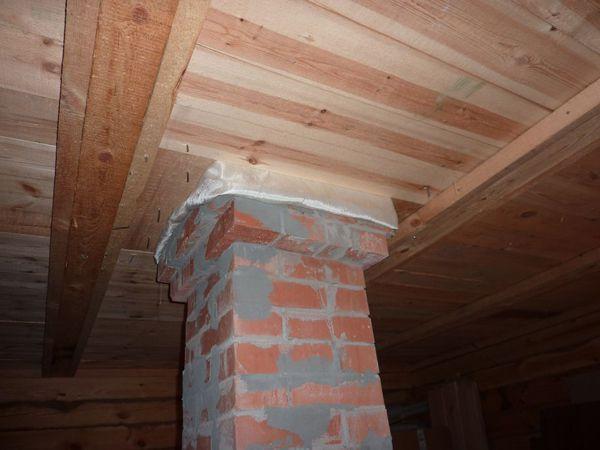
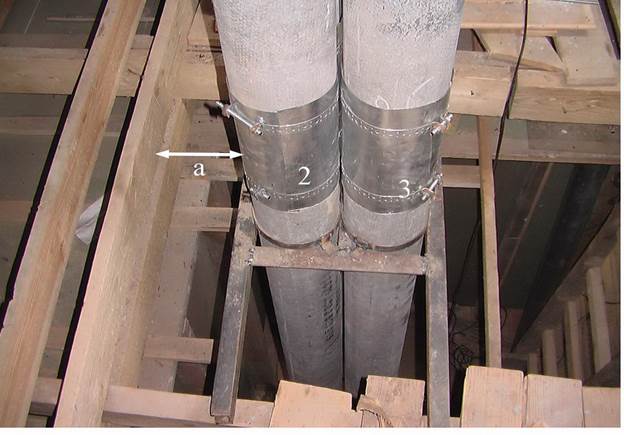
Fluffing a brick pipe where it passes through the ceilings
Plastering a brick pipe
A brick pipe does not heat up much from the outside, so it is necessary to insulate it rather in order to improve operating conditions and extend its service life. The most affordable way to insulate a brick chimney is plastering with cement mortar or a mortar based on cement and lime. Instead of sand, you can add sifted slag chips to it.
- 1 bag of cement (25 kg);
- 2 buckets of slaked lime;
- 10 buckets of sand or a mixture of sand and slag chips;
- 5 buckets of water.
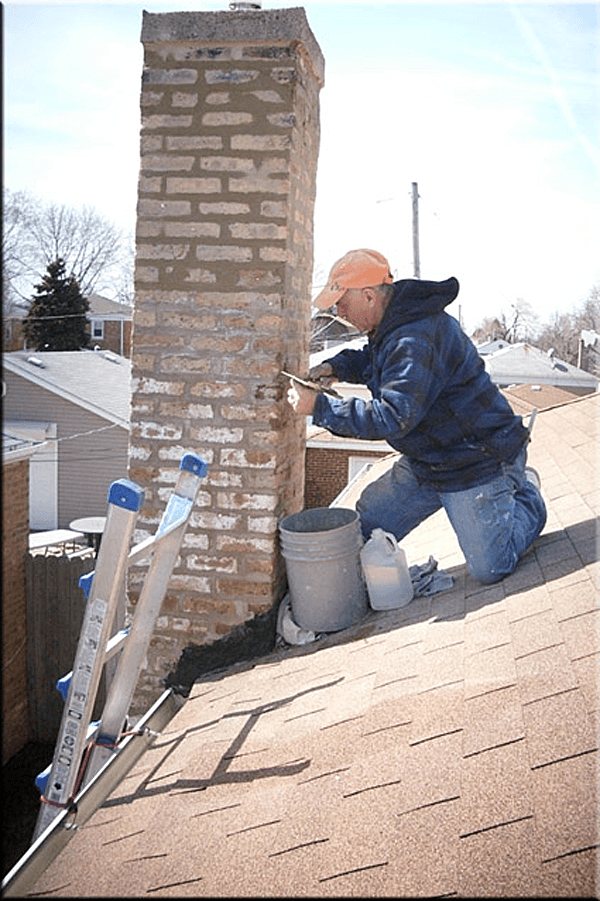
Preparing the pipe for plastering: sealing cracks and irregularities
- To prepare the solution, mix 3.5-4 buckets of water with a bag of cement and 2 buckets of slaked lime - fluff. After thorough mixing, sand and slag chips are added in parts, as well as the remaining amount of water. The resulting composition should be used within 5 hours in cool weather, and 1-2 hours before in hot weather, so it can be prepared in parts.
- If there are large unevennesses in the pipe, the layer of plaster turns out to be quite thick, so it is recommended to first seal all the cracks and differences with the specified solution, and then cover the pipe with reinforcing mesh.
- Plastering is carried out in two layers. For the first layer, the solution is diluted somewhat stronger, to a creamy state, and applied using the spray method: take a certain amount of solution on a trowel or spatula and throw it onto a dust-free and slightly moistened brick surface. The first layer is not leveled.
- For the second layer, a thicker solution is required. It is applied with a trowel and rubbed to a smooth surface. It is necessary to plaster the entire pipe from floor to ceiling or roof.
Roofing apron-cuff
Fireplace installation
Cutting a pipe on the roof is an important task when venting a chimney through the roof, since the safety of your family largely depends on its correct implementation.
According to fire safety standards, the temperature at the points of contact of the chimney with combustible materials should not exceed 50ºC. Cutting for the most popular brick chimneys is solved by increasing the thickness of the walls of the pipe itself at the point of passage through the ceilings or roof.
For a brick pipe, it is recommended to bring the cutting to 380 mm. With such a thickness of brickwork, sufficient thermal insulation is guaranteed.
Why is chimney insulation necessary?
The chimney is mainly protected from two main negative factors that affect it:
- High temperature in the sauna.
- Moisture ingress through poorly made joints in the roof.
To eliminate negative factors, you can wrap the chimney pipe with a heat insulator. This will help prevent heating of the metal structure, as well as eliminate the appearance of condensation, which also has a detrimental effect on iron elements.
Chimney insulation allows you to:
- Make it safe to cross where the pipe comes into contact with the roof or wall.
- Avoid heat loss.
- Extend the service life of metal structures.
- Use all types of finishing materials to create your own unique style and cozy atmosphere in the bathhouse.
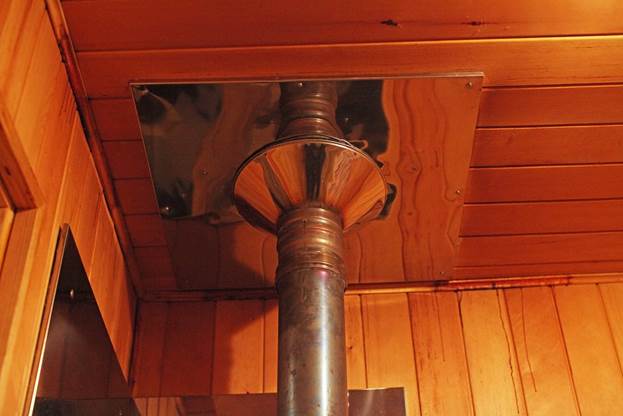
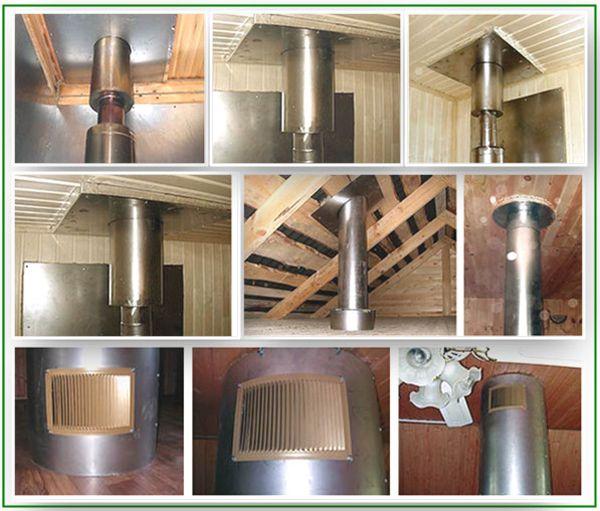
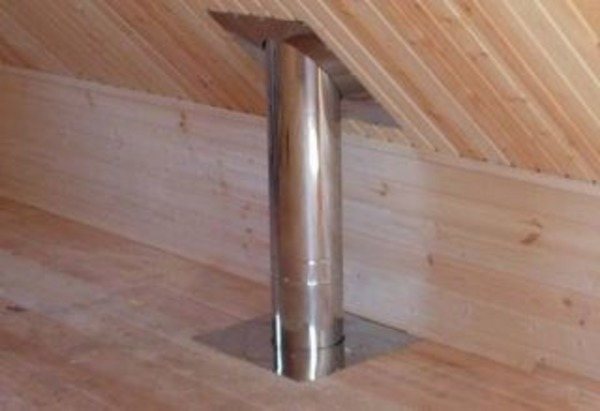
Metal hood in the sauna
In principle, carrying out work on insulating a chimney structure is not particularly difficult; the main thing is to know how to insulate a metal stove chimney pipe in a bathhouse. To choose the right type of insulator that is suitable for you, you need to understand their technical characteristics.
Specifics of insulation work
When insulating a chimney with your own hands, we take into account that during operation of the heating boiler, the temperature in the smoke exhaust duct can reach 200 -300 degrees.
On the building materials market, thermal insulation is sold in the form of ready-made cylinders with a special foil screen. With their help, they decorate the flue and adjacent roof elements - protecting them from fire and cold air. Tubular structures are sold in different diameters, which allows you to wrap smoke outlets of different sizes.
How to choose insulation for a chimney in a bathhouse
There is no fundamental difference in choosing insulators for a bathhouse built separately or in a house. Basically, the choice falls on two types of heat insulators:
- Mineral wool. Its varieties include: glass wool, stone and basalt. These insulation materials are able to withstand high temperatures, in addition, they resist fire and are resistant to open fire. The porous structure allows for good heat retention. It is light in weight, which does not require reinforcement of the walls and foundation of the bathhouse.
Application of mineral wool for a metal chimney
- Modern multifunctional heat insulators: teploizol and folgisol.
Teploizol is an innovative insulation made of foamed polyethylene, with a foil surface on both sides. The material works well as an insulator, does not absorb moisture, and is resistant to high temperatures.
This material is used in different thicknesses. The temperature stability value depends on this parameter:
- A thickness of 2-5 mm can withstand temperature changes from -30 to +100 degrees.
- The width of the layer is from 5 to 10 mm and can withstand temperatures from -50 to +150 degrees.
How to insulate a pipe from the ceiling
Now this is an interesting question. One of the videos says that the maximum temperature to which the chimney duct can, but should not, be heated is 700 degrees. And since most make metal pipes, according to the rules, first there is a mono pipe, then, closer to the ceiling, it turns into a sandwich. That is, in the steam room we will have an unprotected monopipe - a thin layer of metal separating it from hot gases. And this is powerful and hard IR radiation.
We can consider the problem of insulating a pipe in a bathhouse from the ceiling in two ways - both down and up. down is not so much insulation as a device that takes away heat, which literally “flies into the chimney.”
There are two options here - you can hang a heat exchanger on the pipe, which will heat the water. Or you can hang a mesh with stones , which will absorb heat and retain it longer than metal.
If we consider such devices as insulation in particular, then they will perform their function - their temperature will be significantly lower - water heats up to 100 degrees, stones can hold a higher temperature, but lower than that of the gases in the pipe.
As for the pipe above the ceiling, that is, passing through the under-roof space and the roof, then more care needs to be taken specifically about insulation.
insulate a pipe above the ceiling with a calcium silicate box with an air gap between the pipe and the box for better cooling of the former.
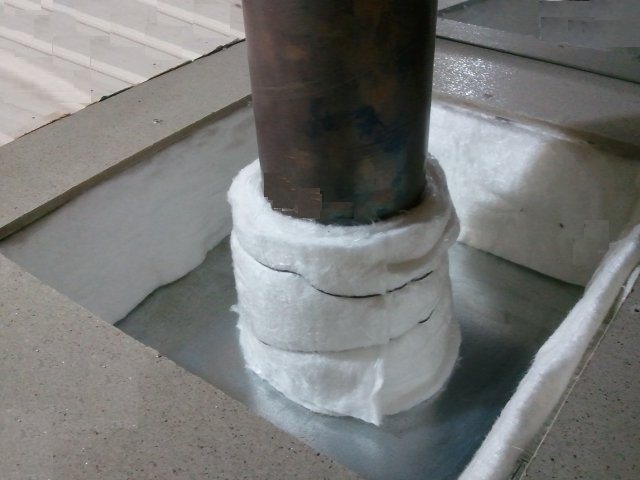
The second option is to use supersilica. It is a ceramic fiber that can be purchased in sheet or mat form. The pipe wrapped with it will become simply warm to the touch. In addition to the pipe, supersilica can be used to protect all flammable surfaces in the immediate vicinity of the chimney.
It even occurred to us that ceramic fiber is much better than ordinary sandwich stuffing, which loses its insulating properties when condensation forms inside, and over time settles and turns into dust (losing binders). And the most unpleasant thing is that the sandwich tends to burn out if it is fired incorrectly frequently, which makes such a pipe dangerous.
In other words, you can either try not to take a sandwich at all, but limit yourself to supersilica insulation, or replace the mineral wool inside the sandwich with this material.
Standards and code of practice
To carry out work on insulating pipes in a bathhouse, certain norms and requirements of SNIP have been created that should not be violated:
- The minimum height of the chimney pipe must be 5 meters.
- A distance is left between the ceiling and the stove structure. For metal structures - 1.5 m, and for brick structures - 500 cm.
- A gap between the pipe and combustible elements of more than 250 mm is maintained.
Compliance with these standards will not only preserve heat, but also protect the building from fire.
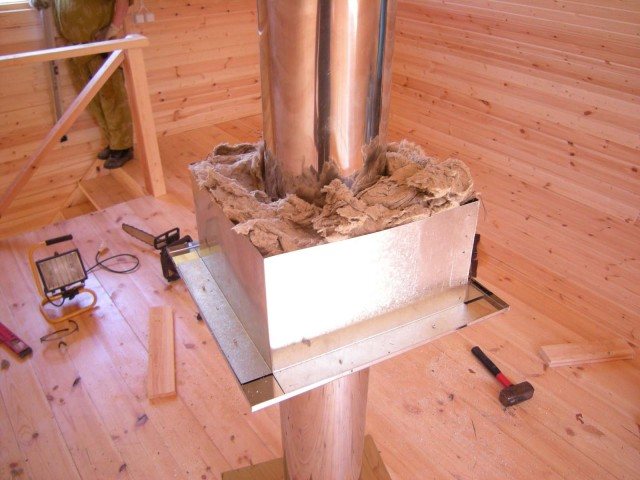
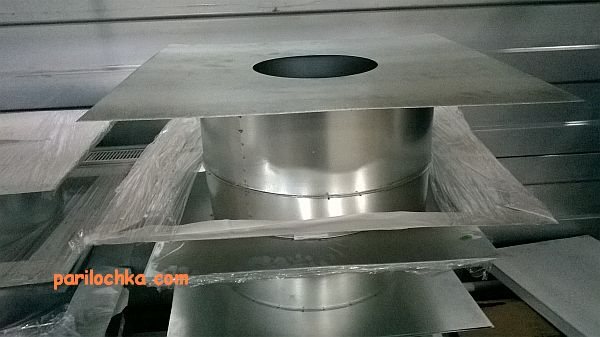
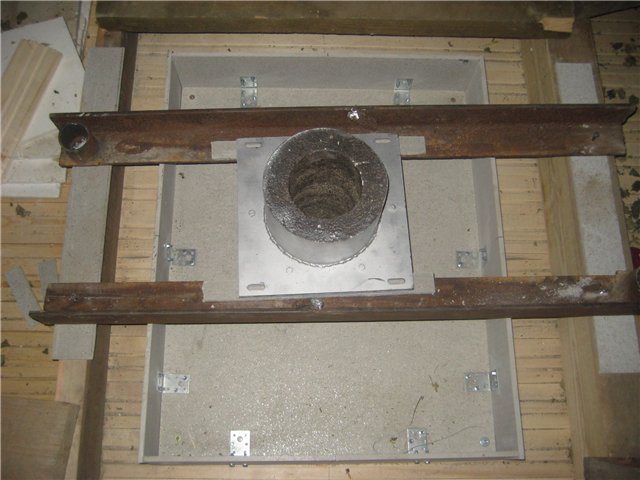
Pass-through unit: structure and dimensions of the box
There are several names for a box that is installed in the gap of a hole cut in the ceiling: these are “pass-through unit”, and “cutting box” and “ceiling cutting”, and PPU (ceiling pass-through unit).
What is he? Quite simply, it is a box with insulating material that should fit into the hole you cut, and also keep the chimney pipe exactly in the center.
Box for the passage of the chimney through the ceiling for installing a stove in a steam room
In addition to this, there is also the finishing of the hole itself, which is very desirable to be reinforced with a material that can withstand high temperatures, is non-flammable and has low heat transfer . Below we will talk about specific materials, but the problems that should be solved by them are exactly the same.
The pass-through unit is made of metal. In particular, it can be stainless steel. In any case, the part that is visible from the steam room is usually made of stainless steel. On sale you can find boxes made entirely of stainless steel, and entirely of galvanized steel , and combinations thereof.
The boxes vary in size. And not only the box itself, but also the internal hole through which the chimney must pass. Diameter varies from 115 to 300 mm.
As for external dimensions, everyone interprets GOST in their own way. We already understand why this happens - some believe that a box with a side of 1 meter corresponds to GOST, others that 26 cm + pipe diameter is quite enough. And all this is based on technical standards.
What is the main limitation when passing through the ceiling? Ceiling beams if the ceiling is false. If the dimensions of the box are greater than the distance between the beams, you will have to cut the beam and insert the cross member in another place. This will affect the load-bearing capacity of this beam. That is why they try to fit the box between the existing beams without additional waste of effort and time.
The ceiling in the bathhouse and the chimney. Photo StroyDom
Of course, if the position of the furnace had been thought out at the design stage, then the beams could have been positioned so that the foam would pass between them. Consequently, the size of the PPU would need to be thought out in advance.
On the other hand, there are now materials with low heat transfer that can withstand heating up to 1000-1100 degrees. If you use them, there is no need to cut out a large piece of the ceiling. For example, watch a video showing a test test of a calcium silicate . We then looked at the technical characteristics of this refractory - they are simply excellent! Find out for yourself (we do not advertise or sell).
For now, let’s summarize the data. It turned out that, according to SNiP and other standards, there are the following options:
- radius of ceramic pipe + insulation + 13 cm;
- ceramic pipe radius + 25 cm;
- pipe radius + 38 cm;
- pipe radius + 50 cm.
As for the device, everything is simple: the metal box has the height of the ceiling, and is closed at the top and bottom with lids with holes for the diameter of the pipe. The lids are larger than the size of the box.
The box itself is lined on all external surfaces with a heat insulator - mineralite or basalt cardboard . Expanded clay is poured inside the box or basalt wool is laid. This is the standard option and is done most often. But in the video you saw that you can get by with a calcium silicate and use it to insulate the pipe in the bathhouse from the ceiling.
Carrying out chimney insulation yourself
Mineral wool is one of the most popular types of insulation for stove hoods. You can “wrap” the entire surface with basalt heat insulator, from the exit to the roof to the immediate proximity to the heat source. In this case, it does not matter at all whether the structure exits through the roof or the chimney pipe is routed through the wall.
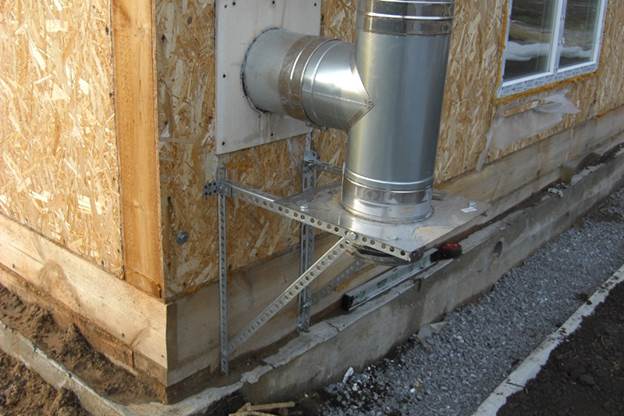
Stove hood outlet through the wall
Important! A metal chimney without an insulating layer seems to be an extremely fire hazardous object, therefore a distance of 60 mm must be maintained between it and the nearest heating element.
Work on insulating the stove hood in the bathhouse is carried out as follows:
- It is necessary to prepare insulation. It is better to take basalt wool in slabs, the thickness of which should exceed 5 mm. You can use rolled material, whose density should not be lower than 6 mm.
- The material is fixed over the entire surface of the pipe using wire, which is wrapped over the material.
- A reinforced mesh is mounted on top of the heat insulator. Prepared cement mortar or plaster is applied to it. If plastering is difficult, you can use a metal sheet. This step is necessary to protect the insulation from moisture.
Particular attention should be paid to insulating the pipe cutting in the bathhouse ceiling. The places where it passes through the ceiling or wall are especially vulnerable, so this area must be insulated. In order to maximize the safety of the roof ceilings and prevent the roofing material from catching fire, additional protection is created from a metal box. You can make it yourself or buy it ready-made in a store.
Installation of hood insulation during construction
When carrying out insulation work, the following should be taken into account:
- The size of the through hole is created larger than the diameter of the pipe. The distance from the roof walls to the chimney is about 30 cm.
- Gaps in this space are not allowed, since this space is filled with insulation, which should fit in a dense layer along the entire perimeter of the box.
- Wooden parts located in the place closest to the pipe must be treated with fire retardants.
- To insulate the ceiling and roof, it is better to take a heat-resistant material: cellular concrete, clay, expanded clay.
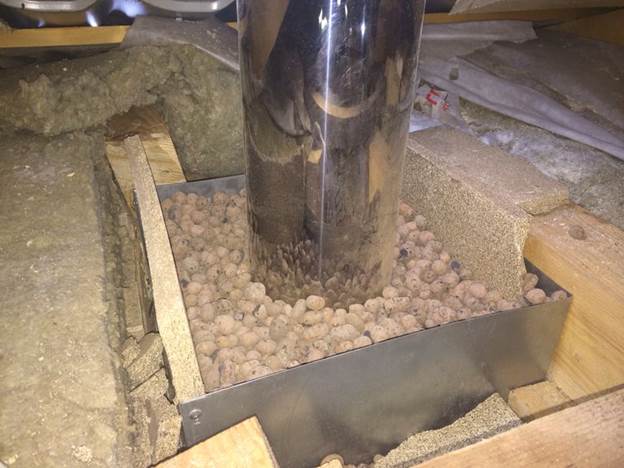
Insulation of chimney installation sites with expanded clay
If the ceiling insulation is not properly insulated, the room will quickly cool down, and heating costs will increase. Therefore, you should carefully consider this issue.
Insulating materials for bath pipes
Moisture and smoke generated during fuel combustion are aggressive factors affecting a brick chimney. The temperature difference during the cold season and the accumulated moisture settling on the walls fills microcracks with water, and the stone structure collapses from the inside. Small ice crystals press from the inside and destroy it.
An insulated chimney can eliminate this. During the combustion process, condensate, which contains a chemical series of oxides, forms on the surface of the flue. When interacting, the elements form weak acids (carbonic, sulfuric, etc.) that can destroy the metal surface. It is for this reason that chimney insulation is necessary.
The main question for owners of country houses with an autonomous heating system is how to insulate the chimney. In order to reliably insulate outlets for a stove or boiler, materials with a high degree of thermal insulation are used to ensure the thermal balance of the stove pipe on the roof.
Relevant for chimney insulation using mineral wool or basalt. The insulation is obtained from the melt of volcanic rock - gabbo-basalt. It is converted into fibers, due to which the insulating material has the following advantages:
- retains up to 95% heat;
- characterized by good permeability of escaping steam;
- is characterized by chemical and corrosion resistance;
- prevents the growth of fungus and mold on the surface of the chimney on the roof;
- vibration and heat resistant;
- made from environmental materials;
- is not subject to destruction under the influence of ultraviolet radiation.
Metal “armor” in the form of a pipe made of stainless steel is used as an insulation option. It is capable of providing complete protection from mechanical damage, moisture and other aggressive factors. The chimney casing is mounted on a pipe on the roof. The interpipe space is filled with basalt wool, the outside is covered with insulation, 5 cm thick. An asbestos chimney can be wrapped with this insulation.
Wooden shields
Wooden panels are considered one of the simplest options for insulating a chimney pipe. Thermal insulation is made in the form of a wooden frame made of plates of the appropriate size. Slate or other flooring is fixed on top of it, from which the roof of the dwelling is made. After the pipe is completely covered with wood, the empty cavity is filled with felt, slag, sand, and mineral wool. Frame seams must be covered with a waterproofing compound.
Insulating a chimney in a private house using reinforced and slag concrete slabs ensures the smallest distance between joints on the structure. The space inside and corners are reinforced with mesh or wire, gypsum, clay and sand are poured in the form of a solution. Plaster is applied over the tile insulation.
Since bath buildings are often built of wood, these objects require insulation of chimneys, stoves, ceilings, and walls, since this material is highly flammable. You need to think about how to protect the pipe in the bathhouse by insulating the smoke exhaust structure so that it cools more slowly and condensation does not collect on it.
It would be a mistake to decide to insulate the pipe in the bathhouse by attaching a sheet of iron to the ceiling, since it gets very hot. As an option to line the chimney, use fire-resistant red brick, but in this case you need to strengthen the foundation.
When solving the problem of how to wrap a metal chimney pipe in a bathhouse, experts highlight foil insulation and thermal insulation.
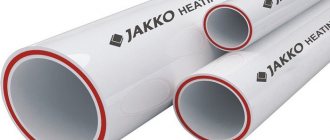
Sandwich pipes - a modern solution for chimney thermal insulation
A chimney made from a sandwich pipe in a traditional bathhouse can be an excellent solution to the issue of insulation. Nowadays you can purchase a ready-made structure on the construction market. Having installed such a system, you don’t have to think about materials and methods for additional insulation of the chimney.
Sandwich pipes consist of several parts of a prefabricated structure that are easy to connect and install independently. This system is ideal for a sauna or iron stove.
The design resembles a layer cake:
- Inner layer made of stainless steel.
- The second one is made of basalt wool.
- The outer sides are covered with galvanized iron.
The sandwich pipe is installed according to the following scheme:
- Prepare an opening where the structure passes through the ceiling.
- An exhaust flange is installed, which is the first stage of the design. The collection of the remaining parts begins from the second stage.
- Double-walled pipes are gradually connected and lead through the ceilings to the roof. The mounted elements are additionally attached to the walls.
- After assembling the structure, insulation is carried out in the areas of passage to the attic. Here it is allowed to use only double-walled parts of the structure without additional elements.
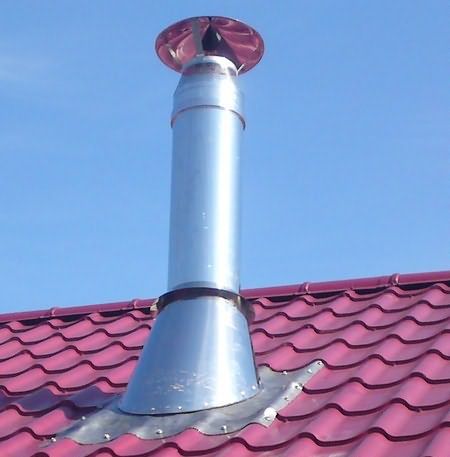
- Next, the chimney is discharged through the roof. In places where it passes, it is necessary to perform thermal insulation.

Exiting a sandwich pipe through the roof
- The sauna chimney is secured with braces if it rises strongly above the roof.
- A spark arrestor and fungus are mounted on top of the finished structure.
When connecting the elements, chimney sealant is used. It is able to withstand temperatures up to + 1000 degrees. The traction force depends on the quality of the connection and the tightness of the joints.
To increase fire safety, the passage of the stove hood to the attic is created through a ceiling-passage assembly. It is a galvanized steel box with a hole for a pipe. It can be purchased ready-made. The box is inserted into the prepared opening before the entire structure is assembled.
Thermal insulation in this place is carried out in the following way:
- PPU is installed in the opening. The structure is placed on the lower beams so that the connection is above the attic floor.
Strengthening the PPU structure on the ceiling
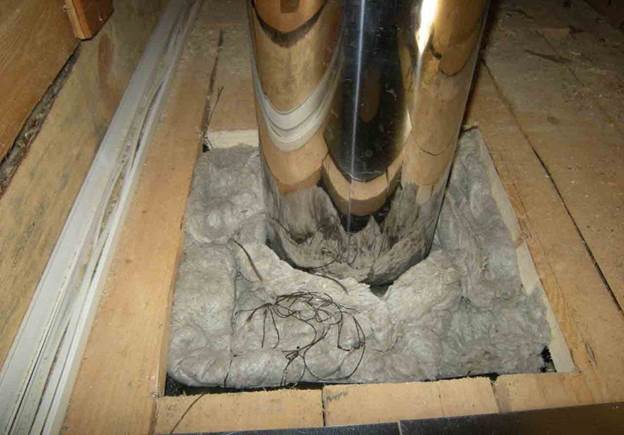
- The gap between the ceilings and the walls of the polyurethane foam must exceed 13 cm, which is filled with mineral wool.
- Next, the gaps are closed on the top and bottom sides with metal plates.
This multi-layer design allows you to retain heat and minimize the accumulation of soot on the walls. The sandwich construction is not suitable for traditional Russian baths with high humidity. This should definitely be taken into account when building a bathhouse.
Pipe passage through the roof: brick and round
One of the most important tasks when building a bathhouse is the correct exit and sealing of the chimney pipe. Moreover, two problems need to be solved at the same time: ensuring fire safety and insulating the pipe joint from the flow of precipitation and condensate.
First of all, before solving the problem of water passage, it is necessary to determine where the pipe exits on the roof. The height of the pipe must comply with certain standards. The height depends on where the pipe will exit on the pitched roof.
How far should the pipe be raised above the ridge of the bathhouse?
When installing a pipe, the following rule applies: “The closer to the ridge, the higher the pipe should be raised.”
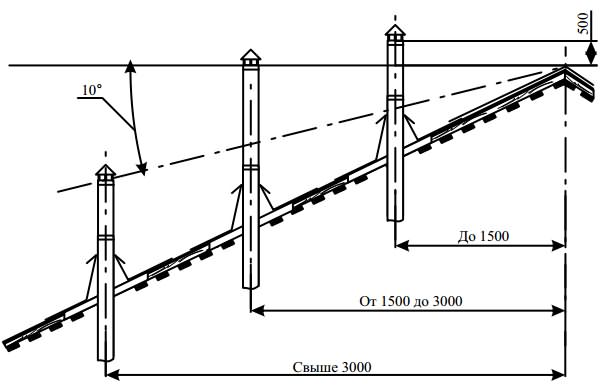
Elevation of the chimney above the roof plane
- If the distance from the center of the chimney to the ridge of the roof does not exceed 1500 mm, the pipe must be raised above the ridge by at least 500 mm ;
- With a distance from the center of the pipe to the ridge from 1500 to 3000 mm, the top of the pipe can be at the same level as the roof ridge;
- At a distance of more than 3 meters, the top of the pipe must be no lower than a line drawn down from the ridge at an angle of 10 degrees to the horizontal.
Where is it better to route the pipe through the roof of the bathhouse?
The most convenient option for bringing the pipe through the roof is to pass it through the ridge. In this case, installation is easiest; there are rarely snow pockets on the ridge, and thanks to this arrangement, it is easy to carry out insulation work. But this method has a drawback: the rafter system should not have a ridge beam. An option with two beams that are attached in the area where the chimney passes through the roof is also suitable, but this is quite difficult to implement and is not always possible.
The most unfortunate option for placing a chimney is in a valley (a valley is a roof element made of a kind of tray, forming an internal angle between the joints of the pitched roof elements). Large masses of snow usually accumulate here; during rain, water flows down from two slopes, so even with the most careful insulation, a leak will only appear a matter of time.
The most convenient option for venting the pipe through the roof is near the ridge
Based on this, the most acceptable option for pitched roofs is not far from the ridge, but below it:
- installation is quite simple,
- There is usually little snow accumulation, which means there is no need to install snow retention,
- installation is not the most difficult,
- Due to the not very high height of the pipe, it does not need to be reinforced with braces.
If it turns out that the chimney runs close to the floor beams, or close to them (the minimum distance should be 13-25 cm depending on the type of pipe), exits in the valley or close to the slope, an additional elbow, with which you can lead the pipe to the right place.
If the roof of the bathhouse is pitched, the most reasonable solution would be to organize the pipe outlet through the roof near the top point of the roof.
How to remove a pipe through a roofing pie
Bathhouse roofs, as a rule, have solid insulation, which solves the problem of heat preservation. To ensure good heat and moisture protection properties of the roofing pie, it is necessary that the membranes and films of heat and moisture protection are continuous.
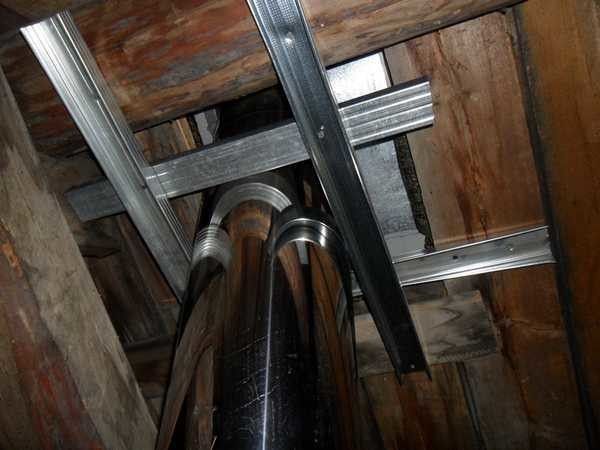
By bringing the pipe through the roof, we necessarily violate their integrity. Moreover, according to fire safety standards, the distance from the pipe to combustible materials (which are vapor barrier and waterproofing films) must be at least 13-25 cm . How to get out of this situation? The best option is to separate the area where the pipe passes through the roof. To do this, additional rafter legs are fixed at the required distance from the pipe on the right and left, and transverse beams are installed below and above at the same distance between these rafters. In this case, the pipe ends up in a separate box.
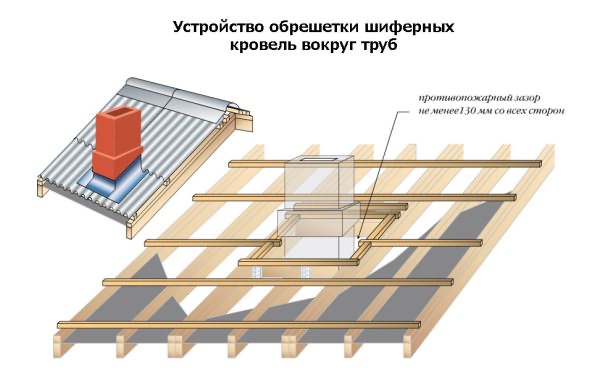
It often happens that “the pipe hits the rafters.” In this case, the rafter leg is cut, additional rafter legs are installed, as well as cross beams. This creates a box for the safe passage of the chimney through the roof
The space between the pipe and the rafter structure is filled with mineral wool. Not with fiberglass - it does not tolerate high temperatures, but with basalt wool, which tolerates temperatures normally and does not lose its heat-insulating properties when exposed to moisture.
At the same time, to ensure the tightness of the roofing pie within the box in which the pipe will be located, the materials are cut into an “envelope”, the edges are wrapped up to the beams and rafters, secured with staples or nails (counter sheathing strips can be used). To prevent moisture from entering, the areas where materials adhere to the wood must be additionally insulated using adhesive tapes or sealants.
The roofing pie at the passage site is cut into an “envelope” and secured to the sheathing and rafters
But there is another option. If the temperature of the pipe in the area where it passes through the roof does not exceed 50-60°C, you can simply glue the roofing cake films using the same sealants and adhesive tapes. This is possible if, for example, a tank for heating water is installed on the pipe after exiting the firebox or an additional heater is installed, etc., but it is not a sandwich that goes out onto the roof.
In any case, to drain condensate in the waterproofing layer, you will need to attach a drainage groove. You can buy it (usually it is made from stainless steel), or you can make it yourself from a film of sufficient thickness. The groove is secured around the pipe and its end is pulled out to the side. Thus, the condensate flows into this groove and is discharged onto the roof slope.
Passage through the roof depending on the roofing material and type of chimney
When passing through the roof, the most important thing is to remove the water flowing down the roof and the pipe itself. To protect against precipitation, protective aprons are used, the upper edge of which is placed either under the sheet of roofing material located above, or under the ridge.
The apron is placed either under the sheet of roofing material located above or under the ridge
When venting the chimney through the roof, it must be fixed, but so that it remains movable relative to the roof. Otherwise, due to thermal expansion/contraction, the integrity will be compromised and leaks will certainly appear. For example, a round pipe can be given direction by metal strips or corners.
When installing, check the verticality using a plumb line - this is important so that soot does not accumulate and there is good traction.
The pipe should not be fixed rigidly when passing through the roof.
Brick pipe passage through the roof
If the chimney is brick, rectangular or square in shape, you can use the materials included with the roofing material.
When passing a brick pipe through the roof, you can use elements offered by roofing material manufacturers
If the roof is made of metal tiles, then the companies that produce it offer special tapes for sealing the joint with the pipe, on one side of which an adhesive layer is applied. These elastic bands are a complex compound containing aluminum and/or lead. One edge of such a tape is glued with the adhesive side to the base of the chimney, the other - to the roof sheathing. The upper edge is additionally fixed with a metal strip, which is attached to the brick with heat-resistant dowels.
To reduce the likelihood of water flowing along the wall, you can make a recess under the bar - a groove. Then the tape and bar will be in the recess. To completely eliminate water seepage, a heat-resistant sealant is applied to the joint.
They practically also seal the passage of a pipe through a roof made of soft tiles or roofing felt. But in this case, instead of an elastic tape, the tiles or roofing felt themselves are placed on the chimney.
When a pipe passes through a roof covered with soft tiles, its edges are placed on the chimney or apron
You can make an apron for a square or rectangular pipe yourself. Roofers usually use sheet metal for this, but sheet aluminum works well. Four separate parts are made of metal - two side, front and back.
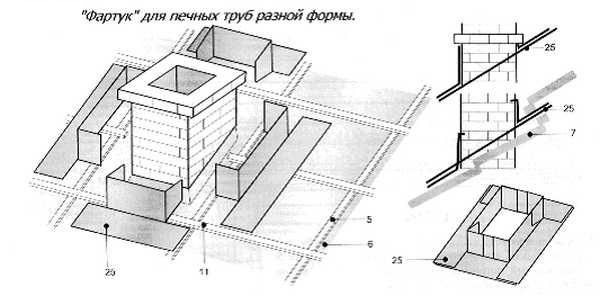
An apron for a rectangular or square pipe is easy to make yourself
The metal strips are bent so that one part fits onto the pipe, and the second is attached to the sheathing. In a brick chimney, in the upper part of the apron, an edge is made, which is inserted into a special groove and coated with sealant. To prevent water flowing down the apron from getting onto the sheathing and insulation pie, a sheet of metal of large width is placed under the front part of the apron, with curved sides along the edges. It goes under the roofing material and is called a “tie.”
If metal tiles are used on the roof, then an apron is made from a smooth sheet of the same color, the upper edge of which is tucked under the row of roofing material located above so that water flows onto the apron and does not flow under it. If the pipe comes out close to the ridge, you can either tuck it under the ridge itself, or bend it to the other side.
There is one important nuance: if the width of the brick chimney is more than 80 cm (its size is perpendicular to the rafters), you need to make a slope - a small gable roof located higher. It removes sediment, reducing the likelihood of leakage. But such a width of chimneys in a bathhouse is the exception rather than the rule.