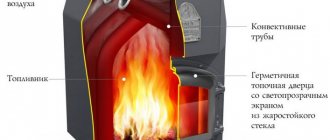
Reasons for coloring
Painting a brick stove located in the house is necessary for a number of the following reasons:
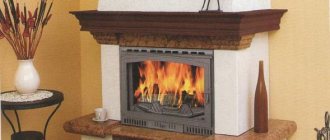
- To give the stove surface an aesthetically attractive appearance and its full combination with the interior of the room in which it is located. Thanks to its coloring, you can create home comfort and noticeably transform the room.
- To prevent the occurrence of cracks and increase in size of existing ones. In many cases, minor defects can be completely eliminated using them.
- After painting, the surface of the oven becomes smoother.
- To increase heat transfer.
- For protection against various harmful microorganisms. When coated with a properly selected coloring composition, it is possible to prevent the occurrence of fungus, mold and other bacteria dangerous to human health on the stove surface.
- To increase the service life. A stove with a protective layer can be used much longer than one without it.
Taking into account all the listed reasons and advantages that appear as a result of treating the stove surface, painting it is not only possible, but also necessary.
Types of professional materials
The range of paints and varnishes for stoves is presented by Russian and foreign manufacturers. You can find paint for any budget with any characteristics. The product can repaint the stove a different color or give it a darker or lighter shade.
This type of composition includes various mixtures created on the basis of organic resins. These can be paints, varnishes, enamels. Used for exterior finishing work and painting interior elements in the house. The choice of dye and its characteristics is determined by its purpose.

To cover the surface of stoves and fireplaces, heat-resistant silicone paints are used. When purchasing, it is important not to confuse the composition, since moderately heat-resistant solutions are produced with a similar name. They cannot withstand temperatures above 100°C.
The positive features of such mixtures include:
- Good adhesion. The paint is easy to apply to any texture.
- High strength.
- The formed shell protects the oven well from moisture.
- Long service life.
- Good heat resistance and elasticity. The paint can withstand about 250 cooling and heating cycles without losing its properties.
To apply enamels and paints, use a roller, brush or spray gun.
The group of heat-resistant acrylic paints includes water-based or hydrocarbon-based materials made from acrylates. They are able to withstand temperatures up to 400°C depending on the composition. In domestic conditions, water-dispersion paints are most often used, although water-based substances can be used.
We suggest you read: How to install a stove in a steam room
Alkyd emulsions
The name of the substance “alkyd” consists of two definitions - alcohol and acid. Emulsion paint contains an alkyd varnish, a coloring agent and a solvent, which is most often white spirit. Also, different types of paints may contain marble and granite dust, as well as additives against fungi, mold, and fire.
Alkyd emulsion is used to coat the body of a stove or fireplace. The temperature on the surface should not exceed 100°C - this is the main disadvantage of such products. At the same time, the color palette is very diverse. It is also important to note the low elasticity of the solution. It does not withstand temperature expansion, which is why after a year small cracks form on the painted surface of the stove.
Criteria for choosing a mixture for coloring
Having made sure that applying paint is not only highly desirable, but mandatory, you should decide what qualities and technical indicators the purchased mixture should have in order to provide complete protection for the stove and withstand various kinds of negative influences over a long period of time. One of them is high temperatures, which can quickly lead to damage and peeling of the coating, which was created using an inappropriate composition.
Taking this into account, you should choose a color mixture that meets the following requirements:
- Its composition must contain non-flammable components that are difficult to melt, so that even under the influence of extremely high temperatures they can preserve their positive qualities and original technical indicators. Taking this into account, when purchasing a particular mixture that will later be used when painting the stove, it is imperative to pay attention to what temperature it can withstand without causing any kind of damage.
- Environmentally friendly. The selected composition must not contain hazardous components, since when the stove surface is heated, they can be released into the air and harm the health of residents and pets. If heat-resistant enamels are preferred, then the solvents contained in them must be completely evaporated in a short time during the drying process. Otherwise, you should choose mixtures that are water-based or solvent-free and do not contain toxins, which can be verified by reading the instructions on the container.
- Elasticity. In case of temperature changes, which will necessarily be significant, cracks should not appear on the surface of the finished coating.
- Resistant to household chemicals used for cleaning.
- Thermal conductivity. The applied coating must allow heat to pass through freely and not lead to a decrease in the heating efficiency of the stove.
- The layer of paint on metal elements must withstand high temperatures, reaching +600°C or even more, without damage.
In addition, you need to choose a mixture that is resistant to moisture, dries quickly and has a long service life. It is equally important that its color also matches the interior of the room and the objects that are present in it.
Recipes for whitewash solutions
You can quickly whitewash the stove using the traditional or modern method. The main thing is that the applied paint lies evenly, so that you cannot accidentally get dirty on it. Traditional means for whitewashing a stove include lime solution, chalk and white dental powder. The modern method includes a mass in the form of a paste - putty. It is available in many repair supply stores.
Experienced stove makers praise the product and note that it does not fade, lasts a long time and does not stain things. Putty for whitewashing the stove is very easy to prepare: it is diluted with water (2:1). The packaging of the product tells you how to properly knead the mixture without lumps.
Before you start whitening, it is advisable to heat the stove in the house a little - two hours will be enough. So l
The coloring agent will adhere better.
Mortar
To whitewash a stove with lime, you must take precautions to avoid contact of the solution with exposed parts of the body and eyes. It is better to wear long rubber gloves on your hands. You need to work slowly and without making sudden movements.
Lime burns are a rather unpleasant phenomenon. But despite the danger, lime is considered a good whitewashing agent and has been used in everyday life for many decades. Lime colors and disinfects the stove from fungi, harmful microorganisms and insects. The following solution recipes are used:
- Lime powder is mixed with water and table salt (35-40 g). Salt gives strength and prevents surface cracking. After painting, it is recommended to light the oven to dry.
- Lime, chalk powder and carpentry glue are mixed with water and then whitened. 100 g of glue is enough.
To increase the durability of the coating, some craftsmen recommend adding Oxol drying oil (2 tsp) to the lime solution.
Chalk based whitewash
A good effect is obtained when painting with an inexpensive natural material - chalk, which creates a rich color on the surface. The disadvantage of this method is considered to be white marks on hands and clothes with each touch. There are several recipes for chalk solutions. Most Popular:
- Dilute chalk with water (2:1), stir and apply immediately.
- Take dry chalk powder, water or skim milk. Stir the mixture until smooth, add natural grated heated soap and 100 g of wood glue.
- The composition of chalk with milk is considered ancient. Proportion of ingredients: two parts milk and one part chalk.
Whitewashing a stove with chalk solution is cheap and quick, but this method often produces stains and requires several layers.
When liquid is added, the chalk turns gray. When the hearth dries, it will turn snow-white. You can add up to 50 ml of blue to the chalk mixture, which will prevent yellowing.
Tooth powder solution
This product makes the surface white for a long time, does not stain things, and you can heat the fireplace on the same day. To whiten a Russian stove with this product, you will need 4 packs of dental powder, 1 tbsp. milk and 4 chicken proteins. The ingredients are thoroughly mixed and left to sit for 20 minutes until the consistency resembles oil paint. Then the necessary work is carried out. If there is not enough mixture, make a new portion.
This method is used for a heated surface - this way the ingredients, in addition to coloring, will add strength. The method promotes quick drying, an even and smooth surface.
How to paint a brick stove in a house
The assortment of construction stores offers a wide variety of products intended for this purpose, but in order to determine the best option for yourself, you should consider in more detail the main and most frequently used of them.
Organosilicon enamels
Mixtures of this variety are characterized by excellent technical properties, which is why they are among the suitable solutions for painting stoves. Organosilicon enamels adhere well to surfaces made of various materials, including bricks, and withstand moisture and high temperatures, which has a positive effect on their service life, which is quite long.
Such formulations are sold in thick form, which is why they need to be diluted before use. They have high strength, optimal heat resistance and elasticity, easily withstanding about 250 heating and cooling cycles, during which the mixtures do not lose their own positive qualities. Compositions of this variety are available in a fairly limited number of colors, which is their significant drawback.
Note! When purchasing, you need to be careful, since the assortment of hardware stores includes moderately heat-resistant compounds with a similar name, which, unlike silicone enamels, are not able to withstand temperatures above +100°C.
Heat-resistant paints
Their drying occurs rather slowly and during it an unpleasant odor is formed in the room, but the coating made using them masks the efflorescence present on the surface of the bricks and withstands high temperatures up to +600°C, and in some cases more. Unlike enamels, heat-resistant paints are available in a much larger number of colors, and their application is much easier.

Before painting them, it is not necessary to coat the surfaces with a primer, and their performance properties are maintained for up to 10 years. In addition to those previously mentioned, the disadvantages of heat-resistant paints include toxicity, which is why when painting with them you must be careful and use a respirator and other personal protective equipment.
Acrylic water-dispersion paints
They are made on the basis of water and acrylic dispersion, thanks to which they can withstand exposure to different temperatures. The positive aspects of such compositions are their wide range of colors, high elasticity and long service life. The disadvantages include the cost, which is slightly higher in comparison with other mixtures.
Drying oil
Suitable only for stoves located in bathhouses. If such a need arises, you should resort to using drying oil of exclusively natural origin. A distinctive feature is that when treated with this composition, the red brick stove surface does not lose its color, but only becomes darker. When painting stoves in homes, it is necessary to avoid the use of drying oil, since different combustion modes inside them can interfere with the drying of the mixture. Another negative side of stain is its extremely unpleasant odor and uneven color change under the influence of high temperatures, which is why it is rarely preferred.
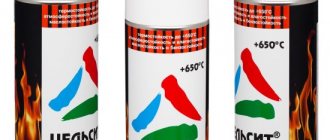
Fireproof paints
In most cases, they are sold in the form of sprays.
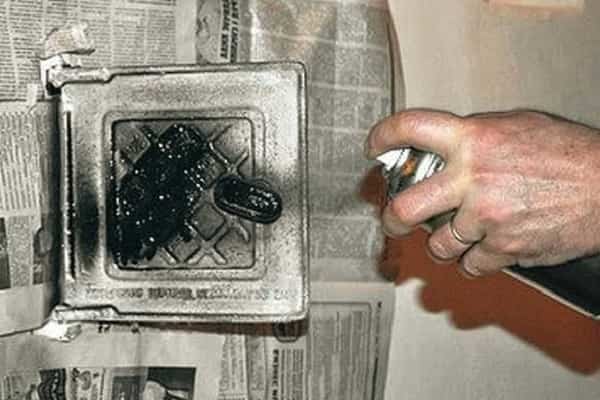
Their main distinguishing feature is the ability to withstand the temperature of an open flame and the red heat of steel, which is why they are often preferred when processing furnace elements that are made of metal.
Heat-resistant varnishes
The varnish PF-283 is often used as it. Before use, such mixtures must be mixed with turpentine in a 1:1 ratio, due to which it is possible to achieve improved technical performance. As a result, after varnishing, a transparent glossy coating is formed on the surface of the stove, which has an attractive appearance and goes well with different interiors. To give the mixture the required color, you can add dry, finely ground gouache of the appropriate shade.
Silicate paints
They contain liquid glass, as well as mineral pigments and fillers. They are characterized by high heat resistance and ease of application.
Note! Before applying the purchased coloring composition, you must completely read the instructions, which indicate important information, for example, that some mixtures can only be used to paint preheated surfaces.
If none of the options are suitable, then you can always whiten the stove, which today, although less often, is still quite often done, by resorting to the use of homemade products that should also be considered.
Whitewash from chalk or lime
Both materials can be purchased at a hardware store. In addition to the selected chalk or lime, you will need water. A distinctive feature of the materials is the speed of final drying. When using a lime mixture, this process occurs somewhat faster. During preparation, 1 kg of the selected material should be mixed with 1.5 liters of water. To increase the level of strength of the composition, it is necessary to add 150 g of salt, without which it will crumble very soon after processing the oven. After mixing, the finished mixture should be white and uniform. If the level of whiteness is not high enough, then you need to add a little blue to the solution (6 g per 1 kg of chalk or lime).
Note! When using lime, extreme caution must be taken as it is alkali and can cause burns.
As a result of doing it yourself, whitewashing is extremely inexpensive. In addition, such compositions are resistant to fungi and mold, easy to apply and able to remove various defects.
Lime whitewash, unlike chalk whitewash, withstands temperature changes and is moisture resistant. The disadvantage of the chalk mixture is its low strength and rapid abrasion, which is why there is a need to periodically re-treat the oven with it. Lime whitewash has a composition that is hazardous to health, requiring care when preparing and applying it.
Natural varnish
To prepare it you need milk (0.25 l), chicken egg whites in the amount of 8 pieces and brick dust formed during the laying of the stove or obtained in another way, for example, when grinding products to the form of flour as a result of rubbing. The components should be mixed in the indicated proportions so that the result is a thick and well-mixed mixture. This volume of composition is usually enough to paint 1 square. m.
Before application using a paint brush, the stove surface must be preheated, bringing it to +30-45°C. As a result, it is possible to create an even orange-colored coating that can withstand high temperatures and has a long service life. The disadvantage of natural varnish is the release of an unpleasant odor during heating for many people, as well as traces that can appear on the surface painted with it from touching.
How to properly prepare a stove for whitewashing
There are various DIY methods for whitewashing the surface of a stove. In practice, chalk, lime, putty, and tooth powder are used for the stove. Which method the owner wants to choose depends only on personal preferences. Each of the coloring options is suitable if you mix the components correctly, observing the proportions.
Do not use a water-based solution of purchased paint, since as the fireplace heats up, fumes harmful to human health will be formed.
Before whitewashing the stove, it is necessary to wear protective clothing, rubber work gloves, perform preparatory work in the form of cleaning and plastering the surface, and also grout the brick. It is important to prepare the place of work:
- cover the floor and furniture with plastic film;
- clean the surface of the fireplace from debris and dust;
- Grout the masonry with clay, cement or asbestos, moistening the surface with water.
The stove should be whitewashed only after plastering to avoid smoke from entering the room through cracks and for a good appearance. To ensure that the solution does not crack, lasts a long time and does not stain things, the home master must adhere to certain rules:
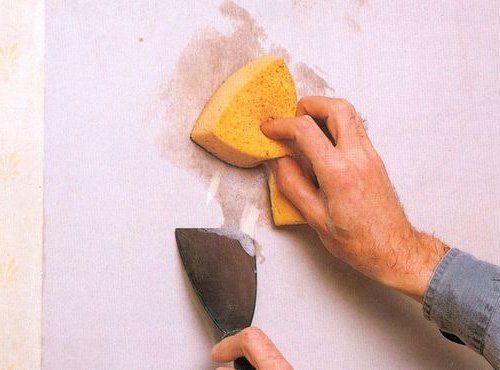
- Inspect the surface of the stove, remove old whitewash, soot, grease stains and cracked plaster, to apply a fresh layer of a new heat-resistant mixture. Soot stains can be easily removed with a brush or a metal sponge. In this case, you need to move the tool carefully so as not to create additional cracks. Soda ash will thoroughly remove grease stains.
- If the previous whitewash is clean and in good condition, it does not need to be removed. Simply wipe it with a damp cloth to remove dust. Wetting the surface is useful for better application of the plaster.
- The layer of plaster mixture should not be thick. You need to apply the composition with a spatula or brush to avoid unevenness. Additionally, wet the surface with water.
- Heat the stove several times to allow the plaster to dry. Many craftsmen recommend not to heat the surface too much, especially on the 1st day of drying. Gradual drying will set the solution and prevent cracking.
- Then you can whitewash the stove.
The plaster is sold in dry finished form. It is mixed with water and used. You can purchase a heat-resistant mixture, for example, “Emelya”. The best homemade fireproof putty for a stove: clay, sand, cement, lime (1:1:1:1). The ingredients are thoroughly mixed with water and used.
Following the advice on preparing the surface of the stove and the rules for applying whitewash promotes long-term operation without frequent painting.
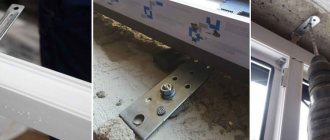
Preparatory work
Without them, at a low level of adhesion, the coating applied to the surface can peel off, because when heated, it expands. The oven must be inspected before painting. If the brickwork was carried out only recently, then it does not require special preparatory measures and you only need to remove the existing dust from it.
In cases where it is already plastered, the thickness of the layer should be determined. If the coating exceeds 1 cm, then in this situation there is a significant reduction in heat transfer. Plaster coating that is too thick must be removed. If its thickness is within normal limits, then the layer should be removed only in places of shedding. If you need to remove all previously applied material from the oven, you must use a metal brush, a narrow spatula or a drill with a brush attachment installed.
Afterwards, the remaining defects must be eliminated using sandpaper, and cracks, holes, seams and plastered areas must be treated with a lime-gypsum or lime-clay mixture to level and give it a smooth and attractive appearance. In addition to them, in specialized stores you can purchase ready-made compositions designed specifically for brick stoves. When the stove surface is in ideal condition, then such actions are not necessary.
It is also not always necessary to remove old paint. If the current coating does not have significant damage, then in most cases you only need to remove dust and dirt with a damp cloth. After drying, you can coat the oven with a new layer, taking into account one important nuance. It lies in the fact that it is necessary to paint with a mixture of the same variety that was used earlier, which is why it must be determined in advance.
As an example, you can take chalk paint, which will not adhere to a surface treated with lime whitewash, since the fresh coating will fall off. In the opposite sequence, a similar result will be obtained. If it is not possible to find out exactly what material the stove was previously treated with, then the best solution is to completely remove it, to avoid possible negative consequences.
In addition, before you start painting the stove surface, you should completely cover it with a deep penetration primer, which will increase the level of adhesion and provide other positive properties. After waiting for the mixture to be completely absorbed, you can begin applying the selected coloring composition.
Some subtleties in whitewashing
Whatever whitewashing method you prefer, before starting work, you need to prepare the surface of the Russian stove. In places where there is the most soot, it must be removed. This can be done using a metal brush. If you skip this step, there is a possibility that this area will not be able to be painted over and achieve perfect whiteness. It is also important to remove the old layer of whitewash. After the surface of the oven is cleaned, it must be moistened with water, otherwise the paint will come off. It is necessary to apply water little by little, right before whitening.
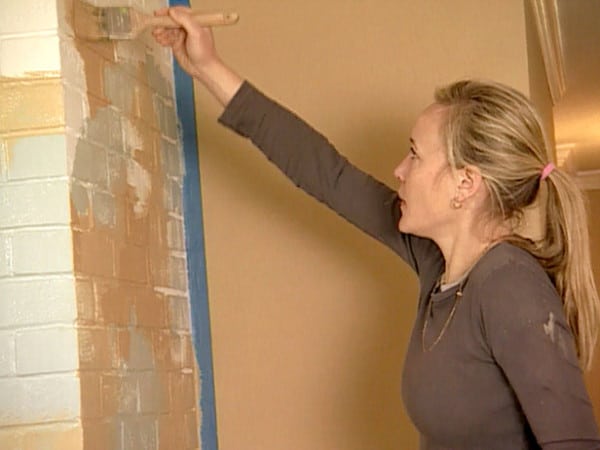
Preparing the oven for whitewashing
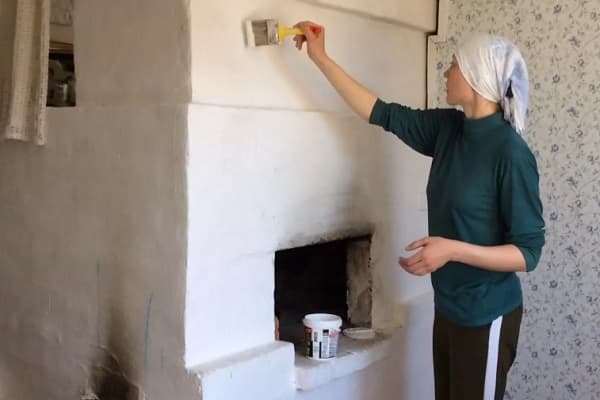
It is necessary to paint in two stages so that there are no streaks or stains left. At the first stage, the furnace is “cut”, i.e. the solution is applied with the end of the brush, and on the second - ironed, using the entire surface of the brush. Moreover, strokes must first be applied in a vertical direction, and then in a horizontal direction. This will get rid of divorces.
Give preference to one of the methods of whitewashing the stove, follow our tips, and your home will always be bright and clean.
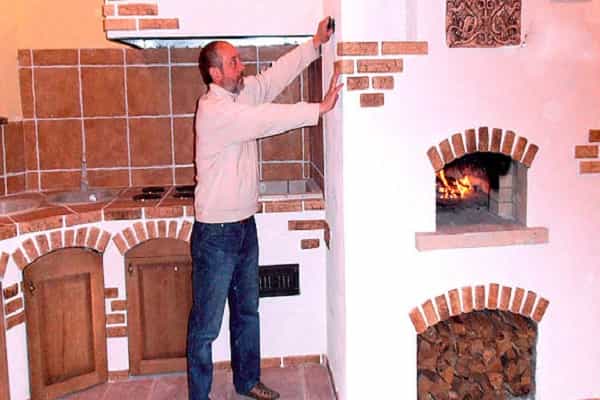
Painting a brick stove in a house
After reading the instructions and completing the preparatory work, the quality of which largely determines not only the final result, but also the service life of the coating, you can begin painting. If you do everything in accordance with the recommendations of the mixture manufacturer, then no difficulties should arise during the work. In addition to the coloring process, you will need the following:
- Container for coloring composition.
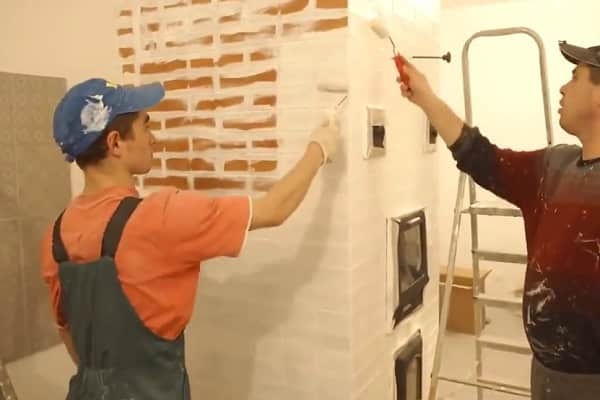
- The best tool to use is a paint brush and roller. You can use either one of them or in combination, it is only important to avoid smudges and stains, and also that the devices are new. When painting with a paint brush, it is possible to give the surface texture, and using a roller, it is possible to apply the mixture more evenly.
The process of painting the stove itself should be performed as follows:
- The first step, if necessary, is to dilute the mixture used in accordance with the manufacturer's recommendations.
- Then you can begin applying it to the stove surface using a brush or roller, avoiding smudges and other defects.
- When finished, you need to take a break and wait for the fresh coating to dry. Once this happens, the oven can be re-coated.
If, upon completion of hardening of the second layer, there are no areas where the brick is visible, then the work can be considered ready. Otherwise, the stove surface needs to be coated again.
After figuring out how to paint a brick stove in a house and the accompanying nuances, the observance of which allows you to do the job efficiently and avoid possible mistakes, you should purchase everything you need, and then you can start painting it yourself.
Video:
How to whitewash a stove without streaks and cracks
You can whitewash a stove in a country house or in a house without streaks and cracks if you mix the plaster and coloring solution correctly and follow the proportions and consistency. The following points must be taken into account:
- The mixture should not stain clothes. After drying, you need to touch the oven. If no traces of whitewash remain, then everything was done correctly. If it gets dirty, it’s better to bleach it again.
- Whitewash must withstand high heating temperatures. At the end of the work, the stove is heated. Then make sure that the coloring solution does not turn yellow, darken, or give streaks. If deficiencies are identified, the work must be redone.
- You can whitewash the stove with rollers, brushes, or a spray gun. The brushes are pre-soaked in water. You can whiten in two directions - along and across. This is how uniformity is achieved. If desired, repeat the staining.
- The solution applies best to a cooled surface moistened with water.
Masters recommend working with a natural swing brush. In this case, movements on the surface must be carried out confidently. When working with this method, do not wait for the applied layer to dry. Repeated painting with a second layer is carried out immediately.
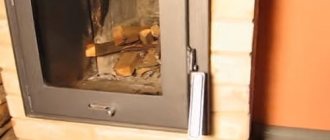
Why paint the stove?
The main purpose of coating a red brick stove is undoubtedly to give a decorative effect. After all, it is not only a heating device, but also an element of the interior that should be in harmony with the decor in the room.
- prevents the formation of cracks in bricks and their growth;
- increases heat transfer;
- makes the surface smoother.
We invite you to read: How to prepare a ceiling for painting with water-based paint yourself
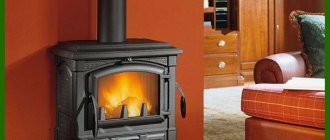
Please note! The stove in the bathhouse is very different from the stove in the house. Accordingly, the technology for applying protective and decorative coating will also differ, as well as the materials used.
Preparing for painting
If the preparation is good, the paint for fireplaces can last quite a long time, otherwise it will simply peel off quickly. This work requires a competent approach, which is where you should start. The base for the coating must be made with high quality:
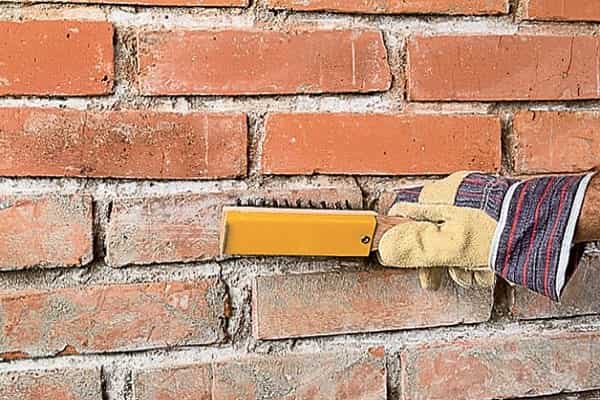
- When preparing a surface for painting, you may encounter some problems that need to be addressed. First of all, it is efflorescence. This is a crust that forms over time and will need to be removed . This is done using a metal brush.
Attention! When correcting this problem, never use water or try to wash away this damaged layer from the surface. This will only lead to its increase.
- After removing the crust with a brush, you should wait a week, and if the disease does not recur, then you can continue working.
- Use a brush to remove old paint. But you should also pay attention to cracks. They must be processed with a scraper and the material that has begun to lag behind must be removed. After this, the cracks are filled with mortar, which must be made exactly as when doing masonry. It should just be uniform. If the brick was laid on clay, then the putty should be done with clay mortar.
- You will also need to do some seaming. A chisel and hammer are used for preparation. Damaged mortar is simply removed using these tools. If damage to the brick is discovered during the work, it will need to be replaced.
- When you have cleaned the seam from damage, remove all dust from the surface with a brush and then moisten the surface of the coating with water. After you apply a layer of solution, the surface should not absorb moisture from the solution; that is why it is wetted.
- If you use jointing, then it should be done after the seam has not completely dried.
- After restoration of the seams, the product should be allowed to dry for at least three days. This is the time it will take for complete drying. After this, you need to apply a stabilizing solution. It should be applied generously and allowed to absorb. Such solutions exist in different forms, which differ in their composition. Therefore, if an oil-based mixture is used, it should be noted that this is a rather dirty job and it is better to wear safety glasses when performing it. Everything should be processed: both the brick and the seam.
Apply foundation using a brush
- Now we apply the water repellent. This work should be done at a surface temperature of about 50 degrees.
Attention! The water repellent should only be applied to a completely dry surface. If the surface is not completely dry, then the mortar particles will remain under the brick surface, which will lead to subsequent crumbling of the surface. The solution is applied to the entire surface using a brush or roller. Water should not penetrate under the coating layer.
- The water repellent should be applied evenly over the entire surface and generously. If there are drips, it’s not a big deal; they should be removed with a rag.
- The grout for filling joints should not be dry, otherwise it will not last long. Make the mixture homogeneous; there should be no stones in it. To make the mixture, use a drill with an attachment or a construction mixer; these are the tools that will help in preparing a high-quality solution.