It is a mistake to believe that underfloor heating systems are an unnecessary luxury. Rather, it is comfort and savings, especially in those rooms where tiled flooring is planned. This is explained simply: ceramic products conduct heat well, so the heating elements in the floor will function very effectively. It must be said that laying heated floors under tiles is very appropriate for new construction or replacing old flooring. In this article we will talk about how to choose and install underfloor heating under tiles.
What type of underfloor heating is best suited for tiles?
In order to make a high-quality heated floor under the tiles, you should choose the type of heating elements from two possible options:
- electrical;
- aquatic.
In apartments with centralized heating, it makes no sense to install water underfloor heating.
Connecting the circuit to the central riser, as well as to the DHW network, is prohibited by regulatory documents
, since this is considered interference with the operation of these systems. For this reason, electric heated floors are most suitable for tiles. Its power consumption will be low, which is quite acceptable for an apartment electrical network. Again, the heating circuit can always be turned off when the bathroom is not in use.
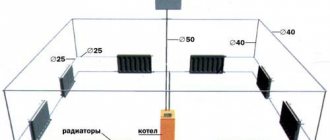
It’s another matter when an individual heat source is installed in a private house. Then there is no point in paying for electricity, and it is easier to install a heated floor with water heating elements. This decision is quite logical if it is also planned to install water circuits in adjacent rooms, or if the building is under construction and the floors in the bathroom have not yet been completed. One point must be taken into account here: due to the fact that the thermal conductivity of a ceramic coating is better than that of wooden parquet, linoleum or carpet, the step of laying the circuit pipes under the tiles should be greater (up to 35 cm).
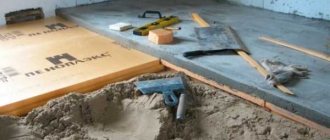
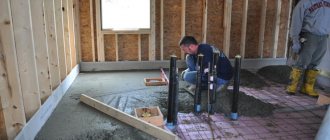
Despite the fact that the technology for installing an electric heated floor under tiles differs from installing a water floor system, they have common points and they are very important. We are talking about high-quality preparation of the foundation. Regardless of the type of heating elements used, the procedure must be performed very carefully, since the durability and efficiency of the underfloor heating depends on this.
The surface of the concrete base should be as smooth as possible. Protrusions and sagging concrete will have to be removed, and potholes and depressions will have to be sealed with cement-sand mortar. It happens that the number of defects is too large; in this case, a thin layer of concrete preparation filled with gravel or slag can be applied over the poor-quality coating. To subsequently install a thermostat, a recess is made in the wall, and under it there is a strobe for wires to connect the circuit and temperature sensor.
The next important point is that installing a heated floor under the tiles requires the installation of a waterproofing and thermal insulation layer. Waterproofing is necessary on ground floor floors, especially when they are located on the ground. For this purpose, take a thick plastic film and lay it out over the entire area of the room with an overlap of 10 cm on the walls. The joints of the film are overlapped and carefully taped. Next, a damper tape is attached to the wall along the entire perimeter of the room.
When installing underfloor heating on floor slabs above warm rooms, a waterproofing layer is not required. If the lower floors are not heated, laying a layer of film is necessary.
Many instructions for installing heated floors, compiled by managers of selling companies, state that there is no need to insulate the floors above warm floors. In fact, a layer of thermal insulation is always needed, but its thickness varies and depends on the type of base.
and a density of at least 35 kg/m3
should be placed .
Thanks to this, all the heat given off by the heating circuit will flow into our room, and not into the neighboring one located below. Floors above basements are insulated with foam plastic 80 mm thick, and for floors on the ground a layer of at least 100 mm of the same density is needed. Before installing the heating elements, a heat-reflecting foil film must be spread over the insulation.
In order to lay warm floors under tiles well and for a long time, you need to purchase high-quality materials. You should not chase cheapness, especially when buying pipes, cables and other components for underfloor heating systems. Remember that any malfunction of the heating circuit will lead to the dismantling of all or part of the tile covering, and this is not cheap. Do not try to use tiles intended for walls or substandard ceramic products for the floor in order to save money; they may crack.
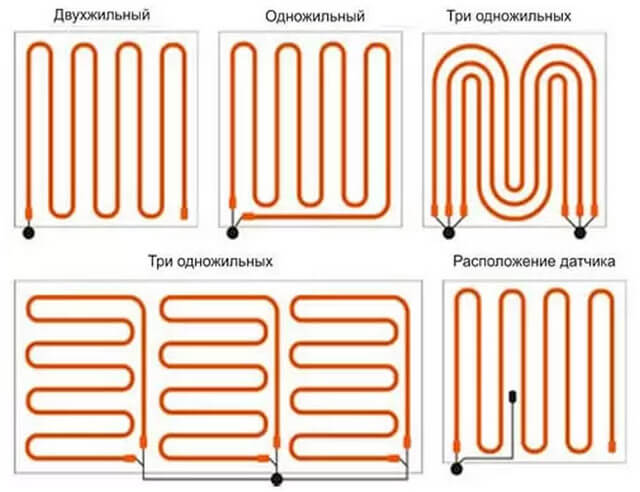
Floor heating systems are notable for their diversity, and the technology of their design depends on this. In a situation where tile floors are laid in rooms, of all existing types of electric heaters, the following are used:
- cable heating mats;
- meshes of individual carbon rods;
- cable systems.
In addition to the above, there are also film-type heaters. However, installation of infrared film heated floors is carried out using a dry method under finishing coatings; installing a screed or applying an adhesive mixture for tiles is not recommended.
Laying cable systems in the bathroom under the tiles only makes sense when you are installing the same heating throughout the entire apartment, since the technology for installing cable circuits involves pouring a screed. This complicates the process and extends it over time; the solution will need 28 days to completely harden, only then can the tiles be laid. It is much more convenient to lay a heated floor without a screed, using cable mats or rod heaters as heating elements. The technology here is simple:
- On the prepared base, a thermomat or a mesh of rod elements is rolled out and securely fixed. Floor heaters should not be placed under bathtubs, washing machines or furniture. This makes no sense, in addition, the products may fail due to overheating.
- a thermostat and a temperature sensor are installed in places prepared before laying the heated floor. Next, all connections are made in accordance with the diagram supplied with the product, and the circuit resistance is checked.
- When installing in a room with high humidity, the tile adhesive mixture is applied in 2 layers. First, the first layer covering the cable or carbon rod is laid down and allowed to harden. Then the surface is covered with a waterproofing compound, and only then can a second layer of glue be applied and the tiles laid on the floor.
In rooms with normal humidity, for example, a kitchen, there is no need to put the adhesive mixture in 2 layers with waterproofing; it is enough to apply tile adhesive once with a thickness of at least 20 mm over the cable. The application operation should be carried out with a plastic notched spatula so as not to damage the insulation of the wires.
After the time allotted for the glue to harden in the instructions, the underfloor heating can be turned on and operated.
how to connect a warm water floor without a pump?
Please advise how to connect a heated floor without using a pump, such as by gravity. Is it possible to install the boiler below the floor, or make a riser separately for the floor to create water pressure?
I have one at home with a pump, but it works without it. and so just the old fashioned way, the diameter is larger and everything is tilted in a circle
Good afternoon, Alexander. Why reinvent the wheel? the price of the pump is 5000 rubles. at a coolant temperature of 40 degrees. There will be no expansion of the liquid necessary to create pressure.
electricity is not a constant factor of presence. Some people don’t have gas and some don’t have electricity. Before answering a question, please read it carefully.
It’s better to install a pump. Firstly, it’s economical. Secondly, there will be no problems due to air in the system
A natural pump (circulation) occurs due to the fact that hot water is lighter than cold water. -if desired, you can make a TP, but in order to link everything hydraulically, you need to count (slopes, diameters.). -it will be cheaper with a pump (and much cheaper!)
THE QUESTION IS HOW TO CONNECT A WARM WATER FLOOR WITHOUT USING A PUMP! ! ! And the fact that it’s better is already clear. in Hawaii you don’t need underfloor heating, it’s already warm there!
from the supply and return! with a certain diameter, observing the slope (what and how much to calculate).
Better buy a pump..)))
I’m amazed at smart guys like you, of course I’ll buy it if you get it going)))))))
You're an ass, you don't have electricity at home. They're telling you the truth.
If the volume of liquid in heated floors is small, then it would be easier to install a water heater. setting it to 35-40 degrees will be enough, just calculate the volume correctly! We did this in a customer’s bathhouse; he pays 200 rubles a month for heating, despite the fact that 1 kW = 1.7 rubles approximately. In November it turns on, in April it turns off
WELL, THERE IS NO ELECTRICITY AT THE FACILITY, ISN’T IT CLEAR. IT'S FUCKING POSSIBLE. THE HOUSE IS LIGHTED BY GAS LANTERNS.
Just for fun, isn’t it easier to install a generator with an uninterruptible power supply and not worry about inventing a perpetual motion machine?
As I understand it, there is no way to get a normal, adequate answer on this site. IT'S A PITY. Gentlemen, if you have nothing to say, there is no need to be clever. It's better to be smart and at the same time be stupid, than to be stupid and at the same time be smart.
If you really need a TP without a pump, find a designer, PAY and they will calculate everything for you, if this option is possible in your premises. And with your statements, no one here will answer you.
There are pumps that run on batteries.
Dmitriy. Why are you bothering a man with electricity? He has gas lamps, and his computer runs on wood.
There are a lot of smart people on the site, but they are of little use. TOPIC CLOSED.
Look at the structure of the ancient Roman baths) everything worked there without a pump) or set up a tender for turning the pump)) good luck and patience.
Water heated floor
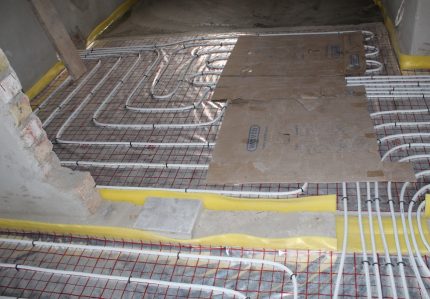
The technology used to lay a water-heated floor under the tiles involves pouring a screed after the heating circuit pipes are laid out on a finished base with insulation. The pipes are secured with plastic clamps of various types. Another common method is to take a reinforcing mesh with a cell size equal to the contour laying step and place it on top of the thermal insulation. After this, the pipe is attached to the mesh bars using plastic clamps.
The connections from the circuit are connected to the distributor, the system is filled with water and checked for leaks. After this, beacons are placed, the solution is stirred and the screed is poured according to all the rules for carrying out such work. It should be remembered that the thickness of the screed above the top of the pipe must be at least 30 mm.
The last stage is laying ceramic tiles; it begins when the screed has completely hardened. In this case, you must comply with the minimum thickness of the glue specified in the instructions. The system can be put into operation after the adhesive mixture has dried.
General ideas about heated floors
It is best to use water heated floors in private homes where there is autonomous heating. This will save you a lot of money. In city apartments, electric heated floors are usually installed, because it is not always possible to connect to the central heating system - permission cannot be obtained, or there is a high probability of problems occurring in the entire house, and not just in one apartment. Therefore, we will consider installing heated floors in a private house.
There is a standard kit of this design, which includes:
- Pipe system made of metal-plastic pipes.
- A substrate that will separate the heated floor from the floor base, thereby preventing possible leakage.
- A fastening system that includes reinforcement mesh and clamps.
- Temperature control system.
As for fasteners, mesh is usually used when heating is installed on a concrete base. If the floor is wooden, then you will need to make grooves for the pipes or lay special chipboard sheets with ready-made grooves. This is a completely new technology that has appeared on the market quite recently - we recommend its use.
Installation of heated floors
Like any installation process, laying a water-heated floor is divided into several stages. Please note that there are no important or insignificant stages - everything must be carried out at the highest professional level. And since you decided to install the floors yourself, you simply must know some of the nuances.
Preparatory stage
There are general requirements and rules underlying installation work. And there are seemingly insignificant little things, but without them you can forget about the quality of the result. Therefore, we pay special attention to them:
Classic installation of a floor heating system
- You should not do all the calculations and design of a hydraulic heating system yourself. You are not an expert, so you will definitely make mistakes. We recommend seeking help from professionals who will accurately calculate the required heat supply and create a pipeline layout.
- Under heated floors you will have to build a very flat surface. Even a small difference in plane can create stagnant areas in the system, which will affect the quality of work. This mainly applies to heating with natural coolant circulation.
- Thermal insulation under the heated floor system is a prerequisite. In order for the floor to be fully insulated, it is necessary to lay the insulation in a layer of 3 to 15 centimeters. It all depends on the temperature of the coolant in the pipes. In this case, the density of the insulating material is taken into account, which should not be lower than 35 kg/m3. If the heated room has a fairly large area, it is recommended to divide it into several sections of up to 40 square meters each. This will distribute heat evenly and reduce loads across the entire floor surface.
- When pouring screed under a heated floor, it is necessary to lay a damper tape around the entire perimeter of the walls, which will compensate for the expansion of concrete from the heat applied. You need to do the same when laying the tape between sections. It is best to use metal-plastic or seamless polypropylene products as heating pipes. Both options are flexible and durable to meet today's long-term use requirements. By the way, the service life of these types of pipes is 50 years. For heated floors, it is better to take pipes with a diameter of 20 millimeters.
- Please note that it is necessary to avoid a large number of joints in the pipe system, which will reduce the likelihood of leaks. Please also take into account the fact that the length of one heating system should not exceed 90 meters. An increase in length leads to heat loss by the coolant.
- The underfloor heating system can be filled with screed only after testing for the tightness of the structure, that is, after pressure testing. The screed is poured if water circulates in the pipes with a certain operating pressure.
Attention! All materials and equipment, as well as components, must be purchased from a reliable supplier. It’s better to pay the full price of the kit right away and get a discount than to waste time and money buying different components and parts separately.
Installation technology on a concrete base
Finished floor installation
This method is quite simple. First of all, a manifold cabinet is installed, where the pumping and mixing unit and manifold are mounted. Then a thin screed is poured over the floor slab, covering floor defects and leveling the base. After it has dried, it is necessary to lay waterproofing material, covering the entire floor area. To do this, you can use polyethylene film with a thickness of at least 200 microns. Lay it so that the edges of the film lie on the walls, covering them to a height equal to the thickness of the screed being poured. Now lay damper tape around the entire perimeter - it should be attached to the walls under waterproofing.
Next, the insulation is installed. The ideal option is polystyrene boards with a foil side. Please note that the foil must be placed on top of the insulation. It reflects thermal energy, which allows you to increase the thermal output of the system.
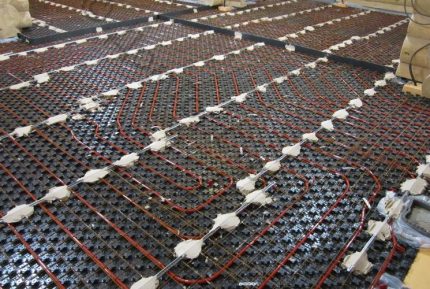
The next stage is the installation of the reinforcing mesh to which the pipes will be attached. Today, there are special polystyrene boards on sale with ready-made grooves for the pipe system or with fastening bosses. If you have chosen this particular option for floor thermal insulation, then it is not necessary to use reinforcing mesh. Please pay attention to one point - when choosing slabs with grooves, you must compare their direction with the installation diagram, which is determined by the project.
Pipe fixation option
After this, you can proceed to the installation of the pipe system. To do this you will need a special welding machine, scissors and a tape measure. The pipes are laid according to the diagram, and their ends are connected to the supply and return. A temperature sensor is installed, and all wire connections are made to the thermostat and servo drive, which will change the temperature using a switch.
All that remains is to carry out the pressure testing. To do this, water is driven into the pipe structure under excess pressure and pressed inside the system. It is necessary to inspect all joints for leaks. If they are not there, then everything is in order and you can pour the screed onto the floor.
Currently, in construction stores you can purchase ready-made dry mixtures, which are diluted with water to the desired consistency. Purchase only those materials that are specifically designed for heated floors. They contain plasticizers and fiber fibers as a reinforcing element of the solution. By the way, the thickness of the screed layer varies in the range of 5–7 centimeters. This layer must dry for 28 days, after which the solution will take on its original strength. Everything is ready, and you can finish the flooring.
Installation technology on a joist structure
Collector group
The absence of a monolithic concrete base requires a completely different approach to installing a heated floor system. To do this, you will have to arrange a lag structure. This is more difficult, but the lack of dirty work and the need to wait for the concrete layers to dry encourage developers to use this option.
First of all, the subfloor is installed along the joists. To do this, along the lower edge of each log, shelves made of wooden slats are attached along it. On them, across the direction of installation, the logs are laid and fastened with self-tapping screws. Now in the space between the joists there is waterproofing in the form of a polyethylene film, which should cover not only the boards, but also the joists. After which you can lay polystyrene slabs with grooves. This is both thermal insulation and a place for installing plastic pipes.
You can use other insulation, for example, expanded clay or mineral wool, but then you will have to buy special chipboard boards. They also have grooves cut into them for easy installation of the pipeline. In this case, some craftsmen do not use a subfloor; they simply lay chipboard directly on the shelves. But what about insulation? If such a floor is installed on the top floor or on the first floor in a house where there is a heated basement, then you don’t have to worry about thermal insulation. After all, chipboard panels come complete with special aluminum profiles that follow the shape of the grooves. This is a kind of reflector of thermal energy.
Safe and warm
So, the base is ready for the installation of pipes, the technology of which exactly repeats that described above. That is, you assemble them according to the diagram, connect them to the collector unit and pressurize them. And now the whole scheme will need to be closed. If laminate, parquet or parquet boards are used as a finishing material, then foamed polyethylene or ordinary cardboard can be used as a covering. If the finishing will be done with tiles or linoleum, then it is necessary to use cement-bonded particle boards or gypsum fiber boards. If the plan has a plank floor, then you don’t need anything - just fill the floorboards over the joists, after laying the waterproofing material.
More recently, when there were no polystyrene boards and chipboard panels with grooves, they used boards on which grooves were cut according to the pipe laying pattern. To be honest, it was very difficult to do this on your own, since it required certain skills. Today everything has become much simpler and more convenient.
TVP Installation Guide
Before laying the heated floor structure, you should carry out preparatory work: purchase components, mark the installation location of the cabinet, drill holes in the walls for communications. Then you can proceed to the first stage.
If you plan to install a heated floor directly on the ground, it is recommended to choose one of two options:
- make a “rough” screed from cement pouring;
- instead of screed, pour, compact and level a layer of sand.
A layer of sand will be required in any case, since it also serves as the basis for the screed. A layer of waterproofing is placed on it, the most basic option is a thick polyethylene film.
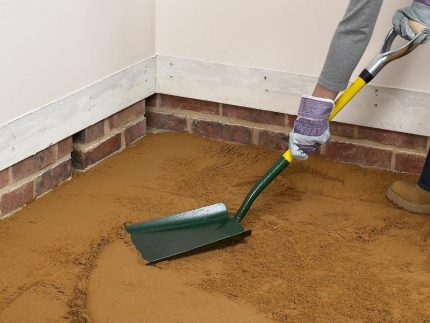
Compaction and leveling of the sand layer is very important. Small depressions up to 5 cm deep are allowed, but for pipe installation it is better if it is perfectly smooth
When making calculations, it should be remembered that heat loss when installing the system on the ground is higher, therefore, the temperature of the coolant in the pipes should be higher than usual.
The insulation is laid on a clean, level floor. Before starting work, a strip is cut on the walls - the level of the clean floor; small depressions, if they were formed during the construction work, are filled with clean, dry sand.
Installation instructions:
- Spread the waterproofing - lay sheets of film with a density of 150-200 microns with an overlap of at least 10 cm and wrap them on the walls.
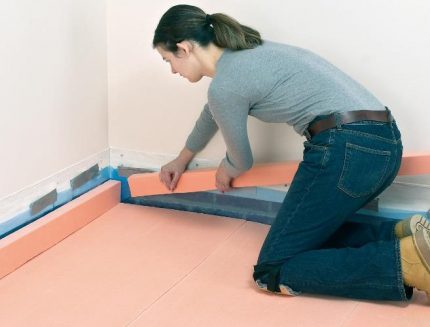
- Lay the slabs of extruded polystyrene foam with the markings facing up, joining the grooves together. It's better to start from the far corner.
- If necessary, cut out fragments with a construction knife.
- Secure the slabs with disc dowels at the corners, along the middle of the joints and in the center of the slabs.
- Seal the seams with construction tape.
If laying a second layer is required, then it is better to change the direction of the upper slabs, that is, lay them perpendicular to the lower ones.
When laying, avoid large gaps and cracks. If they do form, the voids can be blown out with foam or covered with scraps of polystyrene foam
To move on the slabs during installation, it is recommended to use thin boards or pieces of plywood - the structure of the slabs, despite their density, can be deformed.
Markings are applied to the surface of the slabs using a marker or paint cord. If profile mats are used instead of EPS, markings will not be required.
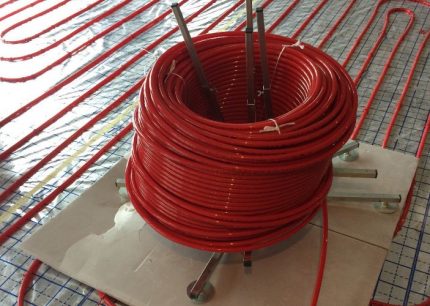
There is a risk of bending and twisting of the pipe when unwinding, so it is better to use a special device for unwinding the coil. It will take longer to unwind manually
Before starting pipe installation, it is also recommended to install collectors and prepare places for connections.
- Unwind 15-20 m from the pipe, put a heat-insulating sleeve and a fitting on the end for connection.
- Connect to the collector.
- Carefully lay the pipe according to the markings.
- Secure the outline with harpoon staples.
- Bring the pipe to the manifold and connect the other end.
The length of each loop must be recorded, and not just remembered, but written down near the fitting on the wall.
A damper tape or some substitute is placed along the edges - for example, pieces of foam plastic 1.5-2 cm thick. They hold up well on liquid nails
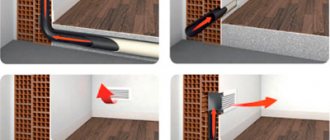
Transit pipes passing through walls or transition zones are insulated as much as possible with sleeves. Instead of expensive imported products, you can use ordinary insulation - foamed polyethylene.
Properly laid fittings should be located above the pipes, not under them or between them. An acceptable option is a metal mesh with a 10*10 cm cell made of 3 mm wire.
It is also incorrect to fix the contours to a metal mesh; in this case, it will serve as a stand, not reinforcement. Proper installation - when the mesh is above the pipes
Nowadays, many people use plastic mesh instead of wire mesh. This option is also suitable, since the polymer creates the necessary rigidity.
Until hydraulic tests have been carried out to check the tightness of the system, the screed cannot be poured. Usually the circuits are checked one by one.
First, a main line and a pump are connected to the pipe, and water is supplied. For drainage, use a hose connected to the drain pipe of the manifold.
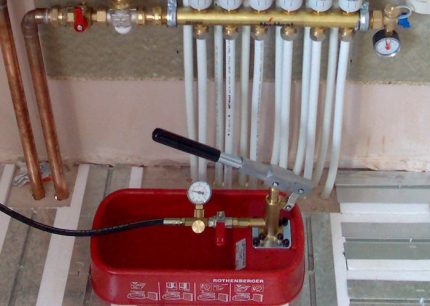
A pressure test pump is the best tool for testing the system. It can be rented. You can also hire a specialist for testing, who usually has the necessary tools
During inspection, staples may fly off as the pipe tends to straighten under pressure. The harpoons that fly off are attached 5 cm from their original place; after pouring the screed, they will no longer fly off.
The pipes are left under a pressure of 5 bar and the screed is laid. Usually the traditional beacon method is used. You can use a metal profile for drywall as beacons.
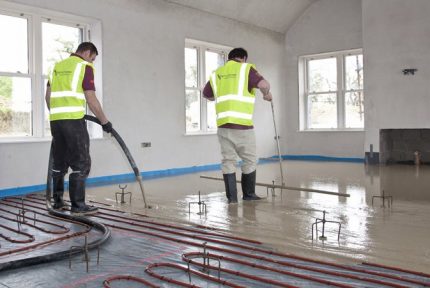
A regular screed solution is not suitable; plasticizers and fiber must be added to the cement, since the load will be not only mechanical, but also temperature
Laying is done in parts, starting from the far corner. Immediately after pouring, each fragment must be leveled, dips and sagging must be eliminated.
READ MORE: How to choose good paving slabs
After 2 days, the surface is cleaned, the damper tape is cut, the screed is sprayed with water and covered with film (the last two steps are repeated for 10 days).
Electric floor
Installation from 1 to 4 hours
DEVI cable electric heating systems include heating cables or mats, thermostats and all necessary installation accessories. Having the skills and experience, it is quite possible to carry out the installation yourself.
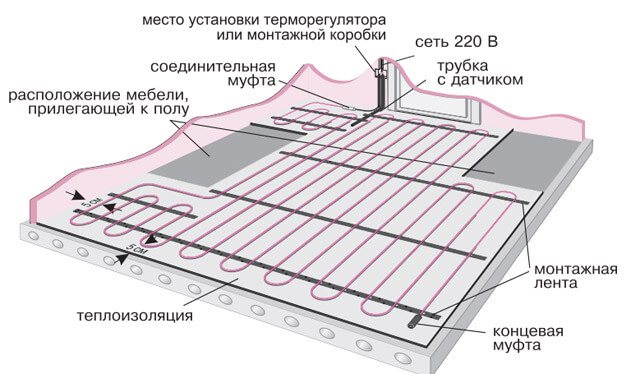
First of all, the purpose of the “warm floor” and the installation area are determined. Then the thermostat is installed, and if necessary, a groove is made for hidden wiring. Wall-mounted thermostats (surface-mounted or built-in), as a rule, are installed in the same rooms where the cable itself is located.
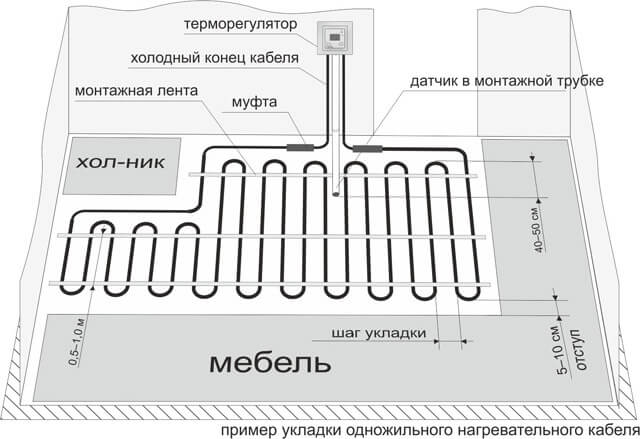
In cases where it is necessary to move the control to a separate room, panel-mounted thermostats with remote floor or air temperature sensors are used. Next, you need to evenly, observing the laying step and bypassing the pipes and areas intended for installing bathrooms, refrigerators, cabinets, lay out the heating cable.
For ease of installation, we use Devifast metal mounting tape, which is attached to the base. In order to maintain the system capacity laid down at the design stage, it is important to adhere to the installation step. The sensor on the wire for measuring floor temperature must be laid in a corrugated or copper tube with an internal diameter of 10 to 20 mm.
The tube is passed along the floor and along the wall to the installation box in which the thermostat is installed. It should allow easy replacement of the sensor through the mounting box (hole in the wall). The tube with the sensor is attached between the cable lines (on the open side of the loop) at the same level with them or slightly higher.
Between the thermal insulation and the heating cable, it is necessary to provide a fireproof layer (preliminary thin screed, fine-mesh metal mesh or laminated foil). Otherwise, when the heating cable is pressed into the thermal insulation or air “pockets” form around it, the temperature of the cable may rise above the permissible level, which will lead to failure of the entire system.
Waterproofing can be laid both under the heating cable and above it, since in an emergency the cable itself can work for some time at any humidity, including water. The location for installing waterproofing must be selected based on design considerations or the requirements of construction documentation. Now you can start pouring the solution.
The heating cable and connection sleeve must be completely closed. To maintain uniform heat distribution over the floor surface, the thickness of the concrete or cement-sand screed over the cable with a specific linear power of 17-18 W/m (this is the average) should be at least 3 cm. The Devimat thin heating mat does not require a screed at all.
The mat is laid in a layer of tile mastic or glue. Laying thermal insulation in this case is necessary if there is a cold room below or if there are local cooling zones.
important
There are three options for installing a “warm floor” system:
- the heating cable is installed in a cement-sand or concrete screed 3-7 cm thick. This option is optimal for installing basic heating;
- a thin heating mat is installed in a layer of tile adhesive, which does not increase the construction height of the floor;
- the heating cable is laid on a special mounting sheet under a wooden floor without screed.
How to install and mount correctly
Before installing a heated floor, you need to draw a cable layout plan, taking into account:
- what kind of finishing coating is supposed to be laid (cable floors fit well under tiles);
- where the thermostat will be located (this should be a convenient place, no lower than 70-100 cm from the floor)
Important. When laying resistive type underfloor heating cables, it should be taken into account that they emit a constant amount of thermal energy. If it does not find a way out, the cables overheat and this can cause failure. Therefore, resistive cables should not be laid under furniture or heavy equipment.
The steps for installing cable floors are as follows:
- Prepare a “rough” surface, which should be smooth and clean. If necessary, you need to make a concrete screed.
- After the screed has dried, thermal insulation is laid, with a protrusion of 15-20 cm on the walls.
It is very important to keep the thickness of the heat insulator at least 2 cm. If you neglect a high-quality heat-insulating layer, additional heat loss will appear, which will lead to additional energy consumption.
- If you plan to lay cable floors under tiles in the bathroom, the next layer is waterproofing.
- Then you need to make a cement screed.
- Place foil on top of the dried screed. It will distribute the heat from the cable across the floor and protect it from overheating.
- A mounting tape is attached perpendicular to the cable with self-tapping screws. Special brackets are provided to secure the cable to the tape.
- Install the temperature sensor in the corrugation.
After testing the cable floor, you can fill the entire structure with a concrete screed (3-8 cm thick). After the floor has completely dried, you can lay a finishing coating.
This option has a clear drawback: it requires pouring a concrete screed. This is not only time and labor, the floor surface rises. Apartment owners do not always agree to reduce the ceiling height.
Film floor
Installation from half an hour to 2 hours
Installing a film “warm floor” does not require special knowledge and is quite accessible to everyone. First of all, you need to determine where the “warm floor” will be installed. We recommend installing thermal film only on an area that is not occupied by furniture and heavy household appliances.
Heat-reflecting material is laid on the floor surface, the sheets are fastened with tape. After this, you can lay the thermal film. The film can be cut into strips of the desired size along the cut space. It is prohibited to cut the film along other lines. Contact clamps are attached to the copper edges of the thermal film: in this case, the side of the clamp should be inside the thermal film, the other side should be outside on the copper strip.
After this, it is necessary to insulate the cut lines of the copper strip at the edges of the thermal film using the short bitumen insulation that is included in the kit. The front side of the thermal film is the one where the carbon semiconductor strip is longer, that is, the copper conductor should be on the bottom.
The thermal film is unwound on a clean, dry and level surface. It is advisable to lay it along the entire length of the room: in this case there will be more solid strips and fewer connection points for installation wires. The thermal film strips are attached with masking tape to the reflective material. We recommend installing the temperature controller next to the existing electrical wiring. It is mounted on the wall, in a place convenient for the user (usually next to the sockets).
After this, the installation wires are laid and the locations for removing the insulation are determined. The thermal film is connected to the network in parallel: all installation wires can be connected on one side of the room. The kit includes wires of two colors: wires of the same color are connected to only one tip of each strip. To connect, remove the insulation at the connection points, bring in the bare wire and clamp it using pliers.
For every square meter of thermal film there are 2 contact clips and 5 pieces of bitumen insulation. One piece is used to insulate the copper busbar. For each wire connection, use 2 pieces of insulation, covering the inner and outer sides of the contact of the thermal film and the tip with the wire. Thus, we obtain electrical and waterproofing of all ends and connections.
The floor sensor is installed under the thermal film and secured to the black strip of the film using bitumen insulation. When connecting the thermostat and power supply, be sure to take into account additional electrical devices that can be connected to the same network. For systems with a power of 2 kW or more, we recommend making the connection through a separate machine.
After turning on the system, you need to check the heating of each strip of thermal film, the connection points of the installation wires, and the insulation along the cut line. After a successful test connection, the flooring can be laid.
important
For installation you will need:
- Caleo underfloor heating kit, which includes thermal film with electrical connection, floor temperature sensor, electrical wiring kit and insulation.
- Installation material for film and floor covering.
- Material with a heat-reflecting effect, covered with metallized lavsan or polypropylene film, with a soft or hard layer - depending on the type of floor covering.
- Scotch.
- Tile adhesive and fiberglass mounting mesh with cells from 5 to 20 mm (if you plan to lay tiles or porcelain stoneware).
- Thermostat.
The issue of heating your own home is quite relevant, especially in the northern regions of our country, so we will now learn how to install heated floors using water coolant. This design is quite economical in energy consumption (gas, electricity, liquid or solid fuel) compared to a radiator circuit and is more aesthetically pleasing, since it is not visible at all.
Let's try to understand the installation process, and the video in this article will help us with this as additional material.
Warm water floor
Preparation
- First of all, we need a screed, since heated floors of this type can only be installed on a flat, rigid base, which is concrete or. In this case, there is no difference in terms of pipe installation, but concrete, as you understand, increases the strength of the base and it is not necessary to install reinforcing mesh there.
- If you install such a structure on the ground, then it is best for you to insulate it with expanded clay, since its price is lower than other insulation materials suitable for water floors, and in this case it is possible to use it. You can also use expanded clay sand, where the fraction is less than 0.5 mm.
- Such a screed will be a layer cake - first a waterproofing film with a fold over the walls, then a sand cushion of at least 20 mm thickness and a layer of expanded clay for insulation. Each of the layers must be well planned and beacons are installed on top, along which. Further work can be carried out after 7-10 days, without waiting for the cement to dry completely.
Pipe installation
Advice. To lay water floors, use either a polyethylene or metal-plastic pipe, although the instructions still consider the first option. But practice suggests that installing metal plastic is not only more profitable, but also more reliable. So, it turns out cheaper, when pouring the second screed it does not require filling with water and it can be filled with concrete without fear of damaging the pipe with pebbles.
First, another layer of waterproofing is laid on the screed, and on top of it is a reflector made of foiled polyethylene foam 2 mm thick with a fold on the walls - both materials are overlapped. The edge strip on the wall will serve as a kind of buffer when the top screed heats up and expands. The joints can be secured with tape so that the coating does not move.
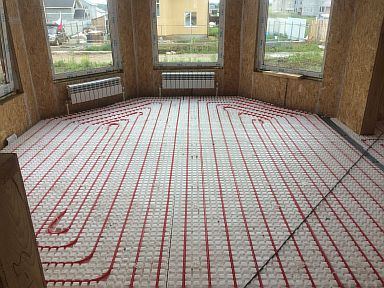
The pipe on the floor is laid either in a snake or in a spiral - it all depends on whether there are any columns or hatches on the floor that have to be bypassed. If there are any, then installation with a snake is more suitable - it will be more convenient. The pipe can be fixed on special mats, which are laid on a screed, but this is quite expensive, so plastic brackets are usually used.
Before installation, it is necessary to mark the laying route with a marker so as not to get confused later and, having drilled holes, install the brackets 40-50 cm apart from each other, and at bends you can reduce this distance to 15-20 cm so that the turn does not ride up.
The laying step must be maintained within 20-22 cm - the uniformity of heating of the surface will depend on this. Please note that heat flows upward in the form of a funnel at an angle of 45⁰, and they should intersect at the top.
If a metal sheet is made in a sharp bend, it can break, therefore, to avoid such damage, a steel spring 20-25 cm long and an internal diameter of 18-20 mm is put on it so that it can be moved freely. Where you need to bend the pipe, a spring is tensioned, and it acts as a crimp casing, preventing creases from forming. It is gradually moved as installation continues, as shown in the photo above.
After laying the pipe, beacons are again installed on top of it and along them. Considering that this layer will heat up, and therefore deform and crack, a plasticizer is added to the solution, the dosage of which is indicated on the label of the canister.
Advice. If you do not have a radiator circuit in addition to a heated floor in your house, and you use gas heating, then it is better for you to purchase a condensing boiler. Such a unit, unlike a traditional convection unit, is considered low-temperature, which is very convenient for our type of heating.
Connection
In most cases, when installing warm water floors, you end up with several wings, since it is installed in different rooms, but even sometimes in the same room you have to make two wings so as not to join the plastic under the screed. For this purpose, somewhere in a convenient place, on the wall, install distribution combs with your own hands, one of which goes to the supply pipe, and the other to the return pipe.
Combs are purchased with outlets according to the number of wings (the extra ones are jammed), and on one of them (preferably on the return) you need to install a Mayevsky valve.
Design and Build Rules
The decision to choose a water floor, rather than an electric analogue that does not require scrupulous installation, is optimal for heating systems with gas boilers.
Such schemes are recognized as the least energy-consuming, most efficient and inexpensive to operate. Options with solid fuel boilers are also acceptable.

Flawless operation of the system is possible only under two conditions: professionally performed design calculations and competent installation.
Consequently, the first steps towards installing a water heated floor in a country house or in a private house are analysis of the structure, selection of materials, and drawing up a project.
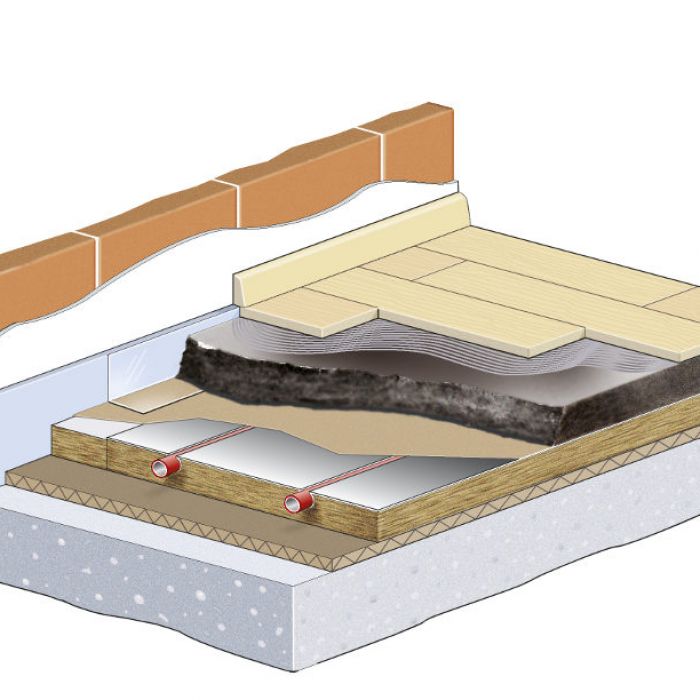
The construction of a water floor is complex and simple at the same time. It is multi-component in composition, so the main thing is to observe the order in which all layers are laid.
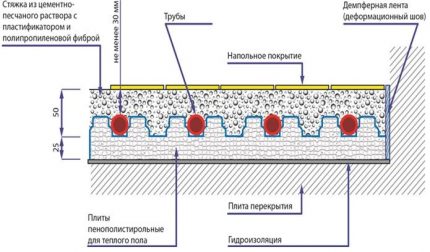
The “wet” type scheme is recognized as universal, in which the contours of the water floor are laid on a heat-insulating layer and filled with cement screed on top
Each element of the “pie” performs a special function. The base for the structure is soil or a concrete slab. A thin film (but not less than 0.1 mm thick) is laid on it - ordinary polyethylene or a more expensive analogue.
Then the floor is covered with thermal insulation material. One of the best options is extruded polystyrene foam - durable, relatively inexpensive, with low thermal conductivity.
Minimum requirements:
- density – from 40 kg/m³;
- thickness – from 300 mm.
The main layer is a cement fill, inside which pipes with coolant will be located. Plasticizers are added to the solution to make it more flexible and easier to install.
For strength, the screed is reinforced with a reinforcing mesh with a cell of 50*50 mm or a larger cell of 100*100 mm and a rod thickness of 3-5 mm.
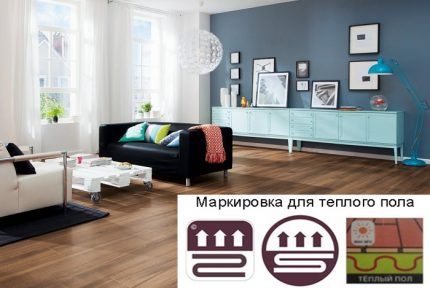
The finishing layer is a heat-resistant floor covering. Ceramic tiles, which conduct heat well, are recognized as the best material. When purchasing linoleum or laminate, you should choose products with a special label “warm floor” ( )
The choice of finishing coating will determine the thermal regime, which can be adjusted automatically or manually using mixing units - manifolds.
First you need to make calculations. This is a separate and complex topic, but for quick calculations on your own, you can use an online calculator by entering individual parameters into the required columns.
If a construction company deals with heated floors, then the calculation operations are carried out by its specialists.
Standard verified figures are taken as the calculation basis, which must be adhered to regardless of the installation method and specific installation conditions.
Image gallery
Photo from
The TVP temperature in the kitchen should be within 22-27 °C, in the corridor or hall - 30 °C, in the living room, children's room or bedroom - 29 °C, in bathrooms or swimming pools the highest - 32-33 °C
If the coolant is supplied to heating devices at a temperature of 85-90 °C, then for heated floors it is sufficient to heat the water to 60 °C, and on the return line the temperature drops to 30-45 °C
The difference between the inlet/outlet temperature parameters is affected by the length of the circuits. Generally accepted values depend on the diameter of the pipes: Ø 16 mm – loop length up to 90 m, Ø 17 mm – up to 100 m, Ø 20 mm – 120 m, although it is not recommended to make contours longer than 80 m
The distance between curved pipes depends on the laying area: in the center of the room - 20-30 cm, in the edge zones, near walls and thresholds - 10-15 cm, in bathhouses, bathrooms, bathrooms, swimming pools - 15 cm everywhere
Warm floors in the children's room
Coolant pipes in the room
Layout pitch between pipes
Typically, PEX pipes are used for installation, which cannot be laid closer than 10-15 cm from each other, since there is a high risk of kinks. If the thermal load on the floor is small, for example, many people like to relax in cool bedrooms, then a layout step of up to 60 cm is allowed.
Some more useful tips:
- one circuit is not distributed into two rooms;
- for a room of 35-40 m², 1 circuit is not enough, the minimum is 2;
- one side of the contour – no more than 8 m;
- The damper tape compensates for deformation due to thermal expansion.
There are exceptions. For example, if the toilet and bathroom are small in area and located next door, then one water circuit is enough to heat them.
The most effective types of pipe installation have long been invented - “snail” and “snake”, so there is no need to experiment with the design of circuits.
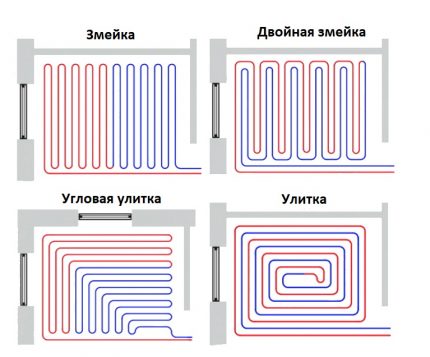
There are many varieties of the two popular methods; the choice depends on the configuration of the room, the length of the circuit and the temperature regime. Sometimes combined schemes are optimal
“Snake” is the easiest option to implement. Its disadvantage is the large difference in coolant temperatures at the inlet/outlet. It should be taken into account that the second half of the circuit will give off less heat.
READ MORE: Laying a warm water floor under tiles
The “snail” evenly distributes heat throughout the room, but it is more difficult to implement. If the owners do not want to divide the room into warm and cool zones, then it is better to use this method.
To save pipes and increase energy efficiency, a combination of two options is often used: in, along the walls - a “snake”. If you correctly position the hinges and calculate the laying step, the floor temperature will be as comfortable as possible for the residents.