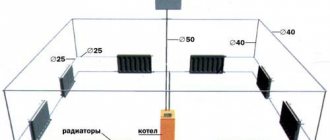
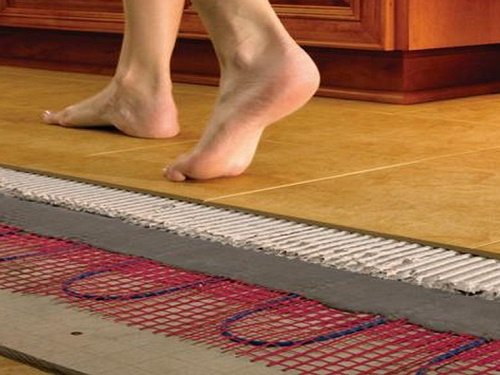
Design diagram
Water floor arrangement for a bathhouse:
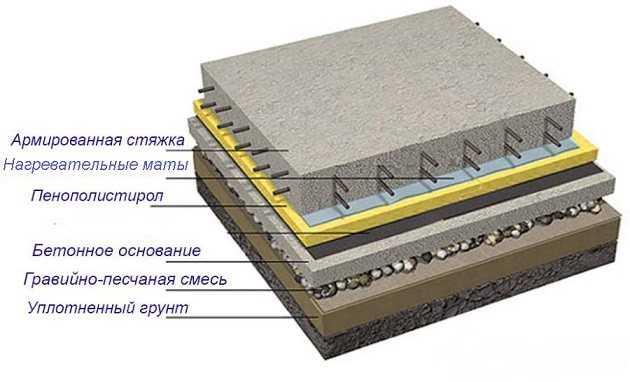
- Subfloor . Laying on a concrete or wooden base.
- Waterproofing layer . Important for preventing condensation from accumulating in the pores of the floor and between layers.
- Insulation . Reduces heat loss. It is important to install quality materials.
- Reinforcement mesh . Needed to protect insulation.
- Foil reflector . Directs heat in the right directions, helping to distribute it evenly around the perimeter of the bath.
- A heating element . The pipes are laid in a certain order. The best way is to lay it in a spiral.
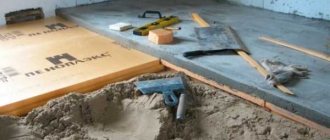
- Concrete screed . The screed should be poured with a slope in the direction of the drain.
- Finish coating . The evenness of this surface must be perfect.
Important The pipe diameter is 16 mm. The length of the contour is 80 m, the maximum allowable is 100 m. The thickness of the insulation should not be less than 10 cm, and the mesh should not be less than 4 mm. Only these parameters ensure ideal heating of the floor surface and the entire room, including the corners and ceiling.
The photo shows a diagram of a water floor in a bathhouse:
Installation methods
Installation of a warm electric floor is possible in two ways. Placing it inside the screed blocks the access of moisture to the heating circuit, which is best made from heating mats or a heating cable. Increased safety is ensured by a liquid-electric heating circuit, in which the water, which is constantly in the tube without circulation, is heated by an electric cable laid nearby.
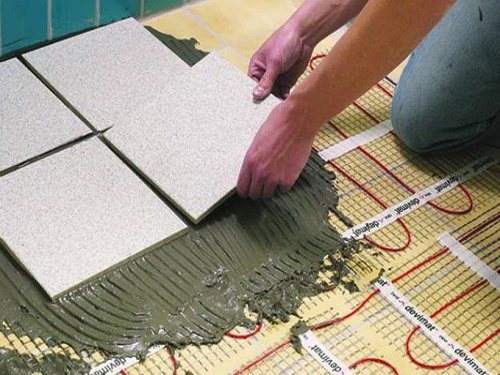
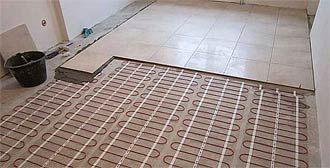
You can lay a warm bath floor under the tiles if the screed is already ready and you don’t want to open it. The heating circuit is placed directly into the tile adhesive. For this purpose, it is preferable to use heating mats, electric rod and film infrared floors, and amorphous metal tape.
Entrust the work of insulating the floor in the bathhouse to a specialist, and it will last much longer
Advantages and disadvantages
Pros:
- Infrared heated floors protect against drafts. This is very important, since a gust of cold wind can cause colds in bathhouse visitors.
- Extending the service life of wooden surfaces. Since there is a high level of humidity in bath rooms, decorative materials are destroyed.
- Increasing the level of comfort when staying in the bathhouse. It is more pleasant to step barefoot on a warm floor than on a cold one.
Flaws:
- difficulties at the initial stage of installation, additional financial costs;
- the air in bath rooms can become dry, which greatly reduces the level of comfort;
- inability to divide rooms into standard temperature zones vertically.
Options for heated floors
The floor in the bathhouse can be installed in two types:
- water floor: liquid circulates in a closed water supply system, for which many use ordinary water. To improve the quality of the system in cold weather, experts recommend using a special antifreeze;
- use of electrical systems: ready-made “cable floors”, infrared films. Such a system can function flawlessly in a damp room only with the use of special waterproofing materials.
Each method has its own advantages and disadvantages. For example, to install a water floor, you will need to install a boiler, pump, and pipe routing. This method is considered more complex. Installing an electric floor will be much easier, but do not forget about the rising cost of electrical energy, which directly affects the cost of maintaining a heated floor system.
Comparison of underfloor heating system characteristics
| Peculiarities | Water system | Film system | Cable system |
| Availability of technical premises | required | not required | not required |
| Installation of a concrete floor, the thickness of the mortar is not less than | 12 cm | 1 cm | 10 cm |
| The time required to set up the system is at least | 4 days | 1 day | 1 day |
| System readiness for use is at least | 28 days | immediately after installation | at least 1 month |
| Placement method | on the floor | on the floor, ceiling, walls, any surfaces | on the floor, on other surfaces with additional structural arrangements |
| Reliability | even with minor damage the entire system fails | if some segments are damaged, the good ones continue to work | If the cable is damaged, the entire system fails |
| Service | needs maintenance | does not require maintenance | does not require maintenance |
| Uniformity of heat distribution over the surface | The method of laying pipes directly affects the uniformity of heat distribution | uniform distribution | formation of zones of increased heating |
Installation of a heated floor system using a special cable
Externally, the cable for installing a heated floor system is similar to a traditional wire. The difference is functionality. The cable used in the installation of an underfloor heating system is capable of converting electrical energy into thermal energy. In addition, it evenly distributes it around the perimeter of the surface.
When using a cable, experts advise using products with ratings of no more than 250 W. You will also need to install thermostats and temperature sensors that will allow you to regulate the temperature in the bathhouse.
Important! When installing a heated floor system using cable, single- or double-core products are used. The two-core cable does not require connecting the second end to the thermostat, so it is easier to install.
The cable can be laid on different surfaces. If it is installed on a wooden floor, it is necessary to strictly adhere to fire safety requirements. Before placing the cable, it is necessary to treat the wood with a special substance, and only then can you begin laying the heat cable. All joints and connections are reliably insulated. An electric heated floor in a bathhouse under tiles is mounted in a concrete screed. The principle is this:
- preparation of the base;
- laying waterproofing material;
- installation of thermal insulation material;
- cabling;
- pouring the solution.
You can purchase a mounting grid and guide contours from a specialized store. Their use makes installation much easier. When laying finished products, you must follow the manufacturer's instructions, adhering to the recommendations of professional craftsmen.
Important! The distance between the wall and the cable must be at least 5 cm and 10 cm.
The heating cable is laid as evenly as possible, trying not to allow too many turns. It is strictly forbidden to bend the cable or lay it under tension. Installation is carried out strictly according to the standards; any errors can lead to a short circuit and the system being out of working order.
After the cable is laid, the entire system is checked for functionality. The very last stage is laying the reinforcing mesh and pouring concrete. After 28 days, you can begin tiling the heated floor in the bathhouse.
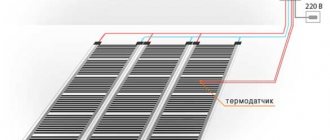
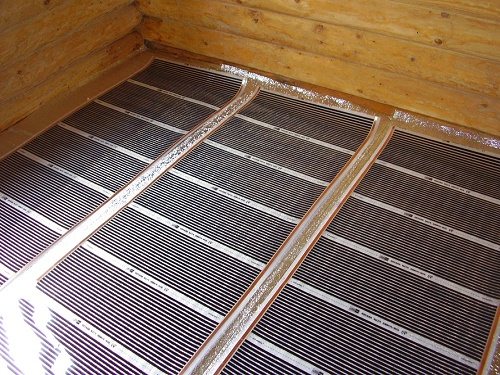
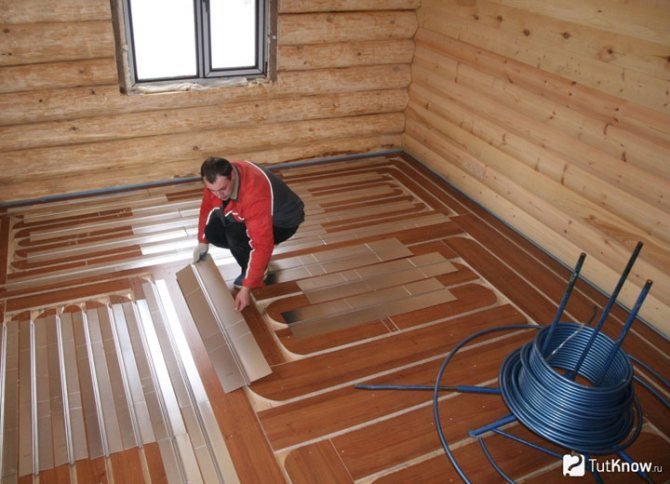
Laying infrared film
An infrared electric floor in a bathhouse is not only the simplest and fastest arrangement option, but also allows you to create a beneficial microclimate in the room. Infrared rays can eliminate infection and increase the body's defenses.
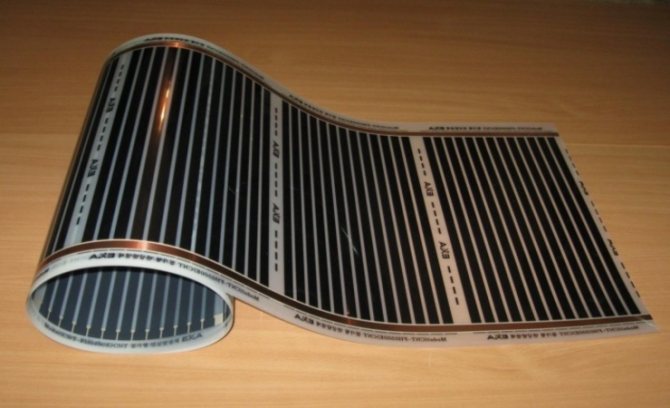
In modern construction halls, film is purchased and sold in rolls. Such material can be purchased in the quantity necessary for installing the system or heating individual zones. Rolled infrared film is very easy to install and is attached using a special adhesive tape.
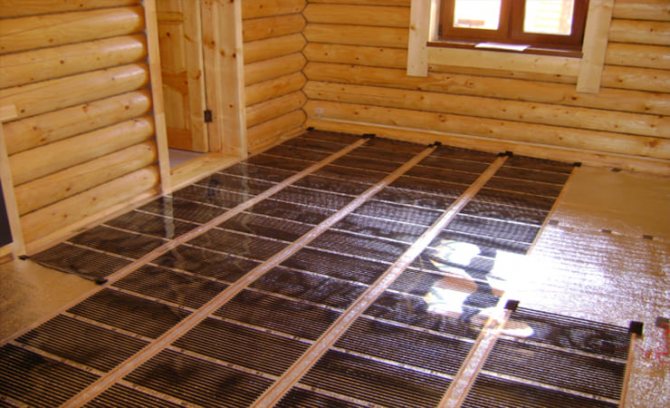
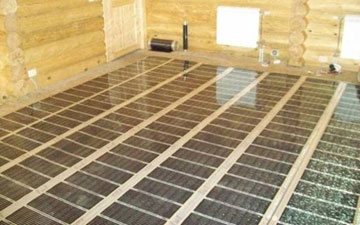
When laying film material, there is no need to level the base or pour it into concrete mortar. Heating mats can even be placed on old flooring, for example, on outdated ceramic tiles. After laying the mats, all connections are sealed. The last step is laying the facing material - tiles.
The use of infrared film allows you to create airtight floors in the bathhouse. In addition, they are completely fireproof. Heating mats can warm up to 45 degrees, creating an optimal temperature for a person.
A warm electric floor in the bathhouse sink will make you feel more comfortable. Many doctors do not recommend stepping on cold tiles with bare feet, and thanks to heating, the floor will always have an acceptable temperature. A warm base equipped with infrared film has many positive aspects:
- the system is very reliable. If the infrared film is placed correctly, breakdowns are excluded;
- parallel connection ensures autonomous operation of each segment;
- infrared radiation has a beneficial effect on the human body;
- does not create an electromagnetic field;
- Can be used under heavy flooring.
Installation of water heated floor in a bathhouse
The method of laying a water floor depends on the technical characteristics of the structure itself and the desires of the owner. Warm water floors are installed in two ways:
- using concrete mortar. The principle of arrangement is the same as when installing electric heated floors, only when creating a concrete base to completely cover the pipes, the screed will have to be made much thicker;
- laying method, in which pipes are laid on a polystyrene foam system or a wooden base. This option is used for baths that were built without a serious reason.
A warm floor from an electric boiler can be constructed from different pipes. Today, to install a heated floor system in a bathhouse, pipes from:
- plastic;
- metal-plastic;
- copper
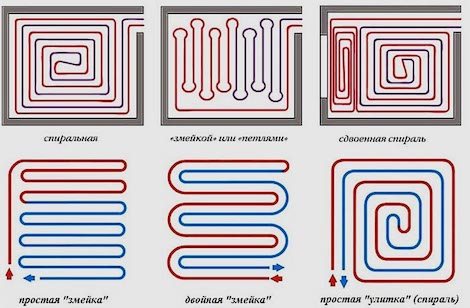
Experts recommend using plastic pipes that have a long service life and high thermal conductivity coefficients. Pipes are laid in two ways: “snake” or “snail”.
When laying pipes, it is necessary to avoid sharp turns and bends of the material. The liquid in the pipes must move freely. For more reliable fastening, fastening elements in the form of clamps and dowels are used. To fasten pipes, you can also use ready-made polystyrene plates that have places for fastening products. This auxiliary element allows you to very simply and correctly place the pipes without the formation of cold zones.
Covering a heated floor in a bathhouse
To create an aesthetic appearance in the bathhouse and to maintain hygiene in the room, the floor must be tiled. The following is used as bath flooring:
- ceramic tiles, which have high thermal conductivity, are resistant to temperature changes, easy to care for, and have a long service life. In addition, ceramic tiles are resistant to high humidity and do not change their technological characteristics;
- parquet when used in a dressing room. Parquet flooring can be used in a dressing room or rest room after treating natural wood with a special product;
- laminate, which is used for a lightweight base;
- anti-slip linoleum, which is the most inexpensive way to arrange a floor in a bathhouse.
A warm floor in a bathhouse can significantly improve the indoor microclimate. It needs to be set up correctly. Creating warm floors in a bathhouse yourself is not that difficult. It is worth carefully studying the installation technique, stocking up on the required materials and boldly getting to work.
A warm electric floor in a bathhouse is a new product that can be installed in any room. Warm floors can be implemented in a brick building and in a bathhouse made of timber. When choosing an installation method, it is necessary to take into account the design features of the bathhouse. It is much easier to install heated floors when building a bathhouse, so if you are going to build a bathhouse on your site, think in advance about the possibility of installing heated floors.
Water heated floors: features and installation work
Before making a warm water floor in a bathhouse, you must:
- make sure that the mounting surface is level;
- think over the route of laying pipes;
- select pipe material.
At its core, such a floor is an analogue of a conventional heating system, only sewn into the floor: a heat transfer fluid moves through the pipes, which is heated by a boiler or furnace.
Water often acts as a coolant, but if the bathhouse is not heated additionally, then it makes sense to use antifreeze. This will avoid freezing of the liquid inside the pipes and, accordingly, the risk of their rupture.
Corrugated bending pipe
A warm water floor in a bathhouse has the following advantages:
- environmental friendliness;
- efficiency;
- ensuring gradual natural heating;
- absence of electromagnetic radiation.
It is important to remember that making a heated water floor in a bathhouse with your own hands is quite problematic, since this is a multi-stage process that requires utmost attention. The slightest mistake can lead to incorrect operation of the system.
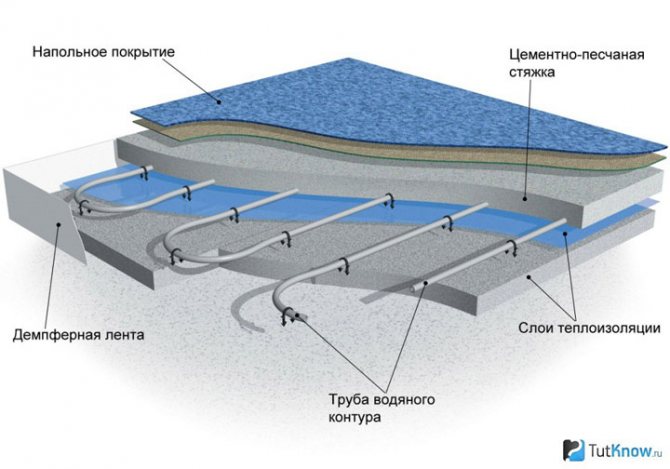
Layers of warm water floor
In particular, the pattern according to which the pipes are laid is carefully selected:
- snail;
- snake;
- double snake.
The distribution of heat also depends on which water floor layout in the bathhouse is chosen. For a bathhouse, a snail is preferable, since it is it that ensures uniform heating of the surface, while a snake cannot provide this: gradually cooling down along the way, the heat transfer liquid may not heat some areas of the floor.
Most often, in order to heat heated floors in a bathhouse from heating, the system is connected to a classic heating circuit, and therefore to a boiler, but the bathhouse allows you to replace it with a stove.
This is appropriate if the steam room itself is a separate building.
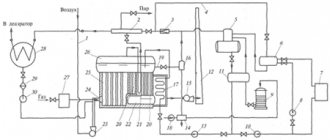
In order to organize a heated water floor in a bathhouse from a stove, it is necessary to install a metal tank above it - it is in it that the water for the entire system will be heated.
Installation diagram for a warm water floor from a stove
There is an option to locate the container below floor level, but in both cases there is a need for a pump: it will ensure proper circulation of liquid in the pipes. Heating the floor in a bathhouse from a stove is a somewhat lengthy process, so a separate wood-burning boiler is often used. Regardless of the method of heating water, the procedure for installing the floors themselves does not change:
- Leveling the surface. The base on which the pipes will run must be level. If we are talking about logs and wooden floors, then special openings for pipes are made in the necessary places.
- Thermal insulation. To increase the efficiency of heat transfer, a layer of thermal insulation material is placed under the system.
- Installing the mounting surface. Most often, this role is played by a special heat-insulating mat with bosses, between which a flexible pipe is laid. However, fastening can be achieved using other suitable means.
- Laying the pipe. It is important to take into account that there should be no sharp turns in the turns.
- Connecting and checking the system. At this stage it is checked whether there are leaks.
- Screed and laying flooring.
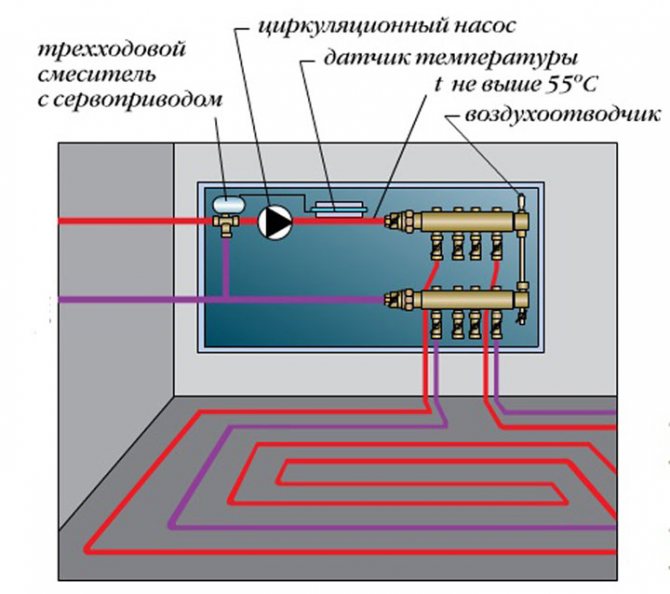
An example of connecting a water floor to a heating circuit.
It is important to ensure that there is no slope.
The pump will cope with the water supply, but the excess pressure created can quickly damage the entire system. Such a warm floor in a bathhouse under tiles and under a wooden covering is suitable. The system will equally cope with heating.
Why is there a heated floor in the bathhouse?
The heated floor system allows you to prepare the bathhouse much faster. By bathhouse we mean those rooms that are not directly exposed to high temperatures and humidity, that is, a relaxation room and, if necessary, a locker room.
A heater should be sufficient to heat the steam room. If there is not enough heat to fully warm it up, then the insulation of the walls, floor and especially the ceiling is not done correctly. The most rare reason is the low power of the sauna stove itself.
The washing room, which usually acts as a vestibule between the steam room and the dry rooms of the bathhouse, is heated by hot air from the steam room.
Electric cable floor: characteristics and installation method
This heating system is based on a heating cable. The installation of warm electric floors in a bathhouse is completely safe, since there will be no direct contact with moisture.
The cable itself can be:
- Single-core. Has more electromagnetic radiation, both ends must be fixed to the thermostat.
- Twin-core. Less electromagnetic radiation, the second end is not attached to the thermostat.
In general, it is almost impossible for an ordinary person to notice the difference in the work of these two types.

An example of an electrical cable floor connection diagram
Before making an electric floor in a bathhouse, you need to decide on the installation scheme. Since there is no heat loss along the entire length of the cable, a snake is most often used - it is easier to install.
It is important to note that during installation, you should observe not only the standard 5 cm from the wall and 10 cm from other heat sources, but also the pitch between the turns. Each manufacturer has its own requirements in this regard. You can see specific numbers on the packaging.
The installation procedure itself is simple. A special mesh is often used as a basis for fastening, but tape can also be used. Following all the rules, the cable is laid over the entire required floor area.
It is important to remember that it is better to avoid placing the cable in the area where furniture will be placed.
If you follow all the steps step by step, you can install an electric heated floor in a bathhouse with your own hands. However, it is recommended to use the services of professionals to connect it.
The undoubted advantages of such a system include:
- full temperature control;
- the ability to heat the bathhouse at any time;
- quick heating of floors.
However, it is necessary to recall that such a warm floor consumes a lot of electricity. For this reason, it is unlikely to be suitable if you plan to use the bathhouse very often.
Electrical structures
Making electric heated floors in a bathhouse with your own hands is much easier than installing a water heater. This is not their only advantage. There are several varieties of this insulation, each with its own advantages and disadvantages.
Electric structures are the most expensive option for heating floors in a bathhouse, but the highest quality
Convection cable option
The main advantages of this type of insulation are automatic temperature control and its compatibility with any type of coating. The main disadvantage is the very high energy consumption. The design consists of a mesh base with a heating cable laid on it.
The cable comes in two versions - single-core and two-core. When purchasing, it is important to pay attention to this - despite the higher cost, a two-core cable has important advantages during installation and use. The power of the electromagnetic field emitted by a two-core cable is several times less than that of a single-core cable. Both contact ends are located nearby, they do not need an additional supply to the thermostat, so installing it is much easier.
When choosing a convection cable, consult a specialist, he will help you choose the most suitable option
Sold rolled into rolls. It is difficult to install it yourself; it is preferable to entrust this to an experienced technician.
Infrared heaters
Infrared film insulation is a thermal film rolled into a roll. It is based on a polymer shell, into which flexible carbon strips are sealed, the thickness of which is 0.3 mm. The film is laid on top of the heat-reflecting material, and the top is covered with polyethylene for waterproofing and the floor covering is laid.
The screed is optional, but it will improve the tightness and mechanical reliability. Infrared film insulation has a number of advantages:
- thanks to the parallel connection of elements, the breakdown of some of them does not affect the performance of the entire system;
- no ultraviolet radiation;
- the infrared spectrum of radiation is useful for humans;
- not afraid of heavy floor coverings (porcelain stoneware, ceramic tiles).
The disadvantage of film insulation is that it cannot be installed in a washing room due to its low moisture resistance.
Warm floor in the bath:
Rod infrared insulation is similar in appearance to a rope ladder due to the rods connected in parallel to the power wires. This installation of heaters makes the operation of mats (another name for this insulation), as well as film insulation, very reliable. Mount the mats inside a cement screed or tile adhesive. The main disadvantage of this heater is its extremely high cost.
Infrared floor: what you need to know about it
The easiest way to make a warm bath floor yourself is when it comes to infrared floors. Initially, this type was developed so that it could be easily installed in any conditions. This kind of floor is also called film: inside the transparent material there are special heat-conducting inserts.
Installation stage of infrared floor
The advantages of such a system include:
- affordable price;
- simple installation;
- precise temperature control;
- If one plate fails, the others will continue to work.
Installing heated floors in a bathhouse with your own hands must begin with thermal insulation. In principle, this type of heated floors can be laid on any surface, since there are no requirements in this regard.
The rolls are rolled out over the entire area of the room, after which they are connected to the thermostat and to the general power supply.
You can make heated floors in a bathhouse within a day, which is also a nice feature of this electric heating system.
The floor covering is placed directly on top of the film. Installing a heated floor in a bathhouse under tiles or wood is equally possible, although tiles are preferable - they conduct heat better.
Types of coatings
Installing such an insulation system takes time and a lot of money. Therefore, before starting work, you need to familiarize yourself with the design features, its varieties, and a description of the installation process. This will help reduce the time required for installation and reduce financial costs.
There are two types of insulated floors - water heated and electric.
Each has its own pros and cons, which should not be forgotten when installing the system in rooms with different operating conditions. Read more: about the types of heated floors.
Not all sauna rooms have the same humidity. It is especially high in the steam room and washing room. A warm floor in the steam room is not needed. You need to think carefully about what type of insulation to use in the washing room: high humidity combined with high electrical voltage is a very dangerous combination. The locker room and rest room will not create such problems as a warm floor in a steam room. It is enough to select the heating element that best suits the coating being installed.
A variety of materials will help you choose the one that suits you most depending on price and quality
Operating an insulated floor with water heating costs less. It is absolutely safe in the washing room and does not require additional protection from electrical voltage. But for its effective operation, it is necessary to constantly heat the stove if the bathhouse is not connected to central heating.
Electric insulated flooring is easier to use, but more expensive due to electricity prices. Not all of its modifications can be used in bathhouses oversaturated with moisture, and in other cases increased safety measures are required.
Electric heated floor in the bath:
How to properly lay a floor pie
In order to install a liquid floor in a bathhouse yourself, without the need to reduce the height of the ceilings, you should provide for the installation of a heating system in the early stages of construction, namely when pouring the foundation in the future building.
Installation work proceeds as follows:
- The foundation for work is being prepared. A preliminary sample of soil is taken at the site where the screed is poured. Sand is added. The soil is compacted. A plastic film or roofing felt is laid on top and thus ensures waterproofing of the future floor.
- Thermal insulation. Concrete steps are placed along the perimeter, and reinforcing strapping is made. Polystyrene boards are laid on top of the waterproofing layer. To fix the joints, the locks are covered with polyurethane foam. To ensure effective insulation of the bathhouse floor with water heating, polystyrene foam is additionally laid vertically along the inner perimeter of the screed. This will prevent the formation of a cold bridge.
- Ecofol is spread on top - a heat-insulating material used in the construction of heated floors, in bathhouses or other rooms. Ecofol joints are taped with tape.
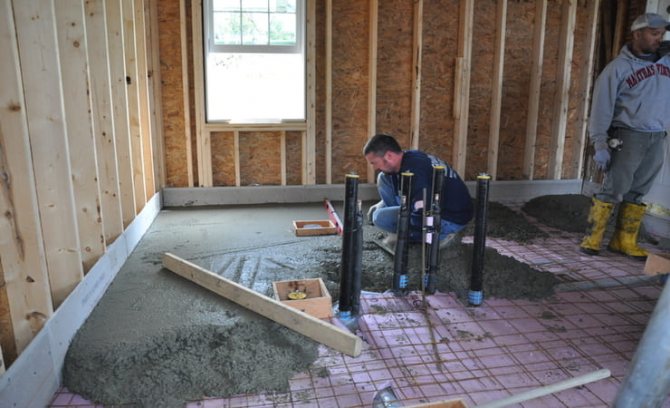
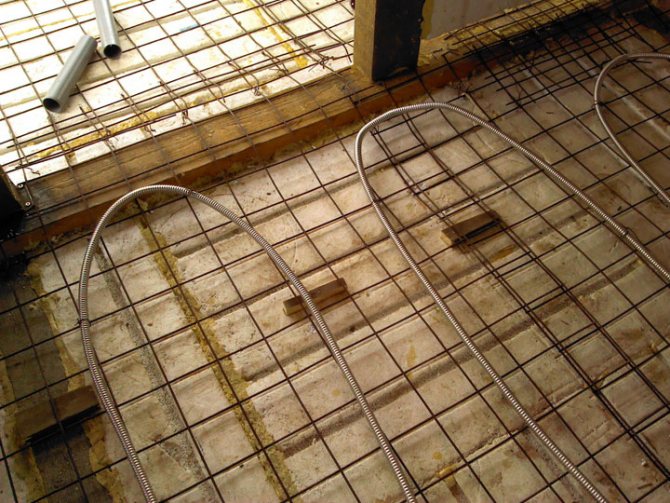
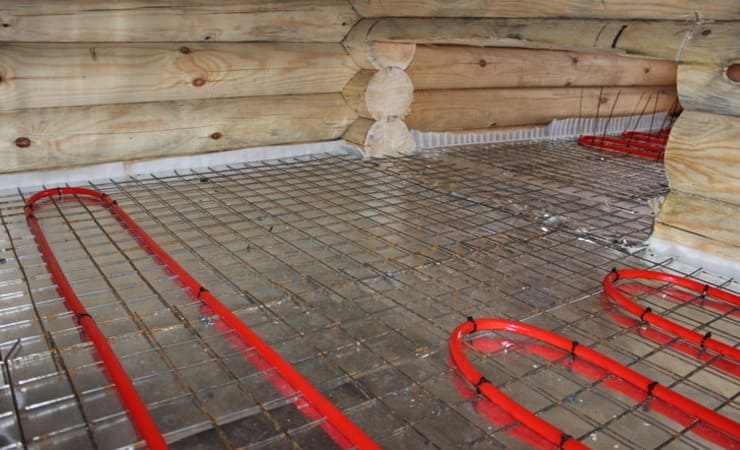
- A layer of reinforcing mesh is laid, raised from the floor level by 3-4 cm. A pipe is laid out over the reinforcement, which will be used as a contour. It is possible to use plastic or metal material. If necessary, you can use special floors on mats. The underlay helps to lay the pipeline with minimal difficulty. Laying is done in two ways. Snail - looks like an unwinding spiral, or snake. The snake method is more labor-intensive, but allows you to heat the room more evenly. The layout of the water floor heating system in the bathhouse is selected depending on the technical characteristics of the room and the total heated area. Pipe bends are raised above the level of the main floor by 50 cm.
- Filling the screed. The thickness of the concrete base is about 10 cm. The pipeline should be approximately in the middle of the screed. To avoid cracking, special plasticizer additives for heated floors are added to the solution. After pouring, the screed is covered with cellophane film and regularly watered until completely dry.
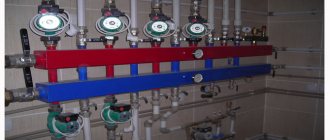
- After all the finishing work has been completed, collectors are installed in the bathhouse and thermostats are connected. The water circuit is fed from a sauna stove or boiler.
The system of warm water floors in a bathhouse has many advantages, one of the main ones is the absence of cold zones after installation. A heating system with heated floors can also be effectively used in a sauna steam room.
Installation features, common installation errors
The design of a water bath floor has one significant drawback. Compared to a similar infrared or electric heating system, a water heating system is quite difficult to install. For this reason, it is best to entrust the installation of water floors in a bathhouse to a professional construction team.
What are the most common mistakes made during installation?
- The outlet of the taps must be in the place where it is planned to install the water collector. Usually the collector is mounted in the dressing room. Before pouring the screed, the bends must be brought as close as possible to this place. The ideal option is in which, even before the start of construction, a design for water heating of the floor of the bathhouse is prepared.
- Lack of ability to adjust floor temperature. With an intensive firebox, especially an iron sauna stove, the heating of the coolant in the floor will easily reach 80-90°C. It is almost impossible to walk on such floors in a steam room. The problem can be solved by installing a mixing unit (collector) for heated floors. The unit automatically regulates the heating of the coolant and also allows you to turn off the heating system in the summer. Also, with the help of a collector, it is possible to create individual heating in zones, powered by one stove.
- Lack of thermal insulation. Trying to cut costs, some owners save on the use of thermal insulation materials. As a result, the floor freezes, takes a long time to warm up, and large heat losses are observed.
- Independent production and installation of a water heat exchanger in a furnace. Any violations can cause the circuit to break and create a dangerous emergency situation. It is best to choose ready-made sauna stoves with a water heating circuit for connecting the floor. Most modern manufacturers offer consumers multifunctional models of heating equipment.
Water heating systems
Water heated floors in a bathhouse can be laid in different ways, based on the technical characteristics of a particular room:
- Laying in a concrete screed. The technology is the same as for heating cables. The thickness of the screed will be greater since the size of the pipes is significantly larger than the diameter of the cable.
- Layered method. It is made on a special base made of wood or polystyrene foam. Often used by owners to avoid unnecessary loads on the foundation and wooden floors.
The first option is the most widely used. Its main disadvantage is the long waiting period for concrete to reach its standard strength. Pipelines are not subject to overheating inherent in cables, so they can be installed at any laying pitch. However, placing pipes too close to each other will lengthen and increase the cost of the entire system, and the coolant at the end point will noticeably reduce the temperature.
It is also not recommended to make a large distance between the pipes, since in this case the heating efficiency decreases. When solving the problem of how to properly lay pipes, you should remember that sharp kinks and bends that impede the process of fluid circulation are not allowed. The pipeline is secured with dowels and clamps.
If reinforcing mesh is used, installed on top of the insulation, then wire is used to secure the pipes. The fittings for fastening are chosen to be more powerful compared to the cable floor. When laying in a flat manner, the pipes are fixed between bosses located over the entire area of the polystyrene slabs. At the same time, they perform the function of thermal insulation.
Pipelines are laid using a snake or spiral. The beginning of the laying or the center can be located anywhere. The distance between pipes is reduced in areas of maximum heat loss - near external walls and window openings. Due to this, the heating of these areas increases.
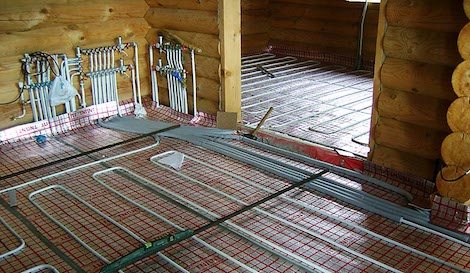
Each water system is equipped with a manifold cabinet. Both ends of the pipeline enter it - supply and return. Shut-off valves and devices for manual or automatic adjustment are installed in the same cabinets.
How to make an electric heated floor in a bathhouse
The first stage of work is the formation of a base with the correct slope for water drainage. All subsequent stages will take place precisely on this inclined base, namely laying:
- Thermal insulator;
- Heating elements;
- Floor covering.
The minimum required slope is 2 cm/m or 1˚. At the same time, the slope should be made not towards the center of the bathhouse, but towards one of the walls. In this case, it will be possible to avoid working with a bowl-shaped surface, on which it is much more difficult to fix all subsequent structural elements of a warm electric floor.
A groove is formed along the wall where the water will collect, which in turn also has a slope. But the projection of the slope inside the gutter is oriented in a perpendicular direction relative to the general slope. The gutter itself will be covered with a grill.
The total thickness of the warm electric floor structure in the bathhouse, from the ground to the floor surface, will be 23 cm, including:
- Clay layer - 5 cm;
- Sand-gravel mixture cushion - 5 cm;
- Base screed - 5 cm;
- Thermal insulator - 6 cm;
- Heating mats - 0.2 cm;
- Glue + tile ≈ 1.8 cm.
But inside the bathhouse, you need to select soil 23 cm below the calculated floor level, plus 2 cm, for each linear meter of the room along the slope line.
Let's consider the example of a 3 × 4 m bathhouse. The slope will be on the short side, therefore, you need to choose 23 cm + (3 m × 2 cm) = 29 cm.
The outlet of the sewer pipe is raised to the calculated floor level and plugged.
The base is compacted, then 5 cm of clay is poured in and also compacted thoroughly.
Tip: the slope is easiest to form at the very beginning, by adding clay to the desired level. After compaction, it will reliably keep its shape.
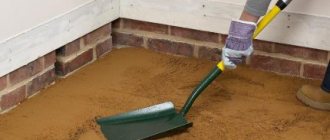
A layer of sand and gravel mixture is poured on top of the clay and compacted thoroughly. To make it more convenient to track the required slope, it is recommended to draw a linear scale on opposite walls, indicating the projection of each level.
Preparation for pouring and installation of beacons
Before pouring the screed, beacons should be installed. The distance between them is 1–1.5 m, varies depending on the experience of the concrete worker and the length of the rule. If the width of the surface being poured is 3 m, you can place 1 beacon in the center, and two on each side of it, at a distance of 1 m.
Important: it is the beacons that must finally maintain the required angle of inclination of the surface.
Along the perimeter of the walls, it is necessary to glue a damper tape 10 mm thick and 200 mm high.
Screed
The inclined surface is filled with semi-dry screed. The volume of concrete is calculated based on the size of the room and the thickness of the screed. For example, for a bathhouse 3x4 m, with a screed thickness of 5 cm, you will need 3x4x0.05 = 0.6 m³ of concrete.
Water-cement ratio 0.45.
Important: steel fiber is used for reinforcement!
Dispersed reinforcement increases the strength of the finished coating by an order of magnitude, because adhesion is carried out throughout the entire volume of the mixture, and not locally, as in the case of using conventional reinforcement.
The volume of fiber depends on the grade of steel fibers and is indicated on the manufacturer’s packaging.

The consistency of the finished semi-dry screed solution resembles moistened sand; when squeezed in the palm of your hand, water does not flow out.

This mixture holds its shape much better and gains strength faster. But after pouring, further work requires a technological break, which is necessary for a full cycle for the “cement stone” to mature.
With a screed thickness of 5 cm, the full cycle will be about 4 weeks.
Laying the heat insulator
The heat insulator requires solid foam polymer with a compressive strength of 2 kg/cm². According to its characteristics, extruded polystyrene foam 3 cm thick is best suited. But it must be laid in two layers with staggered intervals. The joints are taped.
Table of contents
- Options for arranging heated floors.
- Comparison of the characteristics of a heated floor system.
- Installation of a heated floor system using a special cable.
- Laying infrared film.
- Installation of a water heated floor in a bathhouse made of timber.
- Covering a heated floor in a bathhouse.
A heated floor system in a room can create a special atmosphere. Innovative technology is used to install a heating system not only in the house, but also in other rooms, for example, in a bathhouse.
The floor in the bathhouse with a heating system allows you to create a beneficial microclimate in the room. It is more comfortable to perform hygiene procedures in it. In addition, the system will ensure faster and better drying of the surface, protect against the appearance of mold and mildew, and extend the service life of floors and interior decoration.
Installing a heated floor in a bathhouse is not a very simple and cheap undertaking, but nevertheless, many owners prefer this type of heating. Having understood a little about the technology and the types of the system, you can perform the installation yourself.
Do-it-yourself warm floors in a bathhouse
The flooring in a bathhouse is in most cases made of wood, which is due to the low thermal conductivity of this natural material, and therefore you can safely walk on it even barefoot. The base is poured from a concrete mixture with crushed stone additives, which allows you to create a solid foundation that is resistant to the negative effects of climate.
Unfortunately, it should be recognized that concrete has a high level of thermal conductivity, and this provokes overall heat loss. To ensure maximum comfort, it is enough to make a warm floor in the bathhouse with your own hands - after all, there is nothing difficult in this process.
Brief overview of types of heated floors
A warm floor in a steam room can be an excellent addition that will make already pleasant healing procedures even more comfortable. Due to the variety of offers on the market, you can choose the most optimal type of flooring. In particular, there are three types:
- water floor;
- electrical cable;
- electric film (infrared).
Each of them has its own undeniable advantages, but also has a number of features that should be taken into account when installing the floor.
Water floor in the sauna, installation
From an installation point of view, a water floor is the most complicated, as it requires a number of preparatory works and also takes significant time (up to 28 days).
Electric floors are much easier to install, however, they also have their own characteristics.
Installation errors
It is not difficult to carry out independent work on laying a heated floor in a bathhouse, despite this, mistakes are often made that lead to defects in the entire system.
To avoid them, you must adhere to the following recommendations.
- When choosing a cable or mat, you need to take into account not the entire area, but only the space where furniture will not be located.
- It is not recommended to shorten the cable placed in the system. This increases the load on it, causing it to fail. That's right, reduce the pitch and increase the heated area.
- It is forbidden to turn on the system until the concrete is completely dry.
- The heating cable element can only be laid on a clean surface that has been treated with a primer.
- The distance between parallel lines in the structure must be at least 5 cm.
- When laying the cable with your own hands, the degree of bending should be in the range: 5 - 9 of its diameters.
- The heating device sensor must be installed in an accessible place, and it must be protected by a corrugated box.
- It is imperative that the floor surface comes into contact with the sensitive probe of the sensor.
- When laying the system, do not walk on it with shoes to avoid damage.
- Before installing a water floor, you must first prepare a diagram.
- You need to carefully check the water floor for leaks.
Taking these points into account, you can independently install a heating system in the bathhouse.
Which bath floor is better to choose?
No one doubts the need for heated floors in a bathhouse under tiles, because they have a number of advantages:
- The service life is extended, because the steam room is a place with high humidity. In this regard, the likelihood that a wooden surface will begin to rot or become moldy is enormous. Dry air distributed from the bottom of the heating surface to the top promotes better drying of the room.
- Minimizes the presence of drafts, thereby reducing the likelihood of colds among bathhouse visitors. Ideally, infrared flooring solves this problem.
- Creates a more comfortable washing process - it’s more pleasant to step on a warm tiled floor.
- Maintains the bathhouse in good condition - regular heating of the room will protect it from destruction.
Despite all the positive aspects of such floors, they also have disadvantages: high cost, labor-intensive installation and difficulty in repair, because basically it requires removing the flooring.
Taking into account the design and layout of the room, you can install heated floors under tiles in the washroom, dressing room, sauna.
It is most advisable to install a film infrared heated floor in the bathhouse, since for its operation it is enough to connect to the power supply and it is quite simple to install. For a water floor, it is necessary to install a boiler, which is expensive and requires pouring screed, which takes up to one month to dry completely.
Therefore, even with the high price of electricity, the infrared system option still looks more practical and economical, since the system does not work all the time.
Which design to choose is up to the owner. It is worth starting from your preferences, financial capabilities, and, of course, the strength of the foundation and the layout of the room.
Final design
After installing the insulated floor, it’s time to install the top covering. The sanitary condition of bathhouses, as well as their aesthetic appearance, depends on it. Each room uses a different type of face covering.
Ceramic tiles or porcelain tiles are best suited for a washroom. These materials have good waterproofing and thermal conductivity properties, they are durable and very practical during cleaning.
It is better to decorate the dressing room and locker room with laminate or linoleum. The last option is considered budget. But it should be borne in mind that certain types of linoleum, when very heated, emit toxic gases.
Don’t forget to arrange the interior design of your bathhouse to ensure complete aesthetic beauty
It is not recommended to decorate bath rooms with parquet, as well as any decoration made of wood. Regularly getting wet and dry, the tree loses its shape and cracks. In addition, it is an excellent thermal insulator and therefore is not suitable for covering heated floors.
The installation of a heated floor in a bathhouse is available to everyone. All you need to do is choose the most rational design option, the optimal one in terms of financial investment, installation and maintenance, take the time to install it, and comfortable conditions during bath procedures are guaranteed.
Installation
How to make a warm floor in a bathhouse? The most difficult part is installing the water one. One of the reasons for this is the need to pour a concrete screed, which takes a very long time to harden.
Installation of electric heating is much easier, but also has its own subtleties.
Electric
This option is an excellent solution for a bath. A heating cable is used as a heat conductor.
No complex manipulations are required to make the connection.
The advantages of installing electric heated floors are:
- presence of a temperature regulator;
- ease and speed of installation;
- the cost is significantly lower than that of water.
The disadvantage is the electricity consumption, but it only needs to be turned on when using the sauna.
Selecting the type of heating element.
When using a cable floor, heating is carried out by a cable, which is placed on the floor using a mesh and fasteners.
The second option is the use of heating mats. With this method, the electrical cable is located in a special way in a heat-conducting mat. This helps to significantly reduce the installation time of a heated floor in a bathhouse.
The third option is to use infrared film.
Development of an installation project
When carrying out the project, it is worth considering that during installation different cable laying options are used:
- installation in a cement screed;
- location on the surface of the screed under laminate or ceramic tiles.
The project should have:
- electrical cable layout diagrams in all rooms of the bathhouse;
- the place where the heating regulator will be installed and the power wires will be routed has been determined.
Checking Electrical Wiring
This system consumes a large amount of electrical energy. Therefore, before installation, it is recommended to check whether the wiring will withstand the load or whether a new one should be installed from the panel specifically for the functioning of the system.
Be sure to install automatic fuses that will help avoid fire in the event of voltage surges.
Selection of materials
For installing a heated floor in a bathhouse
you will need:
- electric cable that will carry out heating;
- materials for making connections;
- temperature sensor;
- Temperature regulator;
- automatic fuse;
- copper cable for grounding;
- consumables for fastening (clamps, construction tape).
For electric floor heating, the following cable options are used:
- resistive - it contains a core with increased resistance, due to which the cable heats up;
- self-regulating - heating is provided by the polymer matrix; in this case, overheating is not possible.
Preparing the base
The surface is leveled using a cement screed. In recent years, to save time, building mixtures are often used instead of cement screed. They dry much faster, which reduces the installation time for a heated bath floor.
To make laying the cable easier, you can chalk out a diagram of its placement.
A drain must be installed in the floor of the steam room and sink, and the floor is leveled, making a slight slope in its direction.
Preparing a place for the temperature controller
It is recommended to install the regulator at least 80 cm from the floor. A hole is made in the wall similar to the one needed to install the socket. A special groove is made from the hole to the floor for wiring.
Laying insulation
Various materials are suitable for installation as insulation:
- special polyethylene;
- foil backing.
The last option is used most often, since foil perfectly reflects heat, preventing losses and increasing the efficiency of electric heating.
When installing insulation, it is necessary to lay it no closer than 0.5 cm from the wall.
All joints must be taped with construction tape.
Installation of the regulator and temperature sensor
The thermostat is necessary to regulate the temperature of the heated floor.
The sensor is placed on the floor in a special corrugated tube. It is not recommended to bend the corrugation, as this may damage the wire.
These sensors and regulators are installed in all rooms.
Cable placement
The cable is laid out like a “snake” according to the previously developed diagram. The cable is secured with construction tape or laid on a metal mesh and secured with clamps.
When using heating mats, the procedure is simplified. The strips are placed at a distance of 5-10 cm from each other, and a distance of 15-20 cm is left to the walls.
The cable layout must be saved in case a possible breakdown is repaired.
It is not recommended to place the cable in places where furniture is planned to be placed. The disadvantage of this is the impossibility of redevelopment of the premises.
Checking the quality of installation
Before pouring the screed, it is necessary to check the system resistance. The measurement result must be within the normal range.
All joints must be carefully insulated to prevent moisture ingress.
Filling the screed
To do this, you can use one of the following types:
- concrete screed;
- tile adhesive;
- self-leveling floor
For all types, the recommended height is 3-4 cm.
Flooring installation
Having completed all the steps, proceed to installing the selected type of covering on the floor.
Water
When installing a water heated floor, the air in the bath is heated using tinder, in which hot water circulates, heated by a gas or electric boiler.
Installation of this system is significantly more expensive than an electric one, but has a long service life.
Advantages:
- correct heat distribution to heat the air throughout the entire room;
- compatibility with all types of coatings;
- independence from power outages;
- the ability to regulate the temperature in each room;
- absence of radiators in the room, which significantly spoil the view.
Flaws:
- long warm-up time;
- high cost of installation;
- reducing the height of the room;
- in winter, the system must work constantly, otherwise the water in the pipes will freeze.
To install a water heated floor, you will need to follow the steps below.
Step 1. Design
During installation, the height of the floor in the bathhouse increases. This should be taken into account when constructing doorways, which should maintain a standard height.
Based on the parameters of the rooms, the amount of necessary materials is calculated.
Then a layout diagram of water pipes and equipment is developed. Please note that heating elements are not placed under furniture. In addition, it is recommended to make the contour length no more than 0.9 m.
Step 2. Selecting materials
The following materials will be required:
- boiler - usually an electric boiler is used in baths, since it is not rational to supply gas to the bath;
- circulation pump - ensures the movement of hot water;
- pipes - the use of copper, metal-plastic and polypropylene pipes is allowed;
- insulation - special polyethylene or foil backing;
- materials for screeding - cement, sand, water, construction tape and clamps.
Step 3. Installing the circulation pump
This leaves free space for bending pipes, which can only be mounted from below. It is necessary to install a valve between the pump and the pipe system, which will shut off the water when repairing a breakdown or performing maintenance.
Step 4. Preparing the base
The floors in the sink and steam room are made with a slight slope towards the drain hole. In the waiting room - performed smoothly.
The screed should have the same thickness over the entire area of the room.
The dried surface is cleaned of debris and dust.
Step 5. Pipeline installation
When installing water pipes, use one of the proposed schemes:
- “snail” - suitable for small rooms where using one circuit is sufficient;
- “snake” – used for more spacious rooms.
During installation, it is optimal to lay the pipes at a distance of 30 cm from each other. Closer - there will be excessive consumption of pipes, further the surface will heat up unevenly.
The free end of the pipe is connected to the pump.
Step 6. Checking the quality of installation
To do this, water is pumped into the system under high pressure throughout the day. If leaks are detected, they are eliminated and the test is carried out again.
Step 7. Implementation of the screed
For this purpose it is allowed to use:
- concrete with plasticizer;
- a special mixture that dries quickly and conducts heat well.
The height of the screed is 0.3-0.7 cm. It is imperative that when implementing it, the system is filled with water under pressure.
The concrete hardens completely within a month, and the special mixture from 1 to several days, depending on the manufacturer.
Step 8: Launch
After the screed has completely hardened, you can start the system. The room will be fully heated within a few days.