Heating devices in which electricity is generated into heat are called electric. These heating systems include electric heated floors, which are used as the main or additional source of heat.
Electric floors come in several types. We will help you understand the features of each model, tell you about the positive and negative sides. You will also learn how to install electric heating yourself, or we suggest you read more detailed instructions on how to install different types of electric floors yourself.
Types of electric floors
The designs of warm electric floors differ in the type of heating element - a cable or an infrared heater.
The first type includes:
- heating cable - single, two-core or self-regulating wire can be used;
- heating mats - the same cable, but fixed on a mesh.
Infrared systems are:
- film - flexible fabric with an infrared heating element;
- rod - mats with carbon rods.
Below we will look at their features and disadvantages in more detail.
Types of heated electric floor
System with wire for heating. The model includes a thermostat, a temperature sensor, a wire with two-layer insulation, and heating is carried out due to the last element. This type is considered the cheapest, but at the same time it is the most labor-intensive option. First, the long wire is laid out on the base and secured with mounting tape.
The main thing is to lay everything out correctly, to maintain an equal distance between the individual turns, without allowing it to overlap or bend.
System with heating mats. This option is convenient to install; the wire was laid at the factory and securely secured inside special reinforcing mats, so you don’t have to worry about how to lay the cable correctly. Just unroll the rolled mats and connect them to the network; it is important to choose the power correctly.
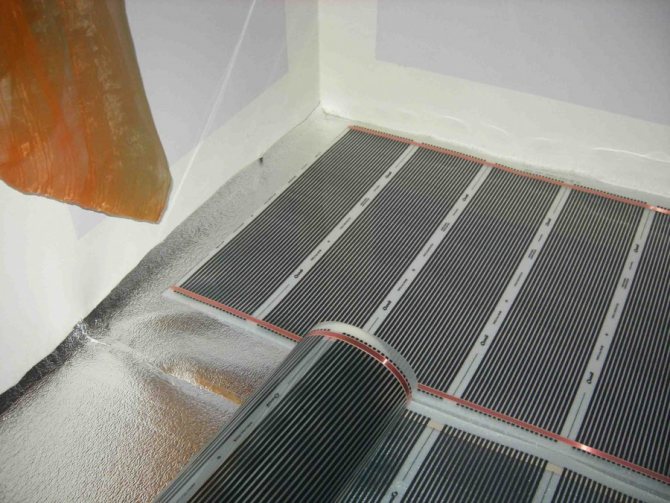
System with infrared film. This model is not at all similar to the previous ones; the heating source is a carbon material that produces infrared radiation, it is applied to the film. If you choose this option, you will not have to install a cement screed.
The final coating is often simply laid on film, but among all the ETP options, this is the most expensive and the least reliable.
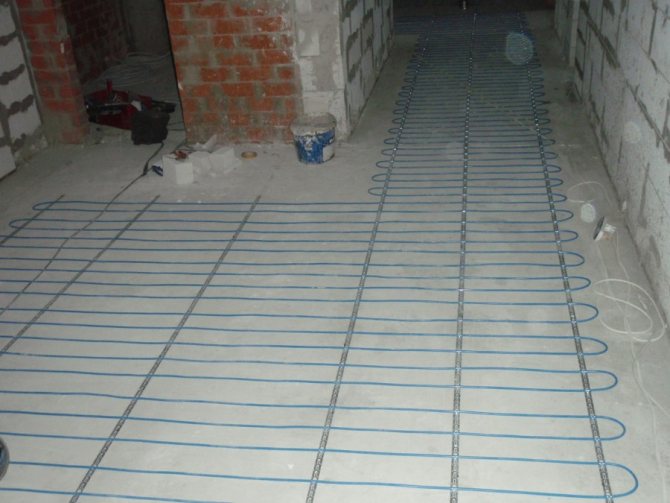
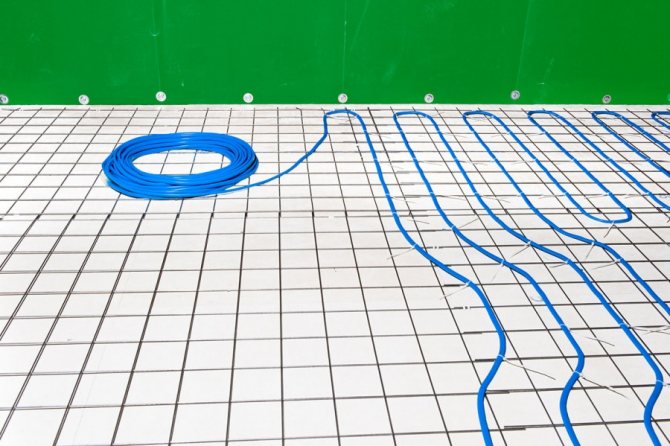
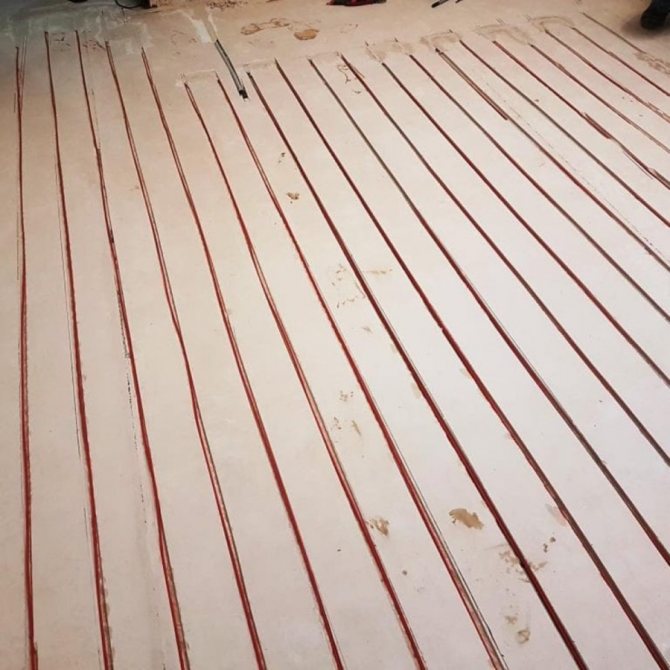
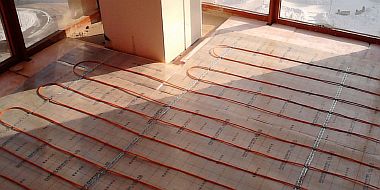
Cable floor
In the design of a cable electric floor, the main element is the wire, which contains electricity. energy is transformed into heat.
Installation of cable floor and heating element
Cable heating includes: heating cable, couplings, adjustment and control devices.
The main part is the heating cable; it has several insulating layers. It consists of: current-carrying conductors, fiberglass reinforcement, polyester film, copper conductor, aluminum screen and a protective PVC layer.
The cable for warm electric floors can be resistive or self-regulating. Resistive ones include:
- Single-core - not expensive, but the high level of electromagnetic radiation makes installation unacceptable in living rooms.
- Twin-core - in it, one heating core performs the function of a regular wire, the second - a heating wire. This property increases the cost, but reduces EMR.
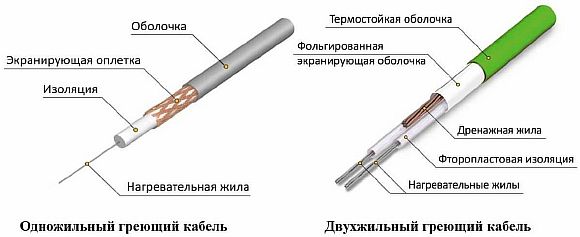
Self-regulating cable - it can change the heating level depending on the room temperature. The wire structure is two closed parallel current-carrying conductors with a semiconductor matrix.
These semiconductors are responsible for regulation and control the heating level. The property of this type of cable leads to energy savings, but this does not affect the uniform heating of the surface.
Principle of operation
Externally, a heating cable resembles an ordinary wire that transmits electrical energy, but everything is not so simple. In its veins, electricity is converted into heat.
Since the wire is shielded, it is suitable for installation in rooms with high humidity levels.
Advantages and disadvantages
This electric floor model is the most difficult from an installation point of view. After all, you need to lay and secure the cable, fill it with concrete screed - this is a labor-intensive process (mixing the mortar, pouring it over the surface and leveling it with the rule).
This design reduces the ceiling height and makes the structure heavier, which makes it unsuitable for installation in houses with weak floors or in high-rise buildings. Another disadvantage is that it cannot be placed under heavy furniture and plumbing fixtures.
However, it should be said that cable-heated electric floors have their advantages. They can be laid in rooms with a non-standard layout, and laid to heat elements outside the house - the roof or drains. There is also no risk of leaks.
Electric cable underfloor heating
In the range of cable systems there are two serial lines:
- self-regulating;
- resistor.
Cable electric floor heating systems
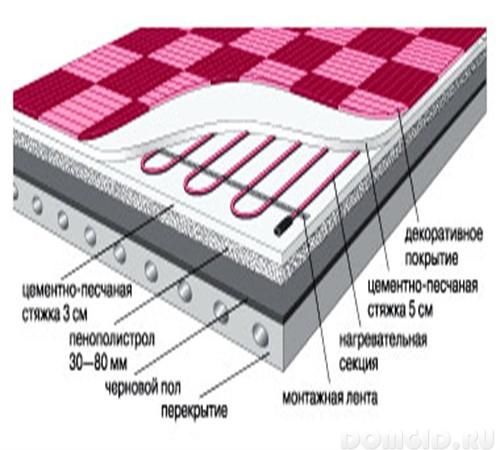
Their general properties: they are installed on the floor under a reinforced concrete floor screed made of cement-sand mortar. This fact, when used in apartments of serial multi-storey residential buildings, refers to the disadvantages of warm electric floors, because the ceilings in such buildings are low, and the screed reduces the height by another 5 cm. The floor covering, if, for example, ceramic tiles are chosen, brings the ceiling a couple of centimeters closer to the floor level.
Resistor type
Among these two varieties, resistor modifications have the lowest price level. They use one or two-core powerful cables. Their advantage lies in the simplicity and arbitrary direction of installation. This option is beneficial for rooms with a non-standard layout, where the floors have versatile shapes.
Self-regulating view
The self-regulating heating system uses two parallel cables on the sides of a common semiconductor polymer insert. It is heated to a given temperature due to transverse electromagnetic radiation created in the cables and penetrating it. When the room is cold, the polymer takes more energy from the conductors to heat up to the desired temperature; if it is warm, it takes less. He always adheres to a given regime, so installing an electric heated floor will not harm the furniture or cause unpleasant burning sensations or cold in children and older people.
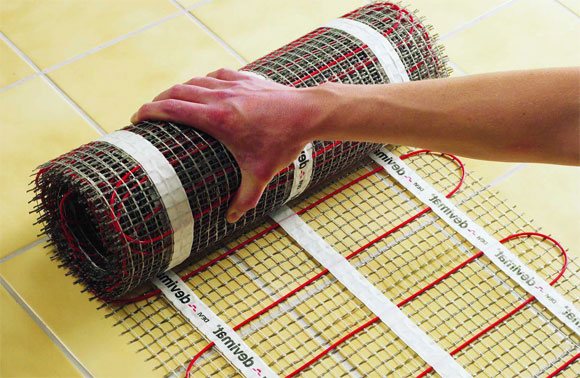
Heating mats
Heating mats belong to the electric cable floor, only the wire is fixed to the fiberglass sheet.

Device
The heating mats are 0.5 meters wide, and a wire is fixed on them at a set pitch. The device kit includes thermomats with cable and corrugation. A temperature sensor is inserted into the corrugation; it protects it from moisture. If the structure is filled with glue and it does not completely cover the sensor, then it is necessary to install a moisture-resistant device.
To install such a warm electric floor, you will need to stock up on a thermostat with a remote sensor, mounting boxes and wires. When choosing a thermostat, the level of energy consumption is taken into account, and the wires, or rather their cross-section, are selected taking into account the power of the device and the material from which they are made.
The design of the heating element is simple - a cable, usually two-core, no more than 45 mm. The cores are shielded and covered with a protective sheath.
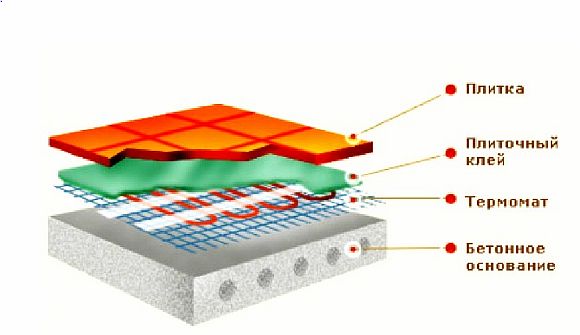
The design of a warm floor with heating mats consists of a rough base, heat and hydromaterials, the mats themselves, tile adhesive and finishing coating.
Principle
The operating principle of the mat is the same as that of a floor made of ordinary cable.
The current passing through the conductor generates heat, through convection it is transferred to the screed, from it to the floor, and it warms up the air.
Advantages and disadvantages
The main advantage of heating mats is the simplicity of their design and installation. There is no need to fasten the cable or calculate the laying step, the structure is completely ready, you just need to lay out the fabric.
In addition, such a floor warms up faster than a regular cable floor, the “pie” is less voluminous, and the mats are thin, they can be mounted in a layer of tile adhesive. Since the device is lightweight, it will not be supported by strong floors. But such floors are more expensive.
The disadvantages also include:
1. Difficulty in laying; if necessary, go around an obstacle. Let’s say it’s difficult for a plumber to get around, since you can’t cut the cable, you can only trim the mesh and bend the wire.
2. Inability to customize the laying step to suit your needs.
3. It is inadmissible to use it as the main heating, since the mats have little power.
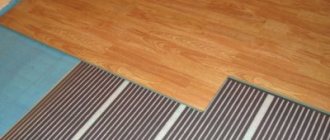
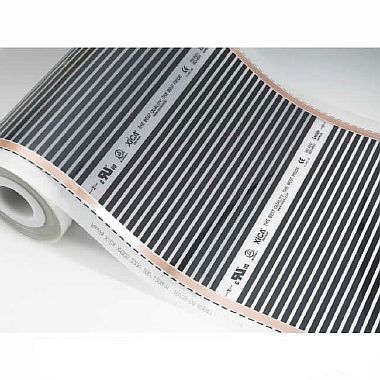
Infrared film
Warm floors based on infrared film are one of the models that also runs on electricity.
Device
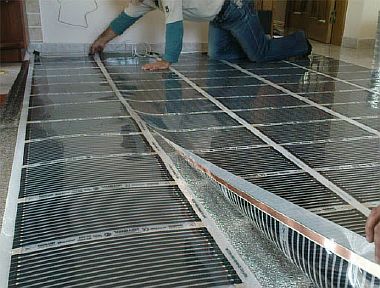
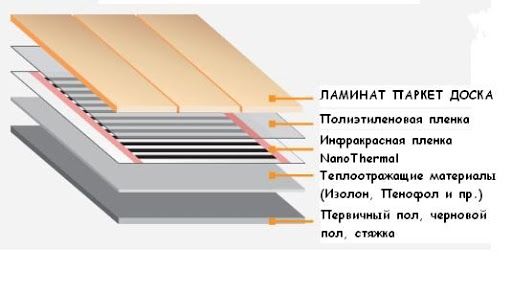
Infrared flooring as a heating device has recently begun to be used. It includes thermal film, clamps, insulating products, electrical wiring, thermostat, sensor and foil material.
The system consists of a two-layer dielectric durable film with a carbon heater inside, the thickness of the structure is about 2 mm.
Infrared films are available in two types:
- solid - two-layer polyurethane fabric, with continuous carbon coating inside;
- striped - this is the same, two-layer lavsan or polyurethane film, with carbon or ultra-thin aluminum strips.
The heating elements are connected in parallel and in series using thin copper-silver conductors.
The method of installing the film system is “dry”, without pouring a screed.
Principle of operation
When the device is connected to the network, the plates heat up and thermal energy is emitted in the form of infrared waves, which heat objects in the room.
Advantages and disadvantages
The film has advantages over cable floors. Firstly, it does not reduce the height of the room, as it is thin. The weight of the structure is also not great, so it can be installed in high-rise buildings or houses with fragile floors.
Secondly, the installation work is simple and easy to do yourself. The film is rolled out on a base; if necessary, it can be cut, for this there are special lines on it. There is no need to consider the location of the furniture and no screed is required. Dismantling is also not difficult.
It is worth noting that infrared flooring is a reliable system, and the most energy-saving - it saves up to 50% of resources. It does not emit electromagnetic waves that negatively affect human health.
Disadvantages include high cost and the risk of electric shock, but with modern systems this is not significant. Another disadvantage that applies to all models of electric heated floors is that they operate on electric current.
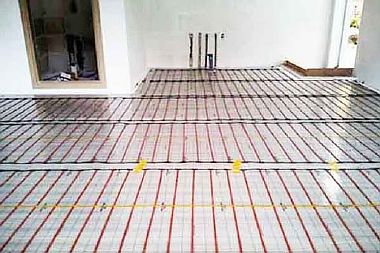
Photo of electric heated floors
Heated floor temperature sensor: installation features, connection options and do-it-yourself testing
How to charge the battery correctly? Step-by-step instructions with photos, videos and useful tips on how to restore charge at home
Insulating tape - the best insulating materials, their properties, characteristics and application features
Read here! Placing lamps on the ceiling - correct calculation of illumination and examples of ideal lighting in a room. TOP ideas from the master!
Rod floor
Core floor - it heats the room with far infrared waves.
Devices
The rod system is carbon parallel rods connected into elastic mats with a power wire. The average width of the canvases is 0.8 and the length is 25 meters.
The heating element consists of rods consisting of carbon, silver and copper, but only the carbon component generates heat. The design of such electrical equipment also includes a temperature controller and sensor. You will need bitumen insulation, thermal insulation material, and corrugated pipe.
Principle of operation
Rod infrared floors are self-regulating devices, that is, the amount of heat is directly proportional to the temperature. If heat dissipation is poor (let's say you've placed furniture), the amount of heat generated is reduced, so overheating does not occur.
This property allows you to lay mats over the entire area. When using this system, it is not the air masses that are heated, but the objects in the room are heated.
Advantages and disadvantages
An important positive feature of rod floors, as well as infrared floors, is the absence of electromagnetic radiation. Heating is carried out by infrared waves.
The system can be installed under any floor covering, it is environmentally friendly, and can be installed in rooms with a non-standard layout and in rooms with high humidity. And the property of self-regulation helps to save resources, and therefore money.
The main disadvantage is that it is installed only in the screed, so dismantling is impossible. Such heating has a high cost and a short service life - from 3 to 10 years.
Errors in the design of electric heated floors
Before you begin installing an electric heated floor, you should familiarize yourself with all the common mistakes, which include:
- The most important mistake is considered to be an incorrect layout of the heating system. When compiling it, it is very important to observe the location of large furniture and household appliances. By placing a heating structure under these places, the electrical wiring will quickly overheat and eventually fail.
- Before connecting cables or heating mats to the power supply, you need to wait until the screed is completely dry. Otherwise, the heater may break or burn out completely. Therefore, in order to check the integrity of the wires, a connection by resistance is used. It is worth noting here that these infrared mats must be immediately connected to the network for testing.
- Before installing the screed, it is worth checking all the insulation of the heating structure very carefully. Its resistance must match the recommended value stated by the manufacturer. The maximum error should be no more than 10%, otherwise after the screed dries, the heating system may malfunction or not work.
- Before pouring the temperature sensor into the screed, it must be placed in a special corrugation. Otherwise, replacing it if it breaks will require a lot of effort.
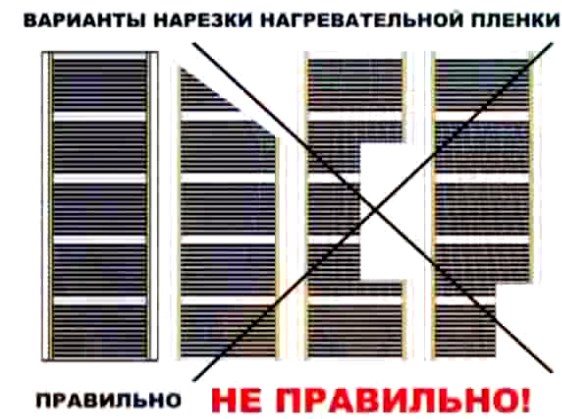
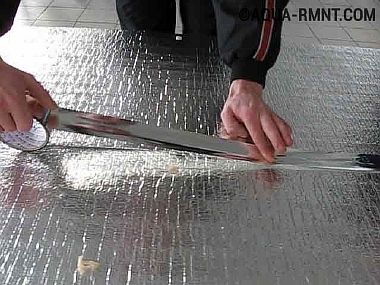
Correct cutting of IR film
Having considered all the tips and recommendations given, we can summarize that you can not only install an electric heated floor in your room yourself, but also do all the work in the shortest possible time. And if you take into account all the nuances and avoid mistakes during installation, this heating system will last a long time.
AdminAuthor of the article
Did you like the article?
Share with your friends:
Comments (1)
- aparbep Sep 07, 2020 at 1:54 am
Excellent instructions for installing heated floors!
Answer
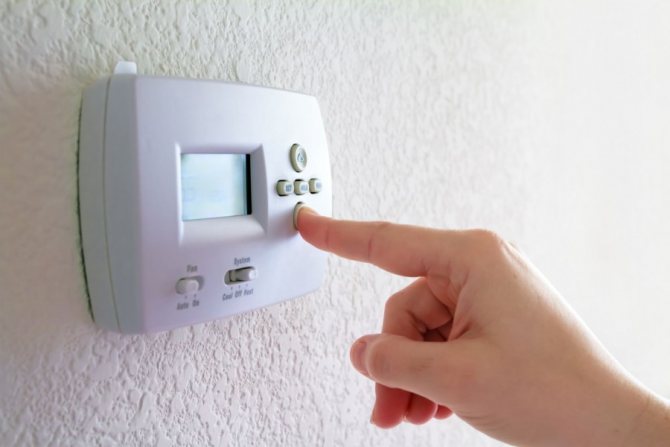
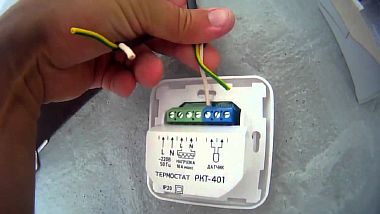
Temperature regulating and monitoring device
The thermostat is responsible for the process of adjusting and controlling the temperature level of the electric floor. After setting, it itself maintains the set temperature.
The thermostat is based on the indicators of the sensor; it is connected to it with a thermal protection wire.
Thermostats are either mechanical or automatic:
- Automatic ones have a digital display, it shows the degree of heating of the room. A convenient component in such a device is a remote control for adjusting the temperature.
- Mechanical - equipped with an adjustment knob, it sets the temperature level.
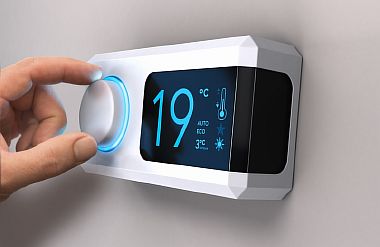
The thermostat works constantly, so the material from which it is made must be of high quality, and the contact connections are reliable. It reacts to any signals from the sensor - turns off or turns on the heating.
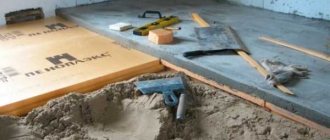
Preparing the base
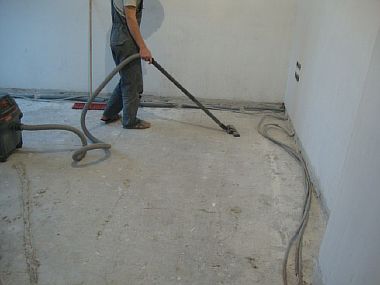
Work on installing heated floors is classified as “clean”, therefore, before installation, the walls should be cleaned and plastered, and cracks should be repaired. But after such work, the surface is covered with dirt, and even hardened tubercles of concrete mortar.
According to the technology of laying heated floors and their installation, the base for infrared systems must be smooth and clean, so all this dirt should be removed. Hardened pieces of concrete can be removed with a spatula or a special compound. After this, the surface must be moistened and all debris must be swept away with a broom.
If there are deep cracks, they are sealed with cement mortar. If there are large differences in the floor surface, you can pour a thin layer of screed to get a level base.
Laying thermal insulation
The function of a thermal insulation product is to minimize heat loss.
A heat-reflecting substrate 3-4 mm thick is laid. It is better to take a product with a foil surface that should face the ceiling. The canvases are held together with tape and attached to the base.
As thermal insulation, you can use foam sheets in combination with foil.
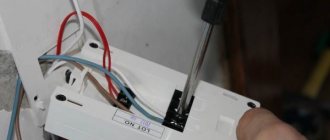
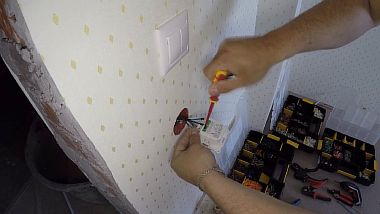
Installing a thermostat
Before installing the heating film, you need to install a thermostat. It is mounted on the wall, at a distance of at least 30 cm from the floor.
Before cleaning the base, a recess is made in the wall for the thermostat, and grooves are made for the wires from it to the floor.
Laying heating elements
The IR film is laid according to plan (it does not spread under furniture), at a distance of 5 cm from the walls. Lay the canvas with copper strips down. One cannot allow one canvas to overlap another. Fixation is carried out using construction tape.
If necessary, the film can be cut along the lines there.
Connection
The process of connecting infrared film consists of several stages:
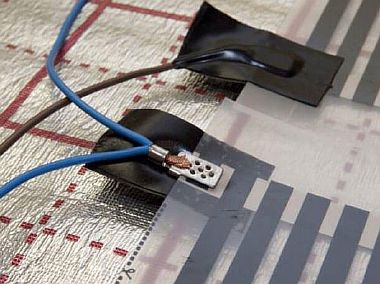
- A temperature sensor is connected - it is placed in a corrugated pipe, which is located in a recess made in the heat-insulating material (its average width is up to 1 cm). The wiring from the sensor, also placed in a corrugation, is pulled along the grooves made in the wall to the thermostat and connected to it. The sensor is placed at a distance of 50 - 70 cm from the wall with the thermostat installed, and is attached with tape. The device must not rise above the thermal insulation material.
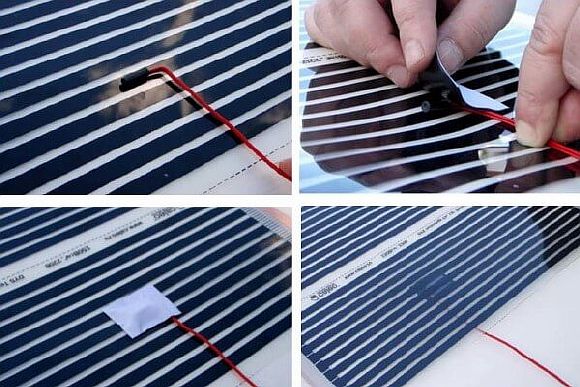
- The film is connected - for this, the terminals that are included in the floor kit are used. At the edge of the film, the insulation is removed from the wire. It is rolled up and inserted into the terminal, the clamp is fixed with pliers. Then the junction is isolated with bitumen tape. To prevent the terminals from rising up in the structure, recesses are also made for them in the thermal insulation.
The terminal itself is installed with one side on the copper strip, the second should be located on the inside of the film. The contact between the clamp and the product is also insulated.
- The thermostat is connected - that is, connected to an electrical power source.
After this, the system must be checked for functionality. If all strips heat normally and there is no short circuit anywhere, then you can proceed to laying the floor covering. But before this, the device is covered with a polyethylene protective film, which will protect it from accidental ingress of water.
Installation diagrams in an apartment and a private house
There are several installation schemes for electric floors that are designed for different rooms:
- In a screed - according to the construction technology, the device is the most expensive and requires a complete overhaul. But the design turns out to be reliable. The installation process according to this scheme is labor-intensive and will take a lot of time, while the floor “pie” is heavy. The scheme is recommended for private houses; it is not suitable for buildings with wooden floors.
- Built-in structures, in the presence of a ready-made screed. More often they are mounted under ceramic tiles and installed in the kitchen or bath. This scheme is used if there is already a good screed, or the floor is installed on concrete floor slabs, which are of ideal quality for placing heating elements. It is enough to fill this system with a liquid self-leveling mixture, and when laying ceramics, you can use glue.
- Laying a film heater is the simplest scheme. The process is quick, without repairs, you just need to roll out the roll. The design is lightweight, suitable for an apartment.
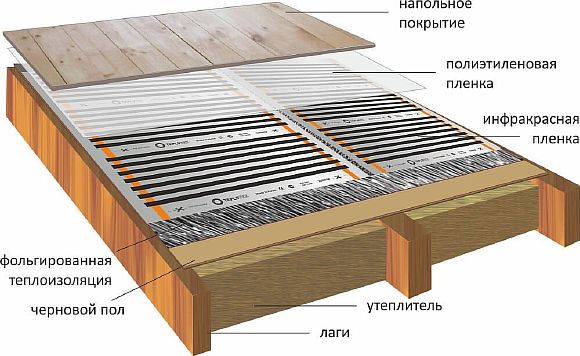
- Installation on wooden floors - a scheme with infrared film is recommended here, but more emphasis should be placed on fire safety. Cable laying on logs is possible.
Comparative characteristics of the sexes, which one to choose
Before choosing a heating system that is suitable for you and will create comfortable conditions in your home, you should familiarize yourself with the characteristics of both the device and the room.
If the floor is planned as the main source of heat, then a powerful cable structure in the screed is required. It is reliable and can provide the house with the required amount of heat.
Infrared systems are suitable for the construction of additional heating. Especially film, it is mobile and can be laid only in the required area. It is light in weight, so it is suitable for rooms with unreliable ceilings, and in an apartment in a multi-storey building.
Electric heated floors are gaining popularity today, since their installation is simpler than water ones, as a result of which installation is not difficult. The only significant drawback is energy costs. But modern systems allow significant savings on resources. Therefore, to ensure that your home is always warm and comfortable, give preference to electric heating.
Features of the heated floor system
Of course, warm water floors in an apartment have a certain number of nuances.
Thus, prolonged exposure to thermal energy on the legs can negatively affect the health of residents; it is also not recommended to install such a system in bedrooms, because this can cause frequent headaches. Although, there are some rooms in which such a system will be very useful, for example, in those rooms that are on the ground floor. You should also be careful when installing the heating system in the bathroom. In this case, as a rule, there is ceramics on the floor, which conducts heat well; besides, in the bathroom, more than anywhere else, you want to step on a heated floor. However, due to the high humidity of the room, you should be especially careful during the installation process.
To ensure maximum safety you must:
- Provide insulated and high quality copper wiring.
- Install grounding for additional protection.
- Purchase a device in case of a protective shutdown (with an operating current of 30 mA).
If we are talking about a concrete floor surface, then the electric heated floor in the apartment is installed simultaneously with the heating cable. This cable must be carefully insulated, since if air spaces occur, the system may collapse and cause a short circuit. In order to avoid this, the floor should be poured with concrete mortar with special care.
Another important point is the installation of heated floors in places where household appliances are located. If it does not have legs and is placed directly on the floor, the surface of the equipment can quickly heat up, so you should adhere to certain safety rules.