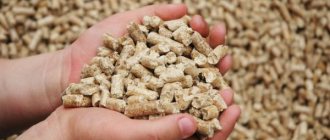
The problem of hot water becomes relevant where there is no centralized hot water supply: in country houses, private city and country houses. Today, installing a ready-made device for heating water to the required temperatures requires serious investment. An alternative way to supply hot water is an indirect heating boiler, which you can make yourself. Its advantage is that hot water supply to residential premises is carried out economically and at minimal financial costs.
On this topic:
We choose a heating element for a boiler on the Aliexpress website from the Chinese...
Mar 16, 2018
How to choose the best water filter for your dacha
Nov 10, 2017
Which water heaters are best suited for a summer cottage?
Nov 3, 2017
Installation and wiring of a water heater
Jun 17, 2017
BACK FORWARD 1 of 14
Indirect heating boiler device
In essence, the device is a regular heat exchanger.
True, heat exchangers are traditionally built according to the “pipe-in-pipe” principle, and in this case the elements of heat exchange are a vessel and a tubular coil.
The storage vessel plays the role of an external “pipe”, inside of which there is an internal “pipe” - a coil. The heating fluid of the heating system is passed through a tubular coil, and the inner area of the vessel is filled with cold water. The coolant heats the walls of the tubular coil, and they, for their part, heat the cold water in the vessel.
The design of an indirect heating boiler in many cases is made using the technology of counterflow of two media, different in temperature level. To put it another way, if the outlet of heated water is at the bottom of the tank, and the supply of cold water is located above, in this case the heat carrier is supplied to the coil at the upper level.
The reverse configuration is performed if the cold water outlet and inlet are reversed. In practice, more often there are schemes with an upper outlet of heated water.
If we take into account that an indirect heating boiler belongs to thermal plumbing equipment, the device and the adjacent piping are subject to thermal insulation. It is smart to install the system in close proximity to the heat carrier control unit of the heating system. This approach will ensure lower costs for installing equipment, and heat losses on the way from the heating system to the indirect heating boiler will be significantly reduced.
Do-it-yourself heating from a water heater: nuances of operation
As a rule, a boiler is used to provide hot water to homes. The water flowing through the pipes is heated by a heating element. Already hot water is distributed through pipes to the bathroom or kitchen.
A flowing electric water heater can be used as a boiler for heating rooms.
Most often, small flow-through heaters are used to heat summer cottages with non-permanent residence. A significant disadvantage of using such a device is the high consumption of electricity. Before using the boiler as a heating boiler, you need to equip it with a pump for circulating coolant and provide the ability to replenish the system directly from the water supply. It is not recommended to use a homemade water heater for the heating system due to the unsafety of its use.
Recently, induction water heaters, which are used to heat water and heat rooms, have been gaining popularity.
Design and installation by yourself
The main task at the design stage with your own hands is the choice of a storage tank whose volume would cover the needs for hot water.
Selecting storage capacity
For most cases of system operation, the calculation of the need is made for 3-4 people (an average family). According to standards, one person consumes about 70 l/day. In other words, for a family with an average income, it is quite enough to install a boiler with a volume of 200 liters. With a similar capacity, the need is fully satisfied.
In many cases, a tank for heating cold water is chosen for vertical installation, but it is very likely that installation in a horizontal position is also possible. As a boiler tank, it is allowed to use containers made of strong, heat-resistant materials. Of course, the container material should be selected taking into account its high anti-corrosion properties, potential thermal expansion, and other operating parameters.
Suitable materials include:
- aluminum;
- stainless steel;
- special polymers.
It should be remembered: boilers of various types are classified as pressure vessels. In addition, the coolant of the heating system can warm up to a high temperature (90? C and above). Based on these properties of boiler installations, you should design and construct the system yourself.
In practice, one often encounters truly absurd designs, also made with one’s own hand, for example, based on an ordinary milk flask or a dining pan. Such decisions should be avoided.
The design of an indirect heating boiler, carried out with one’s own hands, also includes the calculation of a tubular coil. Here it is necessary to calculate the required thermal power of such a device in order to determine the length of the coil pipe and its diameter based on the calculation results.
Calculation of coil length
The traditional material for making boiler coils is copper or brass. It is better to choose one of these materials, since both materials have a high heat transfer rate.
To calculate the required values for the manufacture of a boiler coil, the following formula is suitable:
L = Q / D* (Tg – Tx) * 3.14
Literal definitions here:
- L – tube length,
- Q – thermal power of the coil,
- D – tube diameter,
- Tg – hot water temperature,
- Tx – cold water temperature.
Let's look at an example of how to calculate the length of a copper pipe for a 20 kW spiral for an indirect heating boiler.
There is a copper pipe size 10 mm, purchased on the market in the bay. A vessel with a capacity of 200 liters is taken under the boiler. Estimated temperatures of cold and hot water: 15? C and 80? C, naturally. It is necessary to determine the length of copper pipe sufficient to produce a heat exchange tubular spiral with a power of 20 kW. The following calculation is carried out according to the formula: 20/0.01*(80-15)*3.14. Calculation result: the required length of copper pipe will usually be 10 meters.
Manufacturing and processing of coils
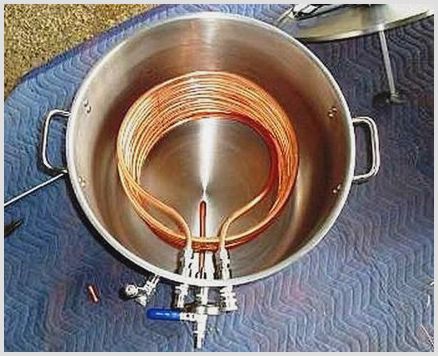
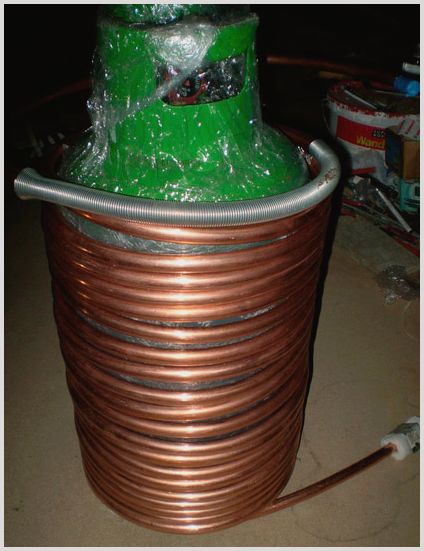
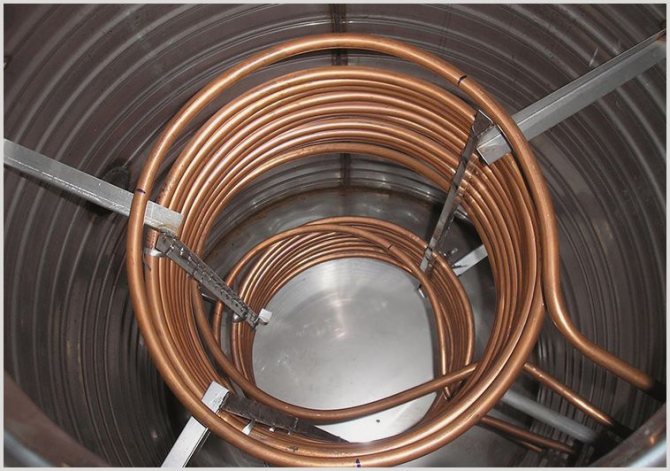
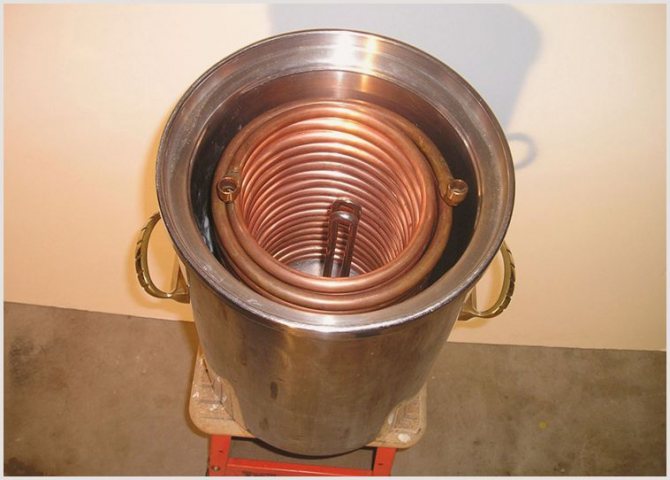
To make an indirect heating boiler coil with a capacity of 150-200 liters, for the most part, a copper or brass tube with a diameter of 10 - 20 mm is taken. The tube is twisted into a spiral, taking into account a residual gap of 5-7 mm between the turns.
Clearance must be done as a priority (it is allowed to move the turns apart after winding), since compensation for the increase in metal is necessary. In addition, with a similar design of the spiral, full contact of water with the surface of the copper (brass) tube is achieved.
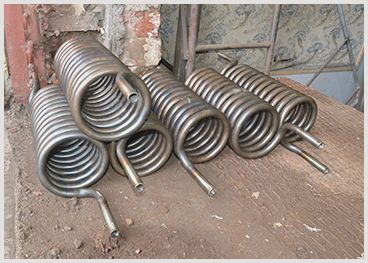
Basically, copper or brass coils can be found ready for use. For example, take a coil from one of those. equipment. But then it will be necessary to take into account the size of the existing container and the correspondence of the spiral in terms of heat transfer power.
Quite often it is not possible to choose in exact accordance with the parameters. Therefore, in order not to waste valuable time, in this sense it is advantageous to make the tubular spiral heater yourself.
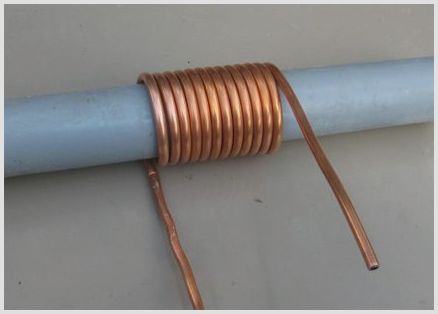
It is quite difficult to make a coil yourself without experience, but such a task is real. The main thing here is to wind the spiral well. It is recommended to use a drum made of good material when winding a copper (brass) tube. The diameter of the drum is approximately 10-15% smaller than the diameter in the middle of the boiler tank. In the end, if the diameter in the middle of the tank is 500 mm, then the value of the coil diameter will usually be: (500 – 500/10) = 450 mm.
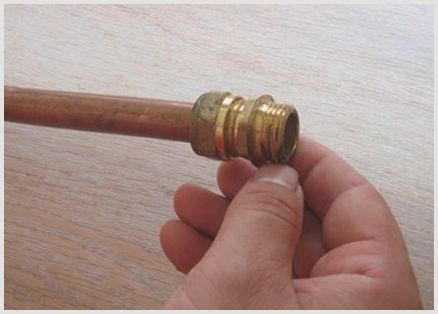
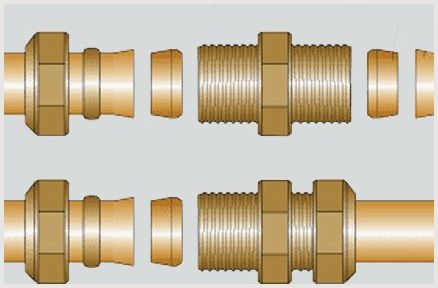
Threaded contact fittings will need to be installed at the ends of the coiled tube. To solve this problem you need to:
- Get an even cut on the ends of the pipe by trimming them with a pipe cutter.
- Place crimp nuts on the ends of the pipe.
- Process the edges of the pipe with a reamer.
- Install the fittings and tighten them tightly to the pipe with nuts.
There is no need to use exclusively threaded double-sided fittings. If you have the ability to solder copper pipes and a good tool, you can install single-sided threaded fittings using the soldering method.
Also, depending on the material of the vessel body, soldering to the walls of the container is very likely. However, when making an indirect heating boiler yourself, this step is not recommended due to the complex technological operation.
Once assembled with fittings or soldered, the heat exchange element (boiler coil) can already be considered ready for installation and subsequent operation. All that remains is to prepare a place for installation on the boiler tank and introduce a water heater into the vessel.
Preparing the boiler tank
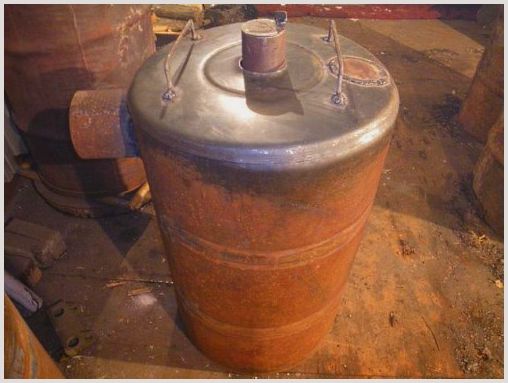
How to place a finished copper (brass) spiral inside a boiler tank if the container is intact? In this case, it will be necessary to carefully cut off the top part and make a lid that will be bolted to the body of the vessel.
Places for landing the lid and tank become ideal, polished, and equipped with a rubber gasket. Meanwhile, internal installation (and maintenance) seems more comfortable if there are two lids on the container - top and bottom.
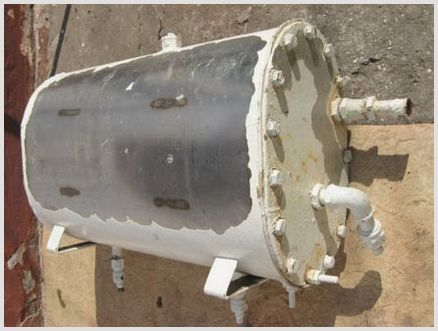
As soon as the lid is installed on the boiler tank, the problem with installing the coil inside the tank disappears by itself. At the moment, it is enough to drill two holes on the body of the vessel, matching the location of the end parts of the spiral pipe. The diameter of the holes must correspond to the diameter of the threaded part of the connectors with a margin of 1-2 mm.
The threaded parts of the connectors are passed into the holes, having installed the sealing gasket in advance. Then, counter fittings are screwed on the outside of the tank wall and the connection is tightened tightly.
With a similar fastening, the heating coil is completely invulnerable, but additional supports must be made. The movement of the coolant under pressure inside the pipe is often accompanied by the appearance of vibration. Additional supports will compensate for the deficiency.
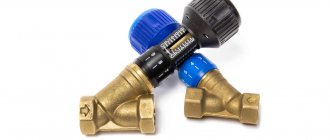
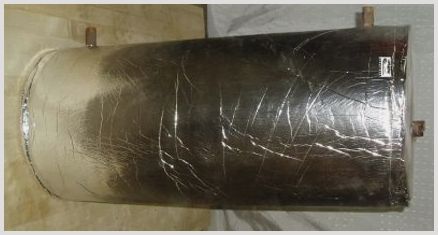
On the body of the indirect heating boiler, you also need to make holes for water supply and drainage, press short pipes into them, and install shut-off valves on the pipes. If desired, you can supplement the device with a dial thermometer. Having completed the installation of all components, the vessel body is closed from the outside with insulating material. Mineral-based cotton wool with a top foil coating is perfect here.
DIY electric and gas water heater
Today on sale you can find various devices designed to heat water.
They differ in operating principle and cost. But it’s not at all difficult to make a water heater with your own hands. A homemade unit will be relevant for private households, where problems often arise with electricity or installation of a gas boiler. There are several available methods of heating water, each of them has its own advantages and disadvantages. A water heater is a device designed to transform various types of energy into heat, which is then transferred to a coolant, which is water. The industry offers various options for such devices. The source of heat in them can be electricity, gas, solid or diesel fuel. Along with this, alternative energy sources - sun and wind - are also becoming popular.
All heating systems on the market are divided into two types:
The design of the former involves the use of a tank in which a certain temperature is maintained. When you open the tap, cold water flows into a sealed container, and hot water is squeezed out into the pipeline. Thus, in the middle of the tank there is always a certain amount of heated coolant. Storage units are distinguished by their size and long-term heating of water. Their use is justified in systems with a large number of water intake points. The devices are available with tank volumes from 10 to 200 liters.
Instructions for connecting and starting the system
First of all, a home-made indirect heating boiler needs to be connected to the heating main. Where a free heating system is used, the device is connected to the home boiler network.
The mechanical connection is made with the lid on the boiler tank open. After connecting, you need to slightly open the shut-off valve connecting to the return line of the coolant, and make sure that there are no leaks both outside and inside the device.
If no leaks are found, open the coolant supply line. It is necessary to wait some time for the coil to warm up to the temperature of the heating system. In full heating mode, check the coil and all connection points for possible leaks one more time with well-deserved attention.
If the check shows the integrity of the system, close the lid of the vessel and connect the heated water supply and discharge lines. The system is tested in real heat transfer mode.
Conclusions and necessary video on the topic
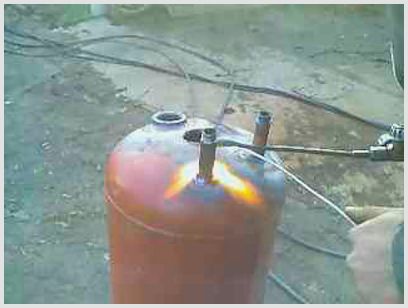
A used gas cylinder is often used to make homemade devices. We would like to present a video on how to make a BKN from a cylinder body.
Here we describe only one option out of all the possible ones that exist and are used perfectly. It should be noted that there are many options for independent designs of indirect heating boilers.
For example, instead of a cylindrical storage tank, vessels with right angles are used. The winding of the coil spiral is not single-layer, but multi-layer. The water heater is supplemented with an electric heating element. Design concepts have no boundaries.
Peculiarities
Unlike water heaters, an indirect heating boiler uses the energy of a coolant used for heating. To do this, a heat exchanger is built into the storage tank, in many cases having the shape of a coil. Passing through it, the heating system coolant heats the water in the tank.
Heating of water in a boiler, as in a storage water heater, occurs within several hours, but its temperature then remains stable for a long time, which increases the convenience of using hot water for showers and baths.
An indirect heating boiler is not only economical, it is also more or less dangerous than a storage electric water heater. In the event of an automation failure in heating element heaters, water may boil and destruction of the device itself or the connections from the connectors, which leads to leakage. In a boiler, the water cannot heat up hotter than the coolant; in many cases this figure is within 60-90 degrees, which is safe for both pipes and humans.
Advantages of using an indirect heating boiler:
- the heat exchanger can be connected to both central heating and various types of boilers;
- heating water does not require electricity, gas or other fuel, which reduces the cost of installing and operating the boiler;
- the water temperature is stable, without sudden changes;
- safety of use even without installing expensive automation - the water does not boil, and if there is a leak or interruption in the supply of cold water, the device does not fail;
- ordinary design and installation provide the opportunity to save additional money by making and installing an indirect heating boiler yourself.
Minuses:
- quite large dimensions and weight, comparable to a storage-type water heater;
- an indirect heating boiler is used exclusively during the heating season; for summer use it is equipped with a heating element;
- long heating of water, during which the temperature of the coolant in the radiators decreases;
- salt deposits on the coil require constant cleaning and maintenance.
There are many models of boilers on the market that use indirect heating. However, if you have minor welding and installation skills, you can make a boiler for your home or cottage with your own hands.
Installation of an automatic water heater
- Storage tank.
- A large tank for cold water (with a capacity of at least 50 liters, it can be any container, such as a barrel).
- Toilet valve with float.
- Materials necessary for installing a water supply system (flexible hoses, fittings for connecting water supply hoses (compression sleeves with a sleeve, union nuts and fittings, seals), mixer).
- Materials required for installation of electrical wiring (wires, terminals, indicator lights, RCD circuit breaker).
- Plywood (or other material) to create a heat-insulating box.
- Material (for example, foam) to create a thermal insulation box.
- Fasteners for tanks. Their appearance depends on where and how you plan to place your homemade heater. Typically, if the design includes a suspension system, steel corners are used.
- to create a heat-insulating box: jigsaw, carpenter's knife, hammer;
- for installation of electrical wiring: screwdrivers, pliers, tester screwdriver or probe;
- for installation of water supply: adjustable wrenches, pliers, stationery knife;
- for installing fasteners: hammer or drill, hammer, pliers.
In order to install a toilet valve with a float (which will regulate the automatic water supply) into the water heater, you will need to make another hole in the tank. It should be located at the top of the structure, just under the lid of the container.
It is possible that the valve design you already have will need to be slightly modified, as it may not fit the tank dimensions. So, most often the float rod has to be shortened, and if the container has stiffening ribs, then the float mounts need to be slightly bent to fit the shape of the water heater.
This design does not provide for the presence of pumps and water supply under artificially created pressure; the structure should be arranged in stages. It is necessary to place the tank with cold water at the top (fixing it to the wall or raising it to a higher place). Next, the water heater tank is suspended, approximately 0.7-1.2 m below the level of the large tank. And the mixer and sink are mounted at the lowest level.
To ensure that the water in the tank does not cool down too quickly, it is necessary to make a heat-insulating box by cutting out the walls from plywood so that a heat-insulating material, for example, foam plastic, “stands” between them and the container. The box is assembled so that all electrical wiring is outside, for safety reasons.
Next, you can install the electrical wiring and water supply system.
Design
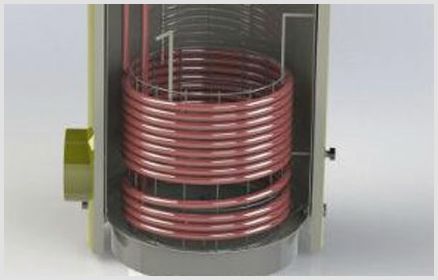
The boiler design is very common. A heat exchanger in the form of a coil or a small tank is placed in a tank made of non-corrosion material. To increase heat transfer, the heat exchanger is made of a material with high thermal conductivity, in many cases copper.
The tank is equipped with fittings for water inlet and outlet. The cold water inlet is located at the bottom of the tank and is equipped with a check valve, through which, using a bypass valve, drainage is performed. The hot water outlet is placed on top of the tank.
To reduce heat loss, the walls of the tank must be well insulated. For this, you can use various materials, but the best option is polyurethane, it has good thermal insulation qualities, is not afraid of moisture, perfectly dampens the noise of water that occurs when heating, is reliable and environmentally friendly.
To make a boiler with your own hands, the easiest way is to place the storage tank in a tank or a body of a similar shape of slightly impressive size and fill the space between them with polyurethane foam from a cylinder.
To measure and adjust the temperature, the boiler is equipped with a thermometer and thermostat. Such an element is not necessary, but significantly increases the ease of use of the heater. To reduce internal corrosion, you can also build a magnesium anode into the tank, designed for heating element type water heaters. They are sold at service centers or at points of sale of household appliances.
Do-it-yourself faults and repairs of instantaneous water heaters
Water heaters are used not only in apartments, but also in private cottages or country houses. Many owners prefer instantaneous electric water heaters because of their advantages - compactness, reliability, efficiency, long service life and reasonable price.
Even the most reliable and high-quality water heaters can experience breakdowns that you can try to fix yourself.
Before you begin repairing the device, be sure to disconnect it from the power supply to avoid accidents. To repair a water heater you will need various types of screwdrivers, adjustable wrenches, a tester and the necessary spare parts.
Water heater breakdowns:
- Failure of the heating element. This malfunction makes it impossible to regulate and heat the water, the indicator light does not light up, and water from the tap flows with scale. Most often, a failed heating element is replaced with a new one.
- Thermal relay and thermostat malfunction. If one of the two elements breaks down, the heating element does not turn on, or the device operates at the lowest power when the regulator is set to the extreme level. The tester is used to measure resistance. The broken element is thrown away and a new one is installed in its place.
- Blockage. When the heater is operating, extraneous sounds are heard or a decrease in the power of the device is observed. To do this, you need to clean the heating element from scale and dirt using special means.
- Violation of the seal of the device. The only sure way of failure is wear of the material to which the heating element is attached. To do this, you need to unscrew the heating element and replace the flange under it.
If problems arise with the instantaneous water heater while the device is still under warranty, it is not recommended to repair it at home. In case of the slightest problem, it is better to contact the service center.
DIY manufacturing technology
Before you start making your own boiler, you need to decide on its parameters and parameters:
- water consumption and tank volume;
- type of coil and calculation of its dimensions;
- the presence of additional devices - heating elements, thermostat.
Based on the answers you have found, you can choose a container for the storage tank, the material for making the coil, and, in addition, decide on the dimensions and make a sketch of the future boiler.

Volumetric calculation
To provide a considerable amount of hot water, you need to imagine its daily consumption. In many cases, they think that each person permanently living in the house needs 50-80 liters of heated water per day.
This quantity will provide the opportunity to take a shower or bath, and in addition will satisfy the need for hot water for laundry, cleaning and washing dishes. Thus, for a family of 3-4 people you will need a boiler with a 200 liter tank.
If water is needed only for household needs, for example, washing hands and dishes, a small tank is enough - 50-70 liters. You should not unnecessarily choose a very large tank - this will increase the water heating time and lead to a decrease in the efficiency of the heating system.
Selection and calculation of the coil
The coil in the boiler can be made of metal pipes in the form of a spiral or snake, or it can be a small internal tank. It is better to make it from a material that has high heat transfer and resistance to corrosion, for example, copper.
You can also use a stainless steel pipe, but it is more difficult to bend and give it the desired shape. It is not recommended to use classic steel pipes - running water, when heated, will release oxygen bubbles, which will cause rapid corrosion of the metal. The most functional copper tube with a diameter of 10 mm is that it bends without using a torch according to a template.
Some craftsmen also use metal-plastic pipes. They are resistant to external and internal corrosion, but they must be used strictly at temperatures less than 90 degrees. Any overheating leads to deformation of pipes, leaks and mixing of water in the circuits. Under certain conditions, this can lead to air pockets and poor circulation.
A pipe coil is wound in the form of a spiral from the calculated number of turns and placed at the bottom of a circular tank. For normal heat transfer, it should not touch the walls. When making a rectangular tank, the heat exchanger is made in the form of a snake and installed against one of the walls.
The dimensions and number of turns of the coil must be determined using the formula:
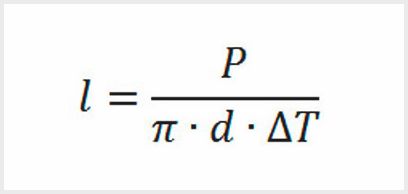
In this formula:
- P is the thermal power of the coil, which must be 1.5 kW for every 10 liters of tank volume;
- d is the diameter of the pipe used, expressed in meters, we take 0.01 m;
- l is the entire length of the pipe, in meters;
- ?T is the temperature difference before and after heating; naturally, for preliminary calculations we take 65 degrees.
For a 200 liter tank with a power of 30 kW the calculation will be as follows:
Having measured the required length of the pipe, you also need to calculate the diameter of the coil. To ensure that the spiral does not touch the walls, it is taken 10-12 cm smaller than the diameter of the storage tank. Design values for some tank sizes are shown in the table.
It is better to make the distance between the turns 5-8 cm to greatly improve the conditions for heat transfer. In this case, it is important to calculate the total height of the coil so that it does not cover the input and output flow for the heated water.
The heat exchanger in the form of a tank is made in many cases from the same material as the tank itself, and its dimensions are 1/5-1/8 of the total volume of the boiler.
Heating element, external water thermostat and other auxiliary devices
One of the low qualities of an indirect heating boiler is that it can only be used during the heating season. There are two ways to solve this problem:
- install a short closed circuit from the boiler, designed only to heat water in the boiler;
- install a heating element in the tank itself.
The first method is associated with unnecessary consumption of time and fuel - when loaded at partial capacity, the boiler will operate with low efficiency, and in the case of using solid fuel - also with the formation of an increased amount of soot and soot. In addition, it will take time to maintain, load and clean it.
Installing a heating element in the boiler tank itself will make it possible to use it in the summer as a regular water heater. To minimize energy costs, heating can be done at night at lower tariffs or a solar collector can be connected to the system.
The power of the heating element must be suitable for the volume of the tank. On average, for a volume of 50 liters a heating element with an electrical power of 1.5-1.8 kW is required, and for a 200 liter boiler - 5-6 kW. These values can be changed slightly, but remember: the higher the power, the shorter the heating time, and vice versa.
When installing a heating element in the boiler tank, first install an external water thermostat that turns off the heating at a temperature not exceeding 90 degrees!
It is also recommended to install a magnesium anode in the tank, which distracts the processes of electrochemical corrosion inside the tank. It gradually dissolves in the process, and after a couple of years it may come in handy to replace it.
Manufacturing and installation procedure
After carrying out all the necessary calculations and preparing a sketch, you can assemble the indirect heating boiler yourself.
- Assembly begins with the preparation of the most important part - the storage tank. You can use any ready-made container made of stainless steel, aluminum or heat-resistant plastic, or weld a tank from sheet metal and pipe scraps of the required diameter. The key condition is sufficient wall thickness and strength of the tank and resistance to corrosion.
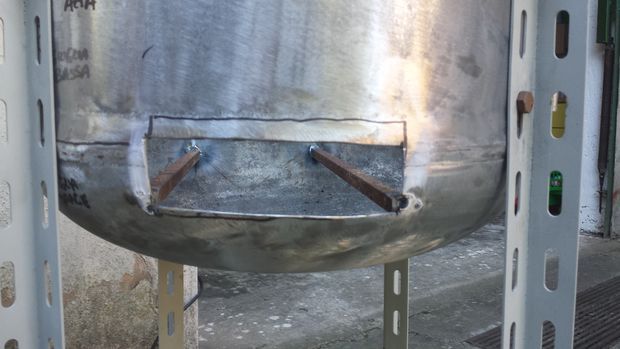
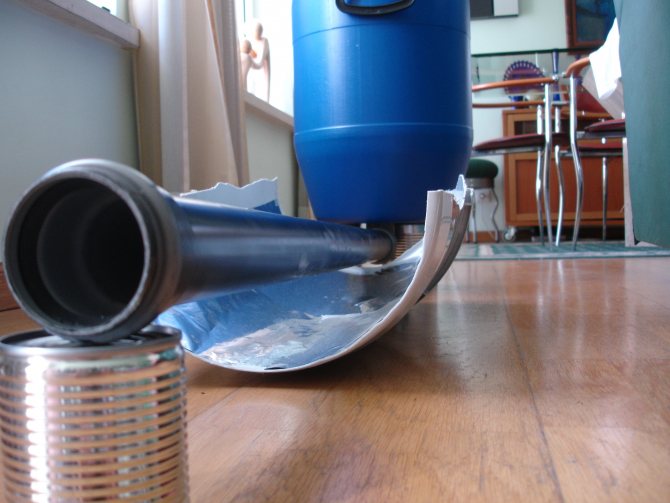
- It is very easy to make a tank from a used gas cylinder. To do this, the top part of the cylinder is cut off, the interior partitions are thoroughly cleaned, washed a couple of times and ventilated in clean air for 3-5 days. Otherwise, the water will smell like gas. After drying, the surface is primed with moisture-resistant paint.
- Naturally, with a sketch, you need to make a couple of holes in the tank: to connect the coil, for the inlet and outlet pipes, and in addition for the heating element and thermostat when installing them.
- The pieces of pipe - pipes - are welded, and threads are cut on the outer part to connect the hot water supply circuit and the outlet from the heating circuit.
- Next you need to make a coil according to the calculated dimensions. It is convenient to wind the spiral according to a template, which is used as a pipe of the required diameter, a log or any strong cylindrical object. The winding must be more spacious so that the finished coil can be removed from the mandrel.
- The coil is attached to the nozzles by soldering, checking the tightness of the connections. This can be done using compressor air and soapy water. The pressure during pressure testing should be at least 1.5 times higher than the working pressure in the heating system.
- If necessary, install a heating element, an external water thermostat and a magnesium anode in the tank. Connect a copper wire of the required cross-section to the electrical part - for a heating element of 2 kW - 1.5 mm?, for 4 kW - 2.5 mm?, for 5 or more - 4 mm?.
- Place the tank in the housing, if there is one in the project. Temporary or permanent spacers are installed between the walls of the tank and the body to maintain the same distance on all sides. Fill the space with a heat insulator, for example, polyurethane foam.
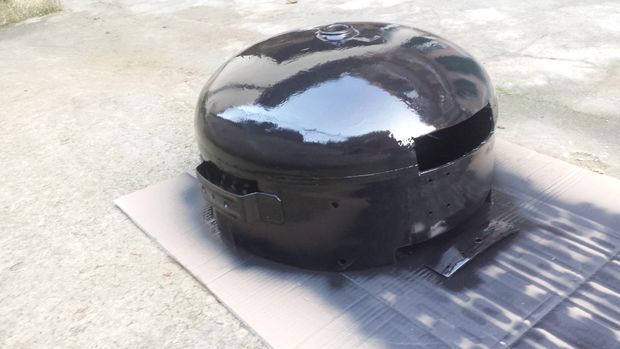
- After the foam has dried, the remains are cut off, the pipes are processed and the housing cover is attached. You can paint it with metal paint in light colors for less heat radiation and longer service life.
- Connect the boiler to the heating and hot water system according to the naturally given diagram.

Making an indirect heating boiler with your own hands is very simple and inexpensive, and its effectiveness and efficiency will quickly pay for all costs . Hot water with a stable temperature will fulfill life in a country house and provide ordinary comfort to city dwellers.
Pros and cons of indirect
The advantages of using a self-made electric storage water heater:
- connection to the central heating system;
- installation near a heating boiler;
- low costs for the circuit installation process;
- significant reduction in energy consumption;
- providing water at a constant temperature.
The disadvantages include the following:
- to install an electric storage water heater, a decent area or an individual room is required;
- It takes a long time to heat a significant volume of water, and heating of the premises will be carried out with less intensity;
- rapid formation of deposits on the serpentine tube, requiring chemical or mechanical cleaning 2 times a year.
This option for obtaining hot water is suitable during the heating season. The rest of the time, the role of a heat carrier is usually performed by a tubular-type heating element built into the tank of an electric storage water heater.
Then the water will be heated using electrical energy. In this case, you can turn on the electric storage water heater at night, when night, low tariffs are in operation, or if necessary.
Making an electric storage water heater with your own hands
Due to its rather simple operating principle, this device can be made with your own hands. Now let's look at how to perform an indirect process with your own hands.
All work on the manufacture of a water heater consists of assembling the main parts of the structure:
A tank is used as a container for an electric storage water heater. Its volume depends on the needs of the home owners for hot water and is calculated from the amount of 50–70 liters for any person every day. A 200-liter electric storage water heater is suitable for approximately a family of 4 people.
For a heating device, the tank must be made of stainless steel, aluminum alloys or other material that is resistant to corrosion. A gas cylinder can be used as a replacement, but its walls must be cleaned and primed in advance. Without this action, hot water will have a gas aroma.
5 holes are made in the tank: 2 on the side for installing the coil, one at the bottom for the inlet pipe, one at the top for drawing water and one at the bottom for the tap to drain the water. To use an electric storage water heater outside the heating season, it is necessary to take into account the installation of a tubular heater. The bottom hole is also drilled for it. Locking parts or ball valves are fixed to the holes made.
A copper or brass tube is suitable for this component, the diameter and length of which depend on the volume of the tank. On average, for every 10 liters the heating output of the serpentine tube is calculated to be 1.5 kW. You can use a tube made of metal-plastic or other metal with good heat transfer.
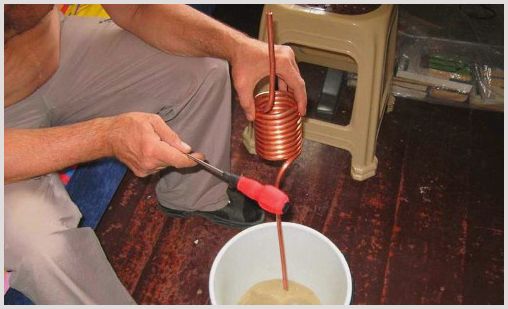
The tube is wound in a spiral on a cylindrical mandrel. To do this, you need to take a log or pipe of large diameter.
When winding the coil, it is important to observe the turns:
- in order to better contact the heating surface of the tube with the heated water, the turns should not contact each other;
- There is no need to wind it with very great force, then it will be difficult to remove the heated towel rail from the mandrel.
- The number of turns on the coil is calculated from the volume and height of the tank.
Thermal insulation
The outside of the tank must be covered with an insulating layer. It is required to increase efficiency and reduce heat loss. For thermal insulation of the container, foam for installation work, mineral wool or any other insulating material that is fixed to the base with wire, glue or strip ties is suitable. For an attentive appearance, it is better to cover the body of the tank with thin sheet metal or foil-based insulation.
You can also thermally insulate the tank using another larger container. To do this, a manufactured storage electric water heater is placed in a large tank with your own hands, and the wall is filled with insulation material or polystyrene foam according to the principle of a thermos.
The assembly of a self-made electric storage water heater is carried out after preparing all the main parts:
- a heated towel rail is installed in the very center or along the walls in the middle of the tank, pipe sections are soldered to its inlet and outlet pipes;
- for a vertically standing electric storage water heater, supports are welded to the bottom, for a hinged device - “ear” loops;
- A tubular type heating element is installed;
- The storage electric water heater is tightly closed with a lid;
- connecting the coil according to the diagram for making an indirect coil with your own hands to the circuit of the heating system;
- connecting the inlet/outlet pipe for water;
- pipe distribution to the kitchen or bathroom at the water intake point.
2017 03 heat exchanger tank battery from a barrel, part 2
How to make an indirect heating boiler yourself?
The indirect heating boiler is made with one’s own hands naturally using a conventional scheme, in which all technological features and characteristics of reliable and durable water heating equipment are primarily taken into account.
Let's consider the design and operating principle of a similar device in detail.
Design and principle of operation
Modern electric storage boilers, which are perfect for constant or periodic use, both in private households and in apartment buildings, are extremely popular at the moment.
The usual volume of the storage tank can vary, and is selected based on the number of consumers.
A similar type of household water heating device is connected to the water precisely after the main pipeline system, which allows hot water to be supplied to several points of distribution. Additional options in such a water heating device are shown by special automatic valves for the radiator.
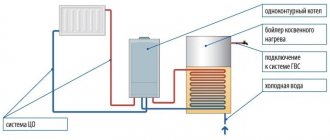
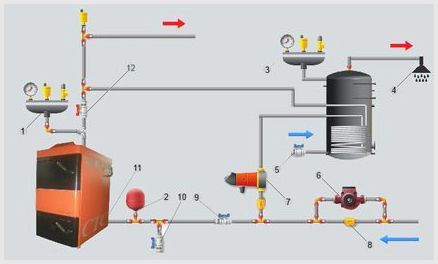
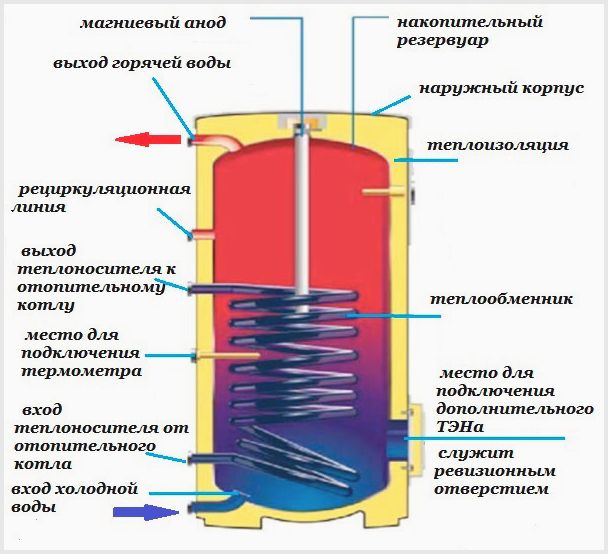
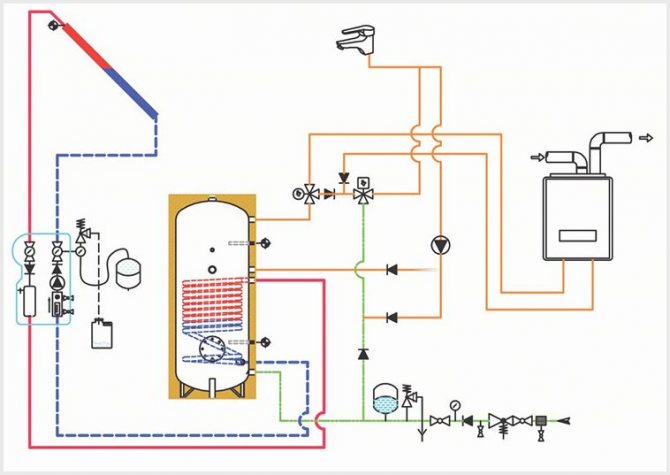
Diagram of a homemade indirect heating boiler
The standard design of a water heating device in the form of a boiler basically has significant differences; everything may depend on the option and design parameters. Indirect heating devices cannot produce thermal energy themselves, but can be equipped with built-in heating elements, through which the temperature of the water is perfectly maintained within predetermined limits.
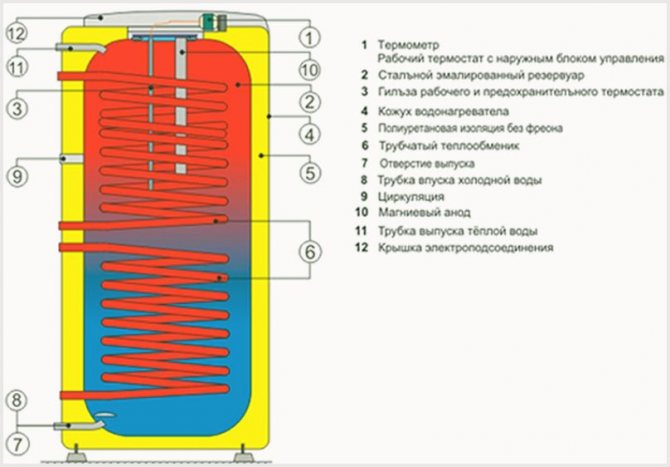
The device diagram assumes the presence of the main components in the design, represented by:
- storage tank;
- outer casing;
- thermal insulation;
- heat exchanger;
- a place for connecting an additional heating element;
- inspection hole;
- cold water inlet;
- input and output for the coolant;
- thermometer connection point;
- recirculation line;
- hot water outlet;
- magnesium anode.
A tubular heating element with a supplied heat carrier is inserted inside the insulated tank. Cold water enters through the bottom of the tank, and hot water is drawn from the part at the top.
Water heating equipment of this type is equipped with a protective magnesium anode. Ultra-modern and prestigious models are equipped with a pair of redundant coils. Maintaining the temperature is ensured by a heating element with a thermostat built into the top of the tank.
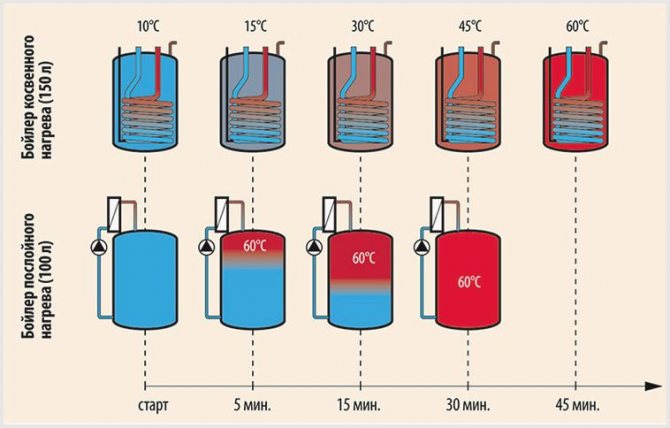
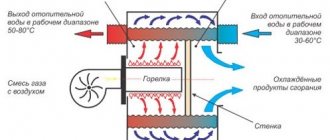
Heating diagram for 2 types of boilers
Boilers with an implicit heating type are also produced, completely devoid of a coil. A similar unusual design is called a “reservoir in a tank,” which is due to the presence of a second tank inside one tank. Heating of water in similar water heating devices occurs inside the tank, and the movement of the heat carrier is done between the walls.
Principles and design of thermal insulation of containers
The principles and design of thermal insulation of horizontal and vertical tanks are similar, but there are a number of differences.
Horizontal tanks
Horizontally located tanks are usually located at some elevation above the ground. This makes it easier to access the bottom of the tank when installing thermal insulation. However, it is important to take into account a nuance: the stands on which the container is installed can become a kind of “cold bridges” and significantly depreciate all efforts to insulate the storage facility. Therefore, when installing a container, it is necessary to provide heat-insulating pads made of durable foam plastic or other material that can withstand the weight of the product along with the stored product.
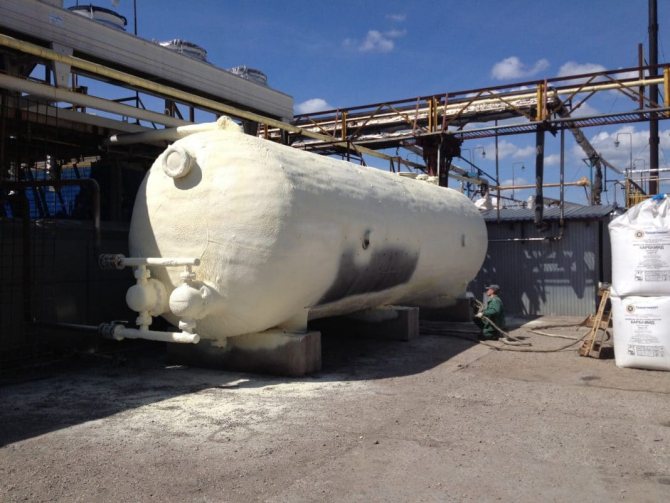
Thermal insulation of horizontal tanks and reservoirs
The snow load on horizontal containers is much lower; the snow itself rolls down the rounded sides. This makes it possible to use insulating materials of lower density and strength.
Mineral wool with a metal coating is used as budget options; more valuable storage facilities are protected by spraying foamed heat insulators.
Vertical containers
When thermally insulating vertically located tanks, it is necessary to take into account the fact that the lower part of the storage facility, standing on the ground, will be inaccessible after construction. Therefore, its thermal insulation must be taken care of at the construction stage. The material must withstand the high pressure of the filled tank. For the bottom layer of insulation, extruded polyurethane foam or high-density foam is often used.
It is also necessary to take care of waterproofing and drainage of groundwater.
When designing external thermal insulation, special attention is paid to wind and snow loads. This is caused by the large size of the containers and the low slope of their lids, which impedes the natural melting of snow. For thermal insulation of covers, high-density materials are also used that can withstand large masses of snow.
The side vertical walls are subject to severe wind loads. Therefore, the strength of the facing layer and the reliability of fastening the thermal insulation to the walls plays an important role.
How to make an indirect heating boiler with your own hands - manufacturing procedure
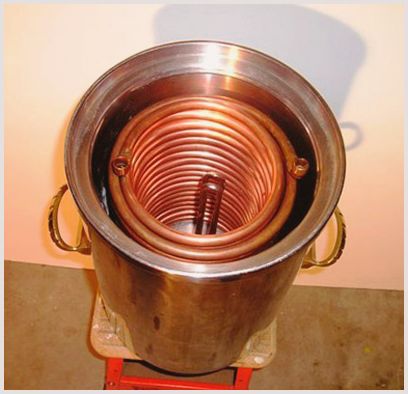
To independently manufacture a large storage container (tank), independent of energy sources, a tank made of corrosion-resistant materials, and in addition a spiral-shaped tube with a circulating heat carrier, are used.
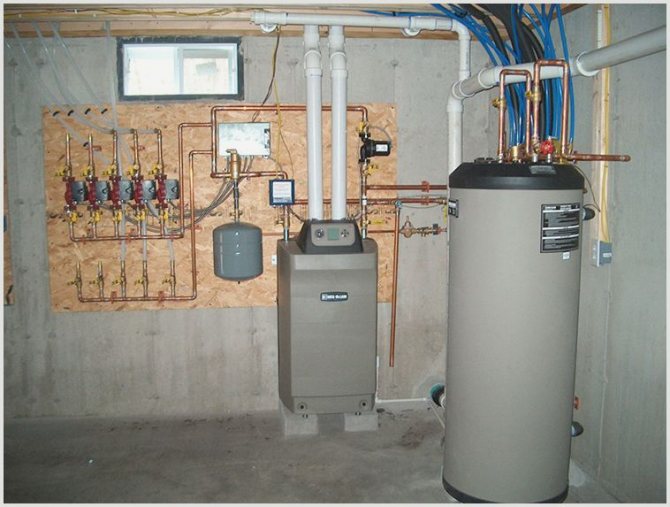
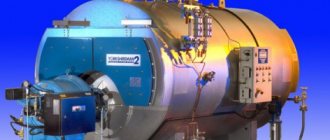
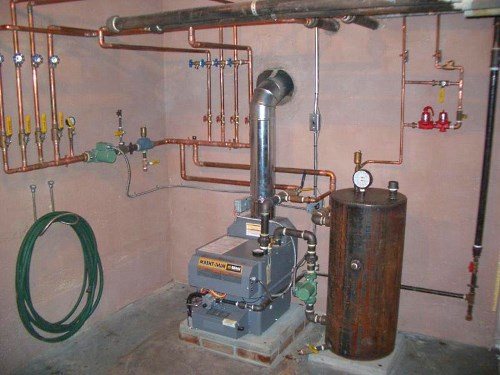
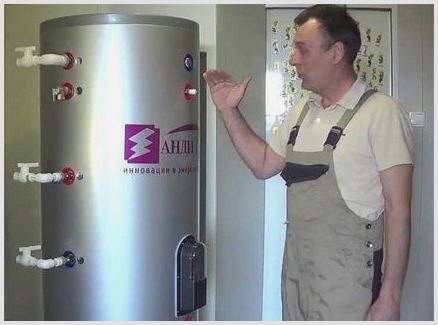
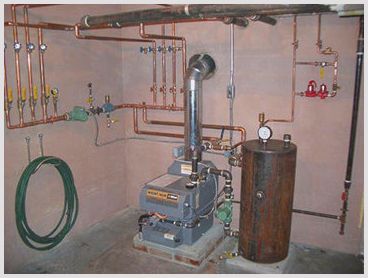
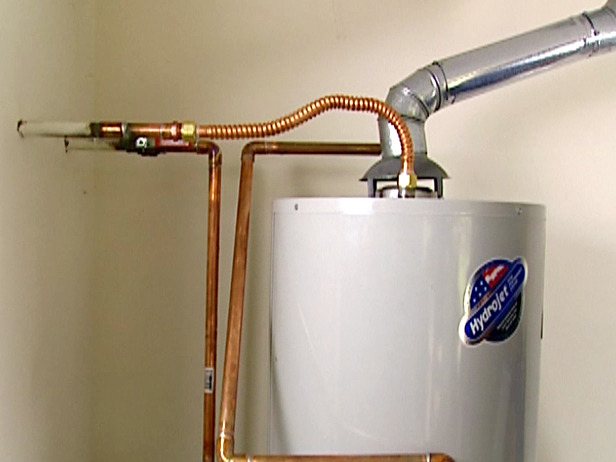
Boiler in the boiler room
Similar heating of the water inside the boiler tank is ensured by the movement of the coolant from the heating system, and a high-quality insulation layer contributes to maintaining the temperature regime. Convenient operation is caused by the installation of special fittings in the form of ball valves.
Do you know why water drips from the water heater safety valve? Let's look at the causes of breakdowns and ways to eliminate them.
What is a toilet installation and what is it used for, we will tell you further.
The diagram for connecting an instantaneous water heater to the electrical network is described in today’s article.
Making a grill from an old boiler
If you have an old boiler, do not rush to throw it away.
You can make many interesting and useful things from it. Specifically in this case, we will look at how you can make an excellent grill out of a boiler. The author equipped his grill with four legs, and its height was 1 meter. The diameter of the grill is 40 cm, which is quite enough for household needs.
Materials and tools for homemade work: - old boiler; — grinder with grinding and cutting discs; — pliers, screwdrivers, wire cutters and other classic craftsman tools; - a corner or other suitable material for creating legs; - drill with drills; — welding; — heat-resistant paint (the author’s is black); - loop with a lock for the blower; — bolts, nuts, washers and other fasteners; - round grill.
In general, a drill may not be needed, the author just decided to make everything collapsible, connecting the structure with bolts and nuts. In principle, all this can be simply welded if all the parts are made of steel.
Grill making process:
Step one. Preparing the boiler
First of all, you need to take the boiler and remove all excess. As a rule, boilers are lined with thermal insulation on top so that they keep the water warm for a long time. This insulation must be thoroughly cleaned off. You may need to cut it off first with a grinder or a sharp knife, depending on what the sheathing is made of. Well, then take a grinder with a scraping wheel and use it to remove all the insulating material. It is important to remember that the remaining insulation will begin to smoke when using the grill.
Step two. Cutting the boiler
Now the boiler needs to be cut.
Here you will need the grinder again. The author decided to choose that part of the tank where the bracket is located, with which the tank is attached to the wall. In the future, this bracket will be needed to assemble a wooden slab. In addition, the author also cut out an opening on the workpiece for installing the grille. Step three.
Making the legs The legs are very simple to make; you will need a steel corner or elements of metal shelving, which is what the author used.
It was decided to use bolts for fastening. But to simplify the procedure, everything can be connected by welding. As for the length, for the convenience of cooking, it was decided to make the legs 75 cm long. Step four.
Screwing the legs Using bolts and nuts to fasten the legs, the author killed two birds with one stone.
Thanks to the screws protruding inward, the grill grate can now be installed. Each leg is secured with two bolts and nuts, so you will need to drill holes in the tank for them.
It is very important here that the top holes are at the same level, since this is where the grille will be located. It is best to mark a couple of points from the top and then draw a line around it. The legs should also be located at the same distance from each other. After assembly, it turned out that the grill was not very secure. To make the legs stiffer, the author added a crosspiece to the lower part.
Step five. Blower for grill
To ensure efficient operation of the grill, the author decided to equip it with a blower. To do this, you need to cut a window at the bottom of the container. There is no need to throw away the resulting plate; a door is made from it. The door must be secured to the hinges and a bolt must be attached. It is important to take care of the handle; it should not actively conduct heat, as it will get very hot when using the grill. The author made it from a bolt and several nuts.
To secure the bottom grille, you will need two steel rods. The author simply welds them at the required level, cutting off the excess. If it is not possible to weld the rods, you can use threaded rods and secure them with nuts and washers.
Step six. Wood slab fastening
A wooden stove is a very convenient addition to the grill, although the grill itself must be well fixed.
Here you can place plates with cooked food and so on. For a wooden slab, the author drills holes in the boiler bracket and then inserts threaded rods into them. Subsequently, wooden blocks will be placed on these rods and tightened with nuts. Step seven.
Painting At this stage, the author paints the part made from the boiler. First you need to remove all the rust and thoroughly sand the surface. Here you will need heat-resistant paint, since the container gets very hot.
Step eight.
Assembly After painting, the entire structure is assembled again.
Using a level, it is advisable to measure the inclination of the grill and adjust the legs. Also now the author attaches the hinge and the blower valve. Rivets were used for such purposes. You can also use bolts and nuts. Step nine.
Manufacturing and installation of the inner grate The inner grate will be loaded with coals, and air will flow from below, which will lead to good burning of the coals.
To make the grille, the author decided to use a steel plate in which he simply drilled holes. The found plate already had a couple of rows of square holes. It is important here that the plate is thick, since the coals generate a high temperature when burning. Then all that remains is to place the plate on the rods welded into the lower part. Step ten.
Assembling a wooden slab A wooden slab is very easy to assemble. Here you will need wooden beams that need to be cut to size. Next, two holes are drilled into them, through which threaded rods will pass. The author drilled the holes in the shape of the letter “V”. Well, then this whole sandwich is assembled and tightly tightened with nuts. Here it is important to stock up on good large washers, since tightening requires a lot of effort. Washers are placed on both sides. It took the author 10 nuts to assemble. Two here act as a support, and two more on the other side press the wood. The remaining nuts are needed to secure the rods themselves. You need to tighten everything thoroughly using wrenches.
As a result, a wooden slab can be thoroughly sanded, and for protection it would be good to paint it with protective varnish, paint, and so on.
In conclusion, it should be mentioned that the grill must be securely fixed, otherwise if you place something heavy on a wooden plate, the entire grill may topple. It can be screwed to the floor or to a large heavy board.
Step 11. Let's start testing
That's all.
The grill is assembled and can now be tested. According to the author, the project was successful and worth the effort. Source
Become the author of the site, publish your own articles, descriptions of homemade products with payment for the text. Read more here.
Selection of capacity
A reservoir or storage tank basically has almost any size and volume. Another sign depends on the number of consumers and the standard consumption of hot water. For the most part, hot water consumption is about 50-70 liters per consumer, as a result of which the approximate volume of the tank for a family of four is approximately 200 liters.
Making a tank
To make your own tank for a water heating device, it is recommended to use stainless steel sheets, and in addition alloys based on aluminum or other materials that are sufficiently resistant to corrosive changes.
As an alternative, you can use a regular gas cylinder, the walls of which must be cleaned and primed in advance, which will make it possible to prevent the appearance of an unpleasant odor in hot water.
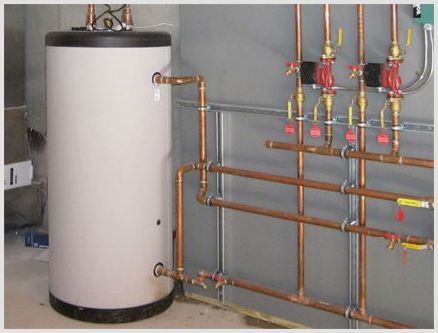
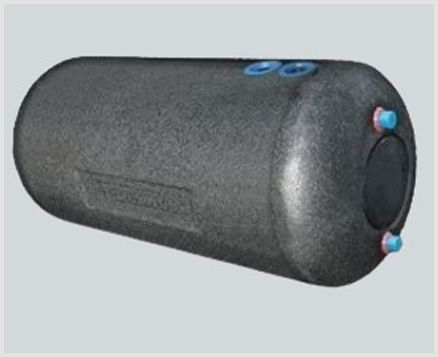
Homemade indirect heating boiler tank
Five holes must be made in the prepared tank, a couple of which are made on the side and are used to install the coil, and two in the lower and upper parts for cold water inlet and hot water outlet.
To make the operation of a hot water boiler trouble-free without using the heating system, it is necessary to install a heating element, for which you need to make a hole from the bottom, providing it with shut-off fittings or ball valves.
Choosing a tank for the boiler
The volume of the storage tank of the water heater should be calculated based on the daily consumption of hot water in the house. If several people live in an apartment or house, a tank of 100 liters will be sufficient. And for a family of 4-5 people, you should choose a container with a volume of 200-300 liters.
The tank used should be made of an aluminum alloy, stainless steel or other metal that is resistant to corrosion. You can use a large-sized gas cylinder, the walls of which are additionally cleaned and primed. If the walls of the cylinder are not primed, the hot water may have an unpleasant gas smell.
Five holes must be drilled in the selected tank Two at the bottom for the inlet pipe and emergency drain, two at the side for installing the coil and one hole for water extraction at the top. If you plan to use such a boiler outside the heating season, you must also make holes for installing an electric heating element. For the heating element, one or two holes are drilled from below. Ball valves or shut-off elements are installed in the holes made, after which the tightness of the storage container is checked.
Thermal insulation
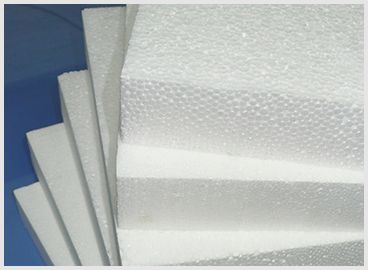
The category of the most affordable and highly effective insulation materials includes modern foamed polymers, such as expanded polystyrene or foamed polystyrene, and in addition polyurethane foam and polyisocyanurite.
When using heat insulators of this type, it is considered necessary to use a sealed protective casing that completely prevents toxic fumes from entering the room.
Coil manufacturing
To make a round steel coil yourself, use a pipe bender, but if necessary, prepare a square tubular heating element, all parts of which are shown connected by electric welding, parts of stainless steel pipes.
The heating power level is calculated naturally with the formula: Q = K x A x dT , where the indicators are shown:
- K - heat transfer index;
- A - area of the total surface of the heating element;
- dT is the temperature difference between the coolant and the heating water.
The coil can be placed either in the very center of the tank or along its walls.
The configuration and dimensions of the tank affect the total number of turns, and in addition the diameter of the heating element.
Design of a homemade storage water heater: tank and spirals
It is very tempting to take a piece of pipe from the heating main for a homemade storage water heater to get a ready-made seamless cylinder. It's just a fairy tale. But we would recommend looking for stainless steel. If only because iron is harmful to the body. It is not for nothing that there is a special maximum permissible concentration for this chemical element, which is periodically measured by specialists. Here the question also rests on the weight of the homemade storage water heater: a linear meter of 720x10 pipe is about 140 kg. Although the price fluctuates around 12 rubles per kilogram, the purchase cannot be called cheap.
AISI304 steel is food grade, stainless and costs about 130 rubles per kg. A sheet of 2000x1000x1 weighs about 16 kg, this turns out to be the main expense for a homemade storage water heater and costs about 2000 rubles. If you bend it along the length, you will get a cylinder 1 meter high and about 63 cm in diameter. Thicker steel will not work; it will not be possible to bend it at home. The volume of the tank of a homemade storage water heater is about:
V = Shx H= 318 l;
It turns out to be an excellent container for a homemade storage water heater, into which a purchased heating element can be installed. For this you will need a brass nut. You will have to place the spiral in the side of a homemade storage water heater, and not as is done in purchased models. Hanging such a colossus on the wall is a disastrous business. You also don’t want to put your future homemade storage water heater on its side for maintenance. In addition, you will need another sheet of tin for the body and a sufficient amount of polyurethane foam. The problem is that the material keeps the temperature no higher than 100 ºС, and then begins to decompose. There is nothing good about this. Therefore, we set the thermostat to a temperature of about 80 ºС, no more. The beauty is that you can disassemble an old electric kettle and remove the necessary parts from it. And the problem is that the thermostat operates at 100 ºС. That is, the parts will also have to be configured for the needs of the storage water heater. (See also: Do-it-yourself Ariston water heater repair)
We speak with such confidence because modern electric kettles are manufactured with a power of 2 kW and above. This one will easily replace the heating element. But the colossus itself should be a little more powerful; for example 6 kW. Moreover, she can cope with three hundred liters in three hours. If you take a 2 kW heating element, it will take all night. Most electric kettles today have a flat heating element. Two of these will need to be placed at the bottom of the tank, isolated from water and equipped with their own thermostats. So two old devices will turn into one new one. In case they fail, it is necessary to install a pair of brass nuts into the side of the tank under standard heating elements of water heaters, which can be bought in the store.
From this point of view, it would be reasonable to place two spirals one above the other:
- The first one will be located at the top to get quick results. This is somewhere at the level of the upper third.
- The second will be at the level of the lower third.
The warm flow will rise from one spiral to the other and then fall on the opposite side. Purchased heating elements have their own thermostats and magnesium anodes. You can get them for about 500 rubles apiece again (without anode). In this case, there is the advantage that the electrical connection is made according to an already established circuit. (See also: DIY gas water heater)
The corpus is created as follows:
- It is necessary to assemble the tank with all its heating elements and pipes, mount the nuts that will serve as fasteners.
- The tank is fully equipped and supplied with a lid. Water pressure tests are carried out. If there is no leak, move on. Please note that tap water is 3 atm. for a home is often even more than needed. Install the gearbox if necessary. Check the pressure with a pressure gauge.
- A tin barrel with a removable bottom is assembled, in which holes are cut as required.
- A tank is placed on the tin bottom, which rests on five cubes of wood with a side of about 4 cm.
- The wiring of all bottom heating elements is attached to the tin bottom. Only after this the side of the barrel is lowered.
- Electrical wiring in the storage water heater is carried out completely using detachable terminals and blocks.
- The holes for the heating elements are surrounded by cylinders of tin. All this is soldered and welded. The argon semi-automatic machine even takes foil. Go for it!
- After this, the inside is filled with polyurethane foam. You need to start from the bottom and work your way up in a circle.
(See also: How to connect a water heater with your own hands)
To make your own water heater, you need to know how to cook. And we haven’t even mentioned the bottom and the lid yet! But it will not be possible to create heating from a water heater, the power is too small. The lid uses the same steel, we believe that it will withstand three atmospheres easily, but for home plumbing this is too much. Install the reducer at the inlet no further than 2 meters from the point of intake from the water heater tank, and everything will be fine. As a last resort, boil again in step 2.

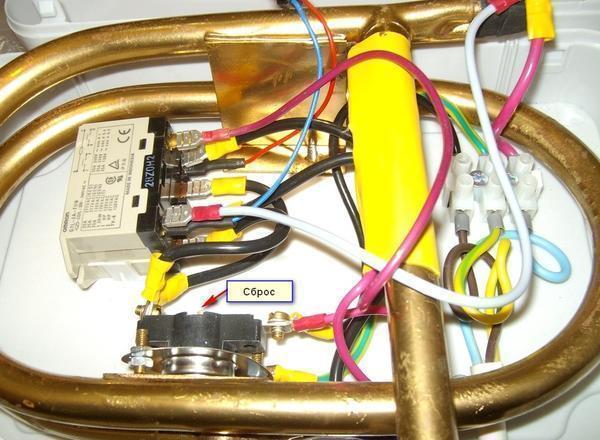
Connection
At the last stage, the heating element is connected to the heating system circuit, naturally with an ordinary circuit. Then you need to connect the inlet and outlet pipes, and in addition carry out wiring to all water distribution points.
Possible connection diagram for an Omicron indirect heating boiler
Before you begin testing the performance of a self-made water heating device, you need to check that all elements are connected correctly.
The operating principle of the safety valve for a water heater and its functions are described in this topic.
Instructions for replacing the magnesium anode in a water heater are provided in this article.
The defining stages of boiler manufacturing are shown by preparing a suitable container, making a coil, providing thermal insulation and assembling the device, including connecting the coil to the heating system, organizing the cold water supply and hot water output.
DIY passive solar water heater: device diagram
A solar water heater is a device for which there is no need to connect to electricity and use pumps to circulate water. The simplest unit, often used for a summer shower or homemade plumbing, is a large metal tank filled with water. During the day, the water in it can heat up to 40 degrees. Thanks to the pipe layout, you can run water both into the shower and into the kitchen.
By using solar energy to heat water, you can significantly save on the electricity or gas required for a tankless water heater.
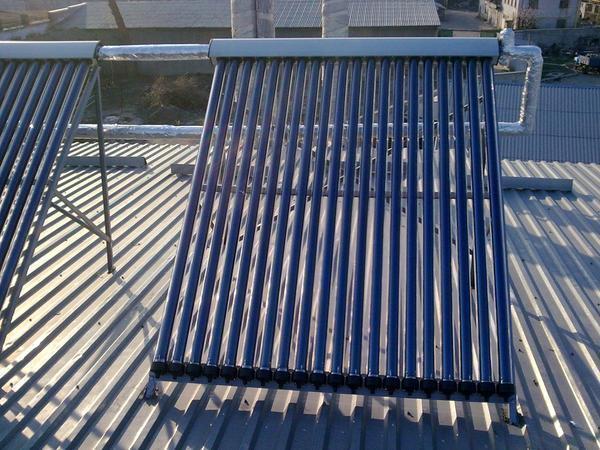
The solar convector consists of a storage tank, water pipes, a heat absorber and a heat exchanger. For domestic needs, a 200 liter tank and a solar convector with an area of 2-2.5 sq.m. are sufficient. Such a device can heat a sufficient amount of water in a couple of sunny hours.
Scheme of working on a solar convector:
- Weld seamless pipes together to form a lattice. By welding, attach it to a sheet of durable steel and cover it with black paint.
- Make a frame from moisture-resistant plywood and attach it to a steel sheet, cutting holes in the frame for pipes.
- Insulate the pipes and cover the collector with glass, connecting the parts with silicone. Also coat the free space between the frame and the glass with silicone.
- Bend the copper pipe in a spiral, bringing its edge out. Insulate the tank for better heat retention.
- Place the manifold in place and connect it to the cold and hot water pipes. Install the expansion tank when hot water enters the tank.
To check the boiler for functionality, you need to fill the tank with water, pour water into the convector system. When water heats up, it will rise up and fill the tank, and cold water will flow from it into the system.