Preparing to mix the solution
To begin with, it should be noted that at the moment there is the easiest and fastest way to properly prepare clay for laying a stove.
The method is convenient for beginners in the stove business or those people who decided to build a brick stove at home once and never return to it. Nowadays there is a ready-made mixture for laying stoves in bags on sale; you need to purchase a sufficient amount of it and mix it in accordance with the instructions on the package. It is clear that such a clay solution for laying stoves will cost a pretty penny, and if not done correctly, even the ready-made building mixture can be kneaded incorrectly. Therefore, it is always useful to become familiar with the traditional process of preparing masonry mixture. And it begins with the extraction of natural clay, which is available in your area. The best way to take it is from ready-made soil excavations, ravines or cuts on river banks.
Having dug up the raw materials for the solution and moved it to the construction site, you need to pour it into a suitable container (barrel or large trough) and dilute the clay with water. The minimum ratio is 1 part water to 4 parts clay by volume. This procedure is called soaking and lasts 1-2 days, after which the solution must be thoroughly mixed to the state of a liquid homogeneous pulp, best of all using an electric stirrer. The resulting pulp is filtered through a sieve with 3 x 3 mm cells, sifting out impurities and pebbles.
It is not always possible to extract sand in the same way, since it is not found everywhere, so it is easier to use imported sand. In order for the mixing of clay for masonry to be successful, the sand must be dry and clean; wet sand cannot be used. Accordingly, the sand is dried if necessary and then passed through a sieve with a fine mesh (1-1.5 mm). The components for the masonry mortar are ready.
There is an important point here. There are no clear proportions of components for mixing the solution; you need to determine them yourself. The fact is that the clay already contains sand in a certain amount; if there is little of it, then it is considered fat, and when there is a lot, it is considered skinny. Accordingly, the proportions can be different - from 1: 2 to 1: 5 by volume.
How to check the fat content of clay
Experienced stove makers can determine fat content by touch, but to do this you need to be a real professional. Most people don't, so it's worth turning to more reliable methods. Take a little clay (about a liter jar) and carefully remove all foreign objects from it - pebbles, twigs, etc. Divide the entire volume into five equal parts. Next you need to add sand in the following proportions:
- 1 part - do not add at all;
- Part 2 – 25% sand;
- Part 3 – 50% sand;
- 4th part – 100% sand;
- Part 5 – 150%.
Add water to the resulting mixtures, mix and knead until you get a homogeneous plastic mass similar to dough. It shouldn't stick to your fingers. There are many ways to check fat content online. We offer two of the most common and reliable ones. Choose the most convenient one.
Roll and dry clay balls
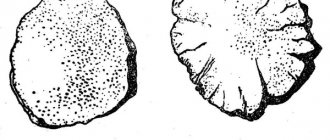
Roll the prepared “dough” into balls, press them between your palms into flat cakes and leave to dry. You must know exactly which cake is made from which mixture, and where and how much sand. All that remains is to wait until it dries completely and determine the proportions. It will take 3 days to dry, in dry weather - 2. The “correct” cake is dense, does not crack, does not crumble, and if it falls from a height of 1 m, it does not fall apart. It is used to determine the ratio of sand and clay suitable for preparing masonry mortar.
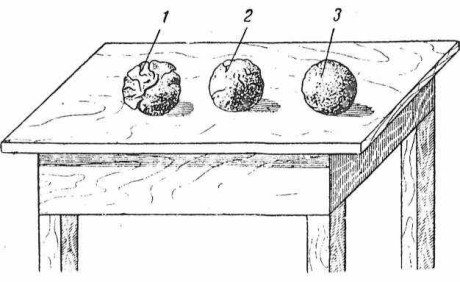
Checking with boards
Prepare clay mixture balls as described above. You will need two smooth, well-planed planks. Place the balls between them and gently press on top, gradually increasing the load. The balls will begin to turn into cakes, on which cracks will form at some point. If cracks appear almost immediately, this solution is thin; if the volume of the ball has decreased by half or more, it is too greasy. Normally, the material should change shape up to about a third.
Laying out the oven is quite a labor-intensive task and requires skills and knowledge.
Such a responsible task cannot be entrusted to ignorant people who do not know the intricacies of the profession. This skill develops over the years. Through trial and error, stove makers honed their skills and did not share their secrets with anyone. These secrets cannot be found in any manual. Previously, this business was passed on from father to son or relative.
Depending on the purpose of the furnace, a specific solution was used. Various parts in the design also required a specific mixture composition. The firebox required refractory bricks and mortar, and a durable, moisture-resistant composition for the foundation. Knowledge of these features was necessary, because the life and health of the owners and the durability of the structure depended on it.
An experienced craftsman uses at least 3 solutions in his work to build a stove. This is due to the fact that the oven shrinks and if the binding solution is chosen incorrectly, it can simply crack and fall apart. If the tightness of the furnace walls is broken, people can be poisoned by carbon monoxide.
We invite you to familiarize yourself with: Sauna stove with a water heating circuit: sauna stoves with a heating circuit in photos and videos
The universal mortar used in laying the stove is clay.
Advantages of clay mortar:
- It is simple and cheap, especially if the stove maker finds the clay himself;
- Fire resistance;
- Resistance to aggressive combustion products;
- Withstands temperatures up to 1100 degrees;
- Strength when drying; together with the brick, an almost monolith is formed;
- You can re-lay the stove, the structure of the brick is not disturbed;
- The solution is stored indefinitely. When dry, you can soak it and use it again at any time;
- Sustainable waterproofing agent.
The disadvantages are:
- When wet, clay masonry gets wet and falls apart, so this masonry is only suitable in enclosed spaces or plastered using a moisture-resistant mortar;
- You need to know which clay is suitable for what, and be able to find it;
- Preparing a clay solution requires skill and time.
Clay is a sedimentary rock from the group of aluminosilicates combined with carbonate particles. Silicon gives strength, and aluminum oxide in combination with water gives plasticity. Various minor impurities give a variety of colors. Clay comes in white, blue, green, red, yellow, brown and black.
Clay is used in medicine, cosmetology, the paper industry, in the production of dishes and ceramics, construction and other industries.
Clay is a common mineral on Earth. Outcrops of layers are visible almost everywhere. Despite this, not every clay is suitable for baking.
The complex of basic qualities is determined by fat content. Clay can be oily, medium fat and lean.
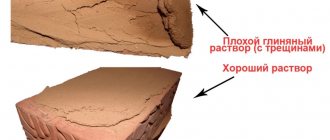
- Oily is plastic, but when it dries it cracks and shrinks greatly. This leads to deformation and destruction of the structure.
- Medium fat clay is the best option. It has good adhesive properties, durable, heat-resistant, and hygroscopic. When dry, it gives a moderate slump and does not crack.
- Lean clay has low adhesive properties. It is dry, cracks quickly, and the masonry crumbles.
We suggest you familiarize yourself with: Insect repellent for wood treatment
Finding good clay is a great success. Good layers lie at a depth of 5 meters. The surface ones are heavily contaminated with humus and contain a high content of sand impurities. This is loamy, thin soil. She's not fit for work.
Under the loam layer there is a clay formation. The thicker the formation, the better. The lower layers are the fattest clay, but it is also not pure. It is better to take from the middle layers with the least content of organic matter and impurities.
A solution of natural clay and sand is used for laying stoves with low temperature conditions - up to 1000 ºС. When a higher temperature is envisaged in the firebox, fireclay clay is used for masonry, and the walls of the combustion chamber are made of refractory bricks. By the way, the latter is made from the same fireclay (kaolin) clay.
In this case, the working solution can be prepared in two ways:
- purchase dry kaolin clay and mix according to the instructions;
- take fireclay sand and mix it with natural clay, as described below.
Stirring a solution of fireclay clay, sold in bags, will not be difficult, you just need to monitor its fluidity so as not to overdo it with water. To prepare using the second method, you need to purchase fireclay (mortar) in the form of sand and white or gray refractory clay. The proportions are as follows:
- refractory clay – 1 part;
- ordinary clay - 1 part;
- fireclay – 4 parts.
Otherwise, fireclay clay for masonry is prepared in the same way as simple clay. The main thing is to maintain the normal fat content of the solution so that your oven does not crack.
Clay research.
Take a lump of clay in half a fist. Wet it, knead it until it becomes soft, and slowly squeeze it between two perfectly even planes. If the lump quickly cracks, then the clay is of poor quality. Cracks appeared after the lump was compressed by one third, then such clay is taken home for further work in a volume of at least 5 kilograms.
Water hardness matters. Use only soft or, in extreme cases, medium-hard water.
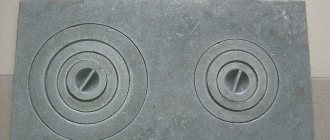
The sand used for the firebox is quartz; for the rest we use regular construction yellow sand. First, the sand mixture is sown through a fine wire sieve. Then they are thoroughly washed with water to remove organic matter - various organisms that like to live in the sand. Their presence in masonry mortar is undesirable, as this deteriorates its quality.
The next step is to find out the proportions of the components of the mixture.
We suggest you familiarize yourself with: DIY brick sauna stove with water tank
We divide the entire volume of clay brought into two parts. We set aside part and divide the second into 5 parts. It is better to label the dishes. Distribute the clay evenly into a marked container and ferment it with water, adding a quarter of the amount of clay. It becomes limp within 24 hours, after which we mix it, press it through a mesh material with 3 mm cells, and let it sit for 1 day.
We make samples from the resulting solution:
- Sausages or flagella 30 centimeters long, no thicker than a finger ˗ 2 pieces.
- Roll into a ball with a diameter of 5 centimeters.
- We make a clay cake of medium diameter as thick as a finger.
We label the samples. Clay sausages are dried for three days, balls and cakes for up to twenty days. The samples are dried in the shade.
When stretching or wrapping flagella around a stick:
- normal clay - only the crust cracks and the mass is damp;
- greasy ˗ the crust will crack or not crack;
- skinny clay ˗ flagellum breaks immediately.
The results of this experiment are not reliable. You must wait until the balls and cakes dry. We inspect dry samples for cracks, then drop them to the floor from a height of 1 meter and see which ones are cracked. Those samples that withstood the impact are dropped again, but from a greater height. We select those samples that have passed the tests. This is the formula of the solution.
Using this formula, a test batch is made from the remaining clay and the adhesiveness of the solution is checked. If the solution is very liquid, the masonry will not be strong enough. If it is too thick, the seam will be too thick. Too liquid settles, drain the upper sludge (settled water) and measure the quantity. This volume is subtracted from the original volume of water for dilution.
Take two bricks. We lay a thin layer of mortar on the wide part of one and press it on top with a second brick. After 10 minutes we take one brick at a time. If the second brick does not fall off when shaken, then the composition is prepared efficiently.
The clay mixture for one oven is prepared as follows: First, the clay is fermented, then filtered, removing impurities, and then mixed with sand in a trough. Sand is added gradually. Stir with a paddle, pour into a barrel and allow to settle. Then the upper sludge is removed, the required amount of solution is taken into a bucket, and the rest is covered with damp sackcloth. This solution was stored for a long time.
Conscientious stove makers carefully and scrupulously selected clay, knew the properties, when and which one to use. They prepared the solution themselves, doing strength tests. Life and well-being in the house depended on their skills.
Tags: clay, soak, masonry, oven
« Previous entry
Fat content of clay. Determination of fat content
In order to begin measures to improve the quality of clay, you need to determine the degree of its fat content. It is from this indicator that you will have to start when choosing between emaciation and elutriation of clay. You already understand that excessive fat content in clay can ruin the finished product, and low fat content can interfere with the production of this very product due to loss of plasticity of the material.
There are several methods for determining the fat content of clay. The most common method used in all spheres of Russian life is the “by eye” method. Everyone can use this method, but only masters who have many years of experience working with this material can obtain information that is close to real. The remaining methods are much more objective and can be used even by beginners.
First way.
In a 10-liter bucket, dilute the clay with water until creamy, stirring with a smooth wooden stick. The fat content of the clay is determined by the thickness of the clay adhering to the stick. If the thickness of the clay is 1 mm or less, the fat content is too low for modeling, and the clay needs either elutriation or the addition of fatty clay. On the contrary, clay needs to be thinned if it sticks to the stick in a thick layer of more than 3 mm. Normal plasticity is achieved if the clay adheres to the stick to a thickness of 2 mm in small clumps.
Second way.
More complicated way. It is used for clay that is obviously fatty and of medium fat content. It consists of experimentally establishing the optimal fat content.
Several identical portions of clay are measured, each of which is mixed with sand in different proportions (4-6 portions). Then each composition is brought to a state of plasticity with water, which allows you to form balls without getting your fingers dirty. You need to make 4-6 balls from each portion. Half the balls need to be flattened. Both balls and cakes are dried for several days. After this, the result of the experiment is determined.
If after drying the balls and cakes are not cracked, they are thrown on the floor. With normal fat content, both balls and cakes should not crumble or crack upon impact. You need to remember in what proportion to dilute your clay with sand in this situation.
The balls and cakes that cracked during drying consisted of clay that was too oily, which is why defects in the form of cracks formed during shrinkage. Balls and cakes that are not cracked when dried, but broken when dropped, have a low fat content of clay that needs to be washed out.
Third way.
Similar to the second, only the rolled balls are not dried, but flattened between two smooth boards. Normal fat content is determined if the balls begin to crack at the edges when flattened by a third of their diameter. Low-fat clay will crumble immediately under pressure. Oily clay will begin to crack when flattened to half its diameter.
There are even more sophisticated ways to determine the fat content of clay, but if you learn to determine this “by eye,” it will greatly reduce your preparation time. Mix several clay compositions and try to determine the optimal fat content yourself.