In fact, it’s very easy to change the cartridge in the faucet yourself and you don’t need to waste your time and money calling a plumber. You yourself can cope with the task of replacing the cartridge, but to do this it is worth studying in more detail the design of the faucet, the causes of breakdowns and other nuances.
Nowadays, the construction materials markets are filled with a wide variety of modern and foreign products. This also applies to plumbing; there are many options for faucets with different characteristics, functionality and prices. But even the most durable and long-lasting equipment requires constant care and monitoring. At a certain stage of operation, the faucet will still leak, which will bring many problems. But you shouldn’t rush straight away to buy a new faucet; you just need to purchase a special cartridge that you can install with your own hands.
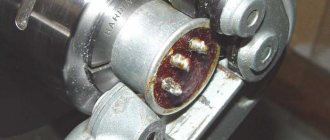
Typically, failure of a ceramic faucet cartridge occurs due to a malfunction of special plastic elements. As a result, the ceramic plates do not adhere to each other, and the structure cannot retain water, and leaks begin. It even happens that the ceramic inserts themselves break.
Causes of failure
There are many reasons for faucet failure these days. First of all, the rapid breakdown of the cartridge in the faucet and its subsequent replacement can be attributed to the ingress of solid and small particles, such as grains of sand, into it. Because of them, the internal elements in the mixer are damaged, that is, the metal parts of the tap and head are abraded. As a result of this interaction, chips, scratches and other damage appear on them, which are the main cause of faucet leaks.
If these signs appear, it is better to immediately repair and replace the cartridge, as well as change other parts of the mixer design.
When is it time to change the faucet?
Along with the question - when to change the cartridge in the mixer, you can also ask - when is it better to change the mixer and how to install it correctly? Expert opinion says: faucets in the kitchen, shower and bath can last quite a long time. The main thing is to promptly replace or repair the cartridge, as well as change the gaskets. But at some point the device has to fail? Of course yes.
Experts say: it is necessary to replace the faucet both in the kitchen and in the shower and bath at the moment when the faucet structure has completely deteriorated and repairs will not help it. Most often, such “breakdowns” occur with the head, cartridge and other components of any faucet. Over time, every part of the mixer deteriorates, but there is no point in constantly replacing it, since the faucet has simply “done its job.”
Therefore, after a cartridge or other faucet structure breaks down, it must be replaced so as not to waste money on repairs. To find out when it is better to replace the faucet and install a new cartridge in the kitchen, bath or shower, we recommend watching a thematic video or photo.
Features of ball cartridges
Before replacing the cartridge in the faucet (in the shower or in the bathtub - it doesn’t matter), familiarize yourself with the features of the types of products presented and select the best option.
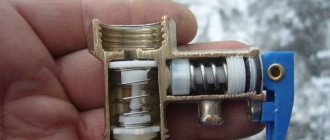
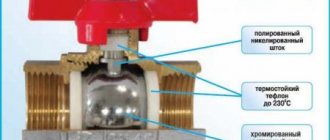
The cartridge for the ball mixer is distinguished by the ability to regulate the water, so you can set a temperature that is comfortable for taking water procedures. Due to their shape, the products are less sensitive to hard water and microparticles.
The principle of operation of the product is that water enters the mixer, passing through spring-loaded Teflon seats and a pair of supply channels, where mixing directly occurs.
One of the main disadvantages of this type of design is the sensitivity of the ball to corrosion. Over time, the cartridge's Teflon seals and connecting gaskets wear out due to increased levels of chlorine in the water.
This type of mechanism can rarely be seen on store shelves, since its release is accompanied by the need to obtain special permission.
Replacing a cartridge in a faucet with your own hands: video
How to replace the cartridge in the mixer yourself? It's actually not difficult. The main thing is to know the components of the faucet design and then you will be able to quickly repair the faucet by replacing the cartridge in it.
Before you start replacing the cartridge in the mixer, it is better to familiarize yourself with the photos and videos in order to have an idea of the upcoming repair.
To replace the cartridge in a ball mixer and completely eliminate structural damage, you need to perform a number of actions.
- Turn off the water in the mixer.
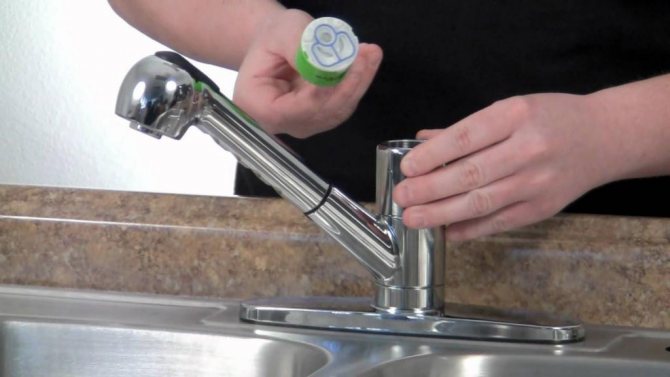
- Remove the plug (plastic).
- Use a screwdriver to unscrew the screw and then carefully pull out the handle.
- Then unscrew the decorative cap located under the faucet lever.
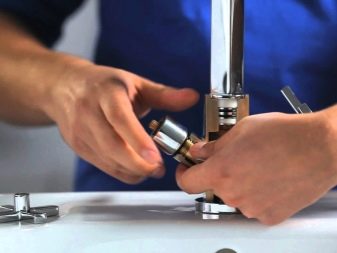
- Under it you will see a locking washer, which also needs to be removed from the faucet structure using an adjustable wrench.
- Then we take out the cartridge. If nearby gaskets have settled, it will be quite difficult to remove the cartridge (see photo).
- We wipe the freed space under the cartridge from sand, plaque and other debris.
- Now we replace the cartridge: carefully insert the new cartridge into the device and secure it with a washer, and then with a decorative cover (if you need to change the gaskets, this needs to be done right now).
- Then we put the handle in place and secure it with a screw.
Now we insert the plug and check the operation of the mixer and cartridge. You have done everything correctly if the tap does not flow and the handle turns smoothly. This completes the repair of the faucet structure and replacement of the cartridge.
It is worth noting that the installation of a similar faucet can be carried out both in the kitchen and in the bath and shower, so in this case the repair and replacement of the cartridge will be identical (especially since changing it in any “part of the house” is equally not difficult).
To clearly see the work ahead, look at the best photos of replacing the cartridge in the mixer, as well as familiarize yourself with its installation process and understand its structure as best as possible.
Stage two: preparing the cartridge for replacement
We took out the old toner container. Now you need to correctly install the new cartridge that you purchased in the store or filled with ink yourself. To do this, we recommend considering the following:
- The cartridge is in your hands. It is without packaging. You also shook it a little to help distribute the ink. Now we insert the cartridge into the printer, making sure to fit into the appropriate slots.
- At the same time, we do not make significant efforts. Otherwise, you may break the cartridge or damage the mechanisms that hold it. It should move freely, smoothly and easily along special guides. If you feel that the cartridge does not go further or is not fixed correctly, then remove it and repeat the procedure.
- Make sure that the consumable is not placed “upside down” or backwards.
- Many printer models (especially inkjet printers) have a stop mechanism. In this case, you need to make sure that the cartridge is inserted tightly. A characteristic click when pressed will tell you this.
- Next you need to close the lid. Then wait until the device enters operating mode. You managed to change the cartridge yourself!
- At the end we print a test page. This is done to ensure that the cartridge and printer are working properly.
READ MORE: Rolsen vacuum cleaner features of vacuum cleaners with an aqua filter review of models C-1540TF and Aqua T-2569S and others
Faucets with one rotary handle are increasingly displacing traditional two-valve designs from bathrooms and kitchens. The main arguments in favor of a single-lever faucet are convenience and durability. But sooner or later, such a mixer also fails.
Single-handle faucets are increasingly replacing traditional two-valve designs in bathrooms and kitchens.
If the faucet starts to leak, the reason is most likely in the cartridge. It is unlikely to be repaired, but it can be replaced. The device is inexpensive, and the installation process is simple and does not require special skills.
The hardest part is behind us. Now let's prepare the cartridge for replacement. To do this, you need to either refill it with ink or purchase a new one. At the same time, you can buy either the same model of consumables or a non-original one that is compatible with your printer.
If you have chosen a new cartridge, the first step is to carefully remove it from its shockproof and sealed packaging. Just open it and remove it from the consumable. Moreover, when performing this procedure, try not to touch the contacts, nozzles and photodrum.
Please also keep in mind that even a new cartridge sometimes leaks toner. Therefore, replace it on a surface protected by newspapers or film. Special clothing will also come in handy.
Also, do not forget to remove the protective tape and the safety tape that is located on the contacts of the cartridge (usually these are sticker tabs with a color indicator). Then rotate the ink bottle back and forth several times while keeping it horizontal. This is done in order to evenly distribute the paint inside the cartridge, which may have stagnated during transportation or long-term storage.
There are two situations: change or refill the print cassettes. One way or another, you will need to remove them from the printer and then put them in place. Let's consider this for several types of printing equipment.
In order to refill an empty cartridge, you need to prepare:
- cotton swabs;
- latex gloves;
- cloth napkin;
- refill kit: syringe, ink.
We proceed in the following steps.
- Open the hinged cover and carefully remove the empty cartridge according to the printer instructions.
- Find the filling hole and insert the syringe needle into it, which will respond with a light touch to the sponge located inside.
- Slowly fill the cartridge with ink at intervals that allow the sponge to become saturated.
- When the paint appears in the drainage hole, the syringe can be removed.
The holes are wiped with a cloth. The cartridge is placed on a flat surface (table) to settle for about 5 minutes.
You need to carefully take the full tank and place it where it was previously located. Install until it clicks. The next step is to enable the “cleaning cycle” to obtain good print quality. The equipment can then be considered ready for use. This way you can refill the cartridge yourself, saving time and money on a trip to the workshop.
Replacing a shower faucet
The cartridge in the faucet can break not only in the kitchen, but also in the bath. Repairing and replacing your shower faucet yourself is not difficult. Most often, single-lever mixers are installed in the bathtub, which differ slightly in design, design and replacement of parts from ball ones. But, nevertheless, replacing the cartridge in such a faucet can be done quite easily, especially if you seek help from the best photos and videos that can briefly describe the process and show the replacement of the upcoming faucet repair.
- Turn off the water in the mixer.
- Just in case, we check the serviceability of the cartridge.
- Remove the plastic part and unscrew the screw (see photo).
- We take out the handle and unscrew the remaining parts that prevent the cartridge from being pulled out.
- After this, we clean the faucet device from scale and sand (see the photo for how this is done). It is important to do this as you install the cartridge so that the device does not become clogged.
- Then we check the seal rings on the cartridge, because if they are installed incorrectly, the mixer will leak after repair.
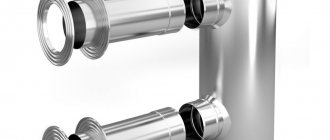
- We put the new cartridge in the mixer and check if it is the right size. When installing, it is important to check the holes in the cartridge, the structure of which must coincide with the mixer (see the photo for what its structure looks like).
- After this, we return the faucet to its original condition and check the quality of your repair.
As you can see, changing a part is not difficult - see the photo for the replacement process.
This replacement of the cartridge in the mixer is not much different from the previous repair. And if you also familiarize yourself with thematic videos and photo tutorials, you can quickly replace the cartridge and check the faucet device for damage.
The design of a single-lever faucet is much clearer than a ball faucet, so you can easily replace the faucet in the shower without the help of specialists, especially since this is much easier to do in the bathtub than in the kitchen.
How to replace it yourself?
Of course, the ceramic plates of the cartridge last much longer, but they can also cause poor operation of the mixer, or even its complete failure. It is impossible to repair cartridges - you need to know how to change them.
There are several external manifestations of a cartridge malfunction:
- there is no mixing of hot and cold water: only one of them comes out;
- there is no water supply at all in any position of the tap lever;
- the outlet water temperature is not fixed and changes frequently;
- the tap does not provide a full supply of water;
- after opening the tap, the water from the mixer cannot be turned off;
- Water constantly leaks from under the lever;
- The lever can only be turned with considerable force.
The operation and condition of the mixer are largely affected by insoluble particles of rust, lime, sand and other impurities in the water. The use of various water purification filters extends the life of the reliable operation of the cartridge, and therefore the mixer as a whole.
The cartridge faucet not only wears out, but sometimes breaks due to a number of reasons:
- low-quality materials were used in production;
- frequent sharp or shock impacts on the mixer lever;
- water hammer in the system;
- poor water quality;
- bad filters or lack thereof.
It does not always happen that a cartridge will work flawlessly for the 10 years it is supposed to. Our plumbing systems are worn out, accidents are occurring more and more often, water quality is deteriorating - all this reduces the life of plumbing parts and components. Statistics show that cartridges do not perform their functions and must be replaced every 5-6 years.
As you can see, you can’t count on the eternal operation of water mixing and supply devices, especially cartridges, and the time will come when the old cartridge will have to be taken out and replaced with a new one. You can invite experienced plumbers for repairs, but if you have the necessary skills and desire, you can carry out this work yourself.
When replacing a cartridge, you will need the following set of tools:
- screwdrivers for different sizes;
- adjustable wrench;
- pipe wrench;
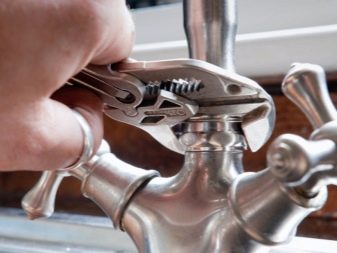
- pliers;
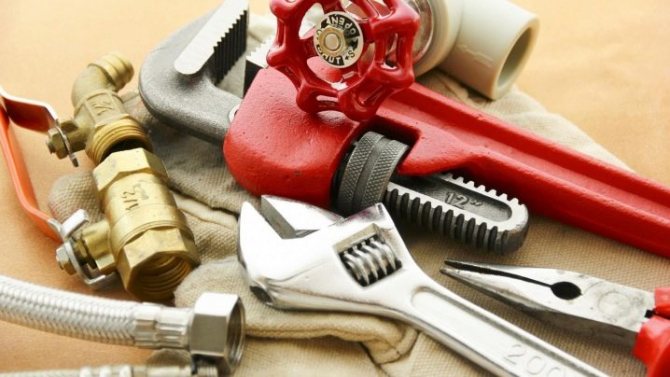
- hex wrench (small, for the locking screw);
- clean rags;
- WD-40 liquid.
The purchased new cartridge may not fit in terms of seats and dimensions, so the best option would be to bring the removed old unit to the store and use it to buy a new one. The condition for such an exchange should be the presence of other working sources of water that compensate for the absence of the cartridge to be replaced. Dismantling a faulty cartridge is done without much difficulty - you just need to take a few simple steps yourself.
There is no need for haste and no great physical effort: faucets are rather fragile products that can easily break.
You should begin work by removing the plastic decorative plug (blue/red) by simply prying it off with a flat-head screwdriver. In the depth of the opened hole there is a small locking screw. You need to make sure what kind of head it has and prepare the appropriate screwdriver or hex key. There is no need to turn the screw out completely - just loosen it a little. Then lift up and remove the mixer lever. If difficult, spray with WD-40 or hot water. The heat will cause the metal to expand and the lever will come off. Manually unscrew the spherical nut. There may also be jams here, so you can use liquid or hot water again. It is necessary to remove the part carefully, without using much physical effort: the nut is fragile and can break. Next, using an adjustable wrench or a suitable tool, unscrew the clamping nut and remove the cartridge from its socket.
How to replace a kitchen faucet
You can replace the cartridge in a kitchen faucet or repair it with the help of several tools and certain knowledge. The technology of this work is not very different from previous methods of replacing the mixer.
The main difference between this type of repair is the ball mixer, which in its design differs significantly from other taps. In addition, installing a cartridge in a ball mixer located in the kitchen is a little more complicated, so it is better to first become familiar with the technology for the upcoming repair.
To properly understand the technology of operation, you can familiarize yourself with thematic videos and photo lessons, which clearly show the picture of replacing the mixer, as well as the structure of the faucet located in the kitchen.
- Turn off the water in the mixer.
- We remove the plastic structure.
- Then use a screwdriver to remove the bolt (see photo).
- We take out the handle and begin to unscrew the remaining parts of the device that interfere with access to the cartridge.
- After this, we take out the cartridge and assess its failure. If the faucet begins to leak or is difficult to open the water, it means that the failure is most likely in the cartridge.
- We install a new cartridge in the mixer and put the faucet back together.
- If the device contains a lot of scale inside, it can be removed using any cleaning agent. It is important to do this before installing the cartridge so as not to damage the gaskets and other components (see the photo for how to do this).
As you can see, replacing the cartridge in a kitchen faucet is not difficult. True, it is better to do this after familiarizing yourself with the thematic photo, since in this case it will be much easier to change this part.
Single lever faucets and their repair
Today, most bathtubs, sinks and other plumbing fixtures are equipped with single-lever faucets. They replaced faucets with 2 valves, which were present in apartments, houses and many government institutions quite recently. They were designed to mix hot and cold water. This required turning one or the other valve several times, after which you could take a bath, wash the dishes, or simply wash your face and brush your teeth.
Related article: How to choose ceiling baguettes for curtains: designer tips
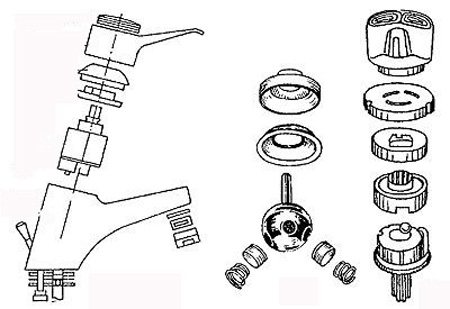
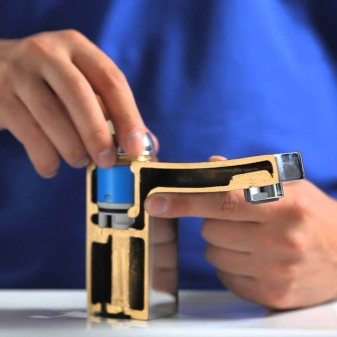
Assembly diagram of a single lever mixer.
Now it’s a completely different matter: just one movement of the hand is enough, and water of the required temperature is already flowing from the tap. But even such a seemingly ideal item is not able to protect itself from wear and tear. Time does not spare him either.
The mechanism most susceptible to wear here is the cartridge. It cannot be repaired, so the only way out of this situation is to replace it with a new one.
Differences between cartridges from different manufacturers
The difference between this replacement part in a mixer from different companies is usually insignificant. However, some try to understand the main differences as much as possible in order to buy a high-quality and reliable cartridge in order to replace it in the mixer.
- Grohe produces cartridges with carbon-crystalline coating located on the plates, which makes the cartridge more durable and reliable and makes installation easier.
- The oras cartridge is standard, so if the cartridge breaks, you can quickly and easily find it.
- The manufacturer Vidima offers customers cheap designs of cartridges for faucets, but, unlike the previous ones, they quickly break down and it is impossible to repair them.
- The brand, called Boltic, sells the best cartridges, which, with a special mounting method, will serve you for many years.
When choosing a cartridge for a faucet located in the kitchen, bath or shower, you should take into account not only the price, but also the quality of the product, which determines the duration of the faucet, installation and reliability of the design.
Cartridge classification
The variety of models is explained by differences in their design and differences in the workflow algorithm.
According to the internal structure, the following varieties are known:
- The mechanism of the device is in the shape of a ball. Both the temperature of the water and the power of the water supply pressure are controlled. Therefore, when a faucet breaks down, it is the one that is replaced. The mechanism is a ball with one or two holes. The moving lever forces the holes to close from the water supply pipes. Water mixing occurs. The ball mechanism is installed only in a single-lever mixer.
- The disk mechanism works on the same principle. A special disc can also be used in two-valve taps.
For faucets, cartridges are distinguished according to the material from which they were made:
- metal;
- ceramics.
The principle of operation of the crane is the basis of the classification:
- cartridge for single-lever mixers;
- faucet with a cartridge, the operating mechanism of which is two-lever.
All types differ from each other in the number of protruding elements that must coincide with the grooves in the mixer body and the number of holes for the pipes.
Single lever mechanism
A single-lever mixer uses a disk or ball model. The mixer meets GOST 25809-96. Water is supplied when the lever is rotated in different directions, the position of the locking device changes. The use of the model has also extended to kitchen faucets and shower stalls. Until recently, it was used only in bathroom devices.
Description of ceramic cartridge
The difference between a ceramic faucet cartridge is that the important parts are 2 plates that lie tightly together. They are involved in regulating the power of water pressure and increasing or decreasing its temperature. The locking device is lubricated to reduce friction between the ceramic plates.
A leak when the tap is closed indicates that this breakdown can only be eliminated by replacing the device.
This type of model is used in the kitchen, bathroom and shower faucet. With the number of device models, it’s hard to figure out how to choose the right manufacturer. Hansgrohe and Grohe are in demand for sale.
Features of the shower cartridge
Diverter is the name of the device. This is a cartridge with a number of water mixing positions from three to six. The number of positions is proportional to the number of connected devices (the hydrobox requires a diverter cartridge with 5 positions).
Knowing this feature of the model, you need to figure out how to choose it for the mixer. The operating algorithm of the crane is based on the rotation of a brass rod by 360 degrees around its axis. This rotation provides 6 lever positions.
Ball valve mechanism and its cartridge
By changing the position of the shut-off ball of single-lever faucets, the cartridge changes the power of water flow or stops it completely. There are 2 identical holes and one large one on the bottom of the device. The holes are all completely blocked or part of them, which regulates the pressure power in the single-lever mixer.
Mixer with thermostat
The tap is equipped with a scale where the required temperature is set. The lock is set to the specified position and does not change. The cartridge device regulates the pressure and temperature of the water supply.
The crane model is used in public places.
The thermostatic model is installed in washbasins and bidets.
Price
To change the cartridge in the mixer, you need to buy it. But how to choose the right cartridge if there are quite a few models of them these days? First you need to decide what is more important to you - the best price or quality. After all, changing the cartridge in the kitchen, bath or shower is not difficult, the main thing is to buy the proper cartridge.
Today, the price category for faucet cartridges is quite diverse (see photo). If the breakdown of your faucet comes from its structure, check the table to have an idea of the cost of this part for the faucet.
| Cartridge type | Diameter | Price |
| Cartridge for mixer 243 | 40 mm | 60 rubles |
| Cartridge L50 (ceramics) 50/500 | 40 mm | 72 rubles |
| Potato faucet cartridge | 40 mm | 31 ruble |
| Cartridge for multi-command mixer AQUEDUC 35′ AQ314 | 40 mm | 45 rubles |
| Glauf switch cartridge for faucet (for slots) | 35 mm | 100 rubles |
To change the cartridge on a faucet, you will need not only a new cartridge, but also gaskets, which play an important role in the operation of the faucet.
Why you should pay attention to product selection
We have already found out that it is enough to simply replace the cartridge in the mixer yourself. But keep in mind that prices for products vary greatly. This is due to the presence of several standard sizes of parts that function according to the same scheme, but differ in the volume of water that can pass through. Sometimes on the market there are Chinese counterfeits of low quality that do not differ in quality - it is not recommended to buy such products, so as not to cause damage to yourself.
If you know how to replace the cartridge in a faucet, plumbing breakdown will no longer be a problem. By applying the studied data in practice, you will quickly cope with the expected amount of work and prevent more serious problems that arise as a result of a leaking faucet.
Expert advice
Following the advice of an experienced expert, you can quickly and easily change the cartridge on the faucet without resorting to the services of a professional.
- To change the cartridge yourself, you need to watch a video of such an installation, which will help you properly recognize its device.
- Replacing a cartridge design if it breaks down in the kitchen, bath or shower is a similar process that requires certain knowledge and the same tools.
- The best cartridges for faucets should be purchased in specialized stores.
- The design of this device is quite simple, so anyone can repair the cartridge, as well as change it in the mixer.
- To assess the degree of breakdown of the mixer, it is first better to understand its structure. To do this, you can familiarize yourself with photos and videos that will explain in detail what the design of the mixer is like.
Cartridge replacement algorithm
Replacing a device in a faucet is a process that is done in reverse.
- The new cartridge for the mixer is installed in the housing so that its lower part with its protruding parts fits into the grooves of the housing. A clicking sound will indicate that it is installed correctly.
- Next, the locking nut and ring are installed in place.
- The last thing to install is the lever.
- The lever is fixed in place.
- The tightened screw that is hidden under the decorative point will be the last step.
Standards for cartridge parameters
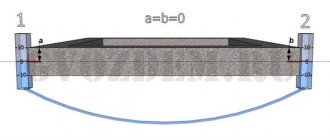
The most common sizes (according to GOST) of cartridges that fit the mixer:
- shower cabins – 32 mm,
- washbasin – 28 mm,
- sinks – 35 mm
- for the bathroom – range 40-46 mm.
A large model of cartridges needed for faucets is produced in China. There is a pattern that a large single-lever mixer (with a larger spout diameter) is of better quality. This rule does not apply to other manufacturing countries.
The cartridge for the mixer is selected taking into account:
- diameter indicator;
- height measurements with leg;
- high accuracy of its height without a rod.