Almost any construction of private houses requires insulation measures.
In some cases, apartment premises also require installation of insulation.
To provide warmth in the house, there are a large number of different materials, one of them is penofol.
It is worth familiarizing yourself with the features and installation process of this material in more detail.
You can also familiarize yourself with such insulation materials as:
- mineral wool;
- Styrofoam;
- penoizol;
- extruded polystyrene foam;
- penoplex;
- polyurethane foam.
Here you can choose the most effective insulation for your home.
Advantages and disadvantages of penofol
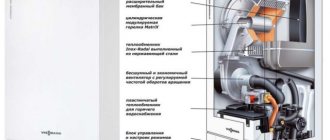
This material is polyethylene, which is foamed during production and covered with an aluminum coating, which reaches a thickness of 14 microns and has a purity of 99.4%. The material can be coated with aluminum on different sides or on both sides at the same time.
Its class and properties of heat and vapor barrier depend on this.
First of all, you should familiarize yourself with its positive characteristics, which play a significant role when choosing a material for insulation:
- High degree of environmental friendliness . The components from which this insulation is produced are non-toxic, since their use is permitted for storing food products.
- Minimum thickness value . Similar insulation materials usually exceed a thickness of 4 mm. If we compare penofol and mineral wool, then 8.5 cm of the second material can provide the same insulation properties.
- There is no need to use vapor barrier materials , because penofol is characterized by a low level of vapor permeability.
- High noise insulation properties , which allows for acoustic and structural sound insulation without additional costs.
- The installation process is quite simple ; there is no need for special clothing or the use of specialized equipment.
- The insulation is not subject to fire.
- Easy transportation , the insulation can be rolled up and packed into a passenger car.
- Rodents do not damage such material.
- Each batch produced undergoes mandatory certification at the sanitary and epidemiological station.
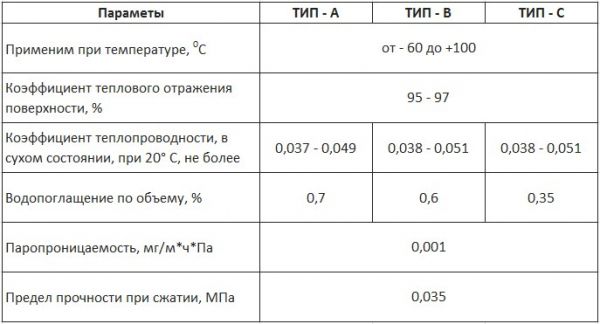
Specifications
In addition to the positive aspects, it is also worth noting other nuances, which in some cases are disadvantages when using penofol:
- Due to the softness of the insulation, it cannot be used for internal insulation in the case of walls decorated with plaster or wallpaper.
- Difficulties in attaching all classes of material except C, which is equipped with a self-adhesive coating. It is better to make the connection using adhesive compounds; it is believed that nailing penofol worsens its properties as insulation.
- Penofol is significantly inferior in its characteristics to other types of insulation.
Types of penofol
This insulation is mainly used for finishing the walls of a house or apartment from the inside . If there is a need to insulate the house from the outside, then it is better to choose another type of heat-insulating composition, and use penofol as an additional layer, thereby enhancing the properties of reflecting thermal energy.
What is better - foil penofol or basalt insulation?
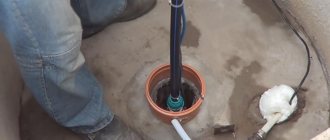
Perlite sand is used to fill the air gap of different parts of the building:
- floors – it is indispensable when laying heated floors, as it is resistant to temperature changes;
- walls - to preserve heat in the house, perlite filling into voids is the best option;
- roofs – used to insulate roofs of various shapes.
In addition, it is used for thermal insulation of chimneys, pipelines and where a heat-protective shell is required.
For every owner of a house or apartment, the time comes when it is necessary to start insulating walls or balconies.
There are a large number of insulation materials on the market that have their own characteristics. How to choose the most suitable one for the task is described in the article below.
READ MORE: Build a house from timber material technology photo video
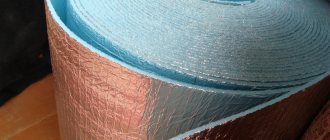
Foil insulation for walls has a number of advantages, including easy installation and relatively low cost.
Foil insulation reflects infrared rays, which are essentially thermal rays. But there is no need to use the material everywhere. In some places it will not work properly.
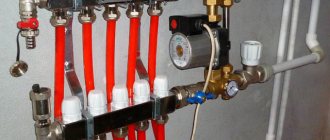
It is mainly installed near thermal energy sources:
- heating devices - batteries, air heaters. The insulation is mounted on the wall with foil in the room;
- boiler, fireplace stove.
It is also used when installing “warm floors”. The reflective layer will direct the heat in the desired direction.
Small spaces where every centimeter plays a role. Here, thin insulation would be appropriate on the walls and ceiling.
In the attic. Here the insulation is installed on the roof. Apply 2 layers to combat heat and cold.
In baths and saunas. The heating of the room is not constant; foil material is suitable for such purposes.
Garages, hangars, outbuildings - an installed radiator or potbelly stove.
They also insulate heating pipes, air ducts, wells and wells.
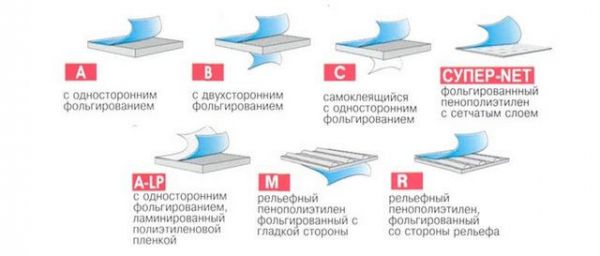
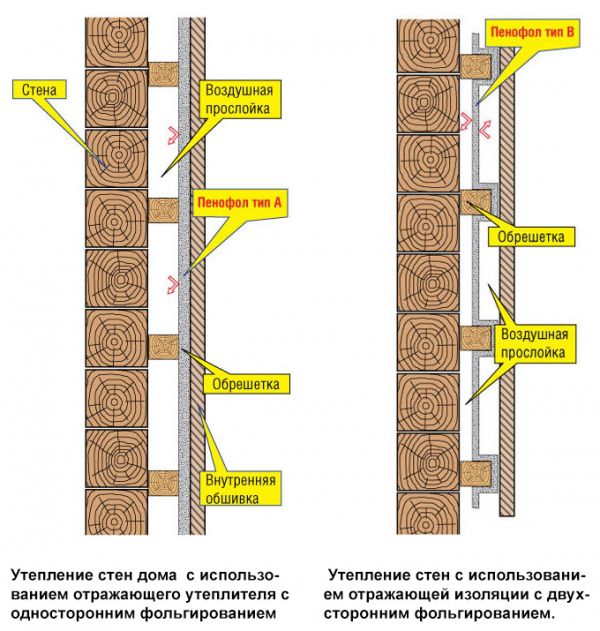
There are 3 types of penofol with foil on sale. Each is marked with Latin letters, which indicate the packaging.
TYPE A – heat insulator made of polymer, foil layer on one side. Produced in different thicknesses. Suitable for complex insulation of buildings inside. Glass wool is used together with this insulation. They also produce foil insulation with perforation. It is installed in log houses to allow the wood to “breathe.”
TYPE B – foil is located on both sides. This is maximum protection against heat loss. Penofol type “B” is used for thermal insulation of the attic, supporting structure, basement, and floor. As well as insulation of the pipeline and heating system.
TYPE C - on one side there is foil, on the other there is a thin layer of glue protected by film. Self-adhesive penofol is easy to install without spending a lot of time. For installation, cut into pieces of the required length and glue to the prepared surface.
TYPE R – a complete comparison to type “A”, but with a pattern on the foil. Used as decor for indoor walls. And also with multi-layer insulation, creating an air gap.
TYPE ALP – high degree of reflection. This insulation is used in agriculture, for example, to insulate incubators or buildings for calves.
Type NET is analogous to type “B”. Produced in narrow rolls or coils. Used for pipeline insulation.
2000 Type C – reduced performance. The adhesive layer is of poor quality and has poor adhesion.
The building materials market is full of types of insulation. They have their own characteristics, positive and negative sides.
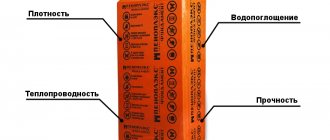
General thermal insulation parameters:
- Weight. The insulation should not weigh much, because when installing it on the structure there should be no weight.
- Thickness. The thinner the material, the more space remains in the room.
- Low thermal conductivity.
- Moisture permeability. The material should absorb moisture as little as possible.
- Noise insulation. Does not allow sounds from the street to pass through.
- Environmentally friendly material. Should not emit harmful substances.
- Easy to install.
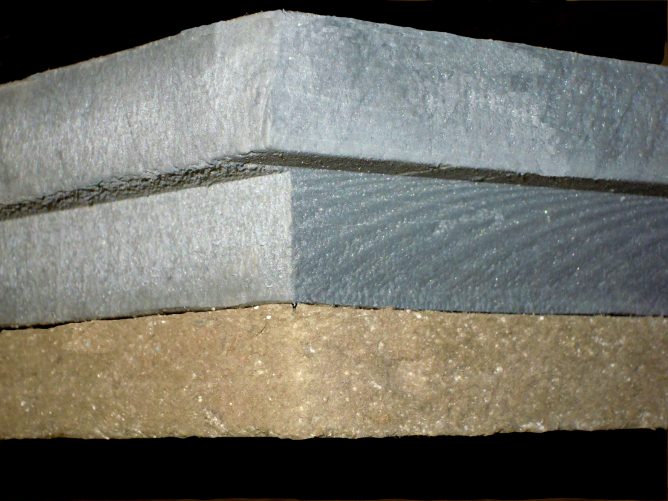
When comparing basalt insulation and foil penofol, you need to compare their characteristics.
Basalt wool
Made from rock of volcanic origin. It does not burn, has good sound insulation properties, and does not lose its qualities over time. It is completely safe for health.
Made from polyethylene foam with a porous structure. A layer of foil is glued on top as a heat reflector. This thermal insulation material is several times thinner than basalt wool. In addition, it reflects heat and practically does not absorb it.
Which insulation to choose depends on the budget for insulation, as well as personal preferences.
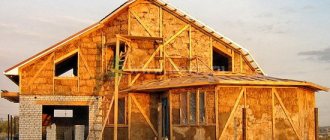
To obtain a guaranteed result, you should know that dry summer weather is chosen for insulation, when the walls of the mansion are thoroughly dry.
The wood is treated with fire retardants to increase fire resistance, as well as antiseptics to increase resistance to fungus and insect colonies.
Also, in order to further insulate, the walls are insulated from the inside with penofol. Of course, many may argue that the internal placement of insulation leads to the formation of condensation between it and the walls.
Yes, this would be so, but you need to remember that the walls outside are already insulated, so they do not freeze and condensation does not form.
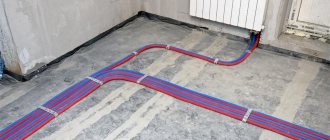
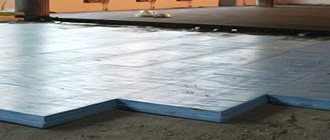
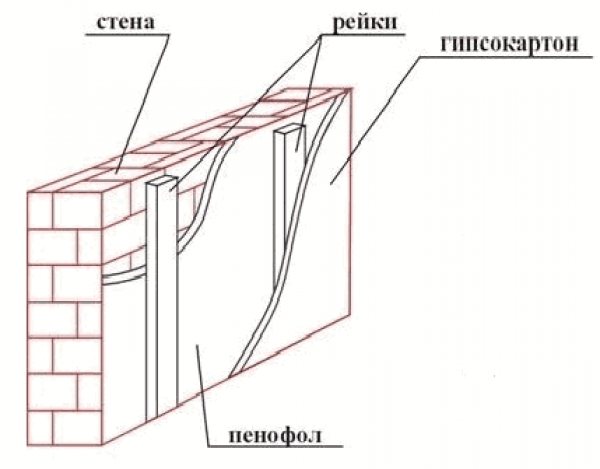
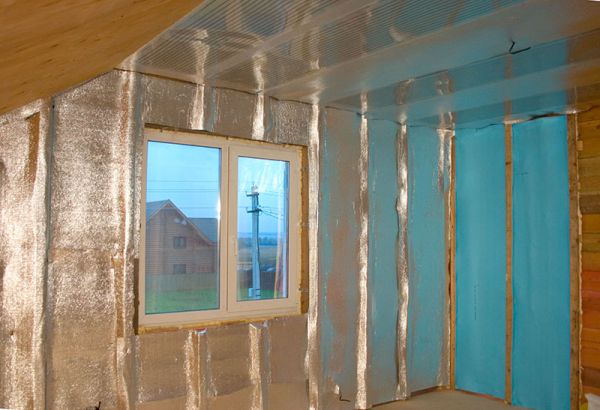
Insulating a house from the inside with penofol begins with stuffing slats under the insulation to allow for its convenient fastening, as well as the formation of a ventilation gap between the insulation itself and the walls of the building.
The slats are mounted on the walls using dowels, after which penofol is installed with an overlap of 10-15 centimeters and secured using a construction stapler.
Insulation
Insulating walls from the inside with penofol further consists of gluing the joints using double-sided foil tape. The insulation itself is laid with the foil side facing the room to create a heat shield. After this, I seal the insulated space; it is “sewn up” with plasterboard boards.
You just need to remember that the interior lining of an apartment/house with penofol or any other insulation without external insulation should be installed only in case of emergency, since condensation between the wall and the insulation cannot be avoided.
Maxim Bragin, Vereshchagino, 2014.
External
, especially wooden ones, according to experts, are more effective than internal thermal insulation.
For this type of insulation, perforated penofol is used, which, in addition to sound and heat insulation, protects the building from wind and precipitation and promotes the release of steam from the structure.
External insulation is suitable in a situation where you do not want to change the interior environment or reduce the usable area of your home due to thick layers of heat insulation. The insulation is installed between the wall of the house and the cladding.
It is very important to carry out external insulation of a house in the warm season, when temperature changes are minimal and the walls of the building are completely dry.
Stages of work:
- So, the work begins with removing all coatings from the walls, which are then treated with an antiseptic. It is better to process in dry, warm weather. Particular attention is paid to the lower part of the wall and the corners, which are more susceptible to rotting and freezing. It will take one to two days to dry.
- Then, as with internal insulation, we make a frame from bars. We fasten it with self-tapping screws.
- We lay penofol, leaving an air “corridor” and carefully gluing the joints with aluminum tape.
- We install the outer frame and move on to cladding the building. It can be carried out using metal profiles, vinyl siding, and corrugated sheets.
So, having studied the characteristics of one of the most modern heat insulators, we conclude that insulating building structures using penofol is an excellent way to protect your home from cold, moisture and extraneous noise at the same time. At the same time, the consumption of thermal insulation materials and the loss of internal space of the house is reduced to a minimum, which will please any owner.
Where is the best place to insulate?
This material is suitable for insulating walls both from the inside and outside.
Before deciding on which side it is better to use such material, it is better to weigh the pros and cons.
It is generally believed that using insulation on the inside of walls is not recommended due to a reduction in living space, the risk of the formation of fungal microorganisms and mold, the accumulation of large amounts of moisture, etc.
In the case of penofol, there is no reduction in area , but certain classes of material allow moisture to pass through only in one direction - this should be taken into account during installation.
IMPORTANT!
Considering the properties of this material, we can conclude that penofol is best used for internal insulation. In addition, on the outside of the building, penofol is not able to provide the required level of thermal insulation properties.
wall pie
To better understand the further installation process, it is worth getting acquainted with the structure of the wall pie, which consists of various layers of material. The sequence of layers is indicated in the direction from the inside of the wall to the outside:
- interior finishing materials;
- panel osv;
- penofol;
- frame racks;
- windproof material;
- sheathing;
- exterior finishing.
Wall pie is indicated for the frame type of house. For other types of structures, some materials can be excluded or added as necessary.
It is worth paying attention to the need to provide a vapor barrier layer in the wall of the cake. Opinions on this matter differ, but in most cases, vapor barrier is not used for insulation from inside the room.
Wall pie device
If penofol is used for external insulation, then a vapor barrier layer is necessary, because the material tends to allow vapor to pass through only in one direction (except for type C).
Penofol wall insulation technology
The installation of this insulation differs depending on the type chosen , namely in the method of its attachment.
If type A is used, then the fastening is made to a more massive insulation; in the case of type B, the fastening is autonomous, and type C has its own adhesive base.
The sequence of actions is as follows:
- Before attaching the insulation to the wall, a frame is constructed , in which there will be a space of 20 mm on both sides of this material, this will ensure the maximum effect from the use of penofol. For this process, it is better to use slats measuring 1.5-2 cm, which are attached with dowels, while maintaining a distance of 1 m.
- The next step is to check the condition of the electrical wiring . It should be taken into account that the insulation contains aluminum, which easily conducts current, and it is very important to ensure that all wires are fully insulated.
- After these measures, the insulation itself is attached directly . This is done using a furniture stapler. The strips are cut with a knife or scissors, the joints are aligned close to each other, and then they are glued with aluminum tape.
- Next, the construction and installation of a wooden frame is carried out, onto which any type of panels is attached to further provide interior decoration.
NOTE!
It is not recommended to attach strips of material with an overlap , since condensation, which on occasion accumulates on the material, can flow down along the overlap lines.
Laying scheme
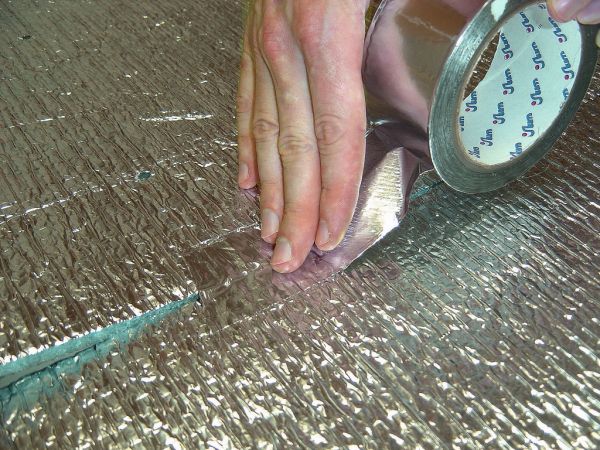
Sealing joints
Wall insulation
Installation of rolled foam foam inside and outside: how to stick it?
Do-it-yourself insulation of walls with penofol further consists of eliminating large cracks. To do this, the tree is carefully caulked. In the same way, I remove cracks from the walls, which often appear as a result of use.
Lathing
Next, a sheathing is installed, which ensures normal ventilation of the facade. If the house is made of logs, you can do without sheathing, but you should leave gaps through which condensate will be drained. They are organized near the eaves and foundation of the mansion.
Vapor barrier
Insulation with penofol from the outside consists of installing a layer of vapor barrier. To do this, you need to purchase a vapor barrier film (there are no problems with this, since there are a lot of offers on the market).
For convenience, the film is made rough on one side and glossy on the other. The film is mounted with the rough side to the wall. The surface of the joints is overlapped and insulated.
Thermal insulation
Do-it-yourself insulation of walls with penofol continues with the installation of the heat-insulating layer itself. Due to the fact that penofol is perfectly cut, the dimensions of the parts can be easily adjusted so that they can be installed by surprise, thereby avoiding the appearance of gaps between the thermal insulation and the cladding.
The insulation is secured with anchors. You can combine penofol with other types of insulation - basalt wool or polystyrene foam.
Waterproofing
After this, insulating the walls with penofol from the outside is the installation of a waterproofing layer. It is organized similarly to the first layer (with the rough side towards the wall, which will rid the insulation of excess moisture; it will not be able to penetrate back).
Facing
Insulating a house with penofol from the outside requires organizing the external cladding of the finished “pie”. This can be done using almost any cladding materials (siding, lining, brick, etc.).
The main thing is the organization of the ventilation gap. To ensure that the insulation of the walls from the outside with penofol is complete, siding is used, and ventilation gaps are created by stuffing thin boards onto the frame slats.
Basic installation rules:
- The material is mounted straightened, uncompressed, without folds. Fix to the lathing or directly to a clean surface.
- Penofol is secured with foil towards the heat to reflect it. This is an obstacle to the release of thermal energy to the street.
- The material is glued end to end. The borders are taped to seal.
- To glue the insulation, special types of glue or a self-adhesive type are used.
Installation is quick and easy, both inside and outside. The work is identical in sequence and principle inside and outside. It is easy to cut and quickly installed.
Before gluing penofol, you do not need to pay attention to its weight. The material is lightweight and can be supported by universal glue. But, for strength, they purchase adhesive compositions intended for this purpose.
The adhesive must correspond to the characteristics of the thermal insulation material:
- temperature range 100/-600C;
- indoor use, not outdoor use;
- non-toxic;
- good adhesion.
The adhesive composition should not emit harmful substances. Penofol is able to absorb 3% of heat, which means the glue on the back side can also warm up.
For gluing the surface and penofol, craftsmen recommend purchasing the following brands:
- Weicon Easy-Mix PE-PP 45. Two-component adhesive designed for gluing concrete (brick) surfaces with polyethylene, polypropylene.
- Moment - has many positive aspects, including good adhesion. The glue will quickly and permanently bond the insulation to the surface behind the radiator or near the door.
- Liquid nails are capable of fixing heat-insulating material for a long time.
READ MORE: Enameling a bathtub with your own hands using liquid acrylic technology
Other brands: Titan, Tilit, Atlas Stopter K-20 kley, Ceresit (ST83).
External
From the inside of a wooden house, insulation is used to insulate the following structures: walls, ceiling, floor, attic, basement or basement. Due to the non-penetration of moisture, it can be used in damp and dry rooms. A number of rules:
- The foil side of the penofol is placed in the direction where the heat should be reflected, that is, into the room.
- For better thermal insulation, a ventilated gap of 1.5-2 cm is left between the wall and the material. The same is done between the insulation and the external finish of the wall.
- To achieve complete sealing, the seams are taped with special foil construction tape.
Insulation of a wooden house from the inside with penofol is carried out according to the following scheme: wall, space of 1.2-2 cm from the sheathing, insulation, sheathing, external finishing, for example gypsum board or gypsum fiber board. The diagram and design are presented in more detail in the video and photo in this article.
The work is being carried out in stages:
- Bars 15-20 mm thick, pre-treated with an antiseptic, are attached to the wall. The pitch of the sheathing is any, but not more than 1 m.
- Penofol is attached to the sheathing. This is easier to do with a stapler or small nails. Laying is done end-to-end. They are glued with foil tape.
- A counter-latten made of timber of a smaller or the same cross-section is attached to the material. The bars are attached in the opposite direction to the first sheathing.
- Any panels (block house, imitation timber, lining) or sheet material (gypsum plasterboard or gypsum fiber board) are attached to the top of the sheathing.
- The walls are plastered and painted, or covered with wallpaper.
It’s easy to do thermal insulation with your own hands. The main thing is to follow all the steps. The video and photo materials in this article will help even a beginner to cope with the work.
Perlite, advantages and disadvantages
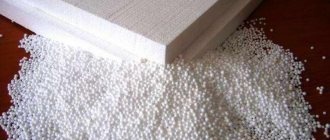
Another type of wall insulation is perlite, or rather materials based on it.
This can be either blocks, bulk materials, or seemingly ordinary plaster. Perlite is a volcanic glass that contains molecular water in a bound state.
During the production process, such a composition is exposed to a temperature of 800 degrees, due to which a high level of porosity is achieved.
The advantages of perlite include:
- light weight;
- low level of thermal conductivity;
- soundproofing;
- good absorbent properties;
- hygroscopicity.
IMPORTANT!
Perlite is considered a completely natural and safe material, because it does not emit any harmful compounds during operation.
It is also worth paying attention to some of the disadvantages of using this insulation, although there are few of them:
- When working with perlite, there is a possibility of causing harm to the body , because... fine aluminosilicate dust is released when cutting blocks or mixing a solution;
- if the humidity level in the material rises to 10%, then this promises a loss of its properties by 90% . The material requires that the wall pie be equipped with a layer of waterproofing;
- Finding such insulation on sale is very problematic;
- On the market there are often counterfeits of this type of insulation, which are difficult to distinguish from the original.
The use of perlite sand in structures with high vibration is prohibited.
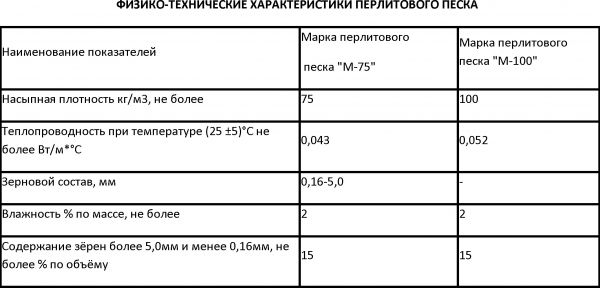
Specifications
We study all known varieties
In total, there are 4 forms of release of this insulation: backfill (it is also called sand), slabs (outwardly similar to penoplex), roofing models and dry building mixtures. These varieties have some features that you should know.
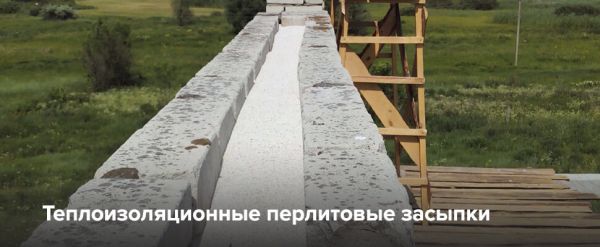
Backfill insulation
The first form factor of Perlite to emerge was loose insulation. The main task of this material in the construction of houses is to lighten the structure (it is lighter than a standard cement-sand mixture) and increase its thermal insulation qualities. This layer is usually used for backfilling floors and interfloor layers. It is also often used to fill voids in wall masonry. Less often it is used in combination with (or instead of) warm plaster.
The most convenient and practical form is slabs
According to official statistics, about 60% of all Perlite produced on the planet goes to create thermal insulation boards. They are obtained by hydraulic pressing, making them very convenient to use. The binder may differ depending on the specific type (bitumen, lime, polymer compounds, cement, liquid glass, etc.).
This category of materials has quite high hygroscopicity. Therefore, it is mostly used for interior decoration. However, when laying an additional moisture-proof layer, it can also be used for exterior finishing. However, this is not very justified from an economic point of view.
Roofing models
From the name, it is obvious that such analogues are used primarily for roof finishing. For this task, the so-called bitumen perlite is used. This material allows you to create a thermal insulation layer of any shape, so it is often used for buildings of unusual design.
Important! There is no need to heat this coating before use!
The average thermal conductivity for this variety is 0.067 W (m*C), which is a very worthy result. This coefficient allows the use of this coating even in northern regions. It is also worth noting the non-flammability of this insulation, which ensures the overall safety of the building.
Dry building mixtures based on Perlite
As a result of mixing cement and perlite sand, a very effective dry construction mixture is obtained. The solution is prepared very simply - just add water (that is, no additional additives such as PGS or gypsum are required). Basically, a similar composition is used for filling cavities in brickwork, grouting seams and cracks, as well as creating a plaster layer with increased thermal insulation characteristics. At the same time, it allows you to easily level the surface.
Wall insulation with perlite
Mostly houses built of brick or blocks are insulated with perlite. The need to insulate with perlite is considered even at the stage of foundation construction, which determines the amount of insulation material required and its type.
For strip foundations with a basement, a perlite plaster solution is used. The process of insulation with perlite sand occurs as follows:
- Insulation begins at the stage of building the walls of the house.
- They mainly use perlite sand, weighing 60-100 kg per m3.
- The walls are laid, and after laying 3-4 layers of brick, insulation material is poured into the space between the walls.
- To prevent shrinkage of the sandy material, it is compacted by tapping.
When insulating walls with perlite plaster, it is possible to carry out surface finishing with any finishing material.
Inter-wall insulation with perlite