If a pet lives in the yard all year round, it needs a warm and cozy home that provides protection from any bad weather, cold and slush. The dog should have the opportunity to fully relax in his personal space, and also to survey his possessions from time to time, protecting them from outside encroachments.
Insulated dog kennel
Thermal insulation options
The thickness of the insulation should be 3-5 cm. Before insulating a dog house, you need to decide which means are most applicable to specific structures.
Sawdust is an environmentally friendly material, but over time it settles and insects infest it.
Polystyrene foam is devoid of these disadvantages and is durable, but if it catches fire it becomes harmful. Plus, it's airtight. This insulation can be used if the manhole or cracks under the roof are able to sufficiently ventilate the room without creating an accumulation of water vapor. It is better to place the material in the walls to insulate the walls and roof and change it periodically. Plates are used with a thickness of 50-100 mm.
Penoplex in the form of plates does not allow moisture to pass through, perfectly protects against freezing, but requires sealing the seams using additional material.
Extruded polystyrene foam (technoplex) can be used as insulation for the walls, floor and roof of the booth.
Reference! Technoplex has advantages in thermal conductivity, moisture resistance, and durability compared to other foam plastics.
Formaldehyde-free, shrink- and rodent-resistant. Inexpensive rolled material such as floor underlay, isolon, synthetic padding can be used by strengthening them with a stapler and staples, and sewing a lath or lining on top. This material is used for the ceiling and roof of the kennel.
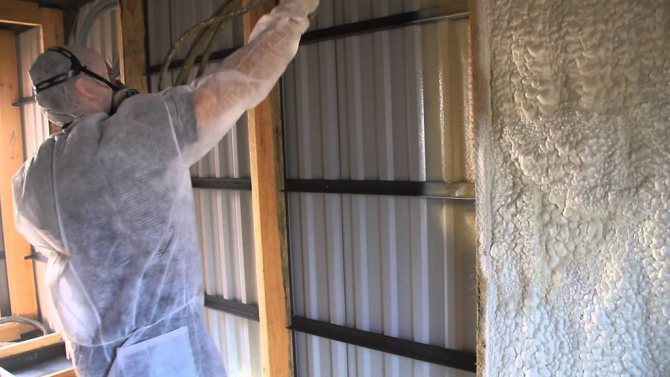
Liquid insulation in cylinders is a foam that hardens after application. A layer of no more than 5 cm is applied and requires mandatory lining. Resistant to wear, steam and moisture, the material has a long service life. Optimally used in structures made of double-layer walls.
Important! No means of insulation can sufficiently protect a pet in severe frosts of 25-30 degrees with winds. In such situations, the dog must be kept at home.
Internal insulation
For these purposes, artificial felt is most often used. This is one of the simplest and most common ways to insulate a wooden structure. Artificial felt is a cheap and environmentally friendly material that is recommended by professional dog breeders.
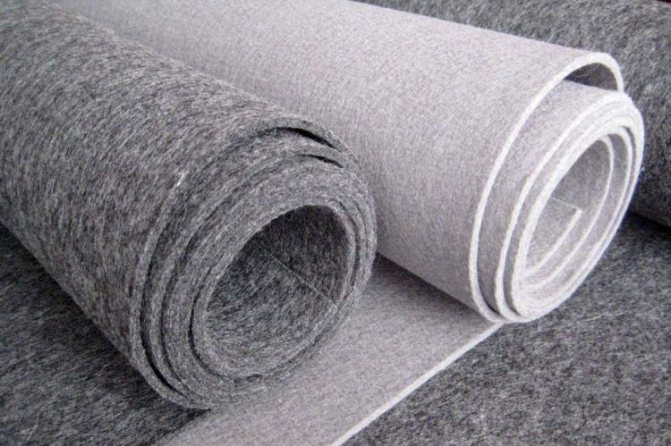
Felt upholstery is done from the inside using upholstery nails with wide heads. The thickness of the felt does not affect the spatial dimensions, so it can be used in an already “living” booth. The only nuance is the need to protect the floor over the felt with moisture-resistant OSB.
It is also possible to use foamed polyethylene (isolon) for internal insulation, but is not recommended. Firstly, it will need to be covered with plywood or OSB, since the animal will quickly tear such material. Secondly, isolon does not breathe and evaporation will form inside, creating increased humidity and complicating natural ventilation. But izolon is excellent for floor insulation, as it is heat and waterproofing at the same time.
Building an unusual warm house for a dog: video
Rules for insulating a kennel
The winter hut has external and internal lining; the walls, floor and roof must be insulated. The optimal material for the room is wood, which is not harmful to the dog’s health, retains heat well in cold weather and provides coolness in hot weather. Plywood, OSB and fiberboard are thin in thickness and emit toxic substances, so this material is best used for cladding facades.
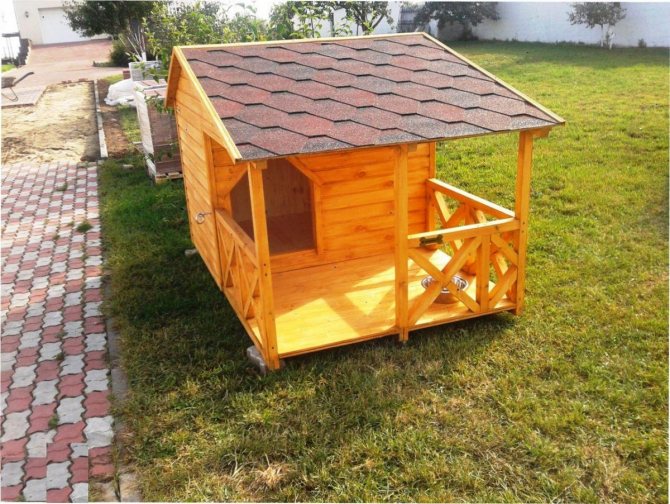
Wooden dog house
Insulation is carried out according to the following principle: an insulator is laid on the surface, then insulation and insulation again, then they are hammered on top with boards. If the walls are two-layer, then insulation is greatly simplified; it is possible to use a wide variety of insulation.
Additional Information! Chipboard is a particle board obtained by hot pressing of wood particles with a non-mineral binder. OSB is a multilayer sheet consisting of wood chips glued with resin, synthetic wax, and boric acid.
All walls of the kennel must be as strong as possible, the opening must be optimal in size, and have a threshold so that internal heat is retained. The place where the booth will be located must be protected from bright sun, wind, and dry. The body is placed on legs and stands so that it does not get wet from contact with the ground.
Features of kennel insulation when using polyurethane foam
Polyurethane foam is absolutely harmless to both humans and animals, and its heat-insulating properties make it one of the best materials for insulating a dog house
Currently, this material is widely used in quality, both residential and industrial. This is due not only to the affordability of polyurethane foam, but also to its unique characteristics, which distinguish this material from a number of similar insulation materials. In particular, it should be noted that there are several types of it: rigid PU foam and elastic PU foam.
The main difference between them is resistance to moisture. and swimming pools. Elastic polyurethane foam should be used as insulation for the inner surface of the booth. This is due to the fact that it has an open structure and absorbs moisture, thereby reducing its effectiveness as a thermal insulation material when used outdoors. Accordingly, polyurethane foam with a rigid structure is perfect for insulating the outside of the booth walls.
In general, insulation of the booth with polyurethane foam is the most optimal. This is due to the main characteristics of this material, which is a modified structure of plastic. And since today almost all elements that people use in everyday life are made from plastic, polyurethane foam is as safe in terms of toxicity as, for example, mattresses or car seats. Moreover, the material purchased in large shopping centers or specialized companies has all the quality certificates and guarantees of environmental safety.
Polyurethane foam can be purchased in both liquid form (applied by spraying) and solid form (slabs)
Polyurethane foam can be purchased in both liquid form (applied by spraying) and solid form (slabs). As a rule, the slabs are massive in size and are not very suitable for insulating a booth. It is best to use special sprayers of liquid polyurethane foam, the main advantages of which can be considered the following:
- The liquid structure completely fills all cracks and gaps, thereby providing maximum protection from cold air.
- booths (usually wood) from mold, mildew and rot.
- After hardening, polyurethane foam increases the soundproofness of the dog kennel.
- If applied correctly and without mechanical damage, polyurethane foam will last more than 30 years.
How to insulate a dog house using electricity
This type of insulation will save the kennel from dampness, mold, condensation, and ice deposits. Wire insulation is important for your dog's safety. In addition, they must be protected from moisture, the sources of which may be snow from the dog’s paws or blown in from outside, rain.
The following are used as electric heating:
- Heaters made of panels that heat the air up to 50 degrees. They come in different sizes, about 20 mm thick, and the animal can lean against the panels without any danger.
- As an electric heated floor, you can use infrared film, supplying electricity to which in cold weather allows you to heat them up to 60 degrees and save electricity consumption.
- You can make heating yourself from an asbestos-cement pipe and cable, ensuring safety precautions for your pet. In this case, it is better to use a self-regulating two-core cable.
Unconventional methods of insulation
The film is installed under the skin of the booth
If, after insulation measures have been carried out, the kennel still lets in cold air and the dog is uncomfortable staying there, additional insulation can be used. These include heaters. It is important to remember that when using them, it is necessary that the booth is protected from accidental fire. For this purpose, it is necessary to use only heat-resistant materials as the main insulation materials, the most optimal of which is polyurethane foam.
Main types of heaters:
- Panel systems. They are represented by elongated metal panels housed in a metal casing. The thickness is no more than 2 cm, that is, it can be compactly placed in a doghouse. They are attached with self-tapping screws to the casing.
- Film systems. This is a specially made thermal film that heats the booth using infrared radiation. It must be installed under the casing of the booth.
Thus, when answering the question of how to insulate a dog kennel, it is important to take into account its location and size. Taking into account these nuances, the necessary materials are selected and, if necessary, additional thermal protection measures in the form of heaters. You can read about the insulation of gazebos in the country on the page.
Video about how polyurethane foam is sprayed from Ecotermix:
Prices for our company’s services can be found in the section
Or order a consultation with a specialist at a time convenient for you!
The application is absolutely free and does not oblige you to anything!
Insulation with mineral wool
This is an environmentally friendly option, but mineral wool loses its thermal insulation qualities after getting wet. Its fibers are unsafe for the pet’s mucous membranes, therefore, mineral wool insulation must be insulated.
Attention! The phenol-formaldehyde resin used in the manufacture of mineral wool can cause serious allergies and irritation of the dog's nose, eyes and larynx.
First, an insulating film is attached to the insulated surface of the kennel using staplers, then mineral wool and a second layer of insulation. The outside is covered with plywood and clapboard.
Insulating a doghouse
The question of how to insulate a dog house should not be a problem, since any thermal insulation material will do. Typically, mineral wool or pieces of foam are used.
So let's get started:
- The insulation of a dog house must be taken seriously, and first of all, raise it off the ground. The kennel is turned upside down. The bottom boards were nailed from the inside, so a timber frame remained on the outside. A layer of roofing material is placed inside the frame. Insulation is placed on top of it, and then roofing felt again. Now this entire layer is covered with a board. To raise the insulated bottom from the ground to the bottom frame, legs are nailed from pieces of timber with a cross-section of 100x100 mm. They can be made about 100 mm high.
- A dog house with an insulated bottom is placed on its legs, after which they begin to work on the walls. In the photo you can see that the insulation is attached to the inside of the walls. After sheathing the frame with boards, there were bars inside the dog kennel that formed cells. This is where they put the insulation in the same way as they did on the bottom. The interior lining can be made of plywood or OSB.
Now you can close the hole with a curtain, put on a roof and paint the booth with soft oil paint or open it with varnish.
Drawings of a winter kennel and a warm enclosure for a dog
An enclosure allows the pet to have its own area for resting and walking, allowing it to be isolated from strangers and animals. The owner can walk the dog outside his territory whenever possible. Having an outdoor area of the enclosure in the fresh air is an excellent option for a dog’s useful time.
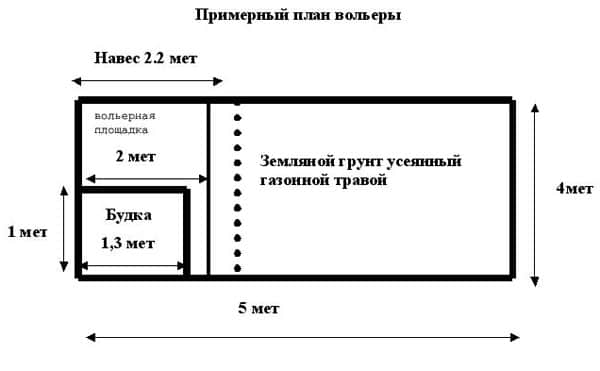
Approximate diagram of an enclosure for a dog
The drawing of the booth is made taking into account the size of the dog - small breed, medium size or large. The height will be equal to the height of the dog with its head raised, you can increase it by 10-15 centimeters, taking into account the bedding, for a possible increase in the pet’s height. The depth will be equal to the length of the dog lying with its paws outstretched, increased by 10-15 cm. To calculate the parameters of the hole, measure the height of the pet at the withers and the width of the chest, add 5 centimeters for free movement.
The vestibule in front of the sleeping compartment is made according to arbitrary dimensions. Instead of a vestibule, you can build an open compartment so that the dog can freely observe the surroundings.
Below are approximate calculations for the size of a warm kennel, recommended by dog breeders.
| Height of the manhole (entrance) to the booth | The height of the dog at the withers is 5 cm. |
| Manhole width | The width of the dog's chest is +5-8 mm. |
| Booth width | The length of the dog from nose to tail. |
| Booth height | Height of the dog. |
| Booth depth | Height of the dog. |
Attention! The kennel should not be too spacious for the animal to effectively warm it up. On the other hand, the dog should freely change positions when resting.
A good house should have an insulated compartment with a manhole, an uninsulated vestibule or an open compartment. Lovers can complement the design with any elements that allow the pet to have a good time - beds, pools, stairs, floors and more.
The most convenient will be a booth with a hole not in the center, but on the side, on the long side. Dogs love to lie on the roof, so it should be made not gable, but single-pitch. In this case, the slope should be in the opposite direction from the entrance so that precipitation does not fall into the booth. The removable roof function will make it easier to clean indoors.
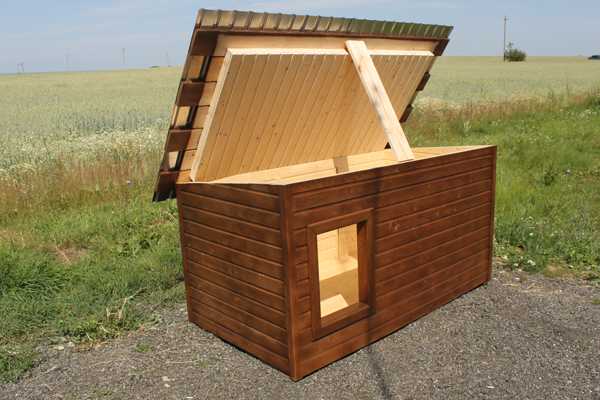
Removable doghouse roof
For the construction of a kennel, the bars are selected taking into account the thickness of the insulation so that it fits tightly to the sheathing. The construction of the kennel begins with the floor, which is made double, then the frame, walls, and ceiling are made. The step-by-step algorithm for assembling a kennel with your own hands will be as follows:
- A floorboard is sewn onto two bars equal to the length and width of the room.
- Install bars with the previously calculated height in the corners, two bars in the place of the hole.
- Install racks for fastening the ceiling with a length equal to the height of the booth from the inside, and line the room with clapboard from the outside.
- Next, make a removable roof from a beam with plywood sewn onto it, while strengthening additional beams to prevent the plywood from sagging. Apply insulation, second plywood on top, roofing.
- The next stage is insulation of the walls and floor.
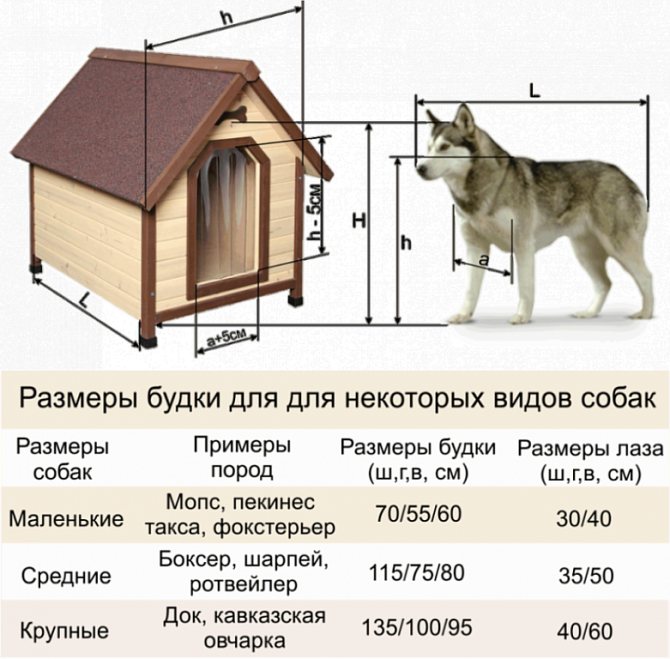
Calculation of dimensions of booth structures
Basic Rules
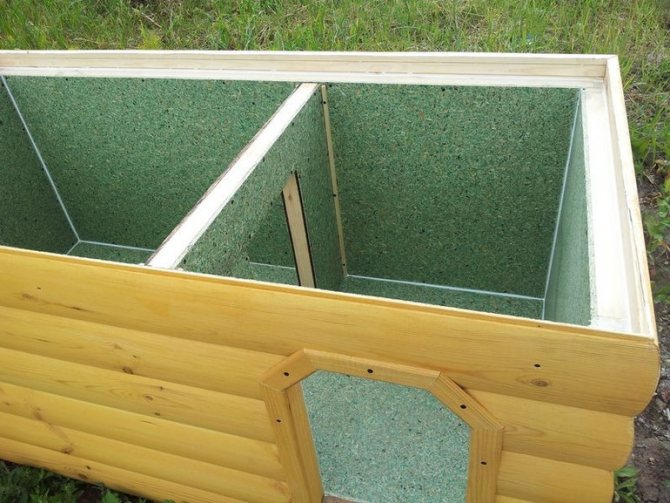
The dog's body quickly adapts to changing conditions, so animals that live in an apartment do not have undercoat - they do not need it. When such a dog is allowed outside during the winter season, the animal begins to freeze very much. First of all, the reason for freezing is that the wind blows through the wool. The second factor why a dog can get very cold is that due to high air humidity or precipitation, the undercoat will become wet and, instead of providing warmth, the body will become cold. Taking these points into account, the priority factors when insulating a booth are:
- The booth must not be blown by winds; there should be no drafts in it.
- The inside of the dog’s “house” must be dry and no precipitation should get into it.
- The entrance must be protected from the wind or the booth must be placed so that it is not on the leeward side.
- It is advisable that the kennel should not stand on the ground, but on stands - this will prevent flooding and the structure getting wet (if it is wooden).
- The litter should either not get wet, or it should be checked regularly, replacing it with a new one when the old one becomes wet.
- It is recommended to place the booth in the shade so that on hot and sunny days it does not get too hot.
- There must be a thermal break in the floor of the kennel - a layer of insulation, the thickness of which is over 1 cm, is placed between the base and the flooring. It is also recommended to make a small insulation of the walls and roof.
It is advisable to take into account the temperature that is present in the booth in winter. When the kennel is wooden, the air in it will be only 3-4˚ C higher than the outside air. This temperature is a consequence of the absence of a “door”. Therefore, it is recommended to hang some kind of “curtain” on the booth made of dense material - flexible rubber, felt, etc. But this is not enough to keep the dog warm in the kennel.
You may be interested in:
How to insulate a garage at your dacha in the winter Long before the onset of cold weather, you need to take care of insulating your garage for the winter. It is important to understand from which...Read more...
Thermal insulation of an old booth
First, the old booth must be washed and disinfected using products recommended by veterinary services that are not harmful to the health of the animal. Having thoroughly dried the room, insulation and exterior finishing are carried out on top of its facades.
Technoplex 1 cm thick is laid on the base of boards (plywood), polyethylene foam 3 mm thick to eliminate cracks, and on top is an old booth, pressed into the polyethylene with screws, nails, and corners. The booth needs to be upholstered on the sides and top with foamed polyethylene 5-10 mm thick, covered with clapboard walls and a roof with roofing material.
Heating a dog kennel
With the advent of modern safe heaters, many owners are trying not only to insulate, but also to install heated kennels. This solution will be successful for dogs living in the country and outside the city, where a sharp cold snap in winter can turn into a tragedy.

Heated kennels are placed either on the floor or on the ceiling

A good option is a homemade heater made of cable or graphite film, installed on the ceiling of the booth. It is clear that heating does not solve all problems; it is still necessary to insulate the kennel, but for purebred dogs that are not particularly healthy, the presence of cable heating of the ceiling or floor can be extremely important in order to survive the winter.
It is best to use a self-regulating two-core heating cable. In winter, in the coldest weather, it easily produces up to 200 W from every ten meters of wire laid inside the booth. This is enough to insulate and heat the kennel to above-zero temperatures.
What is the structure made of?
How to insulate a dog house for the winter with maximum efficiency? Typically, padding is placed in all parts of the kennel. Different materials are used for floors, roofs and walls, based on their characteristics, as well as their positive and negative sides.
How to properly insulate a dog house for the winter and what material to use depends on the location of the kennel and the personal choice of the dog owner, as well as on how often the dog sits in his house.
Commonly used:
- Sawdust. Refers to natural materials. They have a high level of thermal insulation and do not pose a risk to the dog’s health. The only condition is that before use it should be treated against parasites. This will help prevent your pet from getting fleas and ticks. This material also has negative sides. Sawdust is very flammable and is also susceptible to rotting.
- Styrofoam. It is often used to insulate residential premises. It is also suitable for kennels. Polyfoam prevents the penetration of noise from the outside and has a high level of thermal insulation. It does not rot, which also distinguishes it from natural remedies. This material is highly flammable, which poses a danger not only for the four-legged pet and its kennel, but also for nearby structures.

- Mineral wool. Perfectly insulates rooms. However, over time, the material gets lost and loses its original characteristics.
- Penoplex are plate slabs that do not allow moisture to pass through and provide excellent protection from freezing in winter. However, when installing this material, a large number of seams are formed that do not prevent the cold and require additional insulation.
- Glass wool. This material has many advantages. The disadvantages include the presence of tiny particles of fiberglass, which irritate the skin of the hands during installation work. There is also a risk that shrapnel will enter the lungs or eyes of humans and dogs.
- Polyurethane foam is a modern insulation material that is applied by spraying. It has no downsides. It does not pose a health hazard, does not burn, is not subject to deformation and does not rot.
How to make a curtain for a dog house
Once you've built a suitable home for your dog, be sure to attach a fabric curtain to the entrance hole. It will act as a barrier from precipitation, as well as create the necessary comfort and protection from the wind. The winter version of the booth requires a thicker curtain; any thick fabric will do, as well as tarpaulin and burlap. Calculating the dimensions is not difficult; it should be about 8-10 centimeters larger than the hole. You can attach it using a wooden plank or wire.
On the video - how to make a curtain for a doghouse:
Be sure to try the innovation in practice; the dog should not get confused in it or break off every time it gets inside. It is advisable that the fabric is not blown by the wind and also does not fall inside the kennel. For summer time, you can unhook the curtain or simply fold it to the side.
A dog kennel is an important part of a suburban area. Your devoted watchman will keep his watch in any weather, so be sure to think through his home to the smallest detail. The material from which it will be made must be environmentally friendly, and the location must also create all possible conditions for comfortable living. The main nuances of planning and constructing a dog house are described in the information in our article.
Purchased curtain for the booth
Many dog owners whose pets live in kennels prefer not to waste time making their own curtains for the kennel, but to buy a ready-made, high-quality one. Demand, as they say, creates supply, thanks to which today you can easily purchase a curtain of any design on the dog accessory market.
The blinds for the entrance to the booth offered for sale are made of silicone, which is not afraid of the cold and is quite unpretentious in operation. It is easy to clean and bends to allow the dog inside. In addition, a variety of colors allows you to choose a curtain that will please the eyes of both the owner and the dog. The price of silicone curtains starts from 500 rubles.
In this article, we tried to tell you what doghouse curtains are, what you can make them from yourself, and how much they cost. A well-insulated dog house can weather out in a few minutes, so by installing a curtain over the entrance to the kennel, you will protect your pet from bad weather and cold.
And you can buy a ready-made curtain for a doghouse from us - buy a frost-resistant curtain for a doghouse
Pavel Bondarenko, Donetsk.
With the onset of winter, many dog owners living in the courtyard of a private house come to the conclusion that it is necessary to additionally insulate their pet’s home. Of course, the booth must initially be made according to all the rules of “booth” architecture, that is, the structure itself is made of good quality and warm: the walls have a heat-insulating layer, the external upholstery eliminates the presence of cracks, and so on. The most logical action in this case is to install a curtain that would close the hole into the booth. A curtain, which is completely unnecessary in the warm season, comes in handy in winter. So I had a need to make this seemingly simple product.
There are probably few experts in the matter of making curtains for a doghouse. So I, not being one, decided to study the issue using the example of the experience of people who were more successful in this matter than me and posted information about their products on the Internet. As a result of searching and reading information on the topic, I realized that most users consider the curtain a very simple product and does not require special attention and description. Actually, a piece of some fabric that is unnecessary in the household, which is nailed on top of the manhole and cut vertically - this is a typical example of the design. However, in practice everything turned out to be not so simple.
At first I decided not to come up with anything particularly unique and, having found a suitable piece of flannelette blanket, I made a curtain of the simplest design from it.
I will describe what this product was a little lower, first I will give the initial data that determined the design and size of the curtain - these are the parameters of the booth opening.
The hole is a rectangular hole measuring 400 (width) X 450 (height) mm in the front wall of the booth. The hole is shifted to the left side of the front wall and is located at a distance of 65 mm from the outer edge of the left wall of the booth and 540 mm from the outer edge of the right wall of the booth. The manhole has a threshold, so the lower edge of the manhole is located at a height of 115 mm from the lower edge of the front side of the booth. Along the perimeter of the hole there is cashing, made of slats 20 (thickness) X 28 (width) mm. Now directly describe the design of the curtain.
A piece of flannelette blanket measuring 530x1240mm and about 1.5mm thick is folded in half lengthwise. The result was a two-layer blank 530 mm wide and 620 mm long. Along the length of the workpiece, in the center of the canvas, a 520 mm long cut is made - the entrance. The cut is made in the direction of the bend of the workpiece fabric and does not reach the bend by 100 mm. The upper part of the workpiece (above the cut, where the fabric folds) is sandwiched between two wooden slats 60 mm wide and 530 mm long. The thickness of the slats is 12 mm. The curtain is attached with 2 self-tapping screws above the top rail of the cashing hole using two wooden pads 12 mm thick to prevent the curtain fabric from sagging when it touches the top rail of the cashing hole. It’s simpler - you need to place two pads under the structure at the attachment point so that the curtain fabric hangs down freely without touching the cashing hole. This is if you have cash. In the absence of one, it is clear that nothing needs to be placed; moreover, the bottom rail of the structure, adjacent directly to the wall of the booth, should be as thin as possible to avoid the appearance of a gap between the curtain and the wall of the booth. It may even make sense to exclude this rail from the design altogether, but then the installation of the curtain will become more complicated and the curtain itself will lose its mobility and completeness of the design. The height of the curtain is installed so that its lower edge is 50 mm below the upper edge of the manhole threshold.
I draw your attention to the fact that the material for making the curtain should be a flannelette blanket or a fabric with similar parameters: on the one hand, the material is quite thick with satisfactory heat-insulating properties, on the other hand, it is soft. In this case, you can get minimal gaps around the perimeter of the curtain even if your dog is on a chain. By the way, when using insufficiently soft fabric and the absence of special measures to neutralize the action of the chain, this chain greatly complicates the operation of the curtain, clinging to it and partially dragging it inside the booth, thus creating gaps that are incompatible with satisfactory thermal insulation.
Making the curtain described above took very little time. Perhaps this is the main significant advantage of this design.
The product was installed and worked well for some time. The only thing I didn’t like right away was the gap between the curtain flaps. However, immediately after installation, the gap was very small and, in comparison with the obvious overall improvement in the thermal insulation of the booth - the hole is much larger than a small gap - could be considered an insignificant detail. However, over time, this gap gradually increased. After some time, its size already cast doubt on the effectiveness of this design. In addition, a flannelette blanket, even folded in half, does not inspire much confidence as a thermal insulation material. There is a desire to replace it with something denser and thicker, especially in frosts from 8 -10°C.
Nevertheless, such a simple curtain, despite its shortcomings, satisfactorily performed its functions, and its design and parameters were used by me as a guide in the manufacture of a curtain of a more advanced design. The curtain was dismantled after honestly working for one season. This is what the fabric used in this curtain looks like.
The gap between the shutters in the photo is slightly smaller than the one that formed on the real curtain during one season of use and the shape of the hole is different, but still the photo allows you to get an idea of the product, albeit an approximate one.
A better quality curtain will be described below. But whether it’s worth bothering with making it is up to you to decide. The simplest curtain that I talked about is already a good solution to the problem. Yes, there are small gaps around the perimeter, the wind blows on the sides, and there is a gap in the center, but in general the device works satisfactorily. If you want to have a better quality item and can spend a few evenings after work doing tailoring, plumbing and carpentry instead of watching the TV, read the article further. So,
