How to properly hide plastic pipes in the wall
Self-installation of plumbing and heating systems is no longer uncommon: with the advent of accessible and inexpensive materials on sale that do not require cutting and joining equipment, many craftsmen take on such work without fear. Numerous master classes and video lessons are ready to clearly demonstrate all the stages from scratch to putting the system into operation. And yet, some moments sometimes remain outside the frame: the question of whether polypropylene pipes can be hidden in the wall in order to effectively complete the decorative finish often remains open.
Installation of a false wall
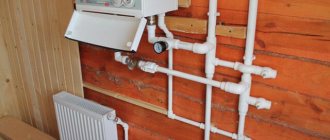
Hiding a heating system under a false wall is much easier than installing it into the wall. First, a base is prepared from the guides, and then the whole thing is covered with plasterboard, clapboard or other material. Many people do not consider this method of covering heating pipes because they are afraid of losing some of the space in the apartment. But this doesn't always happen. If the pipes are located, for example, under a window, then you have nothing to lose. After all, in fact, this place is not used in any way. In addition, the appearance becomes much prettier. And you can decorate this wall as you please.
Another advantage of installing a false wall is that you can do it all yourself, without involving strangers in the work. You just need to buy the necessary materials for the job. You won't have to pay extra for anything else.
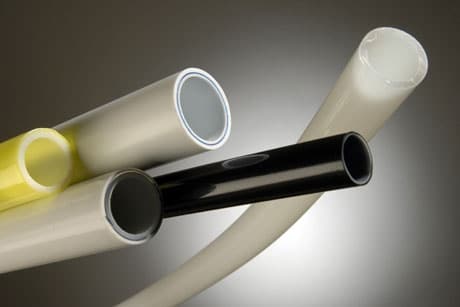
Characteristics of plastic pipes
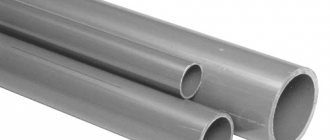
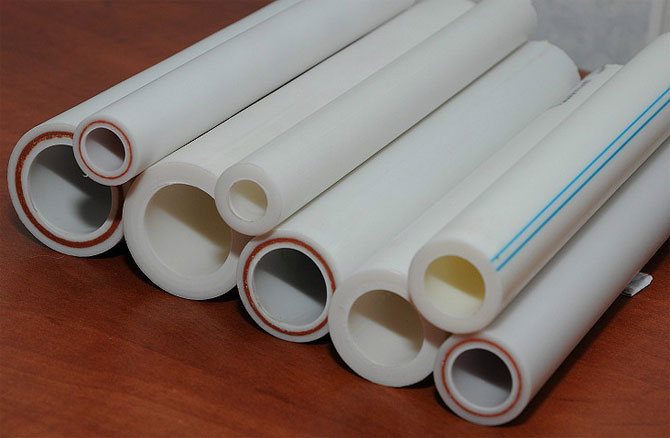
Polymer pipes are a modern material often used for laying household communications. In addition to completely plastic ones, a modification reinforced with aluminum or fiberglass is actively used, which is less sensitive to temperature changes and more durable. Unreinforced pipes are only suitable for cold water systems. For installation of plastic water supply or heating systems, samples with a diameter of 20-110 mm are used. Non-standard diameter is available upon special order.
Manufacturers note that one of the main characteristics of the material is the wall thickness of polypropylene pipes: the table, often attached to the product, clearly shows the requirements for the material for water supply and heating pipelines with different loads and ambient temperatures.
Features of polymer pipes
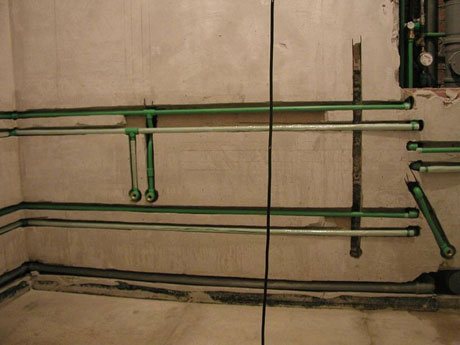
Heating substances increases their volume, says a school physics course. This fully applies to plastics, since temperature also makes them plastic. If when laying a pipeline for cold environments the expansion coefficient can be practically ignored, then when installing a heating system this aspect must always be kept in mind.
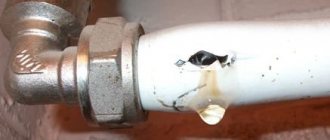
It is this fact that raises doubts about whether it is possible to wall up polypropylene pipes into the wall, which will expand and lengthen when hot water is turned on. Will such a reaction damage the material in which the pipes are embedded and the decorative finish of the walls?
Craftsmen warn: indeed, metal communications that do not expand significantly can simply be walled up in a layer of material, but for plastic pipes you will have to fully comply with the laying technology. Otherwise, the wall will crack, and the tiles laid on top will most likely fall off.
How to properly replace pipes embedded in a wall
Years of use cause pipes to wear out, so they have to be replaced from time to time, even those that are built into the wall. If you plan everything well, you can do this kind of work yourself.
First you need to purchase the required number of pipes of the required length and diameter and accessories (fittings, tees, adapters, etc.). You can make a communication drawing on paper, taking into account the places for the sink, toilet, bathtub and washing machine. To work with polypropylene pipes, we will need a special soldering iron with nozzles and a device for stripping the metal layer of pipes, as well as scissors for cutting pipes, a pencil and a tape measure. When dealing with cast iron pipes, you will need a hacksaw.
Before you start working, clear out the space so that nothing gets in the way. Turn off the water. After this, remove the taps. In the area where the pipes pass, you need to carefully dismantle the wall, removing layer by layer with a hammer drill or chisel. Once you reach the pipes, cut them with a grinder using a suitable circle. Be sure to use a mask, goggles and gloves, as this work is accompanied by flying debris and dust. Old pipes need to be drained of water.
Now you can begin installing new pipes. The wall can only contain a permanent connection, i.e. pipes welded together. The system should be wrapped in a shock-absorbing cushion to give it flexibility.
The most commonly used polymer pipes expand in volume when heated. This will happen if you run hot water over them. This physical feature must be remembered when mounting them into the wall. If the coefficient of expansion is not taken into account, the wall may crack and the laid tiles will most likely fall off. Metal pipes also expand when heated, but not significantly, so this fact can be ignored when laying plumbing communications. It is better not to install mirrors, shelves and other elements on the part of the wall where the pipes are hidden.
If you plan to install new pipes in a different location, you need to make grooves for them. This is usually done with a grinder. If you have just cut metal pipes, do not forget to change the abrasive wheel - it should be designed for stone. Now you need to make sure that the pipes are in good condition by first running cold, then hot water through them. Seal the pipes with mortar and facing material.
Upon completion of work, it is not recommended to throw away the drawing diagram. You can easily navigate through them during any breakdowns or at the time of planned pipe replacement.
New publications are published daily on our channel in Yandex.Zen
Go to Yandex.Zen.
Installation of plastic water supply
To install the system from scratch, in addition to the pipes themselves, you will need:
- fitting;
- plugs;
- tees or crosses if branching is planned;
- clips for fixation.
Scissors for cutting, a shaver for stripping edges and a welding machine are required.
If the question of how to properly wall polypropylene pipes into a wall arises after the entire system has been assembled, the list is reduced to thermal insulation materials, fastening brackets and means for constructing false walls.
Requirements for laying plastic water pipes
Fittings, tees and connecting elements are selected in accordance with the diameter of the pipes used. Most often, like the main elbow, they are made of polypropylene. However, they are used only for branching, fastening measuring instruments and redirecting flow: filling fittings and collapsible units with material is prohibited. In the thickness of the wall there can only be a soldered, permanent connection, made with special welding equipment and tested for the tightness of this welding.
In any case, a shock-absorbing “cushion” must be created around the thickly laid wall, allowing the pipe to “walk.”
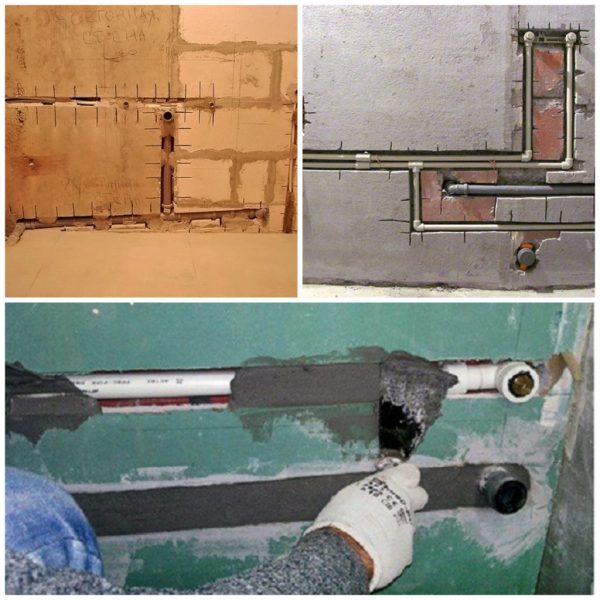
Technique for masking a polypropylene pipe in a wall
- Marking the direction of the pipeline taking into account the placement of functional exits.
- Calculation of possible deformation coefficient. For a significant length of the system, a formula is used that provides for lengthening the pipe by 1 cm for every meter. The calculation was made for a liquid with a temperature of 70 degrees Celsius. The technique of creating a compensation unit, that is, laying out a small area in the letter P, will correct significant elongation and serve as accident prevention.
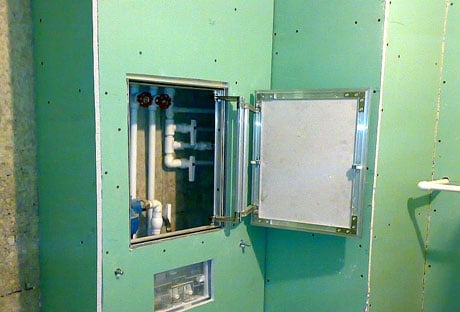
When wondering whether it is possible to embed polypropylene pipes into the wall, if the structure is ready, craftsmen advise not to take risks and instead of a blank monolithic wall, organize a small “cabinet” with access to the pipe. Firstly, this design is guaranteed not to be destroyed by vibrations of the plastic. Secondly, in the event of an accident there will be access to the pipes. The free space in the cabinet can be used to store household items.
Video instruction: hidden installation of PVC communications
Watch the video: Pipe box in 30 minutes
Fittings cannot be masked, since L, T and X-shaped connections are the most likely places for leaks. The locations of meters, stopcocks, and filters for cleaning should also be easily accessible.
Steel pipes connected by welding, or copper pipes connected by soldering, can be embedded in the wall. Pipes with threads at the connection points must remain accessible, so you should not hide them.
When laying pipes, the easiest way is to immediately reduce the number of joints. Proper placement of all equipment and correct pipe routing helps with this. The connections must have the same composition as the pipes themselves. Their safety margin must exceed the safety margin of the pipes.
Also read: Mosaic tiles for the bathroom, design, photo
For free access to meters and other additional elements, an additional hatch is installed. To prevent moisture from accumulating on the pipeline, insulating coatings must be used. Insulation allows the pipeline to easily expand and return to its original state; this fact allows you to hide the pipes in the walls without any problems.
How to hide polypropylene pipes in the wall - installation rules
Many property owners who plan to make major repairs to utilities are interested in whether it is possible to wall up polypropylene pipes in the wall. Do-it-yourself installation of water supply and sewer systems is not uncommon, since you can purchase high-quality building materials without any problems. You just need to study the relevant information.
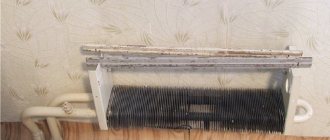
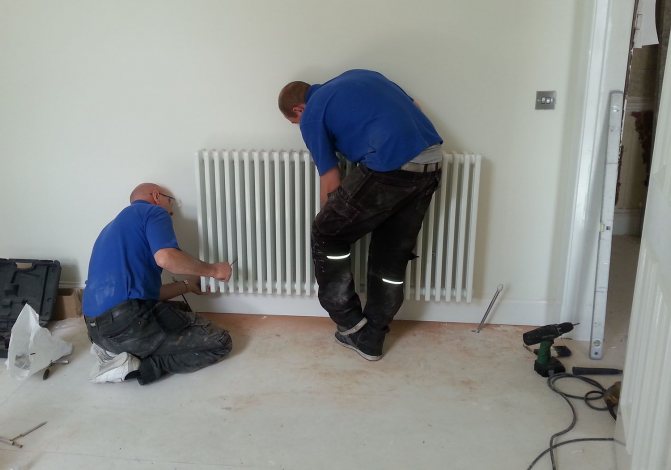
Installation of heating in the wall
In order to install heating, a recess is made in the wall and a heating pipe is installed. It is important to consider the following points:
- Before starting work, be sure to close the required riser. If the size of the recess is larger than half the size of the wall itself, then it is better not to use this method. The correct solution in this case would be to use the second method - install the box on the heating pipes.
- The grooves should be spaced apart from each other, and the contour should not be infringed. When making recesses, also take into account the fasteners, volume and insulating layer.
- Before covering heating pipes in the wall, do not forget to install insulation on them to prevent condensation from forming.
- Before fastening the entire structure, determine where it should be located. The main places of heating pipes are joints and the zone of change in heat direction.
- We recommend using a grinder to grate the wall. Before you start working, make markings on the wall.
- To prevent heat from being lost to heating the wall, it is imperative to install insulation. In addition, insulation will help you avoid mechanical damage to heating pipes.
The advantage of installing pipes into the wall is that this way you can free up some space in your apartment. The downside is the difficulty of installation. Moving a heating pipe into the wall is much easier to do even at the construction stage; in a finished apartment it is much more difficult to do all this, so we do not recommend working on your own.
It is best to entrust the installation of wall heating to professionals. Nowadays you can find many companies that can do all this labor-intensive work inexpensively. You can order a specialist on specialized websites.
Do not forget about the safety rules - hidden heating pipes in the wall should not be blocked by objects that could complicate repair work in the future. The communications network must always be freely accessible. You can close only those places where an accident is excluded.
Characteristics of polypropylene pipe products
Today, such pipes are used, among other things, for laying household pipelines. In addition to completely plastic products, pipe products reinforced with fiberglass or aluminum are popular. It is more durable and less sensitive to temperature changes.
Unreinforced pipes are used exclusively for systems through which cold water moves. To lay a plastic water supply or heating structure, products with a diameter of 20 to 110 millimeters are used. Products with non-standard cross-sectional dimensions are produced exclusively on special orders.
The main characteristic of polypropylene pipes is the wall thickness. Often a table is attached to the products, which reflects the requirements for materials for heating and water supply systems with different ambient temperatures and different loads.
Pipe repair
pipe repair
services in Moscow and in nearby cities in the Moscow region.
On our website, through the feedback form or by phone, you can order pipe repairs
; we work with pipes from Russian and foreign manufacturers.
Replacing or repairing water supply pipes in an apartment is one of the most labor-intensive services in the plumbing industry. To carry out pipe routing without errors, you must have considerable experience, both theoretical and practical. For this reason, in cases where you urgently need to change the pipes in your apartment, and you have no experience in plumbing work, contact specialists without trying to fix the problems in this area on your own.
Replacing pipes in an apartment may be necessary for a number of reasons. The most popular of them include: 1) planned provision of services during major renovations (for example, if you are planning to remodel an apartment); 2) wear, rusting of old pipes, their leakage; 3) significant accident, flooding, pipe break; 4) incorrectly performed installation work - for example, an illiterate plumber performed the wiring incorrectly, as a result of which the client has to deal with a large number of leaks, blockages, and in fact the repair has to be done all over again; 5) the client wants to make not an open wiring, but a hidden one (by recessing it into the wall).
Of course, these are not all of the reasons why urgent pipe replacement may be required. Therefore, you should still have the plumber’s phone number at hand. At the same time, however, you need to remember that in this case the urgency of the provision of services will play an important role - for example, if you need plumbing services at night, then you will have to pay a little more for this type of service than usual.
Replacing sewer pipes in an apartment includes the following set of services: 1) inspection by a specialist of the place where repair work is being carried out; 2) selection of the optimal wiring option; 3) dismantling the old water supply system; 4) installation of a new system; 5) checking the quality of work performed.
Our company offers high-quality pipe repair services, including in old houses. Order specialized services for repairing plumbing systems from our company!
We work according to all plumbing standards and provide guarantees for our services!
Features of polymer products
As you know even from a school physics course, when substances are heated, they begin to increase in volume. This is directly related to plastic products, and the high temperature also makes them plastic.
When installing pipelines for cold water, you can not take into account the expansion coefficient (for more details: “Preliminary calculation of the thermal expansion of polypropylene pipes”). At the same time, when arranging a heating structure, this nuance must be taken into account. It is this circumstance that raises doubts among many home craftsmen as to whether it is possible to wall up polypropylene pipes into the wall, which will begin to lengthen and expand when the hot pipeline is started.
This raises a logical question as to whether the finishing materials in which the elements of the engineering system are embedded will be damaged.
Experts assure that metal pipe products that expand slightly can simply be embedded in a layer of material, but in order to hide polypropylene pipes in the wall, you have to fully adhere to the technology of installation work (more details: “Types, properties, installation of propylene pipes with your own hands”) . Otherwise, the finishing of the room will become covered with cracks, and the tile covering will most likely fall off.
Places for laying electrical lines
Hidden electrical wiring is not visible during operation and for this reason the cable is often damaged when renovating an apartment with your own hands when drilling holes in the walls to attach furniture, shelves, lamps, and carpets. To avoid this, the routes of wires and cables are placed strictly according to certain rules:
- straight lines located in the horizontal or vertical plane of building structures;
- to change direction, use only right angles, avoiding short distances.
This rule allows the owner to better navigate when performing repairs by the sockets, switches and junction boxes located on the walls.
However, in houses built at different times, there are many features in the layout of electrical lines.
Concrete buildings
As a rule, they are carried out in multi-story buildings and have a large number of different layouts for hidden electrical wiring.
Cable routes of Brezhnev panels
Old panel houses were assembled from blanks cast in factories using templates. They created the channels specified in the technical documentation for laying electrical mains. They were located in strictly defined places to save cables and wires, often along the shortest paths.
Utility electricians who service such buildings know the cable routes in such panels. Their location is specified in the construction documentation diagram.
Laying wiring on the ceiling
The main cable routes are located along the ceiling slabs or floor beams, and vertical descents to sockets and switches are installed on the walls.
The scheme is best suited for apartments with suspended or suspended ceilings, eliminating the need to chip load-bearing ceiling slabs, since this process reduces their strength and creates a risk of collapse.
Wiring under the floor
The scheme involves laying out the cable network of the apartment directly along the base surface of the slabs under the floor covering, distributing them in vertical lines to sockets and switches.
Combined wiring routing
The scheme takes into account both of the above options. But it may have features that do not always provide high security.
Dangerous option for combined wiring
Panel houses assembled by army construction battalions had an original scheme for installing hidden electrical wiring. It was carried out with an aluminum two-core wire, called “noodles” among electricians. It has long been outdated, but still works where reconstruction has not been done.
This noodle from the apartment panel was laid in two separate lines for sockets and lighting circuits along the floor. Moreover, there are two apartments at once, located one above the other.
The wires of the socket group were raised inside the wall through the factory cavities in their apartment, and for the switches and lamps of the neighbor below they made descents through the joints of the slabs. The wire connections were made by twisting and welding and protected by tightly fitted cambrics.
The dangers of aluminum wiring discussed above are compounded in this installation design by the fact that the “noodles” are thrown directly onto the concrete slabs and located under the wood floor joists. Due to mechanical loads, it simply breaks off over time.
Houses made of foam blocks and bricks
Installation of hidden electrical wiring involves cutting out long lines inside walls and other structural elements. This very dusty and dirty work can be made easier by a professional tool - a wall chaser, used in conjunction with a construction vacuum cleaner.
I would like to warn you right away that household vacuum cleaners do not have a sufficient degree of engine protection. They quickly fail due to the powerful flow of construction dust. It is not always possible to restore them.
You can also create grooves:
- hitting a chisel with a hammer;
- knocking out with a perforator chisel;
- double cutting the grooves with a grinder and then removing the partitions between them.
Grooves for hidden electrical wiring cables should not weaken the mechanical strength of load-bearing building structures. They are performed with the minimum required depth.
Cables can be placed in grooves in two ways:
- with the possibility of replacing them under the decorative coating created on top;
- permanent installation.
Installation in corrugated hoses
There is a wide selection of corrugated hoses made of plastic or metal on sale.
This corrugation, plastered inside the groove, allows you to replace the cable if it is damaged.
Fixing with plaster mixtures
Cables in a durable protective sheath, for example, brand KVVG ng-LS, can be installed permanently without being placed in a corrugation. Since they will work without the possibility of replacement, their selection according to the current loads must be approached very responsibly, paying attention to protection:
- automatic switches against overload and short circuit conditions;
- protective shutdown devices against emerging leakage currents.
Both of these functions can be performed by a differential machine.
Wooden buildings
Installation of hidden wiring in wooden buildings is associated with the need to simultaneously solve the following problems:
- good flammability of wood;
- building shrinkage;
- the occurrence of condensation in cavities during frost.
Fire danger
When a fire starts in open wiring, the location of the fire is clearly visible, and access to it is usually free. A fire that starts can be quickly extinguished with water or other means.
It is almost impossible to quickly determine the location of the fire in hidden wiring: there is no access to it. Therefore, it is very difficult to use fire-fighting agents at the initial stage of a fire. When the fire burns through the wall and breaks out, only a special fire brigade can extinguish it, and even then not always.
Prevention measures
The chemical industry produces various fireproofing impregnations for wood treatment, which delay the onset of fire. Master builders use them en masse in their activities.
However, the duration of this protection from wires heated to high temperatures is very short, and sparks from short circuits ignite wood well even with fire-resistant impregnation.
Technical solution
The PUE permits the installation of hidden electrical wiring in buildings made of flammable materials only subject to a number of conditions:
- placement of electrical lines inside sealed metal boxes;
- exclusion from operation of wires and cables whose insulation supports combustion;
- availability of access to any elements of the electrical circuit.
These requirements can be met, but not with budgetary funds. Large material costs, time and a team of specialists will be required.
Shrinkage
Wood contains moisture in its structure, which evaporates from it during the operation of the building. As a result of material shrinkage, the entire structure shrinks. Construction technologies provide various ways to take these processes into account.
However, hidden wiring installed inside the walls is subject to gradual deformation, which can cause damage.
Condensate
Warm air entering a cold environment releases the moisture it contains in the form of steam. This process can be observed in cold water pipelines.
If the pipe is cooled from the outside, and warm air is inside, then condensate will flow down the internal cavities. According to this principle, moisture is formed in cold weather on hidden wiring inside a wooden house.
It is possible to reliably and safely install hidden wiring in a wooden house with your own hands, but without good skills as a builder and electrician it is very difficult. But there is no correct budgetary solution to this issue.
housediz.ru
Construction of a plastic water supply system
To lay a plumbing structure from scratch you will need:
- pipes;
- plugs;
- fitting;
- crosses or tees;
- clips for fixation;
- cutting scissors;
- shaver - it is used to clean the edges;
- welding machine.
In the event that the question of whether it is possible to hide pipes in the wall arose after the complete assembly of the system, you will need:
- insulation;
- mounting brackets;
- materials for the construction of false walls.
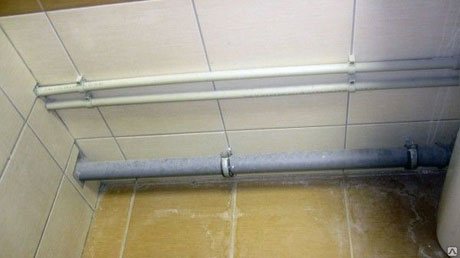
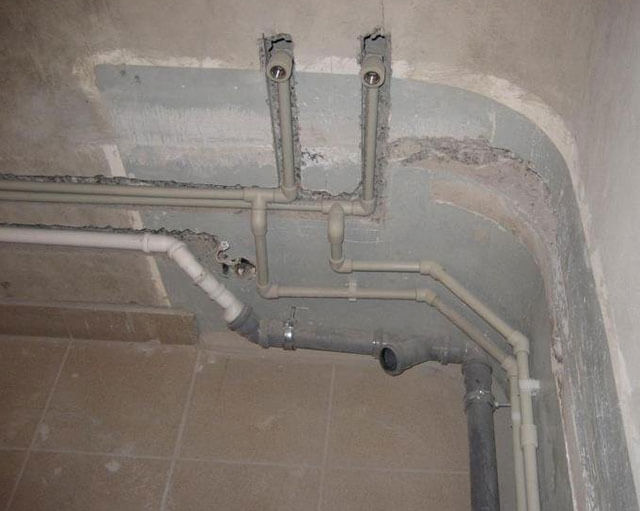
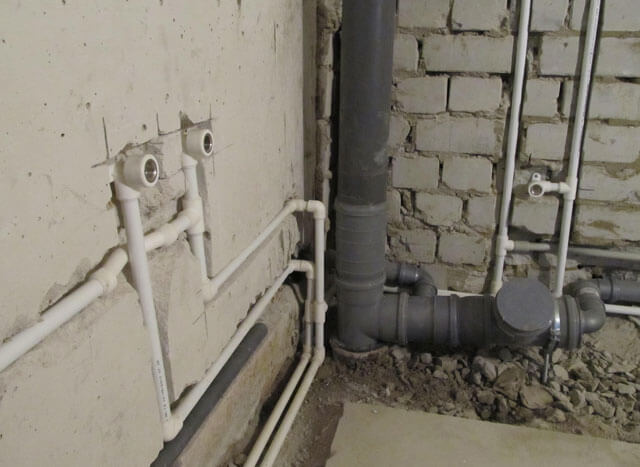
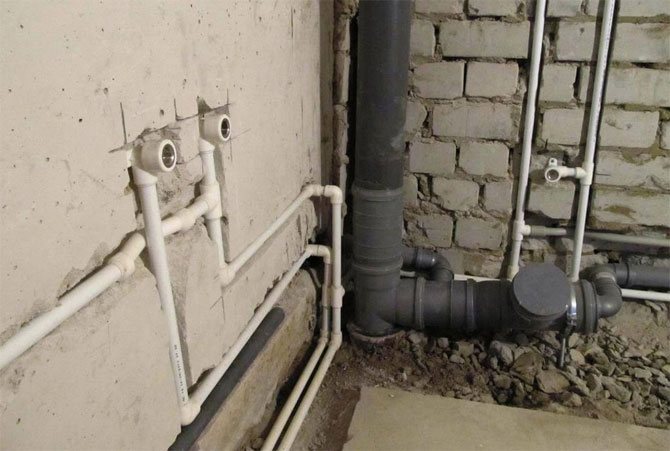
Laying sewer pipes into the wall
Before you hide the sewer pipes in the bathroom installed in the wall, you need to make appropriate grooves in them. To do this, you need to use a grinder equipped with a special disk.
There are different ways to hide pipes in the wall:
- Using a frame covered with any suitable material and lined with ceramics.
- Covering the pipes with thermal material.
- Using roller shutters.
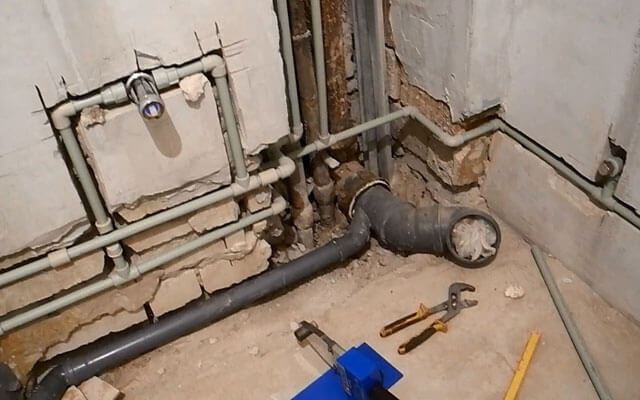
Before closing the sewer pipe in the toilet, you need to choose the appropriate material. Metal smelting products with
not worth using. Instead, plastic parts are much better suited. To prevent the accumulation of moisture under disguise, sewer pipes should be treated
, moisture resistant.
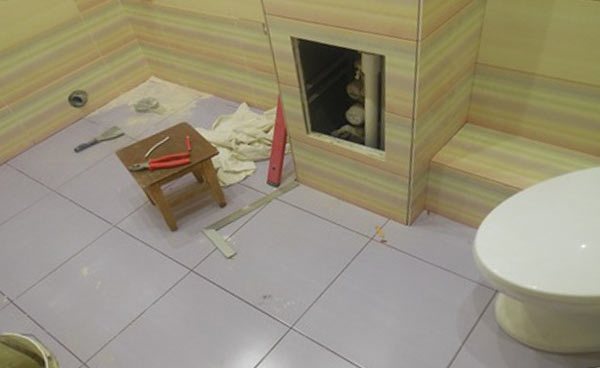
When installing a structure in the kitchen, it is better not to hide it directly into the wall. If this option is the most suitable, then you will have to arm yourself with a hammer drill. To close sewer pipes in the kitchen, special sleeves or plastic film combined with plastic panels work well. Today, stores are replete with similar materials, and they can be selected even by color and aesthetic qualities, not to mention the design. Creating a structure using plastic panels is also advantageous because they can be disassembled almost instantly. In order to close the water meter, it is enough to install a homemade hatch.
A good and effective method of concealing sewerage is to use roller shutters. As a rule, such devices are supplied with detailed instructions that will facilitate installation and allow it to be completed as quickly as possible. Roller shutters have a long service life and good strength, so you won’t have to replace them in the near future.
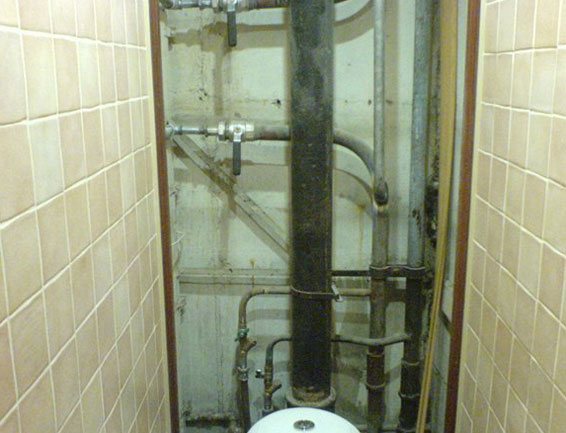
Sometimes there are somewhat unusual situations, by adapting to which you can hide sewer pipes with virtually no additional effort. For example, if the bathroom has a small area, then you can do a redevelopment, during which the sewer pipes will be hidden behind a special podium or hidden in a niche made of plasterboard. Such a unique box for sewer pipes will perform its function perfectly.
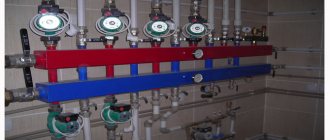
Installation of a water supply system made of polypropylene pipes in the wall
When purchasing fittings, tees and connecting parts, the diameter of the selected pipe products is taken into account. They, like the main elbow, are usually made of polypropylene. But they can only be used when creating branches, fixing measuring devices and for redirecting water flows.
The fact is that installing polypropylene pipes into a wall involves creating a soldered, permanent connection, which is performed using a welding tool. Around the pipeline, laid in the thickness of the wall, you need to lay out a shock-absorbing “cushion”, which will allow the pipe to change its parameters.
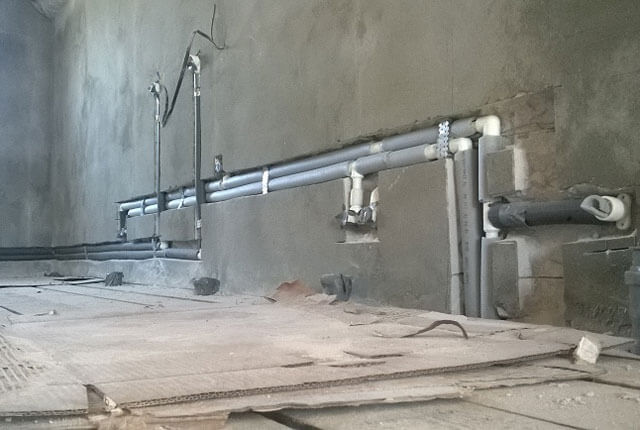
Installation of heating pipes in the wall
Installation of heating pipes in the wall can be done in two ways:
- Move heating pipes directly into the wall;
- Install a box or plasterboard wall over the pipes.
To order repair of a heating pipe in the wall, call +7 495 205-205-2
Each method has its pros and cons. In the first case, there is a danger of not seeing when the pipe starts to leak. But this can be avoided by installing a water sensor. Then you will be able to detect the malfunction in time and make repairs before the pipe breaks. In the second method, the disadvantage is that the installed box or false wall will also take up space in the apartment. Exactly how to install heating pipes in the wall is up to you to decide. In this article we will look at all of the above methods for installing pipes.
Features of polypropylene pipes
To install the pipeline, high-quality and reliable material is required. This could be, for example, stainless or galvanized steel. Over time, polypropylene replaced these types from the construction industry. The main reason was the combination of useful properties at a reasonable price.
Polypropylene is suitable for hot and cold water supply and heating. The material is durable and does not require maintenance, so you can safely wall up water pipes into the wall.
The main thing is that their use does not exceed the temperature limit of 95 ° C, when the material loses its resistance to pressure and deforms. In residential water pipes and heating systems, such pipelines operate at lower operating temperatures, so no problems should arise.
The disadvantage of the material is thermal expansion, which can directly affect the integrity of the wall into which the pipes are walled. The expansion coefficient of polypropylene is quite high. The linear increase can be up to 10 mm per meter of pipe at a temperature of 70 °C; accordingly, the diameter of the pipe also increases slightly.
The higher the temperature, the more the expansion coefficient of the pipe increases. Therefore, the laying of heating networks, their correct installation, and the selection of types of pipes that suit the conditions deserve special attention.
Note! Reinforced grades of polypropylene have a lower coefficient of linear expansion. Approximately 3 mm - 3.5 mm per meter. Consequently, when laying hot water supply or heating, reinforced pipes will be more reliable, since they will create less pressure on the wall, and the likelihood of deformation of such pipes is much lower.
Wiring Requirements
The current-carrying conductors of the cable, closed inside building structures, heat up more under the influence of current than in the open air: the balance between the arrival and removal of heat into the environment is disrupted. Due to this, their protective insulation is subject to more intensive aging and rapid destruction.
To prevent overheating of the insulation of closed wiring:
- increase the conductivity of the metal of the current-carrying core, selecting it for lower electrical resistance;
- increase the cross-sectional area.
Core material
There are two types of wiring in our residential buildings:
- aluminum;
- copper.
Aluminum cable is cheaper to produce and lighter in weight. It was widely used in wiring diagrams earlier, when household appliances consumed low power.
In modern apartments with high energy consumption, the installation of new aluminum wires is prohibited by rules and regulations. And inside the old buildings they are just slowly improving their resource.

This is explained by the increased plasticity properties of soft aluminum, which is easily deformed during installation due to strong compression by screw connections and temperature loads.
Terminal blocks with screws are made of steel alloys, the coefficient of linear expansion of which is different from aluminum. With the same heating, the steel expands more and further deforms the soft core of the wire, compressing it.
During cooling, the steel parts return to their original state, and the aluminum, subjected to additional compression, weakens the electrical contact. The resulting oxide film on its surface worsens its contact resistance. As a result, conductivity is disrupted and increased heating is created.
The quality and technical condition of aluminum wiring must be monitored much more often than copper wiring. Otherwise, there is a high probability of gradual damage to its insulation, leading to sparks and a fire.
Main characteristics of insulation
Manufacturers protect wires and cables with one or more layers of insulation, which, like all technical products, can be damaged if stored, installed, used incorrectly and have different characteristics.
Based on fire resistance, insulation for household electrical wiring is divided into:
- ordinary, subject to combustion;
- non-flammable, marked with the indices “ng”;
- with reduced gas emissions at high heat, denoted by the Latin letters “LS”.
The higher the resistance of the cable insulation to destruction from heat and fire, the more expensive it is. Cable with insulation marking KVVG ng-LS has the best fire-fighting properties.
Dangerous wire brands
Especially for the installation of household electrical equipment and similar purposes, according to state standards, wires of the PPV brand are produced from copper and APPV - aluminum with single-layer insulation.
With the transfer of part of the production capacity into private hands, individual enterprises switched to the production of wire of the new PUNP brand. For its production, special technical conditions have been developed directly at the factory. They allow for deteriorated performance characteristics according to GOST, reduce quality by reducing the area of conductive conductors and using simplified types of insulation. Even its two-layer coating works worse than the single layer of the PPV wire.
The PUNP wire is dangerous in operation: with slight overheating of the insulation, increased voltage, or increased loads, it can cause a fire.
Installation requirements
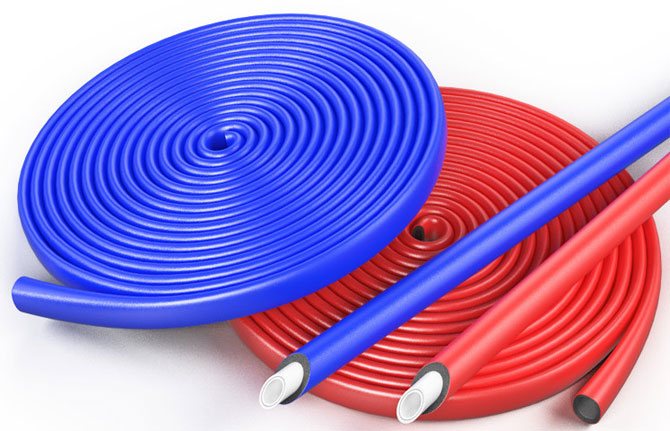
When laying pipes in the wall, it is recommended to use shock-absorbing materials. For example, energyflex, polyurethane foam. These materials will serve as a gap between the wall and the pipe; accordingly, there will be no pressure on the concrete when the pipe expands.
The fewer connections, the better. Connections are the most vulnerable part of polypropylene systems, least protected from leaks and having low pressure resistance.
Pipes must be selected in accordance with the conditions of further operation.
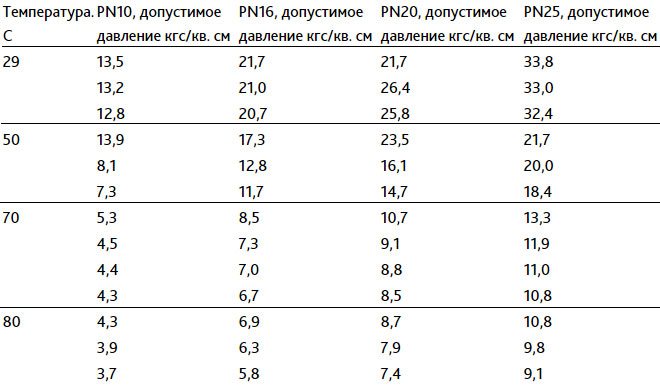
Based on wall thickness, all PPR pipes are divided into categories from PN10 to PN25.
- PN10 pipes are thin-walled, designed for cold water supply or for heated floors and other low-temperature, low-pressure systems.
- PN16 and PN20 are used for water supply with pressure up to 1.5 MPa and heating systems with pressure not exceeding 0.8 MPa.
- PN25 is reinforced with a layer of fiberglass or aluminum, which increases strength and temperature range. Accordingly, the products can be used in central heating systems at pressures up to 1.5 MPa, and in cold water supply up to 2.5 MPa.
Useful tips
Finally, a small instruction containing a number of useful tips on heating installation.
- ALL connections are left open during flush mounting. The only exception is welds on polypropylene pipes, whose strength is no different from a solid section.
- If hidden wiring is carried out in central heating systems, corrugated stainless steel would be the best choice. Agree that if a water hammer breaks the integrity of the polymer pipe in the screed, it will not be pleasant.
- For underfloor heating systems, metal-polymer pipes and cross-linked polyethylene are equally good. The second material, however, is much more flexible; But with metal-plastic, a small bending radius can lead to the aluminum layer of the pipe cracking.
![]()
As you can see in the photo, a polyethylene pipe can be bent with a small radius.
Preparation for installation
The primary task is to draw up an installation drawing of future highways. In fact, the pipeline plan must be carried out taking into account all connections, taps, technological cabinets, shut-off valves. Detailed planning helps to avoid redundant connections and waste of material, since it is determined in advance which parts and in what quantities are needed.
Note! It is better to save the drawn up plan. It may be useful for system maintenance and installation of new communications. For example, for inserting an additional tap.
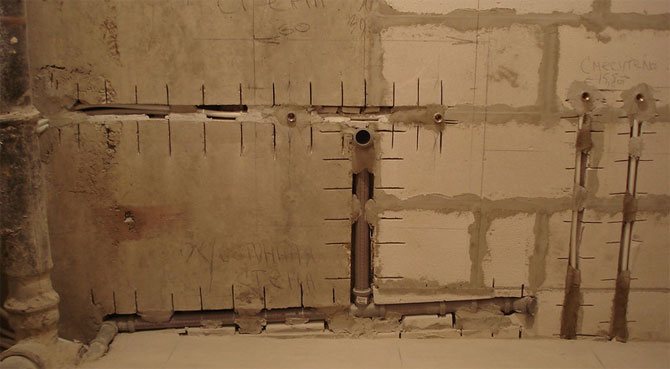
Walls for hidden installation of pipes will have to be grooved, that is, a channel will have to be cut in the concrete for laying a pipe line. It is advisable to pre-mark the working area in order to make an even and high-quality channel.
It is advisable to take into account that it is not recommended to groove walls in panel houses, since the thickness of the panels is usually small. The most suitable walls are made of thick brick or concrete. They can be tapped without fear.
Next, you need to mark the pipes and fittings to know the welding direction and installation order. If necessary, it is better to trim the products in advance.
To perform installation work, you need tools designed for polypropylene:
- cutting scissors;
- a shaver for removing reinforcement and a chamfer for leveling the cut surface;
- welding machine with temperatures up to 260 °C;
- wall chaser or grinder for cutting out a cavity in the wall;
- chisel and hammer or punch to remove material between the grooves.
Installation
When the tools are ready, there is a detailed plan for installing pipe lines and markings, you can start working:
- Using a grinder or wall chaser, cut parallel to each other slots on the concrete surface of the wall; the distance between the slots should be slightly greater than the thickness of the polypropylene pipe in the thermal insulation. It is recommended to use a stone disc or a toothed disc coated with diamond.
- Use a hammer drill or chisel to remove concrete between the slots.
- To place technological cabinets, you will have to make a cavity in the wall and install a cabinet with slots for communications in it. This design will facilitate access to shut-off valves or sensors.
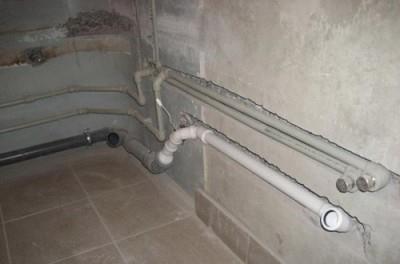
- The pipes are welded in advance, after which they are laid in the wall and fixed in the channel with clamps or supports. It is advisable to do most of the welding outside the channel because it is easier than welding in a confined space. Before sealing the grooves, it is recommended to check the system for leaks by running water into it. If no leaks are observed, then you can proceed to the final finishing.
- Before laying the pipes, it is advisable to wrap them in a layer of energyflex, or fill them with polyurethane foam after installation. This will provide space for the pipe to expand.
Note! Before grating begins, if there is any finishing on the wall, it must be removed. It will not be possible to make a channel in tile or wood without ruining them, but the presence of finishing can significantly complicate the work.
Of course, you can lay pipes on top of the walls, and make finishing on top of the main line, but then the free space in the room is reduced, and the cavity formed between the finishing and the wall will have to be filled with insulation. This approach is ineffective, since the finishing material must adhere tightly to the surface.
If you need to hide a ready-made pipeline structure, it is better not to make a blank monolithic wall, but to build a special plasterboard box to ensure free access to the pipes if necessary.
After a test check of the functionality of the pipeline, you can begin finishing the wall; it is better to use drywall for this.
Pipes in the wall
This method allows you to disguise brazed copper pipes, welded joints of steel pipes and press fittings as cross-linked polyethylene. It is also possible to use this method for press fittings crimped using construction pliers on metal-plastic pipes. The main condition is high-quality fittings produced by trusted manufacturers.
In order to install pipes, you need to trench the wall. However, it should be remembered that horizontal slitting of panel walls is strictly prohibited by safety regulations.
In order to install pipes, you need to trench the wall. However, it should be remembered that horizontal slitting of panel walls is strictly prohibited by safety regulations. In addition, pipes cannot be masked by gating into brick walls whose thickness is less than 120 mm.
The groove on load-bearing structures should not be deeper than one third of the wall thickness, and in conditions of monolithic walls, the groove must be cut before reaching the connecting reinforcement.
Required tool:
- construction pencil for marking furrows;
- grinder or wall chaser for cutting two parallel channels;
- a hammer drill or chisel to knock out the space between the grooves.
After laying the pipes, the grooves should be carefully sealed with sand-cement mortar without creating voids.
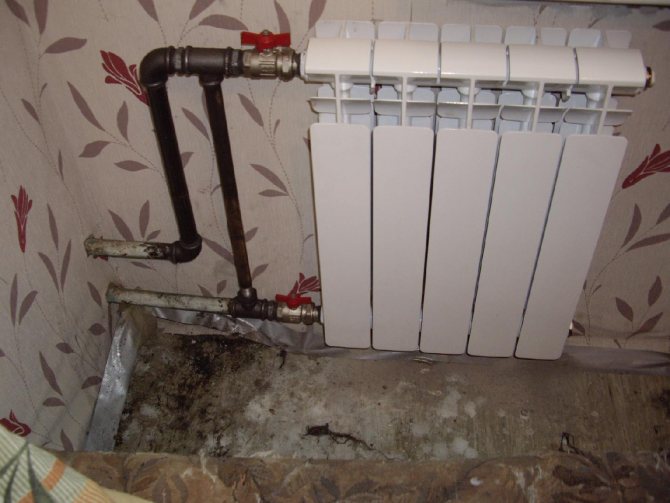
polypropylene pipes in walls
Hello, we are starting renovations next week, the craftsmen seem to be good and qualified, the only thing that confuses us is that they want to hide polypropylene pipes under the tiles. In our neighbors, a year later, these pipes pulled out the tiles and started leaking, is this possible?
The pipes must be covered with a casing or Energoflex to compensate for the linear expansion of the pipe. Then the tiles and everything else will remain in place. It is not only possible, but also advisable to hide the pipes in the wall, only if it is wise, so that the overall appearance after the repair is beautiful and does not resemble a city boiler room.
Energoflex - compensates for linear expansions, what nonsense. The maximum he can do is to insulate the pipe! To compensate for linear expansions, compensators are used, either homemade or ready-made.
Delusion specialist, let's look into it in detail? What is the linear expansion of polypropylene? What is the maximum length of a pipe embedded in a wall in a bathroom? What is the thickness of the Energoflex walls? We started discussing, please answer specific questions.
Yes, it’s easy: regular polypropylene - expansion coefficient 0.15; reinforced polypropylene - expansion coefficient 0.03. Calculation formula I = a * L * t, where I is the calculated length of linear expansion in millimeters, a is the coefficient of linear expansion of a particular type of pipe, L is the calculated length of the pipeline section, t is the difference between the expected operating temperature and the temperature during installation (usually installation temperature is equal to the current ambient temperature). Bathrooms are different (for me, the longest section is 2 meters out of a pipe length of about 5 meters). Wall thickness 6 mm, Relative compression: under load 5 kPa - 0.20 MPa. From which I can say that at the same 2 meters, ordinary polypropylene in an energy flex for hot water supply will have problems with compensation. Now tell me about the compensating ability.
It was worth staying up half the night and copying the Internet. For hot water, only reinforced polypropylene is used, which expands by about 2-3 mm per meter, and then only with a temperature difference of 50 degrees. (temperature difference between hot water and hot water pipe installation temperature. The maximum standard temperature should not exceed 75 degrees; in fact, it often does not reach 60.) The length of walled-up pipes in the bathroom, as a rule, does not exceed 1.5 m. T. e. , the expansion will be about 4 - 5 mm. But the internal size of Energoflex is several mm larger than the outer diameter of the pipe and the pipe, when expanded, slides freely as if in a sleeve. Therefore, deformations do not occur in the wall itself, but outside it, in the area where this pipe is connected to the taps. Small sections of pipes extending from a long section (1.5 m) and walled into the wall compensate for the expansion (minuscule at such a length) with the thickness of Energoflex - 9 mm. In addition, at the ends of the pipes, where they are connected by a corner, pieces of the same Energoflex are laid, which allows the pipe to “walk” freely, without even straining the walls of the Energoflex. I'm interested in how you use loop-shaped expansion joints when embedding pipes into the wall. Or do you also think that this should not be done?
Lots of letters. I have nothing else to do but stay up half the night and surf the Internet. “Only reinforced polypropylene is used for hot water” link to the standard, please, where the word “ONLY” is written. Standard temperature in the system - where is the guarantee that it will not be higher from your own boiler room or from a water heater (where is the protection from the “fool”)? As a rule - what about the rule when the pipe for supplying the washing machine stretches (across the entire wall) and is pinched on both sides, where should it be expanded (if around the groove on the sides of the wall, I’ll assume it’s in the tiles as in the description above)? Pieces from the ends - that's right, you need to first give advice, and then look for solutions to problems. in other words, “do it through the ass.” How to apply it - if you wish, you can wall up the heating radiator into the wall, or for you hidden systems (installations) are unknown and unknown. I’m not saying that you can’t hide pipes in the walls, the rules don’t prohibit this, I initially made a comment to you about the phrase: “Energoflex to compensate for the linear expansion of the pipe,” as a material not originally intended for this.
“I’m not saying that you can’t hide pipes in walls; the rules don’t prohibit it. " , " Energoflex to compensate for the linear expansion of the pipe, as the material is not intended for this. ", " To compensate for linear expansions, compensators are used, either home-made or ready-made. ". Develop the idea further, only without “Many letters. ", but essentially. How to monolith pipes into a wall using the expansion joints you mentioned above? And I’ll leave my comments to your last message as a starter; I won’t pass by such pearls)))). In the meantime, I’m waiting for recommendations on how to properly monolith the pipes so that they do not squeeze out the tiles.
Don't read between the lines, look for the answer, because... I already answered you, but here’s how to wall it up, if you consider yourself an expert, then think about it. I don’t consider myself a teacher, and I won’t teach you! Initially, I repeat once again, there was a remark about the material that was not intended for this, and you started demagoguery about how to do it, ignoring my questions. Further, I think there is no point in arguing. Good luck in your endeavors!
. ))))) The hero quickly merged. The forum does not teach, but rather shares their practical experience and knowledge. If they see that the interlocutor is mistaken, then they prove it with arguments. But many on this forum are soap bubbles, they croaked that they exist in this world without any special meaning and again into the swamp. Now I will comment on your penultimate message. I answered you at 19.35 on May 11. You puffed yourself up until half a fourth of your time (in Tomsk), studied the theory of the issue, copied an article from the Internet, but still didn’t understand anything about it. The pipe to the washing machine carries cold water. (Or in Tomsk they supply hot water to washing machines?) In the formula you provided for calculating linear elongation there is such an indicator as temperature delta. So, for cold water it is no more than 10 degrees. Therefore, this pipe practically does not change its geometric dimensions. Further . you are interested in my word “only”. Let me explain. For embedding hot water pipes into the wall, ONLY reinforced pipes are used because “regular polypropylene has an expansion coefficient of 0.15; reinforced polypropylene - expansion coefficient 0.03." (excerpt you copied from the Internet, but never learned). For ordinary polypropylene, the linear expansion is 5 times higher and you don’t need to have seven spans in your forehead to understand which pipe should be used for embedding into the wall. When a section of pipe “gets pinched into the wall,” as you write, installers play it safe and lay pieces of Energoflex at the ends, which separate the pipe from the plaster and allow it to move. These are the nuances of editing, and not, as you put it, “doing it through your ass.” So far only you are giving your advice through your ass and cannot justify it. Honestly, I have no interest in having a discussion with you. I do this only so as not to mislead people interested in this issue. And I repeat again. When installing polypropylene hot water pipes of short length, embedded in the wall, Energoflex does an excellent job of compensating for linear expansion. In this case, it is better to use with a wall thickness of 9 mm.
If anything, I was working that night. (I hope my answer has put you at ease!) I perfectly understand the calculation formula and the parameters that are calculated in it, and I perfectly understand what water goes where. Everything below should not have been explained to me, but written in the initial response (not to me) dated May 10, 2020. Have a nice day! Talk less and work more with your hands, otherwise all the clients will run away!
“Talk less and work more with your hands, otherwise all the clients will run away!” )))))
“Thermal insulation for ENERGOFLEX Super PROTECT pipes is specially designed for laying heating and water supply pipelines in floor and wall structures. It has increased resistance to mechanical damage and aggressive building materials. The polymer coating increases the strength of the pipes by 50%, thereby making the insulation a strong protection for the pipes, and the elastic layer of polyethylene foam helps compensate for the thermal expansion of the pipes. Progressive technology of simultaneous extrusion of polyethylene foam tube and polymer film ensures reliable welding of thermal insulation and coating.” (c) taken from the manufacturer's website.
To be honest, it’s also written on the fence. For the manufacturer, this is primarily “marketing” (in our opinion, steaming, inhaling, etc.), even in this phrase there is something to think about, as in any advertising: “and the elastic layer of polyethylene foam helps to compensate for the thermal expansion of the pipes” as an ELASTIC layer can compensate. Elasticity is resistance to deformation.
I agree with Vladislav, it is enough to buy good glass fiber reinforced polypropylene, it has the lowest linear expansion. Put an energy flex on it and cover it in the groove. Under the tile it will have enough space for expansion, compensated by energy flex. If the pipes are welded well, then nothing will happen to them..
Thanks a lot. Today I was in the store and they have foil-reinforced and fiberglass-reinforced ones, which ones are better to take?
Better take one reinforced with fiberglass. He has a slightly higher coefficient. linear expansion (by 5 thousandths, for 1st 2 meters it is practically indistinguishable), but the risks for high-quality installation due to the human factor are reduced. It's easier to make a mistake with foil than with fiberglass.
Elena, if you can take a detailed photo from the neighbors. It’s very interesting to see. The fact is that there are a lot of stories on the Internet, but the evidence is somehow deaf.
The pipes need to be heated and the sewer system needs to be built, lined with tiles, and the neighbors probably put tiles on the pipes and the pipes were not heated or sealed. When the pipes are built, let them stand under pressure for one day and then let them seal them.
The pipes should not be hidden under the tiles, but walled up in the wall. These are two big differences for our masters. Pipes in a sleeve made of energyflex or corrugated. If the distance is large, then the expansion compensator is at the output. And wall up all this not with putty or plaster, but with a solution; otherwise, even with such a device, condensation may form, which will saturate the putty like a sponge and fungus will begin to form along the seams on the tile in less than a couple of months.
It’s better not to hide the pipes
Elena, if you decide to install pipes in the wall (floor) and not from the outside, then, regardless of the type of pipes, you must definitely use a “corrugated pipe” for both hot and cold water, fasten the GT joints with plumbing tape (TPL tape), I give a guarantee for many years (until the next repair) Corrugated HDPE pipes for hidden wiring, for insulation. For a pipe D 16 mm, a corrugated pipe D 25 mm is used. For a pipe D 20 mm, a corrugated pipe D 32 mm is used.
Hidden wiring
Hidden electrical wiring is much more difficult to install, but the result obtained is, from an aesthetic point of view, the best. Here, the difficulty of installation is that we have to lay insulated wires or cables in pipes recessed into the walls.
Hidden wiring can be installed before, during or after construction work (the so-called tie-in).
But as elsewhere, there is one nuance here - installing hidden wiring in the floor after construction work is prohibited. That is, it is not allowed to make excavations in an existing floor in order to lay pipes there. Electrical wiring in the floor is only possible before or during construction work. This is due to the fact that when gating an existing floor and removing material from the groove, the concrete screed is weakened (in this case). And in the future, the floor will begin to crack in this place.
Before construction work, try to pay great attention to the pipes that will be installed in a hidden way. They must not be damaged or have any deviations from the norm. When cutting into walls, the grooves must be of sufficient size so that all the recesses you have made can be secured there and completely covered with plaster. Pipes buried in concrete should have absolutely no auxiliary fittings (branches, connections). All connections of hidden electrical wiring should be made in junction boxes. To ensure that the entire process of installing hidden electrical wiring goes smoothly and without any complications or surprises, we have published a table of rules for installing hidden wiring.
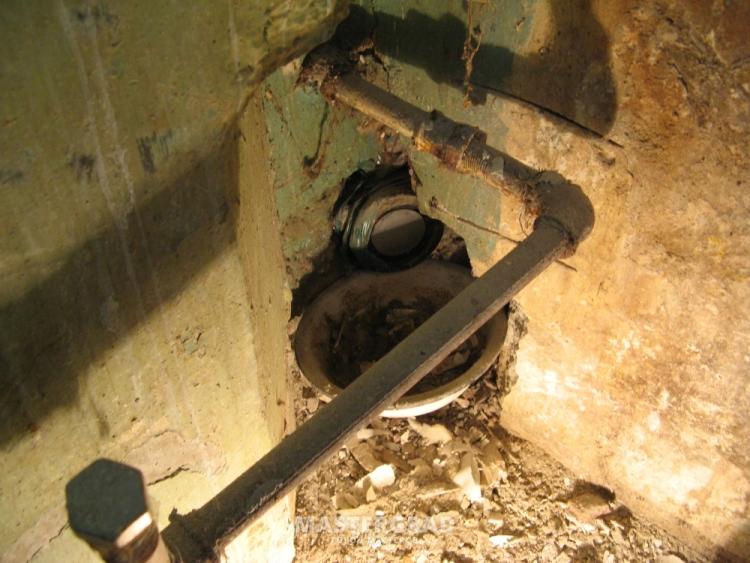
What pipes should not be hidden in walls?
Any apartment in an apartment building is strewn with various pipes. This is how water and heat are supplied to detached housing and sewage waste water is removed. In private construction, you also cannot do without such communications, but there it is possible to build a pipe system according to your own design and place the pipes where it is convenient. In an ordinary apartment, the heating riser pipes, for example, can easily end up exactly in the middle of the wall. I really want to remove them, but this is not always possible or rational.
Pipes in a plasterboard box
Manufacturability and simplicity make this method one of the most popular and in demand. The use of sheet moisture-resistant plasterboard allows you to effectively camouflage not only water pipes, but also the sewer system. The most noticeable disadvantage of this method is the significant loss of usable area of the room. We wrote about masking pipes in a toilet using plasterboard here.
In addition, the structure made of moisture-resistant plasterboard can be replaced with plastic or any other material that is preferable in each particular case. It is impossible not to mention the most budget option for masking pipes in the bathroom - the use of plastic boxes.
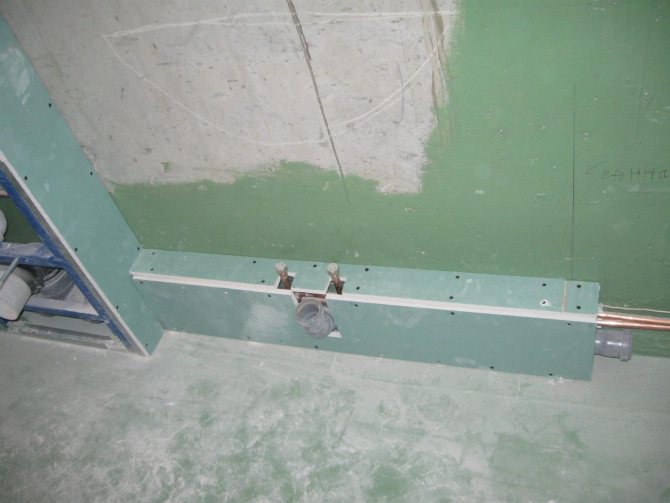
Creating a box from plasterboard is the least expensive. The most noticeable disadvantage of this method is the significant loss of usable area of the room.
Regardless of the chosen material and method of hiding water pipes, you should remember that the number of connections should be properly minimized. In addition, it is advisable to mask minor areas of pipe routing, which will reduce the need for dismantling work in emergency situations to a minimum.
The pipes in the house are so different and so disturbing
I want to hide the pipes from prying eyes not only because of the aesthetic side of the issue. In the bathroom and toilet, these connections take up a lot of space that could be freed up for more useful things. However, you cannot simply wall up all the pipes in the house. Before deciding what can be hidden from view and what cannot, you need to get acquainted with the list of pipes that are completely prohibited from being hidden in walls:
- You cannot hide the pipes that are responsible for the systems of the entire house. These include heating pipes (especially risers) and plumbing systems. Such units are the property of all residents, so in the event of an accident, repair or replacement of drains, you will have to open the walls at your own expense and provide workers with access to the pipes;
- It is also not recommended to tightly hide the joints of pipes - purely for rational reasons. If any leakage occurs, it will be impossible to detect it. But a leak can only occur at the junction;

- It is forbidden to hide metal pipes and walls in walls - they provoke corrosion.
Usually, during a major renovation of an apartment, they try to replace all the “original” pipes with plastic ones. PVC pipes are more flexible for work, do not destroy themselves and can be combined into any design.

If you nevertheless decide to hide the permitted pipes or even a heating riser in the wall, you can use only 2 methods - wall slitting or creating a false wall. When choosing the first option, it is important to entrust the work to an experienced craftsman. Here the matter concerns not only skillful wall slitting, but also the creation of high-quality markings, checking the wall for the presence of wiring, and proper distribution of pipes.

You only need to remember one thing - if problems arise in general communications or a planned replacement of pipes occurs, all work on dismantling hidden pipes will be paid only by the owner of the apartment. Therefore, sometimes measures to hide walls are impractical.
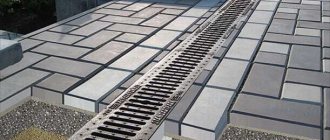
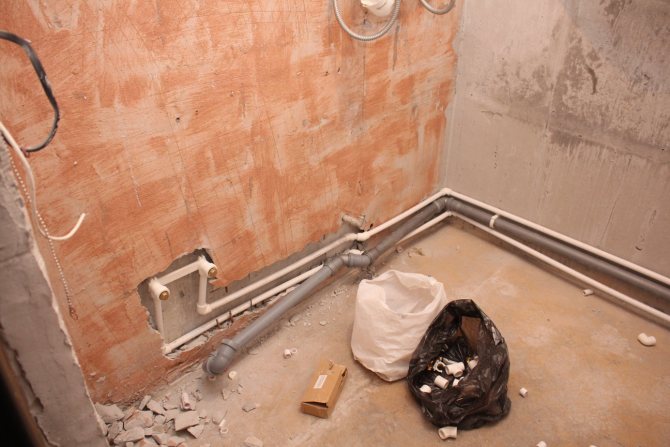
Pipes in a screed
The method of masking pipes in a screed is the most practical and facilitates laying the water branch along the most optimal route. However, you should take into account the thickness of the screed, which should not only accommodate the pipes, but also have a certain margin necessary to level the floor surface. If you plan to lay heated floors, then the installation of pipes must be carried out exclusively around the perimeter of the room.
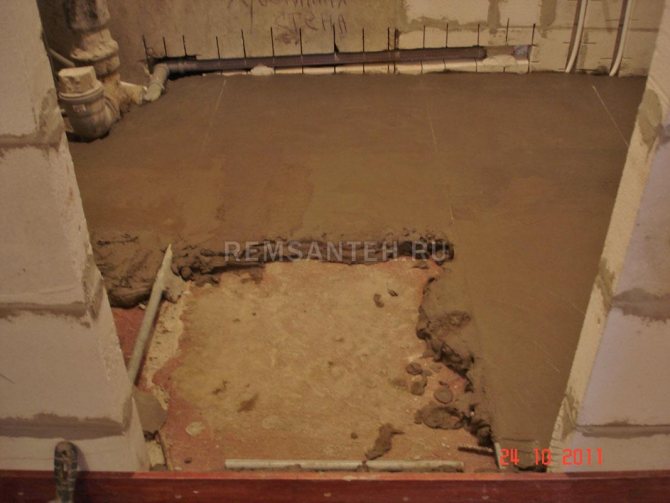
The method of masking pipes in a screed is the most practical and facilitates laying the water branch along the most optimal route. However, you should take into account the thickness of the screed, which should not only accommodate the pipes, but also have a certain margin necessary to level the floor surface.
To maintain the necessary mobility of pipes during thermal expansion, high-quality corrugation is used. Particular attention should be paid to the temperature conditions during the hardening period of the screed - it is forbidden to use hot water until the cement mortar has completely dried. Neglect of this rule can provoke the formation of cracks and ruptures of the cement layer in places where water pipes are laid.