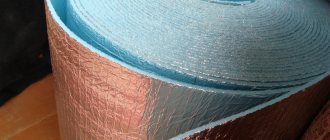
Choosing a stove design
The first thing to consider is the diameter of the oven.
We recommend that the pipe diameter be slightly smaller than the outer diameter of the cauldron. As a result, the cauldron should be wrapped around the stove in the upper half - this will ensure a secure fit.
Smaller containers can be placed if you use oven rings. Yes, larger cauldrons will be installed, but their position will be less stable and will need to be monitored.
We have a 350 mm cauldron.
We consider it inadvisable to make a metal stove for growth: it will be more expensive and much heavier than what you need right now, and it is not known whether it will be useful.
The second question that needs to be decided is whether or not to build a chimney. The chimney is like a pipe.
Our thoughts against:
- The height of this pipe will not be high and it will not create draft;
- A very hot piece of iron will stick out;
- The design is more expensive and heavier;
- You also need to take a pipe with you.
We intended to use such a stove outdoors. If we put the stove indoors, even in a ventilated gazebo, then we chose to make a chimney.
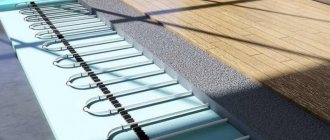
The third, important question is whether to make a blower or not.
There are two options for designing the lower part of the pipe stove:
- The grate is a grate, and small coals and ash fly down;
- A decorated ash pit where small coals and ash fall.
We chose the first option. The stove was supposed to be placed in the backyard on a clay platform. If you were planning to go out into nature with her, then you need to choose the second option.
What can you cook in it?
There are a lot of ideas for preparing dishes in a cauldron. In most cases, large cookware is purchased for preparing oriental dishes. Food cooked outdoors always comes out aromatic and incredibly tasty.
In a bowl you can cook:
- First courses (borscht, solyanka).
- Second courses. The pilaf is especially wonderful.
- Dishes with smoke.
Experts advise paying attention to the preparation of the fireplace. The taste and quality of prepared dishes depends on it. In most cases, it is mounted on a sturdy tripod. Correct installation will allow the flame to evenly burn the walls of the cauldron, as a result of which the food will simmer on all sides.
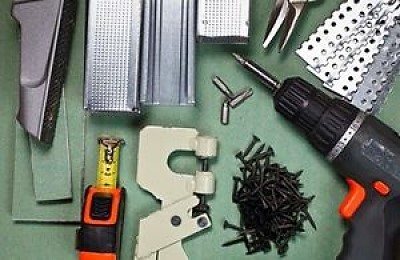
Tools
What you can't do without:
- Welding machine and accessories for it;
- Grinder (angle grinder);
- Drill.
It is better to buy all the iron not at a metal warehouse, but to find scraps or used ones. You will definitely not find a piece of large diameter pipe at a metal warehouse. You can search at scrap metal collection points or on online sites.
We will need:
- 0.45-0.5 m of pipe with a diameter of 300 mm and a wall of at least 4 mm;
- 0.7-0.8 m of pipe (profile or regular) for each leg, for all – 2.1-2.4 m;
- Sheet 4 mm 300*300 mm, for the grate (you can weld the grate from 6-8 mm reinforcement, but this will take longer).
Mobile ovens for cauldrons
They are made exclusively of metal, preferably stainless steel, or in extreme cases ordinary steel painted with heat-resistant paint!
The simplest mobile version of a cauldron stove is a cylindrical firebox made of sheet metal with a hole for adding fuel and slits for smoke to escape. The cauldron is placed on top of the stove, with two-thirds of the bottom located directly above the fire.
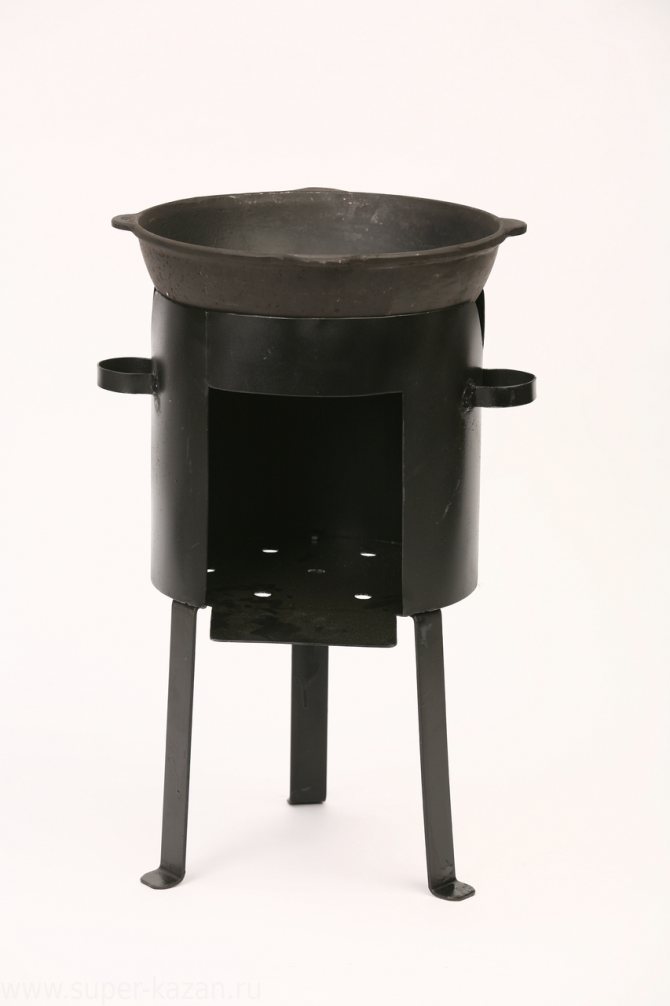
But the lightest structure is a tripod. It is made from a metal tube bent in the shape of a circle and legs are attached to it (by welding or bolts). This “stove” is very convenient for hiking, but does not allow the walls of the cauldron to warm up evenly.
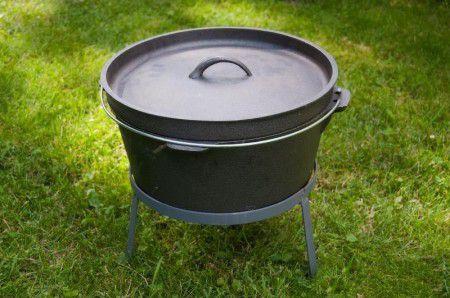
Stove for cauldron tripod
The size of each oven is individual and depends on the cauldron in which the cook will prepare the dish.
In order to make a simple stove for a cauldron with your own hands you will need:
- the cauldron itself (for measuring the diameter of the firebox);
- sheet steel (the thicker the metal, the more reliable and durable the structure) or a piece of thick-walled pipe (a used gas cylinder or even the body of an old cylindrical washing machine);
- metal corners or tubes (from which we will make the legs of the stove and handles for its transportation);
- machine for cutting metal - grinder (or its replacement - hacksaw, file);
- drill;
- hammer;
- welding machine with a set of electrodes.
We will carry out the work outdoors in close proximity to electricity and with mandatory observance of safety rules (protective suit, leggings and mask for working with a welding machine).
- We measure the circumference of the cauldron, according to this value we will carry out construction.
- Using a grinder (we use a cutting wheel for cutting metal), we cut out a rectangle from sheet steel. The long side of the rectangle should be equal to the circumference of the cauldron. Next, cut out a circle - the bottom of the oven.
- On one of the sides, which will be the top of the stove, we make markings and make several slits for the free exit of smoke. At the bottom of the stove we cut out a rectangular window for loading fuel.
- We roll the steel into a cylinder. We use either a suitable form, winding metal around it and achieving accuracy with hammer blows, or using a special sheet bending machine.
- Along the way, we cut out handles and supports for the future stove from corners (pipes, etc.).
Using a welding machine, we connect the steel into a cylinder, weld the bottom, then the supports and handles to the finished structure. However, the last parts of the structure can be bolted on by first drilling holes in the metal.
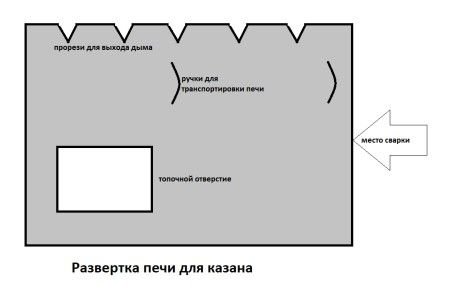
Reamer for cauldron stove
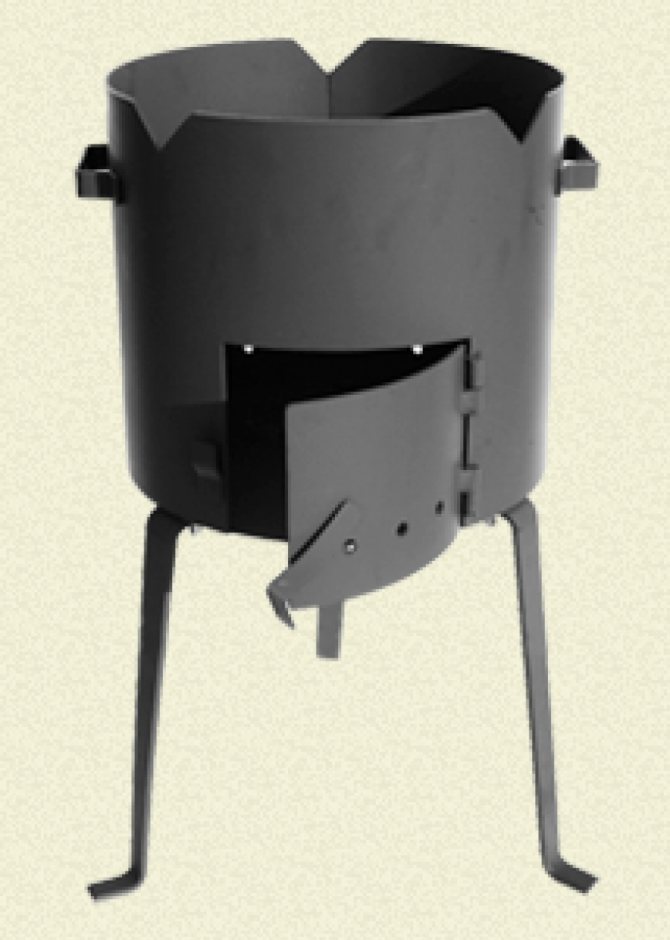
The simplest oven for a cauldron is ready. To protect it from corrosion, we apply several layers of heat-resistant paint. All that remains is to place a cauldron on top, light a fire in the firebox and prepare the food, everything is as simple as one, two, three!
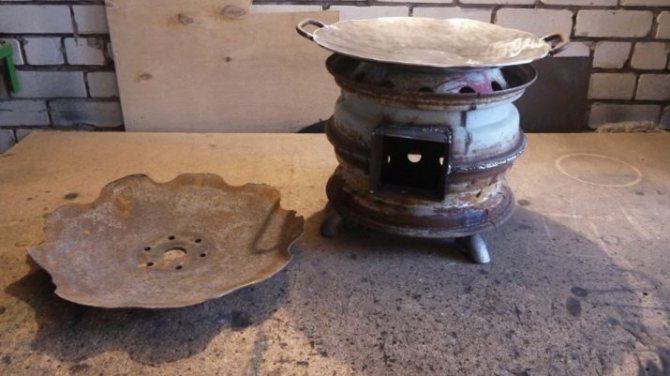
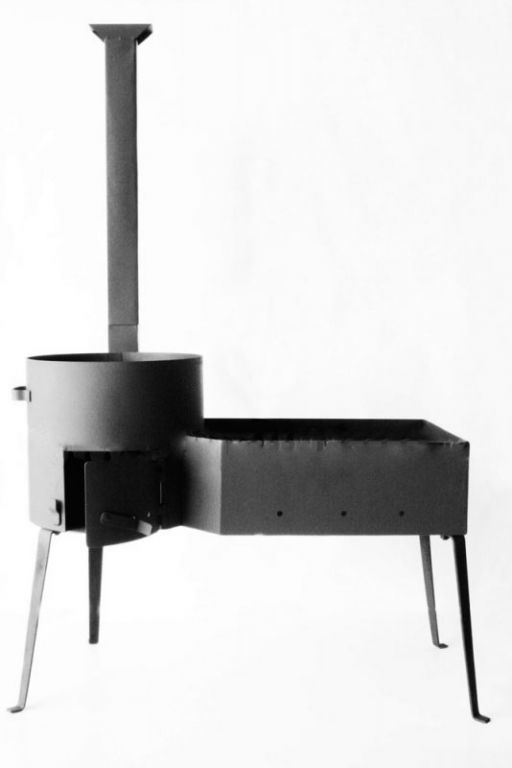
An improved version of the cauldron stove
We supplement the design with a smoke exhaust pipe, doors, a ash pan, and a grate.
The manufacturing process is similar to the first option, but a few points will be added.
- You will have to cut not only the combustion hole, but also the blower hole located underneath it and the hole for installing the chimney.
- Instead of chimney slots, it is advisable to attach a metal rod to the top of the stove to strengthen the structure.
- A grate must be secured between the combustion hole and the blower. To do this, we weld small pieces of metal corners – supports – inside the furnace. The simplest grate is made from thick metal wire (laying out its segments in the form of a grid and connecting them by welding). There is no need to attach the grille to the supports.
- We weld the chimney pipe from the back of the stove. The height of the chimney should be higher than human height (to prevent smoke from getting into the eyes).
- We equip the chimney with a spark arrester - a tin can with many holes drilled in it.
- We make the doors from those metal pieces that remained after cutting out the holes for the vent and firebox, or we cut out new ones from steel.
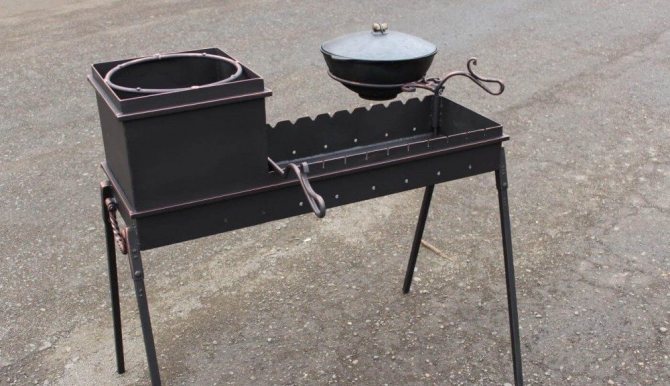
Design features
The grill with a cauldron is a single structure that includes a brazier and an oven with a hood. The diameter of the hole in the cooking surface of the stove is calculated so that a cauldron of the required size can be tightly inserted into it. The parameters of the grill with a roof and stove are selected individually, based on the installation location of the device and the number of users.
An open type stove is called a barbecue. It is used to prepare various dishes from meat and vegetables. A special feature of the device is its high heat resistance. The device is a container made of metal or made of other heat-resistant material in the form of a box for igniting firewood or smoldering coal. Skewers with products for frying strung on them are laid out on the grill.
Almost any type of fuel can be used to cook food in open braziers. The exception is petroleum products, which have a specific odor that is incompatible with food. The design features of the device depend on the type of fuel.
A cauldron is a cauldron made of thick-walled metal with a tight-fitting lid. It has a hemispherical shape and a sloping bottom. The purpose of this form is high-quality all-round heating of the prepared dish.
Traditionally it is believed that a cauldron is needed only for cooking pilaf. However, the devices vary in shape, which depends on the type of dish and type of oven:
- the depth of the cauldron for authentic Asian dishes in brick ovens is equal to the diameter of the lid;
- a barbecue oven for a cauldron, made of metal in a factory, must correspond to the ratio of the depth and diameter of the utensil - 1:3;
- dishes for tourist soups have the shape of a straight cylinder with a spherical bottom;
- For cooking soup and boiling various liquids, a shallow container with slightly beveled side surfaces and a small flat bottom is used.
The cauldron is loaded into the oven through the hob. The grill and cauldron, combined into a single complex, have separate fireboxes. Fuel - firewood, briquettes, sometimes coal is used.
Before choosing a barbecue cauldron, you need to decide on a number of questions:
- expected frequency of device use;
- location of the structure (or mobile option);
- planned duration of operation;
- device design;
- selection priorities in terms of cost, weight, quality of food preparation.
Some models suggest installing a cauldron on the grill. In this case, the metal grill is equipped with a firmly fixed ring under the cauldron.
The device has a number of advantages:
- multifunctionality;
- compactness;
- attractive design.
The disadvantages include the not very affordable price, but this is provided that the device, equipped with a barbecue and cauldron, is made of high-quality material.
How to make a stove from a pipe
The entire process of building a stove for a cauldron from a pipe consists of three main stages:
- Preparation of the material and tools necessary to create a furnace - selection of a pipe of optimal diameter, additional elements, electrodes that are suitable for a specific type of metal.
- Creation of a drawing indicating the specific structural features of the stove and the dimensions of additional elements: at what height are the handles, holes, shape and height of the legs, etc.
- Assembling the furnace in accordance with the created drawing and initial heating to identify possible defects and correct them.
Important! Each stage should be given maximum attention , since all of them together work towards the final result.
Selection of materials and tools
To build a furnace, you will need the following materials:
- Thick-walled pipe - the thicker the walls, the better, since such metal will functionally retain heat.
- Chimney pipe - depending on its diameter, a hole is made for the chimney in the stove body.
- Metal corners for creating design handles, legs and additional elements of the device.
- Metal plate for the bottom of the oven.
- Grate - if the project provides for its installation.
As for the tools used for construction, these include:
- grinder and cutting wheels for it;
- drill and metal drills to create small-diameter holes provided for by the furnace design;
- welding machine and electrodes suitable for a specific type of metal;
- hammer>;
- level>;
- protective gloves, goggles and welding mask .
Advice. All materials can also be selected from available means , for example, a thick-walled pipe can be replaced with a gas cylinder, and handles made from similar elements of old dishes.
Creating a Project
At this stage, it is determined which design is preferable for a particular stove, whether it will be selected for an existing cauldron or in the future it is planned to select the cauldron for an existing stove, etc.
The design stage is responsible for creating a drawing of a specific furnace, taking into account all its features. Such a drawing shows not only the dimensions , but also the location of all the main holes, handles and other components.
At the design stage, information is displayed on the creation of additional elements , for example, a table for food or firewood, and calculations are made of the possibilities of transporting the structure.
DIY assembly: photo
Assembly is the main stage in the construction of a pipe furnace. Despite its apparent simplicity, when implementing it, deviating from the drawing is extremely undesirable, since this may lead to a violation of the design features and subsequent improper functioning of the entire structure.
Assembling the stove consists of certain steps :
- marking - all holes created in the furnace are made in strict accordance with the drawn up drawing.
- The cut of the pipe and all additional elements according to the applied markings is carried out with a grinder using circles of different diameters, so you need to remember about safety precautions and protect your eyes and hands when working with this power tool.
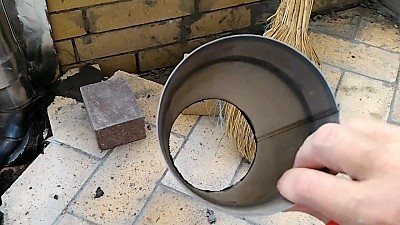
- Primary assembly to check that the holes made in the pipe body correspond to the calculations on the drawing.
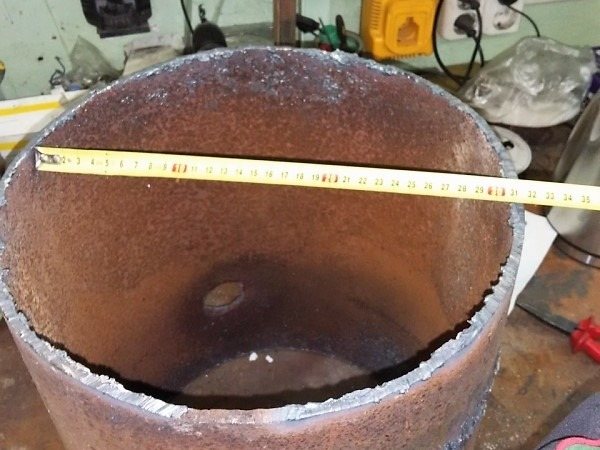
Photo 1. Checking the holes cut in the pipe using a measuring tape. The dimensions must correspond to the diagram.
- Assembling the structure using welding for the final design of the furnace.
Important! When carrying out all operations with metal, it is necessary to protect yourself from possible injuries with the help of safety glasses or a mask , as well as gloves . Before starting work, check the equipment for any malfunctions.
When assembling the stove, the following steps :
- The upper edge of the pipe and all the “excess” is cut off using a grinder - all uneven parts that can subsequently cause curvature of the structure are subject to trimming.
- After trimming, check the resulting cylinder using a level in the horizontal and vertical planes.
- A hole for the firebox is cut at a distance of 10-15 cm from the bottom . The remaining piece of pipe should not be thrown away, as it can be used to make a door to reduce the fire hazard of the oven.
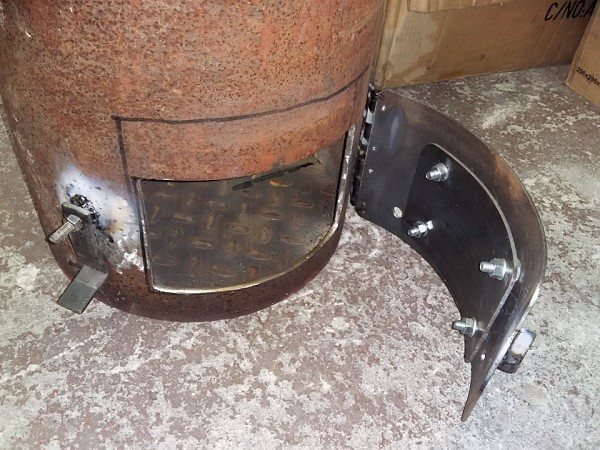
Photo 2. Attaching the door to the stove using bolts on the side of the pre-cut hole for the firebox.
- At a distance of approximately 10 cm from the top edge of the pipe, a hole for the chimney in accordance with the diameter of the selected pipe.
- To create an additional flow of oxygen, several small holes on the sides using a drill or grinder - when creating them, it should be taken into account that too many of them can negatively affect the strength of the structure.
- Using a welding machine, the chimney is welded to the main cylinder . The main condition of the chimney is its location at a right or obtuse angle , which is achieved by connecting the chimney pipe at an angle of 45 degrees .
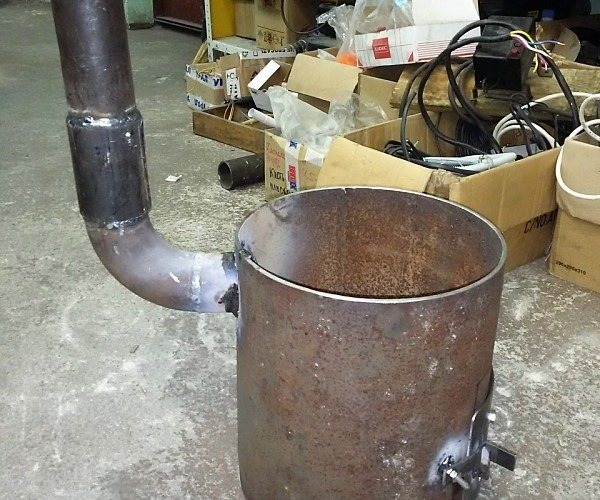
Photo 3. A long chimney pipe welded to an almost completed stove at an obtuse angle.
- Using a welding machine, the legs of the structure are mounted - everyone chooses their number and height, observing the basic rule: maximum stability of the resulting structure.
- A bottom made of a metal plate is welded into the base of the cylinder , and if it is necessary to use a grate , a firewood grate is installed at the height of the lower edge of the firebox.
- Handles are attached to the top of the device .
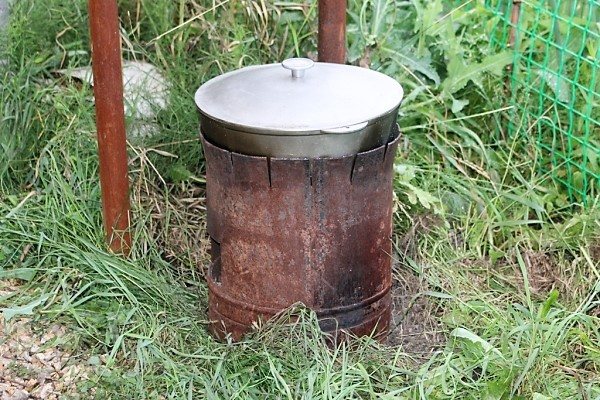
Photo 4. You can place a cauldron on top of the finished stove, light a fire and start cooking.
After all these steps have been completed, it is advisable to carry out the first firing of the furnace to diagnose possible design flaws and correct them. If no defects are identified, the device is covered with fire-resistant paint or special fire-resistant varnishes .
How to make it yourself
The process of installing a stand under a cauldron depends on the complexity of the design. The simplest option is an earthen hearth, which does not require special materials or time. The most labor-intensive is the manufacture of a brick stationary kiln.
Made of brick or cobblestone
Simplified designs look like square or rounded “wells”. Sophisticated multifunctional varieties have additional modules: drying, stove, smokehouse, barbecue. The master will need: brick, clay, sand, water, asbestos, fittings. The work is done step by step:
- pour a concrete base up to 12 cm thick and strengthen it with reinforcement;
- masonry mortar is prepared from clay, sand and asbestos;
- rows of bricks are laid along the intended perimeter, rubbing the seams with mortar;
- a hole is made on one of the top rows for air circulation;
- Allow the structure to dry completely.
Each row of masonry must be checked with a level.
From a metal pipe
The diameter of the selected cylindrical workpiece must correspond to the size of the cauldron. In addition to the main pipe, you will need a metal sheet, fittings, hinges, and a pipe with a diameter of 10–15 cm for the chimney. The technology consists of the following stages:
- make a drawing indicating all dimensions;
- a cylinder of the required length is cut from the pipe;
- a hole is made on the side for a fireplace with a door;
- weld the hinges and hang the door on them;
- a window is cut out from below for the lower rod;
- a circle is cut out of a metal sheet according to the diameter of the pipe;
- weld the cut out bottom to the cylinder;
- a chimney pipe is installed on the side;
- A tripod is made from the reinforcement and fixed to the base.
The finished metal hearth can be coated with fireproof paint.
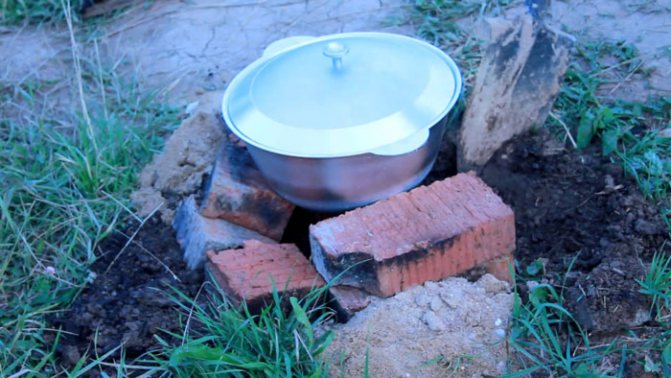
Earthen hearth
This is one of the most ancient types of hearths, although it has not lost popularity in modern times. Its construction does not require expensive materials or complex tools. All you need is a shovel, stone, clay. The technique includes several stages:
- make a hole in the ground of the required size;
- install a cauldron in the pit;
- the walls of the container are lined with stone;
- cover the cracks in the masonry with clay;
- two tunnels are made to the pit for traction.
The technology is simple, as it does not require special construction skills. An earthen structure is convenient as a temporary structure when you need to cook food for a large number of people, since small ovens do not require the installation of a huge cauldron. This type of fireplace is also in demand in camping conditions.
A fireplace for a cauldron is a popular structure that allows you to expand your gastronomic palette and turn the process of cooking into a real holiday in the fresh air. Both stationary and portable copies are suitable for this. If you want to use a homemade oven rather than a factory oven, you can make it yourself. The complexity of the work depends on the type of stand and materials chosen.
Design options from car wheels
A simple option for making a stove for a cauldron is a model made from several rims. In this case, only disks from stock wheels are used, since the material from which they are made and their shape are most suitable for these purposes.
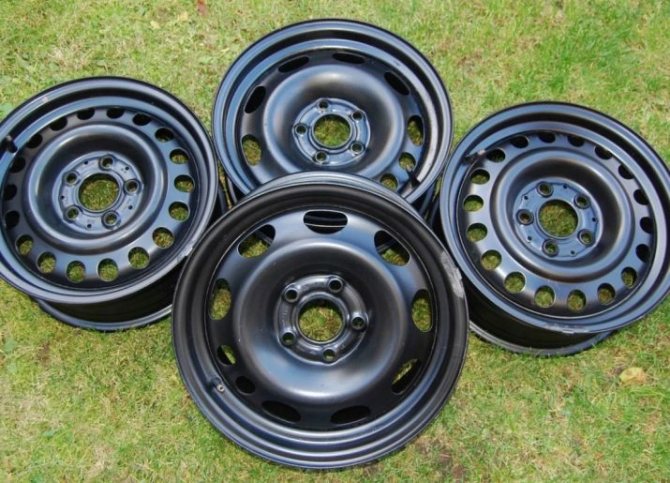
Two disks are installed on top of each other. In this case, the front side of one disk should be facing up, and the similar side of the other should be facing down. Thanks to this arrangement, free space is formed between the disks, sufficient to fill it with fuel material. In this position, the disks are welded together. It is important that the line of their contact is well welded.
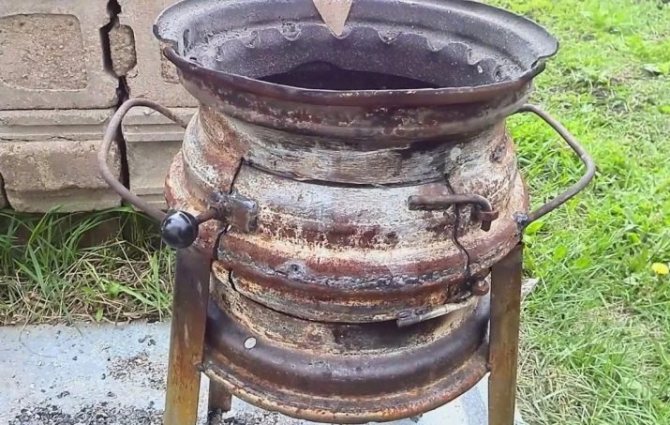
A combustion hole is cut out in the side of this structure. Given the special design of the wheel rims, there is no need to equip a wide hole. A sufficient size will be one that will allow one log to be placed inside the oven.

As an addition, iron handles can be welded to the disk body, which will help hold the stove during transportation. If necessary, this stove is equipped with spacers that prevent it from tipping over during operation.
A cauldron stove made from wheel rims can be used in the country, in the yard of the house or in camping conditions. Thanks to its versatility, it can be equipped with other cooking equipment, such as a disc harrow converted into a wok.
Varieties
Manufacturers offer a wide range of options for making mobile barbecues with a cauldron stove. Stationary devices almost always have individual characteristics, because they are made to order or independently. Structures of this type are installed outdoors, but a barbecue with a roof and a stove is also a completely acceptable solution. Stationary cooking and frying complexes are characterized by impressive dimensions; foundations or special platforms are built for them.
The most common option for laying a cauldron stove is refractory brick. In addition, metal welded furnaces and combinations of steel, stone, and brick are produced.
According to the configuration, there are corner and universal stationary structures. The first ones are designed to ensure compactness of the structure and save area. Universal barbecue cauldrons can include several cooking surfaces and additional devices in the form of tandoors, smokehouses, barbecues, spits, and decorative fireplaces.
The advantages of such structures include:
- long service life;
- strength, reliability;
- aesthetic, often exclusive, appearance.
The disadvantages of stationary facilities are associated with high costs for the construction of foundations, canopies, fences and the impossibility of transporting the structure to another location without disassembling it. The construction of stationary economy class barbecues costs no less than 20 thousand rubles. The cost may increase depending on the materials used, design, functionality.
Portable structures are designed for preparing food outdoors; they can be easily moved and placed anywhere. The weight and dimensions of the cauldron-barbecue stove are selected taking into account the possibility of transporting the device in a passenger car. The range of ready-made portable barbecues is extensive; manufacturers offer massive, lightweight, one-time models.
The cost of mobile devices varies widely. The most inexpensive devices are light and compact, but to simplify the design, the manufacturer reduces the thickness of the steel. As a result, the products are short-lived and the fuel parts burn out quickly.
Brick

Metal
Angular
Manufacturing instructions
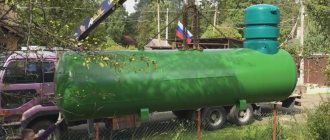
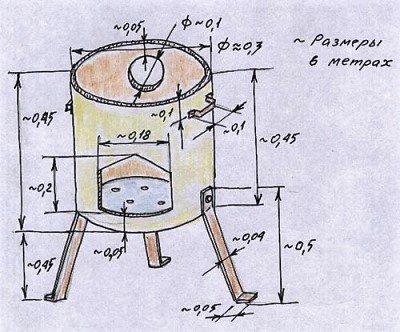
Scheme of a stove for a cauldron made from a gas cylinder:
Diagram of a stove for a cauldron with dimensions (*in meters)
When making this type of stove, you must follow the following sequence of actions:
- Eliminate residual gas volume.
Initially, the cylinder was filled with a flammable and explosive mixture, therefore, before welding, it is necessary to remove all remnants of this substance from it. To prevent an emergency, you first need to open the valve and keep the cylinder in this state for several days. Remove residual gas - Apply markings.
First you need to measure the height of the future product 45 cm and draw a horizontal line at this level in the upper part of the cylinder. At a distance of 10 cm from this line, you should mark the dimensions of the hole for the chimney pipe, closer to the bottom the dimensions of the blower, and just above it - the combustion opening. It may have a rectangular or semicircular shape; this factor will not affect the functionality of the camera. Marking. On the back side, at the top - mark the hole for the chimney - Adjust the height of the oven.
Cut off the top of the container along the marked line. If necessary, you need to make notches 5 cm deep along the entire length of the circumference in increments of 7 - 10 cm and bend the “petals” of the edge so that during cooking you can set the cauldron at the optimal distance from the hearth. At this stage, the cauldron is being fitted. It must be buried in the oven to at least 2/3 of its height. Cut off the top part - Cut openings for the chimney, combustion chamber and ash chamber.
You can use a grinder to create holes. It is better not to throw away the separated pieces of metal, but to use them to make doors. Cutting a hole for the firebox, vent, chimney - Rinse the inner surface of the container. To get rid of the unpleasant odor, the internal surfaces of the walls of the cylinder must be washed several times with an aqueous solution of bleach. Finish washing the container to completely remove chemical compounds with a soda solution. After drying, the balloon can be further converted into an oven.
- Make and attach a chimney pipe.
Using a welding machine, weld a chimney from two sections of pipes, cutting off their edges at such a degree that when connected they form a right or obtuse angle with each other. Then turn the cylinder over and weld it to the previously cut hole; Chimney hole and pipe - Install stove fittings.
If cut pieces of metal are used, then you can drill two or three holes in the wall of the furnace body along the edge of the openings, and thread pieces of wire into them. They will act as loops. Corresponding holes are also needed in homemade doors, as well as handles for ease of opening. The finished oven casting is sold complete with frames. To install it in a gas cylinder, you must first weld frames of similar size from a metal corner and attach them to the walls of the housing. Cast iron doors are connected to them using bolts. To seal between the frames, you need to lay an asbestos cement cord. Inside the combustion section, guides from the corner are installed, onto which the grate is subsequently placed. It will be much more convenient to remove ash if you weld a simple structure made of sheet steel or use half a piece of metal pipe cut lengthwise. It can be inserted into the ash opening of the furnace during combustion and removed when filled with combustion products. We attach doors, grate, etc. - Installation of legs and handles. It will be more convenient to carry a stove for a cauldron made from a gas cylinder if you attach handles made of a small-diameter steel tube to its sides. Their dimensions should correspond to the width of the palm of an adult. The legs can be made from a corner or profiled pipe. A stove made from a gas cylinder must be stable, so the legs must be placed at an equal distance from each other.
- Drill ventilation openings. Using a drill or grinder, you need to make several through holes with a diameter of 10 mm on the sides of the container, which will facilitate the flow of the required amount of oxygen. They should not be located too high to the top edge of the oven, otherwise smoke will escape through them, which will irritate the eyes and interfere with the cooking process.
- Clean all burrs and eliminate other possible design defects.
Ready-made stove for a cauldron from a gas cylinder
The opening in the cylinder is not as elastic as a whisk in an oven made of thin-walled steel sheet, and the cauldron may jam during the cooking process, especially if it is shallow or has heavily smoked walls. To avoid this, it is advisable to equip the stove with a concave cross with long handles made of steel rod.
OVEN FOR CAULDRON
INDUSTRIAL OVEN FROM MANUFACTURERS
There are many different types of industrial furnaces. They have high performance, but do not forget about their other characteristics. As for the cost, industrial furnaces have a higher cost, because it pays off as a very good profit for the enterprise that has such a furnace. In addition, they are significantly different from the ovens that can be seen in laboratories. Testing of furnaces at industrial enterprises is carried out in the same order, excluding the method and place of operation. In addition, such a stove is much more difficult to purchase because many factors need to be taken into account.
What types of furnaces for industrial enterprises exist?
Here are some of the types:
- Convection.
- Heating.
- Induction.
- For melting aluminum.
- For firing ceramics.
- High temperature.
Industrial furnaces are produced by the Nakal in some cities of Russia, namely: Yekaterinburg, Solnechnogorsk, Chelyabinsk.
They find application in a variety of types of enterprises: mechanical engineering, instrument making, metallurgy. These days, industrialists are constantly improving their equipment, including what is used to operate furnaces.
For example, vacuum furnaces are strikingly different from other furnaces. First of all, it depends on the quality of the final result. In the modern world, vacuum is used in most areas of production. It makes it possible to avoid the influence of any external factors on the quality of materials manufactured at the enterprise.
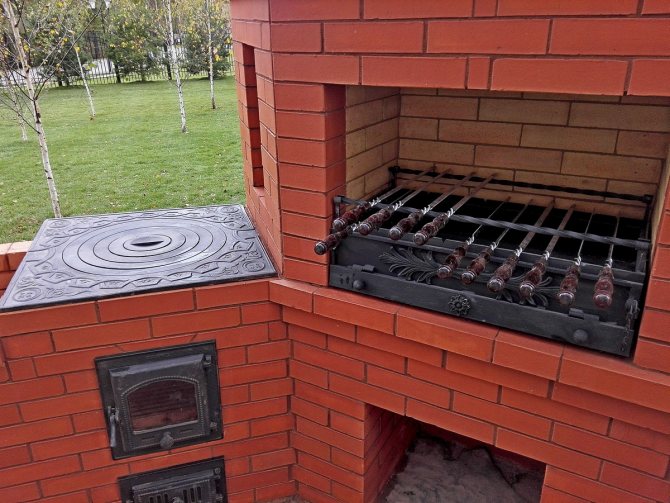
BRICK OVEN FOR KAZAN
Brick kilns are divided into two types:
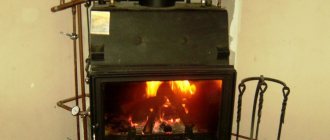
- The most common brick oven, which is easy to create with your own hands. It is represented by a firebox, the cauldron is attached to its upper part. The complexity in the design is only due to the presence of a chimney. However, such a structure cannot promise uniform heating of the entire cauldron, because the heat is directed only to one part of the cauldron - to the bottom.
- In another embodiment, the flame is located quite far from the cookware. It works due to complex flows of hot air that heat the cauldron.
Despite the differences, both options involve the construction of a solid foundation. However, there is no need to build a full-fledged foundation: a brick structure does not have much mass. A reinforced concrete slab is quite suitable. If it is not possible to make such a foundation, then you will need to fill the slab yourself.
A pillow is installed in a pit, the total depth of which reaches 30 cm. To ensure the strength of the slab when pouring, it is reinforced with a solution using any available means: rods or sheets. It is also necessary to take into account one of the most important conditions when pouring the foundation: you need to create a horizontal layer in the form of a perfectly flat plane. The construction of a metal furnace will have almost no impact on the budget if you use the method described below. It is quite possible to make such a stove yourself, spending a couple of hours on it.
What is required to build such a budget version of the stove?
- A piece of metal pipe (note that the diameter is smaller than the diameter of the cauldron in which you will cook, and the height does not exceed 45-60 cm).
- A piece of pipe for the chimney (diameter - 10 cm).
- Metal grate.
- Iron corners for legs.
- Bulgarian.
- Welding machine.
You can adjust the height of the legs for your future stove to suit your height, interests and preferences. This is precisely the beauty of self-made structures: it is not you who adapt to them, but they who adapt to you. It is strongly recommended to draw at least a rough diagram of the furnace to make further work much easier.
In the part of the pipe that is located below, draw a firebox door with a felt-tip pen or marker, and in the upper part - a hole for the future chimney. Then you need to take the grinder and put it to work. As carefully as possible, so as not to damage the future stove, you need to cut a hole for the firebox. Under no circumstances throw away the piece of metal that you cut out, because in the near future it will play the role of a door.
Now you also need to cut a hole for the chimney. At this stage of work, put the grinder aside and take the welding machine. Weld a metal grate to the bottom of the oven and legs. The gratings you take can be of many different types.
Cut the chimney pipe at a 45 degree angle, then rotate one of the pieces to create an L-shaped pipe. Weld the two pieces and weld the current chimney to our metal stove. Of course, it is possible to do without a chimney, but to do this you need to make several slits in the upper part of the stove. Weld the hinges to the future firebox door and attach it to the desired location. If in the future it becomes possible to transport the stove for any reason, we recommend attaching handles to its sides.
OVEN FOR CAULDRON FROM GAS CYLINDER
Now it’s the turn of the stove, built from a gas cylinder. So, we provide you with step-by-step instructions:
Before using a gas cylinder, be sure to check whether there is any gas residue in it. If you do not do this, there is a high probability of fire or even explosion. The easiest way to get rid of residual gas is to leave the cylinder outside with the tap open for one to two weeks.
Take a marker and mark the line along which you will cut, draw it so that the line is as clear as possible. What needs to be done for this? Step back from the top of the cylinder by 22-25 cm. Which indent you choose is at your discretion. We will use the lower part with the bottom for the base of the oven for the cauldron.
Taking a grinder, carefully make a cut, then you need to substitute the cauldron to see if it fits in size. It is best if the cauldron fits two thirds. If it is larger in volume, you need to take a grinder and make vertical cuts about 5 cm from the top exactly every 12-15 cm. You can also bend them if necessary.
Measure 15-20 cm from the bottom. Cut an opening for the firebox door to accommodate firewood. Make it wide enough so that in the near future there will be no problems with throwing firewood inside or cleaning out combustion residues.
Opposite the firebox window, a little higher by a couple of centimeters, make a window of small diameter (15 cm) for the exit of all combustion products.
Try on the cauldron and, if necessary, enlarge the cuts or straighten them a little.
At the end of the entire process, heat the oven to remove all odors and old paint.
How to use it correctly?
Before you start cooking, you must first remove the cauldron from the stove and heat the inside of the device using a small portion of firewood. In this way, you can eliminate any remaining odors and check the tightness of the installation of doors and chimneys.
During further operation, observe the following rules:
- when fuel burns, the surface of the container and its legs are completely heated, therefore, to ensure fire safety, the structure must be installed on a thick sheet of metal;
- regularly clean the oven from ash residues;
- use only solid fuel for heating. It is strictly prohibited to pour liquid petroleum products into this model of furnace;
- limit the access of children and animals to the heated device;
- do not place the stove near flammable objects;
- Do not light the stove with flammable liquids;
- such a stove is not suitable for burning household and construction waste;
- it is advisable to use only dry firewood, since when raw wood burns, drops of condensation will form and settle on the working elements of the device;
- equip the stove chimney with a spark arrester in the form of a tin can with a large number of holes made with an awl.
Cooking
How to choose?
Stoves for cauldrons are presented on the market in a fairly large assortment. Due to its simple design, as well as its practicality and versatility, the stove can become an indispensable assistant in the countryside and nature.
Criterias of choice
- The structure must be metal. You can test the strength of the product with your hands by checking it for “tactile” defects.
- The product for cooking outdoors must be equipped with a chimney. This will ensure compliance with technical and safety standards. You can make a chimney with your own hands.
- It is better if the product has a round shape.
- It is better to purchase a stove with a single hole. In addition to the hole, the manufacturer must attach a set of rings adjusted to the diameter of the cauldron.
- The presence of a stand that will allow the dishes to be immersed 2/3 of the hearth mouth.
- The presence of a door is a must. It would be good if the component had a heat-resistant handle.
Model examples
| Name | Characteristics |
| MChR-12 - reinforced stove
| Weight 12 kilograms. Height 55, diameter 34. Steel thickness 3 mm. Suitable for cauldrons with a volume of 8-12 liters. Starting price from 4,000 thousand rubles. Manufacturer: Russia. |
| Welded stove D-340 with door and pipe + grill
| Weight 14 kilograms. Height 31 centimeters. Steel thickness – 3 mm. Available for cookware of different diameters. Price - from 8000 rub. Manufacturer: Russia. |
| Welded furnace D-480
| Weight 1.5 kilograms. Height 35 centimeters. Sheet steel – 3 mm. Ideal for 18-30 liter cauldrons. Starting price 6500 rubles. Manufacturer: Russia. |
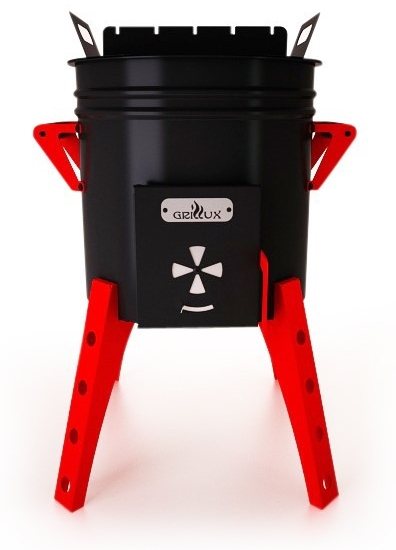
| Grillux stove for cauldron
| Oven size: 466X466X675 mm. Diameter of the roasting pan: 390 mm. Depth: 295 mm. Steel thickness: 2 mm. Weight: 12.9 kg. The design is equipped with a barbecue. Suitable for cauldrons of 8, 12, 18, 25 liters. Starting price 5900 rubles. Manufacturer: Russia. |
By purchasing a ready-made metal or cast iron stove, you deprive yourself of unnecessary hassles. The brick analogue cannot be transported or taken with you on trips. In addition, you can make a stove for a cauldron with a pipe with your own hands; its basis can be a large cast-iron pan.
Laying a stove for a brick cauldron
Note! To obtain the most even seams, place thin wooden slats between the bricks. You can pull out the slats after the masonry has set a little. In addition, this technique will allow you to easily unstitch the seams in the future if necessary.
When laying, bandage the seams, that is, start laying one row with 1/2 brick, another with a whole brick, the third with 1/2 again, and so on. Here are other recommendations.
- All iron structural elements must be installed directly during the laying process.
- If cutting bricks is done with a grinder, then a lot of dust will be generated during the work. Therefore, it is recommended to use protective equipment - glasses and a respirator.
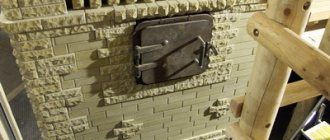
- If you did not purchase a special factory stove for the cauldron, then in a regular stove you can cut out a circle of the appropriate diameter and clean the edges with a file (this way, ash will not get into the food, and smoke will not leak out of the firebox).
- When installing pipes, join them at an angle of more than 90 C for better traction.
- After finishing the masonry, you can unstitch the seams or finish the structure with tiles. Then the oven is dried, for which you should light a small fire in it.
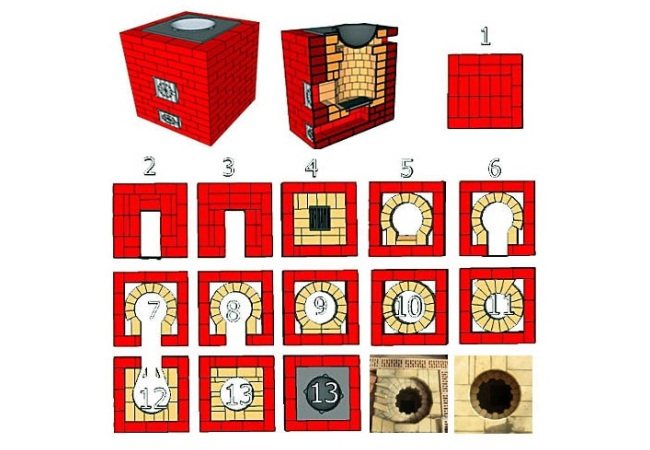
We are building a stove for a cauldron. Order
Row No. 1,2. These rows will serve as the bottom of the future structure. When laying them out, leave a small space that will allow you to clean the ash pan (it will be covered with a lid) and the stove itself. Use wire to secure the door. Clamp the wire with adjacent bricks, then secure with mortar.
Row No. 3. Here you close the ash pan doors and continue forming the walls. Also at this stage it is necessary to install the grate.
Row No. 4. When laying this row, leave a hole through which smoky gases will escape.
Row No. 5. Continue building the walls and install doors for the combustion chamber. The size of the doors depends mainly on what type of fuel will be used. If it is firewood, then it should be about 40 centimeters wide, and if it is coal, then less.
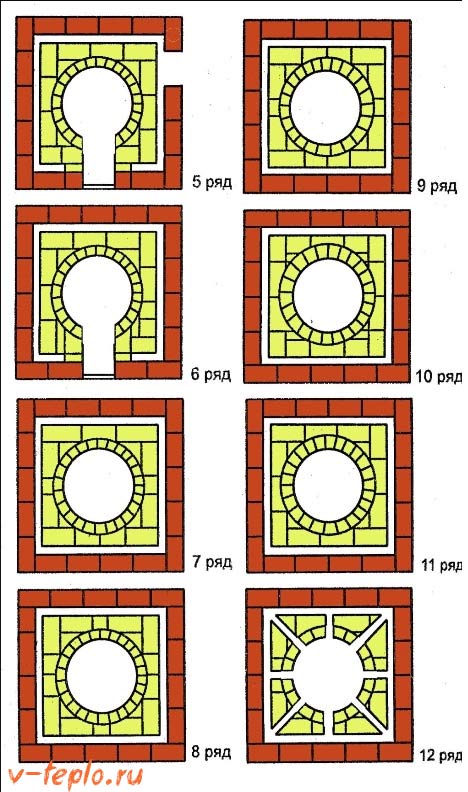
Row No. 6-8. Continue building walls and cover the combustion chamber.
Row No. 9-11. Lay the brick according to the diagram, leaving a small hole for smoke to circulate.
Row No. 12. Cover all the outer walls of the combustion chamber from above by laying a plate with a hole on the steel corners. The hole itself must be located directly above the cylindrical combustion chamber.
That’s it, our do-it-yourself cauldron stove is almost ready, all that remains is to install the chimney pipe.
Where is the best place to install?
If you are the proud owner of a structure for outdoor cooking, you should find out where it is best to install the product.
- It is better if the device is at least 10-20 meters away from a residential building. To prevent smoke from entering the living space, it is better to protect the product from it.
- The stove should not be located near trees or flower beds.
- Protect the stove from wooden structures.
Installation of the stove does not involve laying a foundation, since the product is installed on special legs. If the model does not provide for the presence of the presented components, you can lay a foundation on the territory.
Chimney pipe installation
The chimney is one of the most important elements of the stove. To install it you will need:
- grinder with cutting discs;
- fittings, elbows with the required rotation angles;
- welding with electrodes;
- steel pipe with a diameter of approximately 100-120 millimeters;
- hammer.
The installation algorithm should look like this.
Step 1. Lay out the fittings with the pipe on a flat surface in the desired sequence, then connect them together by welding. Don’t forget about personal protective equipment – welding mask, gloves and overalls!
Step 2. Remove all bulges and scale using a grinder.
Step 3. Install the finished chimney in the required place - the hole of the appropriate diameter that was made during laying. Coat the joints with oven clay.
Step 4. Check the pipe to see if there are cracks on it - light a small flame in the combustion chamber and watch how the smoke moves.
Note! If the structure was built correctly, the cauldron will heat up evenly. To test this, pour water into it. With uniform heating, air bubbles will completely cover the inside of the vessel.
There are several possible options for further finishing:
- jointing;
- painting surfaces with special heat-resistant paint;
- plaster.
We also note that the stove for the cauldron is multifunctional, because you can not only cook various dishes in it, but even boil water or fry shish kebab. For the latter, by the way, an iron rod is laid across the slab on which skewers are hung. As a result, the hot coals will cook the meat as evenly as possible.
Note! The construction of a chimney is, at first glance, a simple procedure, but in reality it is not so. Therefore, it is advisable to entrust this matter to specialists.
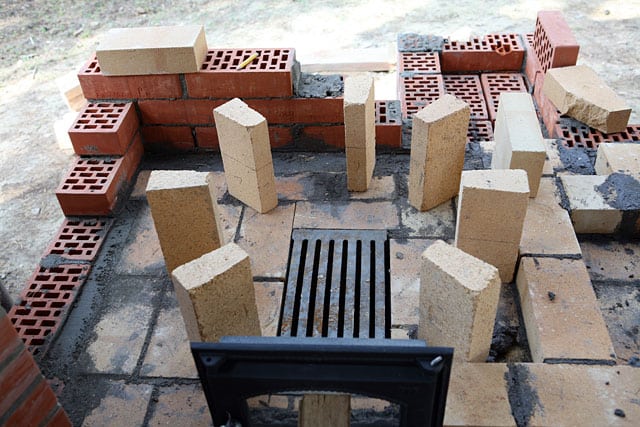
Laying bricks with your own hands
To implement a competent design for a brick base for a cauldron, you need to clearly understand that the fire must heat the vessel evenly . Determining the size of a brick furnace mouth is very simple. To do this, it is necessary to determine the volume of the existing cauldron and, after that, experimentally select the required diameter of the base, which will allow the cauldron to be drowned by 2/3. Preparatory moments:
- We determine the site for placement, level it and fill it with water ;
- spread the solution, which can be prepared from fireclay powder and sand (to do this, you need to mix the components in a ratio of one to three) , on the base;
- Add water until you obtain a consistency comparable to thick sour cream. We prepare the solution in the required quantity so that it is enough for a base 5 cm high. The slab is leveled using a building level ;
- Until the base hardens, we lay a reinforcing grid, which you can make yourself; the width of the grid cells should not be more than 12 cm . The reinforcement will make the base more durable and eliminate moments of subsidence due to temperature changes.
Worth paying attention! If at the initial stage the platform for the masonry is made uneven , the cauldron may not stand up clearly. That is why it is imperative to use a building level and check the horizontal axis.
Basic moments:
- It is not necessary to wait for the base to completely harden, since if you start building the fireplace right away, you can ensure a better connection between the brickwork and the base. It is worth noting that the use of rack spacers will make the seams more even . After completion of the masonry work, the lath spacers are removed, however, after the mortar has set, but not hardened;
- refractory bricks must be laid according to a certain pattern - a whole brick is laid on each odd row, and a half - on an even row. During the work process, it is necessary to adhere to the rules of tying;
- Having laid out the first row, you need to mount the blower door and leave a special hole to accommodate the chimney. The brick order is arranged in a circular pattern;
- after the third row, a frame made of a metal corner is mounted. It is necessary in order to weld a metal grate. This stage is the final one for the blower . The grate is necessary for oxygen to enter the firebox, which ensures a better combustion process;
- after completion of work with the grate and the subsequent row, the firebox door is installed . After the solution has set, it is advisable to do the jointing yourself;
- The final stage will be the production of a base from sheet metal with a thickness of at least 1 cm . The dimensions of the sheet should completely cover the brick base. Then a circle is cut out in the center, the diameter of which should be 2 cm less than the diameter of the cauldron . This will allow the vessel to be immersed exactly 2/3 .
Important! The cut hole should have very smooth edges. Otherwise, gaps and small cracks will allow smoke from under the cauldron to pass through. If thick metal is used, the edges are additionally processed with a round file, which allows you to eliminate metal burrs yourself.