How to insulate a house made of timber with your own hands?
The climate of the CIS countries in general, and Russia in particular, is quite harsh.
Winters are cold, metaphorically speaking, even unpredictable, and therefore the question reasonably arises of how to insulate a house made of timber? There is an answer to this question, and the technology for insulating a house made of timber using sawdust as insulation is quite simple and can even be done with your own hands. Insulation of a timber building
However, insulating a log house from the inside is a process that requires careful preparation before its implementation. You should not only know how to insulate a house made of laminated veneer lumber, but also understand how the entire thermal insulation technology works.
Fortunately, there is nothing complicated either in understanding the technology or insulating a log house exclusively with your own hands.
How to properly insulate a log house from the inside with your own hands and where to start?
Before you begin the process of insulating a log house from the inside, you need to carry out a number of preparatory work:
- the walls are washed from dirt and dust;
- surface treatment (antiseptic against the formation of fungus and mold; emulsion prevents the appearance of rodents and insects; and substances that protect walls from fire);
- separation of wires from the surface.
After the surfaces have been cleaned and treated, they begin to caulk the holes. All existing cracks are closed with jute fiber. To do this, use a chisel. Larger holes are sealed with tape tow.
Detailed and accessible information about the internal insulation of a timber house
Korovin Sergey Dmitrievich
Master of Architecture, graduated from Samara State University of Architecture and Civil Engineering. 11 years of experience in design and construction.
Wood, compared to brick or concrete, has higher thermal insulation characteristics, but in cold climates, even a wooden house requires insulation. You can fix the thermal insulation material outside and inside the room with your own hands.
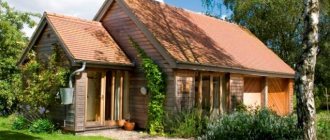
Insulating a log house from the inside allows you to preserve the unique facade made of natural material.
What type of insulation should I choose? Insulate inside or outside?
There are different options and materials for insulating a log house. But, generally speaking, the cladding is divided into 2 types:
- inside;
- outside.
Regardless of which option is chosen, the rooms will definitely become much warmer in winter. But it is worth paying attention to the following points:
- in what region is the house located - warm winters or cold ones;
- used for temporary stay or on a permanent basis;
- How long has the finished house been standing?
All this affects the materials for insulating timber with your own hands.
Material selection
To properly insulate a house, you need to choose the right material for wall insulation.
One of the important factors is that insulation is carried out indoors, so the requirements for environmental friendliness and safety are more stringent than for insulation outside.
The material must not contain toxic components and cause allergic reactions.
Internal and external insulation of timber
The following materials can be used as the main materials for insulation:
- mineral wool;
- ecowool;
- Styrofoam;
- insulation with extruded polystyrene foam (penoplex);
- polyurethane foam;
- foamed polyethylene.
When building a house from timber with your own hands, special attention is paid to the origin of raw materials for building materials. If naturalness is important, the best option would be to use ecowool, which is made from cellulose and allows the walls to “breathe.”
The most commonly used materials include expanded polystyrene (both extruded and foam) and mineral basalt wool. When insulating with penoplex or polystyrene foam, it is important to remember that it deprives the walls of the ability to pass air.
For a normal microclimate in the room, you will have to think about additional ventilation.
When working with mineral wool yourself, you need to remember additional protective measures. These include protective clothing that covers arms and legs, protective masks, goggles and gloves. The same applies to polyurethane foam.
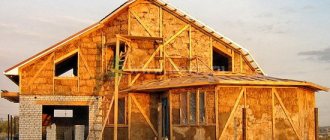
Preliminary thermal insulation of a timber house
Immediately after construction, wood shrinks, so in a wooden house, installation of partitions, interior decoration and insulation begins a year later, when shrinkage is greatest. Immediately after construction, caulking is performed. For work, jute or linen insulation is used. It is correct to start caulking from the bottom crown and carry out work along the entire perimeter of the walls. If you do the preliminary insulation with your own hands first of one wall and then of the other, the shrinkage of the house may occur unevenly. After a year, the main insulation begins.
Preparatory stage of work
If you plan to insulate the walls of an existing building, you need to make sure they are in good condition and free from serious defects. It is necessary to check the condition along the entire perimeter of the building. In places where there are significant gaps due to drying out of the wood, it is recommended to caulk the walls again.
After eliminating significant deficiencies, minor irregularities are corrected and the surface is cleaned of dirt and dust. If necessary, antiseptic treatment of walls is applied.
Due to the low resistance of the material to fire, it is also necessary to treat the wood with special compounds that prevent fire - fire retardants.
In damp rooms, to prevent damage to the walls, they are additionally protected with waterproofing compounds.
When insulating with penoplex, you do not need to use additional waterproofing.
Insulation technology
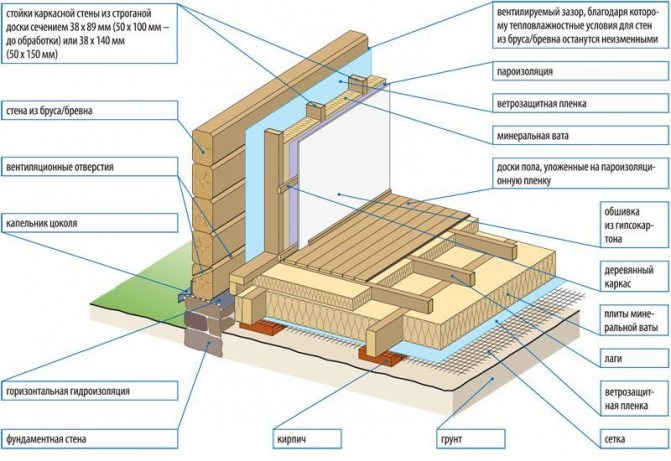
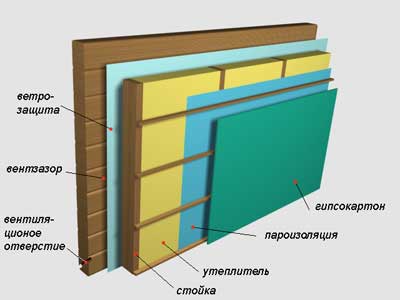
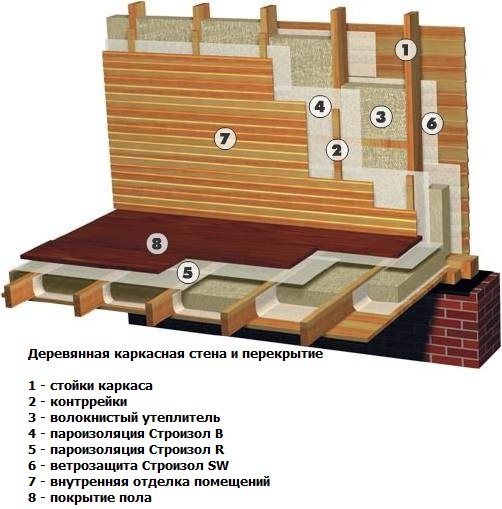
Do-it-yourself wall insulation work is carried out in the following order:
- installation of a waterproofing layer;
- installation of a wooden frame for attaching insulation;
- heat-insulating material;
- vapor barrier film;
- finishing.
To increase the thermal insulation characteristics when insulating with penoplex, polystyrene foam or mineral wool, you can apply a layer of “warm” plaster.
This highly effective composition with a thickness of 20 mm can replace 60 mm of ceramic brick or 40 mm of wood.
The waterproofing is rolled out along the perimeter of the walls and secured with a construction stapler. Next, install the sheathing under the insulation:
- first, the corners of the house are leveled and L-shaped racks are made;
- Next, the sheathing is made of bars with a section of 50 by 50 mm.
The sheathing ball is assigned based on the width of the insulation. When insulating with penoplex or polystyrene foam, the clean distance between the bars should be 60 cm. If mineral wool is used, the distance is reduced to 58 cm for a tight fit to the surface of the boards.
Installation of mineral wool
The material is secured using special anchors. They can be made of plastic or metal. To secure mineral wool, it is recommended to use disc-shaped metal dowels; they will ensure reliable connection of fairly heavy slabs to a vertical surface, since they are characterized by increased strength.
Installation of expanded polystyrene
Expanded polystyrene includes penoplex and polystyrene foam. These materials can be secured using plastic dowels or adhesives. It is important to choose the right adhesive for polystyrene foam. If you plan to carry out work in wet areas, it must be resistant to water. The adhesive composition for walls should not contain the following components:
- solvents;
- formaldehyde;
- gasoline, kerosene, diesel fuel;
- aggressive resins.
If this requirement is not met, the adhesive composition can destroy the insulation and worsen the thermal protection of the building. It is best to choose those compositions whose packaging indicates the possibility of use for polystyrene foam.
Insulation of floors and roofs
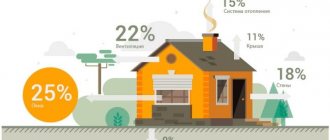
Only 50% of the heat loss of the entire building occurs through the walls. To ensure maximum thermal protection, you will also need to insulate the following structures:
- floors on the ground;
- covering the first floor with a cold basement;
- attic floor, if there is a cold attic;
- roof in the presence of an attic floor.
Insulation is carried out mainly with the same materials as the walls. In the case of mineral wool or extruded polystyrene foam, manufacturers produce different products designed for different types of structures. This must be taken into account when choosing a material.
General insulation of the house
Important points when insulating
It must be remembered that all of the above heat insulators, except mineral wool and ecowool, disrupt the natural ventilation of the room because they do not allow air to pass through. To ensure a normal microclimate, the following measures can be taken:
- regular ventilation of premises;
- forced ventilation device.
If all installation rules are followed and additional measures are taken to ensure normal temperature and humidity conditions in the premises, insulating a house from timber will allow you to significantly save on heating and avoid frequent repairs.
Is it necessary to insulate a timber house from the inside?
The main reasons for drafts and cold indoors are areas that are most vulnerable to heat loss. Errors during installation of a heat insulator, gaps between beams due to poor-quality installation or shrinkage - all this leads to a decrease in the thermal efficiency of a wall made of timber. In this article, we will look at how to properly insulate a timber wall from the inside, and what materials should be used to insulate a timber house from the inside.
Insulation of a house made of timber can be done from the inside, but it is less often done than external insulation, since the area of the house is reduced and humidity may increase if the work is done incorrectly. If it is impossible to insulate a house made of timber from the outside (you have already sheathed the house and do not want to remove the sheathing or you only need to insulate one room), then internal work requires competent execution of the work.
Sequence of work:
1. prepare the surface and caulk the cracks; 2. create a vapor barrier; 3. install timber sheathing on the walls; 4. lay and seal the insulation; 5. We create a ventilation system and carry out finishing.
Is it worth insulating a timber house from the inside with plasterboard? It is possible if it is impossible to do it outside. In addition to insulating the walls, wooden windows should be replaced with plastic ones and the window sill and slopes should be insulated. Only an integrated approach to this problem and the use of high-quality materials for thermal insulation will help to significantly reduce heat loss in the house through the walls and improve the indoor microclimate.
How to insulate a timber house from the inside
A house made of timber: improving its insulation parameters from the inside with your own hands
Let's study what technologies can be used in our time to increase the insulating properties of walls and other parts of a house made of timber. In this article we will consider only that group of techniques that involve performing work inside a building.
In what cases can this type of wall insulation be used?
Work is often carried out outside. It allows you not to reduce the living space, and also makes it easier to move the “dew point” outside the main structure.
Here are a few examples that explain the rationale for using an insulation layer on the inside of the wall:
- It can be created in any separate room.
- If you plan to carry out work internally, then in this case it will be possible to eliminate problems that are created by current weather conditions. It is easier to provide comfortable conditions in a closed residential area. In such an environment, by the way, it is easier to perform all the necessary actions correctly with your own hands.
- Insulating the room significantly increases the soundproofing parameters of the walls. Such an upgrade will be useful, for example, for a room containing noisy technological equipment.
- It will be economically justified in cases where the external decoration of walls, made using expensive materials, must be preserved.
How to properly insulate walls with your own hands
Let's study step by step the sequence of operations that are necessary for the insulation of a log house from the inside to be carried out correctly:
- The condition of the walls is checked. The seams are caulked using jute, flax, and other environmentally friendly fibers. To prevent the appearance of rot and mold, antiseptic treatment is performed. For it, compositions are used that are intended by the manufacturer for carrying out the relevant work inside residential premises. Sealing of cracks on new buildings should be done no earlier than a year after installation of the “box”.
- to the walls . It is installed in such a way that moisture from wooden walls does not penetrate into the insulation.
- Metal or wooden vertical guides are mounted.
- When choosing a wall insulation material, the determining factor is not only the reasonable price. Some types of polystyrene can release substances hazardous to human health into the atmosphere. It is recommended to use factory-made penoplex boards and other analogues suitable for use in residential premises. Spraying with polyurethane foam is also acceptable.
- We use fiber mats to create the insulating layer. In today's market, you can choose the most suitable option without much difficulty. Basalt slabs, for example, are able to maintain their shape and volume over a long service life. It is convenient to install them on the walls between the guides with your own hands. When using this material, it will not require additional fixation with dowels or other fastening devices.
- The next layer of insulation is installed on top. To speed up the process, you can use staples and a stapler.
- To improve ventilation, experts further recommend creating a separate sheathing with a free opening of 30-40 mm.
- Sheets of drywall or lining are attached to it with self-tapping screws.
Additional information that will be useful for proper insulation of walls and other parts of the house with your own hands
An attentive person will understand only from the details of the description of the technology itself that increased attention is paid to ventilation issues. It should be quite effective. This is the only way to eliminate the penetration of dampness into structural elements and eliminate high humidity in the premises. If necessary, the installed equipment is modernized.
Above, only the technology of wall insulation was discussed in detail. In reality, it will be necessary to check and increase the insulation parameters of other parts of the house to the required level:
- Floor. Its insulation can be done with penoplex slabs from the inside or outside of the interfloor ceiling.
- Ceiling. If there is an attic on top, then you can use granular material or polystyrene foam. With them it will be easier to accurately fill all the gaps and ensure good tightness of the layer.
- Window and door openings. The cracks here are eliminated using polyurethane foam, jute, and tow. If necessary, frames, double-glazed windows, and locking fittings are replaced.
Most of the operations listed above can be done with your own hands. If everything is done correctly, the insulation parameters of walls and other structural elements will be improved.
Stages of insulating a timber house from the inside
Preparation and caulking of walls
First you need to assess the condition of the walls, the quality of the caulking - carefully examine the condition of the corners and the joints of the timber. If you find defects, be sure to eliminate them and clean the walls of dust and dirt. The surface of the timber is carefully treated with an antiseptic against insects and rot. Also, special attention should be paid to repairing or replacing surface electrical wiring, if it is on the wall.
After treating the wall with protective impregnation, it is necessary to caulk the cracks. A house made of timber must be caulked a year after construction due to shrinkage of the timber. The cracks are sealed with jute fiber using a special chisel. When caulking walls, the gap between the beams is filled until the rope or tow no longer fits. This is a tedious and time-consuming job, please be patient.
Installation of a vapor barrier
Insulating the walls of a house with your own hands assumes that the insulation will be enclosed between vapor barrier layers to avoid getting wet, and the humidity in the house will increase, because... the walls won't be able to breathe. Indoor humidity can be reduced by using ventilation. This is necessary so that the timber does not become damp, in order to avoid rotting of the walls. Before installing the insulation, it is necessary to install a vapor barrier film.
The vapor barrier must be placed with a smooth surface to the timber, this way you will protect the insulation from moisture entering from the timber. The film will protect the insulation from getting wet and rotting in the future. We should not forget that basalt insulation loses its effectiveness when wet and begins to let in the cold. Next, sheathing is installed on the load-bearing walls to hold the mineral wool.
Installation of timber lathing on the walls
The sheathing can be made from a metal profile or timber and the structure can be sheathed with plasterboard, wood paneling or plank. To obtain even corners, it is necessary to prepare corner posts. Measure the height of the ceiling in the room, cut a beam of this length and secure it level to the wall using self-tapping screws. Such racks should be made at a distance equal to the width of the insulation minus 1-15, cm.
Do not forget to treat all wood used with antiseptics or impregnations that prevent fire and rot. Now let’s look at how to lay ecowool and cover the structure with plasterboard.
Selection and installation of insulation into the structure
The choice of insulation is often determined by its price. You can use inexpensive, domestically produced foam or penoplex insulation materials. But it is not recommended to use expanded polystyrene for insulating residential buildings, because the material begins to release carcinogenic substances. Modern certified insulation materials made from natural materials should be used that will not affect the environmental friendliness of a house made of timber, for example, ecowool.
Having made the sheathing, lay mineral wool. First, the roll is unrolled and cut to the required length according to the height of the wall. The width of the mineral wool strip should be 1-1.5 cm greater than the distance between the vertical slats. If you buy insulation that is already of standard width, then you should make the sheathing with the distance between the vertical posts 1-1.5 cm less than the width of the insulation.
Strips of mineral wool are placed between the bars. Modern basalt slabs do not require additional fastening. A vapor barrier film is attached over the insulation to protect the insulation from moisture. The film is fastened with a stapler, with an overlap between the strips of at least 15 centimeters. Additionally, seal the joints with tape. The film is laid with the rough side facing the room.
Stages of insulating a house made of timber inside
Internal insulation of a timber house includes several stages:
- Preparing the premises.
- Leveling out all irregularities and holes.
- Vapor barrier.
- Frame.
- Insulation of a timber house from the inside using materials.
- Ventilation.
- Decorating the rooms from the inside.
Preparing the room for insulation
Before you start insulating a timber house inside, you need to do a number of preparatory work:
- cleaning all surfaces from dust and dirt (wallpaper, if any, should be removed);
- treat the surface with a special antiseptic solution (this must be done to prevent insects and mold from appearing);
- it is necessary to treat the surface with a solution that protects the wood from burning;
- All wiring that runs along the wall should be separated from the surface.
Wall treatment
At this stage, it is necessary to close all existing cracks, even the smallest ones, using jute fiber. The void is filled using a chisel. For large holes, use tape tow.
Note : If the house has just been built and no one lives in it, then it is necessary to close all the holes again in a year. If people live in the building, then this procedure can be carried out after a couple of years, since shrinkage occurs more slowly than in a non-residential building.
Vapor barrier
The accumulation of moisture between the timber can lead to rotting of the wood. To avoid this, they create a barrier - a vapor barrier and waterproofing film, which is placed on the beam with the rough side. This must be done before you begin to insulate the inside of the wall.
Thanks to the correctly positioned vapor barrier/waterproofing film, moisture does not reach the wood.
Frame/Lathing
The racks are made in advance so that the corners are of the desired shape. The length of the beam will be equal to the height of the room (section 5 × 10 cm).
Cut another strip with the same length, but with a different cross-section (5x5 cm). It is attached using self-tapping screws to the edge of the beam. The result is a design that resembles the letter “G”.
It is worth noting that there should be exactly as many such racks as there are corners in the room. To ensure that the racks are in the desired position, use a level. Then, keeping a distance of half a meter between the slats, install bars with a cross section of 5x5 cm vertically.
Laying insulation
Installation of insulation material
Mineral wool is used for thermal insulation. It is worth noting that the width of the insulation should be a couple of centimeters larger than the gap between the bars.
Using anchors, during installation, the insulation is fixed to the wall.
Tip : For additional thermal insulation (that is, to improve it), add another layer of film.
Finishing work
A stapler is used to attach polyethylene to the block. As soon as the film is fixed, they move on to finishing the room.
Ventilation system
After thermal insulation, the air humidity in the house will increase, so you should create a ventilation system: with its help, the microclimate will improve.
An attic is perfect for this purpose, where you can place the entire ventilation system. To start air circulating, you can use a fan with a low power level.
In winter, you need to turn on the fan for half an hour every day.
Insulation of the floor in a house made of timber from the inside
To reduce heat loss in a wooden house, it is necessary to insulate the floors. To do this, use mineral wool/foam. If the floor is already covered, it must be dismantled.
Important detail : After dismantling the floor, a rough covering is made from the base of the structure, on which polyethylene is placed. The gaps between the joists are sealed with insulating material.
If you are going to insulate using polystyrene foam, you must first pour gravel into the floor structure to a depth of forty centimeters, and then level it.
It will take about two weeks for the concrete to dry completely. After two weeks, a film is laid on the rough coating, and then foam plastic.
Ceilings
To insulate the ceiling, foam plastic/mineral wool/expanded clay is used.
However, despite the wide choice of thermal insulation material, most owners use sawdust. This type of insulation is good because it is highly environmentally friendly and low cost.
But before insulating the ceiling with it, it must be treated with an antiseptic solution. This can prevent the appearance of fungus. This material is also treated with antipyrine so that in the event of a fire, it will not catch fire.
To avoid the appearance of rodents, the sawdust should be thoroughly dried and lime should be added to it. This insulation is tightly placed in voids.
Ventilation and wall finishing with plasterboard
We said earlier that the internal insulation of a house made of ecowool timber leads to an increase in humidity. Therefore, the insulation should be made ventilated. The wall should be finished with plasterboard or clapboard with a gap of several centimeters from the vapor barrier layer. To do this, after covering the mineral wool with a vapor barrier, additional 30x40 mm bars are installed, onto which the false wall is attached.
To ensure ventilation and a normal microclimate in the house, you should make an exhaust hood by connecting all the air ducts from the rooms into one. For a supercharger, you should choose a fan with low power. We hope that this information will help you insulate the inside of a private house made of timber. In the video you can watch a master class on insulation from a leading manufacturer of thermal insulation materials.
How to make interior decoration of a house from timber
- Specifics of interior decoration of a house made of timber
- Methods for interior finishing of a house made of timber
- Fundamental differences between finishing a house made of timber and stone
- Features of choosing finishing in a house made of timber
- Electrical and communications
Specifics of interior decoration of a house made of timber
It is believed that the most authentic interior of a house made of timber must include the natural look of natural wood. However, there are three counterarguments to this:
- Really high surface quality is achieved only by using first-grade lumber, which is on average 50–70% more expensive than conventional construction wood. Additionally, you will have to spend money on high-quality paints and varnishes.
- Wooden walls may be inappropriate in some rooms and living areas, for example, in the kitchen or bathroom.
- In rooms decorated with wood, only furniture of the appropriate appearance looks good, and it is somewhat more expensive than regular cabinet furniture.

Additional interior decoration of a wooden house is not only a whim due to aesthetic wishes; there are also purely technical aspects. Firstly, with a sufficiently thick layer of finishing material or the formation of a false wall, laying wiring or other communications is significantly easier.
Also, additional wall decoration is a good way to improve the noise and heat insulation of rooms, reduce air flow, and with its help you can hide warping and cracking of wood over time.
Methods for interior finishing of a house made of timber
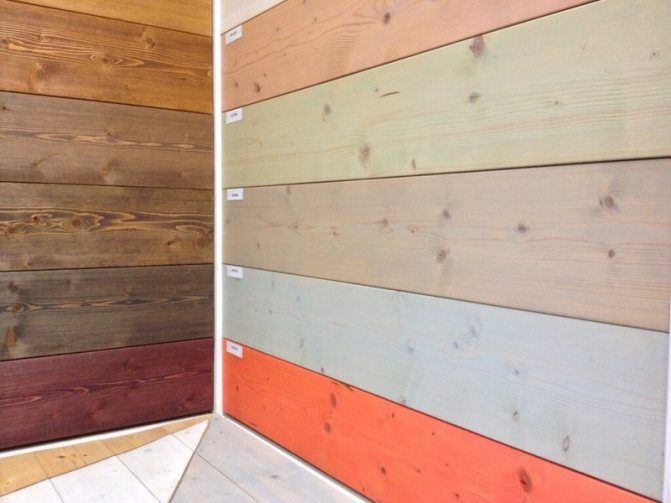
So, what are the possible ways to interior decorate a house made of timber? The natural look and texture of wood is achieved by simple painting: opaque monotone, stain, varnish, tinting compounds. The wall must first be sanded to remove possible planing defects, lint and burrs, and to align the chamfers.
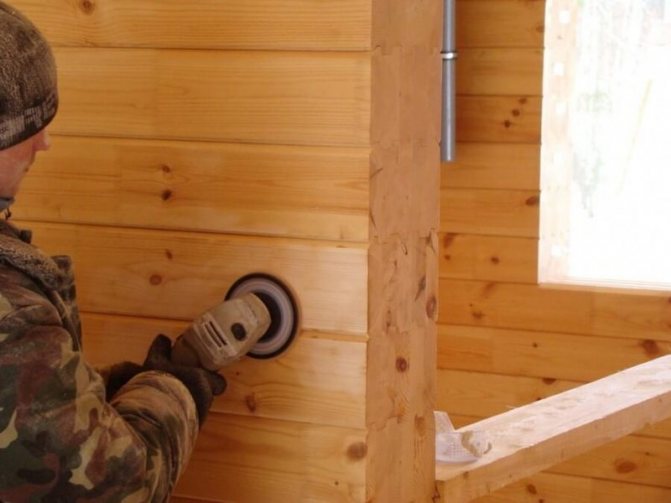
After this, the timber is impregnated. The fire-retardant composition for interior work dries completely within 5–7 days, then the wood is sanded again to knock off the film and raised pile. Impregnation allows you to reduce the consumption of paints and varnishes, stabilizes the color of the wood and clogs the pores, preventing moisture from migrating deep into the wood mass.
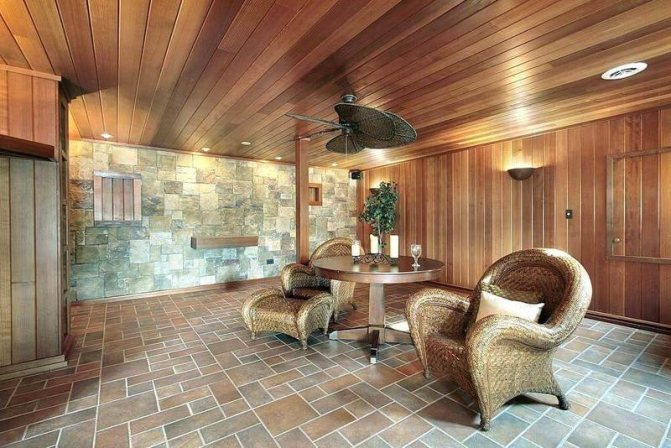
Another type of finishing is lining with clapboard, MDF panels or indoor siding. Typically this method is used to create a visual accent or zoning. As a rule, with the help of suspended cladding, openings, dirt-resistant panels are formed, and permanent furniture installation sites and other functional areas are arranged.
The cladding is mounted predominantly in a vertical orientation, creating an opposite visual appearance with the main material. For fastening, a system of horizontal slats is used, to which the finishing panels are attached with clamps or polymer glue.
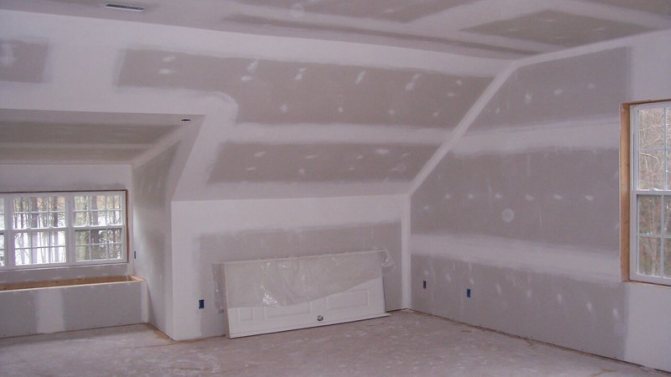
All other types of finishing require rough sheathing made of gypsum plasterboard, SML, plywood or particle boards. Such a superstructure is needed to compensate for the seasonal fluctuations of a wooden frame, which never go away.
Therefore, the cladding is mounted on a subsystem made of galvanized profiles, which is attached to a wooden wall on straight perforated hangers, ensuring the system’s resistance to deformation and shrinkage vibrations. Almost all types of coatings can be performed on a prepared rough surface using standard technology: stone and tile cladding, wallpaper, painting, siding.
Two specific types of coatings can be distinguished. The first is to spray cork chips onto the wooden walls. The result is a rather interesting appearance, fogging of the walls disappears, and noise absorption improves.
The second option is plastering the walls using a polymer reinforcing mesh or shingles. It is important to adhere to the recommended technology: do not exceed the permissible thickness of the coating, prepare the base properly, use plaster with reinforcing fibers.
Fundamental differences between finishing a house made of timber and stone
To be confident in the success of using this or that type of coating, you need to understand how the mechanics of behavior of a wooden house differ from brick and frame ones. Wood is an extremely unstable material; it tends to expand and contract with changes in humidity and temperature. Therefore, the finishing system must normally perceive mechanical vibrations of the base.
Another feature of a timber frame is its ability to allow water vapor and cold air to pass through. The presence of any coating does not fully smooth out these shortcomings, so the log house must be well caulked, and ideally, sealed with liquid seams. To prevent the formation of condensation under the curtain wall, a blind vapor barrier with a two-sided air gap should be used.
The third and most important nuance is that finishing cannot be carried out immediately after assembling the log house. Depending on the number of floors, type and quality of materials, time is required for shrinkage and residual deformation. For glued laminated timber this period is up to six months, for solid timber it is about 10–15 months, and a house made of rounded logs can take several years to shrink. It must be remembered that after the first and second caulking, the log house should also settle almost to its original size.
Features of choosing finishing in a house made of timber
When choosing a finish, you should pay attention not only to the technical side, but also to the practicality of the various coatings. We offer several proven recommendations for arranging various rooms.
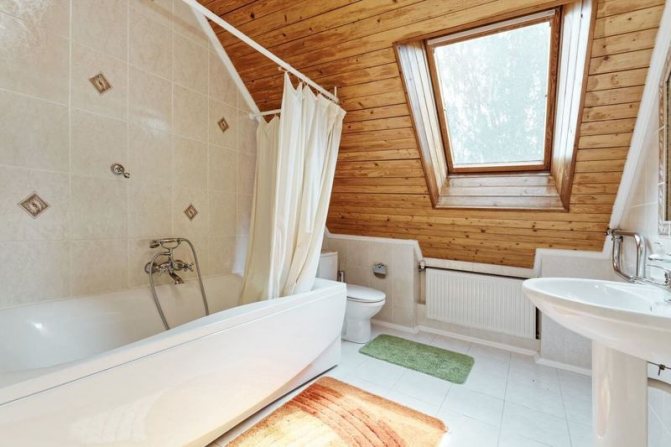
Bathroom. In the bathroom, the humidity is much higher and strict sanitary and hygienic requirements apply. The best finishing method is plastic lining, or laying tiles on a plasterboard base. In both cases, the frame is assembled according to the principle of a nested box and is not rigidly attached to any part of the supporting structure. When installing lining, it is necessary to waterproof the walls with thick polyethylene film.
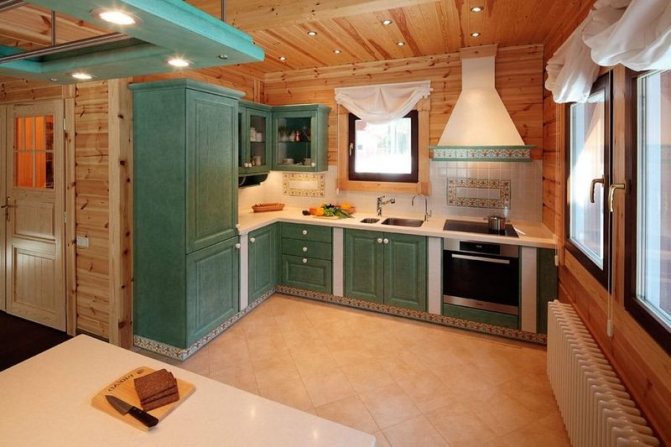
Kitchen. It makes sense to lay tiles only on the apron of the cooking area; other surfaces can have a natural log look. It is recommended to make the ceiling from plastic panels with glossy lamination or other materials from which sticky dust deposits can be easily removed.
Hallway. It is recommended to simply level the walls, so that later you can install the wardrobe and the entrance group of furniture without additional problems. If the house has a separate dressing room, this recommendation can be ignored.
Living room. Fabric suspended ceilings are recommended for all habitable premises. They will eliminate the need for careful adjustment of wooden skirting boards; cracks are guaranteed not to form at the junction points. At the same time, the stretched fabric perfectly absorbs the seasonal deformations of the log house.

The walls in the living room usually have the most authentic look for a wooden house, especially if there is a fireplace and appropriate furniture. But at the same time, the natural appearance of the surfaces is formed not by construction timber, but by its imitation. The inside of the room is lined with wooden siding, the appearance of which in all respects surpasses even first-class lumber.
How to insulate a house made of timber with your own hands?
The climate of the CIS countries in general, and Russia in particular, is quite harsh. Winters are cold, metaphorically speaking, even unpredictable, and therefore the question reasonably arises of how to insulate a house made of timber? There is an answer to this question, and the technology for insulating a house made of timber using sawdust as insulation is quite simple and can even be done with your own hands.
Insulation of a timber building
However, insulating a log house from the inside is a process that requires careful preparation before its implementation. You should not only know how to insulate a house made of laminated veneer lumber, but also understand how the entire thermal insulation technology works.
Insulation of a timber house. Video
An example of a pie for insulating profiled timber
Today, not only the owners of old wooden residential sectors, but also those who intend to build a new house are concerned about the insulation of houses inside. Already at the design stage, the question arises of creating a warm and cozy nest. The previously familiar brick or reinforced concrete faded into the background. These materials gave way to wood - profiled and laminated timber. With additional insulation, such a house will not be demolished.
About what is needed for insulation inside and how to do it correctly, if you have the idea to do the work yourself, installation recommendations and step-by-step videos presented below will be discussed.
Insulation of walls from the inside of a log house must be divided into certain stages:
- prepare the surface;
- align the cracks;
- create a vapor barrier;
- install the sheathing on load-bearing walls;
- lay insulation and seal it;
- create a competent ventilation system;
- carry out interior finishing.
Wall treatment
Before the main work begins, the walls inside must be treated with an antifungal and septic compound. Be sure to check for cracks. Everything needs to be processed - even the smallest of them.
Jute fiber is used to seal cracks. Using a special thin wide chisel, all the necessary cavities inside are filled with special fiber. For larger cracks, tape tow is used, which is twisted into a small roller.
Creating a Vapor Barrier
It is important to prevent the wood from accumulating moisture from the inside, which will subsequently lead to rotting of the walls of the log house. Therefore, before starting installation, it is necessary to install a waterproofing film over the entire insulated wall surface.
Lathing load-bearing walls
Video lesson
Laying and sealing insulation
- When the sheathing is created, the installation of insulation begins. If it is mineral wool, then the width of the strip should be 1-2 cm greater than the distance between the vertical bars.
- Mineral wool blocks are placed between the bars and anchors with large round heads are fixed to the base of the wall.
- When the entire space between the sheathing is filled with insulation, thermal insulation can be improved. To do this, a second layer of film is installed over the bars on top of the cotton wool.
Interior decoration
- Once the second layer of vapor barrier film is completed, you can begin finishing the walls.
- The film must first be secured to the bars with staples using a stapler, which will make it possible to mount 3x4 cm bars on top of the staples on the film.
After installing the film, the paneling is carried out with wooden clapboard. This step will allow you to additionally insulate the room from the inside, and the desire to preserve the cozy, pristine interior of a house made of timber will remain.
In addition to wooden lining, planken will look quite decent. It looks like a small beam, and it is recommended to mount it horizontally.